
Hour 6. Model-View-Controller Application Design
What You’ll Learn in This Hour:
![]() What the Model-View-Controller design pattern means
What the Model-View-Controller design pattern means
![]() Ways in which Xcode implements MVC
Ways in which Xcode implements MVC
![]() Design of a basic view
Design of a basic view
![]() Implementation of a corresponding view controller
Implementation of a corresponding view controller
You’ve come a long way in the past few hours: You’ve provisioned your iDevice for development, learned the basics of the Swift language, explored Cocoa Touch, and gotten a feel for Xcode, the Playground, and the Interface Builder (IB) editor. Although you’ve already used a few prebuilt projects, you have yet to build one from scratch. That’s about to change.
In this hour, you learn about the MVC application design pattern and create an iOS application from start to finish.
Understanding the MVC Design Pattern
When you start programming, you’ll quickly come to the conclusion that there is more than one “correct” way to do just about everything. Part of the joy of programming is that it is a creative process in which you can be as clever as your imagination allows. This doesn’t mean, however, that adding structure to the development process is a bad idea. Having a defined and documented structure means that other developers can work with your code, projects large and small are easy to navigate, and you can reuse your best work in multiple applications.
The application design approach that you’ll be using in iOS is known as Model-View-Controller (MVC), and it can help you create clean, efficient applications.
In Hour 3, “Discovering Swift and the iOS Playground,” you learned about object-oriented (OO) programming and the reusability that it can provide. OO programs, however, can still be poorly structured—and therefore the need to define an overall application architecture that can guide the OO implementation.
Making Spaghetti
Before we get into MVC, let’s first talk about the development practice that we want to avoid, and why. When creating an application that interacts with a user, several things must be taken into account. First, the user interface (UI). You must present something that the user interacts with: buttons, fields, and so on. Second, handling and reacting to the user input. And third, the application must store the information necessary to correctly react to the user (often in the form of a database).
One approach to incorporating all these pieces is to combine them into a single class. The code that displays the interface is mixed with the code that implements the logic and the code that handles data. This can be a straightforward development methodology, but it limits the developer in several ways:
![]() When code is mixed together, it is difficult for multiple developers to work together because no clear division exists between any of the functional units.
When code is mixed together, it is difficult for multiple developers to work together because no clear division exists between any of the functional units.
![]() The interface, application logic, and data are unlikely to be reusable in other applications because the combination of the three is too specific to the current project to be useful elsewhere.
The interface, application logic, and data are unlikely to be reusable in other applications because the combination of the three is too specific to the current project to be useful elsewhere.
![]() In short, mixing code, logic, and data leads to a mess. This is known as spaghetti code and is the exact opposite of what we want for our iOS applications. MVC to the rescue!
In short, mixing code, logic, and data leads to a mess. This is known as spaghetti code and is the exact opposite of what we want for our iOS applications. MVC to the rescue!
Structured Application Design with MVC
MVC defines a clean separation between the critical components of our apps. Consistent with its name, MVC defines three parts of an application:
![]() A model provides the underlying data and methods that offer information to the rest of the application. The model does not define how the application will look or how it will act.
A model provides the underlying data and methods that offer information to the rest of the application. The model does not define how the application will look or how it will act.
![]() One or more views make up the UI. A view consists of the different onscreen widgets (buttons, fields, switches, and so forth) that a user can interact with.
One or more views make up the UI. A view consists of the different onscreen widgets (buttons, fields, switches, and so forth) that a user can interact with.
![]() The logical isolation created between the functional parts of an application, illustrated in Figure 6.1, means the code becomes more easily maintainable, reusable, and extendable—the exact opposite of spaghetti code.
The logical isolation created between the functional parts of an application, illustrated in Figure 6.1, means the code becomes more easily maintainable, reusable, and extendable—the exact opposite of spaghetti code.

Unfortunately, MVC comes as an afterthought in many application development environments. When suggesting MVC design, I am often asked, “How do I do that?” This isn’t indicative of a misunderstanding of what MVC is or how it works, but a lack of a clear means of implementing it.
In Xcode, MVC design is natural. As you create new projects and start coding, you are guided into using MVC design patterns automatically. It actually becomes more difficult to program poorly than it does to build a well-structured app.
How Xcode Implements MVC
Over the past few hours, you’ve learned about Xcode and the IB editor and have gotten a sense for how you will use them to write code and design interfaces. In Hour 5, “Exploring Interface Builder,” you even connected storyboard scene objects to the corresponding code in an application. Although we didn’t go into the nitty-gritty details at the time, what you were doing was binding a view to a controller.
Views
Views, although possible to create programmatically, are most often designed visually with IB. Views can consist of many different interface elements, the most common of which we covered in Hour 4, “Inside Cocoa Touch.” When loaded at runtime, views create any number of objects that can implement a basic level of interactivity on their own (such as a text field opening a keyboard when touched). Even so, a view is entirely independent of any application logic. This clear separation is one of the core principles of the MVC design approach.
For the objects in a view to interact with application logic, they require a connection point to be defined. These connections come in two varieties: outlets and actions. An outlet defines a path between the code and the view that can be used to read and write specific types of information. A toggle-switch outlet, for example, provides access to data that describes whether the switch is on or off. An action, in contrast, defines a method in your application that can be triggered via an event within a view, such as a touch of a button or swiping your finger across the screen.
So, how do outlets and actions connect to code? In the preceding hour, you learned to Control-drag in IB to create a connection, but IB “knew” what connections were valid. It certainly can’t guess where in your code you want to create a connection; instead, you must define the outlets and actions that implement the view’s logic (that is, the controller).
Caution: The Relationship Between Views, Scenes, and Storyboards
At this point, it might seem logical to assume that a storyboard’s scene and a view are the same thing. This isn’t quite true. A scene is used to visually describe a view; it also references a corresponding controller for the view.
Put another way, a scene is where you go to edit a view and assign a controller to it. Storyboards are the files that contain the scenes you will use in a project.
View Controllers
A controller, known in Xcode as a view controller, handles the interactions with a view and establishes the connection points for outlets and actions. To accomplish this, two special directives, @IBAction and @IBOutlet, are added to your project’s code. @IBAction and @IBOutlet are markers that IB recognizes; they serve no other purpose within Swift. You add these directives to the Swift files of your view controller either manually or using a special feature of IB to generate the code automatically.
Note
View controllers can hold application logic, but I don’t mean to imply that all your code should be within a view controller. Although this is largely the convention for the tutorials in this book, as you create your own apps, you can certainly define additional classes to abstract your application logic as you see fit.
Using @IBOutlet
An IBOutlet is used to enable your code to talk to objects within views. For example, consider a text label (UILabel) that you’ve added to a view. If you want to create a variable property for the label under the name myLabel within your view controller, you could declare it following the start of the class, like this:
var myLabel: UILabel!
Note that the exclamation point isn’t there because we’re super excited about having a label. This denotes that the myLabel variable is an “implicitly unwrapped optional” UILabel. While this sounds horrible, it simply means that at some point in time (like when the application is first starting), myLabel may not hold anything, but when we want to use it (that is, “unwrap” it), we don’t need to do anything special; we just use it like any other variable.
myLabel gives your application a place to store and reference the text label, but it still doesn’t provide a way to connect it to the label in the interface. To do this, you include the @IBOutlet keyword as part of the variable declaration:
@IBOutlet weak var myLabel: UILabel!
Once @IBOutlet is added, IB enables you to visually connect the view’s label object to the myLabel variable property. Your code can then use the variable to fully interact with the onscreen label object—changing the label’s text, calling its methods, and so on.
That’s it. That line takes care of variable property and outlet—and is the pattern we will follow throughout the book.
Using @IBAction
An IBAction is used to “advertise” a method in your code that should be called when a certain event takes place. For instance, if a button is pushed or a field updated, you will probably want your application to take action and react appropriately. When you’ve written a method that implements your event-driven logic, you can declare it with @IBAction in the Swift file, which subsequently exposes it to the IB editor. For example:
@IBAction func doCalculation(sender: AnyObject) {
// Do something here!
}
Notice that the method includes a sender parameter with the type of AnyObject. This is a generic type that can be used when you don’t know (or need to know) the type of object you’ll be working with. By using AnyObject, you can write code that doesn’t tie itself to a specific class, making it easier to adapt to different situations.
When creating a method that will be used as an action (like our doCalculation example), you can identify and interact with the object that invoked the action through the sender variable (or whatever you decide to call it in your code). This will prove handy if you decide to design a method that handles multiple different events, such as button presses from several different buttons.
Data Models
Let me get this out of the way upfront: For many of the exercises in this book, a separate data model is not needed; the data requirements are handled within the controller. This is one of the trade-offs of small projects like the one you’ll be working through in a few minutes. Although it would be ideal to represent a complete MVC application architecture, sometimes it just isn’t possible in the space and time available. In your own projects, you must decide whether to implement a standalone model. In the case of small utility apps, you may find that you rarely need to consider a data model beyond the logic you code into the controller.
As you grow more experienced with the iOS development and start building data-rich applications, you’ll want to begin exploring Core Data. Core Data abstracts the interactions between your application and an underlying datastore. It also includes an Xcode data modeling tool, like IB, that helps you design your application, but instead of visually laying out interfaces, you can use it to visually map a data structure, as shown in Figure 6.2.

FIGURE 6.2 After you become more familiar with iOS development, you might want to explore the Core Data tools for managing your data model.
For our beginning tutorials, using Core Data would be like using a sledgehammer to drive a thumbtack. Right now, let’s get started building your first app with a view and a view controller.
Using the Single View Application Template
The easiest way to see how Xcode manages to separate logic from display is to build an application that follows this approach. Apple has included a useful application template in Xcode that quickly sets up a project with a storyboard, an empty view, and an associated view controller. This Single View Application template will be the starting point for many of your projects, so for the rest of this hour you will learn how to use it.
Implementation Overview
The project we’ll build is simple: Instead of just writing the typical Hello World app, we want to be a bit more flexible. The program presents the user with a field (UITextField) for typing and a button (UIButton). When the user types into the field and presses the button, the display updates an onscreen label (UILabel) so that the word Hello is shown, followed by the user’s input. The completed HelloNoun, as I’ve chosen to call this project, is shown in Figure 6.3.

Although this won’t be a masterpiece of development, it does contain almost all the different elements we discuss in this hour: a view, a controller, outlets, and actions. Because this is the first full development cycle that we’ve worked through, we’ll pay close attention to how all the pieces come together and why things work the way they do.
1. Launch Xcode from the Applications folder or Launchpad.
2. Choose File, New, Project.
3. You are prompted to choose a project type and a template. On the left side of the New Project window, make sure that Application is selected under the iOS project type. Select the Single View Application option from the icons on the right, and then click Next.
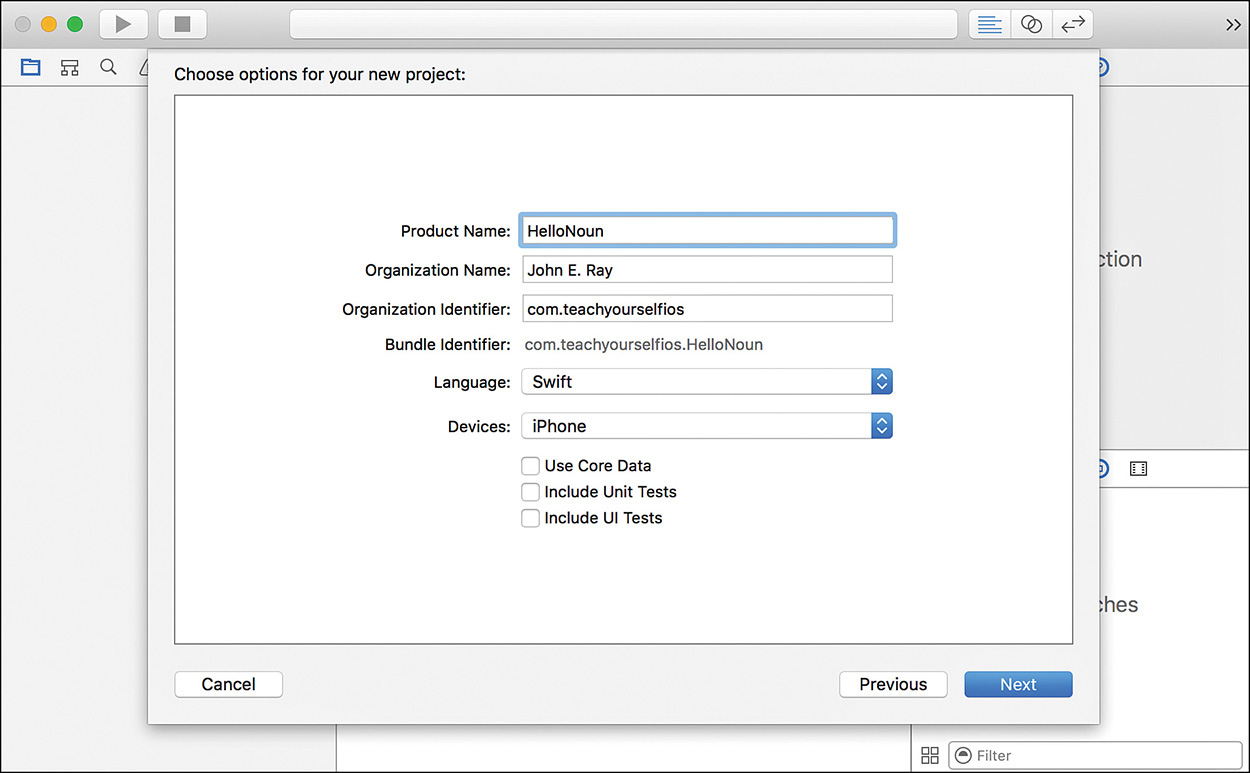
4. Type HelloNoun in the Product Name field. Use your full name for the organization name. For the Organization Identifier, enter a domain to represent yourself, in reverse order. (I’m using com.teachyourselfios; refer to the “Creating and Managing Projects” section in Hour 2, “Introduction to Xcode and the iOS Simulator,” for more information.) Be sure that Swift is selected and Devices is set to either iPhone or iPad. Use Core Data, Include Unit Tests, and Include UI Tests should remain unchecked, as shown in Figure 6.4. Click Next.
5. Choose a save location when prompted and uncheck Create Git Repository. Do not add the new project to an existing project or workspace, if asked. Click Create to generate the project.
This creates a simple application structure consisting of an application delegate, a window, a view (defined in a storyboard scene), and a view controller. After a few seconds, your project window will open (see Figure 6.5).

Class Files
If it isn’t already visible, open the top-level project code group (named HelloNoun) and review the contents. You should see three files (visible in Figure 6.5): AppDelegate.swift, ViewController.swift, and Main.storyboard.
The AppDelegate.swift is the delegate for the instance of UIApplication that this project will create. In other words, this file can be edited to include methods that govern how the application behaves when it is running. You modify the delegate when you want to perform application-wide setup operations at launch or when you want to tell an application how to behave when it moves into the background (or becomes the foreground application again), or when you want to choose what to do when an application is forced to quit. For this project, you do not need to edit anything in the application delegate; but keep in mind the role that it plays in the overall application life cycle.
The second file, ViewController.swift, implements the class that contains the logic for controlling our view: a view controller (UIViewController). This file is mostly empty to begin, with just a basic structure in place to ensure that we can build and run the project from the outset. In fact, feel free to click the Run button at the top of the Xcode window. The application will compile and launch, but there won’t be anything to do.
To impart some functionality to this app, we need to work on the two areas discussed previously: the view and the view controller.
The Storyboard File
In addition to the class files, the project contains a storyboard file that will store the interface design. Click the Main.storyboard file to open it in the IB editor, and then expand the objects in the document outline. Shown in Figure 6.6, Main.storyboard contains icons for the First Responder (an instance of UIResponder), the View Controller (our ViewController class), and our application’s View (an instance of UIView). There are also icons for the Top and Bottom “layout guides”; these are tools you’ll learn about later to help lay out and align your UI. The view controller and first responder are also visible in the bar above the view in the editor. Remember from Hour 5 that if you don’t see the icons in the bar, just click it and they’ll appear.

FIGURE 6.6 When the storyboard file is loaded, the application’s view controller and initial view are instantiated.
As you learned earlier, when a storyboard file is loaded by an app, the objects within it are instantiated, meaning they become real, active parts of the application. In the case of Hello Noun (and any other application based on the Single View Application template), when the application launches, a window is created, Main.storyboard is loaded, along with an instance of the ViewController class and its view, which is added to the window.
Reasonable persons are probably scratching their heads right now wondering a few things. For example, how does Main.storyboard get loaded at all? Where is the code to tell the application to do this?
The Main.storyboard file is defined in the Info.plist file as the value for the key Main storyboard file base name. You can see this yourself by the plist file in your main project code group to show the contents. Alternatively, just click the top-level project icon, make sure the HelloNoun target is selected, and view the Main Interface field in the Deployment Info section (see Figure 6.7).

Okay, so that explains how the storyboard file gets loaded, but how does it know to load the scene? If you recall, a storyboard can have multiple scenes. So, because this is a single-view application, is it just loading the only scene it can? What happens when there are multiple scenes? All good questions.
In typical Apple style, the initial scene (and corresponding view controller/view) is chosen rather subtly in the IB editor itself. Refer back to Figure 6.6. See the gray arrow in the editor area that points to the left side of the view? That arrow is draggable and, when there are multiple different scenes, you can drag it to point to the view corresponding to any scene. This action automatically configures the project to launch that scene’s view controller and view when the application launches. In addition to showing an arrow in the editor area, you’ll also notice a Storyboard Entry Point element contained within the initial scene in the document outline.
In summary, the application is configured to load Main.storyboard, which looks for the initial scene and then creates an instance of that scene’s view controller class (ViewController, as defined in the ViewController.swift file). The view controller loads its view, which is added automatically to the main window. If that still doesn’t make sense, don’t fret; I guide you through this every step of the way.
Note
I’ve mentioned “window” a few times in this discussion. In iOS development, your application has a window that covers the screen and is created when it loads. Views are then displayed within this window. The window is referenced through the variable property window in the application delegate class. Because your initial view is automatically displayed in the window when the application starts, you’ll rarely need to interact with it directly.
Planning the Variables and Connections
The first step of building our project is to decide on all the things our view controller needs to make it work. What objects are we going to use? What outlets and variable properties do we need to connect to our objects, and what actions will our interface trigger?
For this simple project, we must interact with three different objects:
![]() A text field (
A text field (UITextField)
![]() A label (
A label (UILabel)
![]() A button (
A button (UIButton)
The first two provide input (the field) and output (the label) for the user. The third (the button) triggers an action in our code to set the contents of the label to the contents of the text field.
Setting Up the Outlets and Actions
Based on what we now know, we could edit viewController.swift to define the variable properties we need to manipulate the interface elements.
We’ll name the field (UITextField) that collects user input, userInput, and the label (UILabel) that provides output will be userOutput. Recall that we must define these with the @IBOutlet keyword so that we can make the connection between the interface and code. We must also make sure these variable properties are “implicitly unwrapped optionals”; that is, an exclamation mark (!) is added to the end of the declaration.
This boils down to two lines, which we could place right after the class line in ViewController.swift:
@IBOutlet weak var userInput: UITextField!
@IBOutlet weak var userOutput: UILabel!
To finish defining the connections, we also need to include the method definition for the action performed when the button is pressed. We will name this setOutput:
@IBAction func setOutput(sender: AnyObject) {
}
All of this, put into context, results in a ViewController.swift file that resembles Listing 6.1 (with bold lines showing what was added):
LISTING 6.1 ViewController.swift with Connections Defined
import UIKit
class ViewController: UIViewController {
@IBOutlet weak var userInput: UITextField!
@IBOutlet weak var userOutput: UILabel!
@IBAction func setOutput(sender: AnyObject) {
}
override func viewDidLoad() {
super.viewDidLoad()
// Do any additional setup after loading the view, typically from a nib.
}
override func didReceiveMemoryWarning() {
super.didReceiveMemoryWarning()
// Dispose of any resources that can be recreated.
}
}
That’s all we’d need to do. We could then connect our interface to code, just as we did in the last hour, and implement a bit of logic in the setOutput method within ViewController.swift.
Caution: Stop! Don’t Type a Thing
Notice that I’ve been saying we could and we would rather than directing you to start typing? That’s because now that you understand how the code could be set up by hand, I’ll show you how Xcode can automate the process for you.
Some developers prefer to set up outlets, actions, and such manually. You’re welcome to do this, but you’re about to learn that Xcode can generate the same code for you, with almost no typing.
Note
If you’re skimming through the HelloNoun code files, you may notice that there are additional green comments (lines that start with the characters //). Many of these are left out of the code listings in the book to save space.
A Simplified Approach
Although you still haven’t typed any code, what I’m hoping you’ve learned over the past few minutes is that a successful project begins with the planning and setup of your variable properties, and the use of @IBOutlet and @IBAction to define which interface objects will be connected to your code.
You’ve seen that this can be performed manually, but what if Xcode could do all the work for you? What if the IB editor, through the very process of making the connections that you learned about in Hour 5, could add variable property definitions, create outlets, and insert the empty (skeleton) methods for the actions into your swift file? It can!
While the core basis of binding views to view controllers still relies on the code you’ve just seen, you can use Xcode to automatically write it for you as you build your interface. You will still want to identify the variable properties, outlets, and actions to create before starting the interface, and you’ll still sometimes need to do a bit of additional code setup beforehand, but allowing Xcode to generate code automatically dramatically speeds up the initial stages of development.
Now, without further ado, let’s build our application.
Designing the Interface
You’ve seen that IB makes designing a user interface (UI) as much fun as playing around in your favorite graphics application. That said, our emphasis is on the fundamentals of the development process and the objects we have at our disposal. Where it isn’t critical, we move quickly through the interface creation.
Setting Simulated Interface Attributes
Interface Builder defaults to a “generic” interface view in the editor area—it doesn’t quite look like an iPhone or iPad. While we’ll be looking at how to design within this view later in the book, for now I want you to be working with something that looks familiar.
To that end, the first thing we’ll do is switch the simulated screen to the size of the device you own (or one you’d like to own!). Follow these steps to set a specific size screen:
1. Open Main.storyboard by selecting it within the Xcode project navigator.
2. The IB editor opens the file, displaying the view controller scene objects in the document outline, and a visual representation of the scene’s view in the editor.
3. Select the View Controller Scene line in the document outline.
4. Open the Utility area and switch to the Attributes Inspector. You can do this by clicking the button at the far right of the Xcode toolbar, then the third icon from the right of the toolbar that appears underneath that (or save yourself some time and press Option-Command-4).
5. Set the Size drop-down to the iOS device screen size that you’d like. I’ll be using iPhone 4.7-inch in most examples because it is the largest size I can easily fit in a screenshot. If you’re developing for the iPad, that’s great, but you’re going to need a big screen.
6. By default, Xcode uses a portrait orientation for its layouts. If you’d like to switch this, you can use the Orientation drop-down to choose between landscape and portrait screen orientations.
7. After setting the size, the view in the editor should look a bit more like the iOS devices we know and love. Figure 6.8 shows these settings, and their result.

Note
If you choose to skip this step, don’t worry, you can still develop and run your applications. However, you’ll need to use the “resizable iPhone” and “resizeable iPad” devices in the iOS Simulator (see Hour 2); otherwise, your interface may be cut off or look unusual. By setting a simulated size, we can ignore all the fancy resizable interface cruft for now (and just learn how to develop). After all, isn’t that why we’re here?
Adding the Objects
The interface for the HelloNoun application is quite simple: It must provide a space for output, a field for input, and a button to set the output to the same thing as the input. Assuming the storyboard is still open from the preceding section, you just need to follow these steps:
1. With the storyboard open, make sure that the Object Library is visible on the right by choosing View, Utilities, Show Object Library (Control-Option-Command-3). Verify that the Objects button (a circle with a square in the center) is selected within the library; this displays all the components that we can drag into the view. Your workspace should now resemble Figure 6.9.

2. Add two labels to the view by clicking and dragging the label (UILabel) object from the Object Library into the view.
3. The first label is just static text that says Hello. Double-click the default text that reads Label to edit it and change the content to read Hello. Position the second label underneath it; this will act as the output area.
For this example, I changed the text of the second label to read <Noun Goes Here!>. This will serve as a default value until the user provides a new string. You might need to expand the text labels by clicking and dragging their handles to create enough room for them to display.
I also chose to set my labels to align their text to the center. If you want to do the same, select the label within the view by clicking it and then press Option-Command-4 or click the Attributes Inspector icon (a slider) at the top of the Xcode utility area. This opens the Attributes Inspector for the label.
Use the alignment buttons to change the default text alignment for the labels. You may also explore the other attributes to see the effect on the text, such as size, shadow, color, and so on. Your view should contain two labels and resemble Figure 6.10.
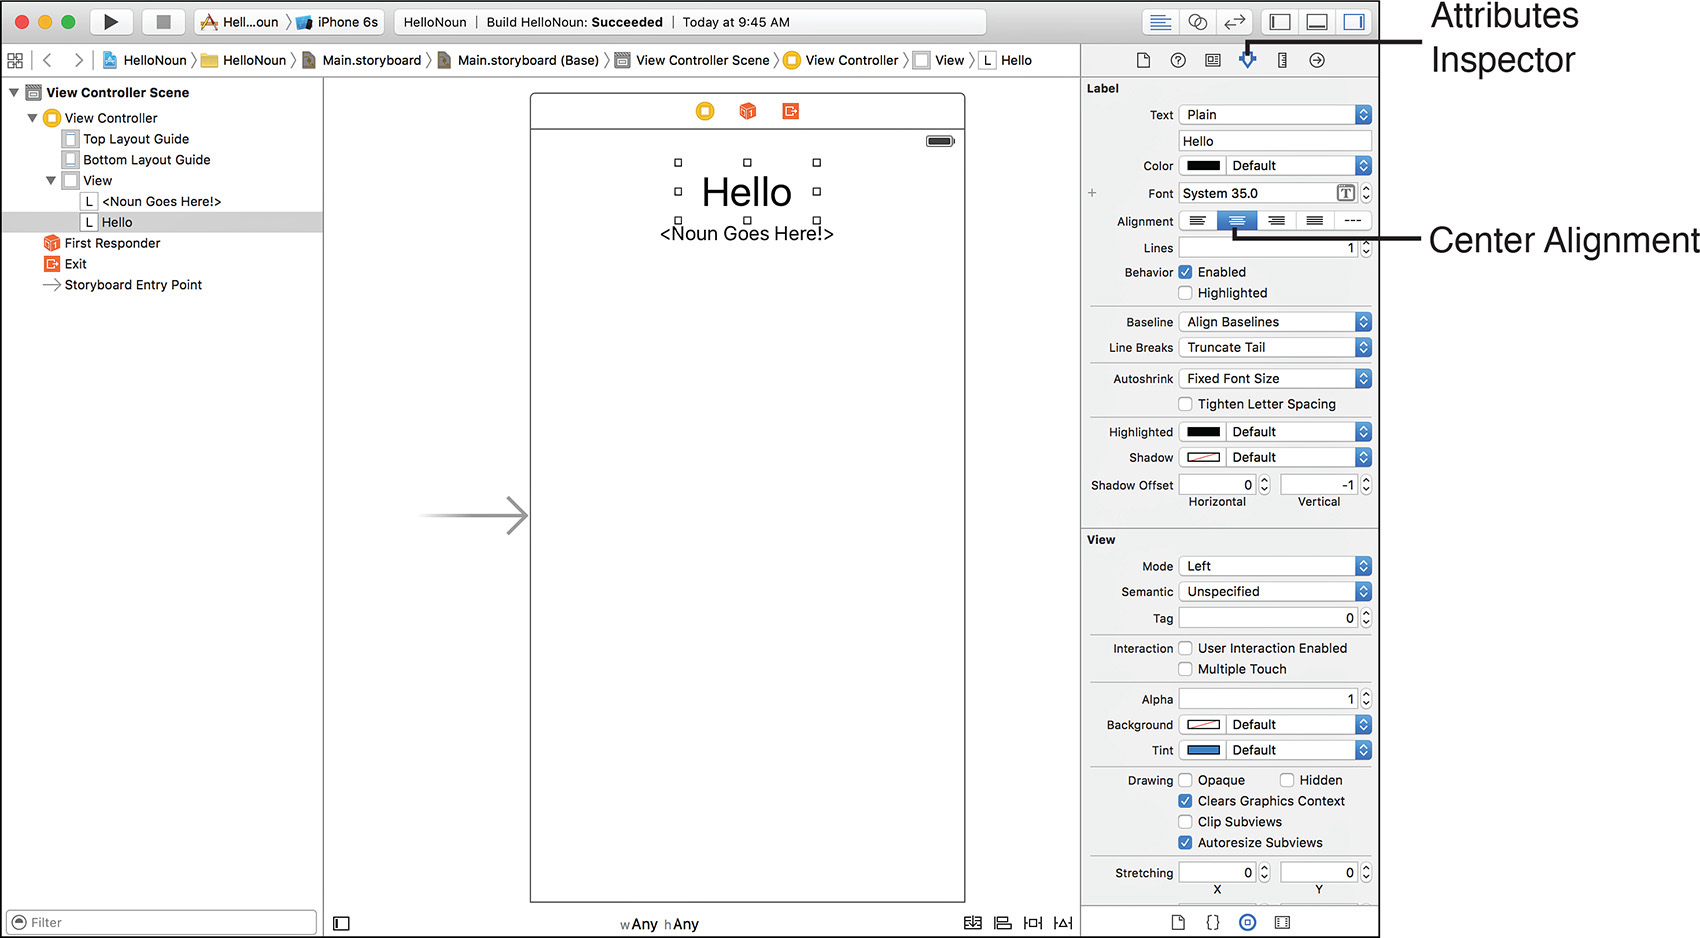
FIGURE 6.10 Use the Attributes Inspector to set the labels’ text alignment to center and to increase the font size.
4. When you’re happy with the results, it’s time to add the elements that the user will be interacting with: the text field and button. Find the Text Field object (UITextField) within the Object Library and click and drag to position it under your two labels. Using the handles on the field, stretch it so that it matches the length of your output label.
5. Open the Attributes Inspector again (Option-Command-4) and set the text size to match the labels you added earlier, if desired. Notice that the field itself doesn’t get any bigger. This is because the default field type on iOS has a set height. To change the height, you can click one of the square Border Style buttons in the Attributes Inspector. The field then allows you to resize its height freely.
6. Finally, click and drag a button (UIButton) from the Object Library into the view, positioning it right below the text field. Double-click in the center of the button to add a title, such as Set Label. Resize the button to fit the label, if needed. You may also want to again use the Attributes Inspector to increase the font size. Figure 6.11 shows my version of the finished view.

FIGURE 6.11 Your interface should include four objects (two labels, a field, and a button), just like this.
Creating and Connecting the Outlets and Actions
Our work in IB is almost complete. The last remaining step is to connect the view to the view controller. If we had defined manually the outlets and actions as described earlier, this would be a matter of dragging from the code to the object icons. As it turns out, even though we’re going to be creating the outlet and action code on-the-fly, it’s still just a matter of click and drag.
To do this, we need to be able to drag from the IB editor to the area of the code where we want to add an outlet or an action. In other words, we need to be able to see the ViewController.swift file at the same time we see the view that we are connecting. This is a great time to use the assistant editor feature of Xcode.
With your completed interface visible in the IB editor, click the Assistant Editor button (the button with overlapping circles at the top right of the Xcode toolbar). The ViewController.swift file automatically opens to the right of the interface because Xcode knows that this class file corresponds to the view controller you’ve been designing.
If Xcode opens the wrong file instead (sometimes it can be finicky), just click the name of the file directly above the editing area, and you’ll see a menu where you can select the other files in the project.
At this point, you might be noticing a problem: If you’re on a small MacBook, or editing an iPad version of the project, you’re running out of screen space. To conserve space, you can hide the navigator area and utility area using the View menu, or by clicking the Hide/Show Navigator and Hide/Show Utility toolbar buttons. Find these buttons at the far right of the toolbar; they resemble boxes with vertical lines in them.
You can also use the Hide/Show Document Outline button (a rectangle with a line inside of it) found in the lower-left corner of IB editor to toggle the outline off. Your screen should now resemble Figure 6.12.

Adding the Outlets
We’ll start by connecting the label we created for user output. Recall that we want this to be represented by a variable property called userOutput:
1. Control-drag from the label that you’ve established for output (titled <Noun Goes Here!> in the example) or its icon in the document outline. Drag all the way into the code editor for ViewController.swift, releasing the mouse button when your cursor is just under the class line. As you drag, you see a visual indication of what Xcode is planning to insert when you release the button, as shown in Figure 6.13.

2. When you release the mouse button, you are prompted to define an outlet. Be sure that the Connection menu is set to Outlet, Storage is Weak, and the type is set to UILabel (because that’s what the object is). Finally, specify the name you want to use for the variable property (userOutput), and then click Connect, as shown in Figure 6.14.

3. When you click Connect, Xcode automatically inserts the proper variable property definition along with @IBOutlet. What’s more, it has made the connection between the outlet you just defined and the code itself. If you want to verify this, just check the Connections Inspector or right-click the field to open the Quick Inspector, as you learned in Hour 5.
4. Repeat the process for the text field, dragging it to just below the @IBOutlet line that was inserted. This time, choose UITextField as the type and userInput as the name of the outlet.
Placing your first connection is easy, but you must target the right part of the code in subsequent drags. It is important that you drag subsequent interface objects that you want to define in your code to an area below the @IBOutlet lines that Xcode adds.
With those few steps, you’ve created and inserted the proper code to support the input and output view objects, and the connections to the view controller are now established. To finish the view, however, you still must define a setOutput action and connect the button to it.
Tip: Xcode Naming and Outlets
As you connect your objects to outlets, you’ll notice something interesting happening in the document outline. When you connect the "<noun goes here>" label to "userOutput", you’ll see the corresponding object in the document outline change to “User Output.” Xcode is automatically parsing your variable names and changing how it displays the objects in the outline so you can easily see how they are connected.
Adding the Action
Adding the action and making the connection between the button and the action follows the same pattern as the two outlets you just added. The only difference is that actions are usually defined after properties in an interface file, so you’ll just be dragging to a slightly different location:
1. Control-drag from the button in the view to just below the two @IBOutlet directives that you automatically added earlier. Again, as you drag, you’ll see Xcode provide visual feedback about where it is going to insert code. Release the mouse button when you’ve targeted the line where you want the action code to be inserted.
2. As with the outlets, you are prompted to configure the connection, as demonstrated in Figure 6.15. This time, be sure to choose Action as the connection type; otherwise, Xcode tries to insert another outlet. Set the Name to setOutput (the method name we chose earlier). Be sure that the Event pop-up menu is set to Touch Up Inside to configure the event that will trigger the action. Leave the rest of the fields set to their defaults and click Connect.

You’ve just added the variable properties, outlets, and actions, and connected them all to your code.
Go ahead and reconfigure your Xcode workspace to use the standard editor and make sure that the project navigator is visible before continuing. If you want to double-check your work, review the contents of the ViewController.swift and make sure it matches Listing 6.1 from earlier in this hour.
Implementing the Application Logic
With the view complete and the connection to the view controller in place, the only task left is to fill in the logic. Let’s turn our attention back toward the ViewController.swift file and the implementation of setOutput.
The purpose of the setOutput method is to set the output label to the contents of the field that the user edited. How do we get/set these values? Simple. Both UILabel and UITextField classes have a variable property called text that contains their contents. By reading and writing to/from these variables, we can set userInput to userOutput in one easy step.
Open ViewController.swift and find the empty setOutput method. Insert the bolded line to make it read as shown in Listing 6.2.
LISTING 6.2 Completed setOutput Method
@IBAction func setOutput(sender: AnyObject) {
userOutput.text=userInput.text
}
It all boils down to a single line. This single assignment statement does everything we need. Well done! You’ve written your first iOS application.
Building the Application
The app is ready to build and test. If you want to deploy to your iOS device, be sure it is connected and ready to go. Select your physical device or the iOS Simulator from Scheme menu on the Xcode toolbar, and then click Run.
After a few seconds, the application starts on your iDevice or within the Simulator window, as shown in Figure 6.16.
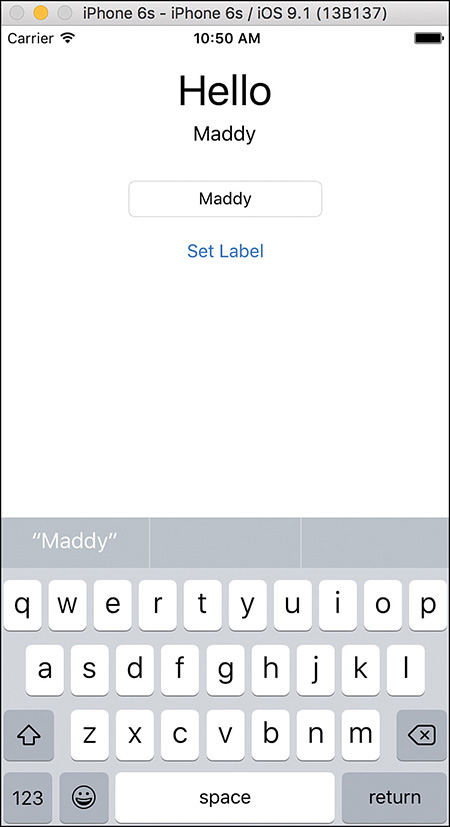
FIGURE 6.16 Your finished application makes use of a view to handle the UI and a view controller to implement the functional logic.
Caution: Quitting Applications
After you’re done running an application, use the Stop button on the Xcode toolbar to exit it. If you use the Home button in the iOS Simulator, the application will move to the background and Xcode may get a bit confused. If this happens, you can double-click the iOS Simulator’s Home button to access the task manager and manually stop the application (just like a real iOS device).
Further Exploration
Before moving on to subsequent hours, you may want to learn more about how Apple has implemented the MVC design versus other development environments that you may have used. An excellent document titled About the Basic Programming Concepts for Cocoa and Cocoa Touch provides an in-depth discussion of MVC as applied to Cocoa (read the section called “Model-View-Controller”). You can find and read this introduction by searching for the title in the Xcode documentation system, which you read about in Hour 4.
You might also want to take a breather and use the finished HelloNoun application for experimentation. We discussed only a few of the different IB attributes that can be set for labels, but dozens more can customize the way that fields and buttons display. The flexibility of the view creation in IB goes well beyond what can fit in one book, so exploration is necessary to take full advantage of the tools. This is an excellent opportunity to play around with the tools and see the results, before we move into more complex (and easy-to-break) applications.
Summary
In this hour, you learned about the MVC design pattern and how it separates the display (view), logic (controller), and data (model) components of an application. You also explored how Apple implements this design within Xcode through the use of Core Data, views, and view controllers. This approach will guide your applications through much of this book and in your own real-world application design, so learning the basics now will pay off later.
To reinforce the lesson, we worked through a simple application using the Single View Application template. This included first identifying the outlets and actions that would be needed and then using Xcode to create them. Although not the most complex app you’ll write, it included the elements of a fully interactive user experience: input, output, and (very simple) logic.
Q&A
Q. I don’t like the idea of code being written without seeing it. Should I create actions and outlets myself?
A. That is entirely up to the developer. The code-generation features in Xcode are several years old at this point, and quite stable. As long as you understand how to set up a project manually, I suggest that you use the Xcode tools to do the work but review the code it creates immediately afterward.
Q. I noticed some circles displayed beside code lines in the interface and implementation files. What are those?
A. These are yet another way to connect your interface to code. If you manually define the outlets and actions, circles appear beside potential connection points in your code. You can then drag from the circles to the interface objects to make connections. What’s more, clicking these circles after connections are in place will highlight the endpoint of the connection.
a. Touch True
b. Touch Down Inside
c. Touch Up Inside
d. Touch Detect True
2. What Swift object type do you use to represent any object?
a. nil
b. AnyObject
c. AllObject
d. PlaceholderObject
3. Which Apple project template creates a simple view/view controller application?
a. Single View Application
b. Standard
c. One View
d. Basic
4. What project-level component contains the scenes and views for your application?
a. View controller
b. NIB file
c. UI guide
d. Storyboard
5. Which project file contains the functions for managing how an application acts at startup and when it transitions between the foreground and background?
a. View controller
b. Main
c. AppDelegate
d. Storyboard
6. What keyword is used to denote a connection point between a variable property and an interface builder object?
a. @IBOutlet
b. @IBAction
c. @IBTouchpoint
d. @IBConnect
7. Which variable property enables developers to read the contents of a text field?
a. text
b. textcontent
c. content
d. fieldcontent
8. How many files are needed to implement a class in Swift?
a. 1
b. 2
c. 3
d. 4
9. When editing a user interface, the assistant editor should open what?
a. Storyboard scenes
b. View controller class
c. App delegate
d. Xcode Help
10. A variable that is defined for an entire class is known as a what?
a. Property
b. Variable
c. Variable property
d. Stored property
Answers
1. C. The Touch Up Inside event is most commonly used to trigger actions based on a button press.
2. B. Variables of type AnyObject can hold any object of any type. This can be useful when functions need to accept a wide range of objects as a their input.
3. A. The Single View Application template is the starting point for many of our apps in this book. It provides a storyboard with a single scene/view and a corresponding view controller (everything a basic app needs).
4. D. Storyboards contain the scenes and views you will use in a project.
5. C. The AppDelegate file contains the functions that manage the startup and subsequent lifecycle of an iOS application.
6. A. Use @IBOutlet to set a connection point between a variable property and an interface builder object.
7. A. The text variable property can be used to access the information a user has entered into a text field.
8. A. Swift only requires a single file to implement a class. Objective-C, the previous iOS development language, required two.
9. B. When you are editing a user interface, the assistant editor should automatically open the corresponding view controller class.
10. C. A variable property is like any other variable, but is defined at the class level and is accessible in any of the class methods.
Activities
1. Explore the attributes of the interface objects that you added to the tutorial project in Interface Builder. Try setting different fonts, colors, and layouts. Use these tools to customize the view beyond the simple layout created this hour.
2. Rebuild HelloNoun using outlets, actions, and variable properties that you define and manage manually. Make your connections using the same techniques discussed in the Hour 5 tutorial. This is good practice for getting familiar with what goes on behind the scenes.
3. Review the Apple Xcode documentation for the Core Data features of Cocoa. Although you won’t be using this technology in this book’s tutorials, it is an important tool that you’ll ultimately want to become more familiar with for advanced data-driven applications.