
1. Getting in a Lightroom Frame of Mind

Lightroom is built upon a database. Inside this database, most commonly referred to as the catalog, is all the data about your photos. This includes all the metadata created by the camera at the time the photo is taken (shutter speed, f-stop, ISO, and more), as well as all the data you add in Lightroom (such as keywords, IPTC data, and ratings) and all the adjustments you make in the Develop module. Understanding the relationship between this catalog of data and your photos is the key to unlocking and mastering the power of Lightroom to manage and organize your photos.
Wrapping Your Head Around Lightroom
One of Lightroom’s greatest strengths is that it is actually very easy to start using. The flipside of this strength is Lightroom’s greatest weakness: Lightroom is very easy to start using before you understand how it works, before you understand the relationship between the Lightroom catalog and your photos. I say this because I’ve seen it happen all too often. Week after week, I teach people about the Lightroom fundamentals while at the same time helping them unravel the file management mess that has resulted from that lack of understanding. This mess most commonly grows from people not knowing where all of their photos are located, not knowing where the Lightroom catalog is located, finding question marks on folders in Lightroom’s Folders panel, and knowing that photos are still on their hard drives despite Lightroom insisting that those same photos are missing or offline. If you’re reading this book, either you’ve been there or you really want to avoid ending up there.
Let’s take a step back and gain a big-picture view of the Lightroom model to give you a firmer foundation for moving forward with less frustration and much more confidence.
The Catalog
In fact, let’s take a step even farther back to the days of library card catalogs, those hulking masses of wooden drawers and cards that were once the height of information storage and organization (Figure 1.1). Although most libraries have replaced them with databases housed in sleek banks of computers, card catalogs still have a lot to offer when it comes to understanding Lightroom’s catalog.

Traditional card catalogs contained rows of wooden drawers arranged in alphabetical order by author, and each drawer was filled with paper cards (also in alphabetical order) that contained an author’s name, names of the books he or she had written, the dates of their publication, page counts, and so on, as well as where in the library you needed to go to actually get your hands on the book. You can think of the information each card held as the metadata for each book. Even small children understood that the real things—the actual books—were stored on shelves all around the library. Lightroom uses a very similar model, although it is not as easy to see and consumes a lot less space.
When you hear someone refer to your Lightroom catalog, conjure up an image of that library card catalog full of drawers and cards. Stored within the Lightroom catalog is a database record for every individual photo you have chosen to include in, or imported into, your Lightroom catalog. These records are like those paper cards for each book in the library; each contains all the available information about each photo taken from the photo’s own metadata, plus anything you may have added via Lightroom’s Import window (such as keywords or your copyright info). As you work with your photos, Lightroom continually writes to that catalog record all the new metadata you add, Develop settings you adjust, virtual copies you create, and so on. There is no Save menu inside Lightroom, because everything you do is saved automatically in the catalog as you make the changes. The record also contains the exact location of where that photo is stored on your hard drive, just as the card tells you where to find the actual book on the library shelves.
The Lightroom catalog, like its library ancestor, is just a container of records about all the photos you have imported. All your actual photos are stored in the various folders you create on your hard drive; think of your folders as the bookshelves in the library. When you want to do something with a photo—such as work with it in the Develop module, print it on your desktop printer, or save a copy to deliver to someone (in Lightroom lingo, that would be exporting it)—Lightroom pulls up the record for that photo, gives you access to all the information contained in the record, reaches across the virtual library to grab the image data off the virtual shelf, and processes it based on the instructions you provide in whatever module you are working.
Now, a big difference between Lightroom and a library card catalog is that you can’t read a book by looking inside the card catalog, but you can see all your photos when you open a Lightroom catalog. This is where I think most of the confusion about Lightroom stems from. When you see thumbnails of your photos in the Library module, you are seeing previews that Lightroom has created and stored in a special cache file alongside the catalog file. This can give the impression that your photos are somehow stored inside the catalog, but it is critical that you understand that your actual photos still reside only in the folders you create and designate on your computer’s hard drives. For now, imagine that someone taped a tiny picture of a book’s cover to its paper card; the book is still on the shelf, but now a thumbnail preview is attached to its record. Later in this chapter, we’ll take a much closer look at all the files Lightroom uses to display what you are seeing.
Your Photos
So if photos are stored in folders on your hard drive and Lightroom only keeps track of those locations in the catalog, how did the photos get to those folders originally? The answer is simple: You saved your photos into those folders before you started using Lightroom, or they were directed to those folders by you after you started using Lightroom. The key point is that you were in the driver’s seat (whether you were fully aware of it or not) when the photos were placed in those folders.
Earlier I said that Lightroom is easy to start using and that this is where some people get off on the wrong foot. In their excitement to get started, people frequently install Lightroom, launch the program, and pop a memory card in the card reader. When they immediately encounter the Lightroom Import screen (Figure 1.2), they simply click the Import button at the bottom without looking too closely at what they are telling Lightroom to do.

Eager to get to the sexy processing part of the program, people often glaze over the mundane housekeeping chores at the start. Unfortunately, the mundane housekeeping is critical to your long-term success as a Lightroom user. When importing photos and instructing Lightroom to copy or move them to a new location, pay close attention to the settings in the Import screen’s Destination panel. The settings you choose here determine where your photos go. Lightroom only does what it is told to do, so make sure you know what you are telling it each time.
The rest of this chapter is devoted to diving deeper into what makes Lightroom tick and into those housekeeping chores. I know I said they were mundane, and, yes, the discussion can get technical and even boring. Resist the urge to skip ahead; that’s what gets people into trouble. Sticking with it to really understand how these pieces work together will save you hours of wasted time and frustration down the road. Once you come to terms with where these important files are stored, how they work together when you launch Lightroom, and your own very important role in making the important decisions that affect everything, you will be a much happier Lightroom user.
What to Do Before You Start Using Lightroom
Lightroom is not a magic wand that you can wave to solve all your organizational problems. It is just a tool that, when used the right way, can make those critical organizational and maintenance tasks more efficient over time. Lightroom doesn’t work in a vacuum, though, and there are things you can do outside Lightroom to get started off right and keep things running smoothly.
Get Your System Ready
Nothing has a bigger impact on Lightroom performance than your own system. Here are two things you can do for free.
Free Up Space on Your Startup Drive
Your computer needs a certain amount of free space to run smoothly. A good guideline is to keep at least 20 percent of your startup drive free and clear of data at all times (granted, the larger your startup drive the more flexibility you have). Your operating system and applications need the elbowroom to operate. Running out of space can seriously affect performance. Set aside some time to uninstall unused applications, delete unused files, empty your Recycle Bin or Trash, and move data to another internal drive or to an external drive. It’s no more fun than emptying your real trash can, but it’s just as worthwhile and necessary.
Note
When moving photos to another drive, do so from inside Lightroom to maintain the connection between the catalog and your photos. We’ll cover how to do this in Chapter 3, so hold off on that for now.
Run Your System’s Disk Maintenance Functions
Which disk maintenance functions you need to run depends on your operating system. Windows offers two utilities that can help keep your system running in optimal condition: Error-Checking and Disk Defragmentation. To find these, double-click My Computer, right-click the C drive, choose Properties, and go to the Tools tab. Run the Error-Checking utility first, reboot, and then come back and defragment your disk, if necessary. (If the utility shows that your drive is not fragmented, you can skip this step.) These operations can take some time to complete, so you might consider running them overnight.
Tip
Adobe offers an excellent resource for learning about hardware choices that will help Lightroom run optimally. For more information, see optimizelr.robsylvan.com.
On a Mac, you have Disk Utility, which resides in the Utilities subfolder of the Applications folder. After you launch Disk Utility, select your disk, click the First Aid tab, and then click the Repair Disk Permissions button. It’s a good idea to run Disk Utility before and after you install any application, as a regular part of your workflow.
Get Your Photos Ready
If you have not yet imported a single photo into Lightroom, this section is for you. Even before you launch the program, you can do a few things with your photos that will help you (and Lightroom) later.
Warning
Don’t move your photos outside Lightroom if you have already imported them into the program. If you move imported photos outside Lightroom, you break the connection between the photos and the catalog and create a new problem for yourself. Don’t do that.
Pre-Lightroom
If you’re brand new to Lightroom, you may find it more efficient to organize your photos into a logical folder structure before you run those photos through the import process. It is not that you can’t create and organize folders in Lightroom later—you sure can (and you will). But your system browser is probably more comfortable and faster for you to use. Instead of trying to learn Lightroom’s controls at the same time, you can focus solely on consolidating all photo folders into one location, renaming folders in ways that make more sense, deleting all the duplicate images, and really wrapping your arms around your existing photo collection.
Consider the Future
I do not believe that there is one right way to organize your photos. There are as many different ways to approach photo organization as there are different ways to approach photography. Just as with photography, however, sticking to a couple of core concepts will help you. Specifically, the organizational scheme you choose must:
![]() Make sense to your brain
Make sense to your brain
![]() Be able to scale into the future
Be able to scale into the future
For my brain, keeping the folder structure based on a combination of dates and descriptive words keeps things simple—plus, this approach scales nicely into the future. For example, on each hard drive I use to store photos, I create a parent folder at the top level and name it Imported Photos. Within that folder is a date-based folder structure organized by year. Within each year folder are subfolders named with the date of, and a descriptive phrase for, each shoot. The descriptions give me a clue about the shoot’s subject or location (Figure 1.3).

Keeping all photo folders in a single top-level parent folder makes it much easier to move them to a new drive, in the not-too-distant future, when you start to fill up your current drive—or if you have to restore from a backup after a disaster. This is not to say that you have to keep them all in a single folder, but just trust me that you will thank me for this later.
In my years of using Lightroom, there have been times when my photos were stored across multiple drives (internal and external) and other times when I needed only one. As I write, I have my entire photo library stored on a single 4 TB external drive. Lightroom doesn’t care how many drives you use. It just has to make sense to you and fit your needs.
Lightroom itself defaults to a date-based folder structure that uses the capture time embedded in each photo, so it is easy to automate the creation of that folder structure into the future as part of the Import process. If you prefer, however, you can disable that date-based option and manually create folders based on event, location, subject, or whatever makes sense to your shooting style. (We’ll cover all the Import options later on.)
Whatever organizational approach you choose (try the single parent folder; you’ll thank me later), take time now to think it through and formulate a plan. When it comes time to meet the Import dialog box, you’ll know what you want to do, and your existing photo library will be ready to be imported.
Key Lightroom Files
The catalog is where all the information about your photos is stored, but there are other files that Lightroom uses to display what you see when you launch the program. In addition to the catalog, these files include the following:
![]() Application (Lightroom itself)
Application (Lightroom itself)
![]() Preview caches
Preview caches
![]() Preferences file
Preferences file
![]() Presets, templates, and (optionally) plug-ins
Presets, templates, and (optionally) plug-ins
The Lightroom Application
I recommend installing the Lightroom program in its default location (Program Files/Adobe on a Windows system, and the Applications folder on a Mac), which if you just clicked all the Next buttons during installation is precisely where it is located. Installing Lightroom anywhere else can lead to problems, so stick to the defaults as the installer walks you through the process. If you are concerned about space on your startup drive, there are other things you can do to reduce Lightroom’s footprint; I cover them later.
Note
Lightroom is nearly identical on Windows and Mac, but there are differences in a few menus, keyboard shortcuts, and file locations because of differences in the operating systems. I will call these out as we come to them and even show screen captures from both operating systems when necessary.
Catalog and Preview Caches
When you open Lightroom, you are doing two things: .
![]() Launching the program
Launching the program
![]() Opening a Lightroom catalog
Opening a Lightroom catalog
Note
Lightroom cannot open a catalog over a network, so technically you can put a Lightroom catalog only on an internal or local external drive.
This is very different from how many other programs operate. For example, you can open Photoshop without opening an image, but it is impossible to open Lightroom without also opening a catalog. Your Lightroom catalog can be located on any drive on your computer, but by default it will be found in My Documents/Pictures/Lightroom on Windows systems and in Pictures/Lightroom on a Mac.
Inside this Lightroom folder you will find your Lightroom catalog, which has the .lrcat file extension. As soon as you start importing photos, the catalog will be joined by its companion preview cache, which has the .lrdata file extension (Figure 1.4). The .lrcat file holds all the data about your photos as well as all the work you do inside Lightroom. The .lrdata file holds all the previews of your imported photos.

As you can see in Figure 1.4, there are actually a few different types of cache files, including the following:
![]() Lightroom Catalog Previews.lrdata: This stores the previews you see in the Library, Slideshow, Print, Web, and Map modules. There are multiple versions of these previews in different sizes (from Filmstrip size up to full 1:1 previews), which can make this preview cache quite large over time.
Lightroom Catalog Previews.lrdata: This stores the previews you see in the Library, Slideshow, Print, Web, and Map modules. There are multiple versions of these previews in different sizes (from Filmstrip size up to full 1:1 previews), which can make this preview cache quite large over time.
![]() Lightroom Catalog Smart Previews.lrdata: This preview cache holds any Smart Previews you create. The size of this cache depends entirely on how many Smart Previews you have rendered; if you don’t use any, you won’t see this file at all. (More on Smart Previews shortly.)
Lightroom Catalog Smart Previews.lrdata: This preview cache holds any Smart Previews you create. The size of this cache depends entirely on how many Smart Previews you have rendered; if you don’t use any, you won’t see this file at all. (More on Smart Previews shortly.)
![]() Mobile Downloads.lrdata: If you are a Creative Cloud subscriber and you also use the Lightroom Mobile app for iOS or Android, then you may have a Mobile Downloads.lrdata file. This is where Lightroom stores photos that are synced from your mobile device and downloaded to your computer.
Mobile Downloads.lrdata: If you are a Creative Cloud subscriber and you also use the Lightroom Mobile app for iOS or Android, then you may have a Mobile Downloads.lrdata file. This is where Lightroom stores photos that are synced from your mobile device and downloaded to your computer.
When you have your catalog open in Lightroom, you will also see Lightroom Catalog.lrcat.lock, which helps prevent other programs and users from opening the catalog, and Lightroom Catalog.lrcat-journal, which helps preserve data in case of a computer crash. As soon as the catalog is closed out of Lightroom, those two helper files automatically disappear. You don’t have to do anything with those files, and if you never open the folder containing the catalog when the catalog is open in Lightroom, you’d never know they’re there.
Smart Previews
In Lightroom 5, Adobe introduced a type of preview file, called a Smart Preview, that provides additional ways to work with offline photos. As mentioned, Lightroom stores the path to each imported photo in the catalog, and Lightroom needs to be able to access photos for certain key functions, such as editing in the Develop module or exporting copies for output.
If you store all your photos on an internal drive, then you’ll always be able to access them inside Lightroom, but many people don’t have room for their entire library on their internal drive, so they use external and network drives to store their photos. External drives are great, but they may not always be attached to your computer, and when those drives are offline, your photos are also offline, and that can severely limit the work you can do inside Lightroom.
To address this dilemma, Adobe created the Smart Preview, which is a special type of preview file that contains the important data Lightroom needs for editing purposes in a compressed package, allowing you to do more in Lightroom when the source photos are offline for any reason. Chapter 9 explores how to use Smart Previews in an offline workflow. For now, you just need to be aware of the basics.
How Many Catalogs?
The simple answer to this question is that you need just one—one catalog to rule them all! Think back to the example of the traditional card catalog: It makes sense to have a single, central card catalog to house all the data about all the books in the library. The books can be spread across an infinite number of shelves in various rooms and on different floors of the building, but it makes your life much simpler to have a single catalog to open when you want to find a book. How much more difficult would it be to find a book if there were separate card catalogs for each year that books were published? Or if there were one card catalog for books on people, another card catalog for books on outdoor photos, and another for books on cats? Where would you look for a book about people with outdoor cats? If you are just getting started with Lightroom, having a single catalog will make your life and many tasks much simpler.
The purpose of the catalog is to keep track of all your photos in one place. If you have multiple catalogs, then you need an external system for knowing which catalog is managing which photos. Of course, there are good and logical reasons for why someone might have multiple Lightroom catalogs. For example, a professional photographer might want to devote one catalog to family photos and another to client photos. We’ll look at how to deal with multiple catalogs and even how to merge them into one in Chapter 9.
Managing the Lightroom Cache Files
Now that you know a bit more about the various files that make Lightroom tick, let’s look at ways you can keep those files in check. Lightroom provides a few configuration settings to help you manage the size and growth of the main preview cache. Go to Edit > Catalog Settings (or Lightroom > Catalog Settings on a Mac), and click the File Handling tab to access the File Handling panel (Figure 1.5). At the top of the panel’s Preview Cache section, you can see the preview cache’s current size, and the size of the Smart Preview cache is displayed in the Smart Previews section. This is useful for tracking how large those caches are getting. My preview cache is at 54 GB, and that is for a catalog managing more than 130,000 photos. The smaller your catalog, the smaller that cache will be.

Figure 1.5 The File Handling panel of the Catalog Settings dialog box will help you rein in the size of your cache file.
If your cache file size is growing too large, you can take control in the File Handling panel. Three settings here have an impact on the size of the preview cache: Standard Preview Size, which controls preview pixel dimensions; Preview Quality, which determines the amount of JPEG compression applied to previews; and Automatically Discard 1:1 Previews, which specifies how long to keep 1:1 (full-sized) previews before deleting them.
Standard-size previews are the thumbnails you see in Grid view, the Fit Screen previews in Loupe view, and the previews displayed in slideshows, print layouts, and web gallery layouts. Ideally, you would set Standard Preview Size to about the same width dimension as your monitor’s resolution to control the maximum pixel width of the preview files. On my MacBook Pro, with its display of 2880x1800, for example, I have my previews set to 2880. My Windows desktop runs a display resolution of 1920x1200, so for it I set Standard Preview Size to 2048. The smaller the pixel dimensions, the less cache space they require. New to Lightroom CC 2015/Lightroom 6 is an Auto option for Standard Preview Size, which is set by default and which is perfectly fine if you want to just set it and forget it.
For the Preview Quality setting, the default of Medium is usually fine. Think of this as the amount of JPEG compression applied to the previews. More compression means a smaller file size but has a larger impact on quality. Medium is a good compromise between file size and quality. If space is not an issue or if you notice artifacts in your previews, change this setting to High.
The last setting to consider is a schedule for discarding 1:1 previews. Viewed in the Library module, a 1:1 preview is essentially a full-size (a 1:1 ratio, or 100%) JPEG copy of your source photo. After a while, these can really take up a lot of space! The purpose of any cache is to speed up viewing time by keeping a copy at the ready whenever you need it. However, Lightroom will always render new 1:1 previews as needed. If space is tight, change the Automatically Discard 1:1 Previews setting to After One Week to dampen the growth of the preview cache.
OK, now that you have your Lightroom catalog and preview cache under control, let’s look at a few things you can do to optimize overall performance.
Configure Preferences and Catalog Settings
The preferences file is where all program-wide settings are configured and stored. Although where and how you access this file and the configuration settings it holds depends on your operating system, the important settings themselves are common across all versions.
Windows System Access
To access the configuration settings on a Windows system, choose Edit > Preferences. The actual preferences file is stored here:
Users/[username]/AppData/Roaming/Adobe/Lightroom/Preferences Lightroom [version number] Preferences.agprefs .
Be aware, however, that sometimes Windows likes to hide folders from you for your own protection. If you can’t see the Preferences folder, you can use a shortcut to it: Open Lightroom, choose Edit > Preferences > Presets, and click the Show Lightroom Presets Folder button. This will open Windows Explorer to the Lightroom folder that holds the Preferences folder.
Mac Access
On a Mac, you can access the configuration settings by choosing Lightroom > Preferences. The preferences file is stored here:
[username] /Library/Preferences/com.adobe.Lightroom [version number] .plist .
With recent versions of the operating system, Apple has made it harder to find the Library folder. Open a new Finder window, choose the Go menu, and then hold down the Option key to reveal the Library option in the list. Choose Library and proceed to the Preferences folder.
Note
On both operating systems, a list of recently opened catalogs resides in a separate Startup preferences file that is stored in your Presets/Preferences folder. This is kept separate from the other user preferences so that you can trash your user preferences without losing the list of recently opened catalogs. (See the appendix for more information.)
Key Preferences Settings
Lightroom is very good at doing exactly what it is told, but unfortunately, a lot of people don’t realize just what they are telling Lightroom to do. By relying on the default preferences settings, you (and your photos) are basically just going along for the ride. To get in the driver’s seat and make decisions about what Lightroom does or does not do, start with customizing the preferences. To help you, the next sections highlight the settings that every Lightroom user needs to understand, starting with the General tab.
General Preferences
Possibly the most important Preferences setting, not only in the General tab but of all, is “When starting up use this catalog,” in the Default Catalog section (Figure 1.6). Adobe sets this to “Load most recent catalog.” In theory, if you have only a single catalog, this setting works just fine because you only ever open one catalog and it is always the same catalog. In reality, I can’t tell you how many times the unspecific nature of this default has caused huge headaches for people.

Figure 1.6 The General tab of the Preferences dialog box contains one of your most important settings.
It always starts off innocently: Curious, you decide to look in the Lightroom catalog backup folder, where all the backup copies of the Lightroom catalogs are stored. You open one of the catalog backup copies (just to see what happens) and then watch as it harmlessly opens into Lightroom. Curiosity satisfied, you quit Lightroom. When you next launch Lightroom to get back to work, the program simply does what it is told and opens the most recent catalog upon startup, which of course was that old backup copy. Because the backup copy is an exact duplicate of the working catalog, it is easy to miss the fact that you are looking at the backup, so you go to work importing new photos and editing existing ones. From this point forward, until you realize something went wrong, that old backup copy has become the new working catalog and your original working catalog is just left sitting unused. While not impossible to untangle, it is a real time waster and an all-around frustrating process.
Avoiding this headache is easy. Change the “When starting up use this catalog” setting to specify the name of the catalog you always want to open. If you have multiple catalogs, choose “Prompt me when starting Lightroom.” Either way, you are in control of deciding specifically which catalog you want to open every time you launch Lightroom.
If you shoot Raw+JPEG, I also recommend turning on “Treat JPEG files next to raw files as separate photos.” When this preference is selected, Lightroom shows both versions of the photo side by side in the catalog. When it’s unselected (the default), you see only the raw versions, which I think defeats the purpose of shooting Raw+JPEG to begin with. If you shoot only Raw files, the setting doesn’t matter. No matter what you shoot, the rest of the settings in the General tab are up to personal preference.
Presets Preferences
The next tab to investigate is the Presets tab (Figure 1.7). The choices in the Default Develop Settings section are largely a matter of personal preference. Lightroom allows you to customize your default Develop settings (which is a real time-saver that lets you apply your preferred Develop settings to all newly imported photos automatically). Using the options on the Presets tab of the Preferences dialog box, you can, by selecting the respective boxes in this section, tie those customized settings to specific camera serial numbers (which could be helpful when you’re shooting with multiple bodies of the same camera model) and to specific ISO settings. (You’ll learn more about these settings in Chapter 7.)

The biggest trouble spot of the Presets panel is the “Store presets with this catalog” setting in the Location section. When it is unselected (the default), your custom presets and templates are kept in a central location and are available to all your catalogs, even across different versions of Lightroom (which I find most helpful). When you turn on the setting, Lightroom creates a subfolder named Lightroom Settings in the same folder as your current catalog file, and your catalog will refer only to that folder for all presets and templates. The new Lightroom Settings folder will contain only the default presets and templates; Lightroom does not copy any custom presets or templates to it from the original central folder. If you’ve turned on “Store presets with this catalog” and then wondered why you could no longer access your custom presets from the Develop module, now you know. Of course, you can manually copy custom presets to their respective folders in the Lightroom Settings folder, but I suggest just leaving the setting off so that you are always accessing the same centrally stored collection of presets.
External Editing Preferences
OK, let’s take a look at the External Editing panel (Figure 1.8). External editors are any other image editing program that Lightroom can pass a photo to for additional editing.

Figure 1.8 The External Editing tab of the Preferences dialog box helps Lightroom work seamlessly with other image editing programs.
The most common external editor is Adobe Photoshop, but there are a growing number of image editors from such companies as Nik, Topaz, ON1, and so on. By default, Lightroom designates the most recent version of Photoshop (or Photoshop Elements, if Photoshop is not installed) as the primary external editor (which appears at the top). Lightroom then uses the File Format, Color Space, Bit Depth, and Resolution settings when it creates copies to send to Photoshop (with Lightroom adjustments) for additional editing. I suggest sticking to the defaults for these. There is room for personal preference; mine is that if you shoot in the Raw format, you should edit copies in 16-bit and the ProPhoto RGB color space to get the most out of all that data you captured. If you use Photoshop Elements or would just rather work with 8-bit files, then change the Bit Depth setting accordingly and set Color Space to Adobe RGB.
Note
Some editing applications designed to work with Lightroom, such as the Nik Collection from Google and ON1 Photo 10 from ON1, create their own links into Lightroom when you install them, so there’s no need to manually configure them in Preferences.
Most of the questions I hear about this panel are about the Additional External Editor section. Its purpose is to allow you to seamlessly send copies from Lightroom to other image editors. For example, I have the desktop version of the Snapseed app from Nik on both my Windows and Mac computers, so I configured Snapseed to be an additional external editor, and now I can “round-trip” files from Lightroom to Snapseed just like I do to Photoshop. To set your own external editor, click the Choose button, navigate to the external editor, and select it in the resulting browser window. After you set the File Format, Color Space, Bit Depth, Resolution, and Compression parameters, you can save all the additional editor settings as a preset by clicking the Preset drop-down menu and choosing “Save Current Settings as New Preset” (Figure 1.9). You can configure presets for multiple editors and then easily switch between as many external applications as you like based on what apps you have installed.

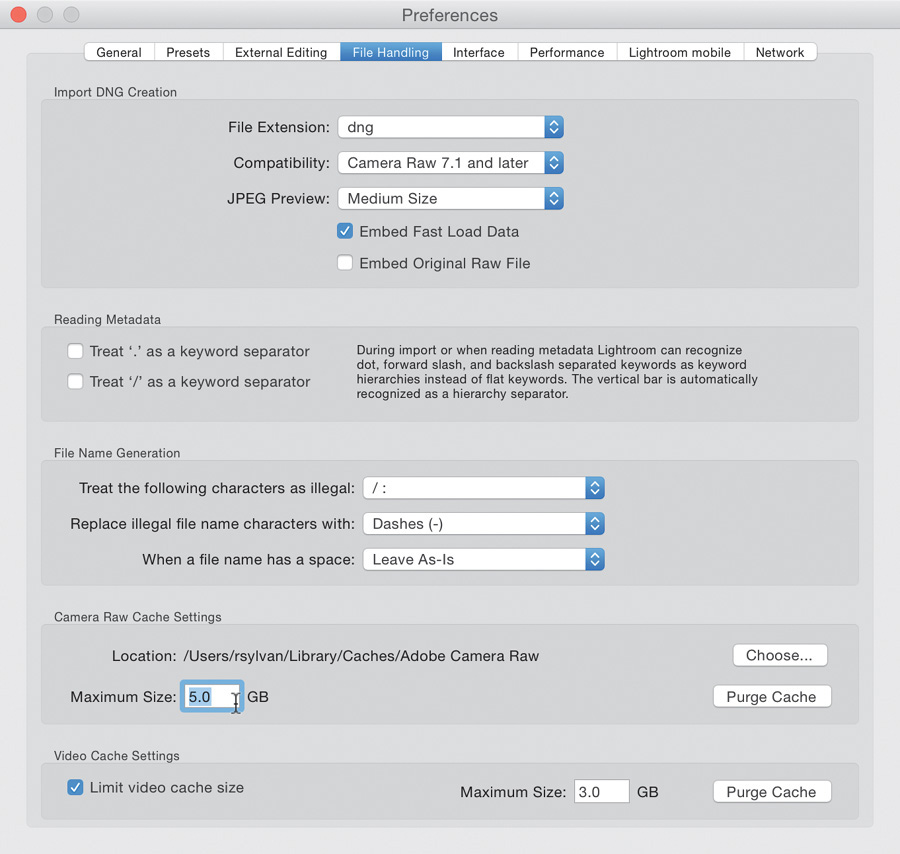
File Handling Preferences
The default settings for the File Handling panel (Figure 1.10) are spot on for most users. To improve performance, however, you may wish to customize the Camera Raw Cache Settings section. The role of the Camera Raw cache is to speed up performance by storing the base rendering of the Raw photos you’re currently working on in Develop, enabling Lightroom to update what you are seeing faster. By default, this cache is set to only 1 GB, which is pretty tiny. You can increase to a maximum of 200 GB, but that is overkill. If you have enough free drive space, try something in the 5 to 10 GB range to see if that has a positive impact on your workflow. If you have multiple internal drives, then you can also click the Choose button and relocate the cache to a faster drive or to a drive with more free space.
Performance Preferences
Although most of the remaining panels are self-explanatory and work well with the defaults, the Performance panel (Figure 1.11) is a source of trouble for some Lightroom users. The Performance panel was introduced in Lightroom CC 2015/6, the first version that was able to leverage the power of your computer’s graphics processor (GPU) in the Develop module. This is good news for most Lightroom users, especially for those with newer machines and powerful GPUs. However, it has created some problems for users with less capable GPUs or out-of-date drivers. If you are experiencing any problems, such as crashing, slow performance, or general weirdness in the Develop module, try turning off the Use Graphics Processor box and see if that helps. In addition, make sure your graphics card’s driver is up to date (Windows users may need to check the website of the GPU maker for an update).

Figure 1.11 Using the graphics processor is great when it works but can be a problem when it doesn’t.
Now that you have a much firmer understanding of how Lightroom works and its relationship to your photos, you’re ready to delve into the import process and get fully oriented to the Library module, which is the subject of the next chapter.
