
5. Using Metadata

Metadata is simply data that describes other data. From a Lightroom perspective, metadata is useful descriptive information about your photos, whether it takes the form of titles, captions, keywords, GPS, or more. Lightroom is a database at its core, and as you learned in Chapter 4’s discussion of collections, the more data entered into that database the more you can leverage it for your own purposes (such as when using smart collections). In this chapter, I’ll introduce you to each type of metadata, how to create metadata, and how to use it to help you tame your photo library. Much of the metadata creation, organization, and application is done in the Library module, so let’s start there.
The Metadata Panel
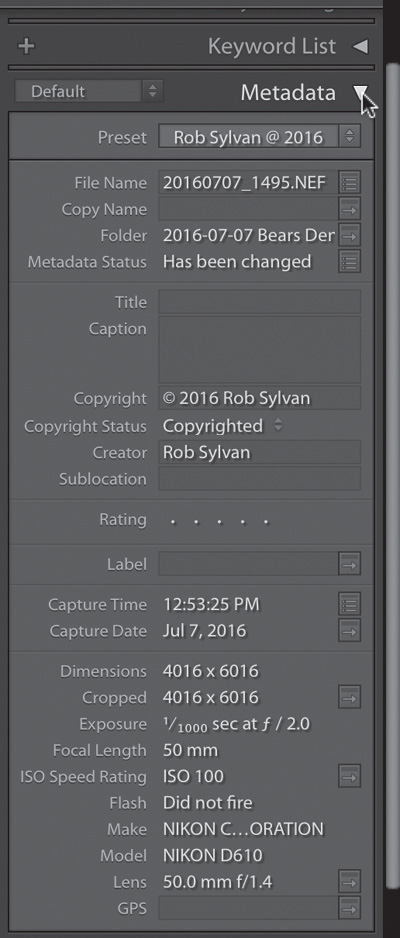
Inside the Library module, you’ll find the Metadata panel (Figure 5.1) on the right side of the interface. The Metadata panel is primarily used for viewing information about your photos, but it also contains editable fields that you can use to enter new information.
Metadata Panel Views
Note
EXIF stands for Exchangeable Image File Format. You can learn more about the EXIF standard by going to exif.org.
At the top of the panel is a view drop-down menu, which you can use to change what information is shown inside the panel. This can help illustrate which fields are for display only and which fields are open for you to edit as needed. For example, if I switch to EXIF view, you can see that most of the fields are un-editable and contain data that was created by the camera at the time the photo was taken (Figure 5.2). Go ahead and click through each view to see what data is displayed—you’ll see some of the same fields displayed in different ways.

Note
IPTC stands for International Press Telecommunications Council. You can learn more about the IPTC standard by going to iptc.org.
For media photographers, the IPTC view and its associated editable fields are very important to their work, as this is where they can enter their copyright, contact information, and a wide range of image-specific descriptive data (Figure 5.3). In Chapter 7 I’ll cover how to create metadata templates that can speed up the entry of data for many of these fields during and after import.
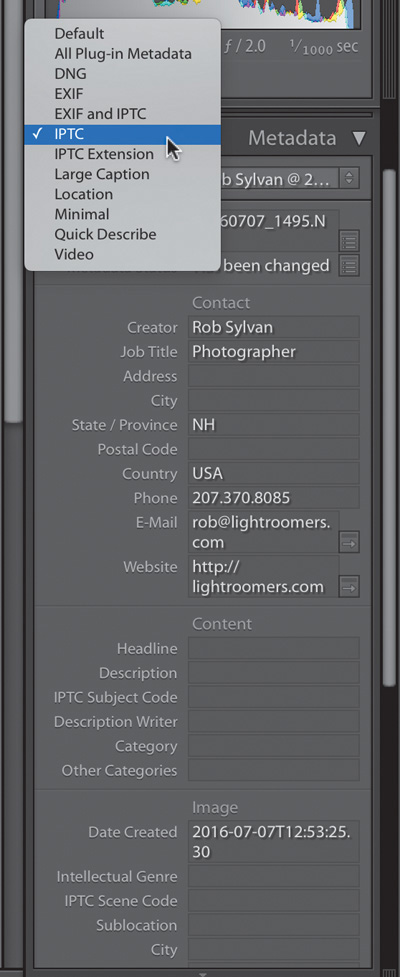
Figure 5.3 The IPTC view shows all of the editable fields available for adding descriptive information about you and your photos.
Much of the information that you can enter via this panel you can also leverage later when using text templates in other modules (Chapter 7), when creating smart collections (Chapters 4 and 8), when exporting copies (Chapter 8), and when using the Library Filter (Chapter 8). Don’t think about adding metadata for the sake of stockpiling data; rather, think about how you can use that information to help you in your workflow.
Adding Titles, Captions, and More
I think the most common type of photo metadata people are familiar with is the kind used in newspapers and online news sources: photo titles and captions. The process for adding this information is the same as for any of the other editable fields. You can see that the camera-generated EXIF data is not editable (Figure 5.2), whereas the IPTC fields are all open for editing (Figure 5.3). Near the top of the Default view (the most commonly used field), you can see that there are Title and Caption fields, which are both open for editing (Figure 5.4).

Here’s how it works:
1. Select a photo (I find it easiest to work in Grid or Loupe view), and expand the Metadata panel.
2. Click into the Title field to activate it.
3. Type in the title you want to apply to the selected photo. Titles are usually short and don’t have to be complete sentences (Figure 5.5).

4. Press the Tab key to jump to the Caption field, and enter a description of the photo. Captions are often short sentences that describe the photo (Figure 5.6). Press Enter to apply the data.

As you enter titles and captions, think about how and where you might use them. Perhaps you’re creating a web gallery, and you’d like the title and caption to display along with the photos, or perhaps you are a photographer and need the title and caption to be included in the metadata of the copies you export later to deliver to a client. There’s no wrong answer here as long as you are using the fields in accordance with your intended purpose.
Here are a few tips to speed up your workflow when entering information in the Metadata panel:
![]() In an active field, pressing the Tab key moves you down the panel to the next editable field. (If you press Tab and the panel hides, press Tab again to bring it back, click into the field to make it active, and then press Tab again to move to the next field.)
In an active field, pressing the Tab key moves you down the panel to the next editable field. (If you press Tab and the panel hides, press Tab again to bring it back, click into the field to make it active, and then press Tab again to move to the next field.)
![]() Holding the Shift key while pressing Tab moves you up the panel instead
Holding the Shift key while pressing Tab moves you up the panel instead
![]() While in an active field, hold the Ctrl key (Mac: Command key) and press the left or right arrow key to move to the previous or next photo, respectively, while remaining in that same metadata field on the new photo
While in an active field, hold the Ctrl key (Mac: Command key) and press the left or right arrow key to move to the previous or next photo, respectively, while remaining in that same metadata field on the new photo
![]() As you begin to type in a field, Lightroom will attempt to auto-complete the data entry if it matches what you are typing (Figure 5.7); press Enter to accept the auto-complete result
As you begin to type in a field, Lightroom will attempt to auto-complete the data entry if it matches what you are typing (Figure 5.7); press Enter to accept the auto-complete result
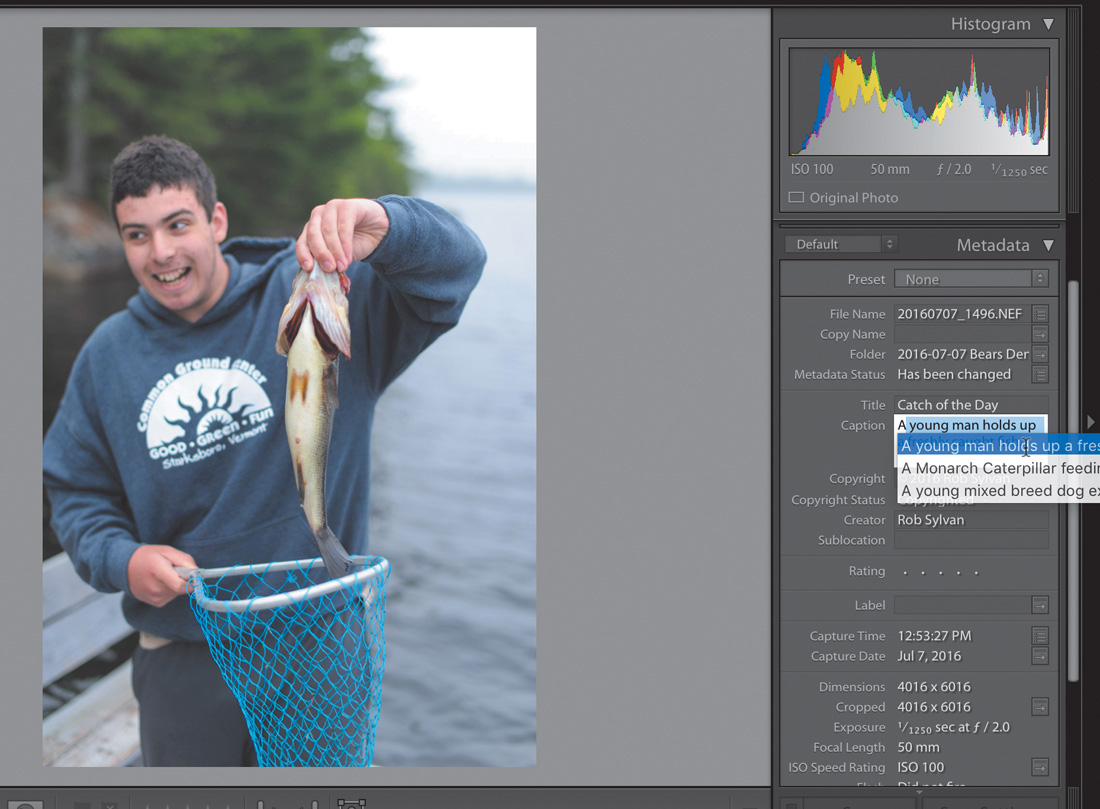
Figure 5.7 Lightroom attempts to speed up the process by showing auto-complete results that match what you are typing.
Used together, these tips can really speed up the application of metadata by keeping your fingers on the keyboard as you move through a shoot. If you have a lot of similar images, you can also take advantage of some batch application tools.
Applying Metadata to Multiple Photos
It is not uncommon to have a shoot with many similar images that can share some of the same metadata fields. The easiest way to apply the same information to multiple photos at once is to work in Grid view and select the photos to which you want to apply this information. When multiple photos are selected, you will see the word “<mixed>” appear in the fields that have differing information (Figure 5.8). This is Lightroom’s way of warning you that you risk losing existing work if you continue.
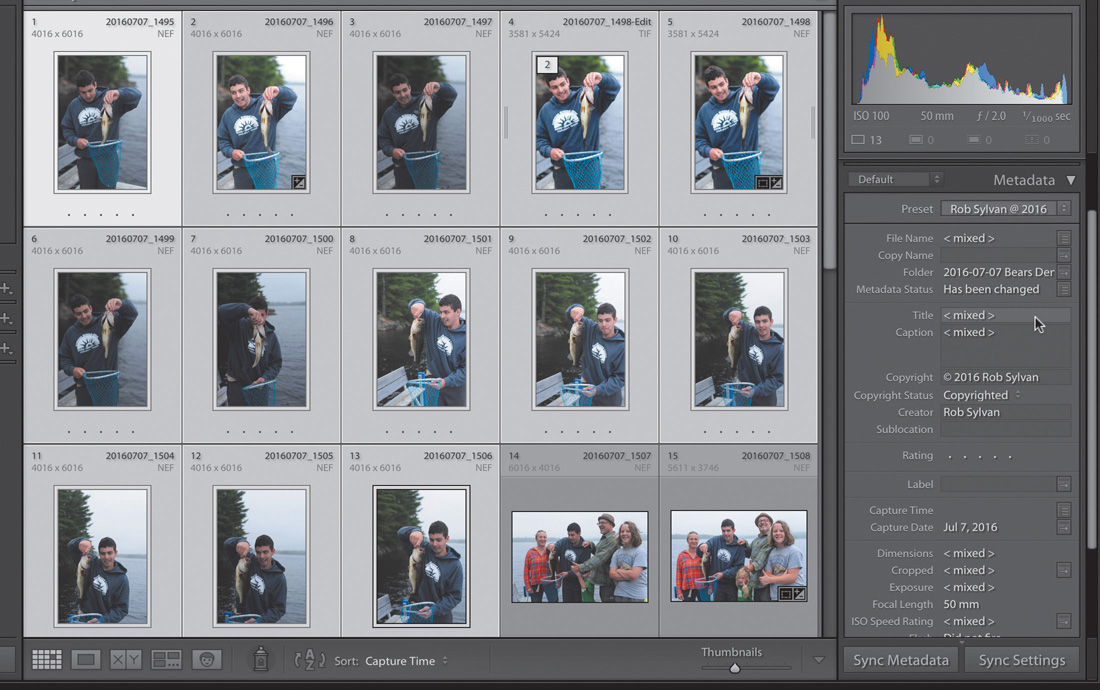
Figure 5.8 When you have multiple photos selected in the Library module, <mixed> appears in fields where the data is not the same on all photos.
Note
If you go to the Metadata menu and select “Show Metadata for Target Photo Only,” then you will see the metadata only for the active, or “most selected,” photo, and the metadata you add or edit will be applied to that photo only.
To enter the same info for all fields, just type that data into the desired field and press Enter. Because I had some photos with an existing title selected, I got the <mixed> warning when I started, and when I pressed Enter, Lightroom prompted me to make sure I really wanted to apply that title to all selected photos (Figure 5.9). If I had started with photos that were all missing titles, I wouldn’t have seen <mixed> appear in the Title field, but Lightroom would still have prompted me before applying the change to all selected photos.

Note
The Sync Metadata function works for other metadata too, such as keywords, ratings, color labels, and so on. If the information is displayed in the Synchronize Metadata dialog, you can sync it across all selected photos.
Alternatively, because I had already added a title and caption to one photo, I could select all of the similar photos in Grid view and then click the Sync Metadata button below the Metadata panel to open the Synchronize Metadata dialog (Figure 5.10). Here I can select the box next to any (and all) metadata fields I want to synchronize (be the same) across all selected photos. In this case, I just selected the Caption and Title fields. Clicking the Synchronize button applies that information to all selected photos.

I hope you are starting to see the pattern that the more data you add, the faster and easier it is to add it to more photos. Let’s move on to discussing keywords.
Keywords
Keywords have a different role than titles or captions. Although they are words that can be used to describe a photo, keywords are primarily used to help you find your photos rather than being an outward display to a viewer of what a photo is about. Keywords can be a simple list of words that are little more than a checklist of the most important aspects of a photo. For example, consider Figure 5.7. For that photo of my son holding a fish, the top five keywords might be fishing, lake, male, New Hampshire, Summer. I could also include his name (I’ll cover assigning names to faces in the next section) and more detailed location information (I’ll cover that at the end of the chapter).
Keywords can be a very personal topic, meaning your specific keyword needs can be very different from mine, and that’s OK, as long as they do the job you need them to do. Aside from my personal photos, I also do stock photography, and the keywording I need for that is vastly different from that of my personal photos. That said, the mechanics of creating a keyword list, managing that list, and applying the keywords is the same in all cases, and even a few keywords, consistently applied, can be really useful over time. The goal is to have additional tools to easily find a photo in the future (weeks, months, or years from now); keywords, in conjunction with other metadata, can help you do that.
Two panels in the Library module are used with keywording: the aptly named Keywording panel and Keyword List panel (Figure 5.11).

There’s a lot of functionality in each panel, so let’s take a closer look at each one. This will get you prepared for Chapter 8, when I show you how they can be used to apply keywords to photos in the context of a larger workflow.
The Keywording Panel
The Keywording panel (Figure 5.12) is useful for direct entry of keywords to photos, meaning you can select a photo and type a keyword into the Keywording panel and that word will be applied to your photo. I don’t think that is the most efficient way to apply keywords, but it works.
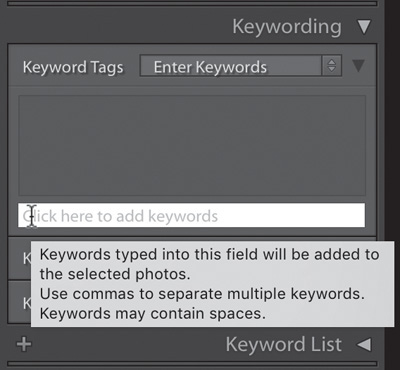
Figure 5.12 You can apply keywords simply by selecting a photo and typing the keyword into the Keywording panel.
Notice when you click into the “Click here to add keywords” field that a helpful tool tip appears as well, explaining that you can “use commas to separate multiple keywords, and that keywords can contain spaces.” So, going back to my earlier list of five keywords for the photo of my son fishing, I could type them right into that field (like so: fishing, lake, male, New Hampshire, Summer), and those words will be applied to the selected photo (or photos, if I select multiple photos in Grid view). Notice that because I used commas to separate each keyword, I was able to use a space in “New Hampshire.” .
Keyword Hierarchy
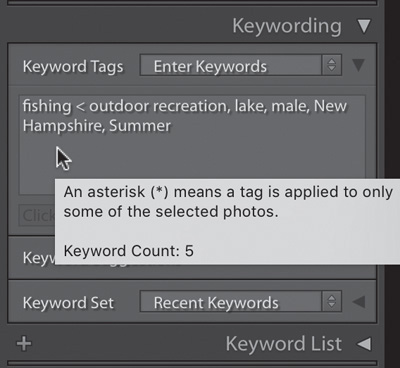
Now take a look at (Figure 5.13); above the field where I entered those keywords, you can see that those words have been applied to the selected photos. Notice that even though I typed in “fishing,” the keyword displays as “fishing < outdoor recreation” after Lightroom applies it. As you enter keywords in the Keywording panel, those words are added to the Keyword List panel. In addition, if you enter keywords that are already in your keyword list, Lightroom recognizes those words, and I happen to have a very large keyword list.
So, where did “outdoor recreation” come from then? Well, if I expand the Keyword List panel and filter on “fishing” (more on that later), you can see in (Figure 5.14) that my keywords are organized in a hierarchal structure. “Fishing” is a child keyword of the parent keyword “outdoor recreation,” so Lightroom automatically adds the parent keyword as well as the child I typed (more on how this works in the “Creating New Keywords” section).

Figure 5.14 The keywords you add in the Keywording panel are added to (and pulled from) the Keyword List panel.
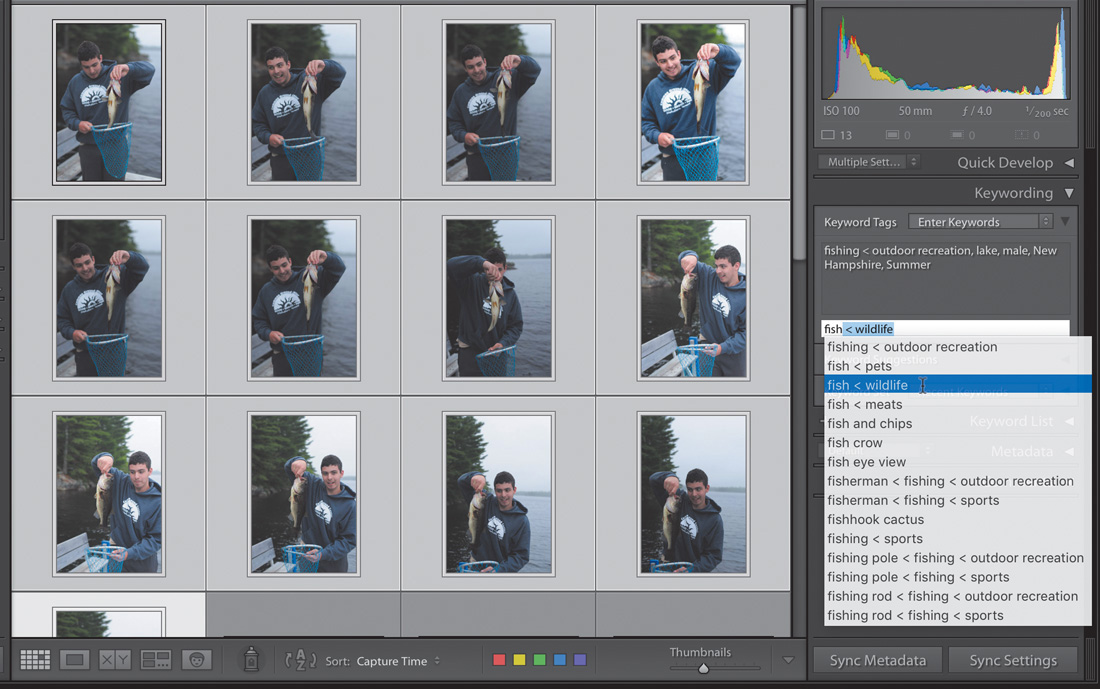
Another benefit of having an existing keyword list is that Lightroom can speed up the entry process by auto-completing entries as you type. For example, if I begin to add the keyword “fish,” Lightroom automatically displays all of the existing keywords that match the letters I’ve typed so far, and I can select the correct one from the list and then press Enter to apply it to the photo (Figure 5.15). The other benefit of pulling from my existing list is consistency, meaning that by always using words in the existing list I don’t accidentally end up with multiple variations of a given word due to accidental spelling differences. (We’ll delve deeper into creating keywords and developing your own keyword list when we discuss the Keyword List panel.)
Keyword Views and Time-Savers
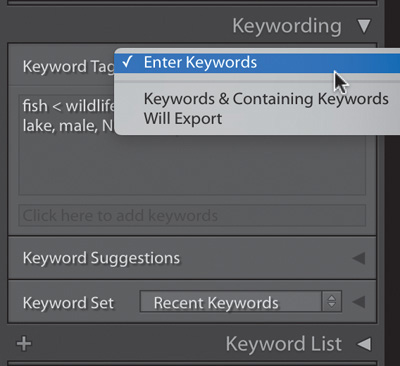
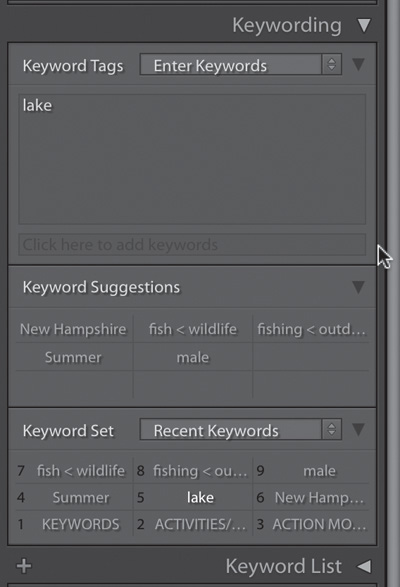
In the Keywording panel, the Keyword Tags drop-down menu (Figure 5.16) gives you access to a variety of views of entered keywords. The default setting of Enter Keywords is what we’ve been using, and although you can type right into the area where the keywords are displayed to add more keywords, I recommend sticking to the “Click here to add keywords” field to avoid accidental keyword deletions. When you set the view to Keywords & Containing Keywords, you can see the keywords you’ve entered and all of the parent keywords containing those keywords (if you have a hierarchal list). The Will Export view shows only the keywords that are configured to be included with exported copies (some keywords may be useful for your hierarchal structure, but you may not want them included with exported copies).
Other tools to help speed up the keywording process are the Keyword Suggestions and Keyword Set sections of the panel (Figure 5.17). As you apply keywords to photos in a shoot and then move on to other photos, you will see that Lightroom tries to help you by providing suggestions based on what you’ve applied so far. Additionally, the Keyword Set section is set to Recent Keywords and displays the most recent keywords you’ve added. Each of the words in those sections is a live button, and you can click any of them to add the associated keyword to the selected photo. If you hold down the Alt key (Mac: Option key), you’ll see numbers appear in the Keyword Set section; they correspond to the keyboard shortcut that you can use to add those words to your photos even faster. In this case, I can press Alt+5 (Mac: Option+5) to apply the keyword “lake” to the photo.
Taking it a step further, you can also access and create other keyword sets by clicking the Keyword Set drop-down menu (Figure 5.18). Keep in mind that you can add only up to nine keywords to a given set, but I know sets are useful to some photographers. As you can see, Lightroom comes installed with three keyword sets (for outdoor, portrait, and wedding photography) to help you get started.
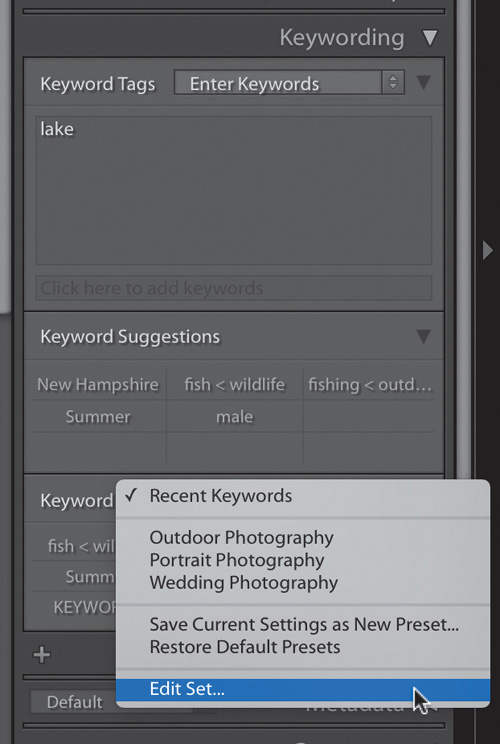
Choosing Edit Set opens the Edit Keyword Set dialog, and from there you can click the Preset drop-down menu to access and edit the pre-installed sets or create completely new ones. You might start by selecting an existing set and then customizing it to fit your needs. When ready, click the Preset drop-down menu again, choose Save Current Settings as New Preset from the list, and give it a name, which leaves the original set unaltered alongside your new set (Figure 5.19).

The Keyword List Panel
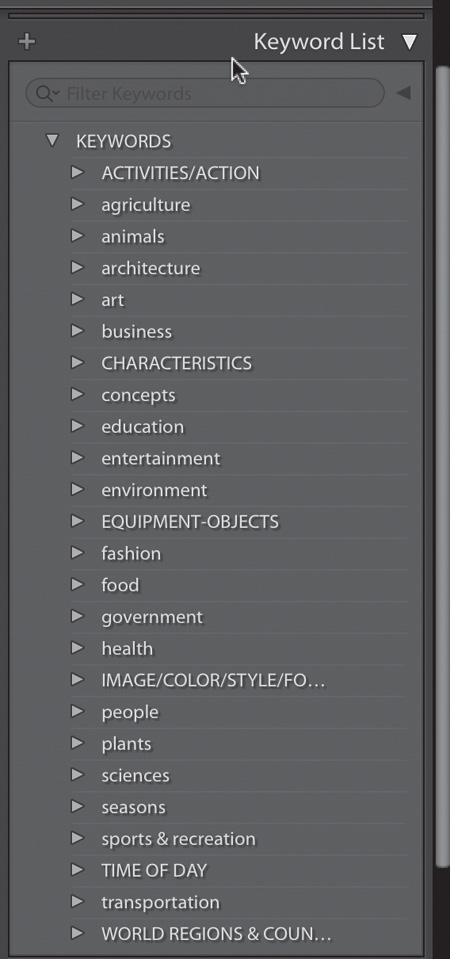
The Keyword List panel is home to all the keywords you’ve entered directly into the Keywording panel, all keywords you’ve created using the Keywording List panel, and any keywords that have entered your catalog via the import process (Figure 5.20).
In my case, I have a rather large hierarchal list of keywords that I purchased many years ago from controlledvocabulary.com to use with my stock photography efforts. This is a very thorough list of more than 10,000 words, and it really got me off to a great start. However, it is most likely overkill for anyone not involved in stock photography or journalism. There are smaller (and free) keyword lists out there too. One place to check out is the Lightroom Keyword List Project (lightroom-keyword-list-project.blogspot.com). These prepared keyword lists are simply plain-text files that you can import into your catalog via the Metadata > Import Keywords menu (you can also export your keyword list as a text file from the Metadata > Export Keywords menu).
Although you may not need a list as in-depth as mine, I highly recommend moving beyond a flat list of words to something that has an organizational structure. The main reason for this is that it gives you greater flexibility in your ability to keyword your photos. For example, imagine you have a photo of yourself wearing your lucky orange shirt and you want to tag all photos of yourself in that shirt with the word “orange” to describe the color. What happens when you take a tour of an orange grove and want to tag those photos with the word “orange” to describe the fruit? In a flat keyword list, you could have only one instance of the word “orange” even though it has multiple meanings. By creating a structure, you could have a parent keyword “color,” and “orange” could be a child keyword, and then you could have another parent keyword of “fruit,” and “orange” could be a child of that one. See what I mean?.
Most Lightroom users I know have at least dabbled with keywords, so you may already have an existing keyword list. Let’s take a look at how to create new keywords, and how to organize any existing keywords into a structured list.
Creating New Keywords
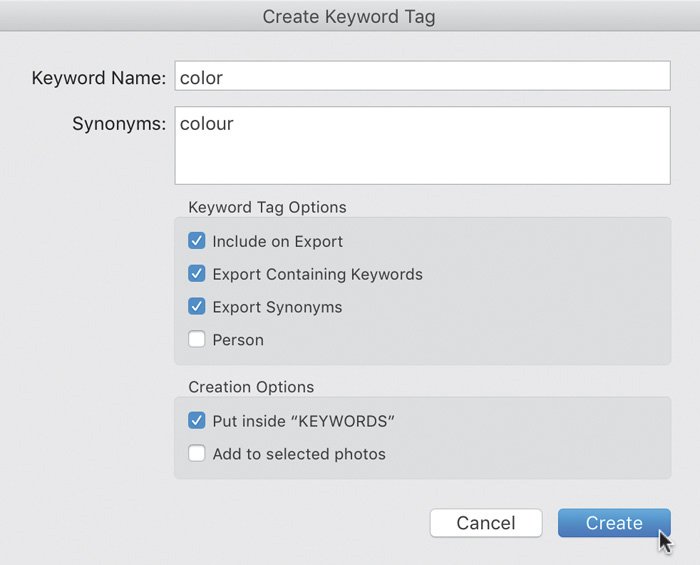
At the top of the Keyword List panel is a + sign; when clicked, it opens the Create Keyword Tag dialog (Figure 5.21), which is used to add new keywords to your list.
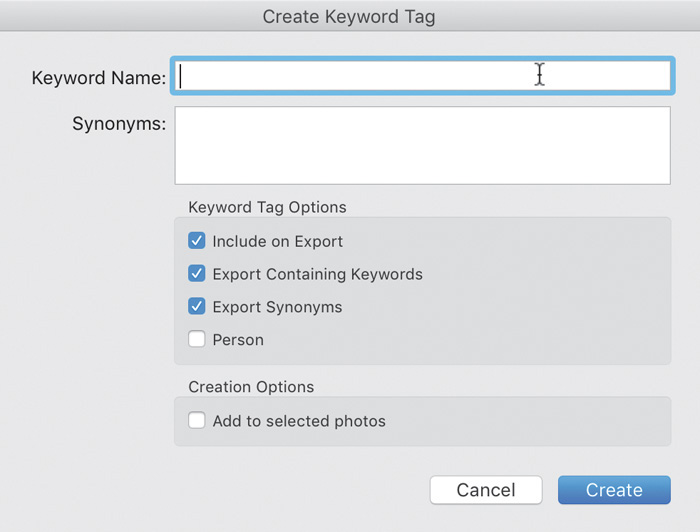
It helps to put some thought into your keyword structure, so let’s take a simple example of adding keywords pertaining to colors. Start with the parent keyword “colors,” and enter that into the Keyword Name field. Whether you use upper- or lowercase letters for your keywords is entirely up to you. I went with using all uppercase for structural words that are not exported and lowercase for all others.
After you enter the keyword, you have some options to consider (Figure 5.22). The Synonym field is optional, but it’s useful if the word you are entering has synonyms that you’d like to be included on exported copies, such as the plural form of the word, other words that mean the same thing, or even alternative spellings (such as “colour” in this case). The remaining options are self-explanatory, with the possible exception of Export Containing Keywords, which when selected means that the parent keywords of this keyword will also be applied to the exported copies.
When it comes to exporting keywords, it is important to think about your purpose for keywording. If you are just keywording for the sake of being able to find your own photos within your catalog, then applying keywords to exported copies is not terribly important. If, however, you are sending your exported photos on to a destination that can use the keywords included in the metadata of your photos, then it becomes very important. For me, when I upload photos to a stock website, the metadata of the photo is ingested into the stock website’s system, which saves me the trouble of having to re-apply the keywords later. By choosing to include the containing keywords on export, it saves me from having to explicitly apply each parent (and grandparent, and so on) keyword inside Lightroom, because by simply applying the child keyword (such as “orange”), the parent keyword (“color”) and its synonyms (“colour”) will also be applied to exported copies, which is a time-saver. Because of this, I am a little more thoughtful about what keywords are included in my exported copies.
We’ll talk about Person keywords in the next section, on assigning names to faces, so skip that for now.
At the bottom of the panel are some creation options designed to make this process more efficient. In my case, I have a top-level structural parent keyword named KEYWORDS, and the dialog is asking me if I’d like to include my new keyword as a child inside it. I do, so I will select that box. You’ll need to decide that on a case-by-case basis. In addition, there is a checkbox called “Add to selected photos,” which is useful if you had the foresight to first select the photos you want to apply this keyword to before launching the Create Keyword Tag dialog. In my case I didn’t, so I left it unselected. When you are ready, click Create to add this new word to your list.
Now I can add all of the color keywords I want to include as child keywords of “color.” An easy way to add child keywords is to right-click the parent keyword and choose “Create Keyword Tag inside” from the context menu that appears (Figure 5.23). That way, the “Put inside” checkbox will already be selected when the Create Keyword Tag dialog box opens.

Editing Existing Keywords
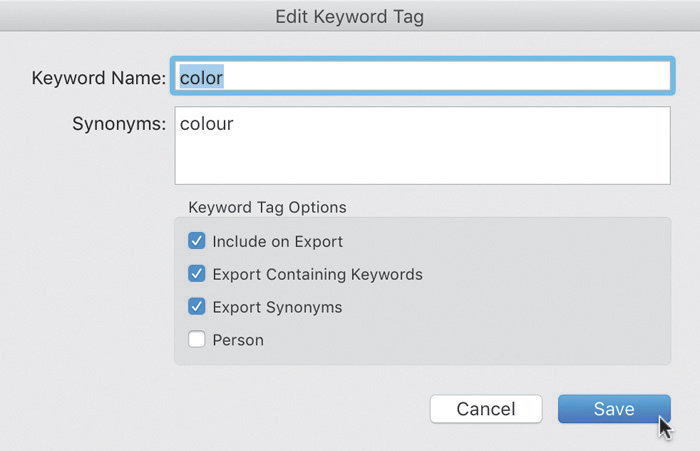
If you’ve already begun entering keywords but never considered the options, you can always right-click a keyword or just double-click the keyword to open the Edit Keyword Tag dialog, which is very much like the Create Keyword Tag dialog (Figure 5.24).
Ordering an Existing Keyword List
If you have already assigned keywords to photos and you want to retain those assignments and create a more structured list, you can (and should) do that right inside the Keyword List panel.
You can drag one keyword and drop it onto another to nest them together. Suppose you have a flat keyword list that contains animals, dogs, mammals, and golden retriever. You can drag “golden retriever” onto “dogs,” then drag “dogs” onto “mammals,” and then drag “mammals” onto “animals,” creating a logical hierarchy while maintaining the assignments inside the catalog you already made with those keywords.
You can also move a child keyword out of a parent-child relationship by dragging it above its top-level parent keyword until you see the space above the parent keyword become highlighted (indicating you are leaving that structure) and then releasing the keyword.
Removing Unwanted Keywords
If you simply want to remove a keyword from all photos and remove the keyword itself from your keyword list, you can select the keyword in the Keyword List panel and click the minus sign (–) that appears in the panel header. Removing a parent keyword will also remove its children.
You can select multiple keywords in the Keyword List section for removal as well. To select continuous keywords, click the first keyword and then hold the Shift key and click the last keyword you want to select. You can select non-contiguous keywords by holding the Ctrl key (Mac: Command key) while clicking individual keywords.
At the bottom of the Metadata menu is the option Purge Unused Keywords, which is sort of the nuclear option for removing keywords. When used, it will delete all keywords that have not been assigned to any photos, so be careful with that one. I’d suggest sticking to manual removal so that you can make the decision on a case-by-case basis.
That should put you well on your way to creating and refining your keyword list, so let’s move on to Lightroom’s functionality for finding faces and assigning names to them.
Finding Faces and Assigning Names
With the release of Lightroom CC 2015/Lightroom 6, Adobe gave us a new face finding and tagging functionality designed to make it easier to find all the people in our photographs and assign them names. I think it is fair to say that although it may not be perfect, it is still quite useful and, once you get into it, kind of fun.
People View
To facilitate the use of this new feature, Adobe also added a new type of view in the Library module: People view. Click the icon with a face in the Library toolbar, or press the keyboard shortcut O, to switch to that view (Figure 5.25).
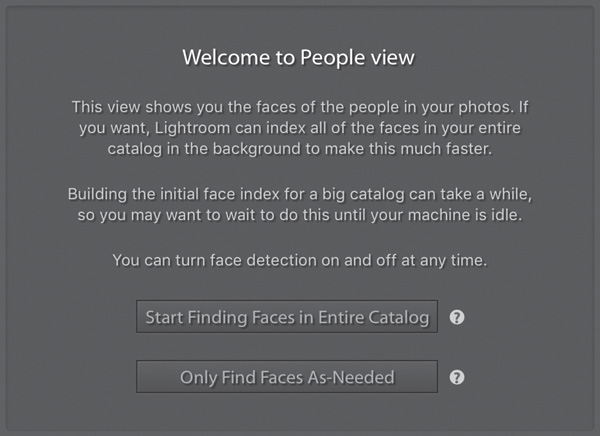
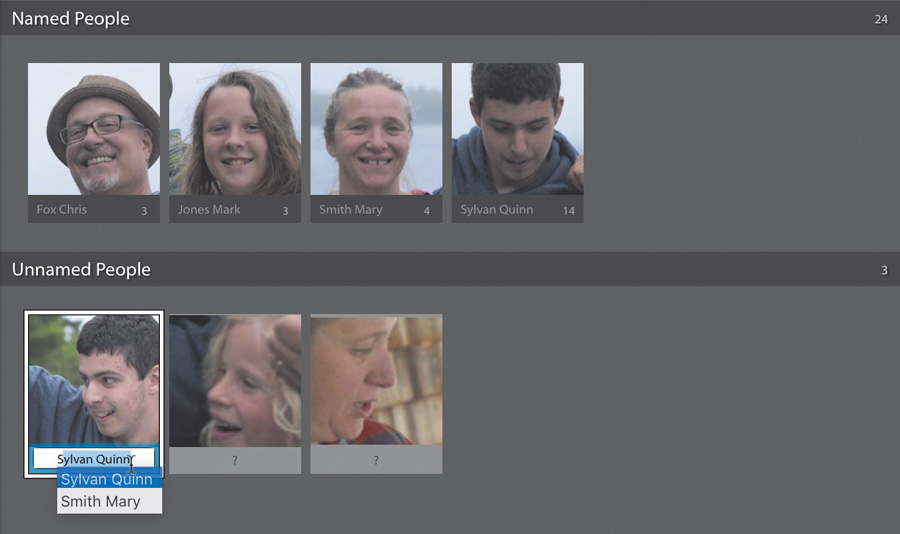
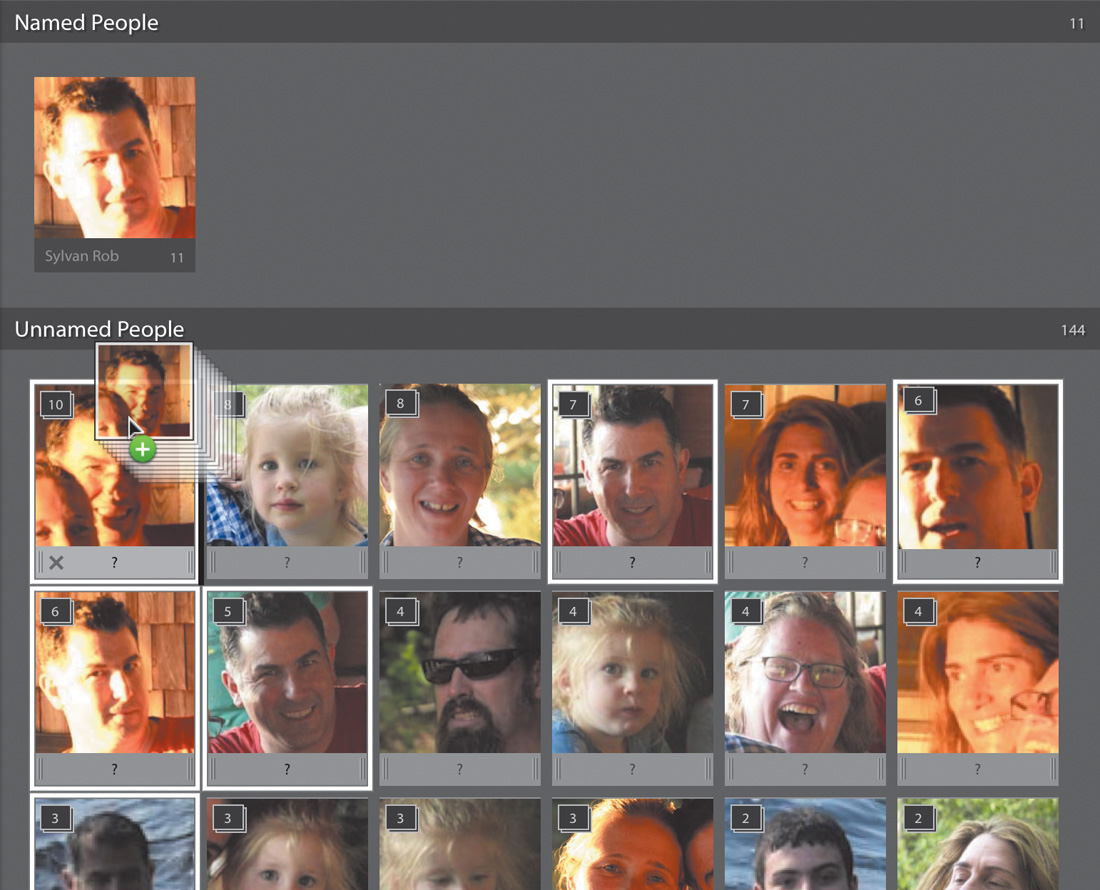
If you click Start Finding Faces in Entire Catalog, Lightroom has to churn through all of the pixels in all of your photographs. As you might imagine, this can take a while, and the larger your catalog is, the longer it will take. My recommendation is to click the Only Find Faces As-Needed button so that Lightroom analyzes only the photos in the currently selected view (such as a folder or collection), and not the entire catalog. Once you enable face finding, Lightroom starts to look through the photos to find faces, and it attempts to group similar faces together within the Unnamed People section (Figure 5.26).
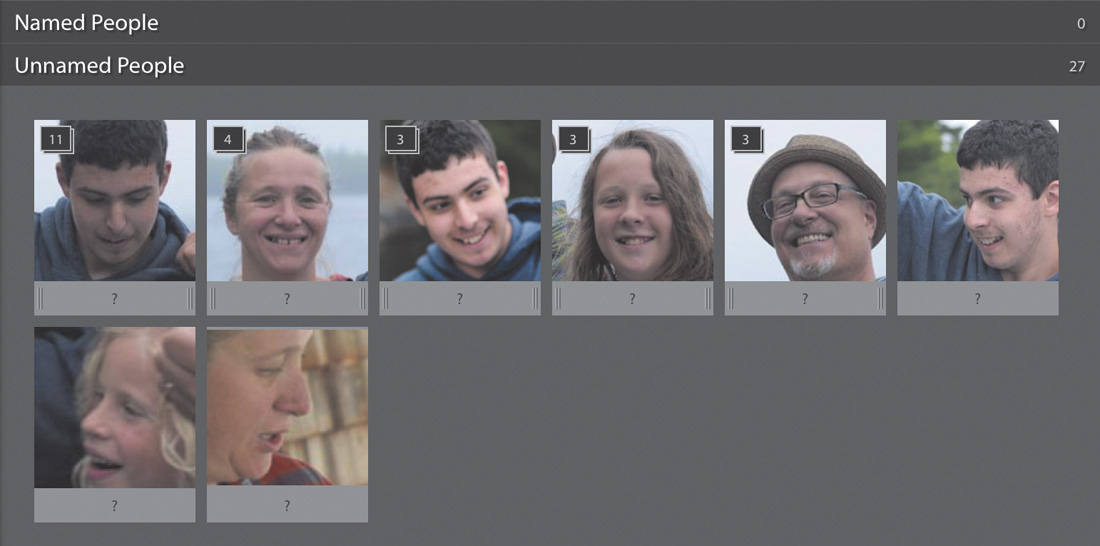
Sometimes it does a great job, and sometimes it misses faces completely or inserts odd things it thinks are faces. From here, it is your job to tag the faces with names, weed out wrongly tagged photos, and tag any faces that were missed. Let’s start with assigning names to found faces.
Assigning Tags
Under each unnamed face is a question mark if Lightroom doesn’t recognize the face. As you tag more and more faces, Lightroom begins to learn who is who, and it will suggest names to help speed the process along. The names you apply to faces are very much like the keywords you just learned about, except they are called person keywords and it is into the pool of person keywords that Lightroom dips to suggest names for the faces it finds.
I created a new catalog for these photos so that I could show you this from a clean slate. When you begin, I suggest you create a parent keyword called PEOPLE that you can use to store all of your person keywords. Create that tag just as you would any other keyword (I disabled all export options). Once it’s created, right-click that tag and choose Put New Person Keywords Inside this Keyword from the context menu. An asterisk will appear on that keyword to denote its role (Figure 5.27).

Note
For privacy reasons, the names shown are fictional.
Another factor to consider is how to create your people name tags, keeping in mind that the Keyword List panel sorts alphanumerically only. If you use the conventional “[first name] [last name],” then the people tags will sort by first name. If you want to keep people with the same last name together, you might consider using “[last name] [first name].” Remember that you can have spaces inside keywords, but not commas (as most programs use commas to separate keywords). For the example, I opted for [last name] [first name], but you need to figure out what works best for you.
Once you know how you want to proceed, you can begin to assign names to each face (Figure 5.28). For example, starting with my son, I entered his name below the photo and pressed the Enter key to apply it. Doing this moved his stack of faces up to the Named People section and added his name under PEOPLE in my keyword list. Continue adding names to faces until the Unnamed People section is empty. As you begin to type, Lightroom’s auto-completion function tries to speed things along.
Drawing Face Regions
To ensure that Lightroom has found all of the faces in a set of photos, I like to go through each photo looking for face regions. To do this, while still in People view, double-click the first photo in the Filmstrip. Now you can see the entire photo and the face region that Lightroom found on that first photo, along with the name of the assigned tag (Figure 5.29).
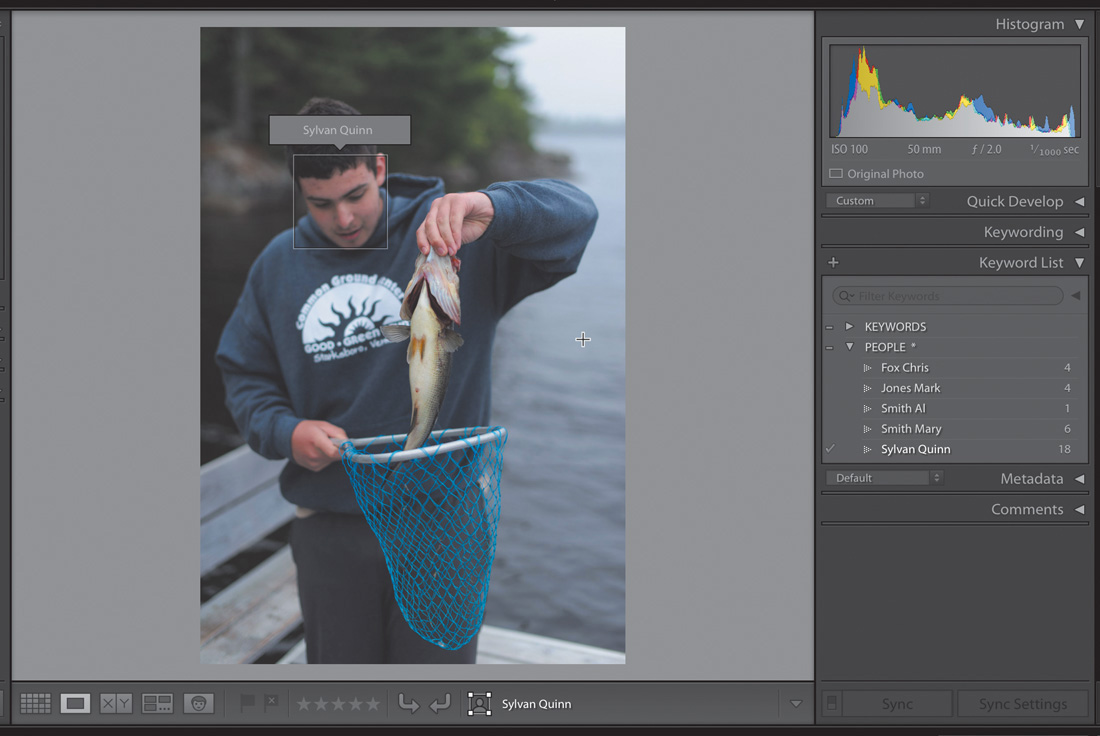
You can then use your arrow keys to move through each photo in that shoot and verify that all faces have been found. If you come to a photo that has a face that Lightroom didn’t find for some reason, then you can manually draw the face region by dragging a rectangle over the face. This can happen if the person’s face was too much in profile or somehow obscured (like in (Figure 5.30) or if Lightroom just missed it.
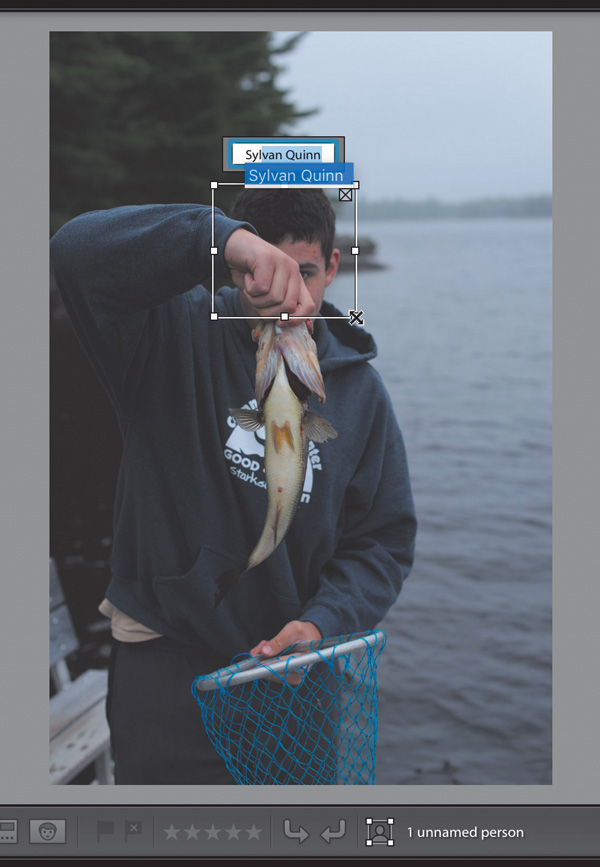
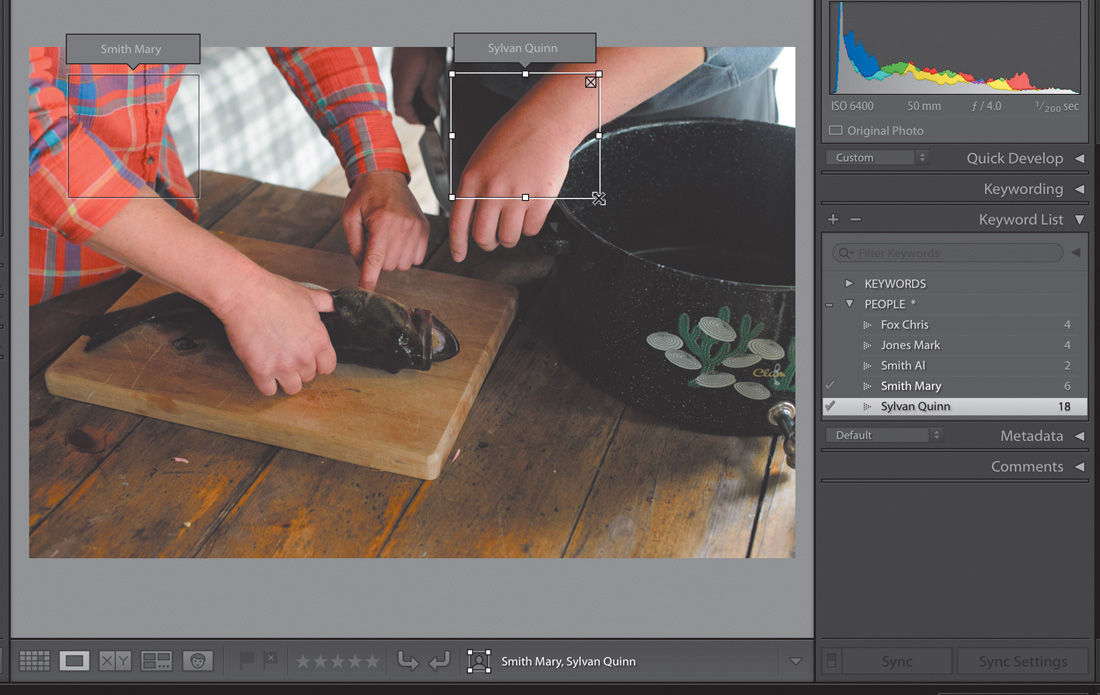
While you can manually tag photos to add people tags, those tags don’t get factored into the algorithm Lightroom uses to learn whose face is whose, so you don’t even have to tag the person’s face to tag someone (Figure 5.31). That way, you don’t risk confusing Lightroom by manually tagging someone’s hand or the back of his or her head, but you still have the benefit of finding the person later.
Moving Forward
That’s the basics of tagging faces, but I want to leave you with a few tips to speed up the process. When you have multiple photos of the same person that you recognize but that Lightroom does not automatically group together, you can select each result in the Unnamed People section and then just apply the tag to one photo to tag them all. Alternatively, you can drag and drop those faces onto a tagged face in the Named People section to apply that tag (Figure 5.32).
As Lightroom learns faces, it will display the name under the photo, and you can click the checkmark that appears to apply that tag (Figure 5.33).
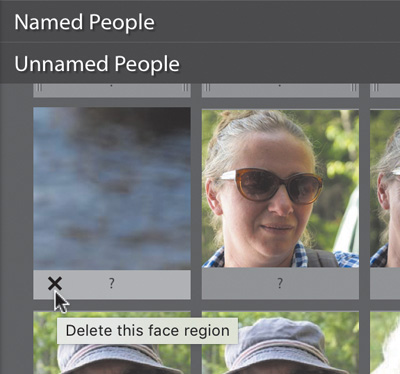
If Lightroom comes up with something that is clearly not a face, or perhaps it is a face of some random person in a crowd that you don’t want to name, you can click the X under the photo in the Unnamed People section to remove the face region (Figure 5.34).
When you are done tagging faces in your photos, you can start to tag your photos to locations.
Tying Photos to Locations
The Map module offers a number of cool and useful ways to interact with, organize, and view your photos whether you travel the world or just around your own town.
It used to be that adding GPS data to photos was left to diehard gear lovers, but these days it is hard to find a new communication device that doesn’t include both a camera and a GPS chip. More and more cameras have GPS tracking built in, and GPS add-on accessories for DSLRs are becoming more mainstream. Lighroom’s Map module provides a great interface for visualizing where your photos with embedded GPS data were taken, and it includes a number of ways to add GPS and location data to other photos.
Finding Photos with Geolocation Data
While on a photo workshop in Death Valley, I forgot my handheld GPS device at home. I was, however, relieved to find that the GPS in my iPhone was able to embed GPS coordinates in photos even when I was way out in the middle of the Racetrack (which truly is in the middle of nowhere). While walking across the hard, cracked earth of the playa, I spotted a set of small animal tracks embedded in the dried mud and snapped a photo with my phone. (Figure 5.35) shows that photo in the Library module. Notice the pin icon in the lower-right corner of the thumbnail? That means the photo has embedded GPS data. You can also expand the Metadata panel, set it to EXIF view, and see the GPS coordinates (and altitude if your device records it).
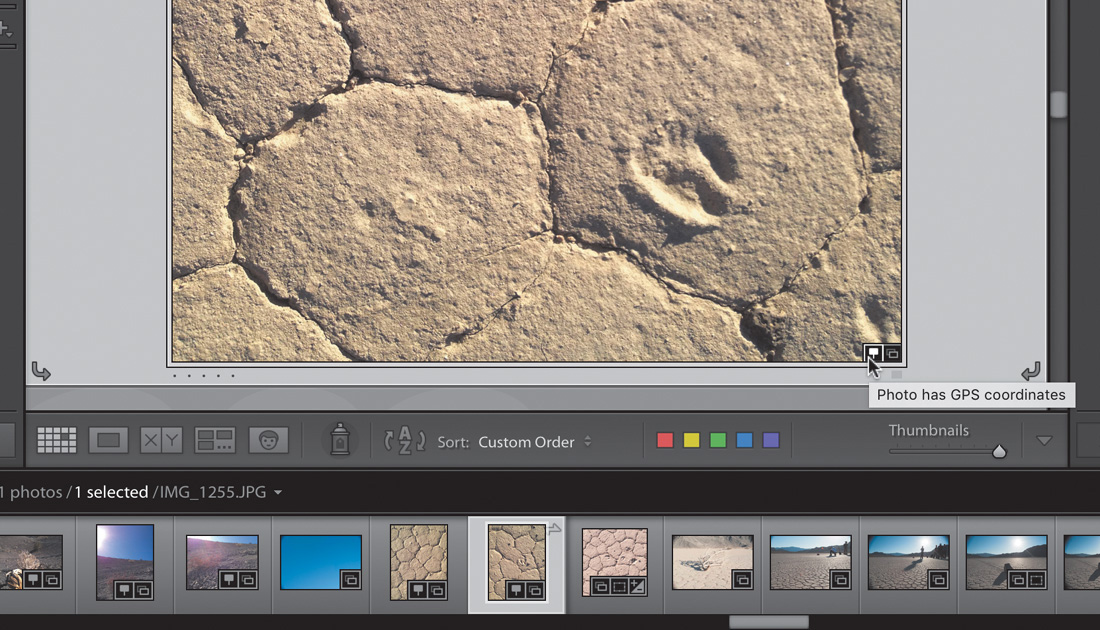
A single click of the pin icon or the arrow next to the GPS field of the Metadata panel will take you to that photo’s location in the Map module (Figure 5.36). Note that if you hold the Alt key (Mac: Option key) and click either of those buttons, your default web browser will open to that location in Google Maps. The Map module uses the Google Maps API, so you need to have an Internet connection to use the Map module.
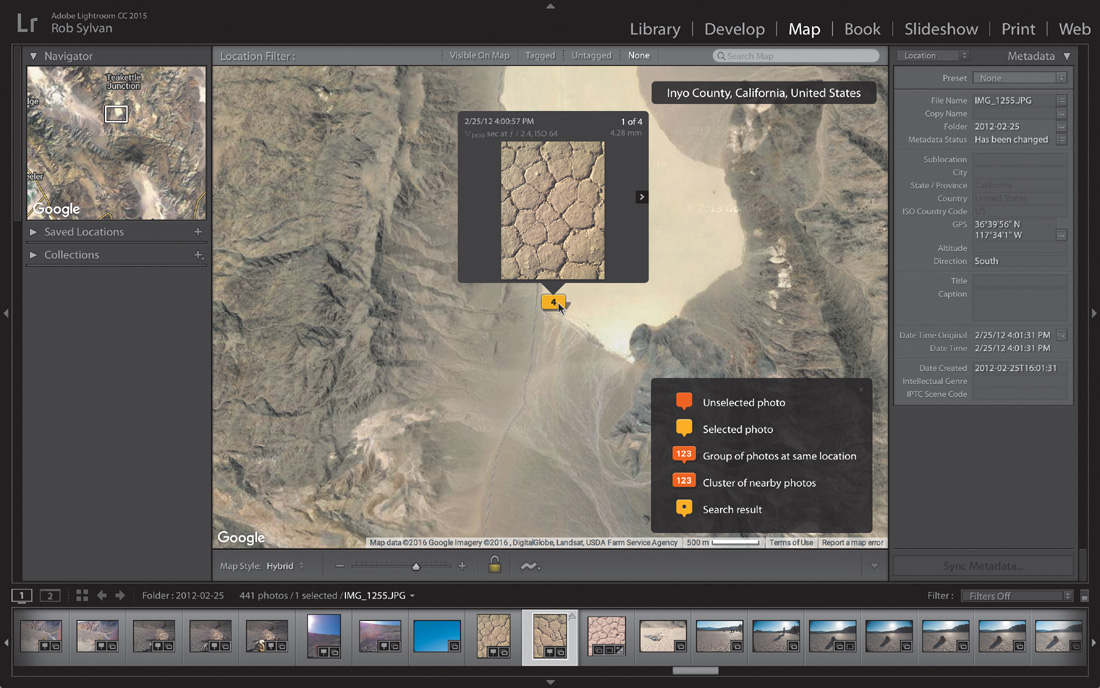
Once in the Map module, you can change the view of the map via the View menu or the Map Style drop-down in the toolbar. The toolbar contains a Zoom slider to zoom in or out on the map, but you can also do this with the scroll wheel on your mouse or the – and + keys. Holding the Alt key (Mac: Option key) enables you to zoom in by dragging out an area on the map.
Manually Placing Photos on Map
My iPhone photos were automatically placed on the map using the embedded GPS coordinates, which provided a handy reference for me for the rest of the photos from that location. You also can use the Location Filter bar (above the map) to quickly filter out the photos in the Filmstrip to just the photos visible on the map, just the photos tagged with GPS data, or just the photos without a GPS tag, or you can set it to None and reveal all the photos. By clicking Untagged, you can easily find the rest of the photos needing to be tagged and drag them from the Filmstrip onto the desired location on the map, which will add the GPS coordinates to those photos as well
(Figure 5.37).

The first time you import photos with GPS coordinates or add GPS coordinates to photos, Lightroom will prompt you about enabling reverse geocoding (Figure 5.38).
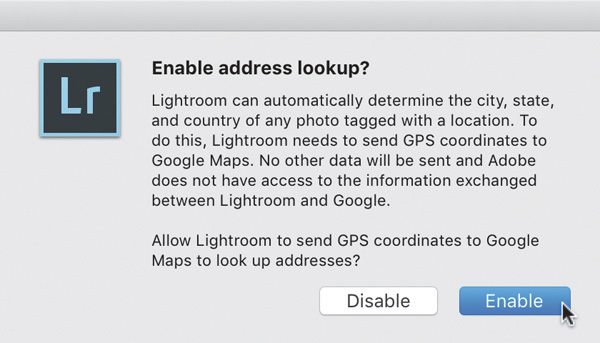
Figure 5.38 You can decide whether you want Lightroom to look up locations based on the coordinates.
When reverse geocoding is enabled, Lightroom will use the GPS coordinates to automatically fill in other location information (if it can find it) in the respective field of the Metadata panel (Figure 5.39). To commit the reverse geocoded location names, you need to click the label for each field and accept the input (do this with all selected photos for the same location to apply the geocoding all at once). You can, of course, manually type in location information too.

You can also search the map for specific locations using the Search field on the Location Filter bar. This provides another easy way to manually add your photos to a specific location or just view previously geocoded photos at that destination.
Working with Tracks
Note
If you forget to change your camera’s date and time, you can use Lightroom’s Metadata > Edit Capture Time function to adjust the date/time stamp of your photos.
If your camera doesn’t have a built-in or add-on GPS unit and you don’t want to manually drag and drop your photos onto the map, you might consider using a GPS device that can save a tracklog. I’ve been using an old handheld Garmin 60CSx for years, and (when I remember to bring it) I just tuck it in the outside pocket of my backpack while I’m out shooting for the day. There are also a growing number of GPS apps for mobile phones that can save a tracklog file. The most important aspect of using a device like this is to synchronize the date and time in the unit with the date and time of your camera before you start shooting. Here’s how to marry the GPS data from your tracklog to your photos in the Map module:
1. Save the tracklog from your GPS device as a GPX file (the GPS Exchange Format is an XML document containing the GPS coordinates and the date/time stamp in a standardized format Lightroom can understand), and transfer it to your computer.
2. Select the photos you want to geocode, and switch to the Map module. I find it easiest to put the desired photos in a collection first.
3. Go to Map > Tracklog > Load Tracklog, or click the Tracklog icon in the toolbar, to access the Load Tracklog menu.
4. Use the Import Track File dialog to navigate to and select the desired GPX file for that shoot.
5. With all of your photos still selected, go to Map > Tracklog > Auto-Tag Selected Photos. Note that if your camera was on the correct time but the GPS device was in a different time zone, you can use the Map > Tracklog > Time Zone Offset to sync it with your camera.
Lightroom will then use the date/time stamp in each photo to associate the matching GPS coordinates contained in the GPX file for that same date and time and show them on the map along with the route contained in the tracklog (Figure 5.40). This is much faster and more accurate than doing it manually.
