2. Getting Oriented to the Library Module and Importing

When you open Lightroom, remember that you are really opening a catalog file. When you subsequently work with your images, you are accessing and changing the data contained within that catalog. Lightroom’s import process is the gateway your photos must pass through to be recognized by the catalog. Think of it like a cocktail party: Your photos are introduced to the catalog first, just like you would be introduced to the party’s host when you arrive, and then everyone goes on to have a good time later.
During the import process, Lightroom creates a new database entry for every photo and fills that entry with the information contained in each photo’s metadata, as well as with each photo’s filename and storage location on one of your disk drives. That is the sole purpose of importing. Once Lightroom has been introduced to each photo, you can go on to access those photos inside each of Lightroom’s seven different modules, including the all-important Library module.
Before we can get into the ins and outs of the import process, however, you need to have a good understanding of the role of the Library module. The Library module is really the hub of your Lightroom experience and where you complete the file management tasks that compose a lot of your post-processing workflow—making selects, deleting rejects, batch processing, applying keywords, organizing into collections, renaming, applying metadata, and so on. It is from the Library module that you’ll launch the Import screen, and it is to the Library module you will return after the importing is done. Once you get oriented to the Library module, the different ways it can be used to view your photos, and how you can customize the interface to suit your workflow, we’ll dive into the import process itself.
The Library Module’s Interface
A few core interface elements and behaviors are consistent across all of the modules in Lightroom. Although this book is primarily focused on tasks related to the Library module, this tour of that module’s interface covers features that apply in other modules too (Figure 2.1).
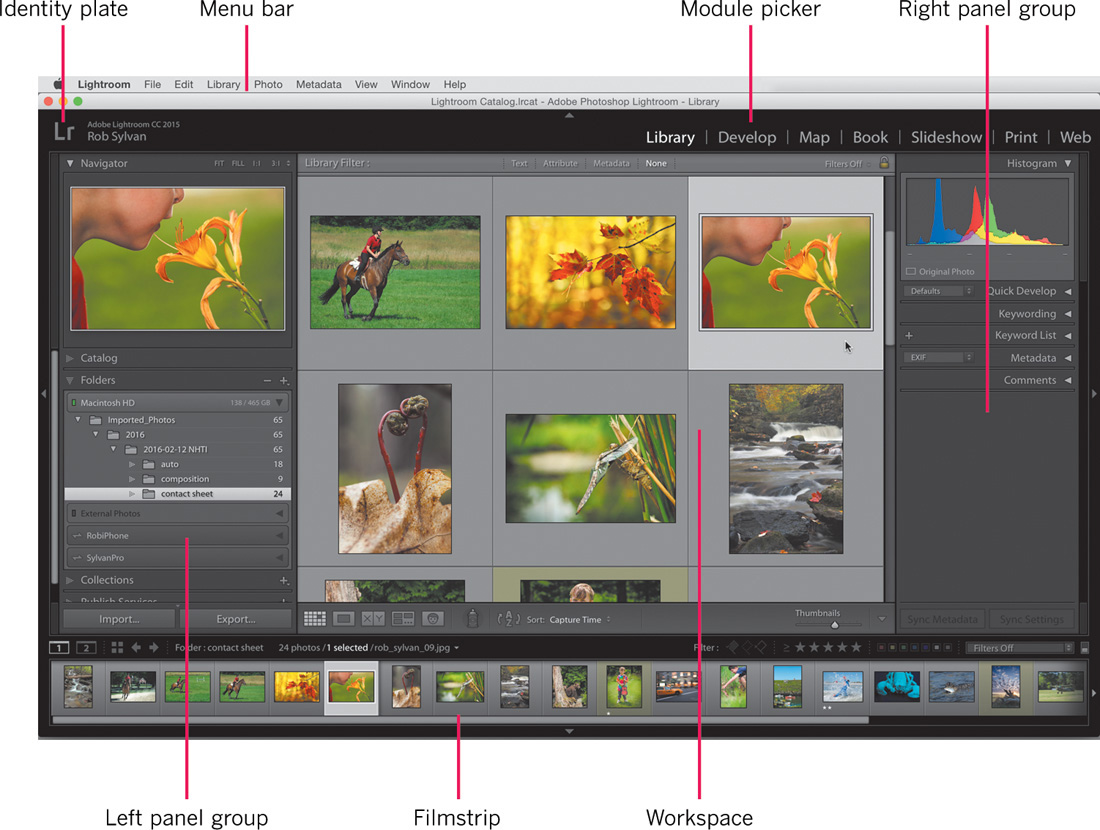
Figure 2.1 The Library module contains all the tools you’ll need to manage your photo library over time.
Menu Bar
Across the very top of the screen in all modules is the main menu bar, which is where you can dive into the various commands that are related to the module you are in and to Lightroom as a whole. This is also where you see one of the few differences between how Lightroom appears on a Mac versus on Windows. On a Mac, there is a Lightroom menu, which the Windows version lacks. When you run Lightroom on a Windows system, the Edit menu contains most of the commands that appear under the Mac’s Lightroom menu. I’ll highlight this anytime such differences occur. Additionally, each system’s interface has unique buttons for closing the current window, minimizing the window, or zooming the window. The Mac version uses red, yellow, and green buttons, respectively, on the top left of the interface (Figure 2.2), whereas the Windows version uses three buttons on the top right of the interface (Figure 2.3).

Figure 2.2 Here are the close, minimize, and zoom buttons on a Mac.
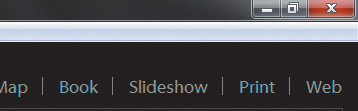
Figure 2.3 These are the minimize, maximize, and close buttons on Windows.
I draw your attention to these minor differences because they are the source of some of the most common questions I hear. Some Lightroom users are not familiar with the other operating system, and they get thrown off when they see the alternate controls depicted in books and videos. Those buttons are also hidden in Full Screen mode (which we’ll cover in just a bit), and that causes a bit of confusion too. I use Lightroom in Full Screen mode 99 percent of the time, so you won’t see the window sizing controls much in this book.
Identity Plate and Module Picker
At the top of the Lightroom interface itself are the identity plate (on the left) and the Module Picker (on the right). By default, the identity plate shows the version of Lightroom you are using, and it may also display progress meters or other information when Lightroom is performing some task (Figure 2.4).
The Module Picker is just a series of labels that act as buttons to navigate between Lightroom’s modules. The highlighted label indicates which module you are in.
Left Panel Group
On the left side of the interface, you’ll typically find the panels that give you access to your photos (the Catalog, Folders, Collections, and Publish Services panels in this module) or display the active or most selected photo (Navigator). The chapters that follow take a much closer look at the Folders and Collections panels. At the bottom of the left panel group, take particular notice of the Import and Export buttons, which launch the Import screen and the Export screen, respectively.
Right Panel Group
On the right side of the interface are the panels that relate to the tools and purpose of the module in which you are currently working. In the Library module, you’ll find the Histogram, Quick Develop, Keywording, Keyword List, Metadata, and Comments panels on the right, but each module displays a unique set of panels. At the bottom of the right panel group are the Sync Metadata and Sync Settings buttons, which help you quickly apply metadata and develop settings from one photo to many others. You’ll learn to use many of these panels and functions in later chapters.
Filmstrip
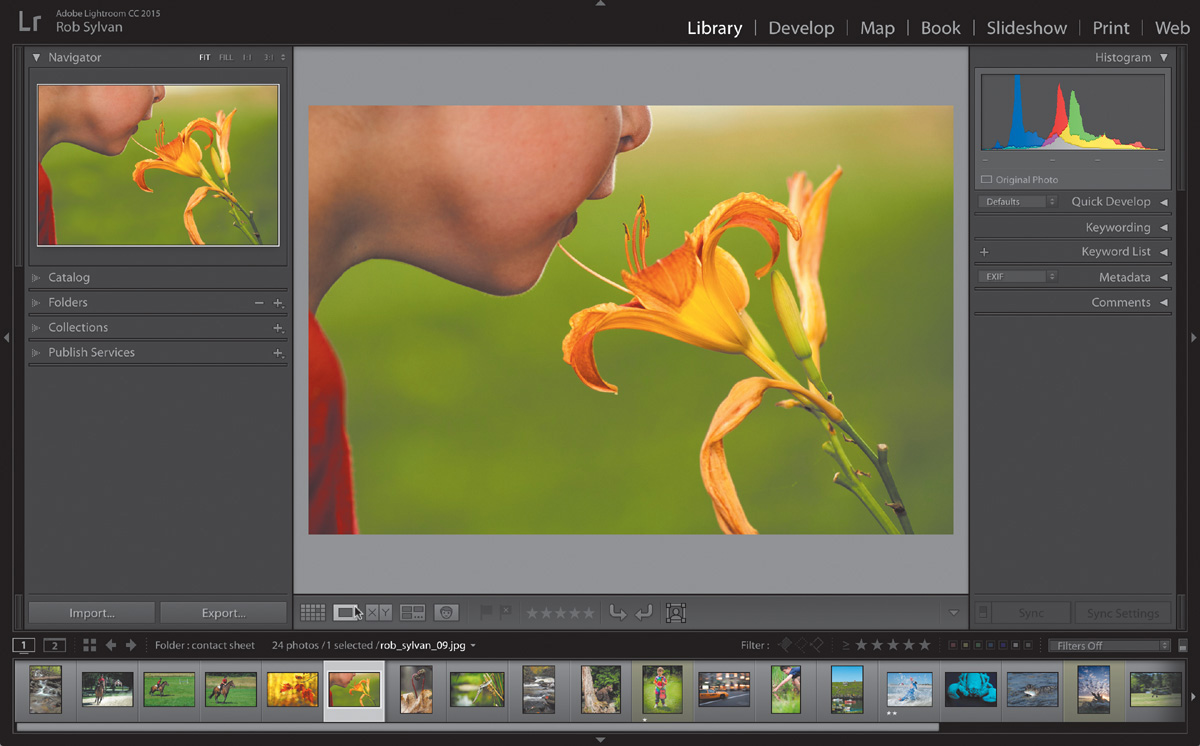
Along the bottom of the interface is the Filmstrip, which displays all the photos in the current view, whether you’re viewing a folder, a collection, search results, or your entire library. The Filmstrip is consistent throughout all modules, just like the identity plate and Module Picker at the top. You can use it to select individual or multiple photos, as well as see at a glance how many photos are selected and the source you are currently viewing (Figure 2.5).

Figure 2.5 The current view is a folder named contact sheet, containing 24 photos. One photo is selected: rob_sylvan_09.jpg.
That path is also a clickable link to other quick routes to your photos (Figure 2.6).
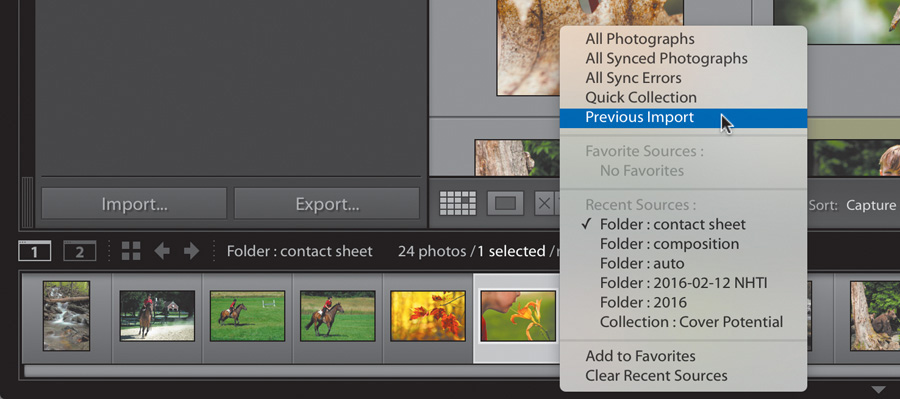
Figure 2.6 Clicking the path in the Filmstrip opens a context menu that provides easy access to recently visited sources, the previous import, the entire library, and more.
Main Workspace
In the center of it all is the main workspace where your photos are displayed. For example, Figure 2.1 uses Grid view (more on the other views coming up). When in Grid view, Lightroom displays a bar across the top of the thumbnails: the Library Filter bar, which can be used to control which photos are visible based on your filter settings (Figure 2.7); you’ll put the Library Filter bar to use in Chapter 8.

Figure 2.7 The Library Filter bar is a powerful tool for displaying only photos that match specific criteria.
At the bottom of the workspace is the toolbar, which displays a set of tools relevant to the module you are in at the time (Figure 2.8). You can configure which tools are displayed by clicking the disclosure triangle on the far right of the toolbar. The toolbar is notorious for disappearing without users knowing, so keep in mind that pressing the T key shows and hides the toolbar if you need to bring it back or hide it.
Now that you’re familiar with the module in which we’ll be spending most of our time, take a closer look at the options for viewing your photos in the Library module.
Library View Options
The most popular way to view your photos in the Library module is Grid view, shown in the last section, but Lightroom offers four other view options:
![]() Loupe view
Loupe view
![]() Compare view
Compare view
![]() Survey view
Survey view
![]() People view
People view
You can switch between each view by using the view buttons on the toolbar (Figure 2.9), but learning the keyboard shortcuts is much faster. If you hover your cursor over each button, you’ll see the name of the view and its shortcut in a tool tip. Each view is displayed within the main workspace.

Grid
When you need to see your photos as a series of thumbnails, Grid view is the place to go. Grid view is great anytime you need to do something to or with multiple photos at once, such as selecting multiple photos to export as copies, to move to a new folder, to apply the same keywords to, to apply the same preset to, and so on.
The toolbar offers a slider for increasing or decreasing the size of the thumbnails, but here again, the + and – keys on your keyboard are a faster way to do the same job.
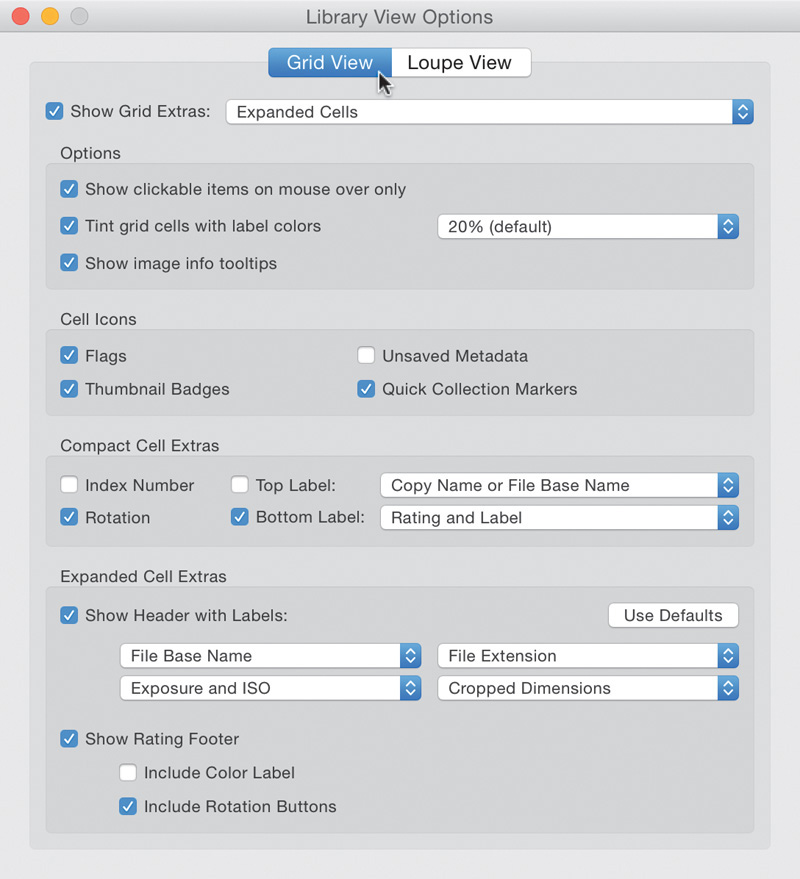
You can configure what information (if any) is displayed on the thumbnails by choosing View > View Options and configuring the Grid View tab of the Library View Options dialog box (Figure 2.10). You can cycle through each Grid view style by pressing the J key.
Here are a few more tips for working in Grid view:
![]() To select all photos in Grid view, press Ctrl+A (Mac: Command+A).
To select all photos in Grid view, press Ctrl+A (Mac: Command+A).
![]() To select a contiguous group of photos, select the first photo and, while holding the Shift key, select the last.
To select a contiguous group of photos, select the first photo and, while holding the Shift key, select the last.
![]() To select a non-contiguous batch of photos, hold the Ctrl key (Mac: Command key) while you click each thumbnail.
To select a non-contiguous batch of photos, hold the Ctrl key (Mac: Command key) while you click each thumbnail.
![]() To change the way the thumbnails are sorted, use the Sort menu in the toolbar or choose the View > Sort menu.
To change the way the thumbnails are sorted, use the Sort menu in the toolbar or choose the View > Sort menu.
These tips work in the Filmstrip as well.
Loupe
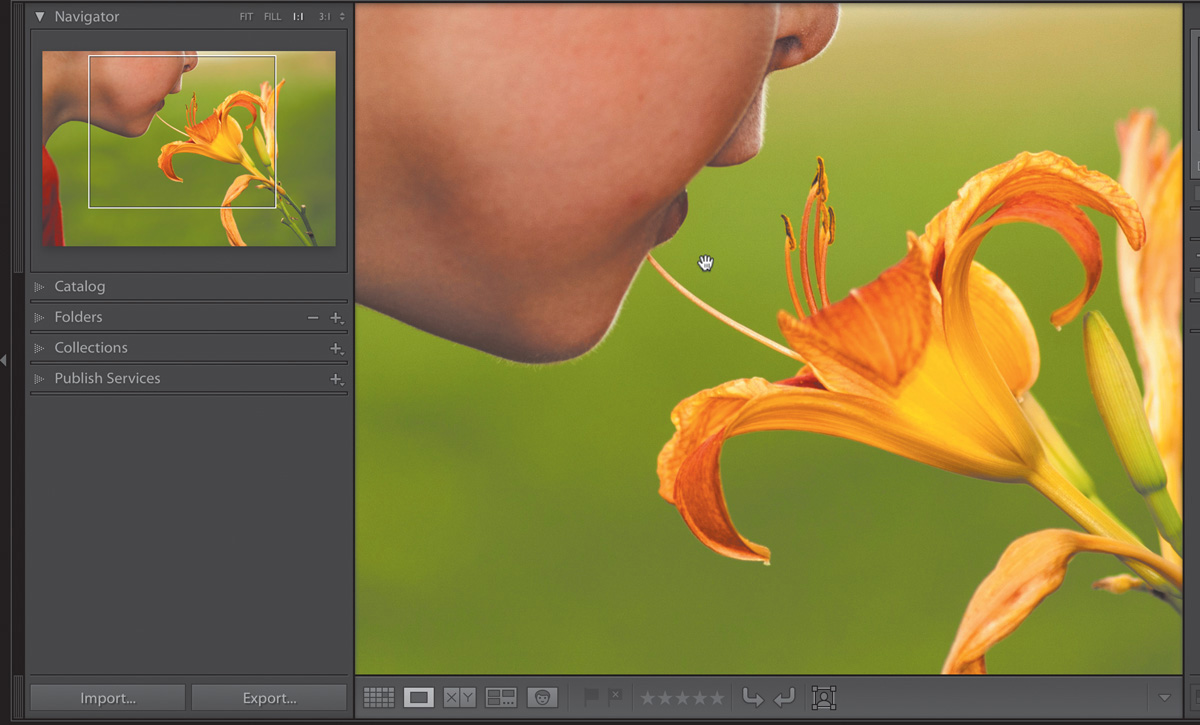
Thumbnails are useful for a lot of jobs, but sometimes you just need to see a large version of a single photo, and that is where Loupe view comes in handy (Figure 2.11). To switch to Loupe view, you can use the button in the toolbar or press the keyboard shortcut (E). In addition, if you are in Grid view, you can double-click any thumbnail to switch to viewing that photo in Loupe view. When you’re in Loupe view, any work you do is applied to the active photo only, even if you have multiple photos selected in the Filmstrip.
Once in Loupe view, you can click the photo to zoom in and examine it up close. While zoomed in, you can drag to pan around within the photo. The Navigator panel has a role here too. Notice that while you’re zoomed in to a photo, a white rectangle appears in the Navigator, indicating the zoomed area you see in the workspace (Figure 2.12). Drag that white rectangle in the Navigator to pan around the photo. Along the top of the Navigator panel, you can set the zoom level, from Fit (fits the entire photo in view) to Fill (fills the workspace with the photo) to 1:1 (zoomed to 100%) to 3:1 (300%), or click the double-headed arrow to choose another level (it goes up to 11!).
Loupe view has its own way to display information about your photos, which is controlled by the same Library View Options dialog box that Grid view uses (Figure 2.10)—except you click over to the Loupe View tab. The information is displayed as an overlay on your photos, which you can cycle by pressing the I key.
Compare
Sometimes viewing a single photo is not enough to help you make a decision, and this is when Compare view comes into play. Imagine you have a series of similar images and you want to compare one against the other to determine which was the best of the bunch. I usually start by making my selection in Grid view and then press the C key to enter Compare view, but you can also make your selections from the Filmstrip after you are in Compare view.
Compare view provides a side-by-side view of the two most recently selected photos. The active photo is on the left (referred to as the select and indicated by a white diamond on its Filmstrip thumbnail), and the photo you selected previously (referred to as the candidate and indicated by a black diamond on its Filmstrip thumbnail) is on the right (Figure 2.13).

By default, the zoom level of the select and candidate are locked together; if you zoom in to one, you zoom to the same point in the other as well, which is great for comparing at a 1:1 ratio. You can unlink that focus by clicking the lock icon on the toolbar. When working unlinked, you can click the Sync button on the toolbar to bring the other photos to the same level.
If you select more than two images to compare, use the arrow keys on your keyboard to scroll through the selected candidates one by one. If you find a better version of a photo and want to make it the new select, click the Make Select button in the toolbar to upgrade the current candidate to the select and demote the current select down to candidate (Figure 2.14).

Survey
When you want to view multiple photos at the same time and then refine your selection, head over to Survey view by pressing the N key (as in refiNe). I usually make my initial selection of photos in Grid view and then jump over to Survey. Lightroom fits each selected photo into the main content area by dynamically resizing the thumbnails to fill the available space, making them smaller or larger as more photos are added to or removed from the selection. For this reason, Survey view works best with a relatively small number of selected photos (Figure 2.15).
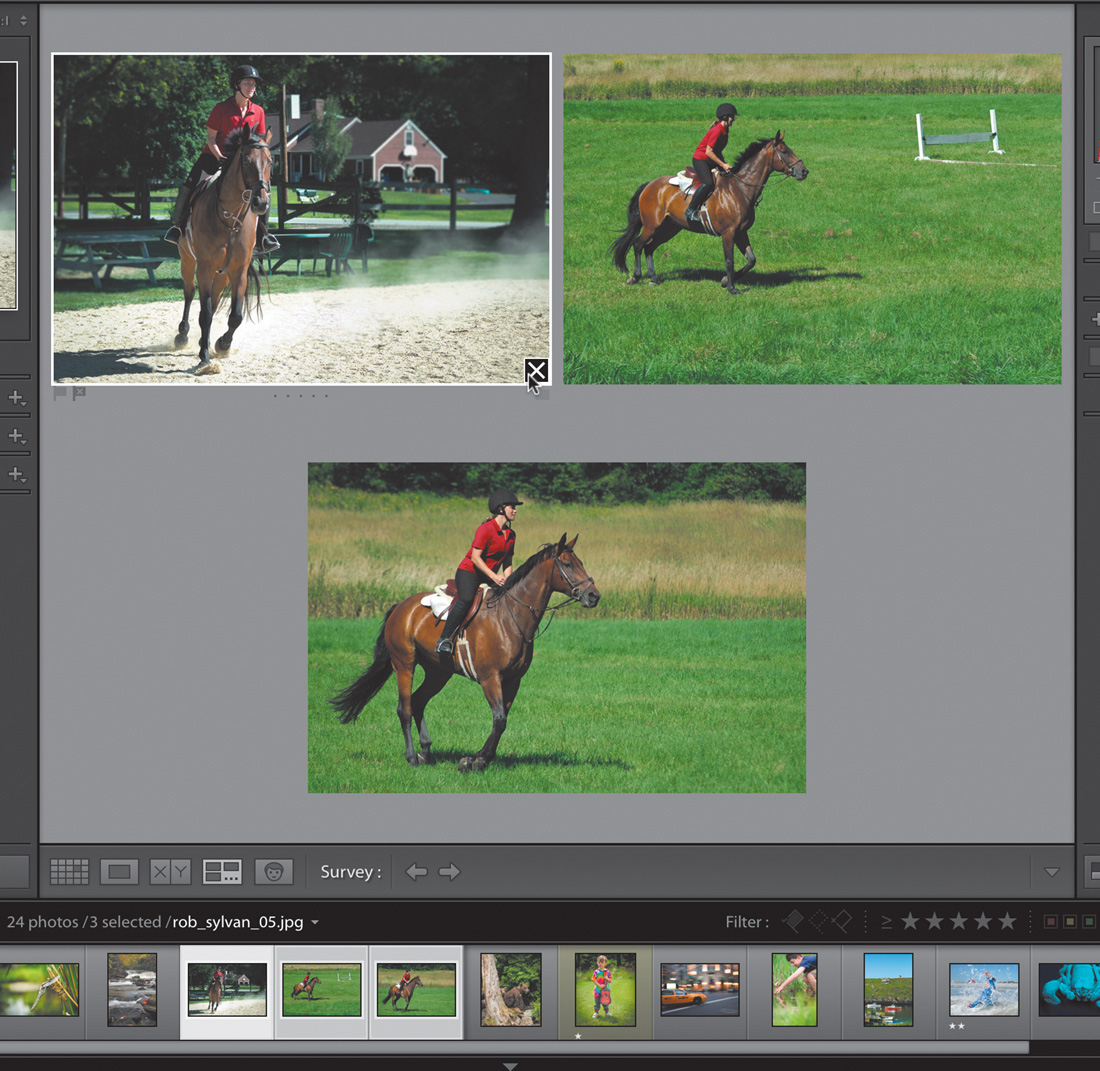
The key function of this view is the ability to narrow down your selection choices by simply removing photos from the view without worrying about removing the photos from the folder or collection. Just click the X under any photo to remove it from view. Lightroom will continue to dynamically resize the remaining photos to fill the screen.
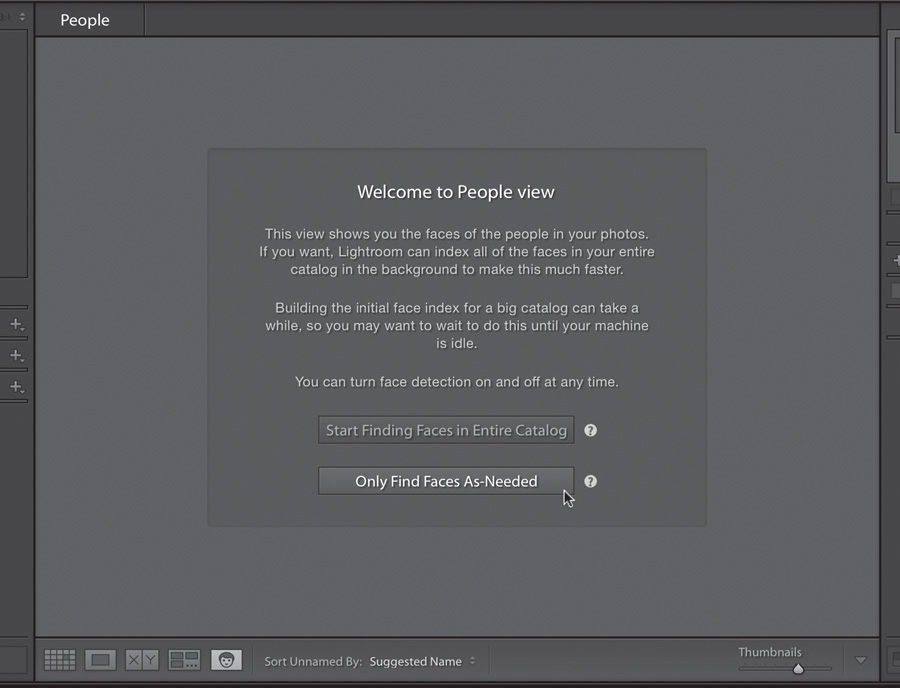
People
People view was added to Lightroom CC 2015/Lightroom 6 as part of its new facial recognition function for helping you find and tag the people photos in your library. Chapter 8 covers how to use facial recognition, but for now, just know that this view is where you will perform the task of assigning names to the faces Lightroom finds (Figure 2.16).
Customizing the Interface
Lightroom’s interface can be customized to maximize the space devoted to your photos, to make your workflow more efficient, and to hide the parts you just don’t use very often.
Screen Modes
You have the ability to switch between a few different screen modes. The modes are listed under Window > Screen Mode, along with their respective keyboard shortcuts. You can cycle through them one at a time by pressing Shift+F. Remember, too, that you can still access the menu bar while in Full Screen mode. Just move your cursor to the very top of the screen, and the menu bar will pop down automatically (Figure 2.17).

Tip
Full Screen Preview (press F) takes the selected photo to full screen, and it is handy when you want to clear all the clutter and see nothing but your photo filling the screen. Press F again to return to the full workspace.
Collapsing Panels
As mentioned, four main panels—the Module Picker, left panel group, right panel group, and Filmstrip—appear in all Lightroom modules. They can be manipulated as needed to allow you to control the size of the main workspace, where your photos appear, as well as to reveal only the set of tools required for the task at hand.
You can collapse any panel completely by clicking its outside edge; you don’t need to click the arrow on the outside edge. If you right-click the outside edge, however, you’ll get a context menu that gives you a greater level of control (Figure 2.18).
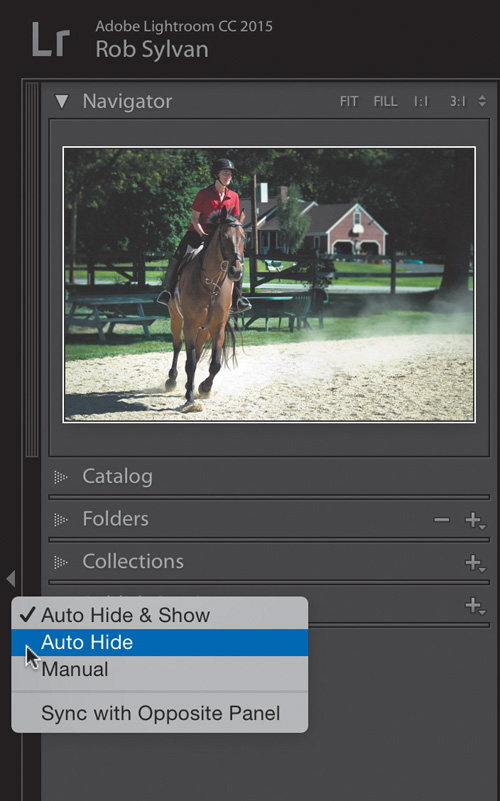
Figure 2.18 The context menu for the outside panels gives you additional options for showing and hiding the panel.
I find the default option of Auto Hide & Show a little annoying, as it automatically shows the panel if your cursor gets too close to the edge, which happens too often for my taste. I prefer to set each panel to Auto Hide. When you choose Auto Hide, the panel automatically collapses, and it won’t expand again until you manually click that panel’s outside edge. The panel will then appear at a low opacity and allow you to access everything inside it. As soon as you move your cursor off the panel, it automatically hides again. This really helps me maximize the space devoted to my photos.
Tip
If you need to refresh your memory on shortcuts, choose Help > Library Module Shortcuts to display all shortcuts onscreen. Note that the option name changes depending on the module you are in.
Of course, as with most things in Lightroom, there’s more than one way to get the job done. There are keyboard shortcuts for hiding and showing each panel group, and they’re all listed in the Window > Panels menu.
While you may most often want to collapse panels to get them out of the way, you can also drag the left or right panel’s inside edge inward to make it wider. I often make the right panel group in the Develop module wider to get a finer level of control on the sliders. Similarly, you can make the Filmstrip taller or shorter by dragging its top edge up or down, respectively. Note that if you make the Filmstrip too small, the icons that appear on the thumbnails will go away.
Now that you have a handle on how to manage the larger panels, take a look at what you can do with the smaller panels contained within the left and right panel groups.
Individual Panels and Solo Mode
To cut down on the amount of scrolling you do in a day, as well as to reveal only the tools you need for a given job, you can expand or collapse an individual panel by clicking its header (not just the disclosure triangle). As an alternative, Ctrl-click (Mac: Command-click) any panel header to expand or collapse all the panels on that side at once.
A really neat trick is to Alt-click (Mac: Option-click) any panel header to engage what is called Solo mode (Figure 2.19). With Solo mode enabled, you’re restricted to opening a single panel at a time within the larger panel group. This makes it very easy to switch between panels with a minimum of scrolling (if any). As soon as you expand a new panel, the last one you were using automatically collapses.

Figure 2.19 When Solo mode is engaged, the disclosure triangles on the panel header are filled with a dot pattern. When Solo mode is off, the triangles are solid.
Alt-click (Mac: Option-click) any panel header a second time to disengage Solo mode in that group. Note that although the Navigator, Histogram, and Preview panels within the various modules can be collapsed or expanded individually, they are not included in Solo mode or in the Expand All/Hide All commands.
Vanishing Panels
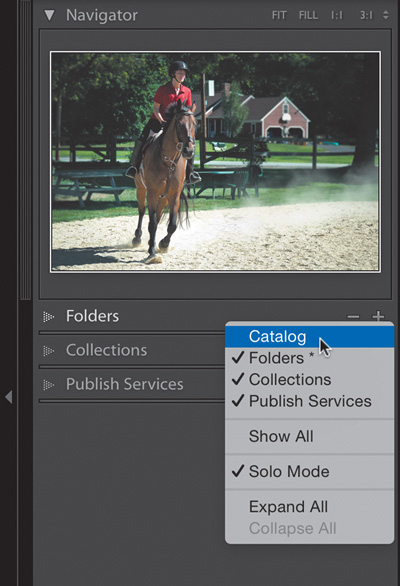
One panel option that most people seem to find by accident is the ability to completely remove a given panel from the panel group so that you no longer even see its header label. If you right-click any panel header—except the ones excluded from Solo mode—you can simply deselect any panel from the context menu that appears, and it will disappear from the group (Figure 2.20). Just re-select that panel in the menu to bring it back. You can also restore panels from the Window > Panels menu.
Lights Out
One last trick up the interface’s sleeve is Lights Out mode. Lights Out comes in three flavors: Lights On, Lights Dim, and Lights Off. Lights On is the default and what you’ll use all the time. Press the L key once to transition to Lights Dim, where the selected photos remain at full brightness but the interface dims. Press the L key again to transition to Lights Off, where the interface fades to black completely.
I love using Lights Off in conjunction with the Crop tool to get a real-time preview of the final crop. On the Interface tab of the Preferences dialog box, you can set the dim level and even change the Lights Out color from its default of black if you wish. Press L one last time to turn the lights back on.
Now that you’ve got a good handle on the role of the Library module, let’s turn our attention to the import process itself.
Importing Your Photos
Because the import process is the gateway through which all photos (and videos) must pass, Lightroom enables you to accomplish a few jobs via the Import dialog box as a way to save you time and effort. After all, one of the driving forces behind Lightroom’s creation was to make a photographer’s workflow more efficient.
To launch the Import screen, click the Import button at the bottom of the left panel group (Figure 2.21) or choose “Import photos and videos” under the File menu. Aside from creating a database record in the catalog for each imported photo, from the Import screen you can:

![]() Copy or move photos to a new destination on disk.
Copy or move photos to a new destination on disk.
![]() Copy and convert copies of the source raw photos to DNG format.
Copy and convert copies of the source raw photos to DNG format.
![]() Rename copied or moved photos.
Rename copied or moved photos.
![]() Copy photos to a second location as a backup of the memory card.
Copy photos to a second location as a backup of the memory card.
![]() Add common keywords to all imported photos.
Add common keywords to all imported photos.
![]() Apply develop settings to all imported photos.
Apply develop settings to all imported photos.
![]() Add common metadata to all imported photos.
Add common metadata to all imported photos.
And that’s not all! These are the most common tasks you’ll perform on a regular basis, but you can do a few other things, as you’ll learn in Chapter 8, which goes step by step through the import process in the context of a workflow. For now, however, I just want you to get oriented to the import options.
The way that these tasks get accomplished is through the settings and options on the Import screen (Figure 2.22) on the next page). There are so many options that some people think of it as a module unto itself!.
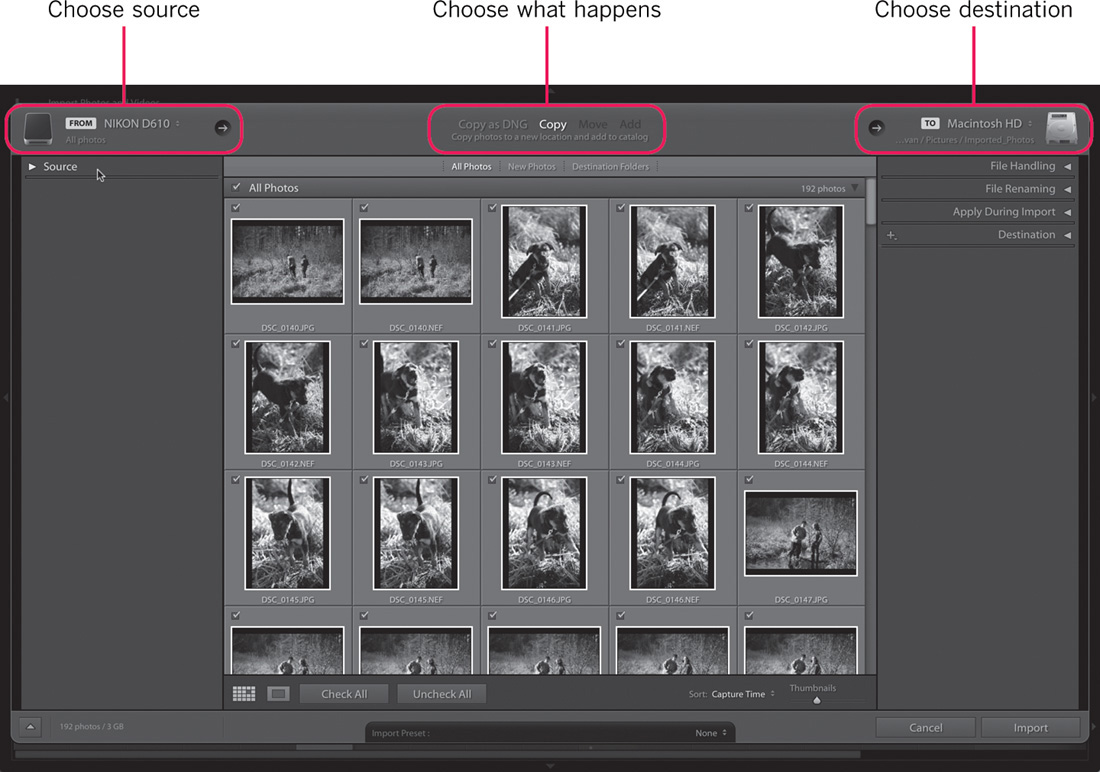
Figure 2.22 The Import screen contains all the tools you’ll need to import your photos into the catalog and perform a number of other tasks.
Like most things in Lightroom, the screen should be read from left to right and from top to bottom. Along the top you can see the basics of the import workflow, which starts with selecting the source for the photos (such as a memory card), followed by the action you want to take (copy, move, or add), and finally whether the photos are going to a new destination. That’s it in a nutshell. The panels on the left and right sides of the screen provide additional options you can choose to configure for each batch of photos you introduce to the catalog. All the photos contained in the selected source appear in the center area of the screen. Take a closer look at the options.
Choosing a Source
The location of the source photos is the primary factor in determining whether the import process will include copying or moving photos to a new location or whether it will just leave them where they currently reside. If you are importing photos from a memory card, then you have to choose to copy the source photos to your hard drive or copy and convert the copies to DNG.
Lightroom will not give you the option to move photos from a memory card. This is done for safety. If something were to go wrong during a move operation (such as a power failure or accidentally unplugging the card reader by kicking its cord), you could lose data. By using a copy operation, you know that your source files are safe even if something goes wrong with the copy.
If you are importing photos that are already on your hard drive, then you have the option to just leave them where they are and add the data to the catalog, or if you wish, you can copy or move them to a new location. The choice is up to you for how you want to organize your photos on disk.
In the Source panel in (Figure 2.23), for example, you can see under Devices a memory card named Nikon D610, and below that, in the Files section, other drives are listed (including the memory card since it is essentially just another removable drive).
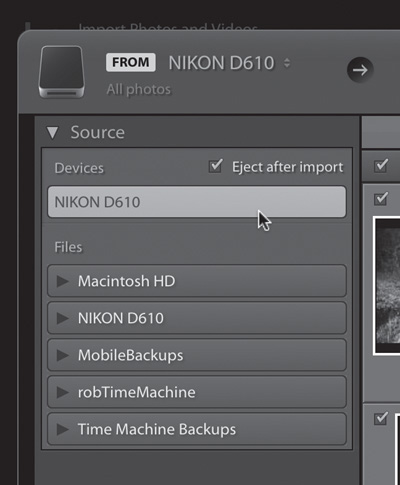
If I wished to select the photos on the memory card for import, I would select the memory card under Devices, which enables the “Eject after import” option in the Source panel and disables the Move and Add options at the top of the screen (Figure 2.24).
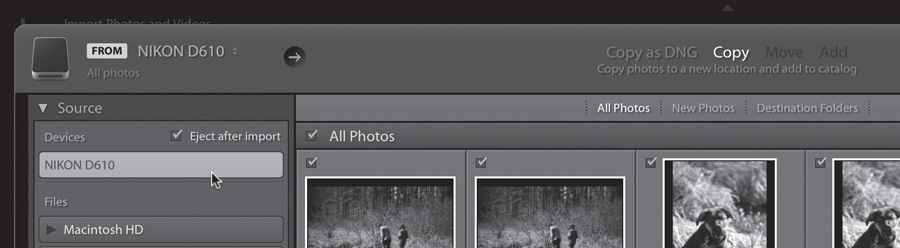
The Copy option is selected by default, but I could also choose “Copy as DNG,” which means that Lightroom would copy the photos from the memory card to my chosen destination, and once that was done, it would proceed to convert any raw photos to Adobe’s DNG file format. There are pros and cons to DNG, but in the end it is a personal choice. Keep in mind that you can always convert to DNG after import (under the Library menu), so you can take your time with this decision.
When you select a folder on your internal hard drive as the source, the process is a little different. In (Figure 2.25), I selected a folder on my Desktop as the source and a few things changed. First, notice that there is now an Include Subfolders checkbox in the Source panel, which allows you to select just a top-level folder and include all the photos contained within its subfolders. This is really helpful when you are first importing your entire existing library. Second, the option on the top switched from Copy to Add. The Add option tells Lightroom to simply record the photos at their current location and not to move or copy them to a new destination. This is reinforced by the fact that the Destination panel vanishes from the interface completely.
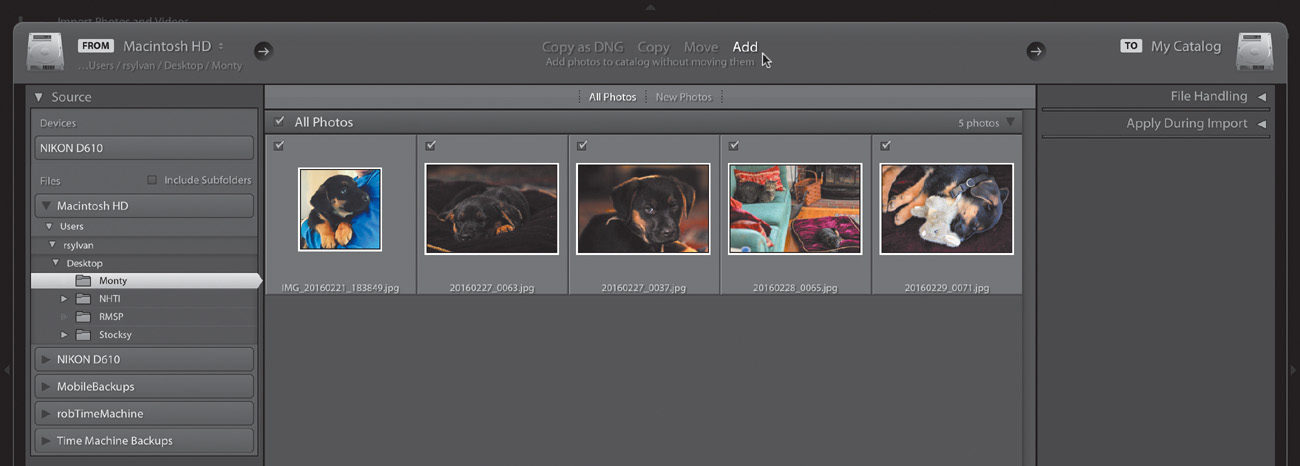
You could still choose the Copy or Move option if you wanted to, but my recommendation is to manually copy or move the photos to a final destination of your choosing before getting to this step. If you’re new to Lightroom, it will be a lot easier to copy and move files in the file browser you already know than to configure Lightroom to do it. Then, you can choose Add and know that the photos are already organized and located exactly where you want them.
Choosing a Destination
When you are not using the Add option—which, after you get your existing library imported into Lightroom, will be what you use most when importing new photos from your camera—the most important decision you need to make is where to tell Lightroom to put your new photos. This choice is configured in the Destination panel on the right side of the screen (Figure 2.26).
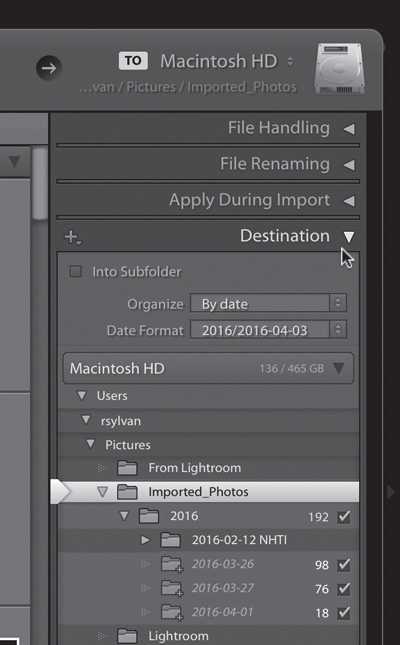
Figure 2.26 The Destination panel controls where your photos are placed as part of the import process.
I wish the Destination panel were at the top of the right side because it is so important and so many people miss it when they get started, so I’m showing it to you first. I switched my source back to my memory card and chose the Copy option at the top. That means I want Lightroom to copy the photos from my memory card to a destination I choose here in this panel. As I mentioned, Lightroom uses a date-based folder structure by default, and that is entirely controlled by the Organize drop-down menu at the top of the Destination panel (Figure 2.27).

When “By date” is selected, the Date Format menu right below it controls the way the date-based folders are created. Lightroom uses the date (and time) from each photo to create the folders, but the Date Format menu lets you control how you want those folders to look on your drive. For example, in (Figure 2.28) I selected the 2016/2016-04-03 option. Those dates are derived from the photos selected in the source, but that structure translates to a parent folder for the year, and within that, a subfolder based on the day each photo was shot. If my memory card contained photos from multiple days (and it does), then Lightroom would create a subfolder for each day. There is no right or wrong choice, as long as it makes sense for your folder structure.
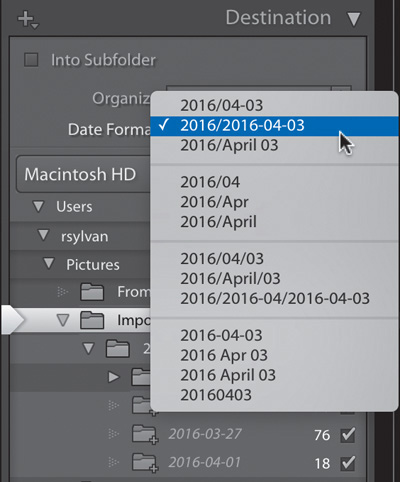
Figure 2.28 You can choose a number of folder structure formats based on the date the photos were taken.
What if you don’t want to use dates? Go to the Organize drop-down menu and choose “Into one folder” instead. Once that choice is made, the Date Format menu disappears, and Lightroom will simply copy all photos to the folder you select down below. OK, what if you want to create a new folder for a specific batch of photos? That’s what the Into Subfolder checkbox at the top is for. Let’s say I wanted to create a folder named “Hike to the Pond” for all the photos on this memory card and have that folder be inside my Imported_Photos parent folder. First, I would select the parent folder, then select Into Subfolder to access a field in which to enter a name for the subfolder, and then type the desired name (Figure 2.29).

Notice that down below my selected parent folder a new folder matching the name I entered is shown in italics. Italicized folder names mean that Lightroom will create those folders as part of the import process, but they don’t exist on the drive yet.
No matter which option you choose for your folder structure, you just need to be the one actively making the decision or else Lightroom will revert to its default behavior and place the copies in the Pictures folder. With your source and destination choices made, you can now turn your attention to the optional time-saving choices that exist in the other panels on the Import screen.
File Handling
The File Handling panel gives you the options to (Figure 2.30):

Figure 2.30 The File Handling panel can help with creating previews, backing up the memory card, and adding photos to a collection.
![]() Schedule the building of regular previews.
Schedule the building of regular previews.
![]() Create Smart Previews.
Create Smart Previews.
![]() Ignore duplicates—that is, photos in the selected source that have already been imported.
Ignore duplicates—that is, photos in the selected source that have already been imported.
![]() Make a second copy of the memory card, in a location different from what is chosen in the Destination panel.
Make a second copy of the memory card, in a location different from what is chosen in the Destination panel.
![]() Add the photos to a collection.
Add the photos to a collection.
Chapter 1 discussed previews in great detail, so suffice it to say that on the Import screen you can schedule the type of previews you want Lightroom to start creating the moment the import process is complete. In addition, you can choose to create Smart Previews right off the bat, which could be helpful if your chosen destination is an external drive that may often be disconnected (offline).
When you’re importing from a memory card, it may contain photos that were already imported. I recommend formatting your memory card after each shoot has been safely copied to a final destination and backed up, but sometimes we forget. In those cases, the Don’t Import Suspected Duplicates checkbox is there to prevent you from re-copying those previously imported photos to your hard drive; it is selected by default, and I suggest leaving it that way.
The sole purpose of the “Make a Second Copy To” checkbox is to give you a way to duplicate the memory card to a second location as a short-term backup solution. This is to give you time for your normal, full-system backup process (whatever that may consist of for you) to get around to including your new photos in the backup. The second copy made by Lightroom is not intended to be a long-term solution. When your photos exist only on a memory card, they are very vulnerable to loss or damage. After you copy them to your hard drive, they are duplicated once, which is great, but you probably want to format that card and go take more photos, and that results in having only one copy of your photos again. The “Make a Second Copy To” option is Lightroom’s way of letting you create two different copies of your memory-card photos in two different locations so that you can reformat the card knowing you have a temporary backup. After you select the checkbox, just click the path to change the destination to a different drive than the one chosen in the Destination panel. After the second copy is created, Lightroom never refers to it, changes it, or removes anything from it. It is up to you to manage those duplicates over time. My recommendation is to periodically delete them once your full system backup has all new photos included.
The final option, “Add to Collection,” is a convenience feature for adding the new photos to a collection. This can speed things up when you need it, but it is entirely optional. (Chapter 4 covers collections in more detail.)
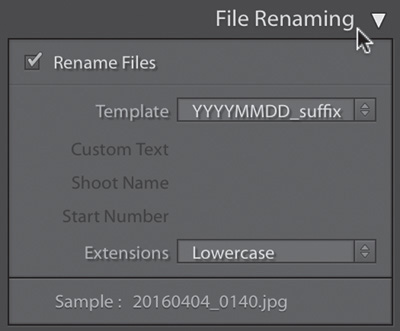
File Renaming
As you probably guessed, the File Renaming panel is all about options for renaming your new photos (Figure 2.31). This panel is visible only when a Copy or Move option is chosen at the top of the Import screen, because Lightroom can rename photos only as part of a copy or move operation. If you select Add, this panel (along with Destination) goes away. Chapter 3 examines file renaming and creating filename templates in great detail. For now, all you need to know is that if you choose to rename your photos during import, you can select an existing filename template from the drop-down menu or create a new template. Lightroom will use the selected template to rename your photos.
Apply During Import
Lastly, you have the option to apply a Develop preset, a metadata template, or keywords to all imported photos (Figure 2.32). Any of those things can be done or changed later, so this is strictly intended to save you time and get it done from the start.

You may not have many Develop presets when you are just starting out, but there may come a time when you have a preset (simply a one-click way to apply an adjustment recipe to a photo) that you want to apply to all photos during import. When that day comes, just select the preset from the Develop Settings drop-down menu, and it will give your imported photos a new starting point.
I do recommend adding a metadata template on import. Chapter 5 goes over how to create a metadata template and all that it can contain, but for now simply understand that it is a very convenient way to apply things like your contact and copyright information to every photo being imported. I apply a simple template containing that information to all my photos.
Chapter 5 also delves into keywording, but again, if a few keywords are common to all photos being imported, you can add them here to speed up the process or to help you more easily find the photos later.
Once you have the Import screen configured to your liking and you’ve double-checked your settings, just click the Import button at the bottom of the screen to start the process. From here on out, you will want to use Lightroom to do the file management tasks related to maintaining your photo library over time, which is the topic of the next chapter.