
3. File Management, Lightroom Style

Now that you understand the purpose of the import process, let’s look at the tools Lightroom provides to help you manage your photos and videos. When you use Lightroom to perform basic file management tasks, such as creating, deleting, and renaming files and folders, you keep your catalog in sync with those changes. Following the procedures outlined in this chapter will help you get these common jobs done while keeping your catalog in sync. Should you have been less than diligent in the past or in case an accident strikes, you’ll also learn how to reconnect the catalog to your photos and folders if they do get out of sync.
Understanding the Role of the Folders Panel
The Folders panel may be one of the most used panels in all of Lightroom, but it is also one of the least understood (Figure 3.1). This little panel packs quite a bit of functionality, and it puts a lot of data at your fingertips to help you manage your photos and keep tabs on your drives. The Folders panel is not, however, a file browser. It displays only folders that have been through Lightroom’s import process. Just like the photos that reside within them, folders do not appear in Lightroom unless they were introduced to the catalog first.
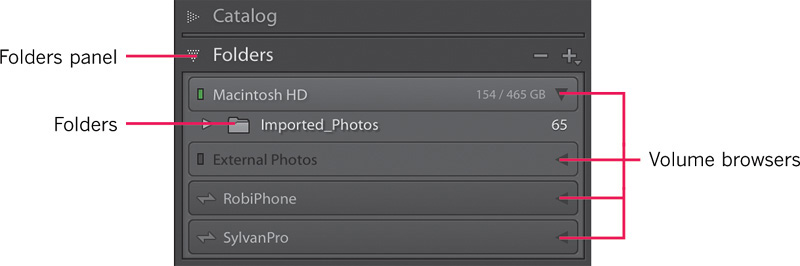
The Folders panel contains a volume browser for each drive that contains folders you have imported into Lightroom, and under each volume browser you will find all of those folders. In Figure 3.1, the volume browser for my Macintosh HD drive is expanded to show the top-level folder that has been imported into this catalog. Below that, the volume browser for my external drive is collapsed. Below that are volume browsers representing the mobile devices I have synced with Lightroom Mobile (see the sidebar “Volume Browsers for Lightroom Mobile”). Being able to expand or collapse each volume browser makes the Folders panel much easier to navigate, especially if you have multiple drives with multiple folders on each. Click a drive’s volume browser to expand it and see a listing of the folders on that drive that you have imported into Lightroom. Click it again to collapse it.
Remember that you will see only imported folders displayed in the Folders panel. You can import any number of folders and subfolders. A subfolder will nest under its parent folder (assuming you imported it as well) in the Folders panel listing, mirroring the folder hierarchy you see in your file browser (i.e., Finder or Windows Explorer) because you are looking at the same set of folders. Lightroom automatically displays your folders alphanumerically on each level of your folder hierarchy.
Although it may be tempting to import only the specific subfolders you need for a project, I find it preferable to import the top-level or parent folder that contains the subfolders where my photos are stored. This enables me to collapse that group of subfolders so that the list doesn’t run on forever, and it makes it much easier to move that entire tree of folders to a new drive if necessary—just drag and drop the top-level folder (which I show you how to do later in this chapter).
Volume Browser Indicators
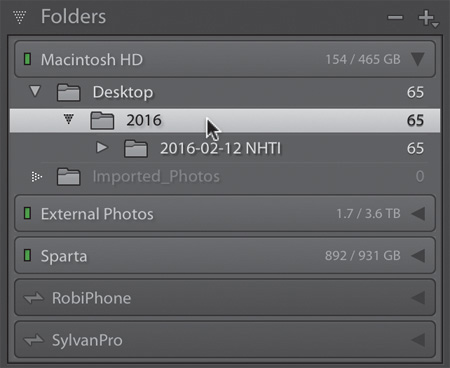
With a glance at the volume browsers you can determine a few useful facts about your drives. (Figure 3.2) shows the Folders panel with two volume browsers: one labeled Macintosh HD, for my Mac’s internal hard drive, and another labeled External Photos, for my external drive. A volume browser displays a drive’s name on a Mac; on a Windows system, you’ll see the relevant drive letter. A green indicator on the left of a volume browser indicates that the drive has ample free space, and the numbers on the right indicate the available space and total capacity of the drive. As you can see in Figure 3.2, my Macintosh HD drive has 154 GB free out of 465 GB. The External Photos drive is offline, as shown by the gray indicator and the faded name label. Because it’s offline, Lightroom can’t display how much free space it has. When I reconnect the drive to my computer and it comes online, the volume browser indicator will change from gray to green (more on this at the end of this chapter). As free space drops on a drive, the indicator changes color: to yellow when 10 GB remain, to orange when 5 GB remain, and finally to red when the disk has only 1 GB free. (For best performance, try not to let your drive get that full.)

Free space isn’t the only information the volume browser reveals. If you right-click a volume browser, you can choose to display the drive’s disk space, photo count, or status, or nothing at all (Figure 3.3). In addition, you can open that drive in Windows Explorer or Finder and even access additional information about it.

Figure 3.3 The volume browser provides important information about the drives where your photos are stored.
Show or Hide a Parent Folder
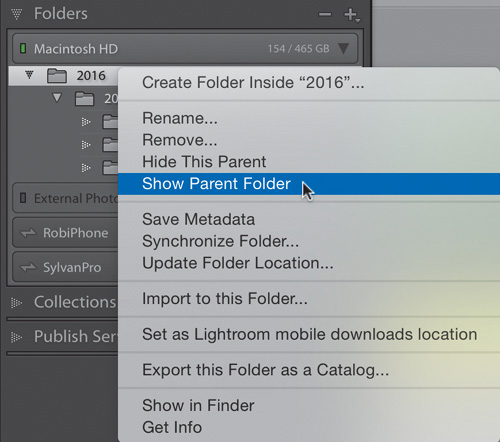
If you did yield to temptation and imported your photo subfolders without their parent folder, don’t worry. It’s not too late, because you can import the parent folder right from the Folders panel. Just right-click the topmost folder in the panel, and choose Show Parent Folder from the context menu that appears. Lightroom then automatically imports the parent folder, displays it in the Folders panel, and nests its subfolders underneath it. For example, in Figure 3.2 you can see that the top-level folder is named 2016. On my hard drive, however, I know that the 2016 folder is stored inside my Imported_Photos parent folder.
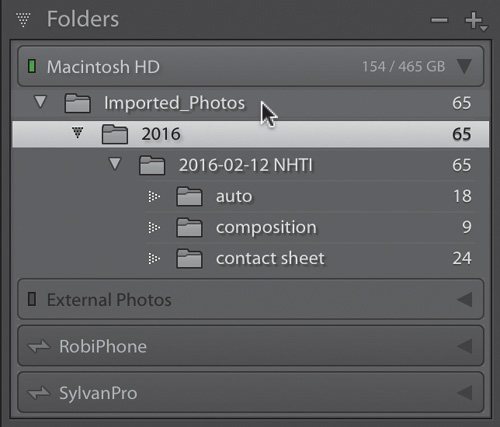
If I right-click the 2016 folder and choose Show Parent Folder (Figure 3.4), Lightroom adds the Imported_Photos folder to the panel and nests 2016 underneath, just like it exists on my drive (Figure 3.5).
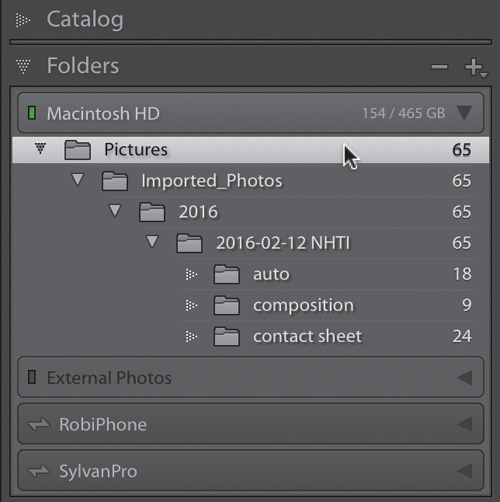
If I repeat that process again by right-clicking the Imported_Photos folder, Lightroom imports and displays that folder’s parent, which is the Pictures folder (Figure 3.6).
If, like me, you display one level too many, you can reverse your mistake easily. If you have a top-level folder that you don’t want to be displayed in Lightroom, right-click that folder and choose Hide This Parent to make it go away.
Find Your Folders and Photos
As you’ve learned, the best practice is to keep careful control of where your photos are stored during the import process, as sometimes your best-laid plans go awry or you may simply forget where you stored a folder or photo.
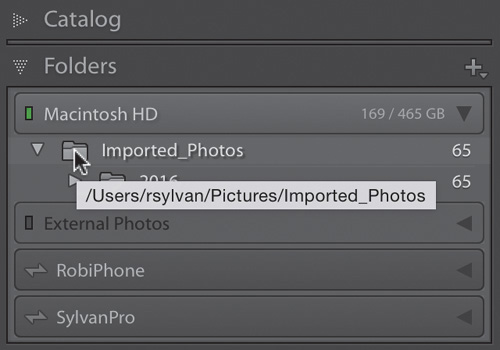
From inside Lightroom, you can identify where your folders and photos exist on your drive in a couple of ways. The easiest is the good old context menu. Right-click any folder in the Folders panel, and choose the “Show in Explorer” (Mac: “Show in Finder”) option. This will open your file browser right to that folder and show you where it exists on your drive. Similarly, you can right-click any photo and choose “Show in Explorer” or “Show in Finder” to go right to that photo in your file browser. You don’t have to leave Lightroom to find that information, though. If you hover your cursor over a folder, you should see its path revealed in a tool tip (Figure 3.7).
So take a moment to make sure you know exactly where all your photos are located on your drive.
Create New Folders and Remove Old Ones
The folders currently showing in your Folders panel may have suited your needs when they were imported, but those needs may change over time or depending on your current project. As you move on in your Lightroom experience, you may need to create new folders for organizational purposes or even remove empty unwanted folders. Lightroom makes it easy to do both.
Adding New Folders
In typical Lightroom fashion, there are several ways to create new folders. Suppose you buy a new external drive with the intention of storing photos on it because your existing drive is filling up. To add folders to it, either press Ctrl+Shift+N (Mac: Command+Shift+N), or choose New Folder from the Library menu, or click the plus sign at the top of the Folders panel and choose Add Folder. All three actions launch the “Choose or Create New Folder” dialog box (Figures 3.8 and 3.9).


From here, the process is simple:
1. From the drop-down menu, select the drive to which you want to add folders. In Figure 3.9, I selected the one named Sparta.
2. Select an existing folder, or create a brand new folder by clicking the New Folder button and giving the new folder a name, such as Imported_Photos. Lightroom creates the folder on the selected drive.
I like to have a parent folder named Imported_Photos on each drive I use to contain photos managed by Lightroom, but you can use a name that makes sense for your setup.
3. Click the Select Folder button (Mac: the Choose button) to return to Lightroom, where you can see the drive and folder you added in the Folders panel. (Figure 3.10) shows my new volume browser for the Sparta drive.

After you add a new drive or folder, you can use it as a destination during future imports, or you can use Lightroom to move photos and folders from other locations to that folder (more on that later in this chapter).
Perhaps, rather than adding a whole new drive, you simply need to create subfolders within existing folders to help with your organizational needs. This process works in a similar fashion, but you start by selecting the parent folder you want to create the subfolder within. Right-click the folder that you want to become the parent folder; then choose Create New Folder Inside “[folder name]” to open the Create Folder dialog box (Figure 3.11). In the Create Folder dialog box, give your new subfolder a name and click Create to complete the process. For example, I right-clicked the Imported_Photos folder on my Sparta drive to add a 2016 folder within it. The subfolder now appears in my Folders panel (Figure 3.12). These two new folders are ready for me to add photos and even new folders to as my organizational needs demand.
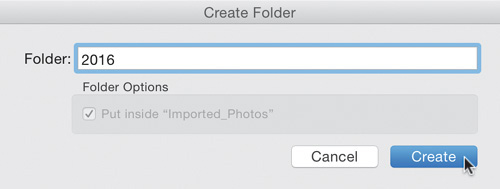
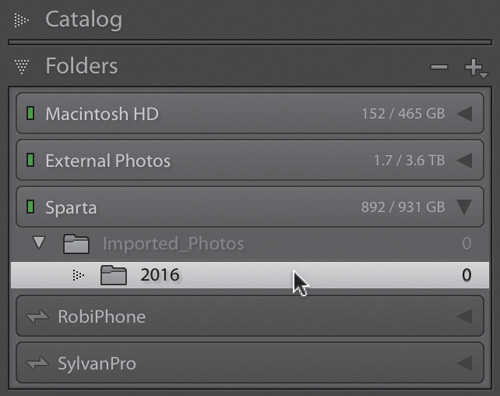
Figure 3.12 When you create a subfolder, it appears under the parent folder in the Folders panel.
Renaming Folders
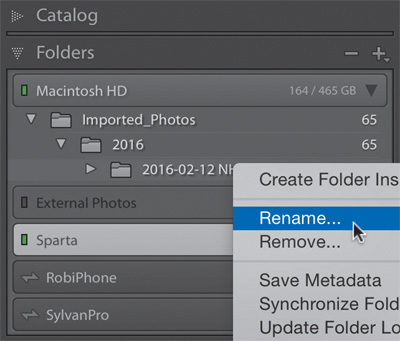
Did you make a typo when naming your new folder? You can easily change the name of a folder by right-clicking the folder and choosing Rename from the context menu (Figure 3.13). In the Rename Folder dialog box that appears, simply enter the new name and click Save to commit the change. The folder will be renamed on the drive, and that change will be reflected in the Folders panel.
Removing Empty Folders
Knowing how to remove folders is important too. Whether you deleted all the photos from a folder or you’ve reorganized by moving all the photos into a different folder, there’s no need to keep an empty and unused folder around. Simply right-click the empty folder and choose Remove from the context menu. Lightroom will remove the folder from the Folders panel and, if it was empty, delete the folder from your drive.
What if the folder isn’t empty? Well, in that case, Lightroom removes the folder from the Folders panel and the Lightroom catalog but also displays the warning in (Figure 3.14), which explains that the photos will be removed from the Lightroom catalog but that the folders and files will remain on your hard drive.

If you’re sure you want to remove the folder this way, click Remove but consider the implications carefully. You will end up with a folder full of photos that aren’t being managed by Lightroom and are just taking up disk space. This is not the best practice, and unmanaged files consuming valuable space is usually not what you want. If you want to totally get rid of the photos, you need to delete them from your hard drive first (more on that in the next section) and then remove the empty folder.
Using Lightroom to Delete Photos
If you are like me, you’ve deleted almost as many photos as you’ve kept. That’s the beauty of digital cameras—you can take as many images as you want and get rid of the ones that are not up to your standards. Before you import photos into Lightroom, you can delete them any way you want; Lightroom doesn’t care, because the program doesn’t know anything about them (yet). After the photos have been through the import process, however, it is important that you do your deleting from inside Lightroom.
Deleting Lots of Photos at Once
When you want to perform a single action on a lot of photos at one time, the best place to do that is in Grid view in the Library module, as you learned in Chapter 2. When you have multiple photos selected in Grid view, the default behavior is to apply whatever action you choose to all selected photos. So if you need to delete several images at once, head for Grid view.
To get there, press the G key from anywhere in Lightroom; you will be transported to the Library module, set to Grid view. But just being in Grid view is not always enough when it comes to deleting photos. You see, Lightroom can delete photos from the hard drive only when you are viewing the photos from within a folder. You cannot delete images while viewing them in a collection, which is a way to use the catalog to group photos. (You’ll learn more about collections in Chapter 4.)
To ensure that you are viewing your photos from within a folder, you can always right-click the photo and choose “Go to Folder in Library” (Figure 3.15). Lightroom will show you the photo within the context of the folder in which it resides on your drive.

Figure 3.15 Right-click a photo and choose “Go to Folder in Library” to ensure you’re viewing the image from a folder.
While viewing the contents of a folder in Grid view, you can delete any number of photos (even just one) by selecting them and pressing the Backspace key (Mac: the Delete key). As soon as you press that key, Lightroom displays a prompt giving you three options: Delete from Disk, Cancel, and Remove (Figure 3.16).

If your goal is to delete the files entirely, then choose “Delete from Disk.” The default option is Remove because Lightroom doesn’t want you to accidentally delete photos from your hard drive, but it removes photos only from the catalog, not from the drive; you don’t want a bunch of bad photos left behind in folders, so Remove is rarely the option you want to choose. Cancel is your escape plan in case you hit the key by accident.
More Ways to Delete Photos
If you are viewing photos while in Loupe view in the Library or Develop module, then you can still press the Backspace (Mac: Delete) key to delete or remove the active photo, but only the active photo, even if you have other photos selected in the Filmstrip. Lightroom plays it safe. When you are not in Grid view, the program assumes you want to apply the action only to the photo you are viewing.
Alternatively, you can right-click a photo and choose Remove Photo to bring up the delete and remove options. If you right-click a thumbnail in the Filmstrip (even in Loupe view) and you have multiple photos selected, however, then Lightroom assumes you want to apply the action to all selected photos. Are you starting to see the logic here? The Remove Photo option under the Photo menu brings up the same options.
Finally, one more way to delete photos involves using what Lightroom calls flags. Chapter 5 covers Flags in more detail, but suffice it to say that flags are a tool you can use to mark photos a certain way, either keeping them or rejecting them. Using flags to mark photos as rejected can be a more efficient way to prepare photos for deletion, which I’ll demonstrate within a workflow in Chapter 8.
Moving Photos and Folders
Moving photos and folders of photos is a fundamental task that you will do over and over. As with everything covered so far in this chapter, if you perform the task in Lightroom, the catalog stays in sync with the changes you make.
Moving Photos Between Folders
The most basic move operation is to move one or more photos from one folder to another folder. Lightroom is all about drag and drop when it comes to moving, so it is critical that you already have a destination showing in the Folders panel into which you can drop the photos. If your destination folder does not yet exist or is not yet accessible in the Folders panel, then you’ll need to add that folder to the Folders panel first.
Once the destination folder is accessible, open the folder that contains the photos you want to move by clicking it. Select the photos you want to move by clicking their thumbnails. You can select multiple photos by holding the Ctrl (Mac: Command) key and clicking each photo, or you can select a continuous range of photos by selecting the first photo, holding the Shift key, and then selecting the last photo in the range; you can select all the images in a folder by pressing Ctrl+A (Mac: Command+A).
Click a selected thumbnail and drag it to the destination folder. As you drag it, you will notice that the cursor changes to an arrow and thumbnail icon (Figure 3.17). If you have multiple photos selected, you will see a thumbnail stack containing the number of photos selected (this is a great way to check whether you accidentally selected more than one photo).
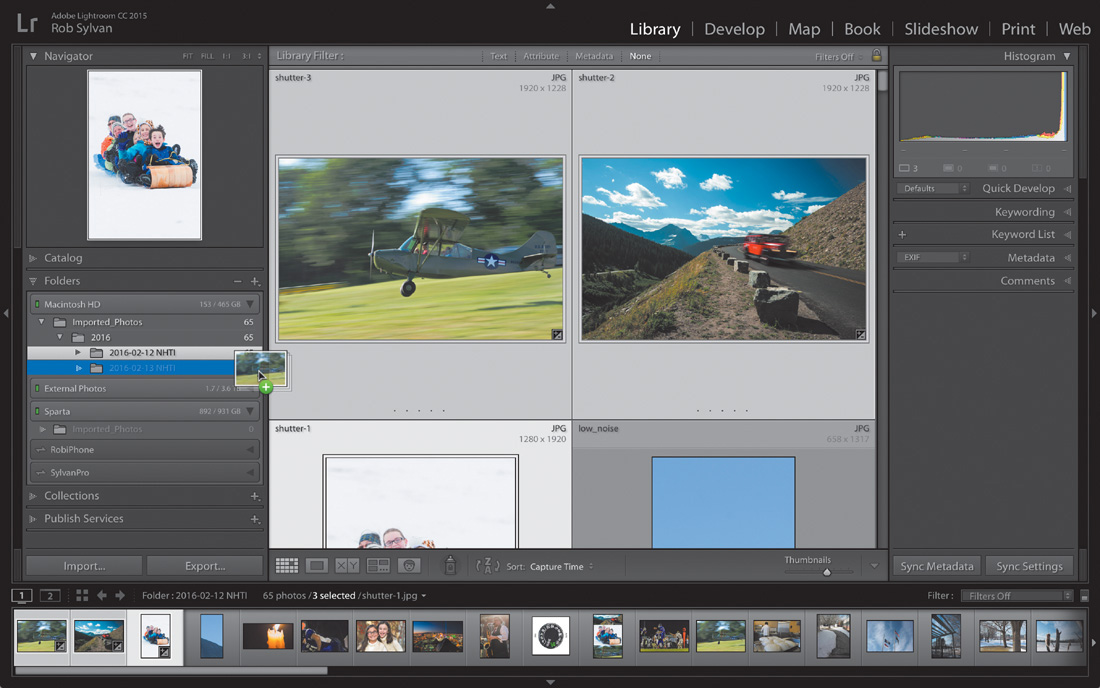
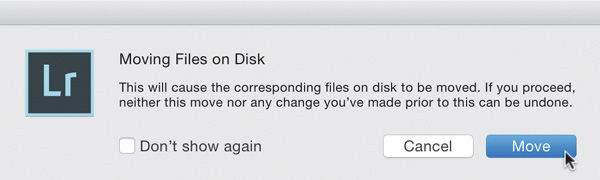
When you move the cursor over a folder, the folder is highlighted, and the cursor shows a green plus badge. Release the mouse button to drop the photos into that folder. Lightroom will display a confirmation dialog asking if you really want to move the files (Figure 3.18). Click the Move button to continue the operation. Lightroom will then move the photos to the new folder and update its catalog to reflect this change. In the warning box, you could select the “Don’t show again” option before clicking Move, but I recommend leaving it unselected as a precaution against accidental moves in the future.
Moving Folders
You can move one folder into another folder just as you move photos. Just select the folder in the Folders panel and drag it into the destination folder. Lightroom will again ask you for confirmation, so you’ll need to click the Move button to proceed.
You can even select multiple folders in the Folders panel and move them all at once to a destination folder. This can be extremely useful when moving a lot of folders at once to a new drive. That said, it is important to keep in mind that a move operation is essentially a copy operation followed by a delete operation. Don’t move files around without having a good backup in place; if something goes wrong during the move operation (like losing power), you risk losing data. The next section outlines a safer way to move a large number of files.
Moving Large Groups of Photos Safely
Buried in the folder context menu is a lesser-known option for moving folders: Update Folder Location. With this option you can direct the catalog to reference an identical copy of a folder that resides in a new location. Why would you ever want to do that? Well, Lightroom is not the fastest means by which to move large amounts of data between two locations, such as when you buy a larger drive for your photo library and you want to put all your photos on it. A faster (and safer) way to put your photos on the new drive is to use third-party drive-cloning software, or even just your operating system’s file browser, to copy your photos from the old drive to the new drive.
Note
When you copy the data from an existing drive to a new drive, you want it to be a mirror image of the original location. Don’t take this opportunity to change things like folder names or filenames outside Lightroom, because the copy has to be an exact match of the original.
Once the copy has been made in the new destination, you can use the Update Folder Location command to tell the catalog to stop referring to that folder structure of photos in the old location and instead refer to the copy in the new location. Here’s how:
1. Open your file browser.
2. Copy the entire folder structure (as is, without changing the structure) to the new drive.
3. Open Lightroom.
4. Once the copy operation is complete, right-click the top-level folder in the Folders panel and choose Update Folder Location from the context menu.
5. In the resulting dialog box, navigate to and select that same top-level folder in the new drive (the one you just copied over there).
Lightroom will update the catalog to point to the new folder (and everything inside that folder). If you have all your folders and photos in a single parent folder, then you are done; if there are additional folders at the same level as that top folder, you just need to repeat steps 4 and 5 with those folders. Give it a test run to make sure everything is as it should be before removing the originals.
Move Shortcut
Now that you know the basics, there is one other feature that is designed to assist in moving photos, and it can be accessed via the right-click context menu. It works like this:
1. Select the photo (or photos) you want to move.
2. Right-click the folder you want to move those photos into, and choose “Move Selected Photo(s) to this Folder” from the context menu.
3. Click Move in the confirmation dialog, and Lightroom will move the photos.
Using Lightroom to Rename Photos
File renaming may be one of the more mundane tasks in a digital photography workflow, but it is a critical component of digital asset management. Lightroom’s file-renaming function is powerful and customizable. Let’s look at all the ways you can rename using Lightroom:
![]() The File Renaming panel of the Import screen when you are using Lightroom to copy, copy as DNG, or move your photos
The File Renaming panel of the Import screen when you are using Lightroom to copy, copy as DNG, or move your photos
![]() The File Name field of the Metadata panel in the Library module to rename individual files
The File Name field of the Metadata panel in the Library module to rename individual files
![]() The Library > Rename Photos menu in the Library module when you want to rename a batch of photos
The Library > Rename Photos menu in the Library module when you want to rename a batch of photos
![]() The File Naming panel of the Export dialog box when you just want to rename the copies you are exporting
The File Naming panel of the Export dialog box when you just want to rename the copies you are exporting
If you are used to using Adobe Bridge or some other software to rename your photos, you can still do that before you import them into Lightroom. Once those photos are part of a catalog, however, you’ll want to use Lightroom from that point forward. After a photo has been through the import process, its name becomes an important piece of data that links the work you do in Lightroom to that photo. If you rename one or more imported photos outside Lightroom, you break that link and are then faced with the tedious task of reconnecting all of those photos to the catalog. Avoid breaking the link by using Lightroom to do the renaming.
Rename a Single Photo
If you need to change the name of a single photo inside Lightroom, the process is very straightforward:
1. Select the photo you want to rename.
2. Expand the Library module’s Metadata panel and, from the top drop-down menu, choose Default.
3. Click in the File Name field, and edit the name as needed (Figure 3.19).

That’s fine for renaming a single image, but Lightroom’s real power is in the batch renaming process. Typically, a filename provides some information about the photo and possibly some information about the creator, as well as a unique identifier like a sequence number. There are many possible combinations of those pieces of data, and in the Filename Template Editor, Lightroom allows you to create a custom filename template that you can then apply to other photos in your library or even to new photos during import.
Create and Apply Custom Filename Templates
As usual, Lightroom provides flexibility to suit any workflow. You can access the Filename Template Editor and the custom filename templates you create there from anywhere in Lightroom that you can batch rename photos—during import, during export, and in the Library module. Let’s walk through the simple process of creating and applying a custom filename template via the Library module. First, you’ll select a folder full of photos. Then you’ll create a custom filename template that contains custom text (meaning you can enter your own unique text each time you use the template) and a sequence number. Finally, you’ll apply that filename template to the selected photos.
1. From Grid view in the Library module, select all photos you want to rename.
2. Choose Library > Rename Photos to launch the Rename dialog box.
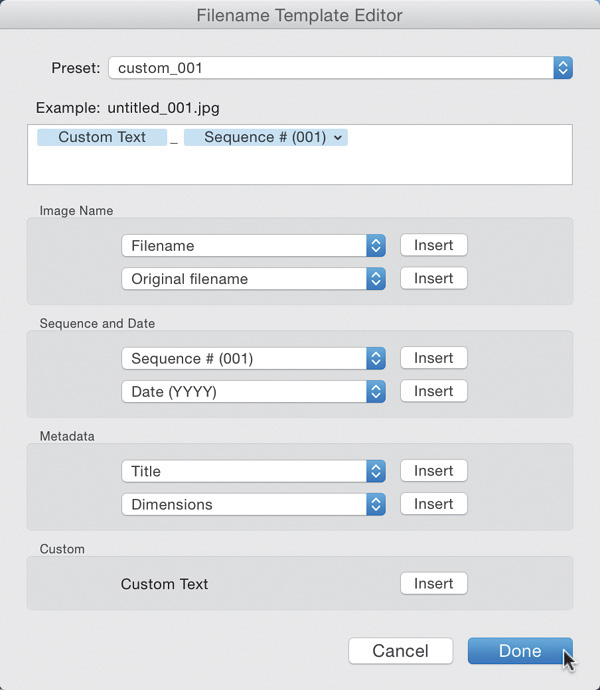
3. Click the File Naming drop-down menu (Figure 3.20) and choose Edit to open the Filename Template Editor (Figure 3.21).
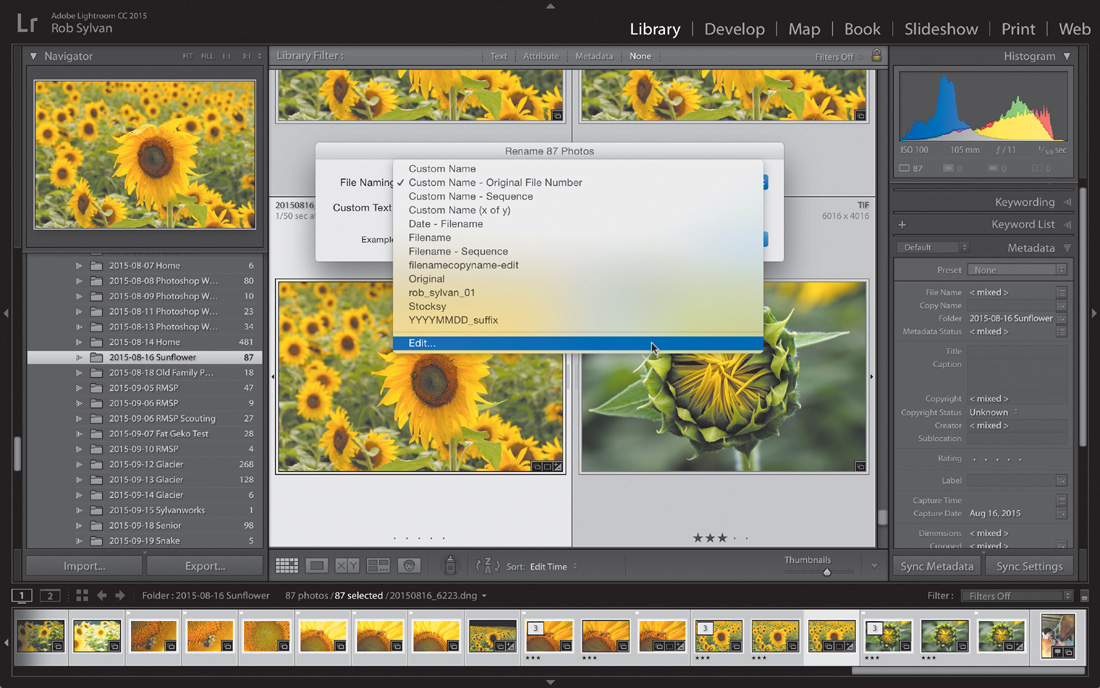
Figure 3.20 You can choose an existing template or launch the Filename Template Editor from the Rename dialog box.
Note that there are several pre-installed filename templates in the Preset drop-down menu, and the settings for the active template appear in the editor upon opening. A filename template comprises various tokens; each token represents some piece of data, such as elements of the capture date or time, the original filename, EXIF and IPTC metadata, and even custom text placeholders.
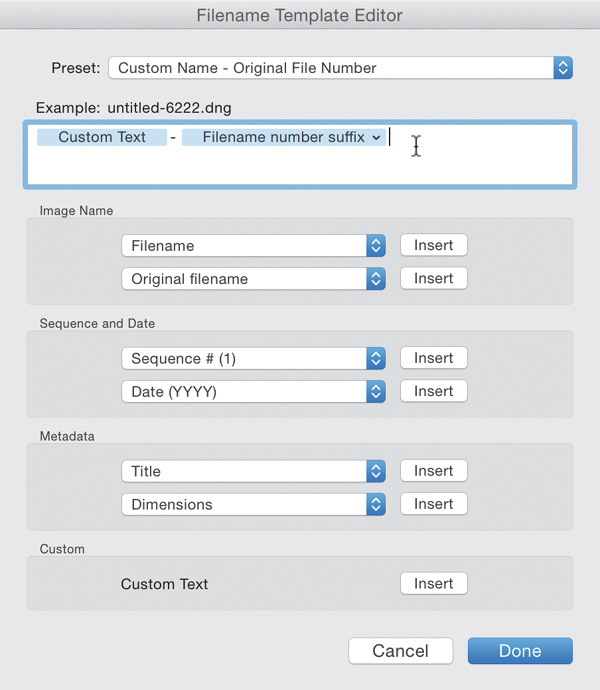
4. In the Filename Template Editor, click in the edit field and delete any existing tokens you see there.
5. Click the Insert button next to Custom Text at the bottom of the editor to add a Custom Text token to the edit field. Notice the cursor blinking next to the token you just added. You can also type directly into the edit field to add any bit of text you want to include in your template. In my case, I pressed the underscore key to add an underscore after the Custom Text token. This separates the custom text from the sequence number, which you’ll add next.
6. Click the Sequence # drop-down menu, and choose a sequence number token that specifies the total number of digits you want to include in your template. I usually choose at least a three-digit sequence. This is reflected in the Example text shown on the editor.
7. Save this as a new template by clicking the Preset drop-down menu and choosing “Save Current Settings as New Preset.” Then give it a name that helps you identify what the template does (Figure 3.22). Click Done to exit the editor and return to the Rename dialog box with your new template selected.
8. Enter the text you want to use in each name in the Custom Text field, and enter the first number of your sequence in the Start Number field (Figure 3.23).
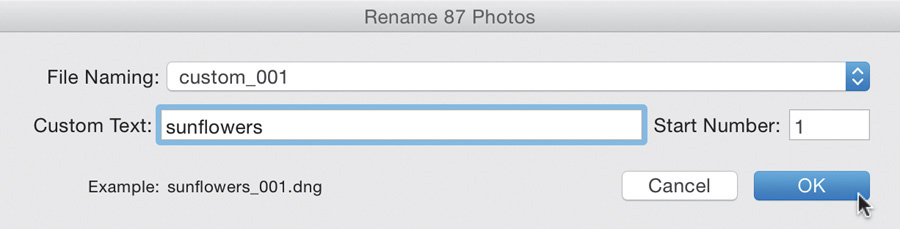
9. Click OK to apply the template to the selected photos.
The text templates you create are also available for use in the Import and Export dialog boxes.
Reconnecting Missing Folders and Photos
If you’ve taken to heart everything I’ve taught you so far, then you’ll be well protected against unsynced-catalog headaches. But what if you have to take a drive offline while you travel or you weren’t quite so diligent with best practices in the past? There are times when it is perfectly normal for your photos to be offline, and it is useful to be able to reconnect them. As long as you are always in the driver’s seat on these decisions, then it is no big deal. Let’s walk through a few scenarios you might encounter and how to resolve them peacefully.
Dealing with an Offline Drive
Using external hard drives to store photos and videos is incredibly useful and common. Because Lightroom stores all the data about your photos in its catalog file and keeps a special folder (called a cache) full of previews of your photos alongside the catalog file, it is possible to open Lightroom and work with your photos (to a limited extent) when the actual photos are stored on an offline (disconnected) drive.
Through the volume browsers in the Folders panel, Lightroom gives you a clear indication when a drive is offline. In (Figure 3.24), for example, you can see that my external drive (cleverly named External Photos) is offline because its name is grayed out and the indicator light next to its name is off. Expanding the volume browser for the offline drive displays the folder listing, and each folder has a question mark on it—a further hint that the drive is offline and the folders are inaccessible. Similarly, the thumbnails of the photos display exclamation points (Figure 3.25). Moving your cursor over any exclamation point reveals the tool tip “Photo is missing.” The same message even gets displayed in the Histogram panel. I give Adobe credit for increasing the number of ways Lightroom delivers this message.
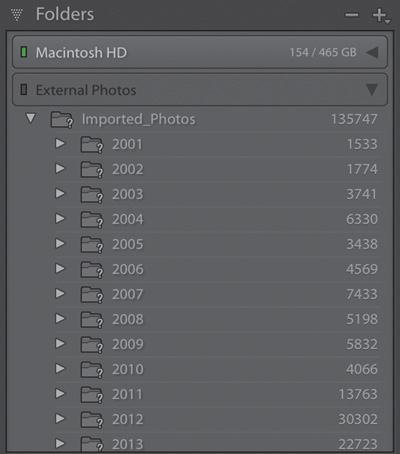
Figure 3.24 A grayed-out volume browser and question marks on folders indicate that this drive is disconnected.

As alarming as that all looks, you can easily fix it by simply plugging the drive back in. As soon as you reconnect the drive to your computer, the drive name will turn white in the volume browser, the indicator will change color to reflect the amount of free space on that drive, and the question marks and exclamation points will go away (Figure 3.26).

Dealing with Deleted Photos
Here’s an even easier problem to fix: If you deleted photos outside Lightroom but still see the thumbnails inside Lightroom, then select the thumbnails in Lightroom’s Grid view and press Delete. Choose Remove when prompted, and Lightroom will remove them from the catalog. Done.
Dealing with Folders and Photos Moved Outside Lightroom
If you use Finder or Windows Explorer or some other file browser (such as Adobe Bridge) to move or rename a folder, then the path stored in Lightroom’s catalog is no longer valid and you will have to update the catalog with the new path information. One way to fix it is to simply put the folder back to the way it was before. The alternative is to reconnect the catalog to the folder in its new situation. Here’s how to reconnect a moved folder:
1. Right-click the folder displaying the question mark in the Folders panel, and choose Find Missing Folder from the context menu (Figure 3.27).
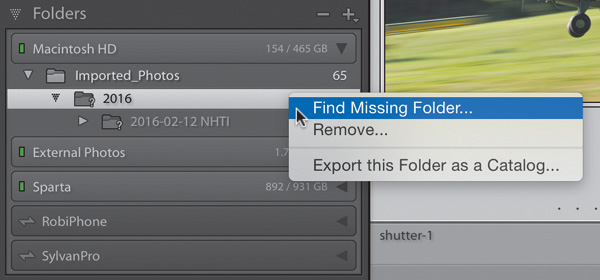
2. Manually navigate to the new location of that folder and select it. Click OK (Mac: click Choose).
Lightroom will then update its catalog with this new location, reconnect to that folder, and reconnect to all the subfolders and photos within it. The key here is that you have to know that folder’s location or, if you renamed it, new name. Find Missing Folder does not tell Lightroom to go find the missing items; rather, it means you have to go find them yourself. In the example in (Figure 3.28), I had moved the folder to my desktop outside Lightroom, which broke the link. I updated the catalog, and now that folder shows under the Desktop folder on the appropriate drive.
The process is essentially the same for reconnecting individual photos that you moved while outside Lightroom. Here’s how to reconnect a moved photo (when its original folder has not been moved):
1. Click the exclamation mark icon on a thumbnail.
2. Note the “Previous location” text in the resulting dialog box; this is the last place Lightroom knew that photo to be located. Click the Locate button (Figure 3.29).

3. The filename of your missing photo also appears in the Locate Missing Photo dialog box. Navigate to the new location of that photo (you need to know this), select the photo, and click Select (Figure 3.30).
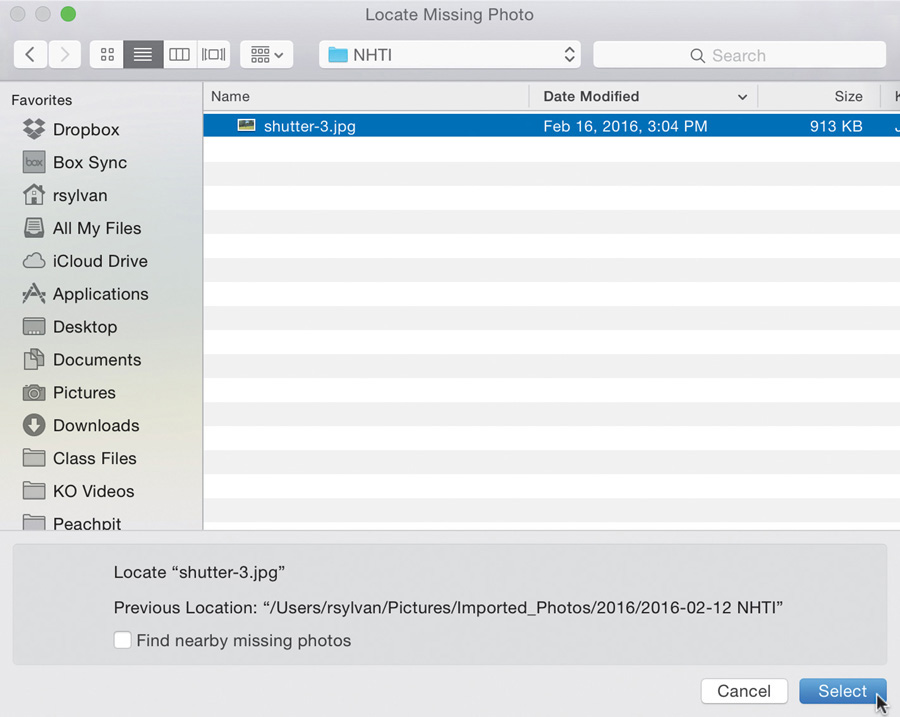
Figure 3.30 Once you’ve found the missing photo, you can select it and update the catalog with its new location.
If you’ve moved other photos to that location, you can reconnect them as well simply by selecting the “Find nearby missing photos” option before clicking Select. As long as the filenames of the other missing photos haven’t changed, Lightroom will update them as well.
Dealing with Photos Renamed Outside Lightroom
The best solution to the problem of a file being renamed outside Lightroom is to avoid it completely; rename your files in Lightroom only. Reconnecting renamed files is tedious because you must do each one individually.
The steps are the same as for reconnecting moved folders and photos. The only difference is that you must repeat the steps over and over for each renamed photo. Lightroom has no way of knowing the new name of each photo unless you tell it and confirm it each time.
If you have lots and lots of renamed photos, it would probably be easier to rename them back to the original name outside Lightroom (use the same application you used to change the name). That way, Lightroom will simply reconnect to them as if nothing had changed. Then, you can rename them properly from within Lightroom—and swear to yourself that you’ll never make the same mistake again.
Remember that you can save yourself a lot of frustration and avoid wasting time by performing all your moving, renaming, and deleting tasks from inside Lightroom. If you forget, however, it’s not the end of the world.