
7. Controlling the Camera
Lesson overview
In this lesson, you’ll learn how to do the following:
Understand the kinds of motion that are best animated with the Camera tool
Activate the camera
Hide or reveal the camera
Pan, rotate, and zoom the camera
Create depth with layers
Attach layers to the camera to keep them independent of camera motion
Apply color effects to the camera
This lesson will take about one hour to complete. Please log in to your account on peachpit.com to download the lesson files for this chapter, or go to the Getting Started section at the beginning of this book and follow the instructions under “Accessing the Lesson Files and Web Edition.”
Use the camera to focus your audience’s attention in your animation. Use filmmaking techniques such as panning, zooming, and even rotating to direct the action for more cinematic approaches.
Animating Camera Moves
So far, you’ve learned to animate different properties of symbol instances on the Stage—their position, scale, rotation, transparency, filters, and 3D position. You’ve also explored how you can create complex motion with eases.
However, as an animator, you’re not just directing the motion of your characters and objects on the Stage like a play. You’re also in control of the camera, making you more like the director of a movie. That means controlling where to point the camera to frame the action, zooming in or out, panning, or even rotating the camera for special effect. All of these camera movements are available in Animate with the Camera tool.
Getting Started
Start by viewing the finished movie file to see educational video that you’ll create in this lesson.
Double-click the 07End.mp4 file in the Lesson07/07End folder to play the video file.
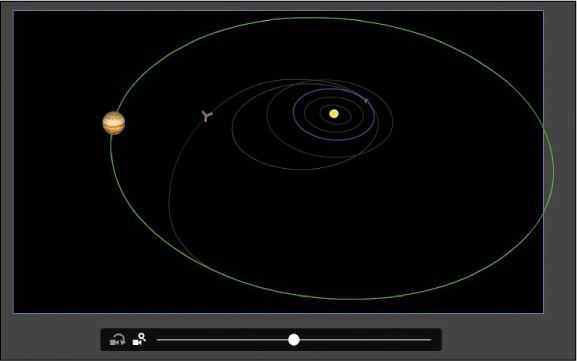
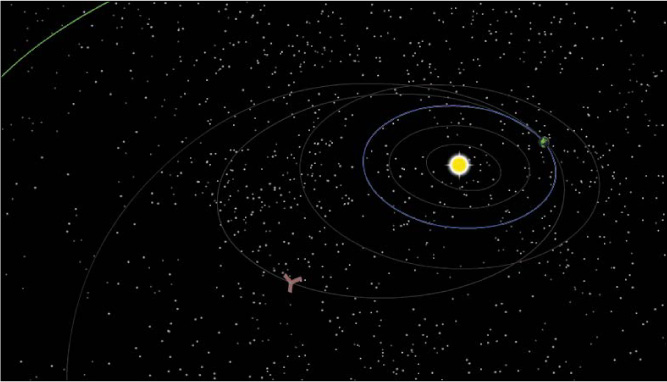
The project is an animation showing the trajectory of the Juno spacecraft, which was launched from Earth in 2011 and reached Jupiter in 2016. The animation is something that you might see on an educational site or at a museum. Notice how the audience’s view zooms in and out, and how the camera tracks the Juno as it moves across the solar system. At various points in the animation, captions appear to explain what’s happening.
Close the 07End.mp4 file.
Double-click the 07Start.fla file in the Lesson07/07Start folder to open the initial project file in Animate.
This file is an ActionScript 3.0 document that contains the completed animation of the Juno’s trajectory and the orbiting Jupiter and Earth. You created a similar animation in Lesson 6, but this one has additional animated elements. There are no camera moves in this project; you’ll add those in this lesson. It also contains additional graphic elements imported into the library for you to use.
Choose File > Save As. Name the file 07_workingcopy.fla, and save it in the 07Start folder.
Saving a working copy ensures that the original start file will be available if you want to start over.
Choose Control > Test.
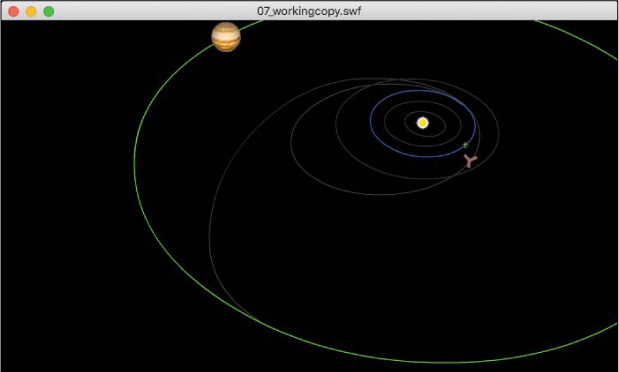
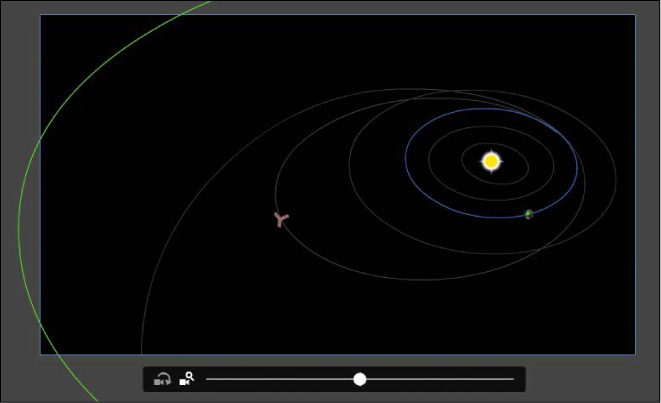
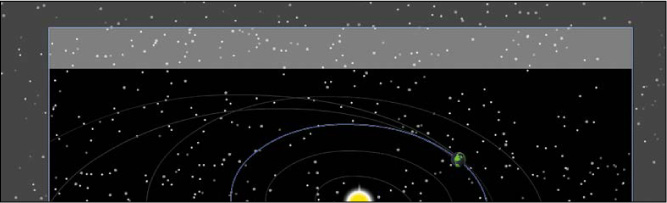
Animate generates a SWF for you to preview the animation. You see a partial view of the solar system, with the sun in the middle and Earth and Jupiter orbiting. A spacecraft launches from Earth and follows a gray track. Watch how it circles back toward Earth to be flung away to intercept Jupiter.
The animation is decent, and the Stage shows all the action: the orbiting planets and the movement of the Juno spacecraft. However, it lacks drama, and some details get lost because of the different scales we’re seeing. When Juno circles back toward Earth to use its gravity as a slingshot effect to propel it toward Jupiter, wouldn’t it be nice to see it up close as it approaches Earth to get flung back out? That’s where the Camera tool can help. You’ll animate the camera to direct our attention to the action. Get close when you need to, or zoom back out to show the big picture. Use a camera to follow the spacecraft just as you would follow a character across the Stage.
Understanding the project file
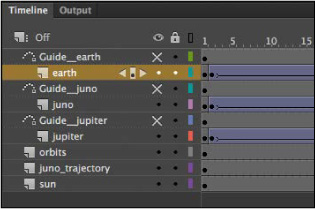
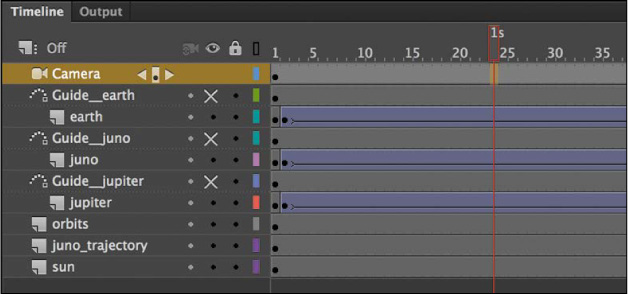
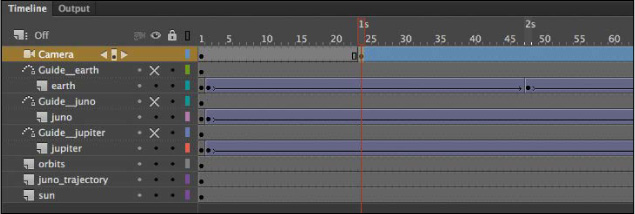
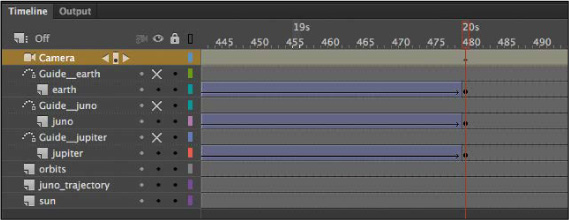
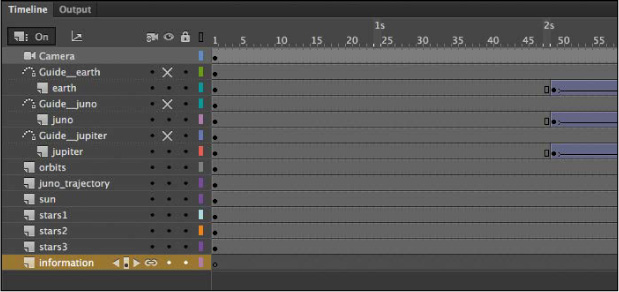
Your 07_workingcopy.fla project file contains three layers—earth, juno, and jupiter—containing classic tweens with a motion guide for each. The motion guides keep the animation on track. Remember that the motion guides for classic tweens are not visible when the animation is published, so to show the orbits of the planets and the trajectory of Juno, the guides have been duplicated in the layers called orbits and juno_trajectory. The bottom layer, called sun, contains the sun in the middle of the solar system.
Using the Camera
Think of the camera as just another object to which you can apply a motion or classic tween to animate its position, rotation, or scale. If you’re already comfortable with managing keyframes and tweens, then the Camera tool should feel familiar.
Enabling the camera
Enable the camera with the Camera tool in the Tools panel (![]() ) or with the Add/Remove Camera button below the Timeline.
) or with the Add/Remove Camera button below the Timeline.
Select the Camera tool on the Tools panel, or click Add Camera at the bottom of the Timeline.
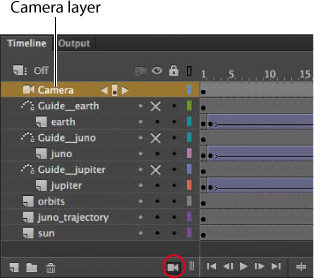
A Camera layer is added to the top of your Timeline and becomes active. On the Stage, the camera controls appear.
Characteristics of the camera
The Camera layer operates a little differently than a normal layer to which you add graphics.
The size of your Stage becomes the frame of your camera view.
You can have only one Camera layer, and it is always at the top of all your other layers.
You cannot rename the Camera layer.
You can’t add objects or draw in the Camera layer, but you can add classic or motion tweens to the layer, which allows you to animate the camera motion and camera filters.
When the Camera tool is selected, you cannot move or edit objects in other layers. Disable the camera by selecting the Selection tool or by clicking the Remove Camera button at the bottom of the Timeline.
 Note
NoteClicking the Remove Camera button at the bottom of the Timeline doesn’t actually delete your Camera layer; it only hides it from view. You can click the button again to restore the Camera layer. To delete the Camera layer entirely, select it and click the Delete button (trash can icon).
NoteThe Camera tool is available for all types of Animate documents.
Setting the camera frame
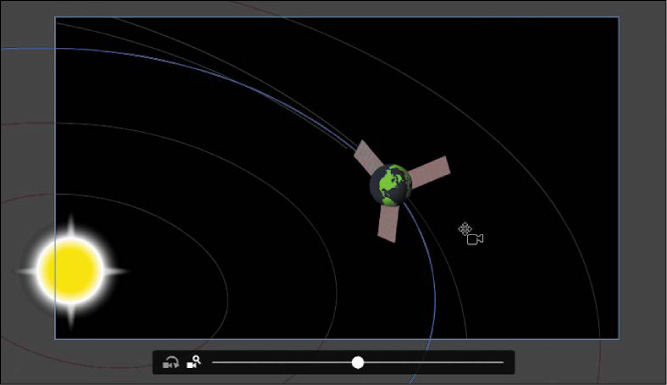
First, you’ll use the camera to frame just a small part of the solar system to focus on the beginning of the action: the launch of the Juno from Earth.
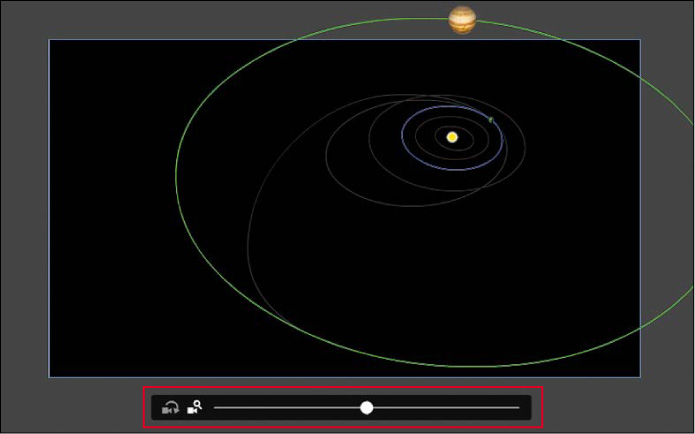
Make sure that your Camera tool is active and that the on-Stage controls are present. There are two modes on the controls, one for Rotate and another for Zoom. The Zoom mode should be highlighted.

Drag the slider to the right.
The Camera view zooms closer into the Stage.
When your slider reaches the edge of the Camera control, release your mouse.
The slider snaps back to the center, allowing you to continue dragging to the right to continue zooming.
You can also enter a numerical value for the zoom in the Properties panel’s Camera Properties section.
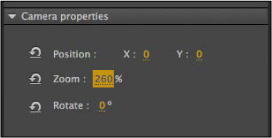
Continue zooming the camera until you’ve reached about 260%.
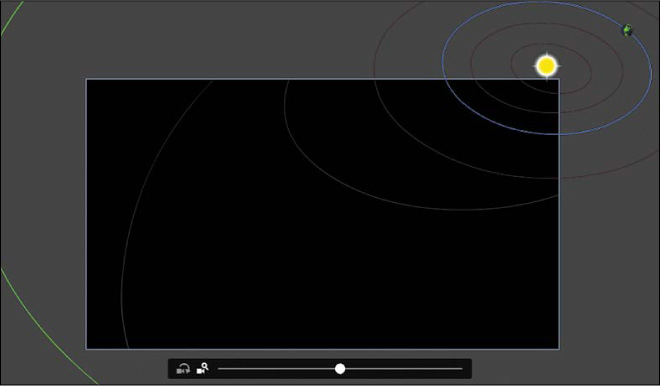
Now drag your camera so that the sun in the middle of the solar system is centered.
It may seem backward to see the objects on the Stage move in the opposite direction that you drag, but remember that you’re moving the camera and not the objects.
As you scrub the Timeline to see the animation, notice that your point of view is now closer into the action.
NoteWhen using the camera zoom mode, be aware of the image resolution. As with any bitmap, zooming in too dramatically will reveal the limitations of the original embedded image.
Animating a zoom-out
Since your camera is zoomed into the earth, you can more easily see the launch of the Juno spacecraft. However, at about frame 60, Juno leaves the Stage boundaries. You’ll want to zoom the camera out to keep the spacecraft in view.
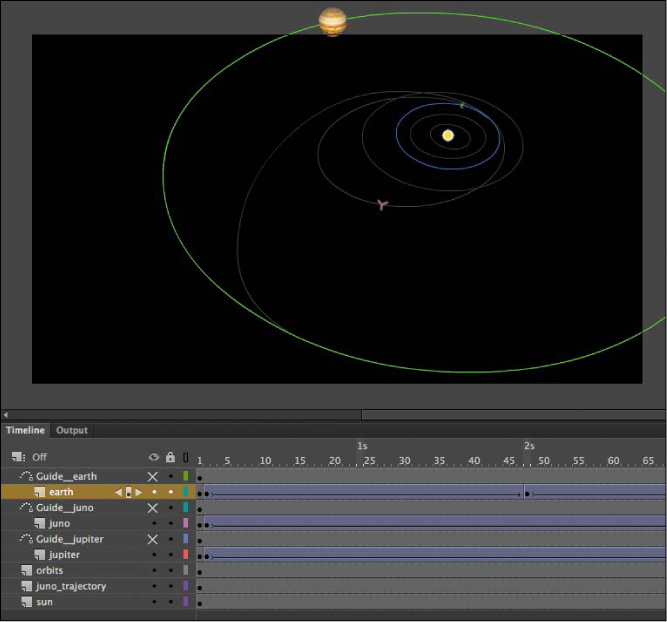
Select frame 24 on the Camera layer.
Insert a new keyframe (F6) at frame 24.
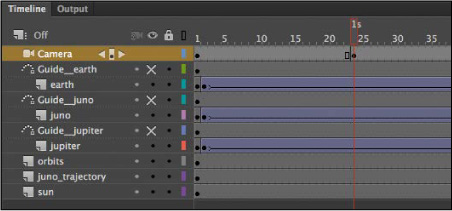
You’ll keep the camera in the zoomed-in position from frames 1 to frame 24, and then begin to animate the camera motion from frame 24.
Select the keyframe you just created on frame 24 on the Camera layer, right-click, and choose Create Motion Tween.
A motion tween is applied starting at frame 24, indicated by the blue tween span on the Camera layer.
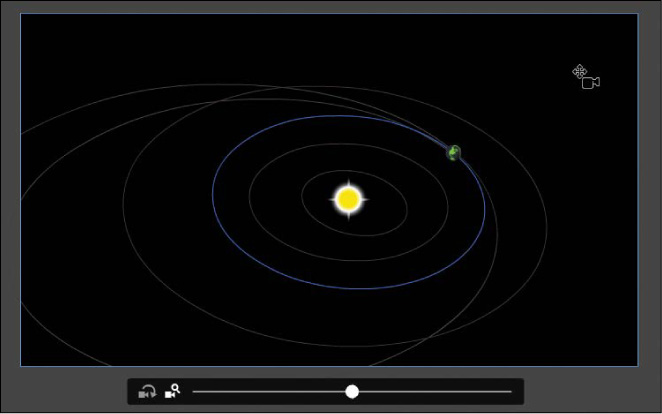
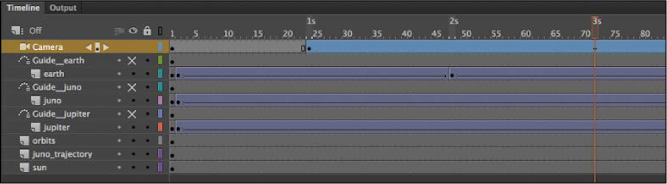
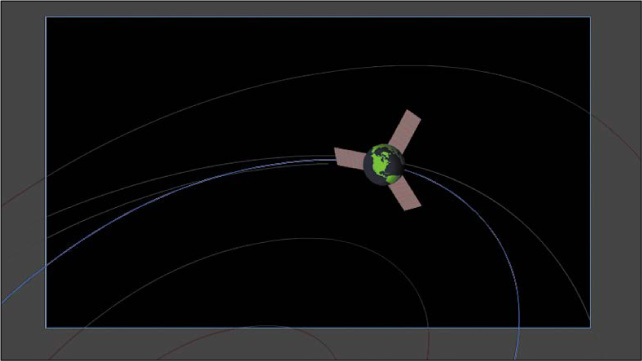
Move the playhead to frame 72.
Drag the Camera zoom slider on the Stage to the left to zoom out and see more of the solar system. The zoom percentage in the Properties panel should be about 170%. Move the camera so that Juno remains roughly in the center of view.
A keyframe is automatically created at frame 72 with the new Zoom value and position for the camera.
Scrub the Timeline between frames 24 and 72 to see the animated zoom.
As Juno moves farther away from Earth, the camera zooms out to keep it in the frame.
Animating a pan
A pan is the motion of the camera side to side or up and down. In this next step, you’ll pan the camera slowly from left to right to follow the motion of the Juno spacecraft.
Move the playhead on the Timeline to frame 160.
At this point in time, you’ll create another keyframe that establishes a new position for the camera.
Move the camera on the Stage to the right. Hold down the Shift key to constrain the movement to a straight line.
The spacecraft should roughly remain at the center of the frame.

A new keyframe is automatically created at frame 160.

Press Enter/Return to preview the motion tween, which animates your camera zooming out from frames 24 to 72, and then panning to the right from frames 72 to 160, tracking the spacecraft.
Animating a zoom-in
A crucial part of this animation is when Juno does a fly-by of Earth, using its gravity as a slingshot to get to Jupiter. You’ll zoom in closer to show how the spacecraft approaches Earth.
Right-click frame 160 and choose Insert Keyframe > All.
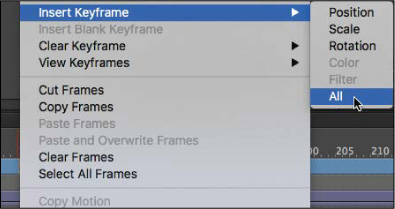
Inserting a keyframe for all the camera properties at frame 160 ensures that any future changes in zoom, position, or rotation occur from frame 160 and not from an earlier point on the Timeline.
Move the playhead on the Timeline to frame 190.
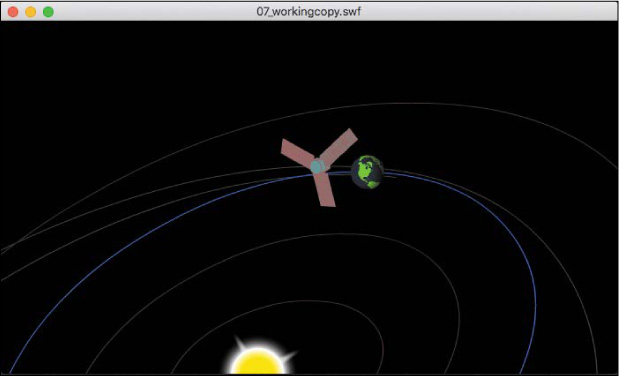
At this point in time, Juno is at its closest to Earth.
Zoom and move the camera on the Stage so that Earth and Juno are close-up and centered. The Zoom value should be about 760%.
A new keyframe is automatically created at frame 190.
Press Enter/Return to preview the motion tween.
From frame 160 to frame 190, the camera does a dramatic zoom in as Juno flies toward Earth.
Animating a rotation
Rotating the camera is unusual, but in some cases, the motion can be quite dramatic and effective. In this project, rotating the camera will intensify the feeling of flying right next to the spacecraft as it approaches Earth.
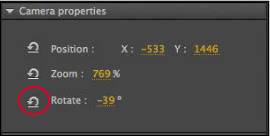
Make sure the playhead on the Timeline is still on frame 190.
Select the Rotation option on the Camera slider.

Drag the Camera slider to the right so that the camera rotates clockwise (and the objects in view rotate counterclockwise).
The Rotation value should be about –39 degrees.
Move the camera so that the spacecraft behind the earth is roughly in the center.
Preview the animation by pressing Enter/Return or scrubbing the Timeline.
The dramatic fly-by of Earth by Juno is captured by the camera zooming in and rotating to be close to the action.
Finishing the camera moves
After the earth fly-by, Juno continues its trajectory toward Jupiter. You’ll animate the camera to frame the rest of its journey with additional zooms, rotations, and pans.
Move the playhead to frame 215.
Reset the Rotation value of the Camera to 0 degrees. In the Properties panel, enter 0 for the Rotate value or click the Reset Camera Rotation button in front of the Rotate label.
The Camera view tilts back to its default angle.
Move the Camera so that Earth and Juno are about at the center.
Now move the playhead to frame 288.
Juno is moving farther out from the solar system, so you’ll need to keep backing up the camera.
Change the Zoom value to about 90% and move the Camera so that most of the solar system, including Jupiter’s orbit, is in view.
Select frame 480. Right-click and choose Insert Keyframe > All.
A new keyframe is created at frame 480.
Your final camera move is to zoom into Juno’s approach to Jupiter, so you have to create a beginning keyframe to establish the beginning values for the camera’s zoom, position, and rotation.
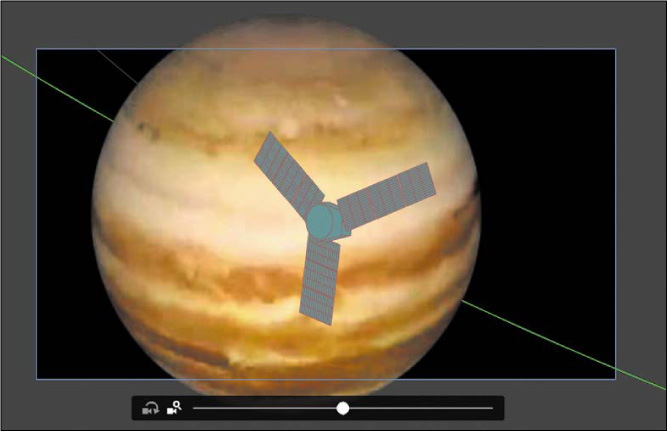
Select frame 480 on the Camera layer.
Zoom in and move the camera so that Jupiter and Juno almost fill the frame. The Zoom value of the Camera should be about 1400%.
NoteWhen you zoom in too far all at once, you may lose sight of your graphics and may have trouble putting them back into the camera frame. It’s best to zoom a little bit at a time, and move the camera to keep the graphics that you want to zoom in on within the frame.
Preview the entire animation by choosing Control > Test.
Animate exports the animation as a SWF in a new window. The animation plays with camera pans, zooms, and rotations that closely follows Juno’s journey from Earth to Jupiter.
Creating Depth
When you move a camera to film a scene in real life, you get a sense of depth because foreground elements move across the frame a little quicker than background elements. This is called a parallax effect, and we’re familiar with the effect when we look out the window of a moving car. The closer trees and street signs zip past our window while the distant mountains on the horizon move very slowly.
Animate offers the ability to create the same sense of depth when you animate camera moves using the Layer Depth panel. The Layer Depth panel allows you to set a layer’s z-depth, which is its distance from the Camera layer.
By default, the Layer Depth panel is turned off, and all layers have a z-depth value of 0. When the Layer Depth panel is turned off, camera pans and zooms do not show a sense of depth, and the overall effect is as if the camera were panning across or zooming in or out of a flat picture. The picture moves or gets bigger or smaller, but there is no differential movement of separate layers.
![]() Note
Note
The Layer Depth panel can be used independently of the Camera tool. That is, you can place objects in layers with different depth levels and animate them without activating the Camera tool. However, it is the motion of the camera in conjunction with layers at different z-depths that allows viewers to see the three-dimensionality of a scene.
Adding layers of stars
In the following tasks, you’ll enhance the animation of Juno’s journey to Jupiter by creating a sense of depth. You’ll add a few layers of stars and position them at different z-depth distances, which will enhance the vastness of space.
Add a new layer in your Timeline and move it to the bottom of the layer stack.
Rename the layer stars1.
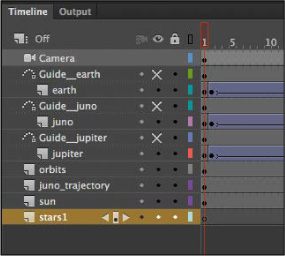
The stars1 layer will contain the first layer of stars.
In the Library panel, drag the graphic symbol called stars1 from the Library onto the Stage.
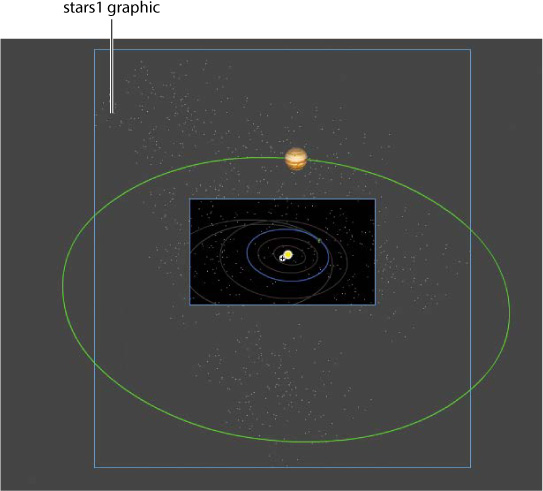
The graphic is simply a collection of gray and white dots randomly scattered over a large area. Don’t worry too much about precise placement; just position the instance to cover most of the solar system.
It may be helpful to change the Stage view magnification level so that you can see more of the graphics that may be off the Stage (and out of camera view).
Add another layer called stars2 below stars1, and add the graphic symbol stars2 in that layer.
Again, just make sure the stars cover most of the solar system.
Add a third layer of stars called stars3 below all the others, and add the graphic symbol stars3 in that layer.
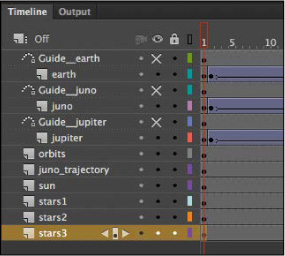
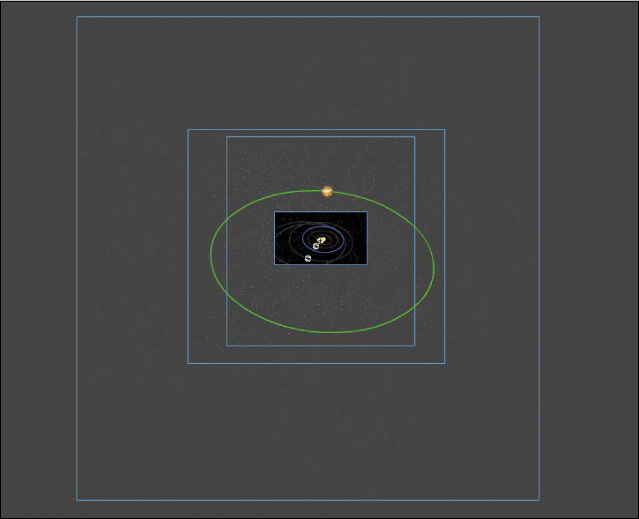
You may have noticed that the size of the field of stars in each of the layers gets progressively larger. That is, stars3 is larger than stars2, and stars2 is larger than stars1. The background graphics do need to be quite large in anticipation of moving them to a deeper z-depth level farther from the Camera layer. The farther from the Camera layer (the larger the z-depth), the smaller the graphics will appear.
Preview your animation by pressing the Enter/Return key.
While the stars add a nice touch of realism to the highly diagrammatic solar system, the stars are still flat and don’t move with any parallax effect. You’ll change that with the Layer Depth panel, next.
Setting the z-depth in the Layer Depth panel
The Layer Depth panel manages the distances of each layer from the Camera layer.
At the top of the Timeline, click the Advanced Layers button.
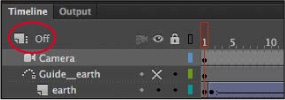
Animate displays a notification about advanced layers, and how they allow you to control a layer’s depth level.
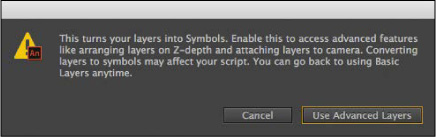
Click Use Advanced Layers.
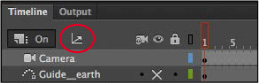
The Advanced Layers button appears depressed and is labeled “On,” indicating that advanced layers are activated.
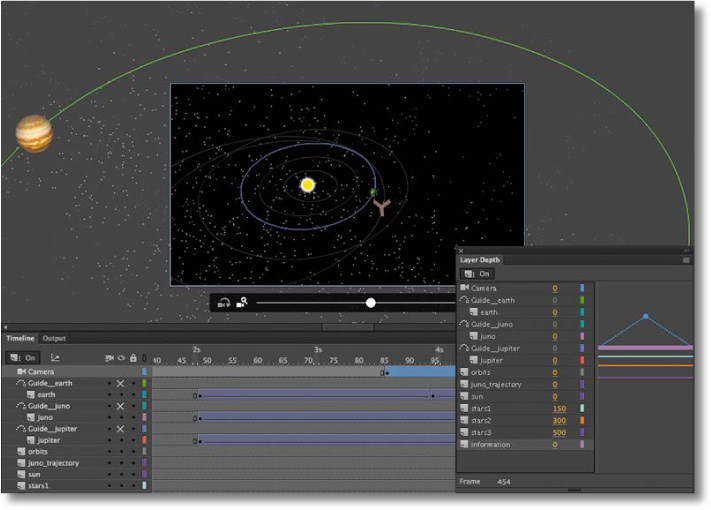
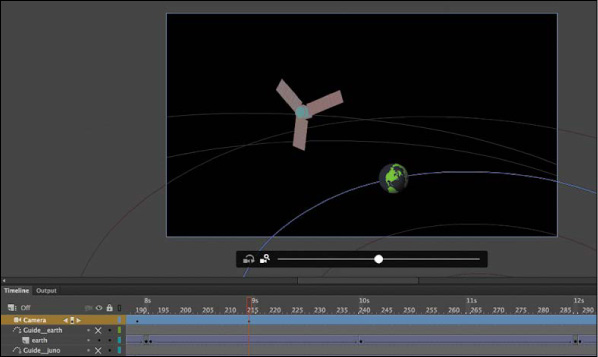
Next to the Advanced Layers button, click the Layer Depth button, or choose Window > Layer Depth.
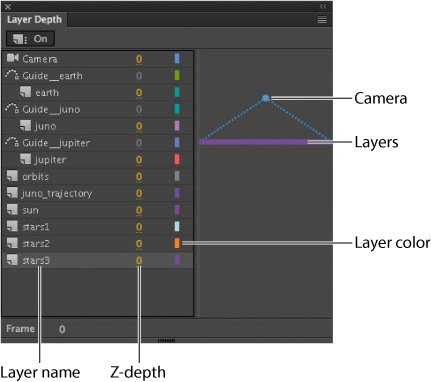
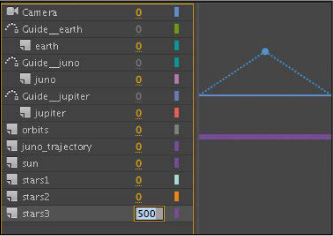
The Layer Depth panel appears, showing all the layers in the order in which they appear in the Timeline. Next to each layer is a 0, indicating its current z-depth value. Next to the z-depth value is a color coded to the depth diagram on the right of the panel.
Since all the layers are currently at a z-depth of 0, they are at the same depth level, and they lie at the same plane as the camera frame.
The camera is indicated by the ball with the dotted lines radiating from it. The flat blue line attached to the dotted diagonal lines shows the field of view of the camera.
Drag the z-depth value for the stars3 layer to increase it to 500. You can also click the value to enter a numeric value, or you can drag the corresponding colored line.
Notice the effect of the stars3 graphic on the Stage as you change the z-depth value. As the z-depth increases, the layer’s distance from the camera increases and the stars recede. If you decrease the z-depth into negative values, you can actually make the layer appear behind the camera (try it out!).
Set the z-depth value for the stars2 layer to 300 and the z-depth value for the stars1 layer to 150.
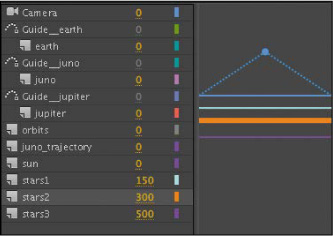
The diagram on the right in the panel indicates the positions of the three layers relative to the camera and the other layers (which remain at a z-depth value of 0). The bold highlighted layer in the diagram is the layer that is currently selected.
That’s all you have to do! Preview the effects of setting your last three layers farther behind the others.
The parallax effect due to the motion of the camera over levels at varying depth levels is most noticeable if you scrub the Timeline between frames 72 and 160. That’s when the camera is panning from left to right, tracking Juno. You see the orbits sliding by faster than some of the stars, which are sliding by faster than the more distant ones. The overall effect is a realistic sense of space.
Attaching Layers to the Camera for Fixed Graphics
There’s one last item to add to the animation of the Juno spacecraft, and that’s the informative captions that pop up to explain the different parts of its trajectory. However, any graphic that we add to the Stage would be subject to all the camera moves—the panning, rotating, and zooming—that is, unless we fix, or attach, a layer containing the graphic in such a way that it is unaffected by the camera motion.
Animate allows you to do this to one or more layers when you attach them to the Camera layer.
Adding an attached layer to the Camera layer
The attached layer is an option in the Layer Properties dialog box. You can also attach a layer by choosing the Attach Layer To Camera option in the Timeline.
Create a new layer and rename it information.
This new layer will contain the captions that appear at various points along your animation.
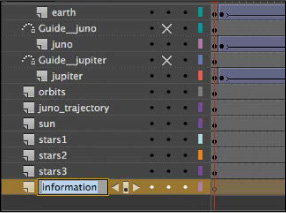
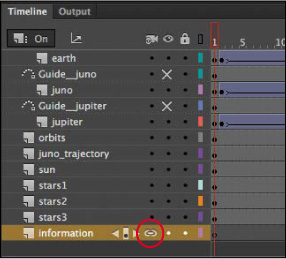
Click the black dot next to the layer name under the Attach Layer To Camera icon in the Timeline.
A chain link icon indicates that the layer is currently locked to the Camera layer.
Double-click the layer icon in front of its name, or choose Modify > Timeline > Layer Properties.

The Layer Properties dialog box appears. Confirm that the option Attach To Camera is selected.
Adding the captions
Now you’ll add the information for the animation in kefyrames along the Timeline.
Add about 2 seconds’ worth (48 frames) of time at frame 1 before the animation begins (F5).
The slight pause before the animation begins will give your audience a chance to read the first caption.
Select frame 1 of the information layer.
Select the Rectangle tool. Choose No Stroke and a 50% transparent white for the Fill.
Create a long rectangle from the upper-left corner about 700 pixels wide and 50 pixels high.
The semitransparent rectangle will be the box for your text.
Select the Text tool.
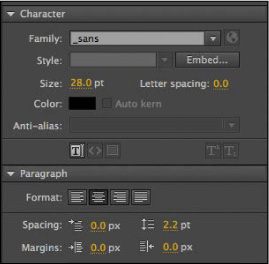
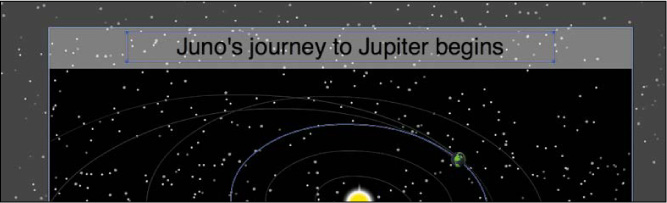
Choose a font that appeals to you by choosing from the Family and Style menus in the Character section of the Properties panel. Make the Size 28 points (but you may have to increase or decrease the size depending on your font) and the color black. Select Align Center in the Paragraph section Format.
Drag out a text box over the semitransparent white rectangle in your information layer.
Type Juno’s journey to Jupiter begins and use the Align panel to center the text over the box horizontally and vertically (see Lesson 2 if you don’t remember how to use the Align panel).
The first caption is complete.
You’ll make the first caption disappear before the next one appears, so at frame 90, right-click and choose Insert Blank Keyframe (F7).
A blank keyframe appears at frame 90 and the caption disappears from the Stage.
The second caption appears as Juno doubles back toward Earth, so create another keyframe at frame 118.
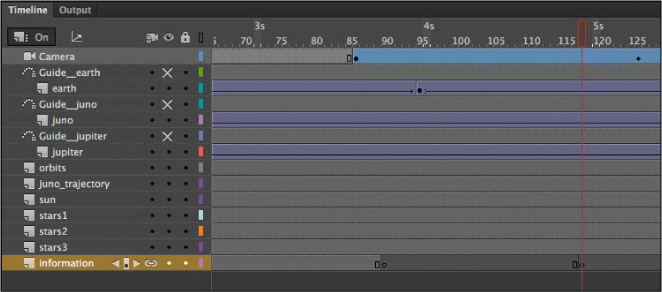
At this new keyframe at frame 118, copy and paste your text and semi-transparent rectangle from frame 1.
Move the rectangle and caption down to the bottom of the Stage and change the contents of the text to read Juno heads back to Earth.
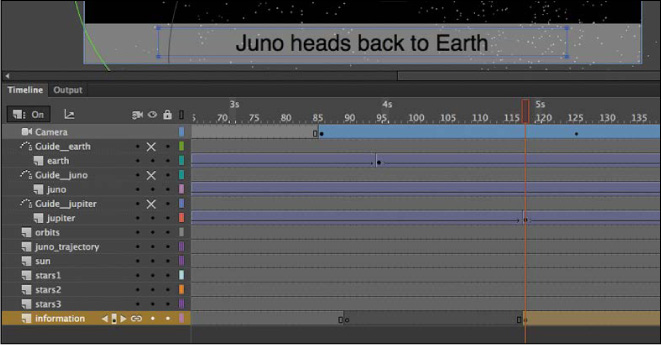
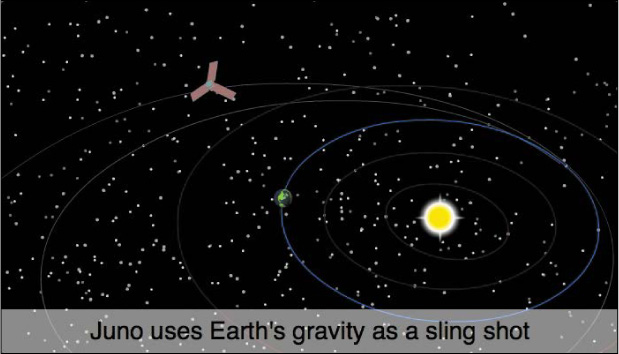
Continue in a similar manner to add the third caption. The second caption should disappear at about frame 192, with the third caption appearing at frame 236. The third caption should read Juno uses Earth’s gravity as a sling shot. The third caption should disappear at frame 336. Feel free to play around with the timing and positioning of the caption!
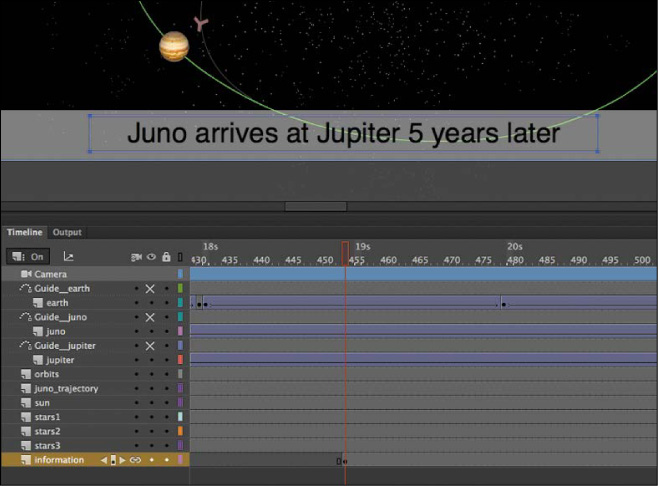
The final caption, which should appear at about frame 454 as the camera zooms into Jupiter, reads Juno arrives at Jupiter 5 years later.
Test your movie.
As the animation plays, your captions appear one by one. Since the information layer is attached to the Camera layer, the rotations, pans, and zooms do not affect the contents of the layer.
NoteYou can still change the z-depth value of a layer that is attached to the Camera layer.
NoteYou can have more than one layer attached to the Camera layer.
Camera color effects
You can also apply and animate camera color effects to create a color tint or to change the contrast, saturation, brightness, or hue of the entire view on the Stage. The effect simulates a filter that a cameraperson might put on a lens to heighten certain colors for a mood, or to create a black-and-white film noir feeling.
To apply a color effect, click the Apply button (eye icon) in front of the Tint or Adjust Color option in the Camera Color Effects section of the Properties panel. The Camera tool must be active to apply a camera color effect. Click the color box next to the Tint value to select the color of the tint, or change the Red, Green, and Blue values individually and then change the value of the Tint to set the amount. A value of 100 is the maximum.
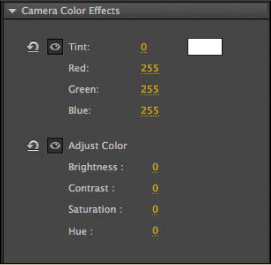
Change the values of Brightness, Contrast, Saturation, or Hue to modify those properties of your camera color. For example, set the Saturation to –100 to desaturate all the graphics that appear through the Camera.
Exporting Your Final Movie
Create the MP4 movie file by exporting it from Animate and converting it in Media Encoder, a freestanding application that comes packaged with Animate (you’ll learn more about Media Encoder in Lesson 11).
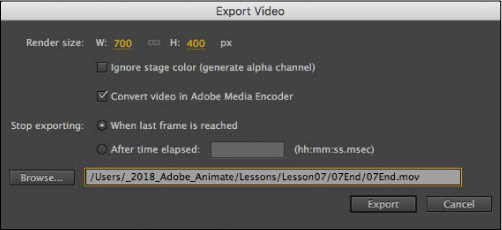
Choose File > Export > Export Video.
The Export Video dialog box opens.
Keep the Render size at the original 700 pixels by 400 pixels. Select Convert Video In Adobe Media Encoder. Choose Browse to select the destination filename and location.
Animate generates a SWF file and a .mov file from it. The Adobe Media Encoder automatically launches.
In Adobe Media Encoder, choose File > Add Source, or click the Add Source button (the plus sign) in the Queue panel. Choose the .mov file that Animate exported.
Adobe Media Encoder adds the file to the queue.
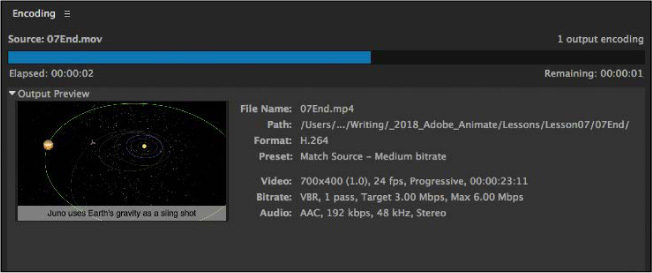
In the Preset menu, choose Match Source – Medium Bitrate.
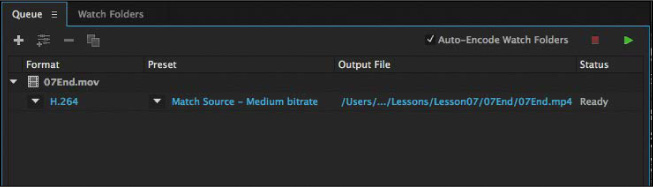
The Match Source – Medium Bitrate setting keeps the dimensions of the source file (700 pixels by 400 pixels) and maintains a medium quality.
Click the Start Queue button (the green triangle) or press Enter/Return to begin the encoding process.
Media Encoder converts the .mov file into an H.264-formatted video with the standard .mp4 extension.
The final file can be uploaded to Facebook, YouTube, or other video sharing sites, or put up on your own website.
Review Questions
1 What are the three kinds of camera motion that you can animate with the Camera tool?
2 How do you activate the Camera layer?
3 What are two ways to attach a layer to the Camera layer?
4 What is the z-depth and how do you change it?
Review Answers
1 You can animate a pan (motion from one side to another or up and down), a zoom, or a rotation with the Camera tool.
2 Activate the Camera layer by selecting the Camera tool from the Tools panel or by clicking the Add Camera button at the bottom of the Timeline.
3 Attach a layer to the Camera layer by clicking the dot next to the layer name and under the Attach Layer To Camera icon in the Timeline. The layer displays a chain link icon, indicating that it is attached to the Camera layer. You can also open the Layer Properties window and choose Attach To Camera.
4 Z-depth is a numerical value that indicates a layer’s distance from the camera. First, turn on Advanced Layers at the top of the Timeline and open the Layer Depth panel. Change a layer’s z-depth from the Layer Depth panel (Window > Layer Depth) by changing the value directly or by dragging the corresponding colored line that represents a layer relative to the black dotted line that represents the camera.