6 Lightroom–Photoshop Roundtrip Workflow
Lesson overview
This may be the most important lesson in this book because it covers the mechanics of a typical roundtrip workflow between Lightroom and Photoshop. It teaches you how to adjust settings in both programs to ensure you pass the highest-quality files between the two. You’ll learn how to send files from Lightroom to Photoshop in a variety of formats and then reopen the edited files in Lightroom.
In this lesson, you’ll learn how to:
Configure Lightroom’s External Editing preferences and Photoshop’s Maximize Compatibility preference.
Match Photoshop’s color settings to Lightroom’s.
Keep Lightroom in sync with Photoshop’s Camera Raw plug-in.
Send a raw file or JPEG from Lightroom to Photoshop, and then pass the file back to and reopen it in Lightroom.
Send a raw file from Lightroom to Photoshop as a Smart Object.

This lesson will take 1 to 2 hours to complete. Please log in to your account on peachpit.com to download the files for this lesson, or go to the “Getting Started” section at the beginning of this book and follow the instructions under “Accessing the lesson files and Web Edition.” Store the files on your computer in a convenient location. Your Account page is also where you’ll find any updates to the lessons or to the lesson files. Look on the Lesson & Update Files tab to access the most current content.
©2015 RAFAEL CONCEPCION, ABOUTRC.COM
Setting up Lightroom and Photoshop to work together ensures you’re passing the highest-quality photos back and forth between the two programs.
Preparing for this lesson
To get the most out of this lesson, be sure you do the following:
Follow the instructions in the “Getting Started” section at the beginning of this book for setting up an LPCIB folder on your computer, downloading the lesson files to that LPCIB folder, and creating an LPCIB catalog in Lightroom.
Download the Lesson 06 folder from your Account page at peachpit.com to username/Documents/LPCIB/Lessons.
Launch Lightroom, and open the LPCIB catalog you created in “Getting Started” by choosing File > Open Catalog and navigating to the LPCIB Catalog. Alternatively, you can choose File > Open Recent > LPCIB Catalog.
Add the Lesson 6 files to the LPCIB catalog using the steps in the Lesson 1 section “Importing photos from a hard drive.”
In the Library module’s Folders panel, select Lesson 06.
Create a collection called Lesson 06 Images and place the images from the Lesson 06 folder in the collection.
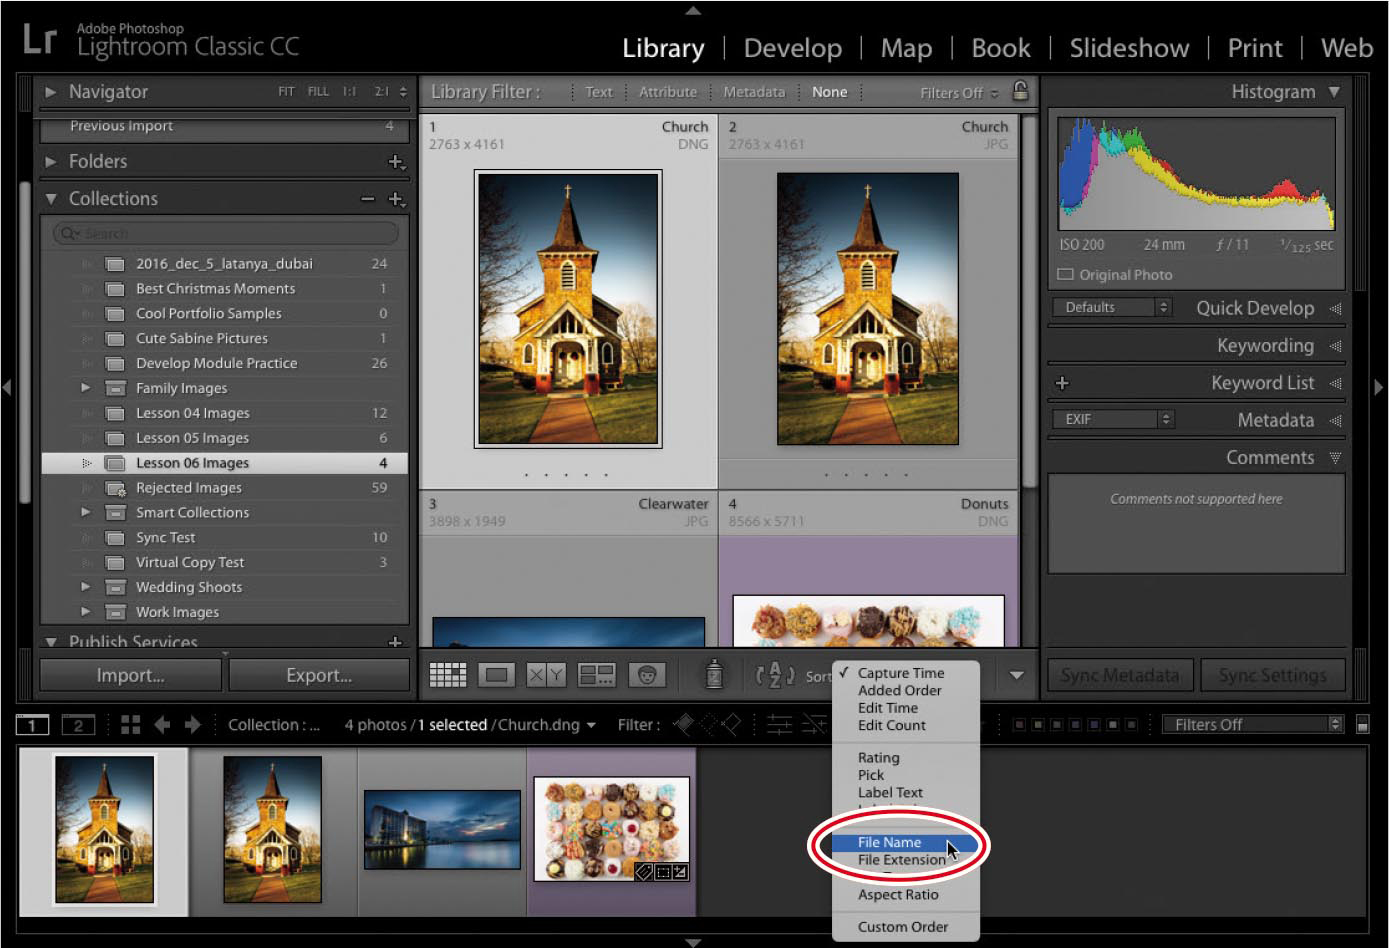
Set the Sort menu beneath the image preview to File Name.
In the next section, you’ll learn how to set up various preferences and settings in both Lightroom and Photoshop so they work together as a team.
Setting up Lightroom and Photoshop for smooth integration
Before you start sending photos back and forth between Lightroom and Photoshop, there are some settings to adjust in both programs to ensure you’re moving between them at the highest possible quality.
In the next few sections, you’ll learn how to adjust Lightroom’s preferences to control the kind of file it sends to Photoshop. You’ll also adjust Photoshop’s settings so the color space you’re using in Lightroom matches that of Photoshop. Next, you’ll learn how to keep Lightroom’s and Photoshop’s Camera Raw plug-ins in sync, and then you’ll dig into how to send files back and forth between the two programs.
While these sections don’t cover the most exciting topics in this book, they are important for your success in using the programs together. Once all this is set up, you won’t have to worry about it again.
Configuring Lightroom’s External Editing preferences
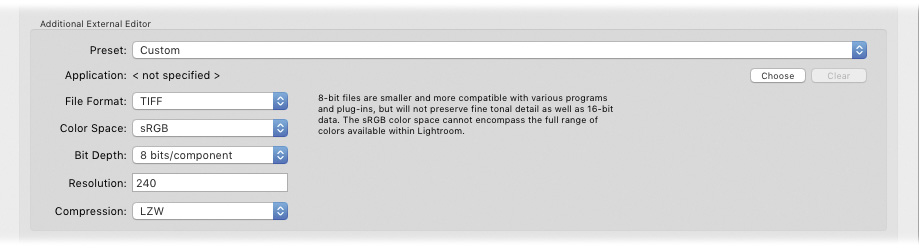
Lightroom’s External Editing preferences determine exactly how files are passed from Lightroom to Photoshop. You can control file format, bit depth, color space—all of which are explained in this section—as well as file naming conventions and how the Photoshop files are displayed back in Lightroom.
You can set up an additional external editor if you are more comfortable with it. Truth be told, the intergration between Photoshop and Lightroom is so tight, you’ll rarely need to use a different editor.
Setting your primary External Editing preferences
Lightroom automatically scours your hard drive for the latest version of Photoshop (or Photoshop Elements) and picks it as the primary external editor. To control exactly how Lightroom sends files to Photoshop, use these steps:
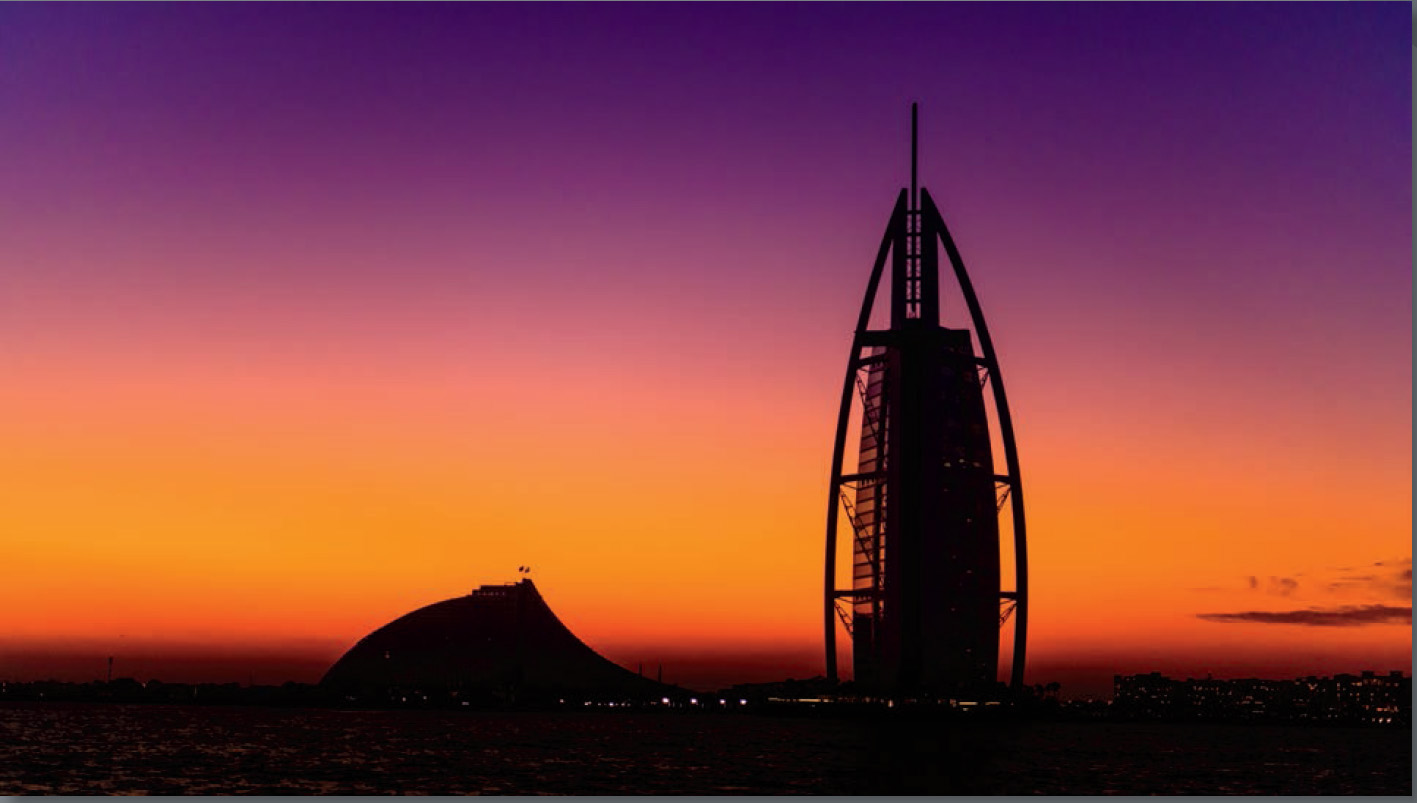
In Lightroom, choose Edit > Preferences (Windows) or Lightroom > Preferences (macOS), and click the External Editing tab.
The settings in the top section of the resulting dialog determine the properties with which a file opens in Photoshop when you use Lightroom’s Photo > Edit In command and choose to edit in Photoshop. (If you don’t change these settings, their default values are used.)
Choose PSD from the File Format menu to preserve the quality you get in Lightroom, as well as any layers you add in Photoshop.
 Tip
TipTIFF supports layers too, but it creates a larger file size than PSD does.
From the Color Space menu, choose the range of colors you want to work with. If you’re shooting in raw, choose ProPhoto RGB. If you’re shooting in JPEG, choose Adobe RGB (1998) instead.
 Note
NoteAnytime you convert an image in a large color space to a smaller one, its colors may shift. That’s why it’s important to view the image in the smaller color space (a process known as soft proofing) before you export it.
As you can see in the sidebar “Choosing a color space,” ProPhoto RGB encompasses the widest possible range of colors and protects colors captured by your camera from being clipped or compressed. Since a raw file doesn’t have a conventional color profile until it’s rendered by a pixel editor (such as Photoshop) or it’s exported from Lightroom, choosing ProPhoto RGB here preserves that broad color range when you edit it in Photoshop.
JPEGs, on the other hand, can’t use the broad color range that raw files do. If you’re shooting in JPEG format, your largest color-range option is Adobe RGB.
Color space refers to the range of colors you want to work with. Here’s what you need to know about choosing the one that’s right for you:
Adobe RGB (1998) is the most popular workspace. It includes a wide range of colors, so it’s perfect for designers and photographers. It’s also great for printing on inkjet printers and commercial presses.
You can also change your digital camera’s color profile to match what you use in Photoshop. For example, most cameras are initially set to sRGB mode, but you can switch to Adobe RGB instead. Alas, you’ll have to dig out your owner’s manual (or find it online) to learn how, but the increased range of colors and monitor consistency can be worth it.
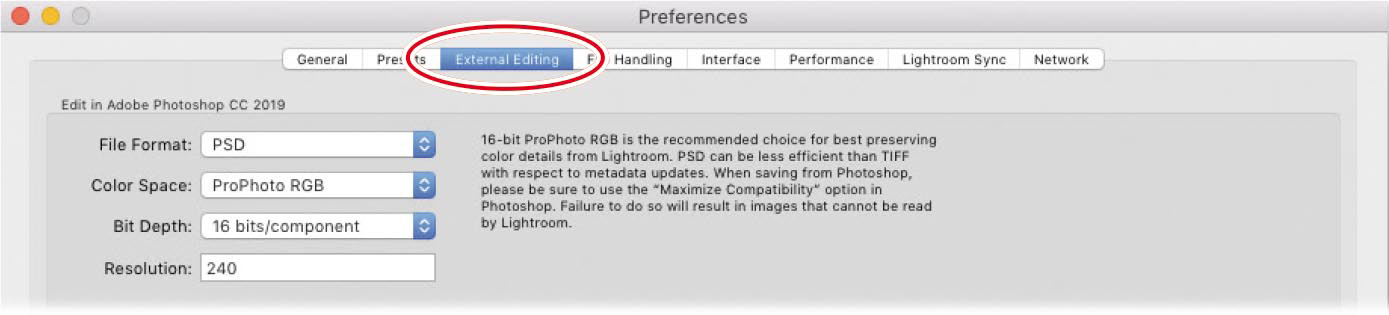
ProPhoto RGB is currently the largest workspace in use and is the one used by programs that process raw images. It’s the native workspace of Lightroom and of Photoshop’s Camera Raw plug-in. In the infographic shown here, the ProPhoto RGB workspace is shown in white with the other workspaces superimposed atop it.
sRGB is slightly smaller than Adobe RGB (1998). It is the Internet standard, so it’s perfect for prepping images for use on the web, in presentation programs, and in videos, and for submitting to online printing companies (labs such as mpix.com and nationsphotolab.com). This is the RGB workspace that Photoshop uses unless you pick another one.
The CMYK workspace, on the other hand, represents the smaller number of colors that are reproducible with ink on a commercial printing press. The lower-right image shows the ProPhoto RGB workspace compared to the color gamut of the truly incredible human eye.
From the Bit Depth menu, choose 16 bits/component if you’re shooting in raw format or 8 bits/component if you’re shooting in JPEG format.
Bit depth refers to how many colors the image itself contains. The goal is to keep as much color detail as you can for as long as you can.
JPEGs are 8-bit images that can contain more than 16 million colors. Raw images, on the other hand, can be 16-bit and contain over 280 trillion colors. If you have 16-bit files, send them to Photoshop and reduce them to 8-bit only if you need to do something in Photoshop that doesn’t work on 16-bit files (say, running a filter) or when you’re ready to export the image from Lightroom for use elsewhere.
NotePPI stands for pixels per inch. DPI stands for dots per inch. The latter term is used when referencing printers, because many printers use a dot pattern to reproduce an image with ink on paper.
Leave Resolution set to its default value of 240.
Resolution determines pixel density and thus pixel size when the image is printed. Leave it at 240 ppi, which is a reasonable starting point for a typical inkjet printer, and then adjust the resolution as necessary when you export the edited file from Lightroom.
Don’t close the dialog yet; you’ll use it in the next section.
![]() Note
Note
Only Photoshop or Photoshop Elements can be your primary external editor. If you don’t have one of them installed, the commands for editing in a primary external editor aren’t available in the first section of the Photo > Edit In menu. You can still designate other applications in the Additional External Editor section and then choose them from the second section of the Photo > Edit In menu.
From this point forward, whenever you select a thumbnail (or several) in Lightroom’s Library module and choose Photo > Edit In > Edit In Adobe Photoshop, or when you press the keyboard shortcut Ctrl+E/Command+E, Lightroom uses these settings.
Setting additional external editor preferences
You can designate one or more additional external editors that also appear in Lightroom’s Photo > Edit In menu. Doing so gives you a choice of editors or a choice of settings for the same editor.
Additional editors can be third-party programs or plug-ins such as Adobe Photoshop Elements, Nik Color Efex Pro, ON1 software, and so on. You can even create additional configurations for Photoshop, each with settings geared toward particular kinds of photos or uses.
For example, you may set up Photoshop as an additional external editor with options suitable for photos destined for the web.
![]() Tip
Tip
You can use the Additional External Editor section to configure as many external editing preferences as you like. Simply use the Preset menu to save each one as a preset. You won’t see them all separately in the Preferences dialog, but they stack up in the second section of Lightroom’s Edit In menu.
You can configure Lightroom to use Adobe Photoshop Elements as your primary or additional external editor. The process is roughly the same, but there are a few things to keep in mind.
First, if you have Elements but not Photoshop on your computer, Lightroom automatically picks Elements as the primary external editor.
Second, if you have both Elements and Photoshop on your computer, you can designate Elements as an additional external editor. To do that, be sure to navigate to the Elements Editor application file, not the alias (shortcut) in the root level of the Elements Editor folder. To find the real application file, use these paths:
C:Program FilesAdobePhotoshop ElementsPhotoshop Elements Editor.exe (Windows)
Applications/Adobe Photoshop Elements/Support Files/Adobe Photoshop Elements Editor (macOS)
If you pick the alias or shortcut instead, and then try to send a file from Lightroom to Elements, the application will open but the photo won’t.
Third, Elements works only in the Adobe RGB (1998) and sRGB color spaces. So if you’re sending files from Lightroom to Elements, choose Adobe RGB (1998), not ProPhoto RGB. You’ll also notice these commands missing from Lightroom’s Photo > Edit In menu: Open as a Smart Object, Merge to Panorama, and Merge to HDR Pro.
Setting the stacking preference
When you send a file from Lightroom to Photoshop, the PSD that comes back to Lightroom appears next to the original file in the Library module. In some cases, you may also generate copies of the PSD—if, say, you want to create different versions of it.
![]() Note
Note
You can expand and collapse a stack by selecting it in the Library module’s Grid view and then pressing S on your keyboard.
To reduce the clutter in your library, you may want to select Stack With Original to have Lightroom stack your PSDs into a pile with the original photo.
Doing so creates a collapsible group, known as a stack, of thumbnails. When you expand a stack, your PSDs are displayed side by side in the Library module in Grid view and in the Filmstrip. This makes related files easy to spot.

However, when a stack is collapsed, only one thumbnail is visible in the grid and the Filmstrip, so you can’t see all of its associated files. Therefore, you may want to leave Stack With Original unselected, and instead rely on the Library module’s Sort menu to keep original photos and their associated PSDs together.
To do that, click the Sort menu in the toolbar at the bottom of the Library module, and choose File Name or Capture Time.
![]() Note
Note
If you don’t see the toolbar in the Library module, press T on your keyboard.
Setting the file naming preference
The Template menu at the bottom of the External Editing Preferences dialog box lets you specify how Lightroom names the files you’ve edited in Photoshop. It adds “-Edit” by default, but you can change the naming scheme to whatever you want (the sample filename is given the PSD extension automatically).
For the purposes of this lesson, stick with the default file naming scheme. However, if you want to change it later on, in the Template menu, choose Edit to open the Filename Template Editor, where you can choose what you want your filenames to look like and save that as a template.

The next section teaches you about the changes you need to make to Photoshop to work well with Lightroom.
Configuring Photoshop’s color settings
Now that Lightroom’s settings are configured, you can turn your attention to Photoshop. In this section, you’ll learn how to make Photoshop’s color space match the one you told Lightroom to use when it sends a file to Photoshop.
In Photoshop, choose Edit > Color Settings.
In the Working Spaces section, choose ProPhoto RGB or Adobe RGB (1998) from the RGB menu. The choice you make here should match the choice you made earlier in Lightroom’s External Editing preferences.
In the Color Management Policies section, choose Preserve Embedded Profiles from the RGB menu.
For Missing Profiles, select Ask When Opening and leave the other options unselected.
NoteIf you’re using Photoshop Elements as an external editor, you need to adjust its color settings too. To do that, launch the Elements Editor and choose Edit > Color Settings. In the dialog box that appears, choose Always Optimize for Printing, and click OK. This makes Elements use the Adobe RGB (1998)color space. (Choosing Always Optimize for Computer Screen uses the smaller sRGB color space instead.)
With these settings, the files you send from Lightroom to Photoshop should open in the correct color space. And if Photoshop encounters a file that doesn’t have an embedded profile, you get a dialog asking how you’d like to proceed. In that case, choose Assign Working RGB, and click OK.
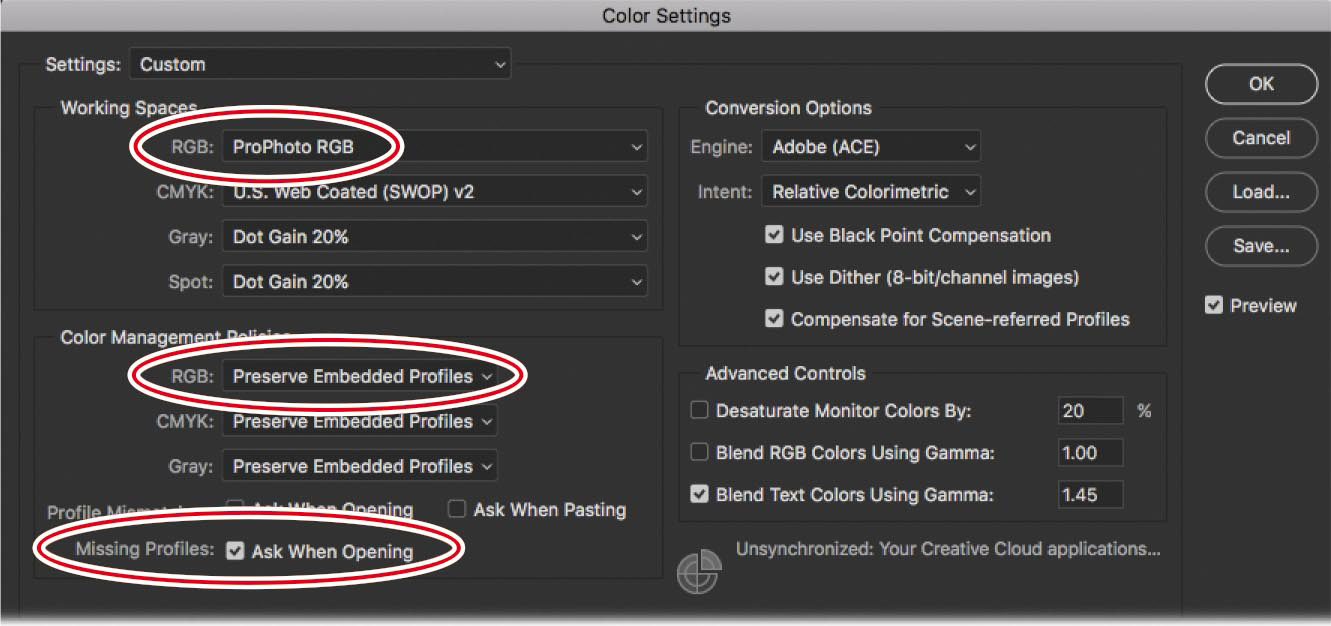
Click OK in the Color Settings dialog box to close it.
Now let’s take a look at how to create Photoshop files that Lightroom can preview.
Configuring Photoshop’s Maximize Compatibility preference
If you followed the advice of this book and told Lightroom to send files to Photoshop in PSD format, there’s one more Photoshop setting to adjust.
![]() Note
Note
If you assigned Photoshop Elements as your external editor, you need to do this in Elements too. In the Elements Editor, choose Edit > Preferences > Saving Files (Windows) or Adobe Photoshop Elements Editor > Preferences > Saving Files (macOS).
Lightroom doesn’t understand the concept of layers, so in order for layered PSDs to be visible in Lightroom, Photoshop needs to embed a flattened layer into each document. This flattened layer is what you see in Lightroom.
In Photoshop, choose Edit > Preferences > File Handling (Windows) or Photoshop > Preferences > File Handling (macOS).
In the File Handling Preferences dialog box, change the Maximize PSD and PSB File Compatibility menu from Ask to Always.
Click OK to close the dialog box.
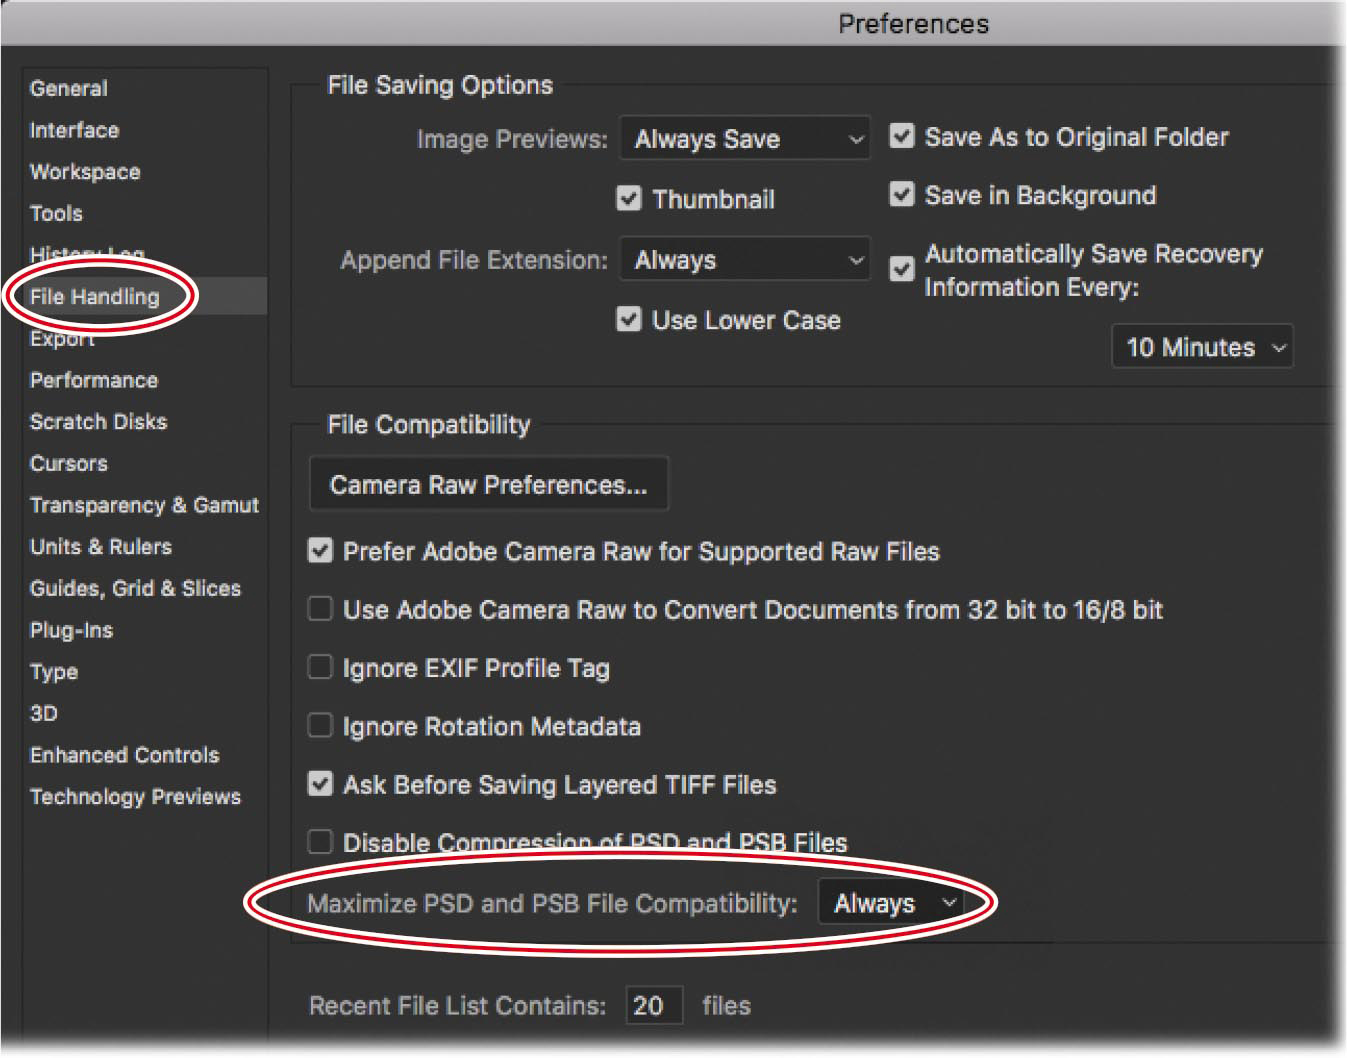
Once you do this, you’ll be able to see your PSDs in Lightroom.
The next section teaches you how to keep your version of Lightroom synced with Photoshop’s Camera Raw plug-in.
Keeping Lightroom and Camera Raw in sync
Lightroom, at its heart, is a raw converter whose job is to convert the data in a raw file into an image that can be viewed and edited onscreen. Photoshop has a raw converter too: a plug-in named Camera Raw. Camera Raw and Lightroom use the same raw conversion engine, and when Adobe updates one, it usually updates the other with a matching version.
This is important because when you send a raw photo from Lightroom to Photoshop, Photoshop uses Camera Raw to render the raw data into pixels you can see and work with onscreen. If you don’t have matching versions of Lightroom and Camera Raw, you may encounter a mismatch warning in Lightroom and you may have content issues as you pass the file back and forth. For more on this topic, see the sidebar “Encountering a Lightroom–Camera Raw mismatch.”
To check which versions of Lightroom and Camera Raw are installed on your computer, follow these steps:
In Lightroom, choose Help > About Adobe Photoshop Lightroom (Windows) or Lightroom > About Adobe Photoshop Lightroom (macOS). A window opens that shows your version of Lightroom. It also reports the version of Camera Raw that’s fully compatible with your version of Lightroom. Click the X in the upper right (Windows) or the window itself (macOS) to close it.
In Photoshop, choose Help > About Photoshop (Windows) or Photoshop > About Photoshop (macOS). Your version of Photoshop appears in the window that opens. Close the window by clicking the X in the upper right (Windows) or clicking the window itself (macOS).
Also in Photoshop, choose Help > About Plug-Ins > Camera Raw (Windows) or Photoshop > About Plug-Ins > Camera Raw (macOS). Your version of the Camera Raw plug-in is reported in the window that opens. Click the window to close it.
If you have mismatched versions of Lightroom and Camera Raw installed on your computer, you may get a mismatch warning in Lightroom when you try to send a raw file to Photoshop.
Although that’s not the end of the world, it’s important to understand the options Lightroom gives you, which are:
Cancel closes the warning dialog without sending the file to Photoshop. You can then upgrade your software before trying again.
Render Using Lightroom sends the raw file to Photoshop, but instead of Camera Raw rendering it, Lightroom does it itself. The advantage of letting Lightroom render the file is that doing so ensures that all your Lightroom adjustments are included in the rendered image, even if you used a feature in the most recent version of Lightroom that isn’t in the version of Camera Raw on your computer. A potential downside is that as soon as you click the Render Using Lightroom button in the warning dialog, an RGB copy of the image is added in your Lightroom catalog, and it stays there even if you change your mind and close the image in Photoshop without saving. In that case, you now have the extra step of deleting the RGB copy from your Lightroom catalog.
Open Anyway sends the raw file to Photoshop, and Camera Raw, not Lightroom, renders the file. This option doesn’t guarantee that all your Lightroom adjustments are included in the rendered image. For example, if you have a newer version of Lightroom than Camera Raw, any new features you used in Lightroom that aren’t in your version of Camera Raw won’t appear in the image when it opens in Photoshop.
The moral of this story is that it’s easier to keep your versions of Lightroom and Camera Raw in sync if at all possible.
If you subscribe to Adobe Creative Cloud, you can use the Adobe Creative Cloud app to update your software. If you’re not a subscriber, choose Help > Updates in Lightroom or Photoshop (CS6 or earlier) instead. When you update Photoshop, you get the latest version of Camera Raw, as well.
Sending a raw file from Lightroom to Photoshop
Once you adjust a raw photo in Lightroom, you may determine that you need to send it to Photoshop for additional pixel-level editing.
![]() Note
Note
You can easily send other file formats, such as JPEGs, from Lightroom to Photoshop too. That topic is covered later in this lesson.
The process of sending raw files from Lightroom to Photoshop is easy, and it’s the same process for a camera manufacturer’s proprietary raw file (say, a .CR2 from Canon or an .NEF from Nikon) or a DNG file. This section teaches you how to do that.
When you’re working with your own photos, begin by adjusting the photo’s tone and color in Lightroom, which you learned about in the previous lessons.
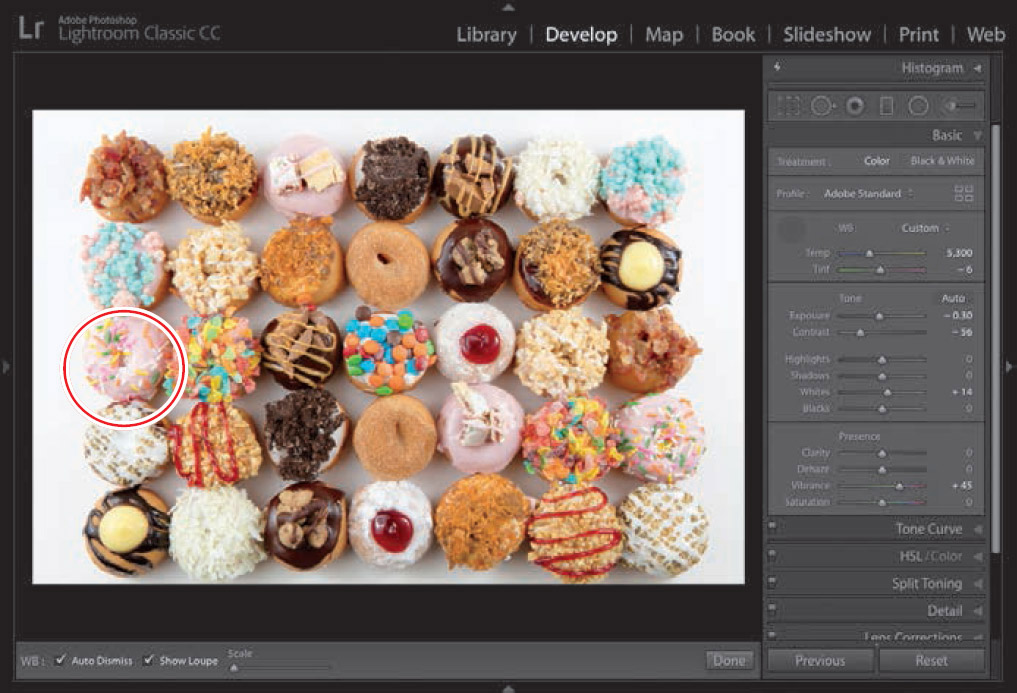
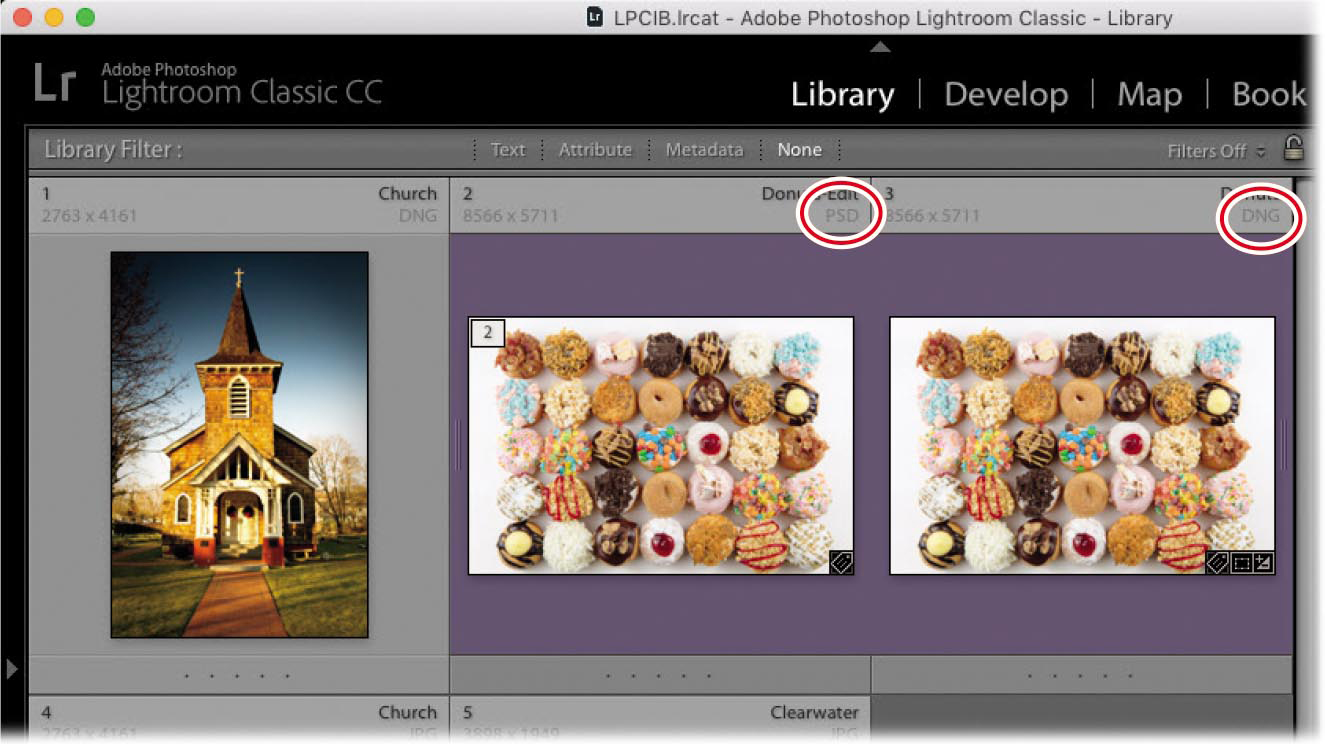
The basic adjustments have been completed for you on this photo of a box of mini doughnuts; however, one of the mini doughnuts (circled in red here) is missing some sprinkes. This would be best added at a pixel level using the Clone Stamp tool in Photoshop.
![]() Note
Note
Once you send a photo from Lightroom to Photoshop, any Lightroom adjustments you’ve made to it become permanent in the PSD file Photoshop sends back to Lightroom. For that reason, you may want to wait to make some adjustments—say, adding an edge vignette—until the file is returned to Lightroom.
Choose Photo > Edit In > Edit in Adobe Photoshop CC (or whatever version you’re using). Alternatively, you can press Ctrl+E/Command+E.
Photoshop opens (it also launches if it isn’t already running), and Lightroom passes the raw file to Photoshop.
Behind the scenes, the Camera Raw plug-in renders the raw file so you can see and edit it in Photoshop. Any adjustments you made in Lightroom are made permanent in the image that opens in Photoshop. (Of course, your adjustments are flexible in the original file back in Lightroom.)
TipYou can access the Photo > Edit In menu in the Develop, Library, and Map modules. It’s also available in the Library module by right-clicking one or more thumbnails and choosing Edit In from the resulting menu.
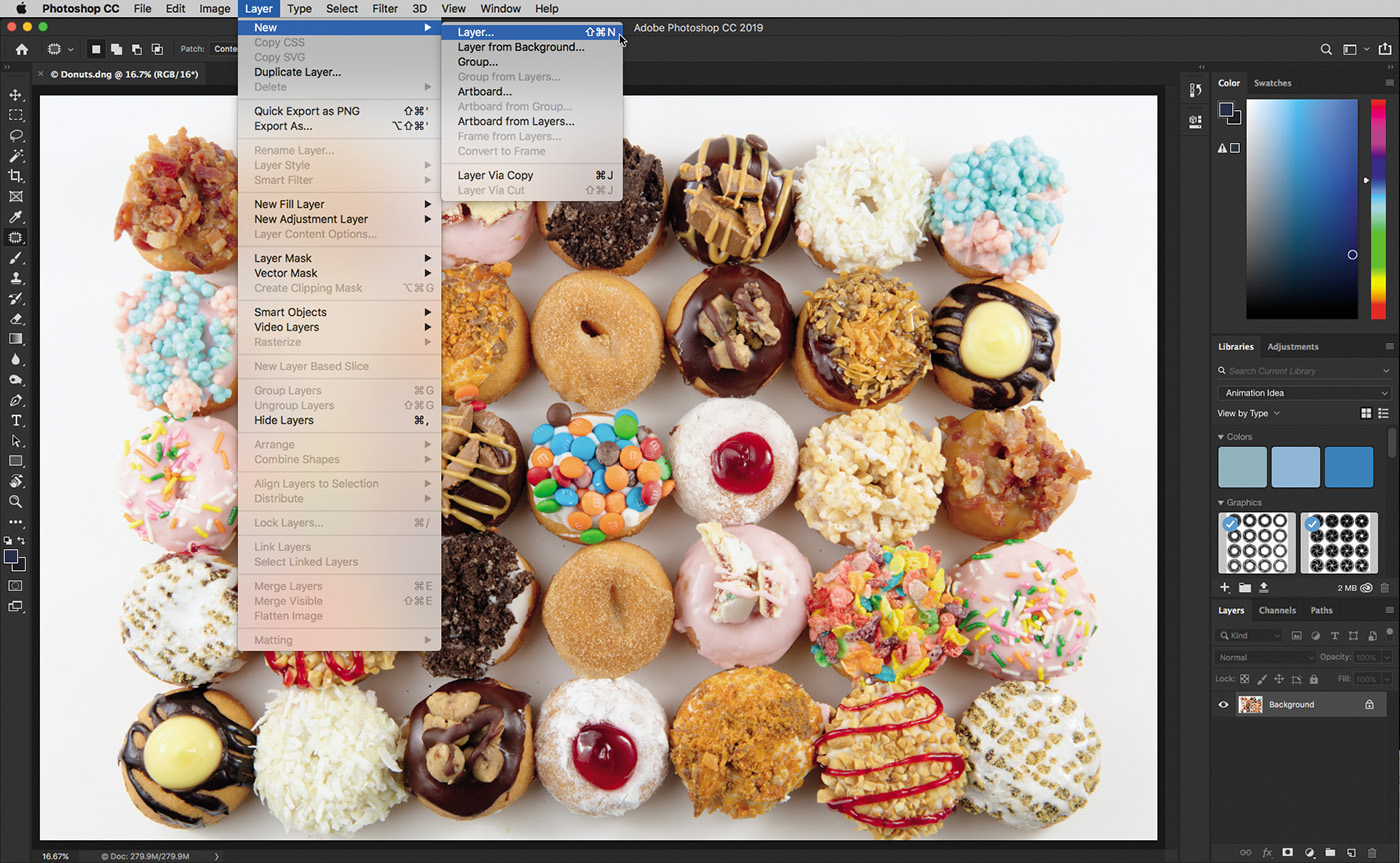
In Photoshop, create a new blank layer by choosing Layer > New > Layer or pressing Shift+Ctrl+N/Shift+Command+N.
 Tip
TipIf you can’t see the whole photo in Photoshop, press Ctrl+0/Command+0 to fit it onscreen
Select the Clone Stamp tool by pressing the S key. Then, hold down Ctrl+Spacebar/Command+Spacebar and click the image to zoom in to the doughnut in question.
In the brush options for the Clone Stamp tool, select a soft brush a little wider than a sprinkle. Also, make sure that the Sample menu is set to All Layers in the options bar at the top.
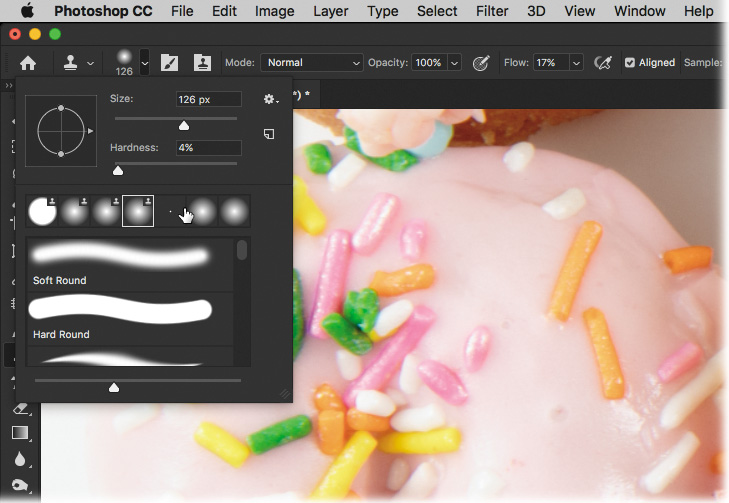
Hold down the Alt/Option key and click one of the sprinkles on the dougnut. This will sample that specific area and load it into your brush. Because you created a new layer and set it to sample all layers, the results will be painted onto a blank layer.
 Tip
TipIf you want to follow along with this tutorial, make sure you access the videos that accompany this lesson online. Refer to the “Getting Started” section at the beginning of this book for how to access the videos.
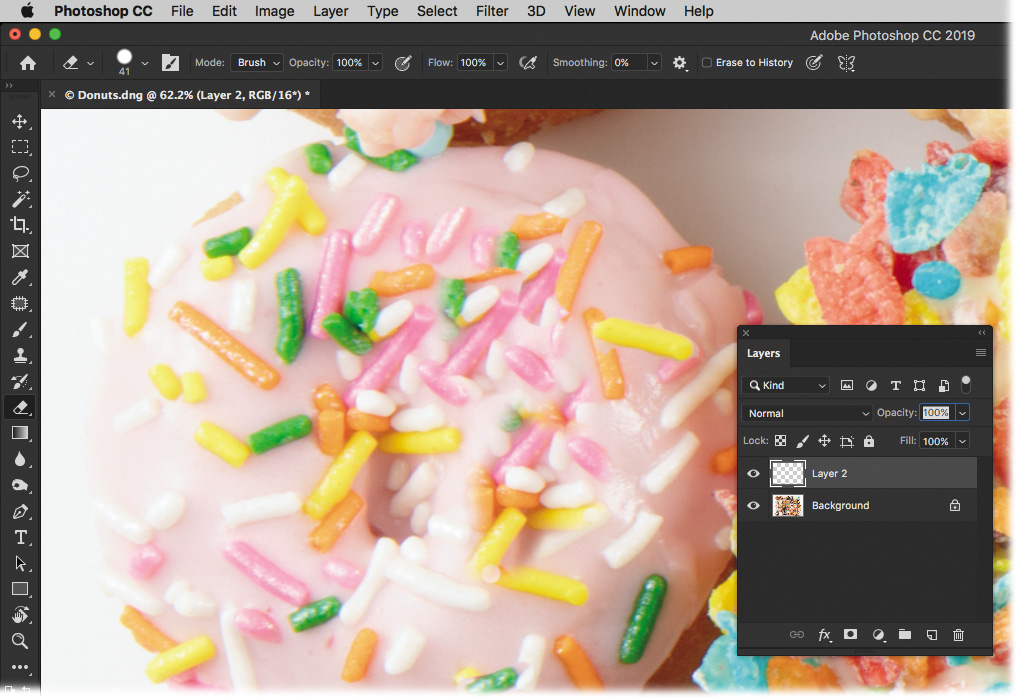
Switch to the Eraser tool by pressing the E key, and erase out some of the areas alongside the new sprinkles to make sure that they blend in with the old ones.
Now that the doughnut is fixed, you’re ready to send the photo back to Lightroom.
![]() Note
Note
You can also send a raw file from Lightroom to Photoshop as a Smart Object, which has some unique benefits. You’ll learn how to do that later in this lesson.
Send the photo back to Lightroom
When you’re finished editing in Photoshop, all you have to do is save and close the photo. As long as Lightroom is open and running when you do this, the PSD appears in your Lightroom catalog next to the original photo.
In Photoshop, choose File > Save (or press Ctrl+S/Command+S) to save the file. Close the Photoshop document by choosing File > Close or by pressing Ctrl+W/Command+W.
Technically, you can use the File > Save As command to rename the file, but it’s important that you don’t change the file’s location. If you do, Lightroom won’t be able to find it.
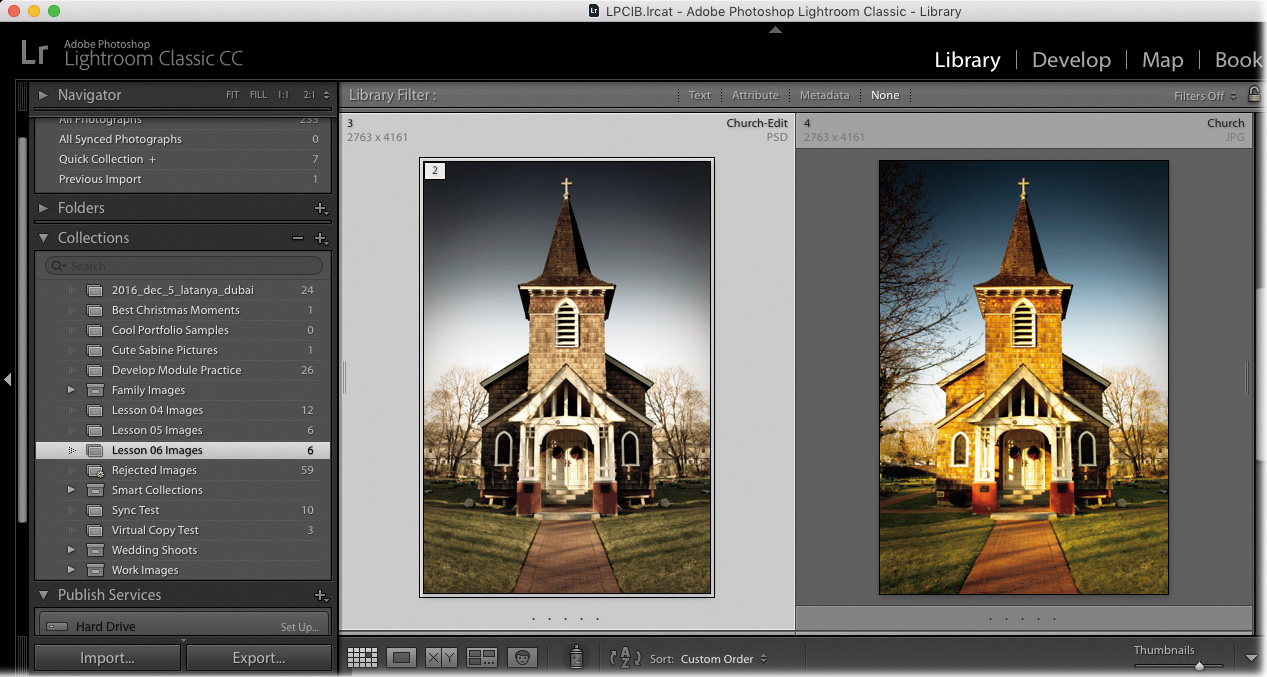
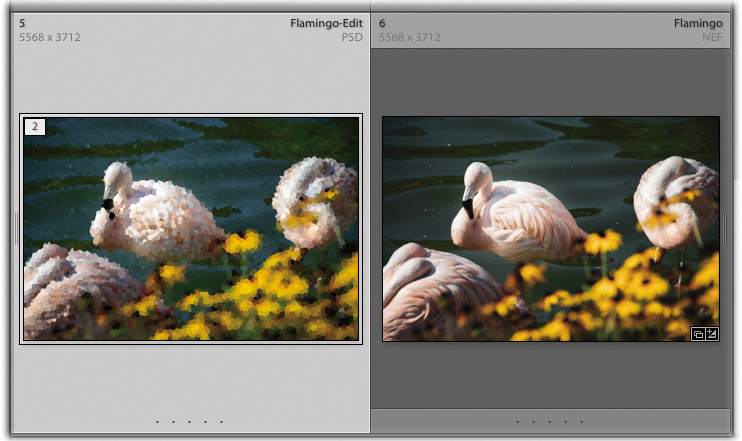
In Lightroom, press G to return to the Library module’s Grid view, and the PSD appears next to the original raw file.
Notice the file formats at the upper right of each thumbnail: one is a PSD, and the other is a DNG.
The raw file displays the adjustments you made to it in Lightroom before you sent it to Photoshop. The Photoshop file reflects your Lightroom adjustments as well as the cloning you did in Photoshop. As mentioned, your Lightroom edits are permanent in the PSD file. That said, you can reopen the PSD file and continue editing it if you need to, which you’ll do next.
TipIf you are following my suggestion for creating collection sets for each shoot and collections for different parts of the shoot, this would be a good time to create a specific collection called Photoshop Files within the parent collection set. That way, you have a quick way of accessing all of the Photoshop files from the shoot in one place.
Leave the photo open because you’ll use it in the next exercise.
Reopen the PSD for more editing in Photoshop
If you determine that you have more pixel editing to do in the PSD that came back to Lightroom, you can easily reopen it in Photoshop. For example, you may decide to do a bit more cloning on the doughnut. Follow these steps to do that:
Select the PSD in Lightroom’s Library module, and press Ctrl+E/Command+E.
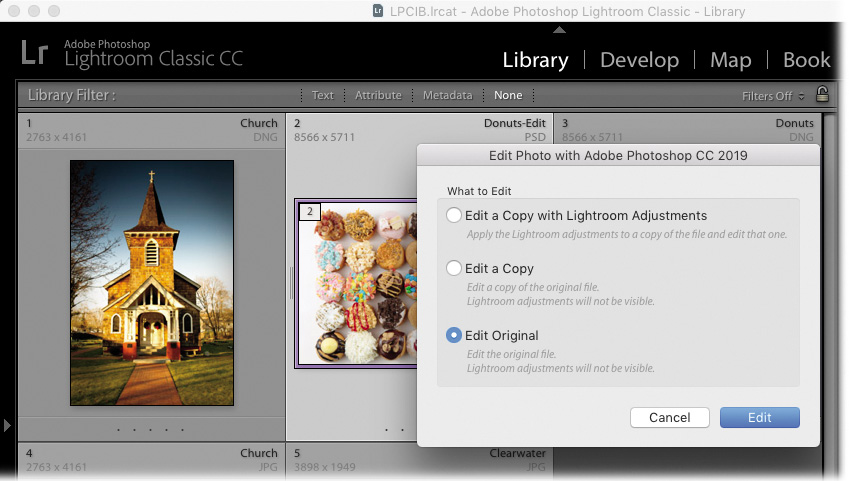
In the dialog box that opens, choose Edit Original, and click Edit to open the layered PSD in Photoshop. Choosing any other option here opens a flattened copy of the PSD, not the layered PSD. (You’ll use the other options later.)
When the layered PSD opens in Photoshop, use the Clone Stamp tool to add a couple more sprinkles on the layer we added.
Save the PSD by pressing Ctrl+S/Command+S. Close the document by pressing Ctrl+W/Command+W.
The updated PSD returns to Lightroom with your changes intact. Now you’re ready to add final adjustments to the PSD in Lightroom.
Add final adjustments to the PSD in Lightroom
Once you’ve taken a raw file from Lightroom to Photoshop and back again, you may be finished editing; however, you may have a thing or two left to do in Lightroom. Some examples of the editing you may do to a PSD are finishing touches, such as an edge vignette, a quick crop, or color adjustments you need to print the file.
![]() Note
Note
If you add the edge vignette to the PSD and then realize you have more cloning to do, you’ll have to add the edge vignette again to the updated PSD that comes back to Lightroom.
Generally speaking, try to avoid redoing any of the original adjustments you made in Lightroom’s Basic panel because that can complicate your workflow. If you need to reopen the PSD in Photoshop, it won’t include any additional Lightroom adjustments (this is due to the special flattened layer Photoshop includes in the file, which you learned about in the section “Configuring Photoshop’s Maximize Compatibility preference”). And, if you open a copy of the PSD that includes the Lightroom adjustments, you lose the layers you originally made in Photoshop.
Let’s get the doughnut photo ready for printing:
In Lightroom, select the PSD of the doughnut file and press D to open the photo in the Develop module, if you aren’t already there.
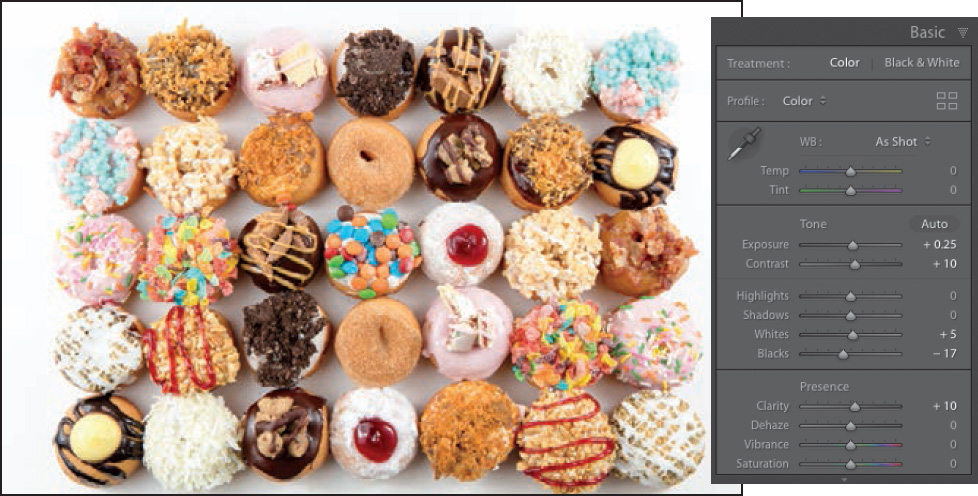
Let’s finish off the toning of the document in the Basic panel: move Exposure to +0.25, Contrast to +10, Whites to +5, Blacks to –17, and Clarity to +10.
My client would like to print this picture large, so I want to be able to see the detail in each of the doughnuts. Go into the Detail panel and adjust the Sharpening Amount to 57.
Holding down the Alt/Option key, drag the Radius slider until you see the edges of the doughnuts (I used a setting of 1.3).
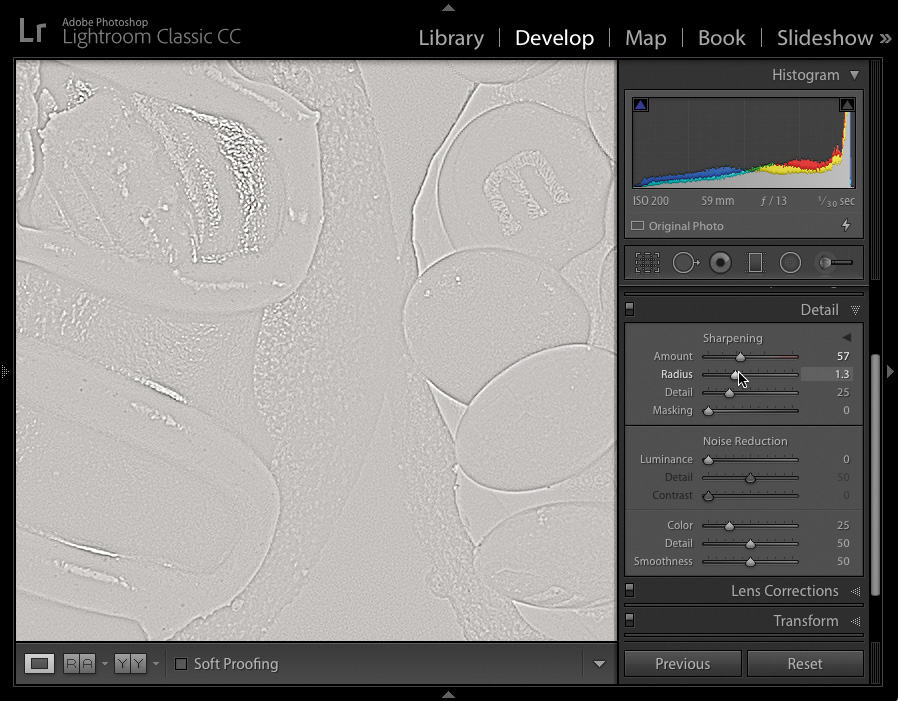
Holding down the Alt/Option key, drag the Detail slider until you see enough detail to taste (I returned mine to 25 after dragging to the right).
If you find that noise has been introduced into the image, mitigate it using the Noise Reduction slider. Also, it’s important to keep in mind that, depending on what paper you’ll print on, you may need to do additional sharpening. The point? Sharpen, but don’t go overboard here.
Sending a JPEG or TIFF from Lightroom to Photoshop
When you send any file format other than a raw photo from Lightroom to Photoshop, Lightroom questions you as to what it should send to Photoshop. The choice you make determines whether or not the edits you’ve made in Lightroom tag along for the ride over to Photoshop.
In this section, you’ll send a JPEG to Photoshop for the purpose of using Photoshop to get rid of an element in a picture, as well as apply a toning preset.
In Lightroom’s Library module or the Filmstrip in the Develop module, select the Church1.jpg photo.
Open the photo in Photoshop by pressing Ctrl+E/Command+E.
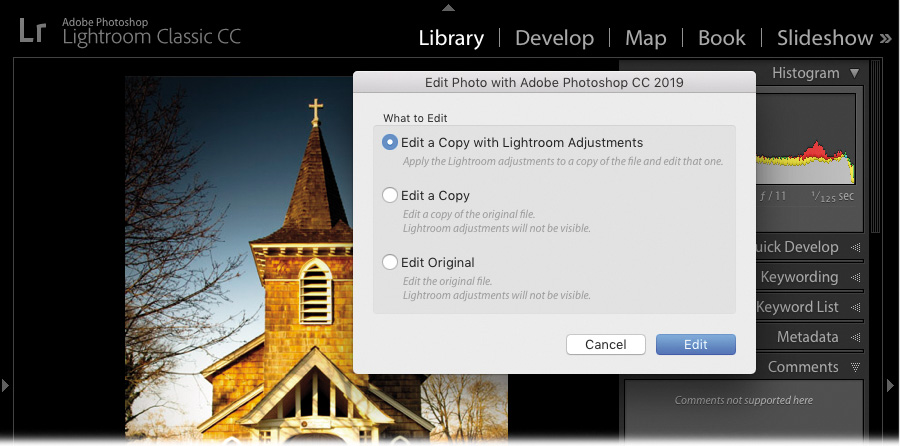
In the Edit Photo with Adobe Photoshop dialog box that appears, choose Edit A Copy With Lightroom Adjustments, and click Edit.
NoteThis dialog is exactly the same one you encountered when you reopened a PSD from inside Lightroom earlier in this lesson.
The image opens in Photoshop with your Lightroom adjustments applied. Choosing any other option in the Edit Photo dialog box would prevent your adjustments from being visible once the file opens in Photoshop.
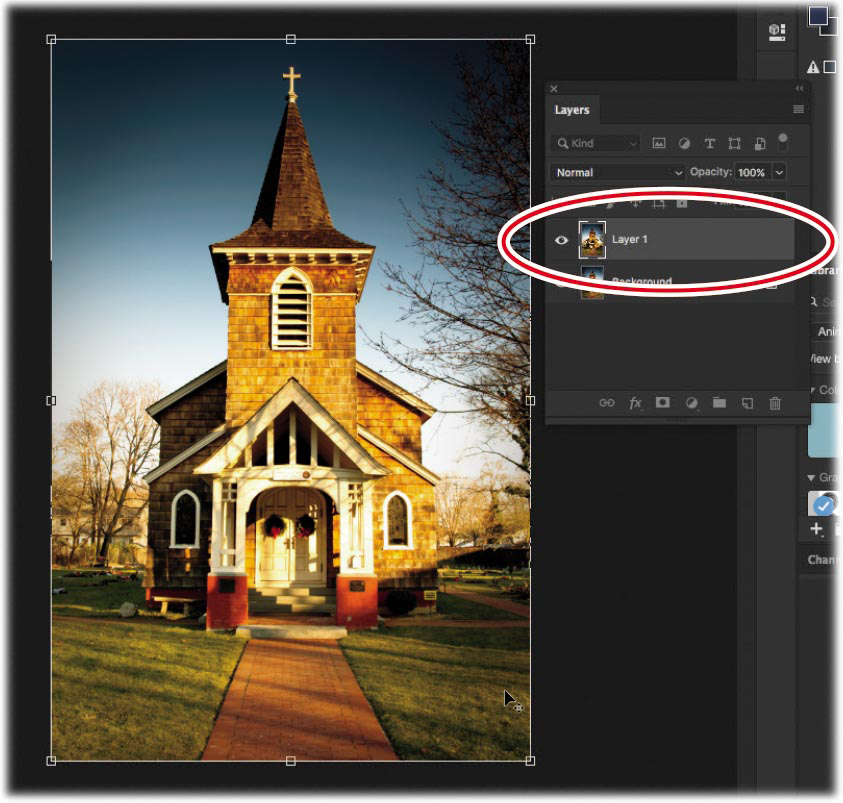
In Photoshop, choose Layer > New > Layer Via Copy or press Ctrl+J/Command+J.
Let’s flip this copy of the picture so that we have a clean left border. Press Ctrl+T/Command+T to enter Free Transform. Then, right-click anywhere on the picture and select Flip Horizontal. Press Enter/Return to exit Free Transform.
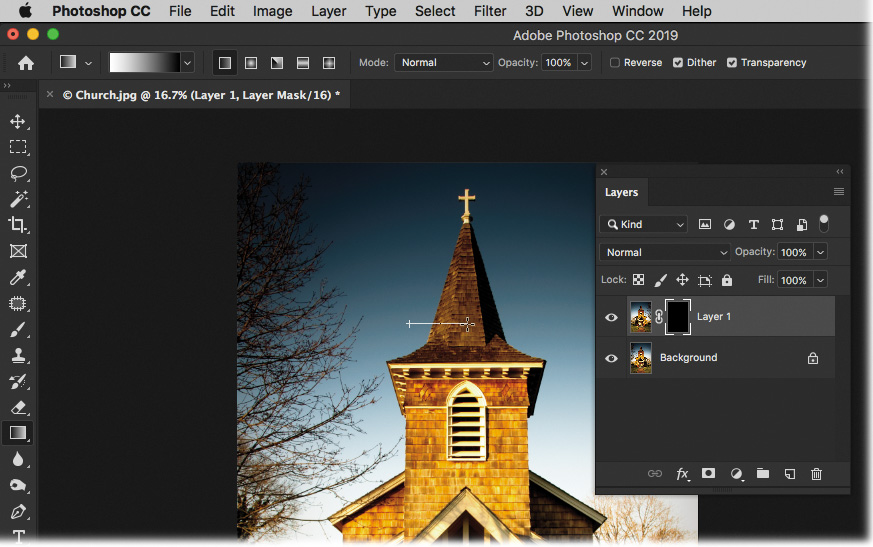
I want to show only the left side of the picture, but hide the right side with a mask. So, hold down the Alt/Option key and click the Add Layer Mask icon at the bottom of the Layers panel to add a black mask to the duplicate layer.
Press D on your keyboard to make sure the Foreground and Background colors are set to black and white. Then, press G to get the Gradient tool (click the three dots icon near the bottom of the toolbar to add it, if needed). Click the arrow next to the gradient thumbnail in the options bar to open the Gradient Picker, and choose the Foreground To Background gradient in the upper left.
Click to the left of the church’s steeple and, while holding down the Shift key, drag toward the center of the steeple. If your Foreground color is set to black and your Background color is set to white, this should reveal the contents of that layer on the left and slowly hide it as you move to the right.
Let’s finish this image off with a photographic effect. Click the Create New Adjustment Layer icon (the black-and-white circle) at the bottom of the Layers panel and select Gradient Map near the bottom of the menu.
In the Properties panel, click the arrow next to the gradient thumbnail to open the Gradient Picker, then click the little gear icon and choose Photographic Toning from the menu. Make sure that you click Append (not Replace).
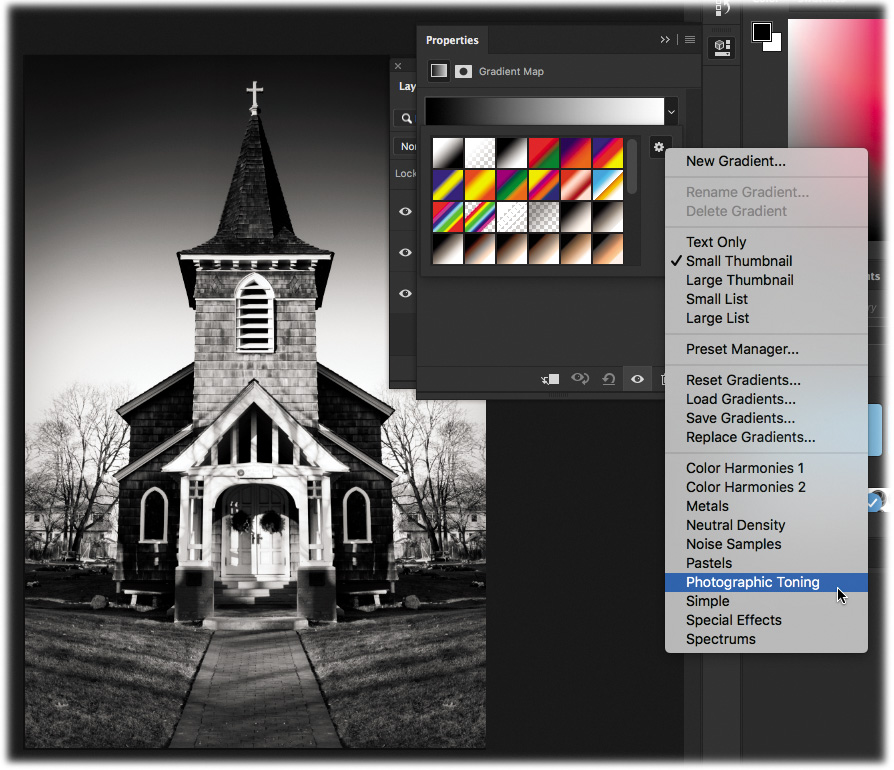
The gradients here are really interesting takes on tinted effects. I tend to like the Selenium gradients instead of the Sepia ones, but experiment with them to find one that speaks to you. At the upper right of the Layers panel, lower the layer’s Opacity setting to around 75% to let some of the original colors show through.
TipIf your colors are reversed in the Gradient settings in the options bar, you may need to swap your Foreground and Background colors. Press the X key to swap them.
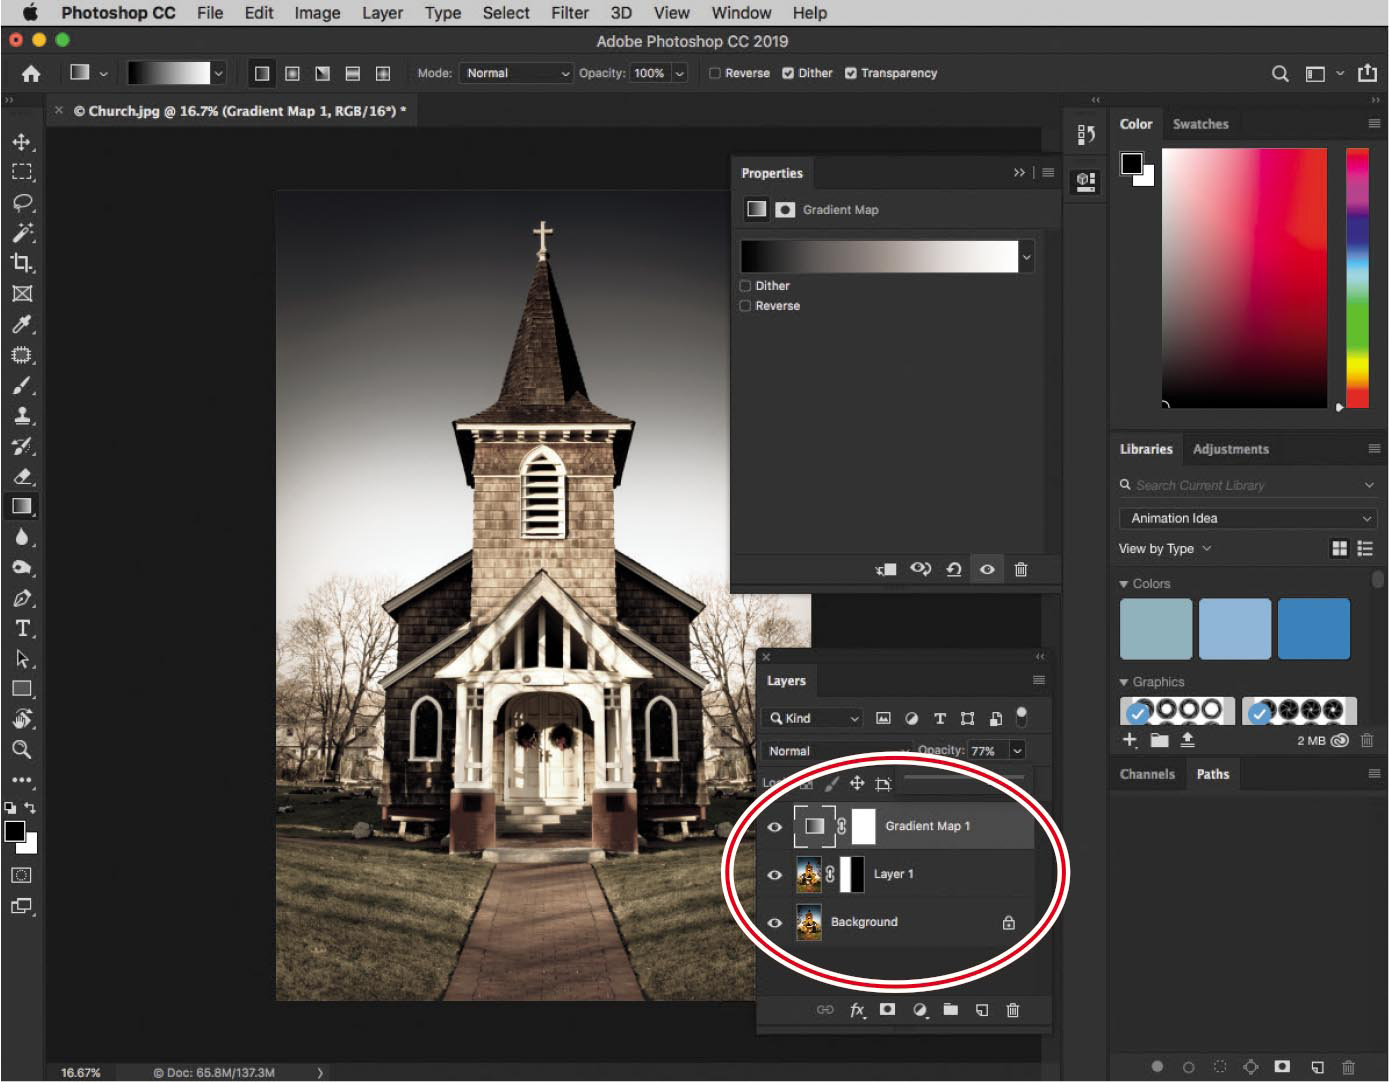
You now have several layers in this JPEG file: the original Background layer, the masked copy layer, and a Gradient Map layer at the top. Press Ctrl+S/Command+S to save the file. Close the file by pressing Ctrl+W/Command+W. Because of the layers, Photoshop saves it as a PSD. In Lightroom, the PSD appears next to the original JPEG in the Filmstrip or Grid view.
If you decide you want to change the opacity of the Gradient Map adjustment layer you applied in Photoshop, select the PSD in Lightroom, and reopen it in Photoshop by pressing Ctrl+E/Command+E.
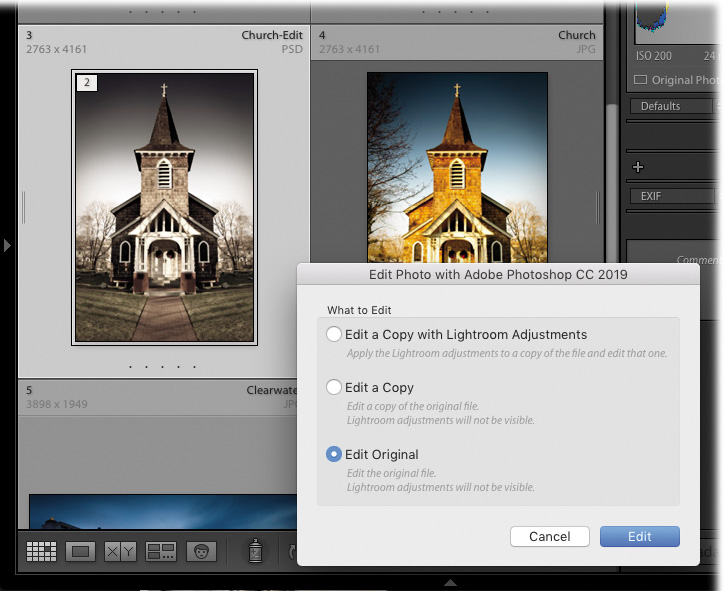
This time, in the Edit Photo dialog box, choose Edit Original and click Edit.
In Photoshop, select the Gradient Map adjustment layer in the Layers panel, and then lower the Opacity setting at the upper right of the panel to around 52%.

Press Ctrl+S/Command+S again, and then close the file by pressing Ctrl+W/Command+W.
Your changes are updated in the PSD that appears in Lightroom.
Sending a photo from Lightroom to Photoshop as a Smart Object
Another way to send files of any format to Photoshop is as Smart Objects, which you can think of as a protective wrapper. Anything you do to a Smart Object happens to the wrapper and not to the photo inside it. Smart Objects also let you do stuff like resize and run filters on the photo without harming the original.
![]() Note
Note
Adobe Photoshop Elements doesn’t support Smart Objects, so you won’t see this option if you’re using Elements as your external editor.
When you send a raw file to Photoshop as a Smart Object, the Smart Object stays in raw format, too. This enables you to fine-tune it using Photoshop’s Camera Raw plug-in if the photo needs a last-minute tweak while you’re in Photoshop.
This feature also lets you access any snapshots (saved image states or versions) you’ve made in Lightroom via the Camera Raw plug-in’s Snapshots panel. This can be another good way to experiment with different treatments of the image while you’re still in Photoshop.
Working with snapshots in Lightroom and Photoshop
Before we start working with snapshots, I want to use one of the images that we worked on in Lesson 4—the flamingo.
![]() Tip
Tip
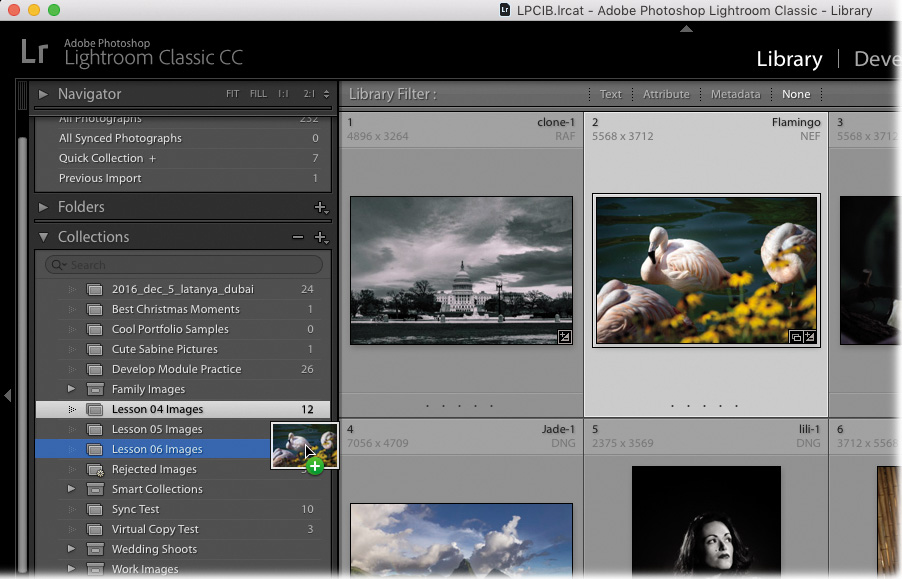
If you want to keep the changes you made to the flamingo image in the Lesson 04 Images collection, create a virtual copy of it after you drag it into the Lesson 06 Images collection.
Navigate to the Lesson 04 Images collection and drag the Flamingo.NEF file into the Lesson 06 Images collection. This not only adds it to a new collection, but any changes that we make will appear in both collections.
Edit the image in the Develop module to taste. I increased the Exposure setting to +0.35, decreased the Highlights setting to –71, and increased the Whites setting to +14 to begin. I’d like to save this version of the file in the event I want to get back to these edit settings, so I will make a snapshot of them. In the Snapshots panel on the left side of Lightroom’s Develop module, click the plus sign (+) and create a new snapshot called Full Color.

Expand the Presets panel to find a creative preset to apply. Click the triangle next to Creative, and let’s apply the Creative-Warm Contrast preset.
Repeat step 2 to create a new snapshot named Warm Contrast.
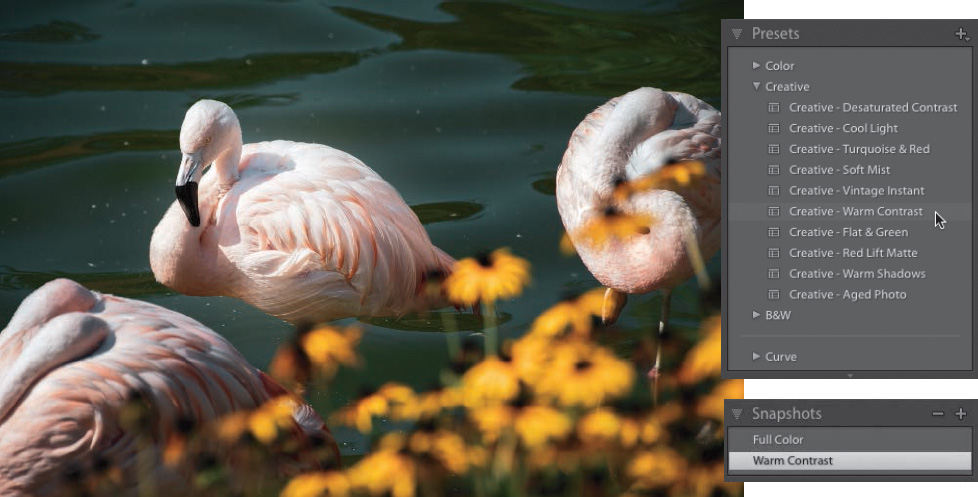
In the Snapshots panel, you now have two different color treatments that you can go back to quickly and easily. The only drawback? You can’t compare two snapshots with one another in Survey mode, as you can with virtual copies. However, it’s a great speed tool, so let’s make a Smart Object from this file.
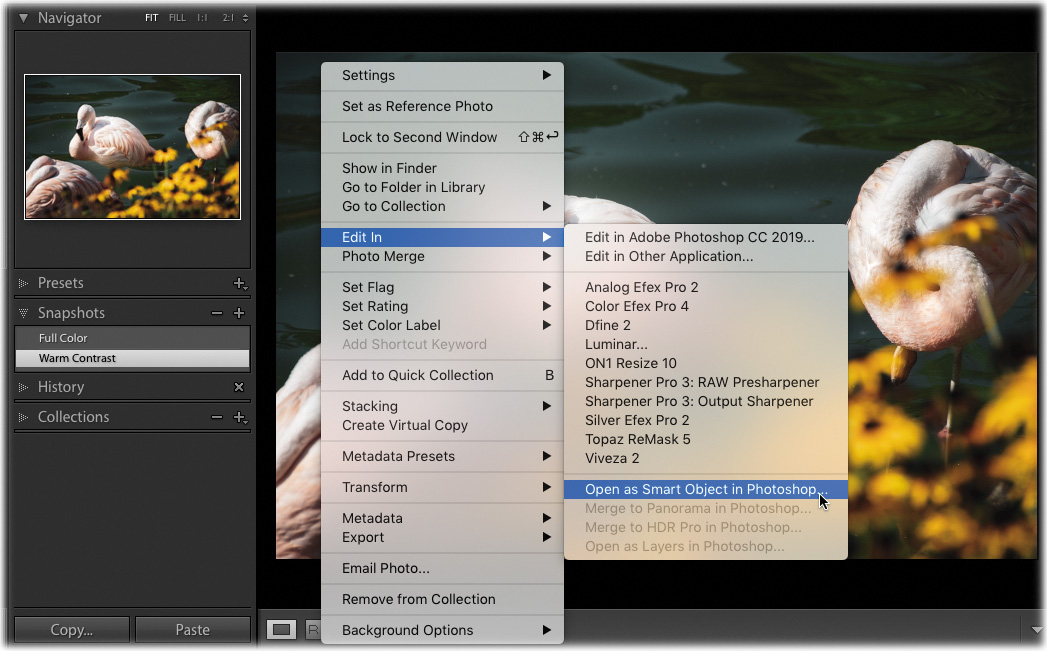
Right-click the photo and choose Edit In > Open as Smart Object in Photoshop.
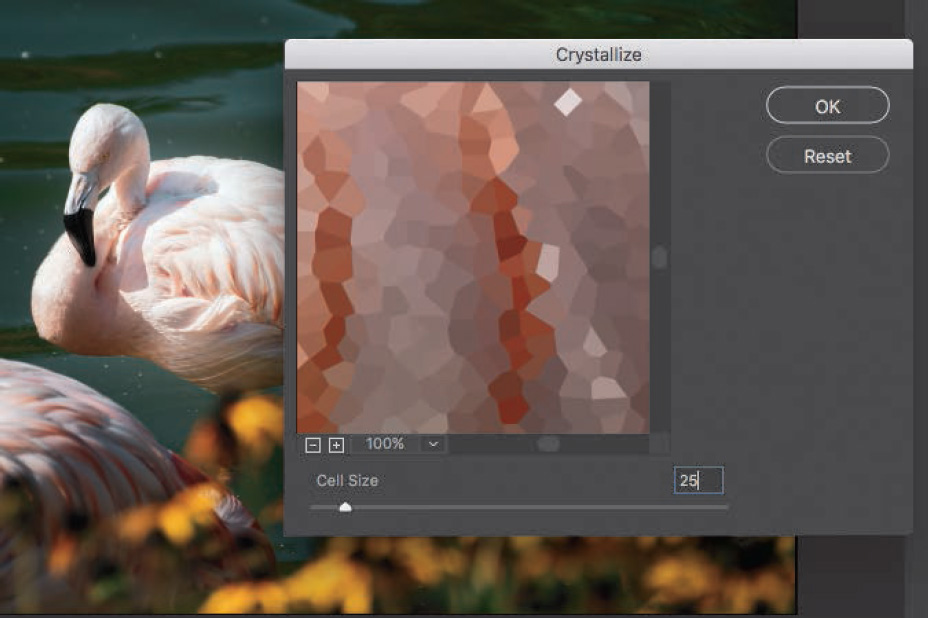
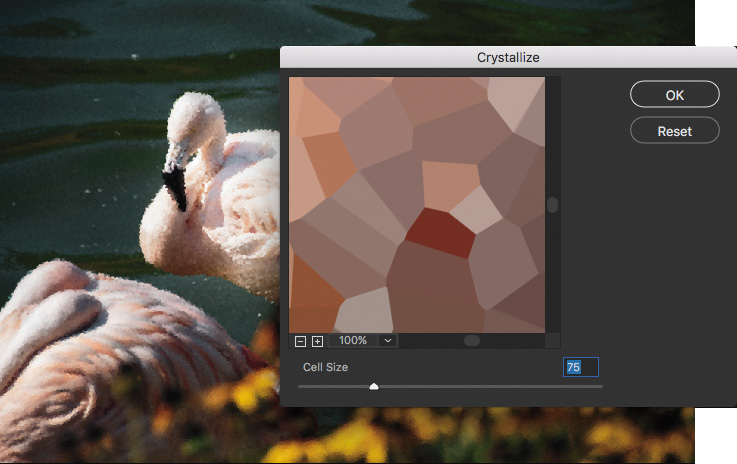
In Photoshop, apply a filter to the image by choosing Filter > Pixelate > Crystallize. This makes the image appear as if it is constructed of a series of small crystals. Changing the size of the crystals gives you different looks.
Change the Cell Size value in the Crystallize dialog box to 25 and press the Enter/Return key.
Because the image is a Smart Object, Photoshop applies what is called a Smart Filter to it. Filters are normally applied to pixel-based images. A Smart Filter gives you all of the options of pixel-based filters, but on raw images. The Smart Filter even includes a mask that lets you paint the filter in, in specific areas.
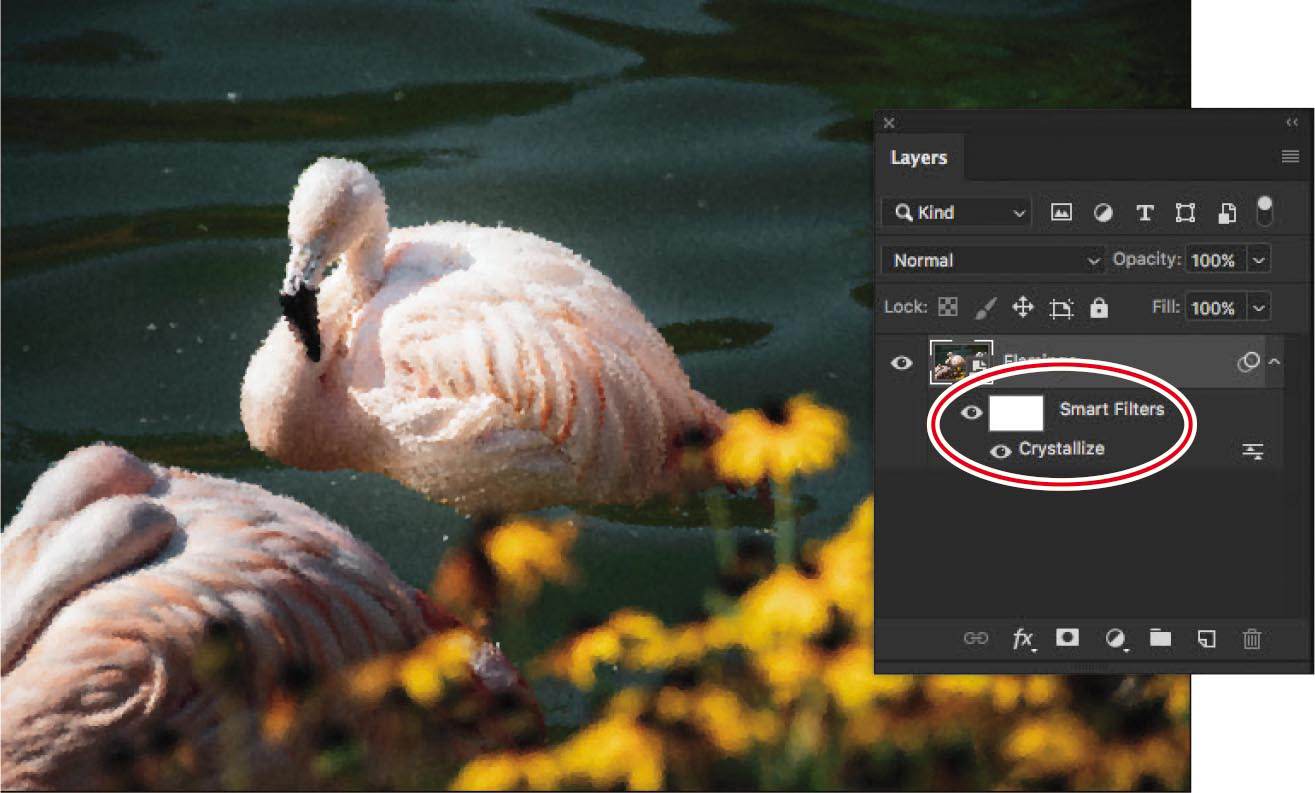
Double-click the word Crystallize in the Layers panel and it will bring back the Crystallize filter dialog box, letting you change the values for your filter. This time, change the size of the cells to 75 and click OK.
The image will automatically change, and the new settings will be applied to the Smart Object. You can paint on the white mask that appears above the filter with a black brush to hide the effect from part of the picture. If you want to reapply that effect to the area, switch your brush color to white and paint over the black on the mask. We’ll cover layer masking in a later lesson.
While being able to re-edit Smart Objects and alter Smart Filters is useful, the ability to read snapshot information inside Camera Raw is just as powerful.
Earlier, we saved a couple of snapshots inside the raw file in Lightroom before we opened it as a Smart Object in Photoshop. Let’s open the Smart Object and change the snapshot to apply a new look to the image.
Double-click the Smart Object layer’s thumbnail and you will be taken into Camera Raw. You’ll notice that the sliders there are very similar to the ones in the Develop module in Lightroom. Click the far right icon at the top of the panel area, and you will see the snapshots we saved in Lightroom.
Select the Full Color snapshot that you made inside Lightroom and click the OK button at the lower right of the Camera Raw window.
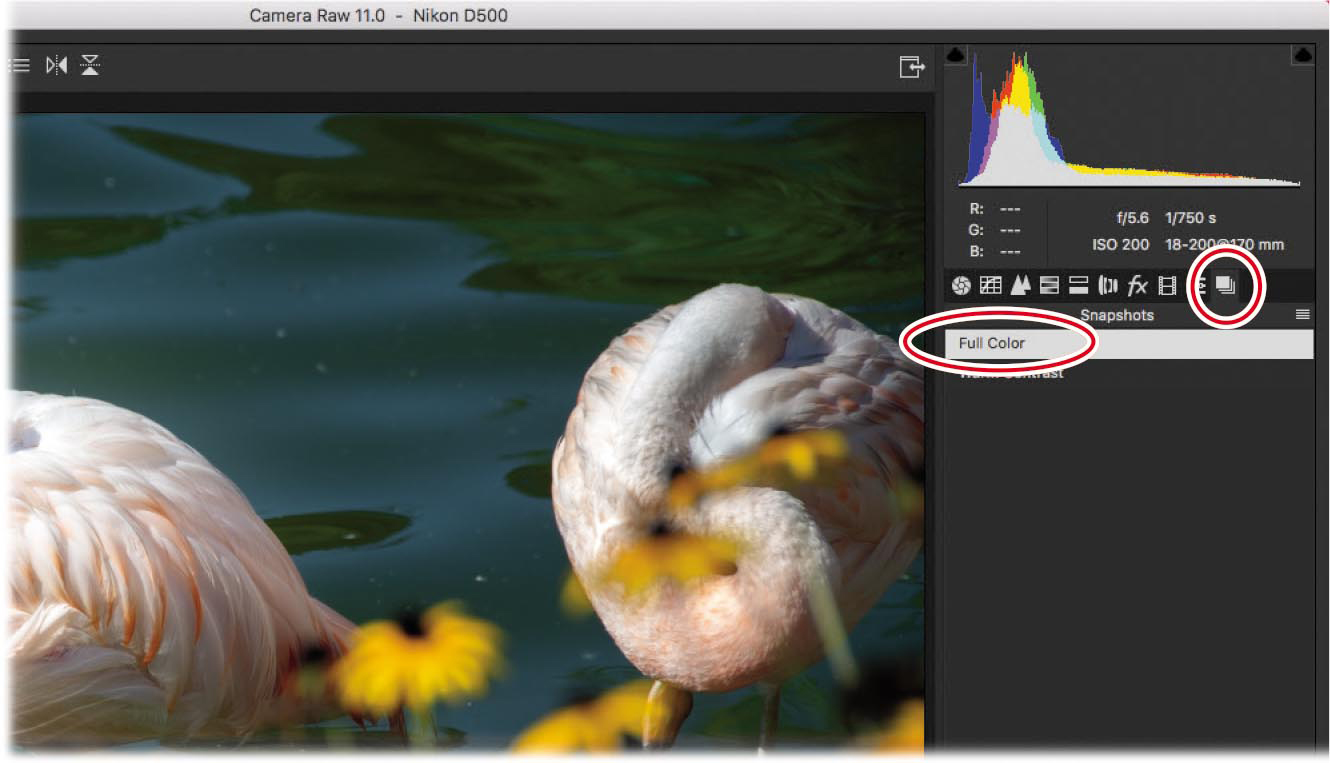
Save and close the file in Photoshop and the Lightroom thumbnail will reflect the changes that you made in Photoshop.
![]() Note
Note
You can send any file format to Photoshop as a Smart Object; it doesn’t have to be a raw file.
While it’s easy to access snapshots you make in Lightroom via the Camera Raw plug-in while you’re in Photoshop, it bears repeating that this maneuver works only on raw files.
If you use a third-party plug-in in Photoshop—say, Alien Skin’s Exposure X or the Google Nik collection—simply use the plug-in as you normally would and the results are saved in the PSD that Photoshop sends back to Lightroom. If you use a third-party plug-in in Lightroom, you can access it in the Photo > Edit In menu. Lightroom asks you to set the options you want to use when you open the image: file format, color space, and so on. Some plug-ins, such as Exposure X, can’t read PSD files, so you’ll have to use TIFF files instead. The end result is an additional file in your catalog.
Can you set up more than one configuration of Photoshop settings for opening photographs from Lightroom in Photoshop?
What is the keyboard shortcut for Photo > Edit In > Edit in Adobe Photoshop CC (or the latest version of Photoshop installed on your computer)?
When you hand off a raw file from Lightroom to Photoshop by pressing Ctrl+E/Command+E, which program is rendering the photograph so you can see and work with it in Photoshop?
After you pass a raw file from Lightroom to Photoshop and save it in Photoshop, what format file appears in your Lightroom catalog alongside the raw file?
If you reopen a PSD in Photoshop that you made additional Lightroom adjustments to, can you see those final adjustments in Photoshop using the Edit Original command?
Is it possible to access snapshots you made in Lightroom while you’re in Photoshop?
Yes. In addition to configuring the primary external editor, you can set up additional configurations for the same editor, or a different one, in the Additional External Editor section. When you save additional configurations as a preset, they appear as a menu item in Lightroom’s Photo > Edit In menu.
The shortcut is Ctrl+E/Command+E.
Photoshop’s Camera Raw plug-in renders the photo.
Passing a raw file from Lightroom to Photoshop and saving it in Photoshop generates a PSD file, unless you changed Lightroom’s External Editing preferences to TIFF.
No. When you reopen a PSD using the Edit Original option in the Edit Photo dialog box, any adjustments made in Lightroom after editing in Photoshop aren’t visible in Photoshop due to the special flattened layer that it includes in the document. Therefore, you’ll have to redo those adjustments once the edited PSD returns to Lightroom.
Yes, but only for raw files. If you create snapshots for a raw file and then send it to Photoshop as a Smart Object, you can double-click the Smart Object in Photoshop to open the Camera Raw plug-in. When it opens, click the Snapshots icon, and you’ll see all the snapshots it contains.