11 Exporting and Showing Off Your Work
Lesson overview
When you’re finished editing your pictures in Lightroom and Photoshop, it’s time to show them off. This is where Lightroom really shines. It offers a variety of options for photos: emailing, exporting, sharing on social media, printing, or crafting them into a custom book, slideshow, or web gallery.
In this lesson, you’ll learn how to:
Set up an identity plate.
Create a watermark and signature graphic to add to your photos.
Email or export photos from your Lightroom catalog.
Create drag-and-drop publish services for exporting and sharing photos on social media sites.
Create a custom single-photo fine art-style print template.
Calculate the maximum print size of a photo.
Get started creating books, slideshows, and web galleries.

This lesson will take 2 hours to complete. Please log in to your account on peachpit.com to download the files for this lesson, or go to the “Getting Started” section at the beginning of this book and follow the instructions under “Accessing the lesson files and Web Edition.” Store the files on your computer in a convenient location. Your Account page is also where you’ll find any updates to the lessons or to the lesson files. Look on the Lesson & Update Files tab to access the most current content.

©2012 RAFAEL CONCEPCION, ABOUTRC.COM
Lightroom excels at showing off your work in a variety of ways and complete with branding, such as the fine art-style print shown here.
Preparing for this lesson
Follow the instructions in the “Getting Started” section at the beginning of this book for setting up an LPCIB folder on your computer, downloading the lesson files to that LPCIB folder, and creating an LPCIB catalog in Lightroom.
Download the Lesson 11 folder from your Account page at peachpit.com to username/Documents/LPCIB/Lessons.
Launch Lightroom, and open the LPCIB catalog you created in “Getting Started” by choosing File > Open Catalog and navigating to the LPCIB Catalog. Alternatively, you can choose File > Open Recent > LPCIB Catalog.
Add the Lesson 11 files to the LPCIB catalog using the steps in the Lesson 1 section “Importing photos from a hard drive”.
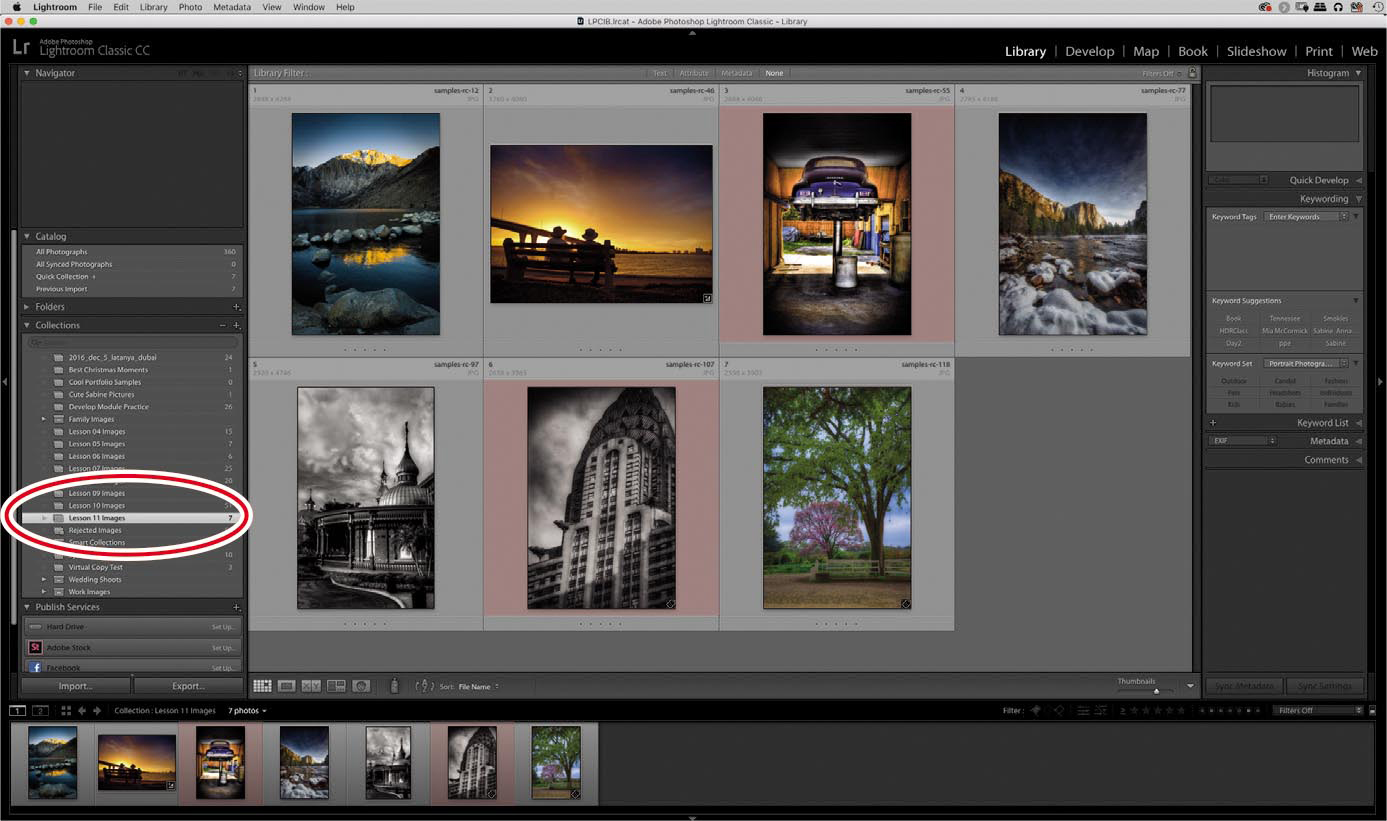
In the Library module’s Folders panel, select Lesson 11.
Create a collection called Lesson 11 Images and place the images from the Lesson 11 folder in the collection.
Set the Sort menu beneath the image preview to File Name.
The next two sections walk you through setting up identity plates—a handy way to personalize or brand your copy of Lightroom and your projects—and watermarks, which you can use throughout the program to brand your images.
Setting up an identity plate
Adobe knows that some photographers use Lightroom in public—say, on a computer in a studio sales room or in a teaching situation. That’s why you can personalize the Adobe branding at the upper left of the Lightroom window using its identity plate feature. You can use stylized text, a custom graphic you’ve made, or both. You can create as many custom identity plates as you want and save them as presets that are accessible in the Book, Slideshow, Print, and Web modules.
In this exercise, you’ll create a text-based identity plate.
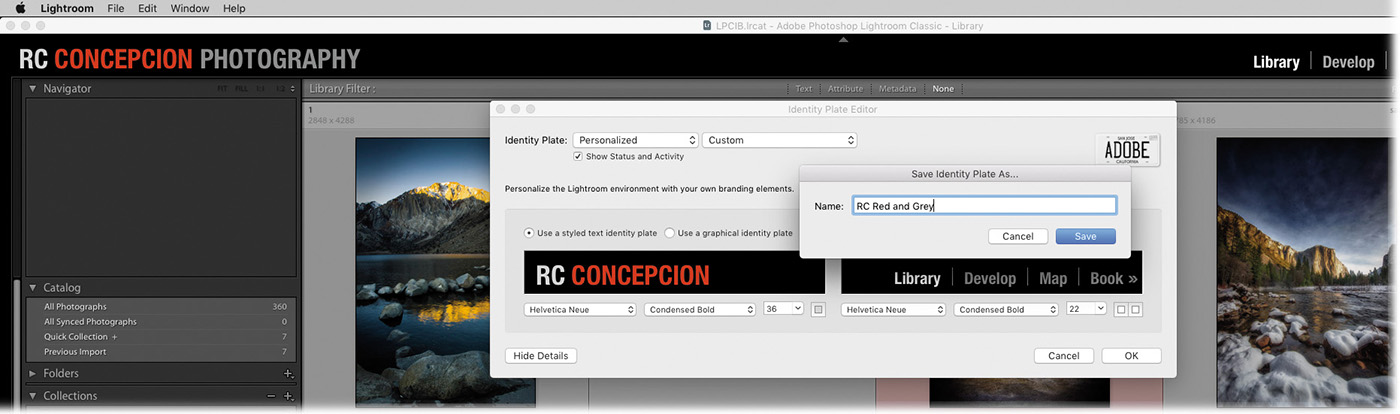
Choose Edit > Identity Plate Setup (Windows) or Lightroom > Identity Plate Setup (macOS). In the dialog box that opens, choose Personalized from the Identity Plate menu at the upper left.
Select Use A Styled Text Identity Plate, and enter your name, studio name, or URL into the black field beneath the radio button.
Format the text as you would in a word processing program: Highlight the text you want to change, and then use the font, style, and size menus beneath the text field. In this example, Helvetica Nueue Condensed Bold was used for the type. To change the color of all or a portion of the text, highlight it and then click the square gray button to the right of the size menu to open the color picker, and select a new color.
As you format the text, your changes appear in the upper-left corner of the Lightroom window in real time.
On the right side of the dialog box, you can change the font, style, size, and color of the module names to match your new text identity plate.
When you’re finished, click the Custom menu and choose Save As. Enter a name into the resulting dialog box, and click Save.
From now on, your new identity plate preset will appear in that menu.
 Tip
TipSome photographers prefer to use their signature as a graphical identity plate. The sidebar "Creating a graphic from your signature" explains how to do that
Click OK to close the Identity Plate Editor.
Now you can access your identity plate in Lightroom’s other modules, where you can control its opacity, scale (size), and positioning.
If you want to go the graphic route instead, create the graphic in Photoshop first. Design it to be no more than 46 pixels (Windows) or 41 pixels (macOS) tall, and then save it in PNG format to preserve any transparency. In the Identity Plate Editor, select the Use A Graphical Identity Plate option and click the Locate File button that appears. Navigate to the file on your hard drive, select it, and click Choose.
In the next section, you’ll learn how to create a custom watermark.
Creating a watermark
One way to let people know who created an image online is to add a watermark—text or a graphic that’s placed atop the image, usually at the lower left or right. Watermarking your photos serves not only as a deterrent for would-be thieves, but also as a branding opportunity; by including your URL in the watermark, anyone who sees the image online can easily find you and book a session.
![]() Note
Note
Just as with identity plates, you can create as many text or graphical watermarks as you want, and they don’t always have to be about branding. If you create a watermark that reads PROOF in a thick, bold font, you can use it in the Print module to indicate a photo’s status.
In this exercise, you’ll create a simple text-based watermark.
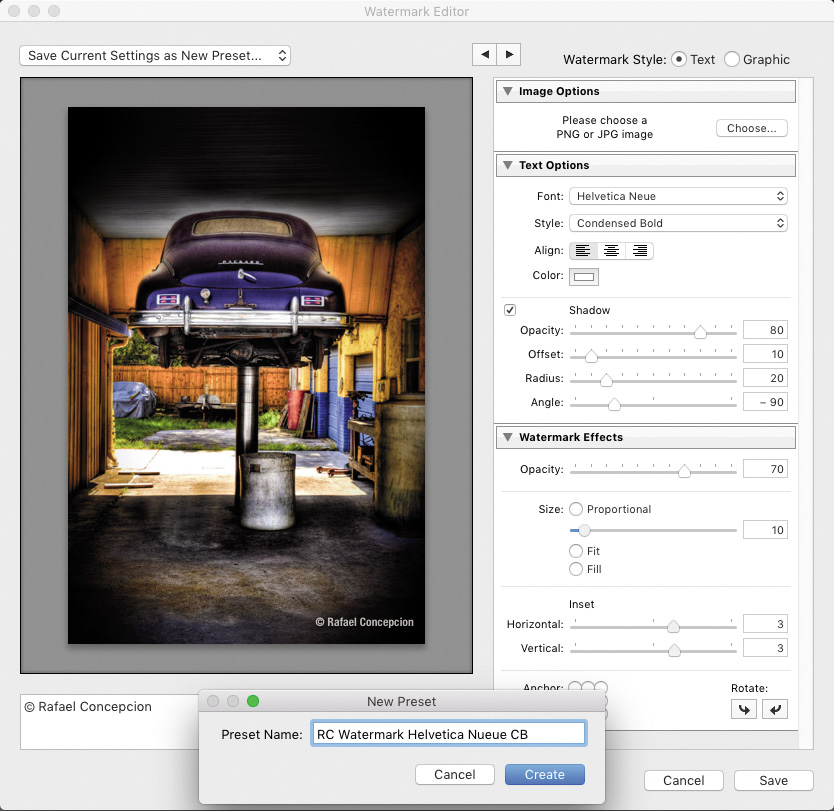
Choose Edit > Edit Watermarks (Windows) or Lightroom > Edit Watermarks (macOS). In the dialog box that appears, select Text at the upper right.
In the field beneath the image preview, enter your watermark text. You could enter your name or your URL. By default, you will start with a copyright symbol or the word Copyright, so place any other information to the right of it.
TipTo create a copyright symbol in Windows, press Alt+0169. In macOS, press Option+G
Use the settings in the Text Options panel on the right to format your text, and make sure Shadow is selected.
You don’t have to highlight your text to format it in this dialog box, which also means you can’t format portions of it in different ways. Leaving the shadow selected ensures that the watermark can be read even when it’s placed atop a white background. Adjust its sliders until the shadow looks the way you want it.
TipTo rotate your watermark, click the Rotate buttons to the right of the anchor icon.
In the Watermark Effects panel, set Opacity to around 70. Select Proportional in the Size section, and use the slider to set a size (10 was used here). Scoot the watermark away from the edges of the photo by entering 3 into the Horizontal and Vertical fields in the Inset section. Click the lower-right circle in the Anchor icon to position your watermark at the lower right.
The Proportional option instructs Lightroom to resize the watermark so that it looks the same no matter what pixels dimensions you export the photo at.
Click Save, and in the New Preset dialog box that appears, enter a descriptive name, such as RC Watermark Helvetica Neue CB and click Create.
Lightroom adds the watermark preset to the Custom menu at the upper left.
From this point forward, your watermark preset is available in several places throughout the program, including the Export dialog.
Emailing photos
Emailing photos from your Lightroom catalog is a snap, and you don’t have to export them first. Lightroom handles all the resizing and, if necessary, the file format change (say, from raw to JPEG). Here’s how to do it:
Select a few photos, and choose File > Email Photos.
In the resulting dialog box, enter the email address of your recipient(s) into the To field, and then enter something into the Subject field.
Use the From menu to pick your email program. If you use web-based email, choose Go To Email Account Manager from the same menu. In the dialog box that appears, click the Add button at the lower left.
Adding your own signature as a Lightroom identity plate or watermark is incredibly handy and fairly easy to do. If you add it as an identity plate, you can use it in other places in the program—to, say, autograph a fine art-style print, which you′ll learn about later in this lesson.
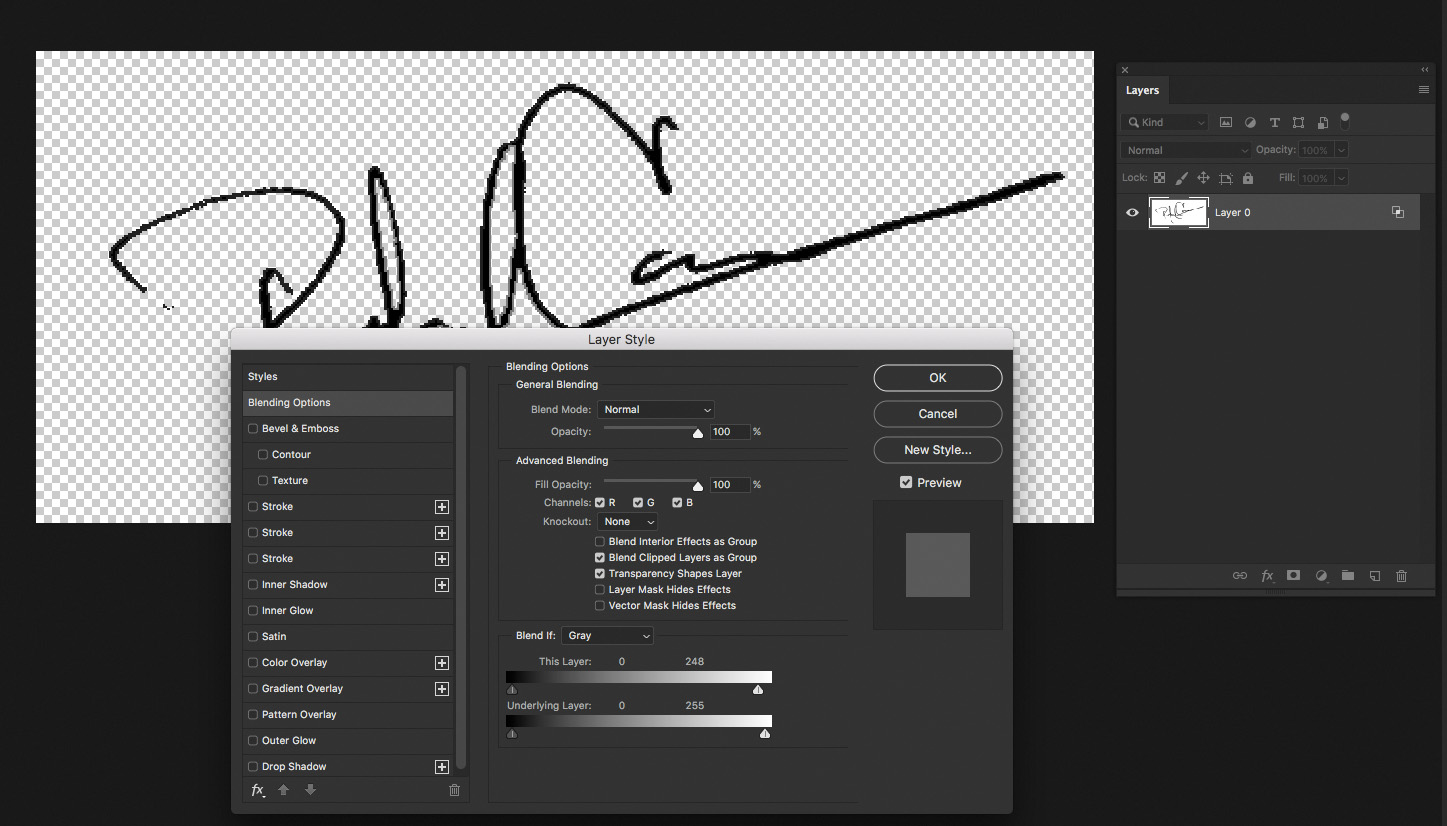
Begin by signing a white piece of paper with a thin black marker. Scan or take a picture of your signature, and then open the graphic in Photoshop. In the Layers panel, click the padlock to unlock the layer, click the Add a Layer Style (fx) icon at the bottom of the panel, and choose Blending Options from the menu.
In the Blend If section of the dialog box that opens, drag the right triangle on the This Layer slider to the left until the signature′s white background becomes transparent (as shown below).
Click OK, and save the file in Photoshop format (PSD) so you can edit it later if necessary.
To save a transparent version that you can use in Lightroom, choose File > Save As, and choose PNG as the format. Click OK in the PNG Options dialog box that appears. In Lightroom, use the Identity Plate Editor or Watermark Editor as described in the previous sections to add the graphic.
In the New Account dialog box, name your account preset and choose your service provider from that menu. If you are using one of the providers in the menu, your server settings will be added for you. If you choose Other, you will need to add your server settings. With all choices, you will need to provide your login information and click Validate, and then click Done.
You have to set this up only once. After that, it will show up in the From menu.
From the Preset menu at the lower left, pick a size, and then click Send.
Lightroom prepares the photos for emailing, opens your email program, and prepares a new message with the photos attached.

If your email program includes a resize option, choose Actual Size (or something similar), and then send the email on its way.
Exporting photos
When you’re finished adjusting your photos and adding effects, you can free them from your Lightroom catalog using the Export command. This command generates a copy of the photo(s) with all your edits intact. The Export dialog also lets you rename, resize, change the file format of (say, from raw to JPEG), sharpen, and add a watermark to your photos en masse. Exporting is also a background operation, meaning you don’t have to wait until Lightroom is finished exporting your photos to do something else, including triggering another export.
In this exercise, you’ll export a batch of photos destined for online use at specific settings that you’ll save as an export preset.
![]() Note
Note
The Export command is available in all of Lightroom’s modules. For example, to export from the Develop module, select one or more images in the Filmstrip and choose File > Export
In the Collections panel of the Library module, make sure the Lesson 11 collection is highlighted and then, in Grid view, select several thumbnails—it doesn′t matter which ones you pick. Choose File > Export, or click the Export button at the bottom left of the Library module.
Lightroom opens the Export dialog box. The Preset column on the left includes some handy built-in combinations of Export settings, along with any export presets you create. There’s no limit to the number of files you can export at one time.
Click the Export To menu at the top of the Export dialog, and choose Hard Drive.
Expand the Export Location area of the dialog box by clicking its title bar and choose Export To > Desktop at the top. Select Put In Subfolder, and enter Final Images for Client in the field to its right. Leave Add To This Catalog unselected. Ensure that the Existing Files menu is set to Ask What To Do.
When working with your own photos, you may want to set the destination to Specific Folder or Same Folder As Original Photo instead of Desktop, but you still may want to name the subfolder Final Images for Client or something else that makes sense in your workflow.
Selecting Add To This Catalog automatically imports the exported copy into your Lightroom catalog, which is unnecessary because the master file is already in your catalog, from which you can always output another copy.
Under File Naming, select Rename To and pick the filename convention you want to use from the menu to its right.
The Rename To menu lets you access the filenaming template system in Lightroom’s External Editing preferences.
If you upload the exported photos online, replace any spaces with an underscore. In this example, the Custom Name - Sequence template was chosen, with rc_finals entered for the Custom Text, and the Start Number set to 1.
In the File Settings area, choose JPEG from the Image Format menu, set Quality to 80, and choose sRGB from the Color Space menu.
When working with your own photos, set the quality to 100 if you’ll submit them to an online stock photography service or upload them to an online lab for printing, or if you’re preparing final, print-worthy JPEGs to give to your client. Doing so produces a file at the highest possible quality, although it’ll also be huge in file size. Dropping the quality to 80, which is fine for almost all uses that don’t involve printing, cuts the size in half.
TipThe Limit File Size To field is handy for limiting the resulting file size of your exported photo for, say, a website limitation. Select the option, and then enter your maximum size in kilobytes
The Internet-standard color space is sRGB, and it’s the one used by most online printing labs (check with the lab to determine which color space to use). Exporting with one of the other, larger color spaces can cause a photo to look dull when viewed online.
In the Image Sizing area, leave Resize To Fit unselected. If you are exporting these photos for use online, you’ll use this to ensure your images fit and that the site you’re uploading to won’t do the resizing for you. In that case, you’ll choose Long Edge from the menu to the right, set the measurement field menu to Pixels (the best choice for images bound for the web), and enter the maximum size you want your images to be on the longest edge, whether that’s height or width. Leave the Resolution field at its current value.
If you’re preparing photos for print, preserve the photo’s pixel count by leaving Resize To Fit turned off. Enter the image resolution that’s best for your printer—240 pixels per inch (ppi) is adequate for most desktop inkjet printers and online printing labs. If you’re preparing photos for inclusion in National Geographic magazine, ask what resolution is best to use. When you’re exporting images for online use, resolution doesn’t matter, because resolution here refers to the number of pixels per printed inch.
Under Output Sharpening, leave Sharpen For unselected.
When you resize a photo, it becomes a little less sharp, so extra sharpening is a good thing. However, this is an extra round of sharpening that’s added on top of any input or creative sharpening you’ve done in Lightroom (or Photoshop, for that matter).
If you are planning to use these photos online, choose Screen from the Sharpen For menu and set the Amount menu to Standard.
In the Metadata area, choose Copyright & Contact Info Only from the Include menu.
 Note
NoteCopyright information is embedded in the metadata of the exported file, but it does not appear across the face of the photo like a watermark does.
In the Watermarking area, select Watermark, and from the menu to its right, choose the watermark you made earlier in this lesson. Lightroom adds your watermark to the face of each photo you export.
When preparing images for a real client, you’ll likely leave this section turned off.
Under Post-Processing, choose Do Nothing.
If you want Lightroom to open the location of the exported files in your operating system when the export is complete, choose Show in Explorer/Show in Finder instead.
Click Add at the bottom of the Preset column.
In the New Preset dialog box, enter a descriptive name, such as JPEG 80 sRGB CC, choose User Presets from the Folder menu, and click Create.
NoteThis excellent preset naming convention was suggested by Adobe’s Principal Evangelist, Julieanne Kost (blogs.adobe.com/jkost).
This saves the combination of settings you made as a preset that you can use in the future. The preset’s descriptive name lets you know at a glance what file format, quality, color space, and metadata (copyright contact) you used.
To export other photos using this preset, click the preset’s name in the User Presets section of the Export dialog, or choose File > Export With Preset, and then pick the preset you want to use.
Click Export at the bottom of the Export dialog. In no time flat, Lightroom exports a JPEG copy of the photos to the destination you picked in step 3.

Lightroom remembers the export settings you last used even after you quit and relaunch the program. So if you forgot to include one or more photos in the export, you can quickly export them with the same settings by selecting the new files and choosing File> Export With Previous. You don’t get a dialog box with this method; Lightroom immediately exports the photos and adds them to the same location you used last time.
Exporting and sharing using publish services
If you regularly prepare images for other destinations—to, say, send to a printer, feature on your website, or submit to a stock photography service—or if you regularly upload them to social media sites such as Flickr, you can automate the process using the Lightroom drag-and-drop export presets known as publish services. In the Publish Services panel in the Library module, you see that it already includes presets for Hard Drive, Adobe Stock, Facebook, and Flickr, although you can download more by clicking the Find More Services Online button.
![]() Note
Note
You can no longer upload photos to Facebook from Lightroom desktop apps—Lightroom CC (new), Lightroom Classic CC, and Lightroom CC 2015/Lightroom 6—as of August 1, 2018. If you have images that are synced with Facebook currently, go to the following page to learn how to move them permanently to your personal repository: https://helpx.adobe.com/lightroom/kb/facebook-publish-service-error.html
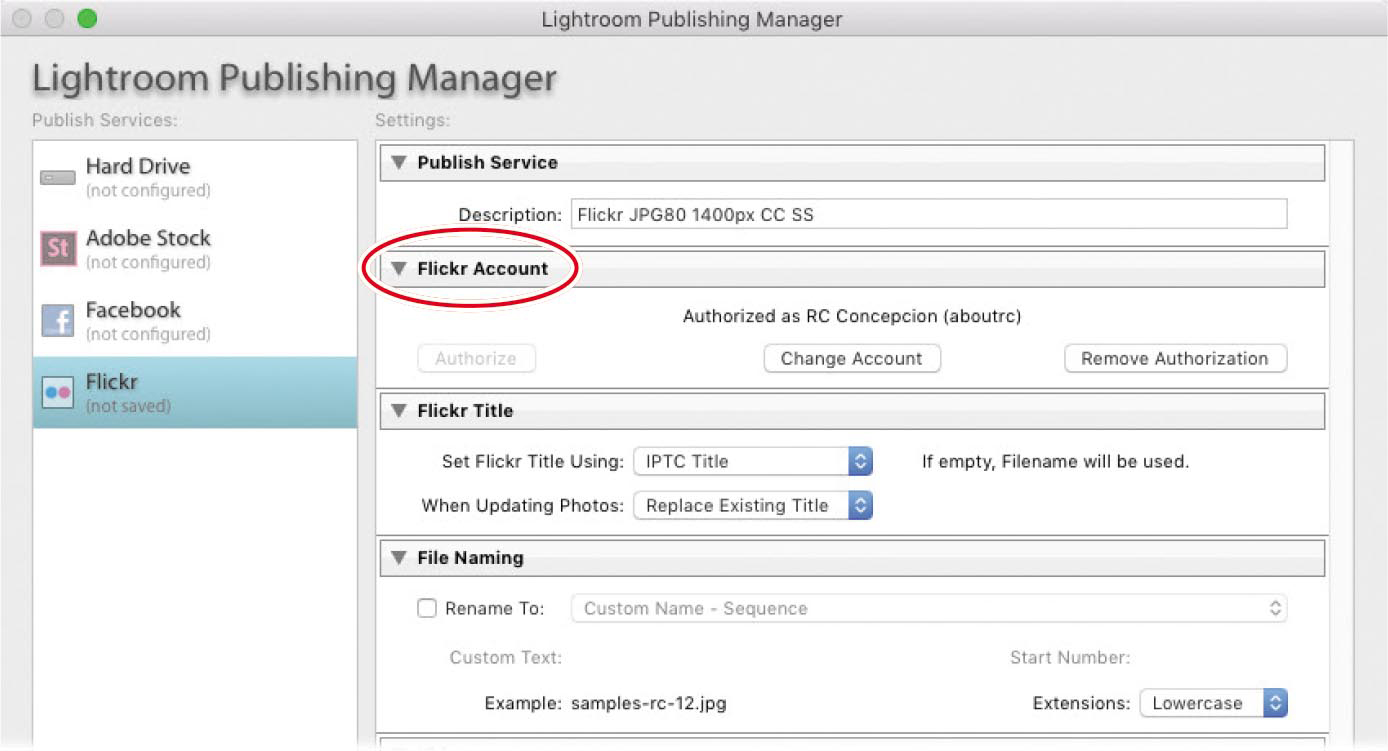
To set up one of these presets, click the publish service button you want to use—Hard Drive, Adobe Stock, or Flickr (see the note here for more information about Facebook). In the dialog box that appears, you see the same Export settings you learned about in the previous section; however, the dialog box for Flickr includes an area for you to enter your account information.
When you’re finished entering all the settings, the new preset appears beneath the service button. Simply drag the photo(s) you want to export (or upload) atop the new preset, named Photostream here, which puts them into an export queue. When you’ve added all the photos you want to publish, click the preset in the Publish Services panel to see the photos it includes, and then click the Publish button beneath the Publish Services panel or the one that appears above and to the upper right of the thumbnails.

Lightroom publishes the photos at the settings you entered. If you then make changes to a published photo, Lightroom marks it as modified—click the preset to view its contents, and the photo you edited appears in a section named Modified. To publish the modified version, click Publish. If you don’t want to update it, right-click it and choose Mark As Up-To-Date in the menu.
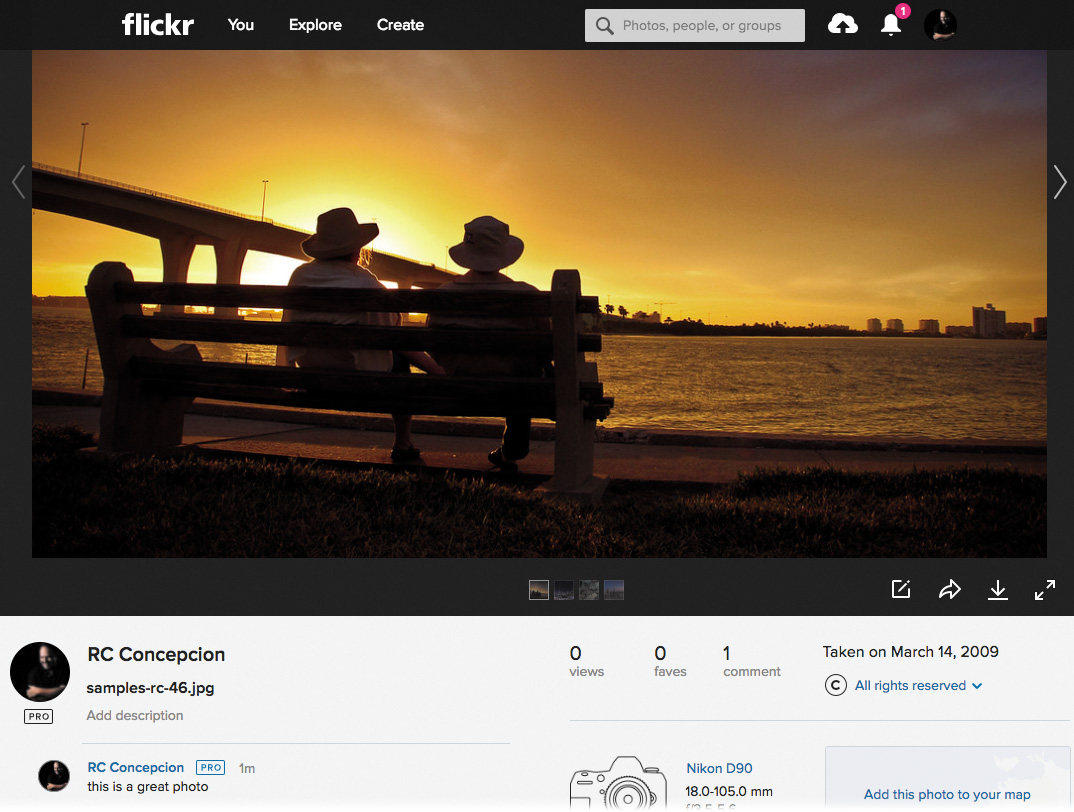
If the social media platform allows commenting by visitors, those comments appear in Lightroom too. Take a look at the Comments panel at the bottom right of the Library module (it’s beneath the Metadata panel) to see them. To update it with the newest comments, click the Refresh Comments icon in the upper-left corner of the panel.

Creating prints
Lightroom’s Print module is very powerful; you can use it to print a single photo per page or several per page. It also includes many useful template presets for printing your photos, although you can create your own. Lightroom also gives you the choice of sending a file to your own printer or saving the print as a JPEG that you can email to a local printer or upload to one online.
![]() Note
Note
Saving a print as a JPEG is handy for posting online or emailing to a client. For example, you could create a multi-photo template that you use on social media or your blog. Although you could use this feature to make a social media cover photo, adding text is far easier in Photoshop, where you can also save the result as a PNG, which keeps text crisper than a JPEG.
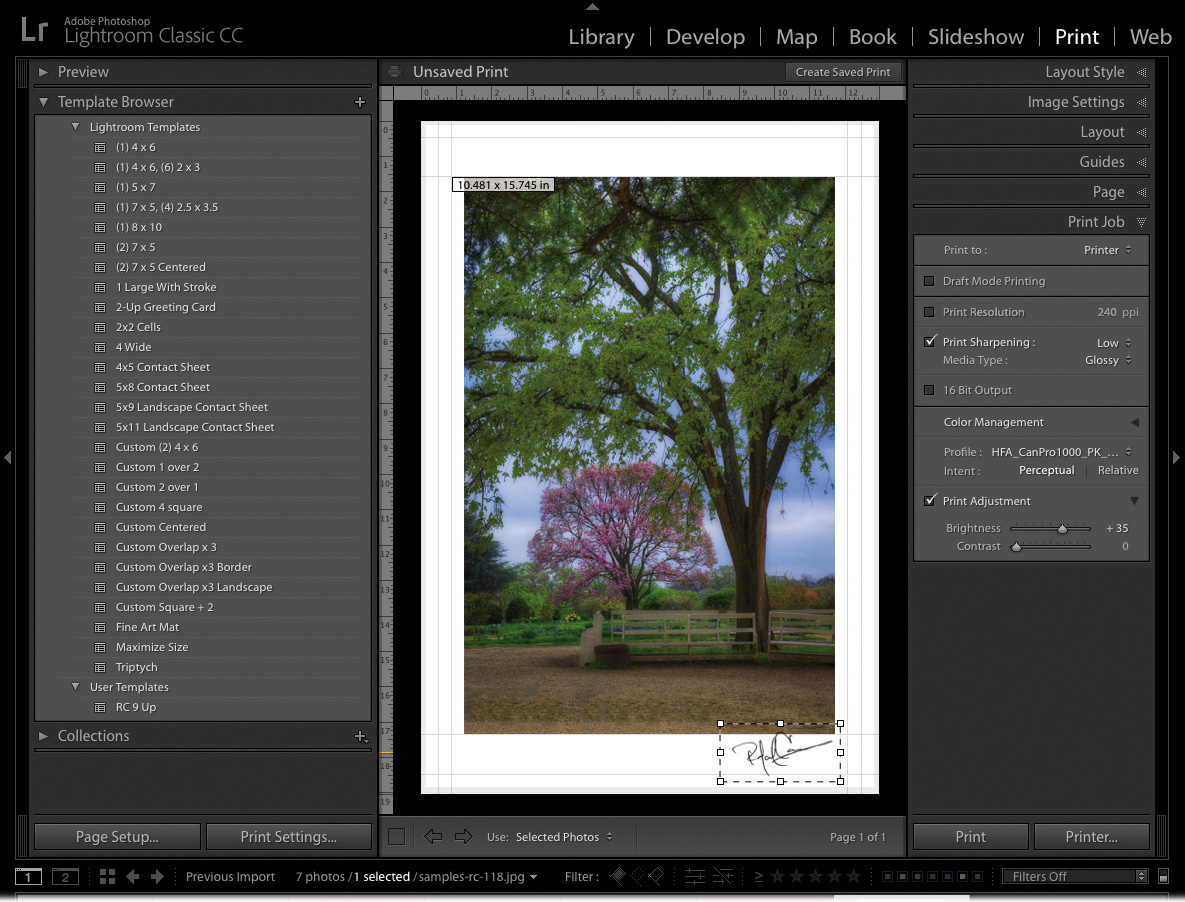
In this exercise, you’ll learn how to print a single photo and add your signature identity plate, for the look of a signed print.
Select a photo in the Library module, and then click the Print module button at the top of the workspace (or press Ctrl+P/Command+P).
You’re going to create your own print template, but there also is a Template Browser panel here with a number of common and creative layouts.
Click the Page Setup button at the lower left, and in the resulting dialog box, choose your printer and paper size. Click OK.

Back in Lightroom, locate the Layout Style panel at the upper right, and click Single Image/Contact Sheet to print one photo.
In the Image Settings panel, make sure all the options are unselected.
TipYou can also point your cursor at the edges of the photo—when it turns into a double-sided arrow, drag to adjust the margins.
In the Layout panel, leave the Margins and Page Grid settings at their default values. Use the Cell Size slider to adjust the size of the photo on the page, or simply enter the size you want in the fields to the right of the sliders. Depending on the photo you’re working with, you may need to alter these dimensions.
If you use the Cell Size section to control photo size, Lightroom calculates the margins for you. Alternatively, you can adjust the margin sliders to create the size you want.

In the Page panel, select Identity Plate. Click within the preview area beneath the checkbox, and from the menu that appears, choose the identity plate you want to use. The identity plate appears atop the photo.
Drag the identity plate into the desired position, and then use the Opacity and Scale sliders in the Page panel to make it look the way you want.
In the Print Job panel, choose Printer from the Print To menu. Deselect Draft Mode Printing (it’s low quality), and then deselect Print Resolution. From the Print Sharpening menu, choose Standard, and choose Matte from the Media Type menu. If you’re printing a raw format photo, turn on 16 Bit Output (macOS only).
As mentioned, you can send a print to your printer or save it as a JPEG file. When you deselect Printer Resolution, Lightroom calculates the resolution based on the printer you chose, the photo’s original size, and the desired size of your print.
 Note
NoteA print profile is a mathematical description of a device’s color space. For more on color spaces, see the Lesson 6 sidebar “Choosing a color space”.
In the Color Management area, choose Other from the Profile menu. In the dialog box that appears, select the profile that matches the paper you chose in step 2, and then click OK.
Click Print, and your printer springs into action.
If you click the Printer button instead, you open your printer’s print dialog again.
Save these settings as a preset by clicking the plus icon (+) at the upper right of the Template Browser panel on the left side of the workspace. In the dialog box that opens, enter a descriptive name such as 15.75 x 11 in print on 13 x 19 paper, and click Create.
The new template appears in the User Templates section at the bottom of the Template Browser panel.
If you want to use this template again with the same photo, click the Create Saved Print button at the upper right of the print preview.
![]() Note
Note
Make sure you check out the accompanying videos for this lesson, where I cover printer profiles and show you the entire print process from start to finish. You can access those lessons by following the instructions in the ″Gettting Started″ section at the beginning of this book
That’s all there is to printing one photo per page. If you want to print a contact sheet, where multiple thumbnails are arranged in a grid, select a slew of images and, in the Print module, choose Single Image/Contact Sheet, and then use the Page Grid section of the Layout panel to add more rows and columns.
When you have time, use the exercise files to experiment with other templates in the Template Browser. Be aware that if you pick a template that includes the word custom in its name—meaning its layout style is Custom Package, as noted in the Layout panel—you can drag and drop photos from the Filmstrip into the black-outlined photo slots in the layout preview.
Before you make a print, it’s a good idea to calculate the maximum print size that you can make from the photo. For example, you may not have enough pixels to create, say, a 13 × 19-inch print. If you go forth without calculating your maximum print size first, you may not be satisfied with the results.
The first step in calculating your maximum print size is to find the photo’s pixel dimensions and jot them down. In Lightroom, the dimensions are visible in the Library module in the Metadata panel.
Next, grab a calculator and divide the longest edge of your image (measured in pixels) by the longest edge of your desired print size (measured in inches). For example, if an image measures 3840 × 5760 pixels and you want an 8 × 10 print, take the longest edge in pixels and divide it by the longest edge in inches of the target print size: 5760 pixels divided by 10 inches = 576 ppi. That’s more than enough resolution to produce an awesome print; remember that you need a minimum of 240 ppi, though it really depends on the printer (resolution determines pixel density and thus pixel size when the image is printed). However, if you want to make a 30 × 20-inch poster out of that image, you’d have a resolution of 192 ppi (5760 ÷ 30), which isn’t high enough to print well.
Since big prints aren’t cheap, you’ll wisely decide on a smaller size and you’ll be more satisfied with the results. And if you typically shoot with the same camera, you only have to do this calculation once to know how big you can go.
Wouldn’t it be great if you could see what a photo will look like before you print it on a certain kind of paper or post it online? As it turns out, Lightroom can simulate the result through soft proofing. Doing so gives you the opportunity to adjust the photo’s tone and color for the particular profile you’re using.
Open the photo in the Develop module, and click the down-pointing triangle to the right of the toolbar beneath the image preview (if you don’t see the toolbar, press T on your keyboard).
From the menu that appears, choose Soft Proofing, and then select Soft Proofing in the toolbar.
In the Soft Proofing panel that appears at the upper right of the workspace, click the menu to the right of the word Profile. If you’re posting the photo online, choose sRGB. Otherwise, choose Other.
In the dialog that appears, select the appropriate profile for the printer and paper you’re using and click OK. (If you’re sending a photo to an online lab for printing, they often have profiles you can download for this use.)
To the right of Intent in the panel, click Perceptual, and then, if you’re printing the photo, select Simulate Paper & Ink (this option isn’t available for all profiles).
To see if your photo includes colors that are outside your monitor’s or printer’s gamut (range of colors), click the tiny icons at the upper left and upper right of the histogram in the Soft Proofing panel. When you do, colors outside your monitor’s gamut appear in blue, and those outside your printer’s gamut appear in red; colors outside both appear in pink.
To edit a photo specifically for the destination profile, either to make it look better or to clear the gamut warnings, click Create Proof Copy, and Lightroom makes a virtual copy (shortcut/alias) of the photo. If you start editing the photo without clicking that button, Lightroom politely asks if you’d like it to make a copy for you.
To populate other template styles, such as Single Image/Contact Sheet or Picture Package, activate photos in the Filmstrip to make them appear in the layout preview–otherwise, it’ll be empty. For example, if a template has three slots, select three photos in the Filmstrip by Ctrl-clicking/Command-clicking or Shift-clicking them. If you deactivate a photo in the Filmstrip, Lightroom empties that slot in the layout preview.
To rearrange the order of photos in the layout preview, you must drag to rearrange them in the Filmstrip. This may feel a little strange at first, but you’ll get the hang of it soon enough. (Alternatively, you can have Lightroom automatically fill template slots by choosing All Filmstrip Photos from the Use menu beneath the layout preview.) You can also add pick flags to the photos in the selected collection that you want to print, and then choose Flagged Photos from the Use menu.
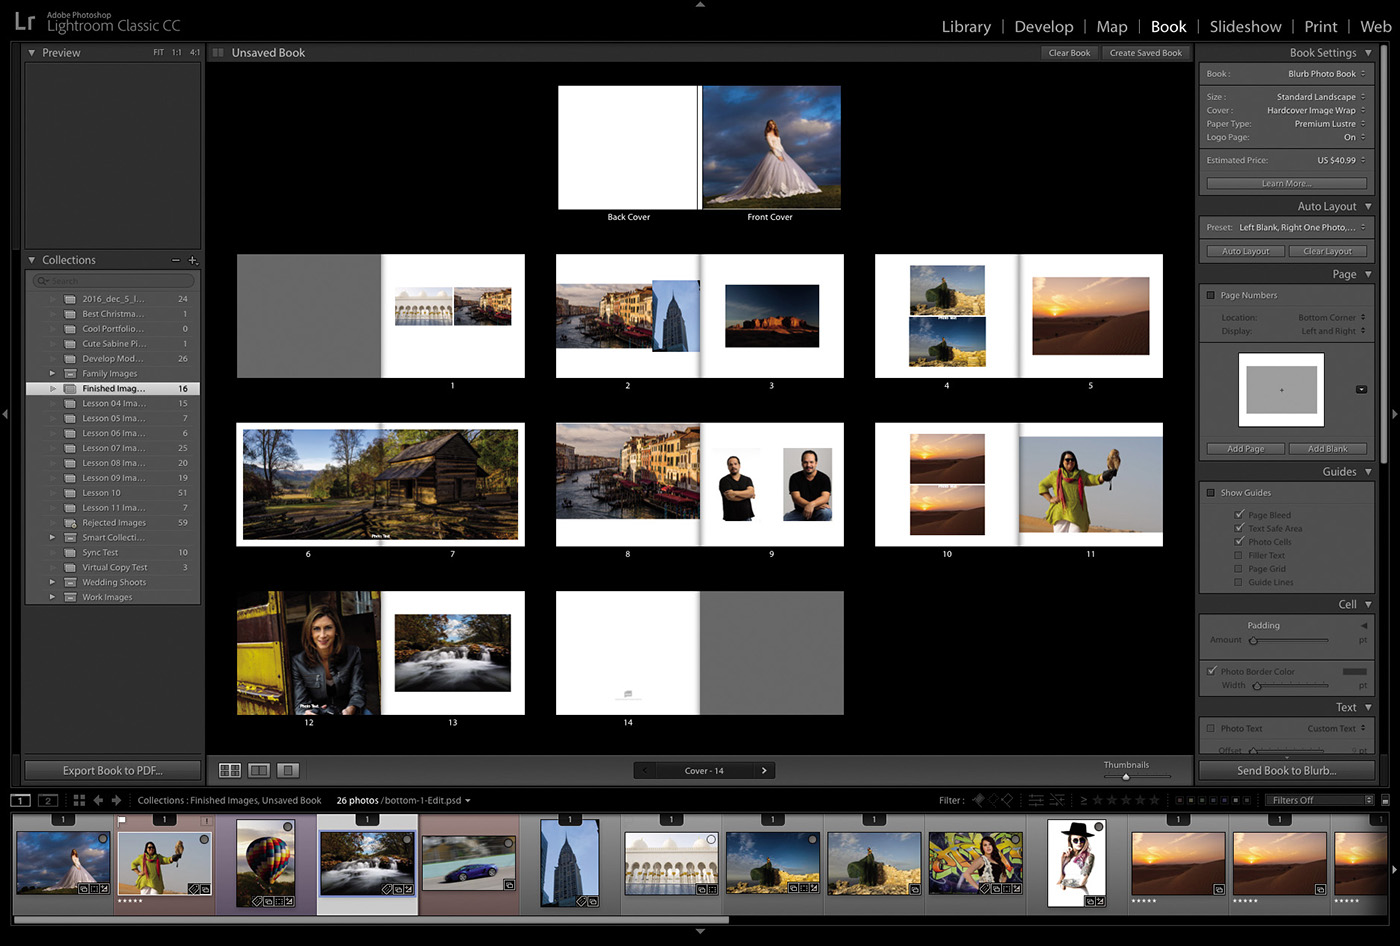
Books, slideshows, and web galleries
Alas, detailed information on creating books, slideshows, and web galleries is beyond the scope of this book. But this section still has useful tips for you.
Book, slideshow, and web gallery projects should start in the same way: Create a collection for the purpose of the project (you can use the finals collection you made at the beginning of this lesson to practice). Use the collection to drag the photos into the order in which you want them to appear in the project, and then consider whether you want to add text (think captions) to those projects. If the answer is yes, use the Metadata panel in the Library module to add text to the Title or Caption fields before you jump into one of Lightroom’s project modules.
When you’re finished, click the collection in the Collections panel to select all the photos it contains (there will be white borders around all the thumbnails), and then click the button—Book, Slideshow, Web—for the module you want to work in.
![]() Tip
Tip
If you’re in the Library or Develop module, you can trigger a full-screen, impromptu slideshow of the photos you’re viewing without using the Slideshow module. To do that, click the down-pointing triangle to the far right of the toolbar below the image preview (press T on your keyboard to show the toolbar if it’s hidden). In the menu that appears, choose Slideshow, and a play button appears in the toolbar
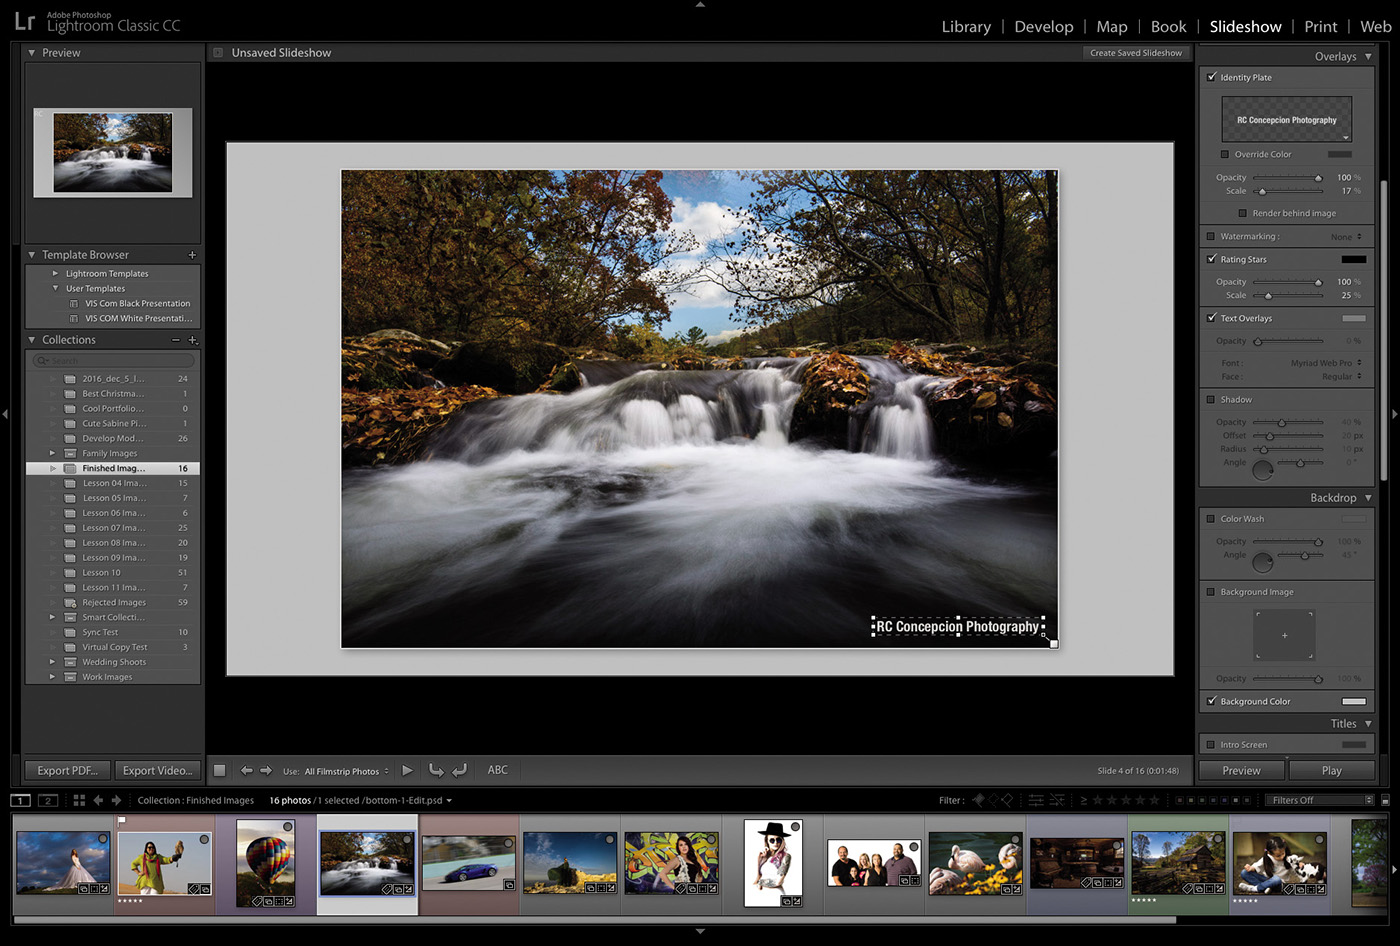
Lightroom creates the project and autofills the default template, which you can change. In the Slideshow and Web modules, you can choose a different template to start with in the Template Browser panel on the left. In all three modules, use the panels on the right to format the project to your liking.
If you took the time to add captions or titles in the Library module, you need to know how to access them. In the Book module, select a page in your project, and in the Text panel on the right, select Photo Text and choose Caption or Title from the Custom Text menu. In the Slideshow module, select Text Overlays at the bottom of the Overlays panel, and then click the ABC button in the toolbar (press T if you don’t see the toolbar). From the Custom Text menu that appears, choose Caption or Title. In the Web module, select Caption in the Image Info panel, and choose Caption or Title from the menu to its right.
The identity plates or watermarks you created earlier in this lesson are available in the Slideshow module’s Overlays panel and the Web module’s Site Info and Output Settings panels.
To add a graphical logo to the book, import it into your Lightroom catalog and drag it into the same collection as your book. Then, treat it like any other photo: Drag it from the Filmstrip onto the page you want to use it on, and use the panels on the right to control size and opacity.
Books can be ordered through Blurb.com from inside Lightroom; the price calculates as you build the book. Books can also be saved as a PDF or a series of JPEGs. Slideshows can be exported as a video or a PDF. Web galleries can be exported to your hard drive or uploaded directly to your web server.
To save any project with a certain set of photos that you can work on later, click the Create Saved Book, Create Saved Slideshow, or Create Saved Web Gallery button that appears at the upper right of the workspace.
Next steps
Now that you know how Lightroom and Photoshop work together, and when you should use one program over the other, you can apply everything you’ve learned in this book to your own workflow. Practice on the exercise files until you’re comfortable with the techniques presented in this book—each technique was chosen very carefully in order to give you a practical and firm foundation in both programs.

If you have any questions, please feel free to email me at [email protected] or connect with me at Facebook.com/aboutrc.
When you are ready to learn more or want to dig deeper, please check out the other books in the Adobe Classroom in a Book series, including my upcoming book Adobe Photoshop Lightroom Classic CC Classroom in a Book, 2019 release.
Finally, if you find yourself by Syracuse University, please feel free to stop by Newhouse College. I’d be happy to take you on a tour to show how our future creatives are using Lightroom and Photoshop to share their unique world view.
Thanks for learning with me. I can’t wait to see what you make next!
How is an identity plate used?
Do you have to wait until the export process is finished before doing other things in Lightroom?
Can you add your signature to a print made in Lightroom?
How do you add captions to photos in book, slideshow, print, and web projects?
It can be used to add your name or logo to the Lightroom workspace, as well as to add your name, logo, signature, or other text to slideshows, prints, and websites created in Lightroom.
No. The export process happens in the background, so you can keep working.
Yes. To do that, digitize your signature and save it as a custom identity plate, which you can access in the Print module.
The easiest way to add captions that you can access in other modules is to enter text into the Title or Caption field in the Metadata panel in the Library module.