
8 Lightroom to Photoshop for Retouching
Lesson overview
Photoshop is renowned for its retouching capabilities—you can use it for everything from intricate portrait refinements to larger-scale content removal and repositioning. So when your desire to change the reality of a photo exceeds the abilities of Lightroom’s Spot Removal tool, you can send the photo over to Photoshop for more serious pixel-pushing voodoo.
In this lesson, you’ll learn how to use Photoshop to:
Remove objects using the Spot Healing Brush, Healing Brush, Clone Stamp, and Patch tools.
Remove objects using the Content-Aware Fill command.
Reposition objects using the Content-Aware Move tool.
Resize your image using the Content-Aware Scale command.
Smooth skin without losing texture.
Sculpt a portrait using the Liquify filter.

This lesson will take 1 to 1 1/2 hours to complete. Please log in to your account on peachpit.com to download the files for this lesson, or go to the “Getting Started” section at the beginning of this book and follow the instructions under “Accessing the lesson files and Web Edition.” Store the files on your computer in a convenient location. Your Account page is also where you’ll find any updates to the lessons or to the lesson files. Look on the Lesson & Update Files tab to access the most current content.
©2018 RAFAEL CONCEPCION, ABOUTRC.COM
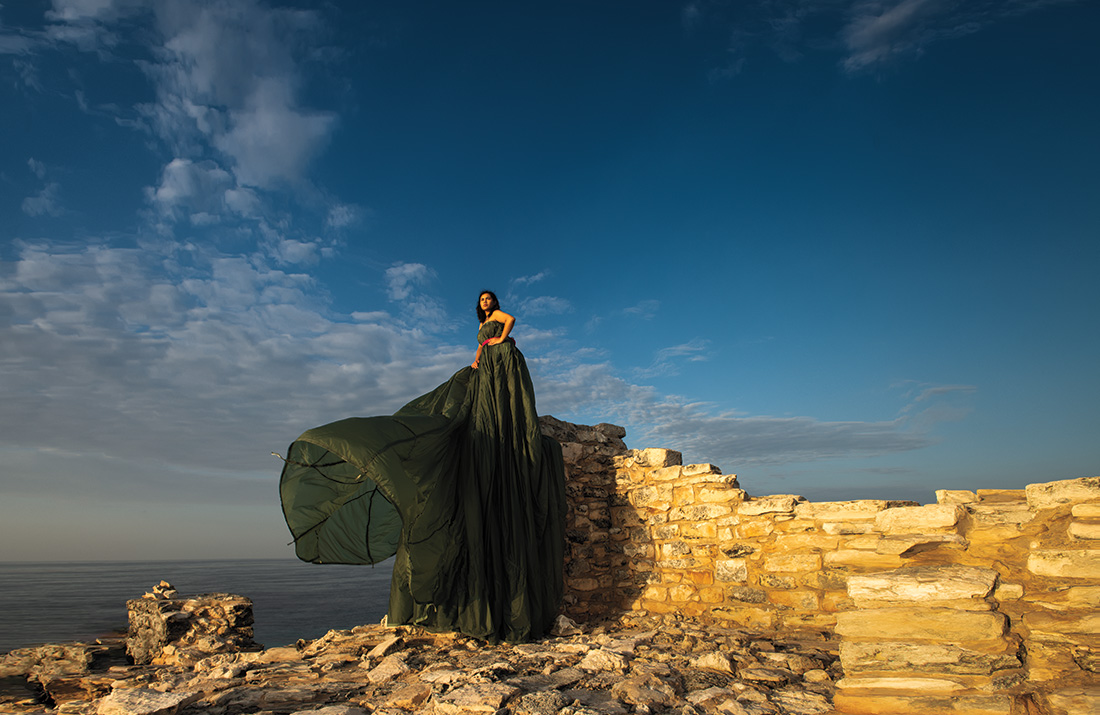
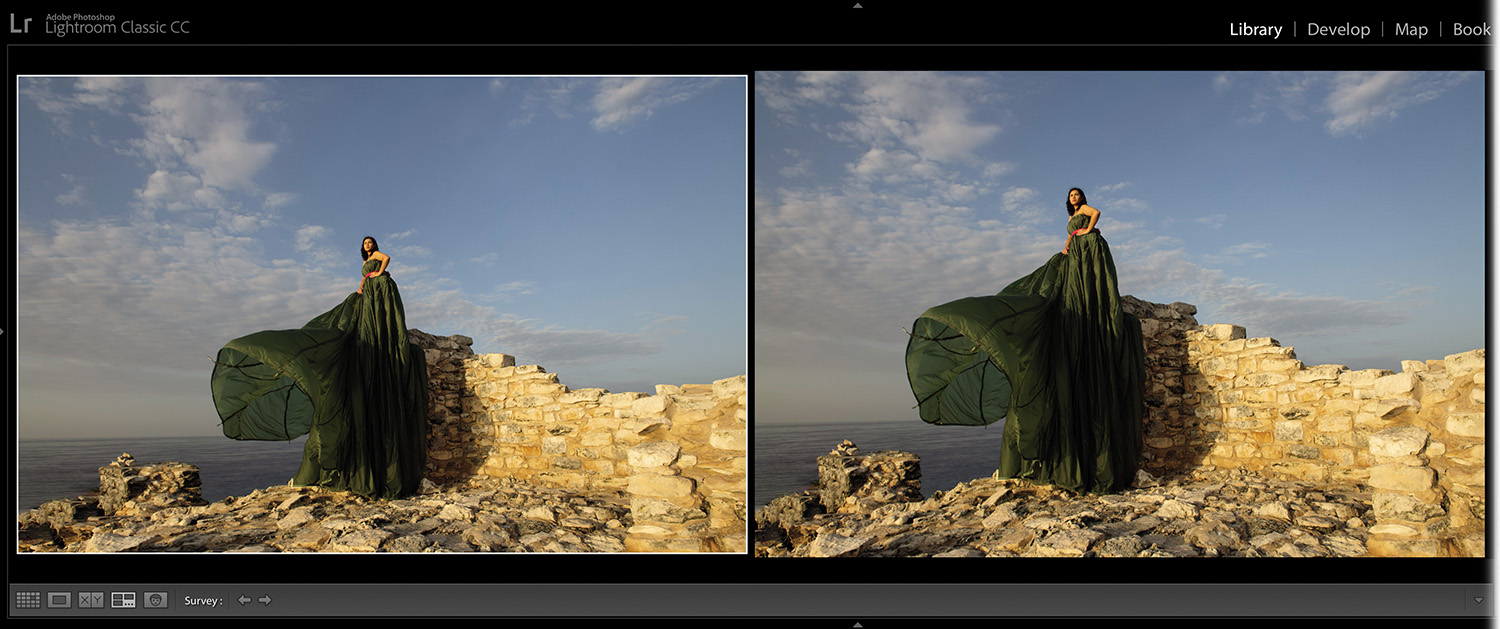
When your goal is to change the content of a photo, you need Photoshop’s sophisticated retouching capabilities. In this image, some elements were removed and the picture was extended for dramatic effect.
Preparing for this lesson
In order to follow along with the techniques in this lesson, make sure you do the following:
Follow the instructions in the “Getting Started” section at the beginning of this book for setting up an LPCIB folder on your computer, downloading the lesson files to that LPCIB folder, and creating an LPCIB catalog in Lightroom.
Download the Lesson 08 folder from your Account page at peachpit.com to username/Documents/LPCIB/Lessons.
Launch Lightroom, and open the LPCIB catalog you created in “Getting Started” by choosing File > Open Catalog and navigating to the LPCIB Catalog. Alternatively, you can choose File > Open Recent > LPCIB Catalog.
Add the Lesson 8 files to the LPCIB catalog using the steps in the Lesson 1 section “Importing photos from a hard drive.”
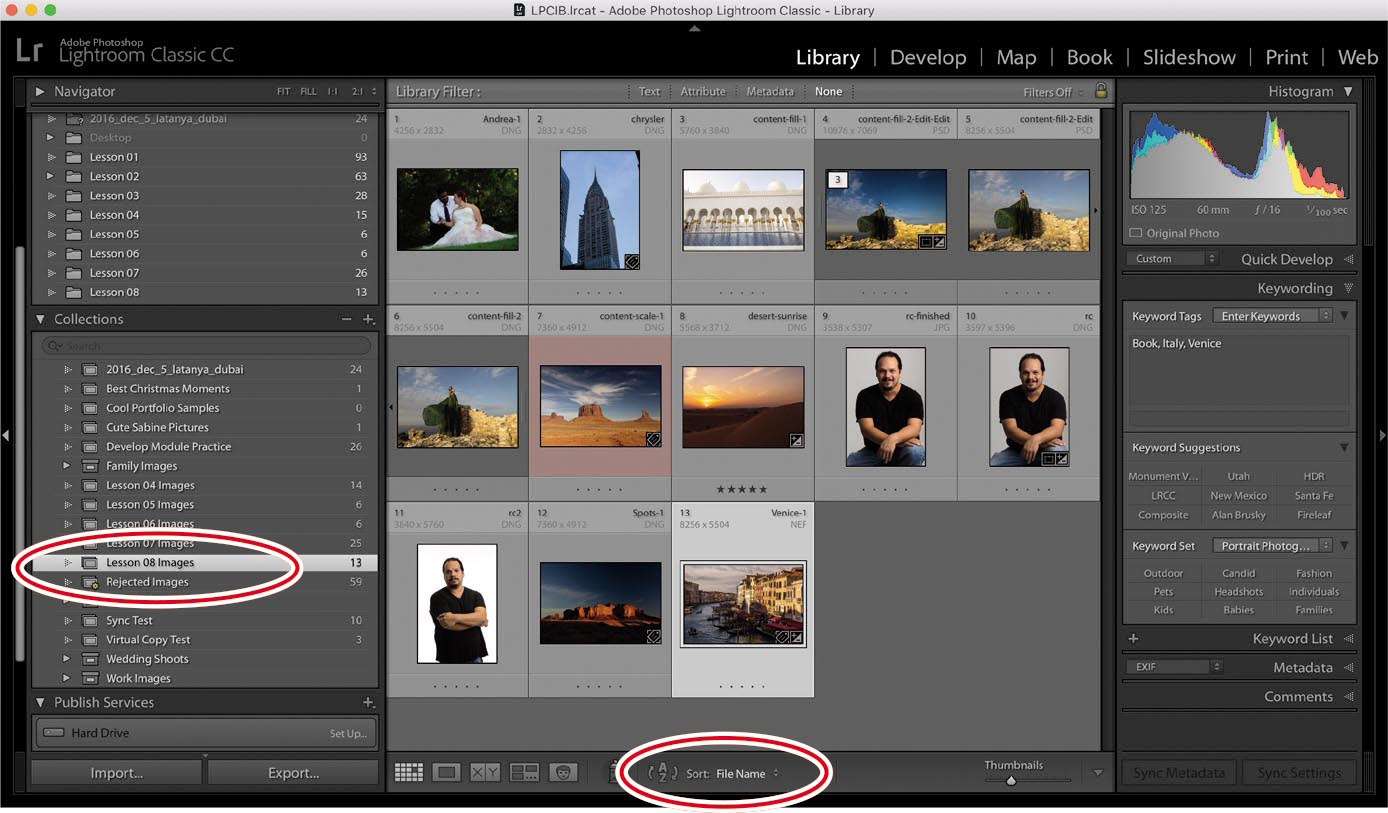
In the Library module’s Folders panel, select Lesson 08.
Create a collection called Lesson 08 Images and place the images from the Lesson 08 folder in the collection.
Set the Sort menu beneath the image preview to File Name.
 Note
NoteBefore sending images to Photoshop for retouching, be sure to adjust the tone and color of each photo. Save finishing touches, such as adding an edge vignette, until after you’re finished retouching it.
The next section teaches you how to use a variety of Photoshop tools to get rid of unwanted content in your photos, beginning with the healing tools.
Removing unwanted content in Photoshop
As you learned in “Removing distractions with the Spot Removal tool” in Lesson 4, you can use Lightroom to remove small stuff from your photos. That said, it lacks the advanced Content-Aware technology found in Photoshop, so you may get better results by performing the removal in Photoshop, especially with larger objects.
Indeed, Photoshop includes many tools and commands that you can use to remove objects from your photos, including the Spot Healing Brush and Healing Brush tools, the Clone Stamp and Patch tools, and the Content-Aware Fill command. The one you reach for depends on the size of the object, how much open space there is around it, and whether or not you want Photoshop to automatically blend surrounding pixels with the ones you’re copying from somewhere else. You’ll usually need to use a combination of the tools to produce the results you want.
![]() Note
Note
Once in Photoshop, it’s important to maintain editing flexibility and safeguard your original image, so you’ll perform each edit on a separate layer.
Let’s start by learning how to use two tools that largely rely on healing technology: the Spot Healing Brush tool and the Healing Brush tool.
Using the Spot Healing Brush and Healing Brush tools
Photoshop’s Spot Healing Brush and Healing Brush make getting rid of objects very easy. Both tools blend copied pixels with surrounding pixels to make your changes look more natural. Whereas the Spot Healing Brush copies pixels directly outside your brush cursor, the Healing Brush lets you copy pixels from anywhere in the photo, which is an important distinction.
![]() Note
Note
The process of telling the Healing Brush where to copy pixels from is referred to as setting a sample point.
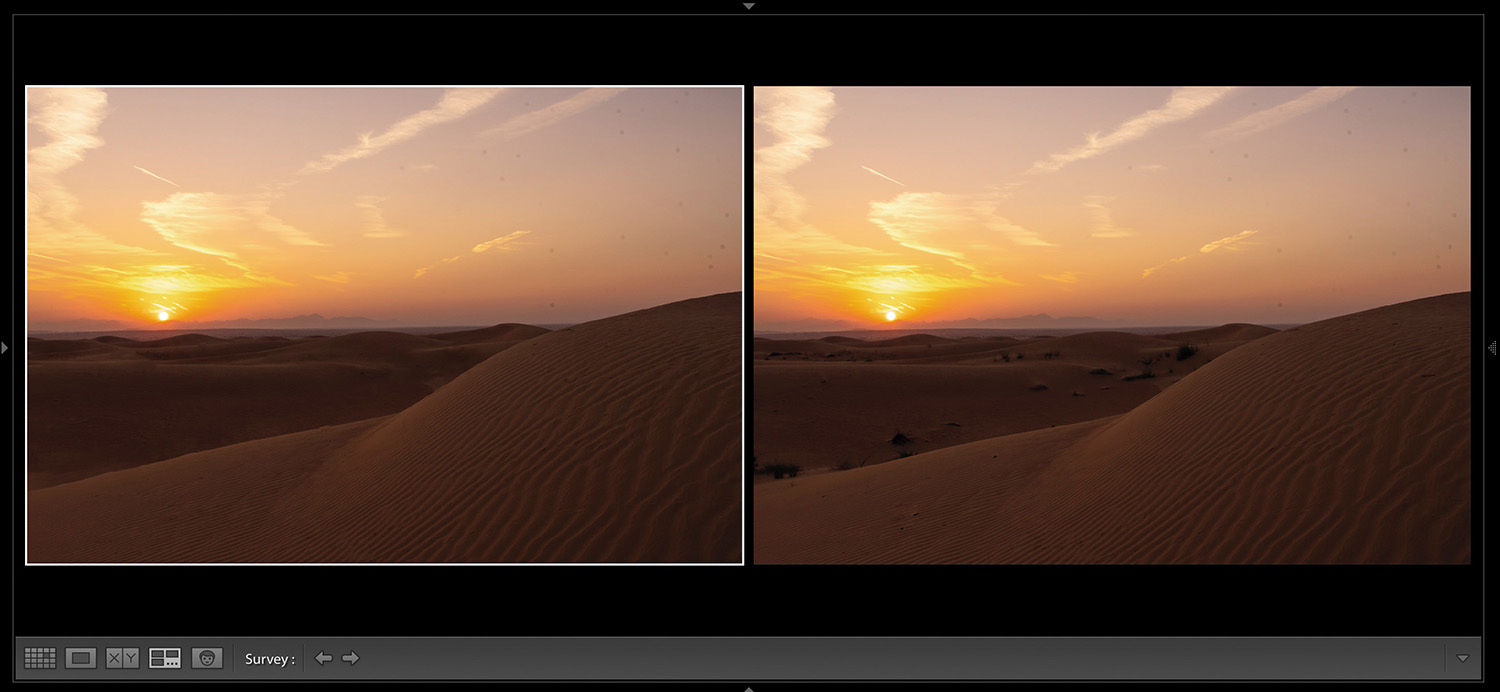
In this exercise, you’ll use a combination of the two healing brushes to clean up the sand in a desert sunrise image:
Select desert-sunrise.dng in Lightroom’s Library module, and then send it to Photoshop by choosing Photo > Edit In > Edit In Adobe Photoshop CC or by pressing Ctrl+E/Command+E.
In Photoshop, press Shift+Ctrl+N/Shift+Command+N to create a new layer. In the resulting dialog, enter spot healing into the Name field, and then click OK.
Activate the Spot Healing Brush tool in the Tools panel by pressing J on your keyboard.
 Tip
TipYou can cycle through all the tools in this toolset by pressing Shift+J repeatedly on your keyboard.
In the k options bar, click Content-Aware for Type and select Sample All Layers. Leave the other settings at their default values.
Turning on Sample All Layers tells Photoshop to look through the currently active empty layer to where the pixels live on the layer beneath it.
Zoom in to the photo by pressing Ctrl++/Command++. Hold down the Spacebar on your keyboard, and then drag to reposition the photo so you can see the bottom-center portion of the foreground.
Move your cursor over one of the green plants. Use the Left Bracket ([) and Right Bracket (]) keys on your keyboard to resize the brush tip so it’s slightly larger than the item you’re removing.
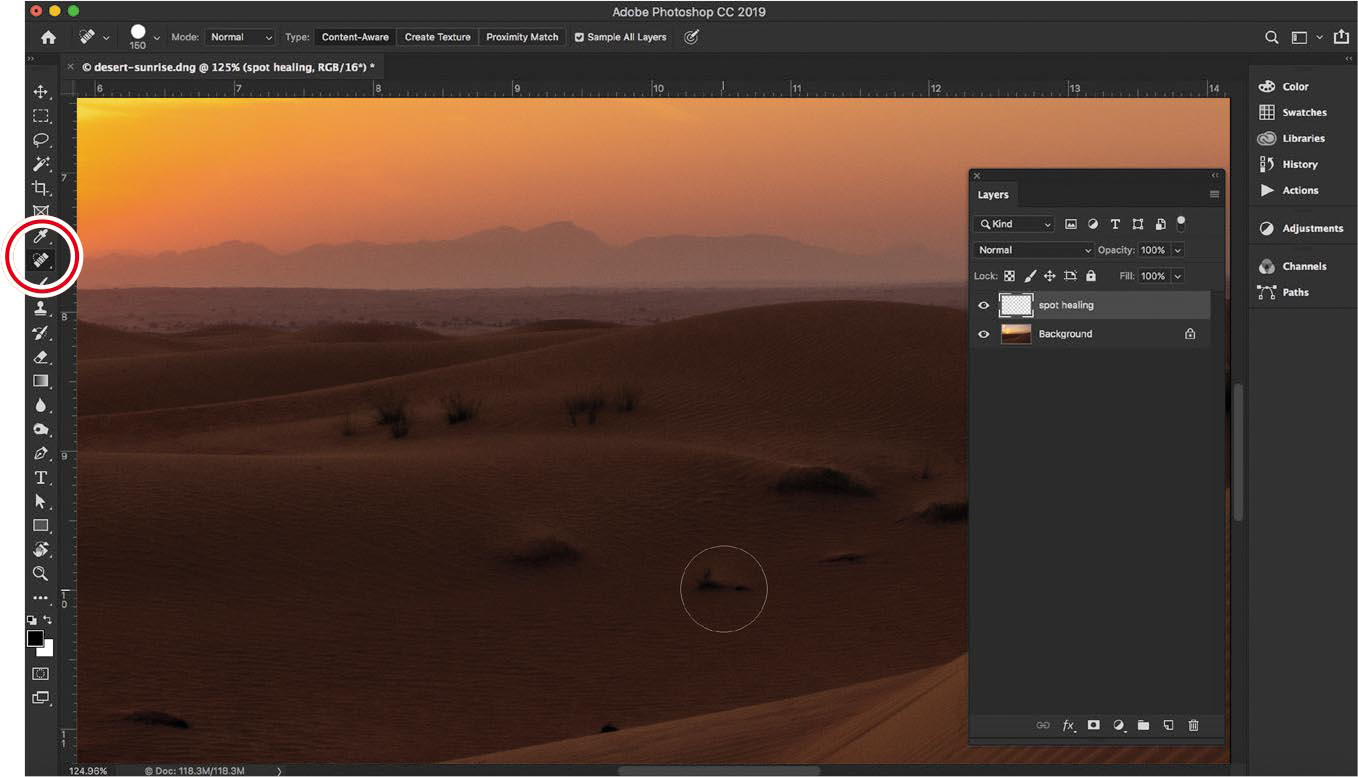
Click or drag atop the plant in the sand to remove it. Be sure to resize your brush cursor as you go. Use the Spacebar-drag trick to reposition the photo onscreen so you can see the left side, and continue to remove plants.
The Spot Healing Brush automatically samples pixels from an area near the outside of the brush cursor, copies them to the area you’re brushing over, and blends them with surrounding pixels.
If you don’t like the results you get with the Spot Healing Brush, choose Edit> Undo or press Ctrl+Z/Command+Z to undo your brushstroke, and then try again using a larger or smaller brush.
While this does a great job with individual small spots of problems, larger trouble spots often look a little off when fixed with the Spot Healing Brush. For larger areas, try the Healing Brush or the Patch tool. Let’s tackle the Healing Brush first.
Add another new layer by pressing Shift+Ctrl+N/Shift+Command+N. In the resulting dialog box, enter healing brush in the Name field and click OK.
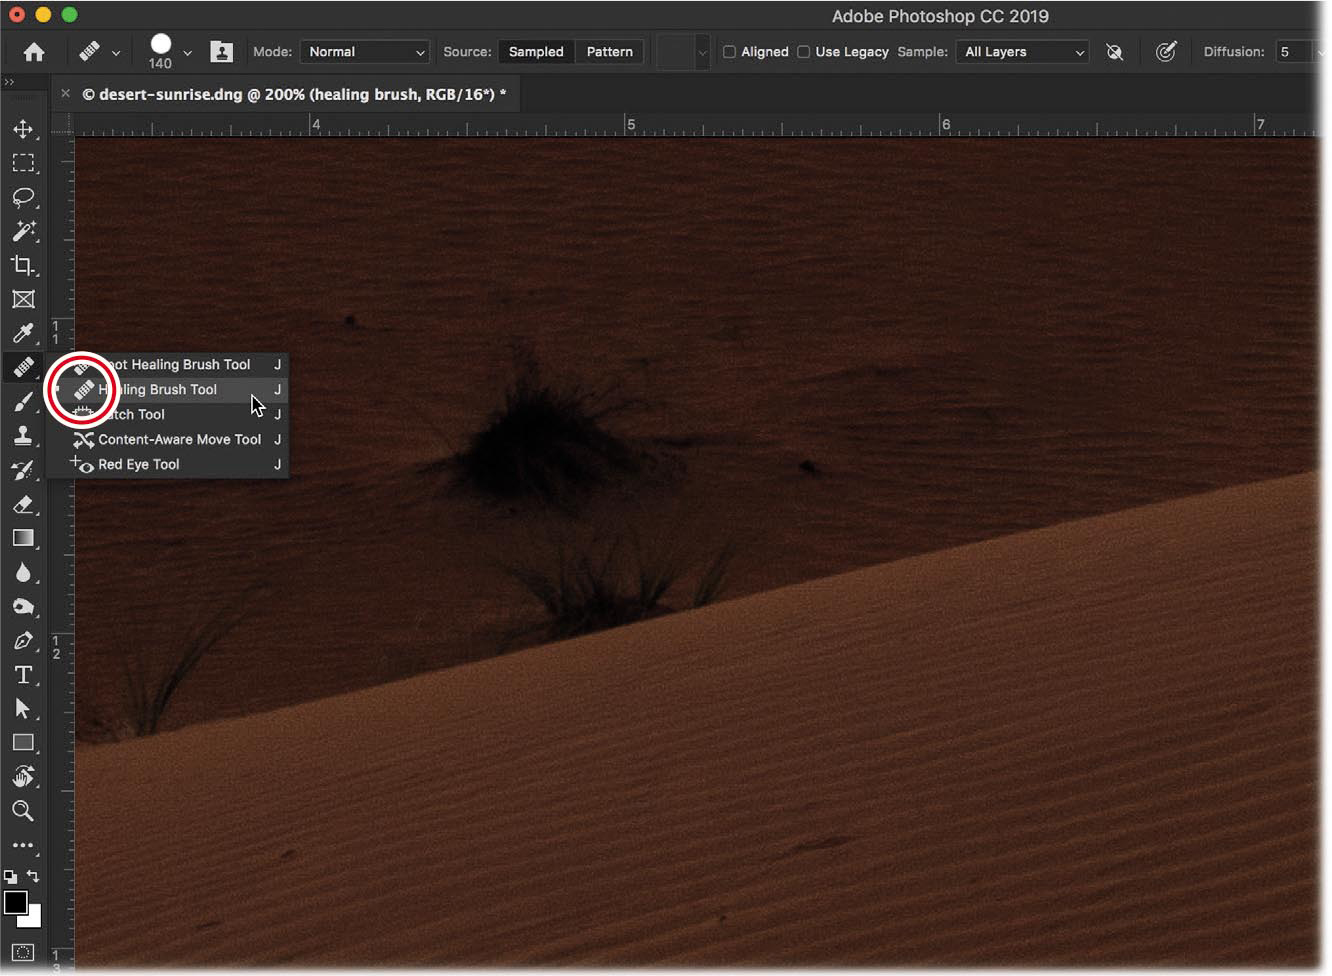
Activate the Healing Brush tool in the Tools panel, which is in the same toolset as, and immediately below, the Spot Healing Brush.
You’ll use the Healing Brush tool to remove the larger pieces of vegetation, or the smaller ones where you didn’t get a good result by using the Spot Healing Brush tool.
The Healing Brush tool is similar to the Spot Healing Brush tool, except it allows you to control the source from which pixels are copied.
In the options bar, ensure that the Mode menu is set to Normal, Source is set to Sampled, Aligned is unselected, and the Sample menu is set to All Layers.
With Aligned turned off, the Healing Brush tool will return to the original sample point whenever you release your mouse button and start another stroke.
To set a sample point, hold down Alt/Option on your keyboard and click a clean area of sand near the larger piece of vegetation (your brush cursor turns into a tiny target). Release the Alt/Option key.
Move your cursor over that plant and brush across it to remove it.
As you drag, a small plus sign (+) appears that indicates the source from which pixels are being copied.
TipDepending on the photo, you may need to keep resetting the sample point to make the removal look realistic and to avoid introducing a repeating pattern.
To see a before version, hide all the layers above the Background layer by Alt-clicking/Option-clicking the Background layer’s visibility icon (it looks like an eye). To turn the other layers back on, Alt-click/Option-click the same icon again. Choose File > Save (or press Ctrl+S/Command+S) to save the file, and then choose File > Close (or press Ctrl+W/Command+W) to close the document in Photoshop.
The edited photo is saved back to the same folder as the original, and the PSD appears in Lightroom. You can see before (left) and after (right) versions on the following page.
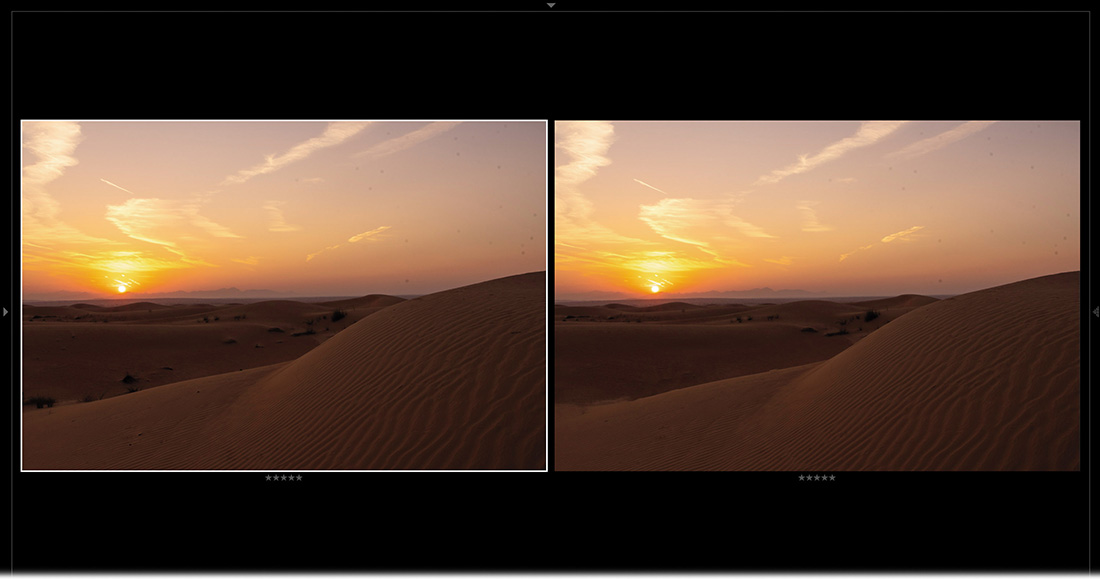
As you can see, the healing brushes and their automatic blending worked well on the textured sand. In the next section, you’ll learn how to use the Clone Stamp tool to remove objects without any automatic blending.
Using the Clone Stamp tool
Sometimes the healing brushes’ automatic blending creates a blurry area near pixels you want to keep. In order to avoid automatic blending of pixels, you can use the Clone Stamp tool instead.
For example, if you’re working with a portrait taken against a (nearly) solid-color background, flyaway hairs around your subject’s head can be the bane of your existence. Although you could use Lightroom’s Adjustment Brush to blur them, they may still be distracting.
Photoshop’s healing brushes can remove the hairs, but you’ll end up with a blurry area next to the strands you want to keep. The Clone Stamp tool performs no blending; it simply copies pixels from one area and then pastes them onto another, which makes it better suited for this particular job. Here’s how to use it:
Select the Flyaway.dng file from the Lesson 05 Images collection. Right-click it and choose Create Virtual Copy. Drag that virtual copy into the Lesson 08 Images collection. Send this image to Photoshop by choosing Photo > Edit In > Edit In Adobe Photoshop CC or by pressing Ctrl+E/Command+E.
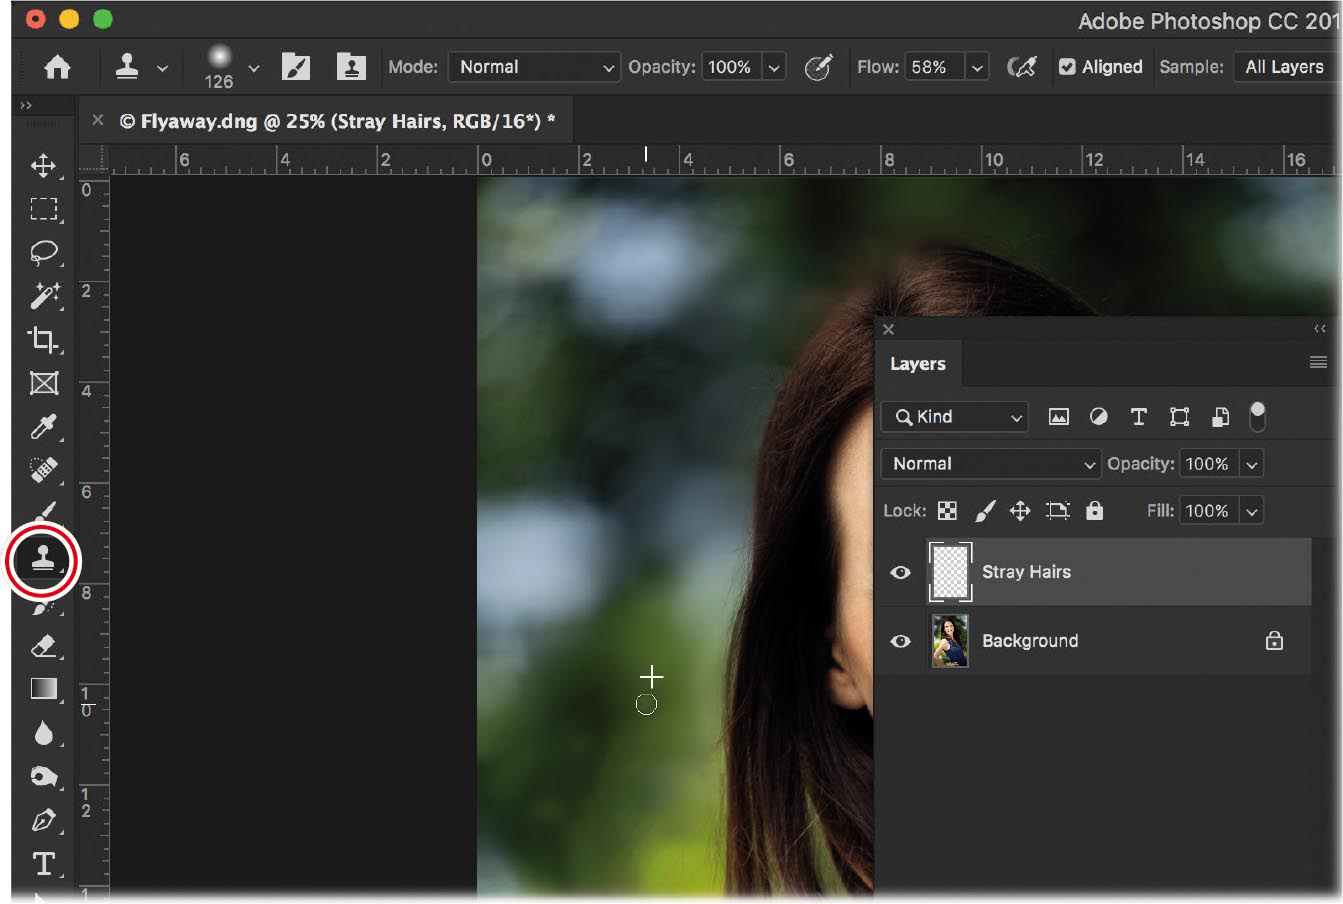
In Photoshop, press Shift+Ctrl+N/Shift+Command+N to create a new layer. In the resulting dialog, enter Stray Hairs into the Name field, and then click OK.
Zoom in to the photo by pressing Ctrl++/Command++. Hold down the Spacebar on your keyboard, and then drag to reposition the photo so you can see the left side of the model’s head.
Activate the Clone Stamp tool in the Tools panel. In the options bar, set the Mode menu to Normal, the Opacity to 100%, and the Flow to 100%, and deselect Aligned. Set the Sample menu to All Layers.
TipIn some cases, you may get a better result by selecting Aligned in the options bar. Doing so causes the source point to move as your brush cursor moves.
Resize your brush cursor so it’s slightly larger than the strand of hair you want to remove. Next, tell Photoshop where to copy pixels from by setting a sample point. To do that, Alt-click/Option-click a clean area of pixels as close to the hair you’re removing as possible to match tone and texture. Brush over the hair you want to remove (short strokes typically work better than long ones).
If the background behind the hair shifts in color or texture, set a new sample point. A plus sign (+) marks the area you’re sampling from as you paint (see to the left of her head below).
Repeat this process until you remove the most distracting hairs. Be sure to set new sample points as you go. Use the Spacebar-drag trick to reposition the photo so you can see all the stray hairs on the left and top of the model’s head.
NoteBe careful not to create an obviously broken strand of hair. If that happens, clone farther into the hair so the strand appears shorter and not broken.
When you’re finished, choose File > Save (or press Ctrl+S/Command+S), and then choose File > Close (or press Ctrl+W/Command+W) to close the document and return to Lightroom.
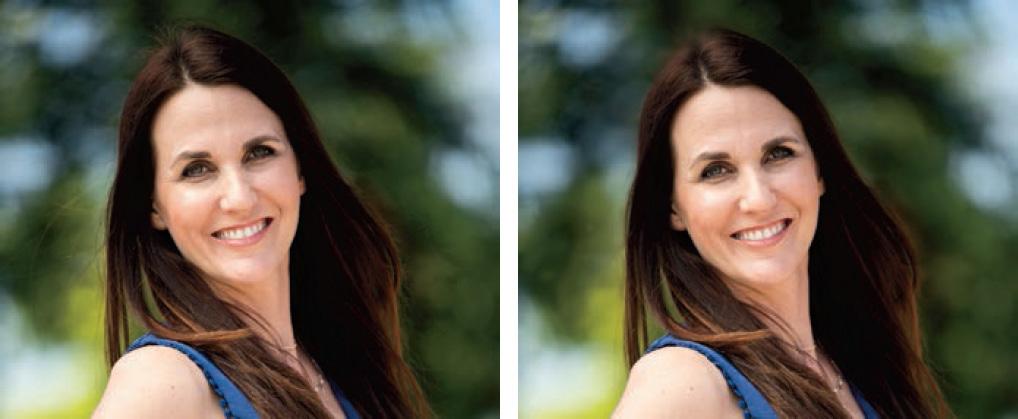
This figure shows the before (left) and after (right) versions. Notice how much cleaner the portrait is after using the Clone Stamp tool.
The next section teaches you how to tackle removing larger objects using Photoshop’s Patch tool.
Using the Patch tool
The Patch tool is good for removing larger objects from your photos. Like the healing brushes, it performs automatic blending between the copied and surrounding pixels, although you get to control how much blending occurs in both texture and color. You also can tell Photoshop exactly where to copy pixels from with this tool, which is handy if the item you want to remove is close to an item you want to keep.
Removing desert vegetation
In this exercise, you’ll use the Patch tool to remove the larger areas of vegetation from the desert sunrise picture we worked on earlier in this lesson:
Select the desert sunrise PSD file in Lightroom, and then send it to Photoshop by choosing Photo > Edit In > Edit In Adobe Photoshop CC or by pressing Ctrl+E/Command+E. Choose Edit A Copy With Lightroom Adjustments, and click Edit.
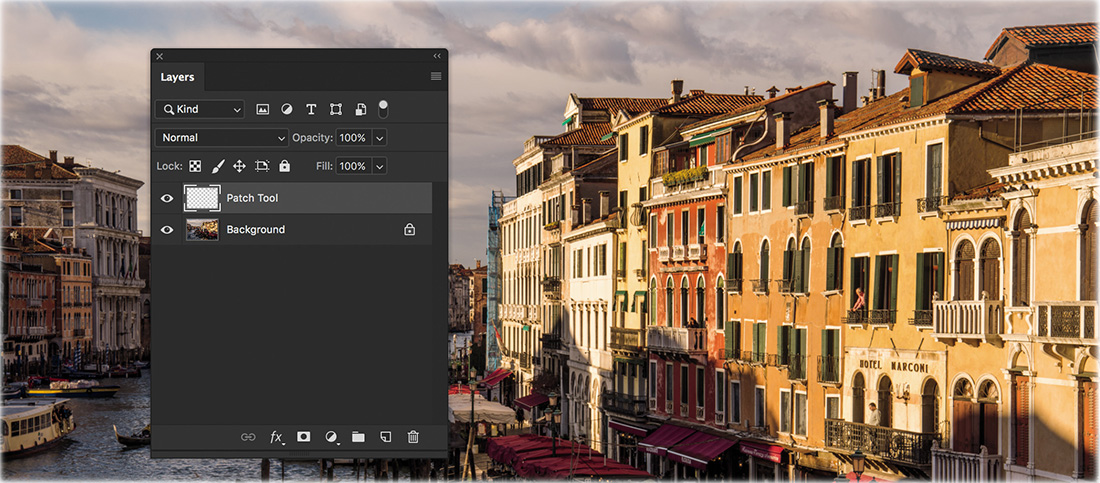
In Photoshop, press Shift+Ctrl+N/Shift+Command+N to create a new layer. In the resulting dialog, enter Patch Tool into the Name field, and then click OK.
Zoom in to the photo by pressing Ctrl++/Command++. Hold down the Spacebar on your keyboard and drag to reposition the photo so you can see the areas of vegetation.
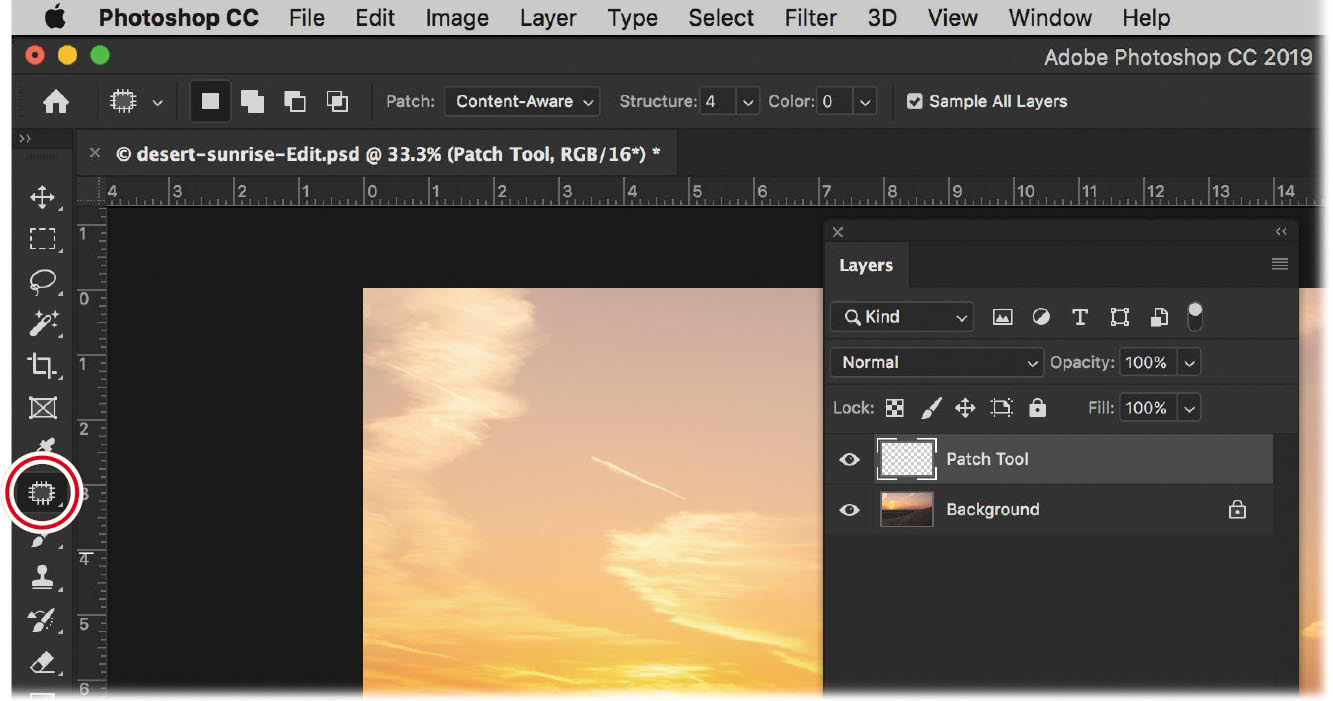
Activate the Patch tool in the Tools panel, which is in the same toolset as the healing brushes you used earlier. In the options bar, set the Patch menu to Content-Aware, leave the Structure and Color fields at their default values, and select Sample All Layers.
NoteIf you forget to change the Patch menu to Content-Aware, you won’t see the Sample All Layers checkbox.
Move over your document and drag to create a loose selection around the larger vegetation. Be sure to make the selection slightly larger than the item itself; otherwise, you may end up with a ghostly outline of it.
TipYou don’t have to draw a selection by hand using the Patch tool. You can use whatever selection tool you want, and then switch to the Patch tool when you’re ready.
Drag the selection to the area you want to use for the fix, which is to the left of the vegetation.
As you drag, a preview of the potential source area appears inside the selection. If there are any horizontal or vertical lines involved, try to match them up. When you release your mouse button, Photoshop performs the patch and blends it with the surrounding area. Don’t deactivate the selection yet!

While the selection is still active, experiment with the Structure and Color fields in the options bar to make the patch look more realistic (values of 4 and 0, respectively, were used here).
To preserve more of the texture from the area you copied pixels from, increase the Structure setting; to preserve less of the texture, decrease it. To perform more color blending between the two areas, increase the Color setting; to perform less, decrease it. As you experiment with these fields, keep an eye inside your selection and you’ll see the pixels change.
When you’re satisfied, deactivate the selection by choosing Select > Deselect (or by pressing Ctrl+D/Command+D).
If you see any imperfect areas as a result of the patch, create another new layer, and then use one of the healing brushes or the Clone Stamp tool to fix it. In this example, a combination of the Spot Healing Brush and the Clone Stamp tool was used to clean up a couple of areas.
Choose File > Save (or press Ctrl+S/Command+S), and then choose File > Close (or press Ctrl+W/Command+W).
This figure shows the before (right) and after (left) versions. As you can see, the Patch tool did a nice job of removing the larger vegetation.
Removing antennas and lines
In the next exercise, you’ll learn how to use the Patch tool to remove a couple of antennas from a photo (you can use the same technique to remove power lines).
Select the Venice-1.dng file in Lightroom’s Library module, and then send it to Photoshop by choosing Photo> Edit In > Edit In Adobe Photoshop CC or by pressing Ctrl+E/Command+E.
In Photoshop, press Shift+Ctrl+N/Shift+Command+N to create a new layer. In the resulting dialog box, enter Patch Tool in the Name field, and then click OK.
Zoom in to the photo by pressing Ctrl++/Command++. Hold down the Spacebar on your keyboard, and then drag to reposition the photo so you can see the antennas on the roofs on the right. Make sure the Patch tool is activated.
To get rid of these antennas successfully, you will have to work in stages. First, draw a selection around the top of an antenna, and drag it to the right to get rid of it and clear the area.
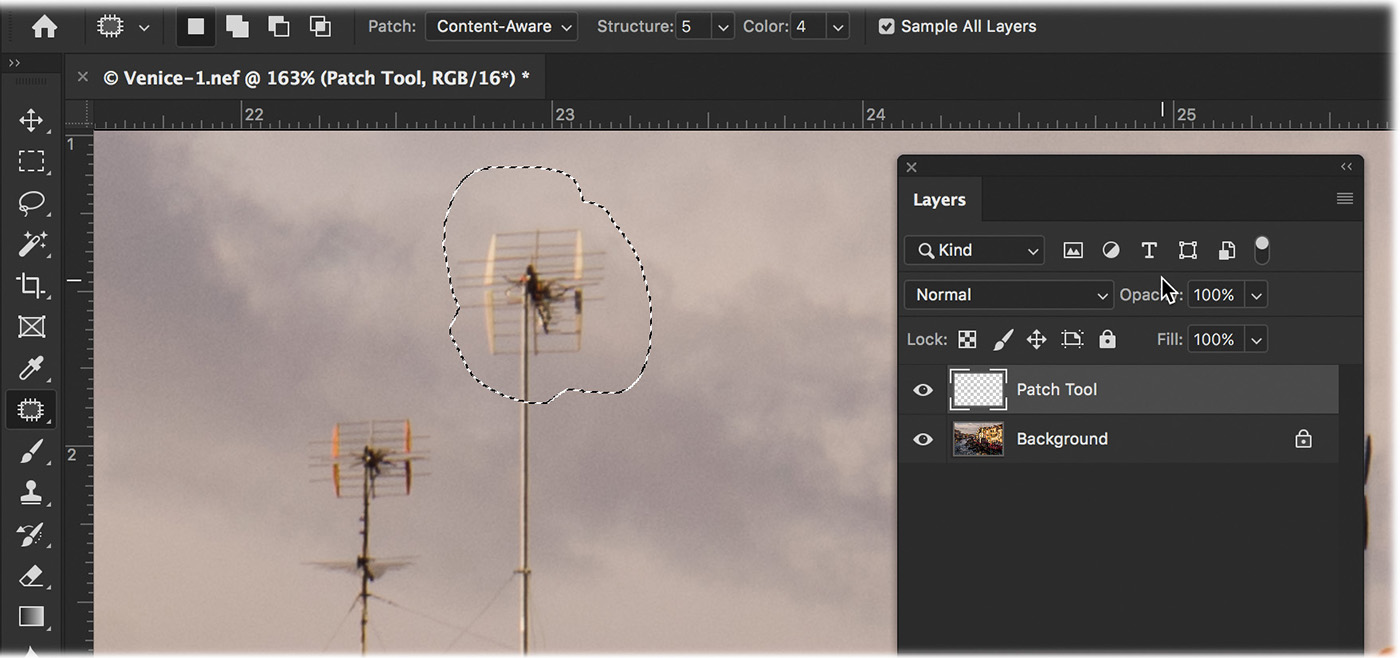
Once you have removed the top of the antenna, clear the cables holding the antennas up by making smaller selections around them and removing them.
Once the cables are gone, you can make a selection of the antenna pole with the Patch tool and get rid of it by dragging the selection to the right.
This makes a clear area of sky. Now you can make a selection of the antenna next to it and remove it entirely by dragging the selection into the clean area.
 Tip
TipThe October 2018 release of Adobe Photoshop CC eliminated the need to hold down the Alt/Option key to step backward in time. Previously, Ctrl+Z/Command+Z toggled between undo and redo. Now, pressing Ctrl+Z/Command+Z multiple times will step you back through a series of undos.
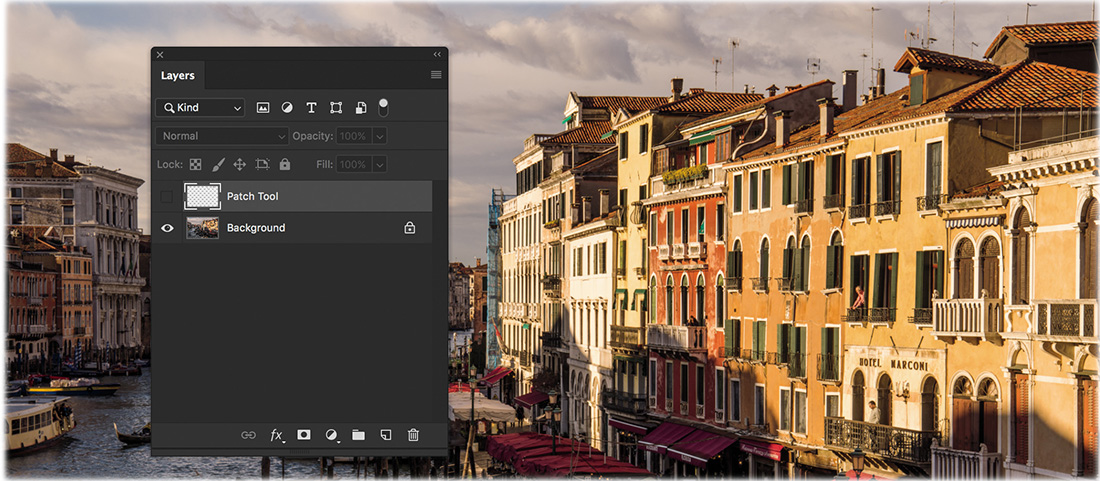
Continue selecting and removing the rest of the antennas on nearby roofs. Keep in mind that this will take a little time and a fair bit of patience. If you mess up a selection, press Ctrl+Z/Command+Z. When you finish your patch selection, 216you’ll see that the elimination of the antennas gives the sky a cleaner, less distracting look, making for a better scene.
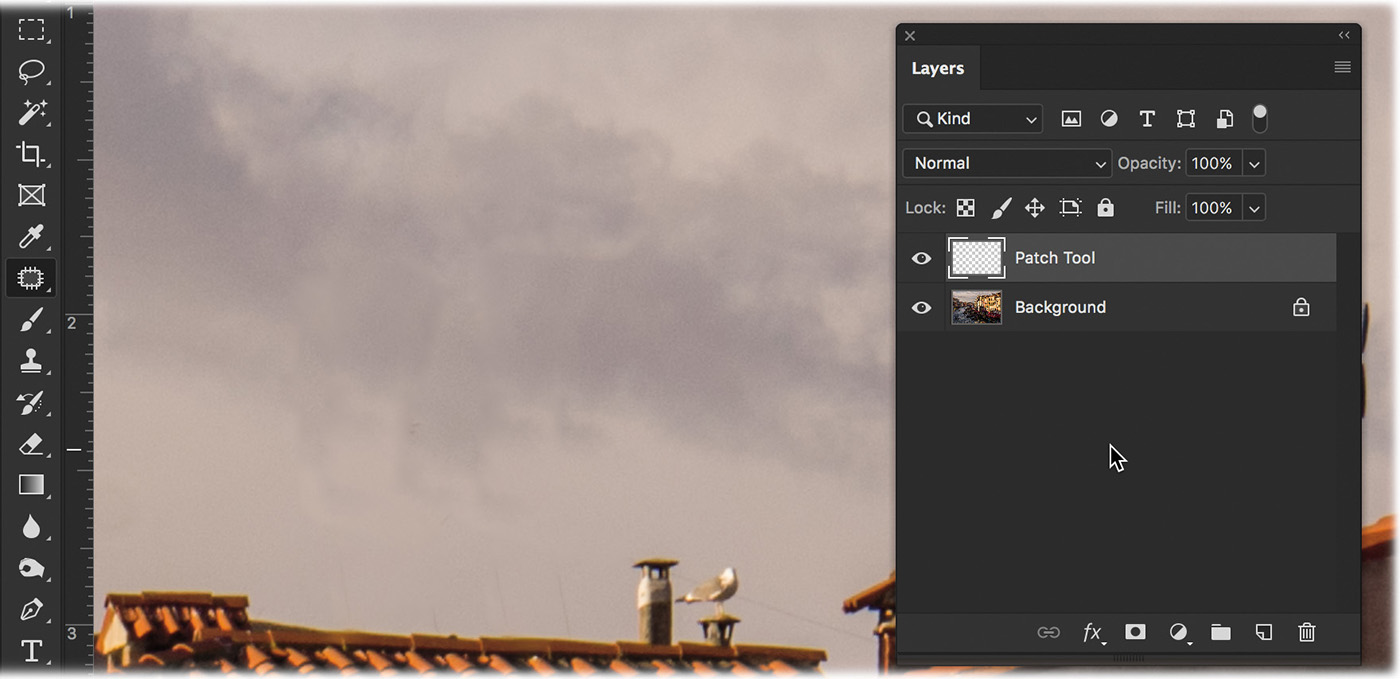
To see what the image looked like before, click the visibility icon for the Patch Tool layer to hide it, and see all of the antennas and cables on the rooftop. Save and close the file.
Now let’s look at yet another way to remove a fairly large object: using the Content-Aware Fill command.
Using Content-Aware Fill
If you’ve got plenty of background pixels surrounding the object you want to remove, try using the Fill command’s Content-Aware option. Like the Patch tool, this command is quick, and it performs automatic blending between copied and surrounding pixels.
Previously, the drawback of Content-Aware Fill was that you didn’t get to choose where Photoshop copied the pixels from. In the October 2018 release of Photoshop, a Content-Aware Fill workspace was added that gives you even greater control.
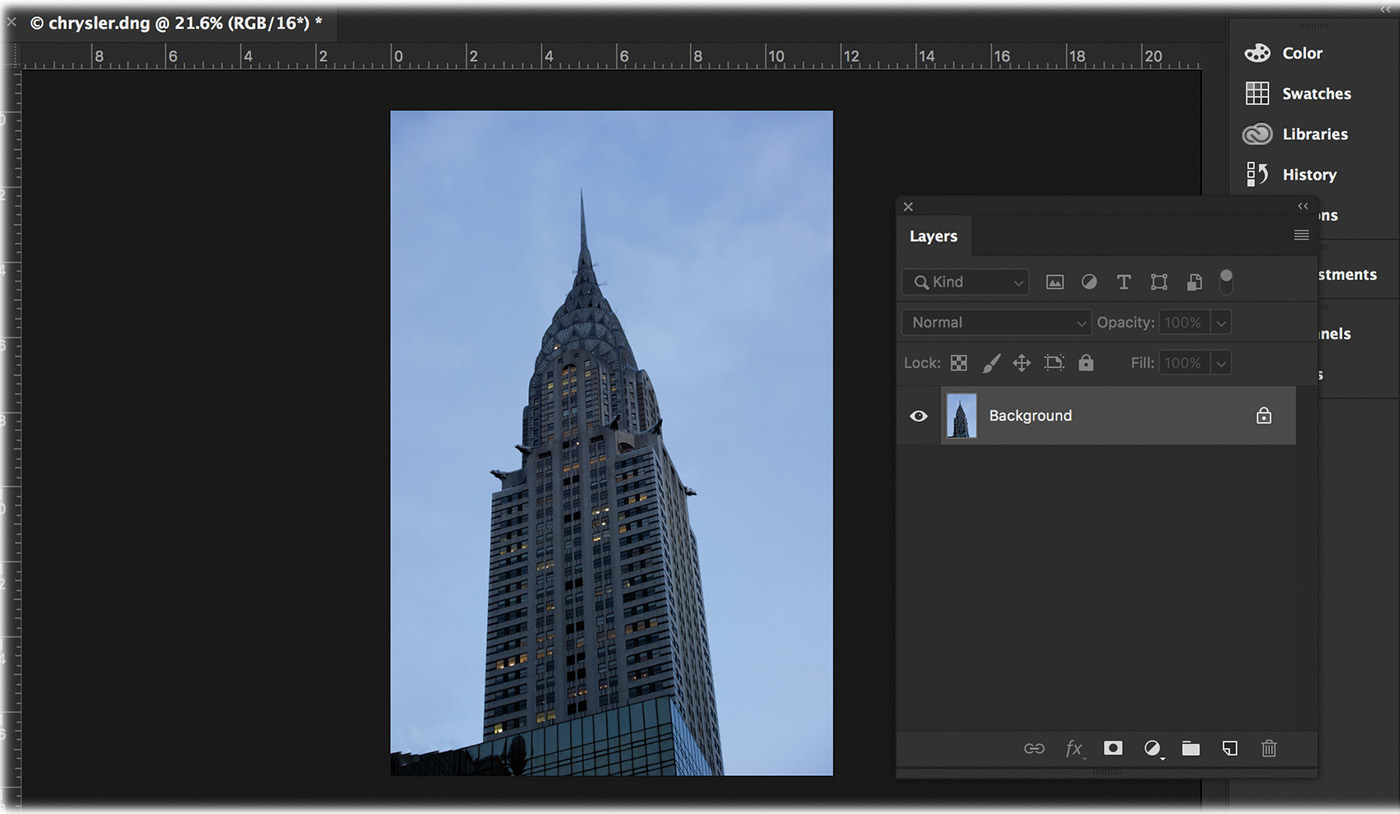
Let’s start by using the Content-Aware Fill command to remove some of the buildings surrounding the Chrysler Building.
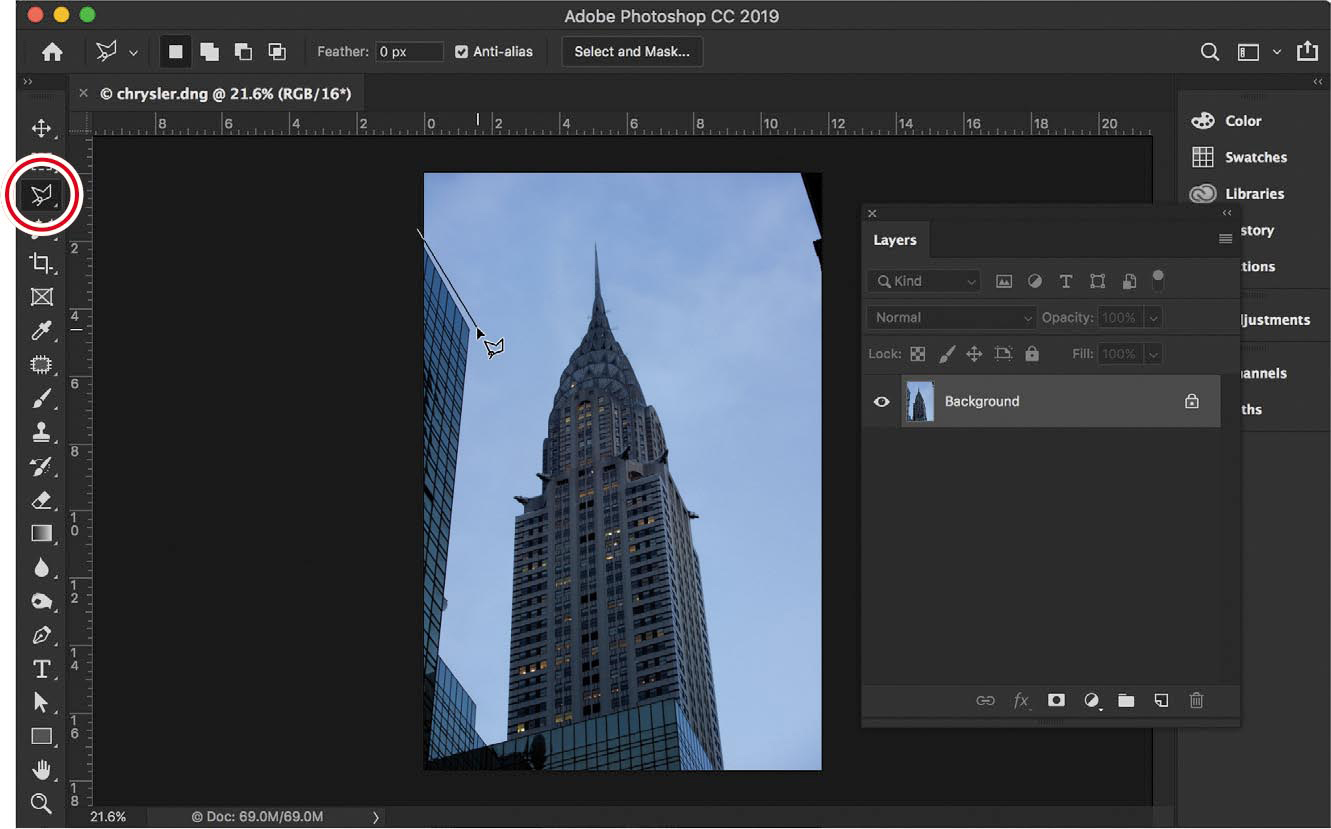
Select the chrysler.dng photo in Lightroom’s Library module, and then send it to Photoshop by choosing Photo > Edit In > Edit In Adobe Photoshop CC or by pressing Ctrl+E/Command+E.
Select the Polygonal Lasso tool (it’s in the tool group under the Lasso tool) to create a geometric selection. When you click with this tool, it places a dot on the image. Clicking again creates another dot and a connecting line. Think of it as connecting the dots. The goal is to make a selection around the buildings that take the focus away from the Chrysler Building.
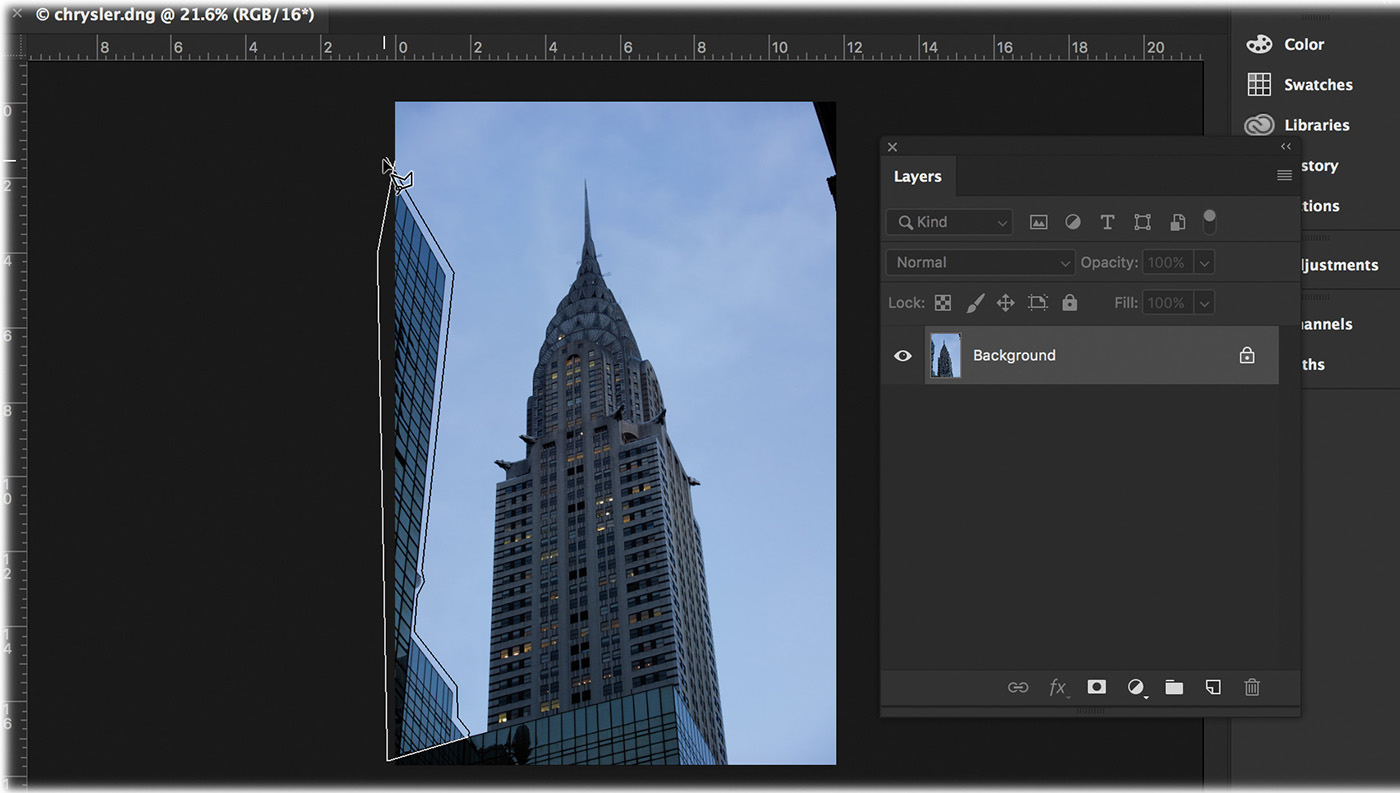
To ensure you get the very edge of the image when making the selection, click to create a dot on the outside the image, in the canvas area. This ensures that the selection includes the very edge of the image.
Continue making a connect-the-dots selection of the buildings at the lower left of the image, clicking the canvas outside the image to make sure your selection includes the very edges of the image. You can turn this path into a selection by clicking when you reach your starting point and the cursor turns into the Polygonal Lasso tool with a circle next to it.
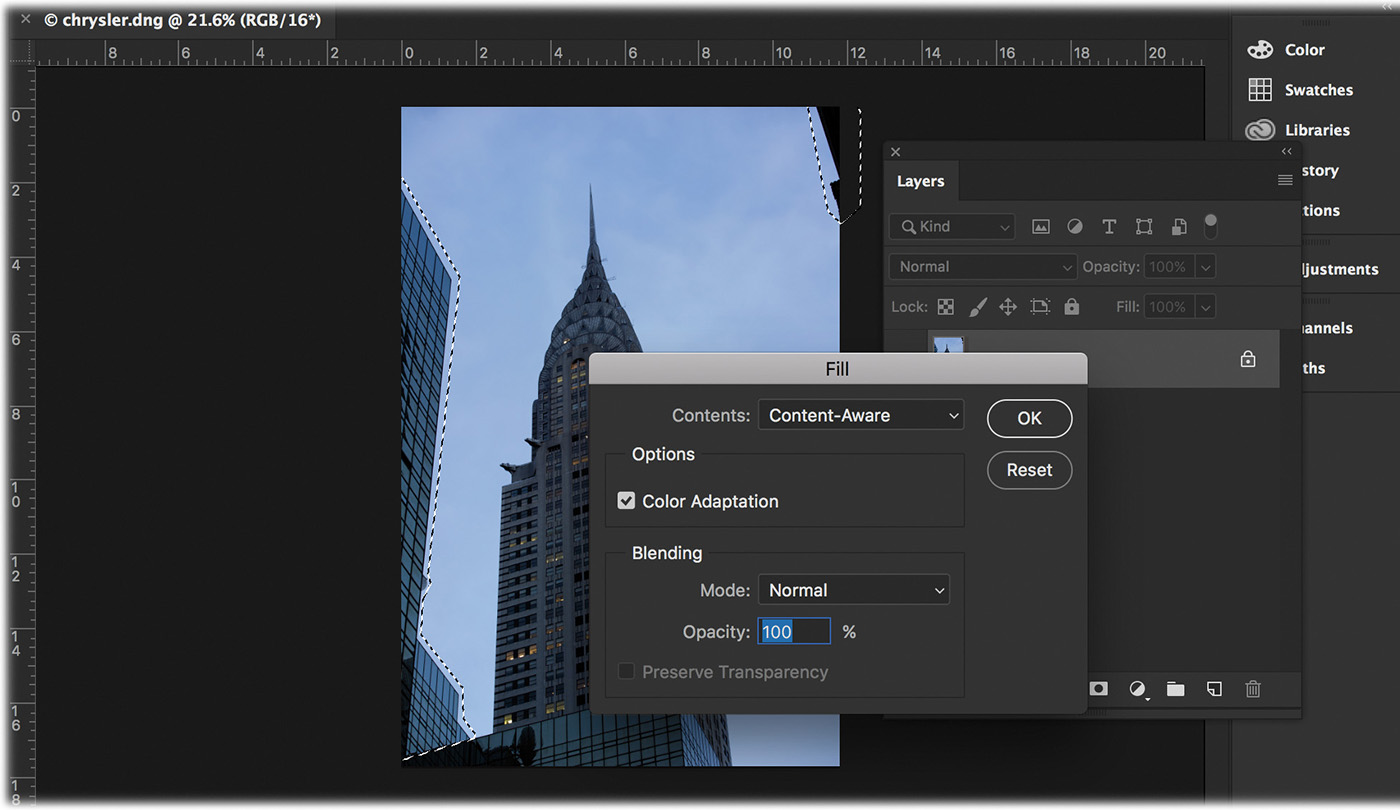
Hold down the Shift key and you’ll notice a plus sign (+) next to the tool. This lets you add a new selection to the existing selection on the left side. Click the canvas area outside the upper right of the image and make a selection around the edge of the building there. This creates two distinct selections: one to the left and one to the right of the Chrysler Building.
 Note
NoteWhen the active layer is not a Background layer, the shortcut for opening the Fill dialog is Shift+Backspace/Shift+Delete.
Choose Edit > Fill to open the Fill dialog box (or press the Backspace/Delete key). Choose Content-Aware from the Contents menu, select Color Adaptation, and then click OK.
Photoshop fills the selection with pixels it samples from outside the selection. You get different results each time you use this command, so you may need to undo it by pressing Ctrl+Z/Command+Z and then run it again.
If you still don’t like the results, try using a different selection tool, creating a tighter or larger selection, or both. For example, if you first used the Polygonal Lasso tool, you may want to try the Lasso tool in order to make the selection more similar to the shape of the thing you’re removing.
Deactivate the selection by choosing Select > Deselect or by pressing Ctrl+D/Command+D.
When you’re finished, save and close the document in Photoshop to return to Lightroom.
The Content-Aware Fill workspace and the Content-Aware Scale command
While Content-Aware technology can be really helpful fixing problem areas in your images, in the past, it didn’t always work well. Behind the scenes, the technology would fill a smaller selection from a larger area, and place random elements in the picture that didn’t belong. A tool was needed for finer control—to specify what area of the picture you wanted to sample from to let it perform its magic. The October 2018 release of Photoshop included a new Content-Aware Fill workspace that lets you do just that.
Content-Aware Scale is also incredibly useful to explore, as often, an image may benefit from being extended horizontally or vertically. Transforming a picture by scaling (with Free Transform) can distort it. Making it larger proportionally can reduce its quality. Content-Aware Scale can give you the benefit of a new canvas size, without either of those drawbacks.
Using the Content-Aware Fill workspace
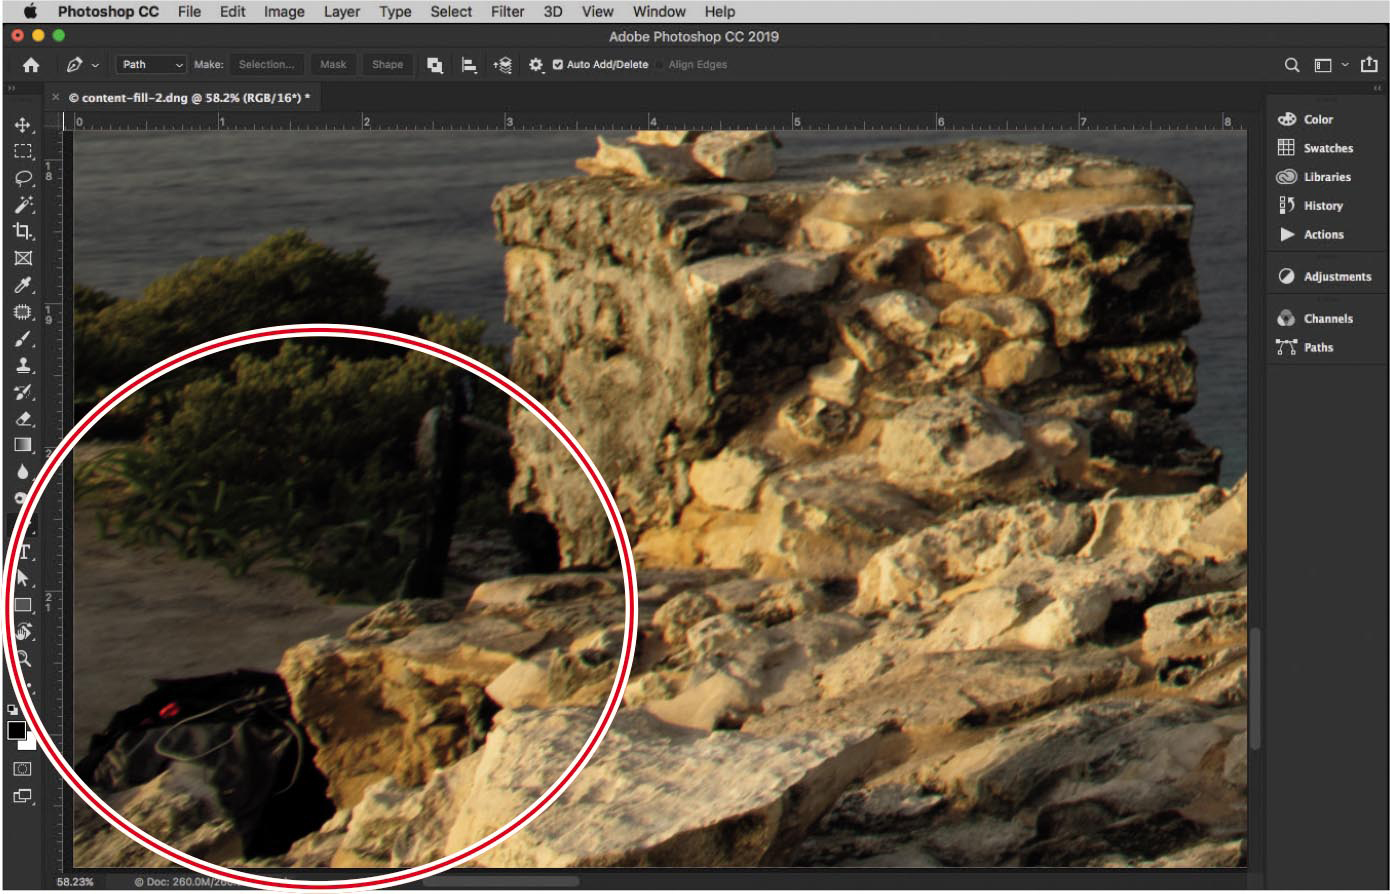
The Content-Aware Fill workspace is an extremely powerful tool, since it lets you restrict the area you want to include as part of the fill, but it requires practice. In the image here, we forgot to remove some backpacks from the shoot area, and there’s a black guardrail we need to clean up before we deliver the picture.
Select the content-fill-2.dng image in Lightroom’s Library module and send it to Photoshop by choosing Photo > Edit In > Edit In Adobe Photoshop CC or by pressing Ctrl+E/Command+E.
Use the Lasso tool (L) to create a selection around the lower-left portion of the picture to remove the backpacks and guardrail areas.
Fill this selection using the Edit > Fill command. In the Fill dialog box, set the Contents menu to Content-Aware, select Color Adaptation, and click OK.
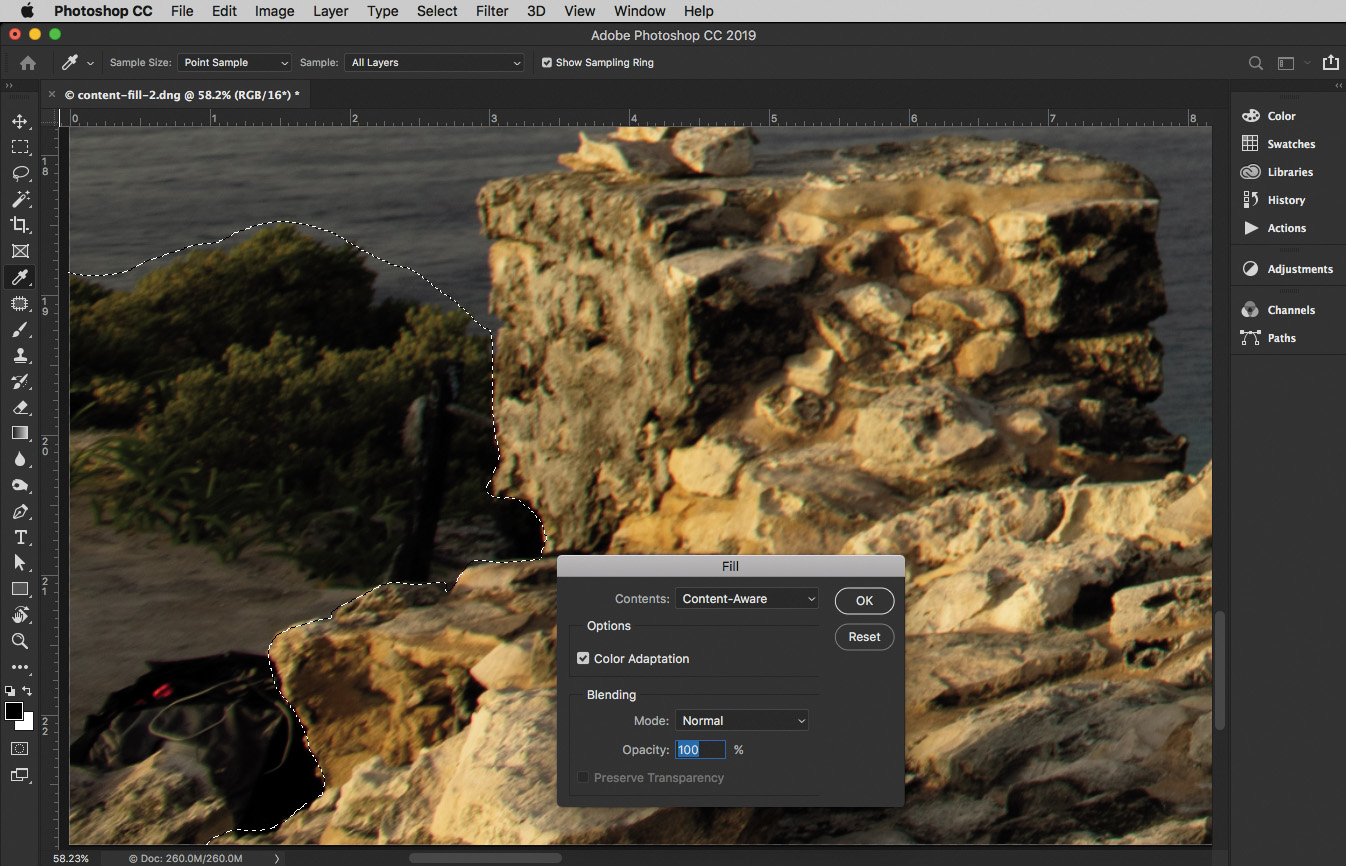
You’ll notice that Photoshop has used different parts of the picture to “fix” the selected area, not always correctly—you may see some of the sky appear, some of the water appear, or perhaps even some of the dress appear. We want to have greater control over what appears inside the fill area.
TipIf you are unhappy with the results of the fill, you can always try a new fill by going to Edit > Fill and using Content-Aware again. It will generate a new fill for you.
Instead of pressing Ctrl+Z/Command+Z multiple times to complete multiple undos, choose File > Revert. Revert will take the image back to the point that it was exported from Lightroom and remove anything we have done.
Create a new selection around the area that we want to remove in the lower-left portion of the picture.
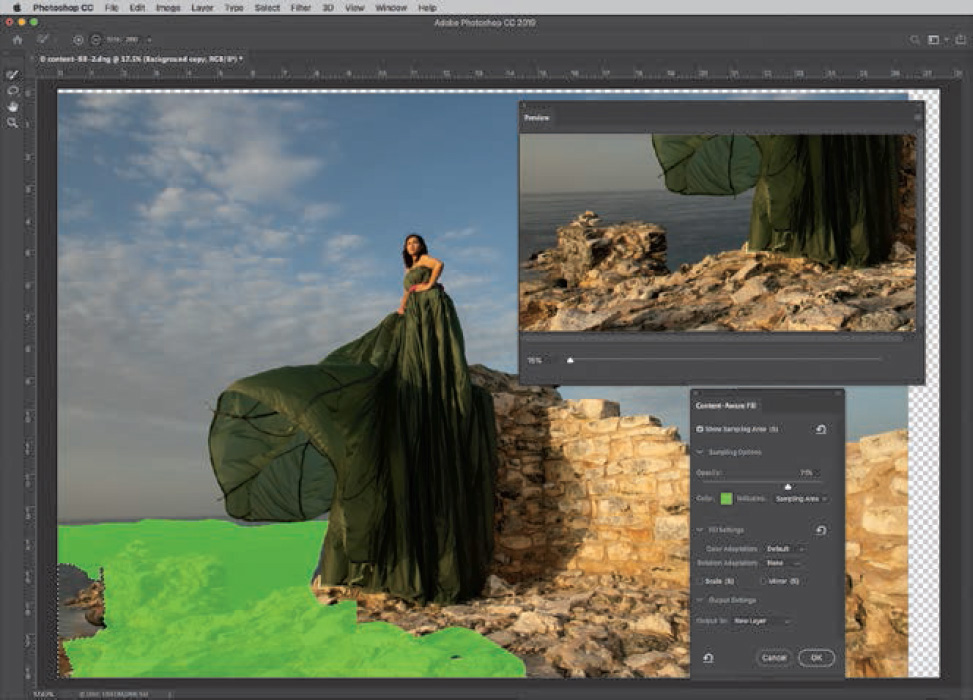
This time, let’s use Edit > Content-Aware Fill. This will bring the picture into the Content-Aware Fill workspace, which contains tools and panels that make its use quite easy:
The green that you see on the image shows the sampling area by default. The color and opacity of this area can be controlled under Sampling Options in the Content-Aware Fill panel in the workspace.
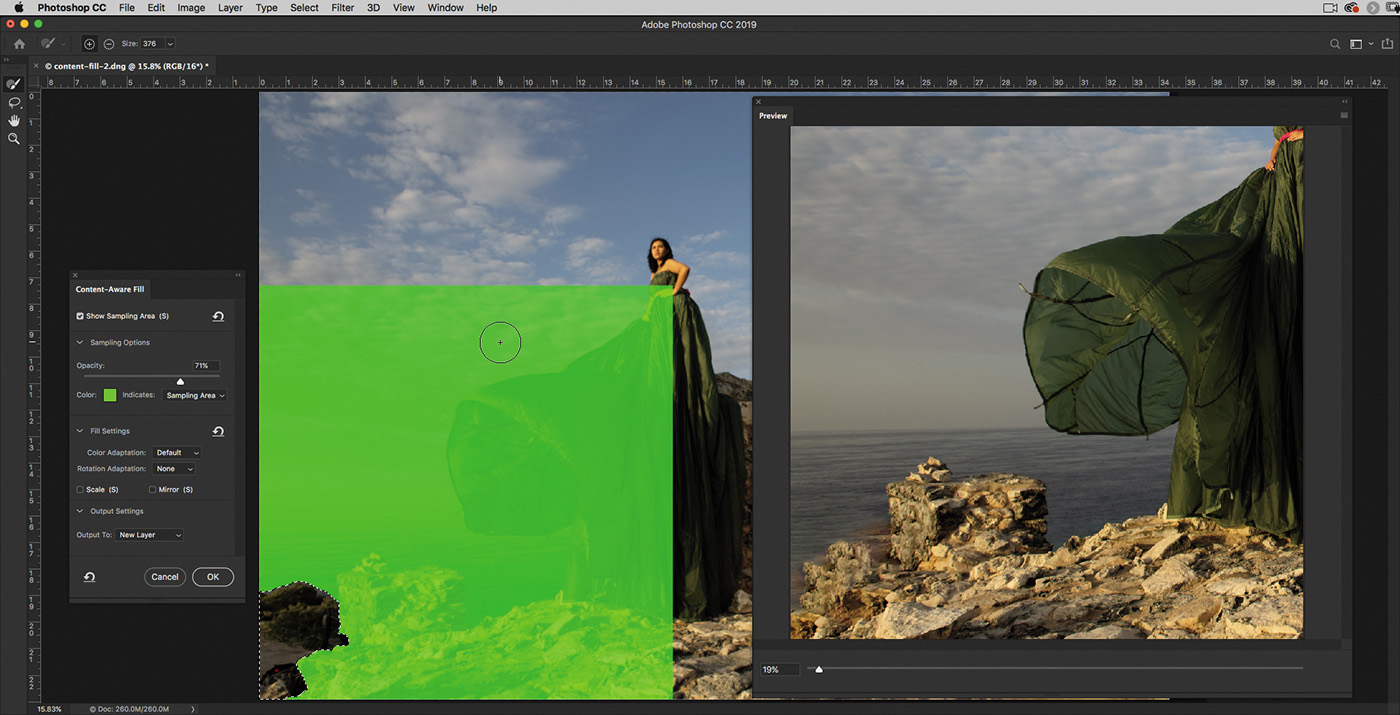
The Sampling Brush tool (B) lets you remove parts of the picture that you don’t want Photoshop to consider when filling in the selected area, or add areas you do want it to use. You can toggle the brush to add or remove areas from the selection in the options bar at the top, or you can hold down the Alt/Option key as you paint to switch between the add and remove settings.
If you have not made a selection of an area to fill or need to add to a selection, you can do that with the Lasso tool (L). As with the regular Lasso tool, you can use the Alt/Option key to remove a portion of a selection on the fly.
The preview in the Preview panel automatically updates depending on the area that you have added to or removed from the sampling area.
You can change the size of the brush you are using with the tool options at the top of the panel or by holding down Alt-Ctrl/Option-Command while you right-click and drag to the right or left.
You can reset the panel locations anytime by clicking the second icon from the right in the options bar and choosing Reset Content-Aware Fill. To reset the sampling area and settings in the Content-Aware Fill panel, click the Reset All Settings icon in the lower left of the panel.
NoteThe Content-Aware workspace has its own panels and tools for you to use. Take advantage of this new space and adjust the Preview panel, Content-Aware Fill panel, and tools so that they make the most sense to you. I prefer the layout as you see it here.
Using the Sample Brush tool, remove all of the water, sky, and dress components from the fill selection. The selection will get a little tighter and only include the rock. If needed, hold down the Alt/Option key while brushing to add more of the rock area at the bottom to get a more realistic look for your image.

Choose Currrent Layer from the Output To menu near the bottom of the Content-Aware Fill panel. Click OK to return to the main Photoshop window, and then press Ctrl+D/Command+D to deselect.
Save and close the document to return to Lightroom.

We now have a good foundation for the photo, but I’d like to add more sky to add more drama. We can easily achieve this using the Content-Aware Scale command.
Using the Content-Aware Scale command
Scaling a picture inside Photoshop is pretty easy. In the Image > Image Size menu, you have a series of options to make a picture bigger that keep a lot of detail. The problem usually comes when you try to extend the canvas in only one direction.
If you attempt to use Free Transform, the image will stretch unnaturally. The pixels are enlarged and stretched, and both realism and detail are compromised. To extend the image in only one direction, you’d have to get really creative, sampling different portions of the image to extend the canvas as needed.
The Content-Aware Scale technology really stands out in this arena. Rather than stretch the pixels in a given direction, Photoshop analyzes the picture and copies the pixels it believes would look good next to one another to complete the scaling. It reviews elements that it believes are not important to the image and duplicates them to fill the space without compromising the main subjects.
You also can save a selection and protect it from being copied or distorted when the image is scaled, giving you an even more dramatic look without the unrealistic byproducts. In this example, you’ll extend the sky vertically to give the picture a more dramatic look.
Select content-fill-2-edit.psd (this is the file that you saved in the previous exercise) in Lightroom’s Library module, and then send it to Photoshop by choosing Photo > Edit In > Edit In Adobe Photoshop CC or by pressing Ctrl+E/Command+E. In the dialog that appears, select Edit A Copy With Lightroom Adjustments to keep a separate copy of the work you have done.
In Photoshop, select the Crop tool (C) and deselect Delete Cropped Pixels in the options bar. Drag the top-center crop handle upward, and press Enter/Return.
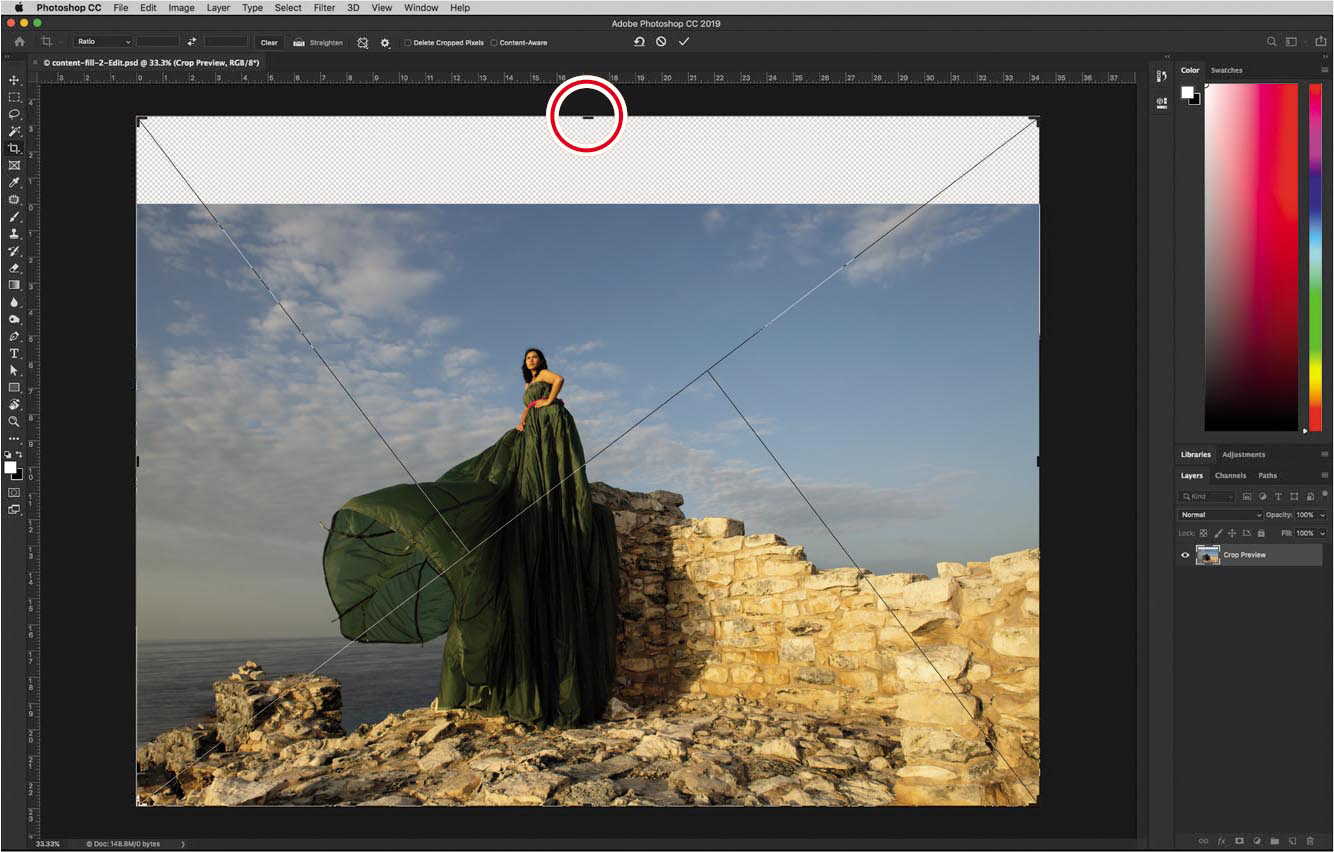
While the Crop tool is commonly used to crop inward, cropping outward will extend the canvas area. It’s a great way to extend the picture visually.
Once you have the image extended, choose Select > Subject to get a rough outline of the subject in the picture.
Choose Select > Save Selection to save the selection for use later. Give it the name Ixchel and click OK. Press Ctrl+D/Command+D to deselect.

Now choose Edit > Content-Aware Scale and you’ll get transformation handles that look similar to the Free Transform ones. As you hold down the Shift key and drag the top-center control handle upward, the Content-Aware technology automatically fills in the sky area with other portions of the sky, instead of stretching the pixels in the image.
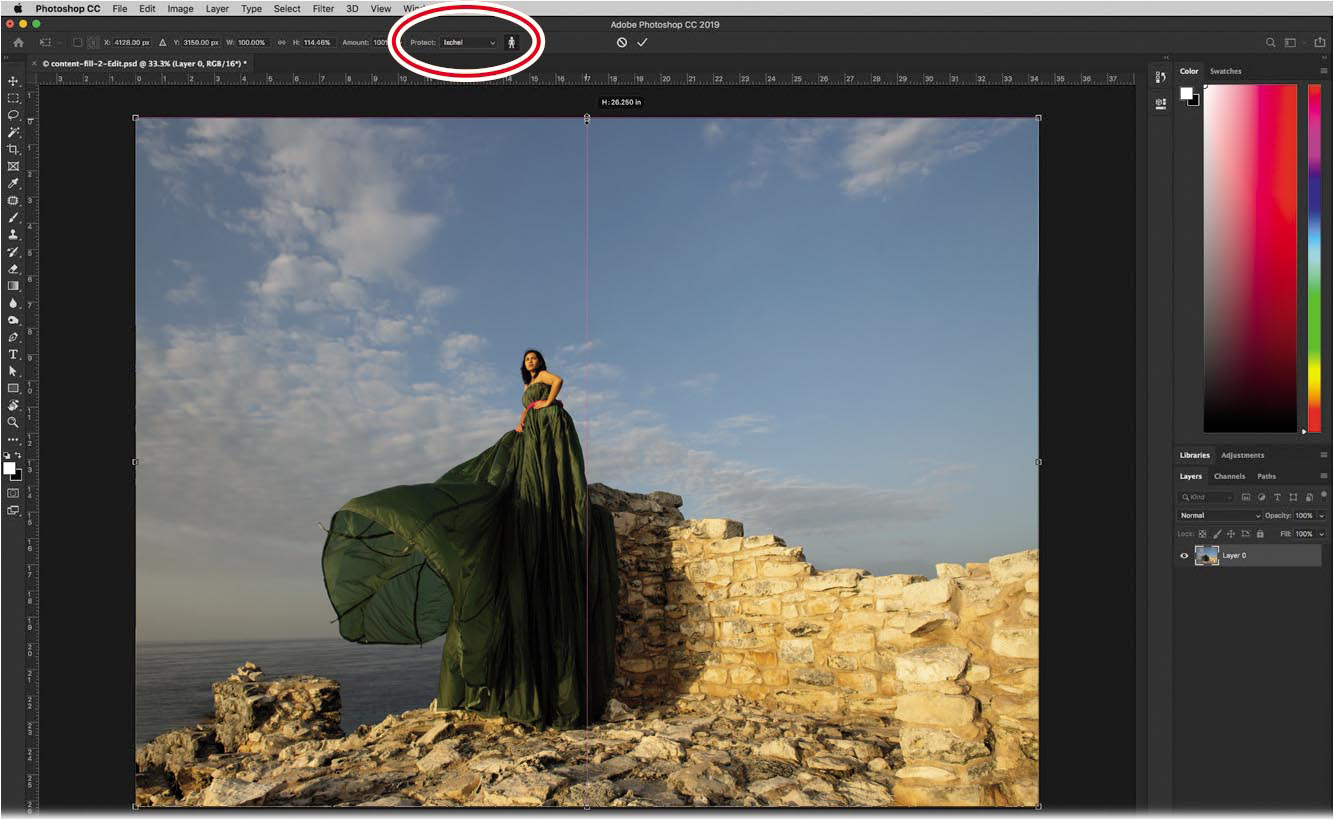
To ensure that we do not transform the subject, we will select two additional options in the options bar. First, in the Protect menu, choose the Ixchel selection we saved to exclude it from the scaling. Then, click the icon that looks like a person. This option looks for skin-tone elements that look as if they belong to people, and ensures that they are not exaggerated. Press Enter/Return to commit the transformation.
Let’s repeat using the Crop tool to extend the canvas, this time horizontally to the left of the image, and using Content-Aware Scale, this time to expand the image to the left. Be sure that you set the Protect menu to our selection and click the Protect Skin Tones (person) icon.
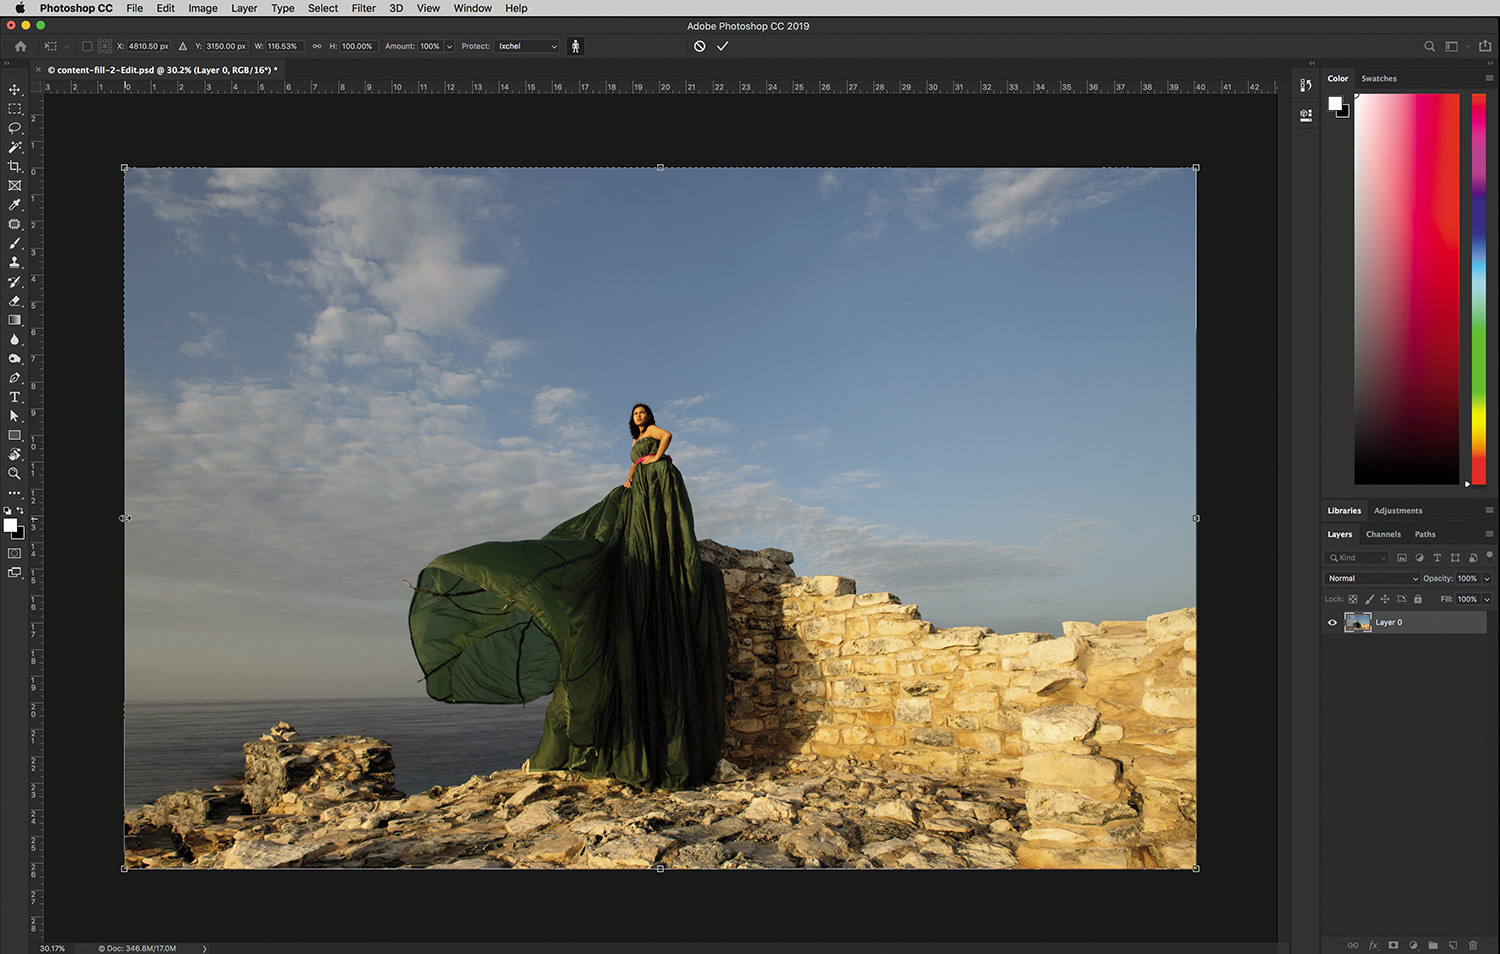
Once you have transformed the image horizontally and vertically, save and close the file to return to Lightroom.
You need to keep in mind that there is a limit to what Content-Aware technology can do—it’s not magic. You may be able to push the boundaries of what you can scale, but after a while, the image will start to break down, so be careful how much you scale.
Skin retouching and body sculpting in Photoshop
While Photoshop is capable of helping you express yourself creatively in incredible ways, it has become strongly identified with its use as a retouching tool that changes how a person looks. In retouching, the two biggest requests are skin softening and body sculpting—we’ll cover both here.
Skin softening is a commonly discussed retouching topic, and a great many tutorials tackle the subject, but it’s important to highlight that it is not an actual feature inside the program. It is a technique, and you may find different techniques later that may tackle skin softening better for your taste.
When it comes to body sculpting, this has become a feature inside Photoshop through the Liquify tool. In earlier versions of Photoshop, you had to use a brush to push pixels around—think of it like handling a lump of clay. As more users became interested in the tool for body sculpting, the Photoshop team added more features to it to make people-specific transformations easier. These days, a quick trip to the Liquify tool can yield results that used to take hours.
Smoothing skin realistically in Photoshop
One of the biggest complaints about any skin retouching technique is that the resulting skin doesn’t retain pore detail. If you are trying to get rid of blemishes, freckles, dark areas, and wrinkles, the results should not be so blurred that you cannot see any texture in the skin. This technique not only allows you to retain pore detail, but gives you the ability to fade it in and out as you see fit.
Let’s start with how to minimize dark areas and wrinkles under the eyes in the image.
Select the rc.dng portrait (that’s me, your author) in Lightroom’s Library module, and then send it to Photoshop by choosing Photo > Edit In > Edit In Adobe Photoshop CC or by pressing Ctrl+E/Command+E.
In Photoshop, duplicate the image layer by pressing Ctrl+J/Command+J.
With the Patch tool selected, draw out a selection of the dark area under the eye on the right, and then drag the selection down slightly, over the cheek, and release it to create a lighter, more even patch of skin. If you find that the area you have selected becomes too dark or light, press Ctrl+Z/Command+Z to undo and try dragging to a new clean area.
Because the Patch tool is looking for samples of skin textures, you can actually go across my entire face to find the right patch. For my right eye (the one on the left side of the image), I sampled a patch of skin from my forehead.
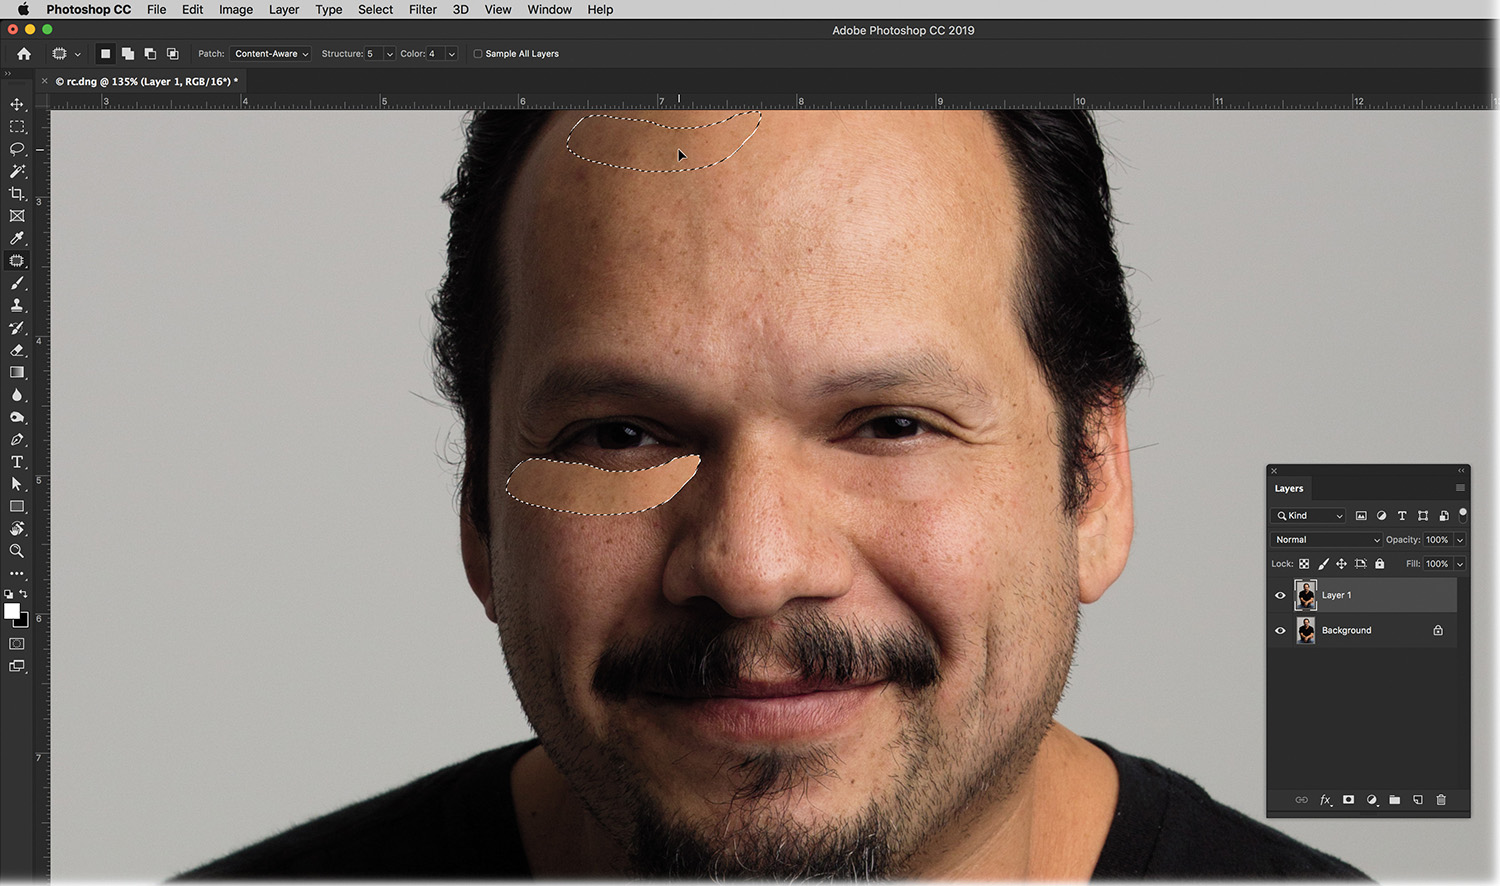
The picture above shows what the softening of the area under my eyes will look like. Don’t worry; while it looks really unrealistic, we’ll fix it in a little bit. In the meantime, use the Patch tool to sample any acne spots or freckles that you would like to minimize in the picture. Press Ctrl+D/Command+D to deselect.
Hold down the Alt/Option key and click the Add Layer Mask icon at the bottom of the Layers panel and the entire layer will be hidden by a black mask.
Select the Brush tool by pressing the letter B. Set the Flow to 8% and the Opacity to 100% in the options bar at the top.
Make sure that you have white selected as your Foreground color, then brush under the eyes in the picture and you’ll see some of the patch layer start to overlay the original image.

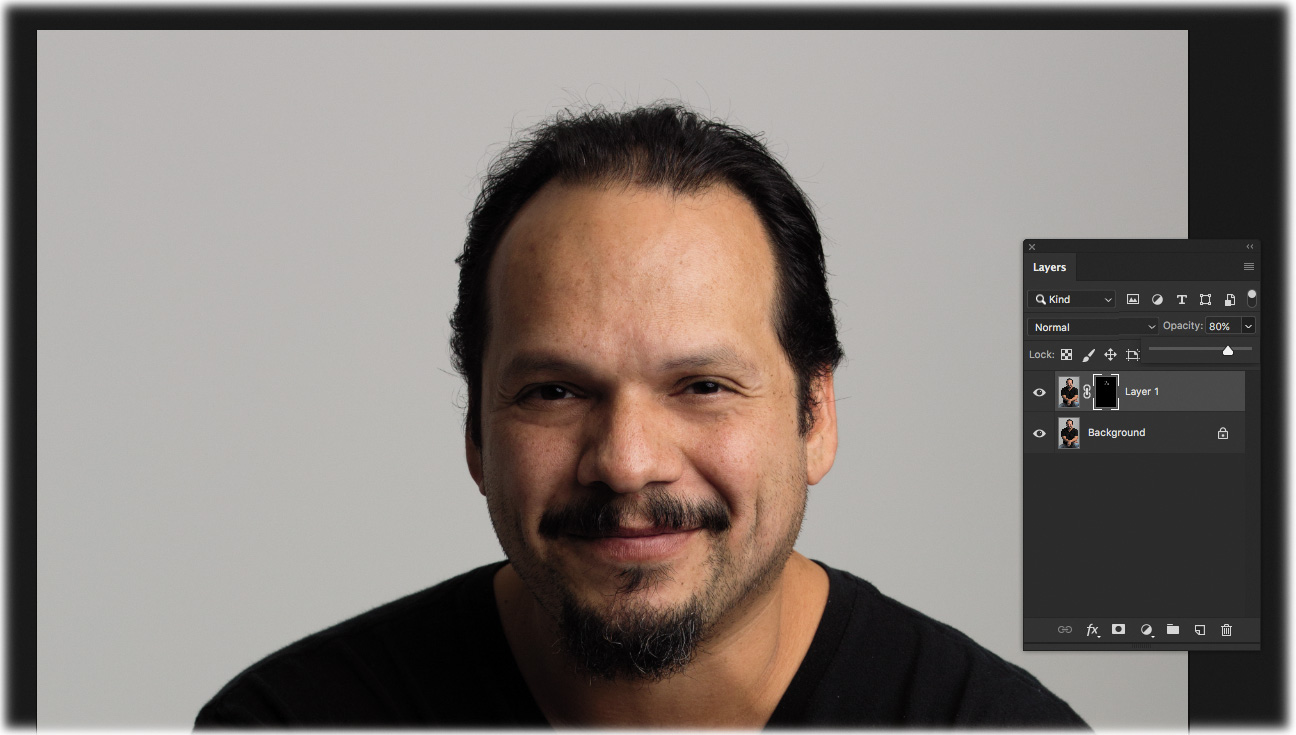
Use the same brush to softly go over all of the spots in the image that you want to correct. Once you’re finished, you have an additional level of control with the Opacity slider in the Layers panel. Turning the layer’s opacity down minimizes the effect further.
As artists, we have the opportunity to share our passion with the world, but also a responsiblity to ensure that we do not add to the burden of it. Our society is constantly bombarded by images, and this can bring a host of self-image problems to people who are shown images every day of what the general public considers beauty or beautiful.
Our youth struggle with issues of self-esteem at levels never seen before as they compare themselves to images that may not seem altogether real. The problem is so pervasive that, in 2017, France instituted a law forcing magazines that use digitally altered images to make it known that they were edited.
Did you know that from 1999 to 2006, hospitalizations for eating disorders among children younger than 12 spiked 119% (Agency for Healthcare Research and Quality, 2009), and it’s estimated that almost 1.3 million adolescent girls in the United States have anorexia (Rosen and American Academy of Pediatrics Committee on Adolescence, 2010)? As social tools like Instagram and Facebook dominate our communications, the excessive digital manipulation of images can contribute negatively to people’s self-image and lead to depression and eating disorders.
My retouching ethos is largely based on making someone look like they’ve had a good day’s rest. As we age, we all develop dark circles and fine lines under our eyes. A couple of good nights of sleep can certainly minimize such problems, so any retouching work I do is to get to that goal. I’ll smooth out and lighten a problem area, then fade the result so the discoloration and lines are never completely gone but are more subdued.
I push and pull pixels in Liquify to correct problems in my photos, such as awkwardly draped or wrinkled clothing, that I didn’t address during the posing of my subjects. I try to make the transformations fit the pose, but I never remove excessive weight or alter the body unnaturally.
In fact, whenever I teach these techniques, I usually resort to using pictures of myself. I’m completely okay with you seeing every acne scar, every dark mark, and every blister.
When I sit down to work on an image, I picture my young daughter, Sabine, next to me. I ask myself, are the results of what I am going to do something that I would be comfortable showing her?
You will pick your own ethical line in this controversy, and that’s okay. I can only remind you that we share a duty to our future to be as responsible as we can.
Frequency separation for skin texture
A popular method for softening skin is commonly known as frequency separation. Think of your skin as two distinct areas: the fine details (high frequency) and the color and tone of it (low frequency). When performing any retouching, you want to make sure that you separate each specific task you need to do to its own frequency.
Just as a high-pass filter in the audio world can be used to remove high frequencies in an audio track (the treble), the High Pass filter in Photoshop can be used to remove high frequencies in an image (fine details; the small, sharp details), which produces a blurring (smoothing) effect.
![]() Tip
Tip
Retouching, and all of its various undo/redo steps as you test different skin patches, is something you can see a lot better in a video. I’ve recorded all the steps in this book for all the examples so you can follow along and see how I do them in real time. To access them, make sure that you read the “Getting Started” section at the beginning of the book.
The technique is broken down into three components. First, the image receives a High Pass filter. Next, you apply a Gaussian Blur to the image. Finally, the image is inverted and set to a specific blend mode. We’ll cover each of those steps next, but let’s start with inverting and changing the blend mode of the image first.
If you work on the image by applying the High Pass and Gaussian Blur filters first, you may not be happy with your slider adjustments once you invert the image and change the blend mode. Then you have to redo the entire technique from scratch. By inverting the image and applying the blend mode first, you can see how it affects the image as you apply your filters.
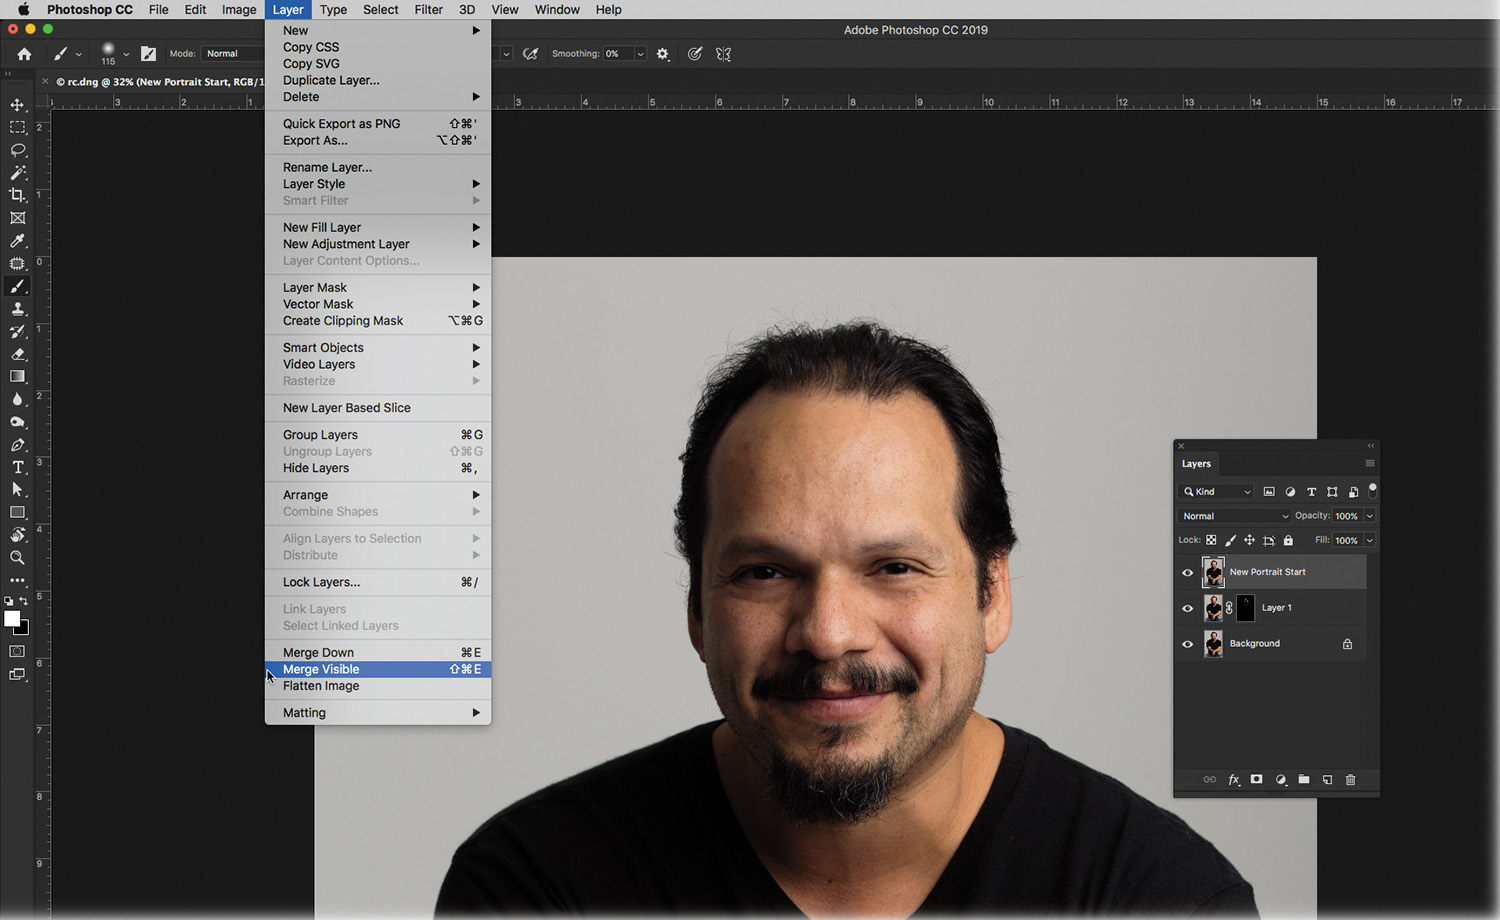
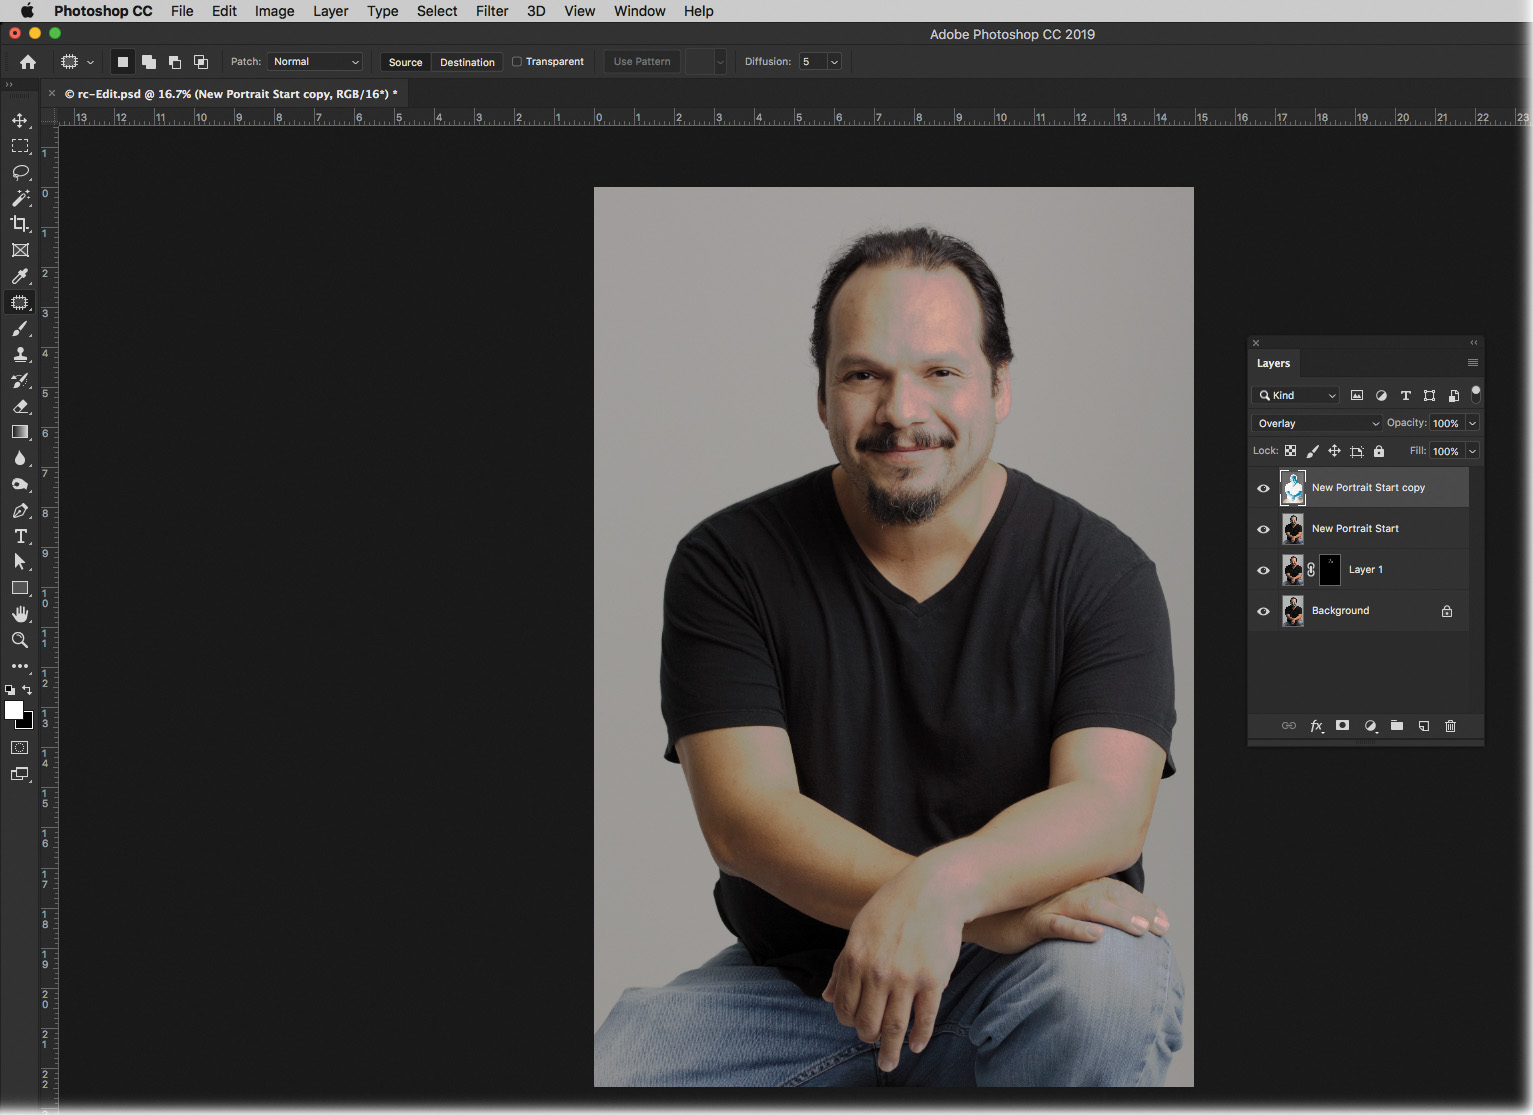
Before we begin, lets take the two layers we had at the end of the previous technique and merge them together into a new layer (in case we need to go back and make any edits). Press Shift+Alt+Ctrl+E/Shift+Option+Command+E, or hold down the Alt/Option key while choosing Layer > Merge Visible. To keep everything in order, double-click the layer name, type New Portrait Start, and press Enter/Return.
Duplicate this new merged layer by pressing Ctrl+J/Command+J.
Using the menu at the upper left of the Layers panel, change the blend mode of the duplicate layer to Overlay, and then invert the information on that layer by pressing Ctrl+I/Command+I. The Overlay blend mode boosts contrast by making dark areas darker and light areas lighter. Inverting the photo’s information flip-flops it.
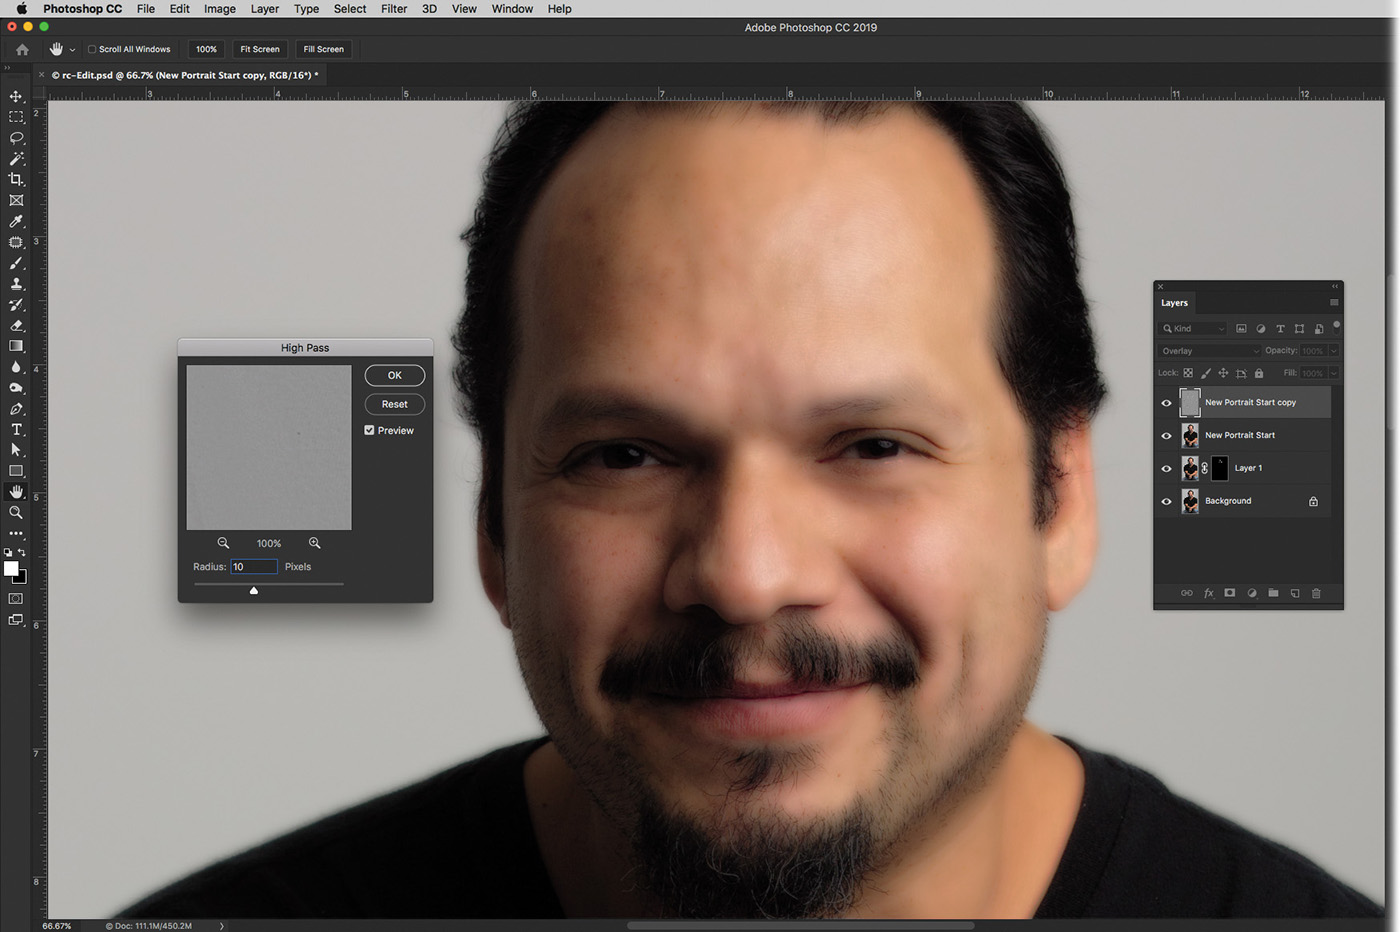
Choose Filter > Other > High Pass, and in the resulting dialog, enter 10 pixels into the Radius field and click OK.
NoteIf you find that the skin gets excessively smooth, you can adjust this setting to your liking, but 10 is a good start.
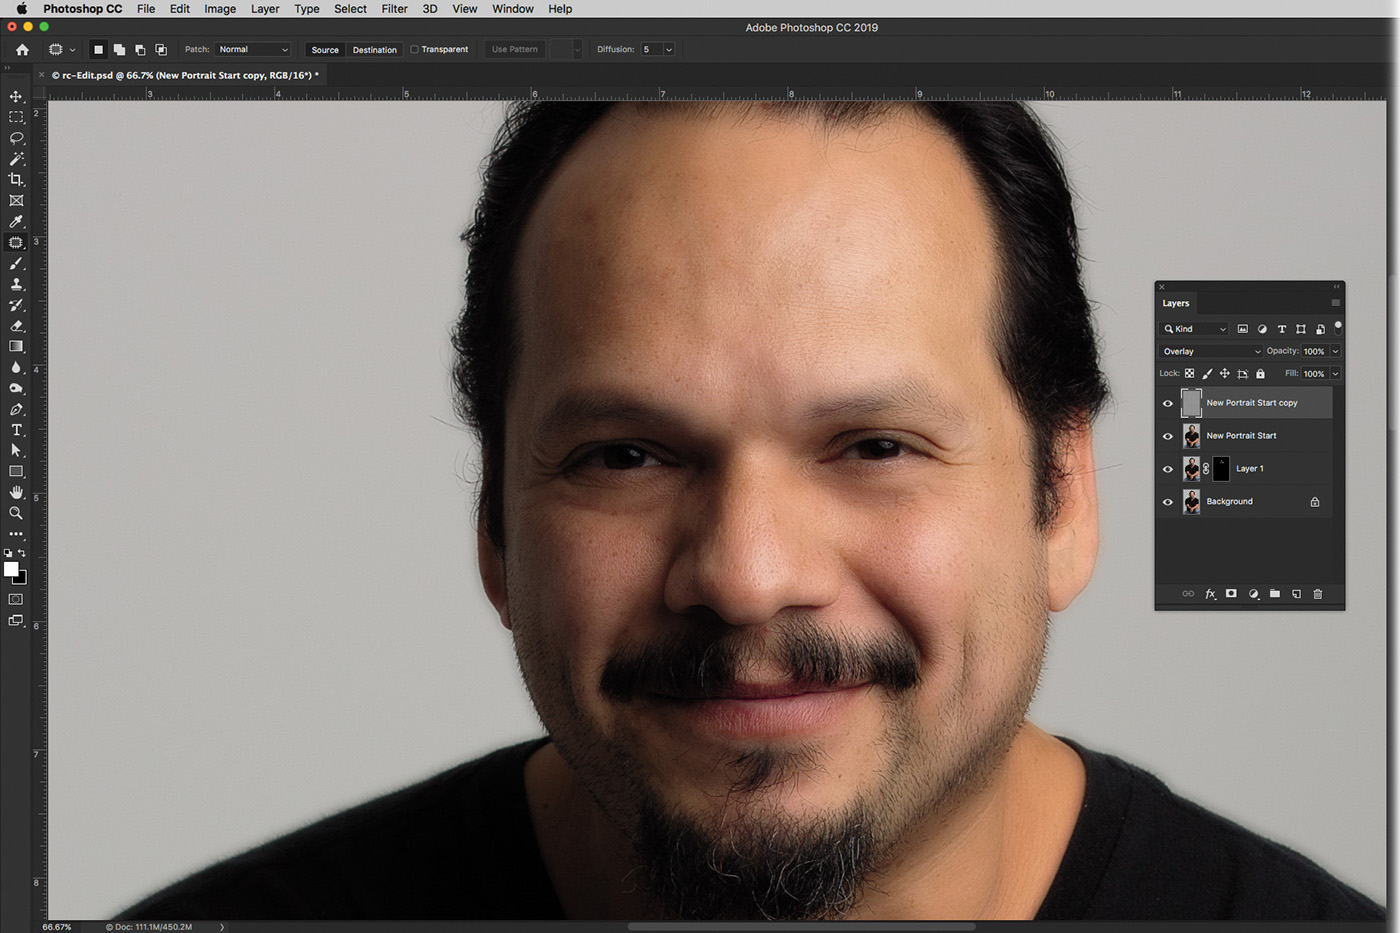
Choose Filter > Blur > Gaussian Blur, and in the resulting dialog box, drag the Radius slider all the way to the left, then slowly drag it to the right until you’re happy with the way the skin looks (a setting of 4.5 was used on the next page). Click OK.
NoteThe Gaussian Blur filter was named for the gentleman who invented this blur method, Carl Gauss.
When retouching images, a common question is: Which brush setting is better to use, Opacity or Flow? Let me give you an example I use to explain the two.
Imagine that we are outside and I hand you a garden hose and a cup. Then imagine that I ask you to fill that cup halfway full of water, but open the faucet’s flow to its full rate. How hard will it be for you to fill that cup halfway? Pretty hard.
Now, imagine I turn down the rate the water is coming out to a trickle. How hard will it be then? Nowhere near as hard. If you need to fill the cup halfway, all you have to do is keep the hose there longer.
Let’s say you paint with your brush at 10% opacity. When you regulate your brush using the Opacity setting, every brush stroke is at that opacity (10%). Any brush stroke on top of the original brush stroke (releasing the mouse button between strokes) would be an additional 10%.
If I keep the Opacity setting at 100% and reduce the Flow down to 8%, it is as if I turned the hose down on how much color is coming out of the brush. This lets me step into an effect a lot more smoothly. If I want to add more of the effect, I just continue to brush the effect onto the photo a little more (with the same brush stroke).
Now we’ll use a layer mask to hide the blurring (smoothing) from everywhere except the skin. Since the goal is to hide the blur from the majority of the image, Alt-click/Option-click the circle-within-a-square icon at the bottom of the Layers panel to add a layer mask filled with black. This hides the blurring from the entire image—with layer masks, black conceals and white reveals.
TipIf you would like to learn some of the best techniques in the world for restoration and retouching, Adobe Photoshop Restoration & Retouching (4th Edition), by Katrin Eismann, Wayne Palmer, and Dennis Dunbar, is my gold standard. You can learn more about the book at peachpit.com.
Press B on your keyboard to grab the Brush tool, and in the options bar, click the Brush Preset Picker and choose a soft-edged brush. Set the Mode menu to Normal, and then set the brush’s Opacity to 100% and Flow to 8%.
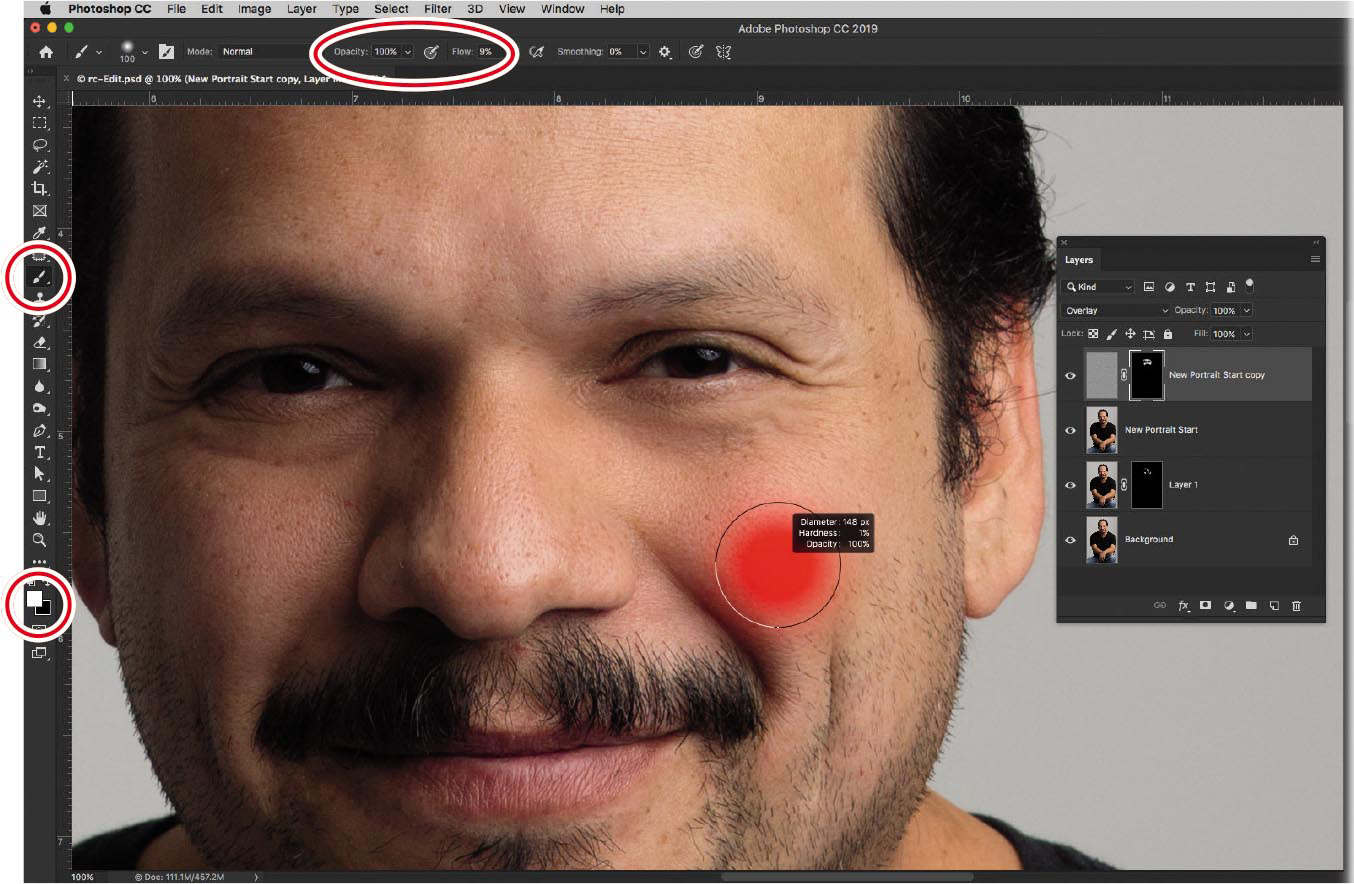
If your Foreground color isn’t white already, press D on your keyboard to set your Foreground and Background colors to their layer mask default values of white and black. The Foreground color is the color the Brush tool uses. Since you want to reveal the skin smoothing, the Foreground color needs to be white.
Brush across your subject’s skin to smooth it. Avoid blurring the eyes, lips, and any hair, including eyebrows, mustache, and beard. If you mess up and reveal the smoothing in an area you didn’t mean to, press X to flip your Foreground and Background colors so that black is your Foreground color, and then brush back across that area. You can also use the Opacity setting on the layer to minimize the effect.
Save and close the file in Photoshop to return to Lightroom.
As you can see, this technique really helped even out the skin tones in this portrait, yet the skin texture is preserved. Below, you can see the before (left) and after (right).
Sculpting a portrait using Photoshop’s Liquify filter
Bad posing, bulges in pockets, fabric wrinkles, and the occasional shifting of the subject’s weight can all pose challenges in your photography. Photoshop’s Liquify feature can be a valuable tool for moving pixels around to counteract these things, but it does require a softer touch for fear of getting out of hand.
![]() Note
Note
Because the Liquify filter lets you move, bend, and warp pixels, make sure you’re finished retouching the subject in Photoshop before using it.
Because of people’s constant use of the Liquify filter to change features on their portrait subjects, Adobe added a series of tools to automate these kinds of transformations. In addition, you’ll learn how the changes in the Liquify filter can help you with a landscape image in need of a push.
Pushing portions of a picture
In this exercise, you’ll learn how to move around portions of a picture using the Forward Warp tool in the Liquify filter.
Select the rc2.dng portrait in Lightroom’s Library module, and then send it to Photoshop by choosing Photo > Edit In > Edit In Adobe Photoshop CC or by pressing Ctrl+E/Command+E.
Choose Filter > Liquify to be taken to the Liquify workspace. At the upper left, choose the Forward Warp tool. This tool works similarly to any brush tool in Photoshop. The tool options for this brush are on the right side of the window.
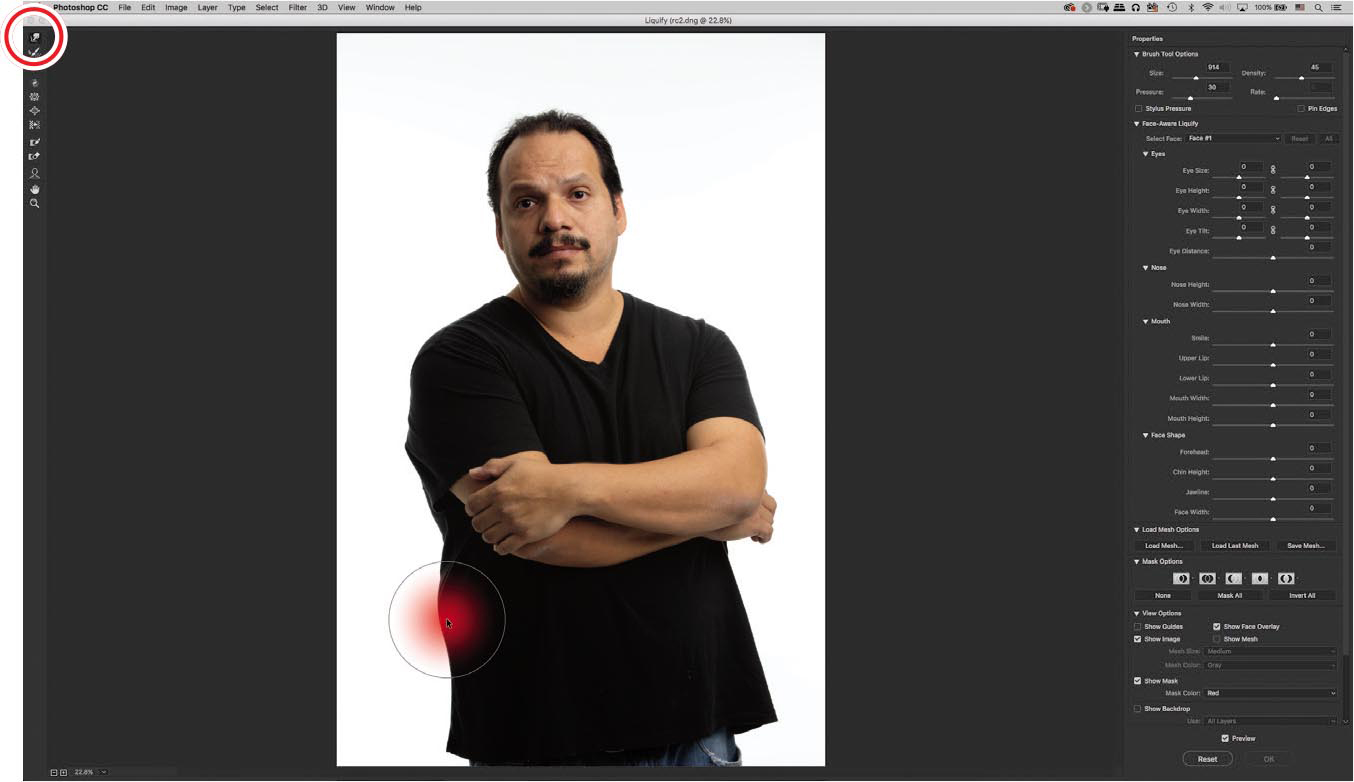
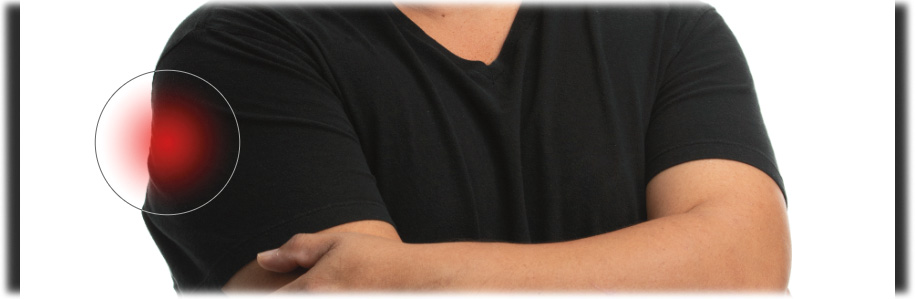
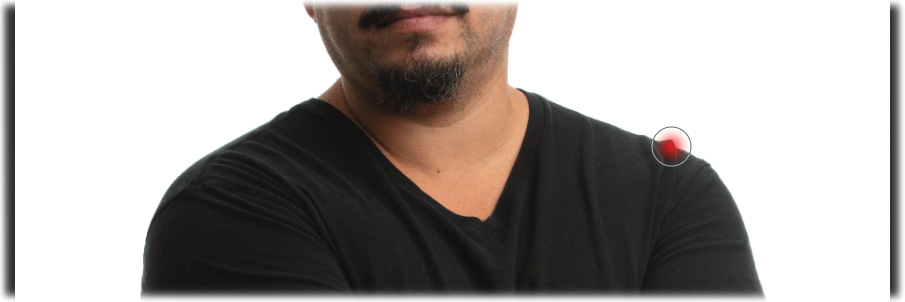
In the photo here, you need to push in the area on my right side, where you see the brush, so the shirt doesn’t stick out as much (I shouldn’t have crossed my arms so high in this pose, but...it happens). Use the center of a soft brush to push that part in. Keep your movements small.
NoteWhen using the Forward Warp tool, align the center of the brush with the edge of what you want to move, and use several small movements, rather than one large one.
The natural instinct in retouching is to pull in an image. That said, it might be a better idea to pull out this section to create the even look, rather than pushing it inward. Again, use the center of the brush.
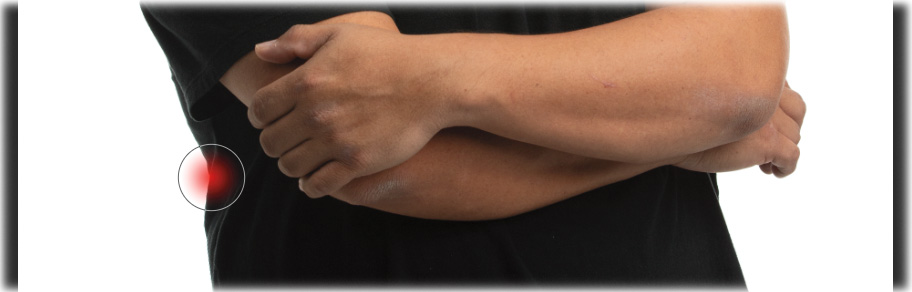
You can use the same technique on the sleeve of my t-shirt above that area. Instead of pushing the fabric in, pull it out to even the drape of the sleeve.
Also do the same for the small wrinkles in the fabric on my opposite shoulder, using a smaller brush.
I purposely distorted the picture more than I should have to highlight the second tool in the Liquify tools, the Reconstruct tool. This tool also behaves like a brush with similar settings, but it paints back the original image that you brought into Liquify. So instead of having to undo all your steps for a specific fix, this tool brings back the original picture wherever you paint and lets you try again.

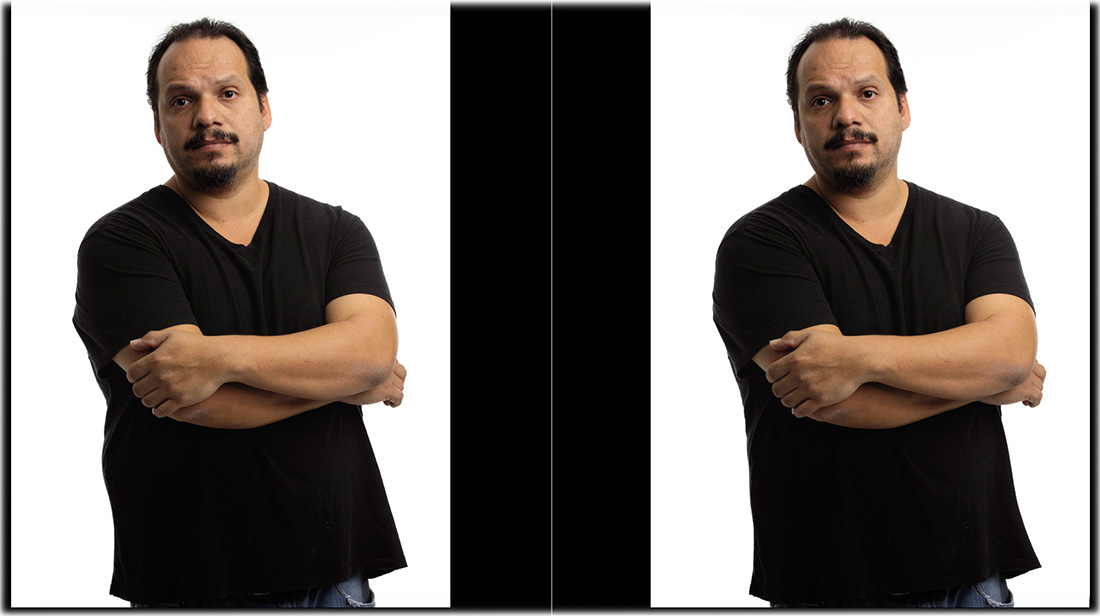
You can see how much better it looks in the before (left) and after (right) on the next page.
Face-Aware features in the Liquify filter
In previous versions of Photoshop, the tools directly below the warp tools were responsible for most facial feature manipulations. As Photoshop evolved, Adobe streamlined these manipulations, making them quicker and easier.
Photoshop scans the picture and looks for facial features. Once that’s complete, it plots a series of points around the eyes, mouth, forehead, jawline, and so on. Select the Face tool (A), and as you point your cursor at different parts of the face, you’ll see an overlay of what Photoshop detected. On the right is a series of sliders you can adjust. The technology is pretty amazing, and a little scary.
 Tip
TipTo really see how much the facial features can be transformed in the Liquify tool, you should consider downloading the accompanying video for this lesson. Refer to the “Getting Started” section at the beginning of the book for instructions.
In the Face-Aware Liquify section, there are groups of sliders for each part of the face. Each of those components is broken down into smaller components. To adjust the eye size on the left, drag the left Eye Size slider. To adjust both eyes, click the link icon between the left and right sliders.
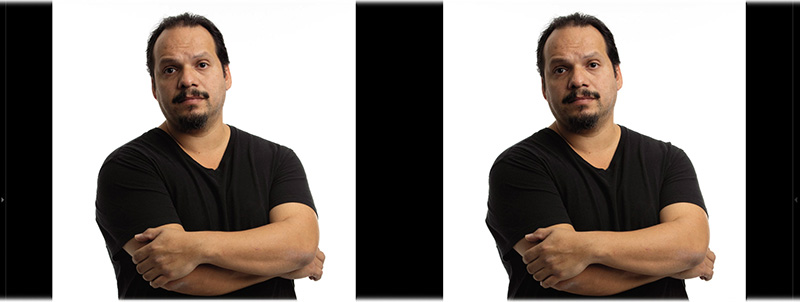
I made adjusments to Eye Distance (–15), left Eye Size (–17), Nose Height (13), Jawline (–30), and Face Width (–18), so you can see some changes in the photo.
Once you’ve made your changes, click OK. Save and close the image to get back to Lightroom.
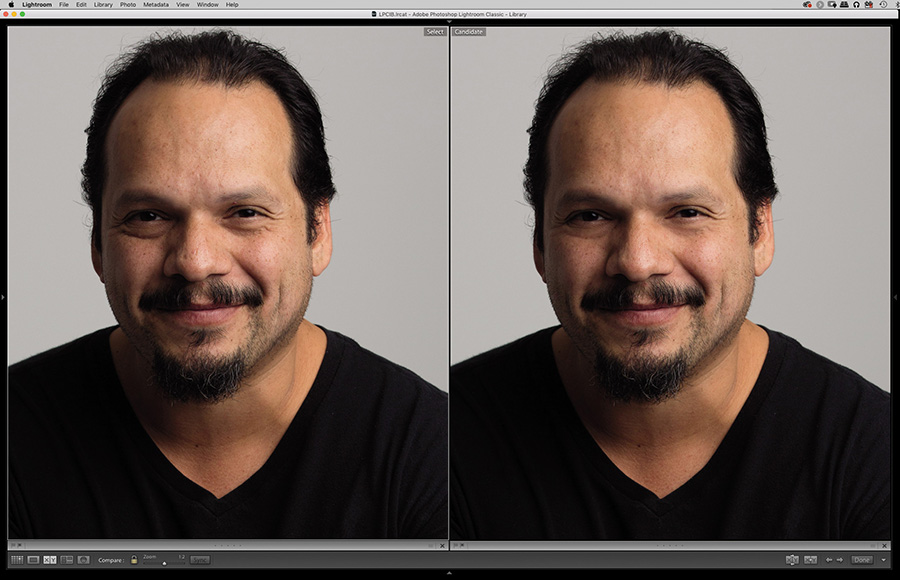
Below is a before (right) and after (left) comparison. The goal was to be subtle and realistic. Taking it slow definitely helps.
Using the Liquify tool for landscape images
Earlier versions of Photoshop limited your brush size to either 600 or 1400. As Photoshop evolved, the brush size limits increased to a staggering 15,000. This took pixel pushing in a whole new direction, letting you transform entire landscapes.
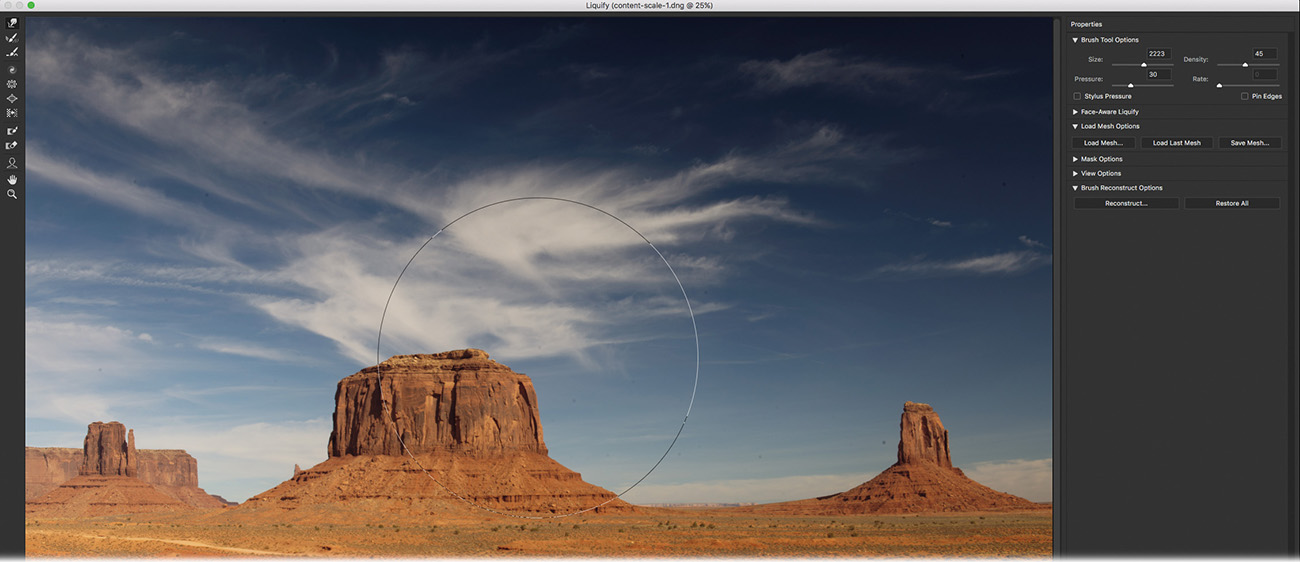
Select the content-scale-1.dng photo in Lightroom’s Library module, and then send it to Photoshop by choosing Photo > Edit In > Edit In Adobe Photoshop CC or by pressing Ctrl+E/Command+E.
Choose Filter > Liquify to open the photo in the Liquify filter workspace.
Using the Forward Warp tool, select an extremely large brush (I set it to 2223). Use the brush to straighten the butte (the center rock) in the picture so that it doesn’t appear to lean left. As this brush is so large, you can really do some large-scale pushing in the picture. Just keep in mind that it’s a good idea not to completely alter the look of the image. I tend to use this to mitigate any distortion I may have created by shooting the picture at an odd angle.
Once you have transformed the image to taste, save and close the file to return to Lightroom.
How does the Healing Brush tool differ from the Spot Healing Brush tool?
How does the Clone Stamp tool differ from the healing brushes?
What is the major advantage to using the Content-Aware Fill workspace rather than the Content-Aware option in the Fill dialog box?
How do you keep Content-Aware Scale from stretching any people in your photo?
What is the easiest way to do facial retouching in the Liquify filter?
The Healing Brush tool and the Spot Healing Brush tool sample pixels from a source area and use them to cover content in a destination area, blending them with the surrounding pixels. The main difference between these tools is that the Healing Brush tool allows you to choose the source area; the Spot Healing Brush tool doesn’t.
The Clone Stamp tool copies and pastes pixels without automatically blending surrounding pixels, whereas the healing brushes do blend.
The Content-Aware Fill workspace’s major advantage is that it lets you specify the portion of the image that you want Photoshop to use to cover your selected area. The Content-Aware option in the Fill dialog box also covers the content in your selected area, but Photoshop chooses which pixels to use.
To keep Content-Aware Scale from stretching people in your image, create and save a selection of the people, then choose that saved selection in the Protect menu in the options bar. You can also click the Protect Skin Tones icon to the right of the Protect menu.
The new Face tool, with its facial mapping, and the Face-Aware Liquify sliders based on individual facial features, are the easiest way to do facial retouching in the Liquify filter.