
16 Viewing and Editing Photos and Video with the Photos App

In this chapter, you explore all the photo- and video-viewing and editing functionality that your iPhone has to offer. Topics include the following:
Chapter 15, “Taking Photos and Video with Your iPhone,” explains how to take photos and video using the iPhone’s Camera app. The photos and video you take with your iPhone’s cameras are stored in your photo library, which you access using the Photos app. In this chapter, you learn how to use the Photos app to view, organize, edit, and share those photos and videos.
Getting Started
The Photos app provides many useful tools that you can use to view and edit photos and video stored on your iPhone, whether you used the iPhone’s camera to capture them or you downloaded them from another source, such as images attached to email messages.
As you take photos, capture video, save photos in email or messages onto your iPhone, you can quickly build up a large photo library. Fortunately, the Photos app automatically organizes your photos and video so that you can find specific photos or video you want to view, edit, or share quite easily. You can also manually organize photos in albums with just a few steps.
After you locate photos and video in which you’re interested, you can view them in the app manually, or you can use groups that the Photos app builds for you automatically; these groups contain collections of photos and video based on location, dates, people, and other factors.
You can also edit photos and videos to fix mistakes, make improvements, or express yourself artistically.
You’ll probably want to share photos and videos with others, and the Photos app makes that a snap, too. You can do that directly from within Photos or using other apps on your iPhone, such as Messages or Mail.
Finding and Viewing Photos
To work with your photos in the Photos app, you first find the photos that you’re interested in. You use the tabs along the bottom of the Photos screen to choose different ways to find the photos you want to view and with which you want to work (such as editing them).
After you find photos, you can view those photos in a number of ways, including individually, in groups that Photos creates for you automatically, or in groups that you create for yourself.
Finding Photos Using the Photos Tab
The Photos tab automatically organizes photos based on the time and location associated with them (this information is embedded in the photos you take with the iPhone’s camera, assuming you haven’t disabled Location Services for it). The top level is Years, which shows your photos grouped by the year in which they were taken. From there, you can move down into photos by month, and then day. You can use the All Photos option to browse all of your photos.
To find photos based on their time, follow these steps:
![]() On the Home screen, tap Photos.
On the Home screen, tap Photos.

![]() Tap Photos and then tap Years. You see photos collected by the year in which they were taken.
Tap Photos and then tap Years. You see photos collected by the year in which they were taken.
![]() Swipe up and down the screen to browse all the years.
Swipe up and down the screen to browse all the years.
![]() Unpinch on the year whose photos you want to view. You see that year’s photos organized by month.
Unpinch on the year whose photos you want to view. You see that year’s photos organized by month.

Tabs Work, Too
You can jump from the Years view to the Months view by tapping the Months tab. Likewise, you jump directly to photos collected by their dates by tapping the Days tab. However, the unpinch method often makes it easier to get to the specific group of photos you want to view.
![]() Swipe up and down the screen to browse the months in the year you selected; if the app identified photos taken over a timeframe, you see groups by those timeframes too.
Swipe up and down the screen to browse the months in the year you selected; if the app identified photos taken over a timeframe, you see groups by those timeframes too.
![]() Unpinch on the timeframe whose photos you want to view. You see that year’s photos organized by their capture date; if there are multiple photos associated with a date, you see those collected under that date using thumbnails of different sizes.
Unpinch on the timeframe whose photos you want to view. You see that year’s photos organized by their capture date; if there are multiple photos associated with a date, you see those collected under that date using thumbnails of different sizes.

![]() Swipe up and down the screen to browse the photos collected by date.
Swipe up and down the screen to browse the photos collected by date.
![]() To go back to a previous level, such as moving from Days to Months, pinch on the screen.
To go back to a previous level, such as moving from Days to Months, pinch on the screen.

![]() Continue browsing until you find photos you want to view.
Continue browsing until you find photos you want to view.
![]() Tap a photo to view it.
Tap a photo to view it.

![]() You’re ready to view the photo in detail as described in the task “Viewing Photos” later in this chapter.
You’re ready to view the photo in detail as described in the task “Viewing Photos” later in this chapter.

View Them All
Tap All Photos to browse all your photos. Swipe up or down to move back or forward in time (respectively). As you browse, the title at the top of the screen changes to indicate the timeframe and location of the photos you’re browsing. You can change the size of the thumbnails you see by tapping +/– and then tapping + to increase their size or – to decrease it. Tap x when the thumbnails are the size you want them to be. Tap a photo to view it.
All Photos Collections
When you’re viewing the All Photos tab, pinch to show photos collected into groups based on larger timeframes, such as by month. If you keep unpinching, you’ll eventually see photos grouped by year. Unpinch on a group to drill down into shorter timeframes, such as from year to month.
Finding Photos Using the Albums Tab
Albums in the Photos app are analogous to albums in which you organize and present physical photos; except albums in the Photos app are much more flexible and easier to create and organize.
There are four basic types of albums within the Photos app:
Albums the Photos App Creates—The Photo app creates and organizes a number of albums for you automatically. These include albums based on people and places along with albums based on types of photos such as Selfies, Live Photos, and Portraits.
Albums You Create—You can create albums to keep your photos organized in many different ways; and the same photos can be in multiple albums. You learn how to create and manage albums in “Working with Photos” later in this chapter.
Shared Albums—Shared Albums are collections of photos you’re sharing with others or that others are sharing with you.
Albums Other Apps Create—Some other apps (such as Instagram) that you use for photos might create their own albums within the Photos app.
To use albums to find photos, perform the following steps:
![]() Continuing in the Photos app, tap Albums. You see albums organized by type including My Albums, Shared Albums, People & Places, Media Types, and Other Albums.
Continuing in the Photos app, tap Albums. You see albums organized by type including My Albums, Shared Albums, People & Places, Media Types, and Other Albums.
![]() Swipe up and down the screen to browse the albums (such as albums you have created) or automatic albums (for example, Selfies).
Swipe up and down the screen to browse the albums (such as albums you have created) or automatic albums (for example, Selfies).
![]() Swipe left or right on groups of albums, such as My Albums, to browse them.
Swipe left or right on groups of albums, such as My Albums, to browse them.

![]() To see all the albums in a group, tap See All and then browse the resulting group.
To see all the albums in a group, tap See All and then browse the resulting group.
![]() Tap the album you want to view.
Tap the album you want to view.

![]() Swipe up and down to browse the photos in the album.
Swipe up and down to browse the photos in the album.
![]() Tap the photo you want to view.
Tap the photo you want to view.

Go Back
As you move into albums and to specific photos, you see Back (<) in the upper-left corner of the screen. Tap this to move back to a previous screen, For example, to move from a photo you are viewing to the album it is contained in.
![]() You’re ready to view the photo in detail as described in the task “Viewing Photos” later in this chapter.
You’re ready to view the photo in detail as described in the task “Viewing Photos” later in this chapter.

Finding Photos by Searching
Browsing photos can be a fun way to find photos, but at times you might want to get to specific photos more efficiently. The Search tool enables you to quickly find photos based on their time, date, location, content, and other factors.
![]() Continuing in the Photos app, tap Search. At the top of the screen, you see the Search bar that you can use to perform a specific search. Below that are potential searches you might want to use; these are based on a variety of criteria, such as moments, people, or places.
Continuing in the Photos app, tap Search. At the top of the screen, you see the Search bar that you can use to perform a specific search. Below that are potential searches you might want to use; these are based on a variety of criteria, such as moments, people, or places.
![]() Swipe up and down the searches on the screen. For example, Places finds photos based on where they were taken.
Swipe up and down the searches on the screen. For example, Places finds photos based on where they were taken.
![]() To use a search, tap it and skip to step 6; if you don’t want to use a current search, move to step 4.
To use a search, tap it and skip to step 6; if you don’t want to use a current search, move to step 4.
![]() Tap in the Search bar.
Tap in the Search bar.

![]() Type your search term. This can be any information associated with your photos. As you type, collections of photos that match your search criteria are listed under the Search bar. The more specific you make your search term, the smaller the set of photos that will be found. Suggested searches appear immediately under the Search bar.
Type your search term. This can be any information associated with your photos. As you type, collections of photos that match your search criteria are listed under the Search bar. The more specific you make your search term, the smaller the set of photos that will be found. Suggested searches appear immediately under the Search bar.
![]() Tap a suggested search to perform it. The search results refresh based on the search you selected.
Tap a suggested search to perform it. The search results refresh based on the search you selected.

![]() Tap Search (this is optional because you can work with the results as they appear when you do a search).
Tap Search (this is optional because you can work with the results as they appear when you do a search).

![]() Swipe up and down the screen to browse all the results. At the top, you see the individual photos that were found (tap See All to see all of them). Under that, you see collections of photos based on various criteria, such as Moments, Places, and People. (You learn more about the collections Photos creates for you in “Viewing Photos in Collections” later in this chapter.)
Swipe up and down the screen to browse all the results. At the top, you see the individual photos that were found (tap See All to see all of them). Under that, you see collections of photos based on various criteria, such as Moments, Places, and People. (You learn more about the collections Photos creates for you in “Viewing Photos in Collections” later in this chapter.)
![]() Tap the results you want to explore.
Tap the results you want to explore.

![]() To see all the photos in the results, tap Show More.
To see all the photos in the results, tap Show More.

![]() Tap a photo to view it.
Tap a photo to view it.

![]() View the photo (covered in the next section).
View the photo (covered in the next section).
![]() Tap Back (<) to return to the group of photos you were viewing.
Tap Back (<) to return to the group of photos you were viewing.

![]() Tap Search (<) to return to the search results.
Tap Search (<) to return to the search results.

![]() Tap a different result to explore its photos.
Tap a different result to explore its photos.
![]() To change the search, tap in the Search bar and change the current search term (you can delete the current term by tapping Delete [x]).
To change the search, tap in the Search bar and change the current search term (you can delete the current term by tapping Delete [x]).
![]() Tap Cancel to exit the search.
Tap Cancel to exit the search.

Viewing Photos
The Photos app enables you to view your photos individually. Here’s how:
![]() Using the skills you learned in the previous tasks, open the group of photos that you want to view.
Using the skills you learned in the previous tasks, open the group of photos that you want to view.
Orientation Doesn’t Matter
Zooming, unzooming, and browsing photos works in the same way when you hold your iPhone horizontally or vertically.
![]() Swipe up and down to browse all the photos in the group.
Swipe up and down to browse all the photos in the group.
![]() Tap the photo you want to view. The photo display screen appears.
Tap the photo you want to view. The photo display screen appears.

![]() If it is a Live Photo, touch and hold on the photo to see its motion.
If it is a Live Photo, touch and hold on the photo to see its motion.
My, Isn’t That Special
When there’s something special about a photo, you see an icon above or on the image. In this figure, you see the LIVE icon indicating it is a Live photo. You might also see Burst for Burst photos, HDR for a photo captured with HDR, and so on. Keep an eye out for these icons as you explore your photos.
![]() To see the photo without the app’s toolbars, tap the screen. The toolbars are hidden.
To see the photo without the app’s toolbars, tap the screen. The toolbars are hidden.

![]() Rotate the phone horizontally.
Rotate the phone horizontally.

![]() Unpinch on the photo to zoom in.
Unpinch on the photo to zoom in.

![]() When you’re zoomed in, drag around the image to view different parts of the zoomed image.
When you’re zoomed in, drag around the image to view different parts of the zoomed image.
Lose the Zoom
Double-tap on a zoomed photo to unzoom all the way.
![]() Pinch on the photo to zoom out.
Pinch on the photo to zoom out.
No Zooming Please
You can’t have any zoom when you swipe to move to the next or previous photo, so make sure you are zoomed out all the way before performing step 10. If not, you move the photo around instead.
![]() Swipe to the left to view the next photo in the group.
Swipe to the left to view the next photo in the group.

![]() Swipe to the right to view the previous photo in the group.
Swipe to the right to view the previous photo in the group.
Auto-Play
As you swipe through photos, any that have motion associated with them, such as Live Photos or videos, plays automatically. This behavior is enabled or disabled by a setting; refer to the Go Further sidebar “Photos Settings” at the end of the chapter for details.
![]() When you’re done viewing photos in the group, tap the screen to show the toolbars again.
When you’re done viewing photos in the group, tap the screen to show the toolbars again.

![]() Swipe to the left or right on the thumbnails at the bottom of the screen to view all the photos in the current group. As you swipe, the photo you’re viewing changes to be the one in the larger thumbnail at the center of the screen.
Swipe to the left or right on the thumbnails at the bottom of the screen to view all the photos in the current group. As you swipe, the photo you’re viewing changes to be the one in the larger thumbnail at the center of the screen.
![]() Tap a photo to view it.
Tap a photo to view it.
![]() Swipe up on the photo to get information about it and to see photos related to it.
Swipe up on the photo to get information about it and to see photos related to it.

![]() Tap Show Nearby Photos to see photos that were captured near the location associated with the photos you’re viewing.
Tap Show Nearby Photos to see photos that were captured near the location associated with the photos you’re viewing.
![]() Tap the photo on the map to move to the map view (using the map view is covered in the “Viewing Photos by Location” section later in this chapter).
Tap the photo on the map to move to the map view (using the map view is covered in the “Viewing Photos by Location” section later in this chapter).

![]() When you are done viewing the details, tap Back (<).
When you are done viewing the details, tap Back (<).
Viewing Photos in Collections
As you take and gather photos, the Photos app automatically creates collections of photos in many different ways. Here are some examples:
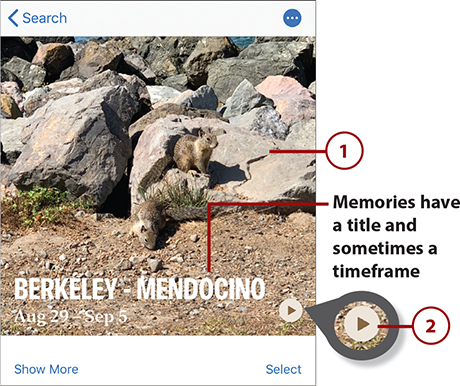
Memories—The Memories feature automatically creates collections of photos for you to view in a number of ways. You can view them in a slideshow, individually, by selecting places, or by selecting people. This feature provides lots of options and at times can be a very interesting way to view photos because you might be surprised by some of the photos included in a particular memory. Memories pop up throughout the Photos app.
The Photos app creates memories for you dynamically, meaning they change over time as the photos in your library change. You can save memories that you want to keep as they are. Otherwise, the memories you see change as you take more photos or edit photos you have. This keeps memories a fresh and interesting way to view your photos.
Locations—Unless you’ve disabled Location Services for the Photos app, it automatically associates photos with the locations in which they were taken. This is a really useful way to collect photos because you’re often interested in finding and viewing photos based on where you were, such as when you traveled somewhere for vacation. You can use the Map tool to see where photos are located and quickly view photos in that location.
You will see the Show Nearby Photos command in different places; tap this to see photos that were captured near the location associated with the photos you’re currently viewing.
Moments—Moments are collections of photos based on location, timeframe, people, and other factors. Like memories, the Photos app builds these for you automatically, and you see moments in different locations as you use the app.
People—Through the iPhone’s facial recognition technology, it can identify photos featuring specific people and group those for you. You can associate those photos with a name and the Photos app attempts to tag future photos with that person with her name. You can view photos of that person simply by opening the group associated with her name.
Other—The Photos app uses other techniques to group photos, too. For example, it can group photos based on the type of subject, such as planes or animals. Like the other collections, you see these groups throughout the Photos app.
While there are lots of ways Photos collects photos and videos for you, you can work with these groups in similar ways. The following tasks show you how to work with photos in memories and by location. Using these techniques, you’ll be able to work with other types of collections just as easily.
Viewing Photos in Memories
There are a number of ways to access memories:
Tap the For You icon on the Dock at the bottom of the screen. The Memories section appears on the For You screen. You can browse memories there or tap See All to see all your memories.

Tap a heading for a group of photos when viewing years, collections, or moments; you see a right-facing arrow (>) when you can tap to open a memory. You move into a memory associated with whatever you tapped on.
When you’re viewing a photo, swipe up the screen and tap a memory in the Related section.
Tap a memory that appears as part of a search.
To view the photos in a memory, perform the following steps:
![]() Open a memory using one of the methods provided in the previous list.
Open a memory using one of the methods provided in the previous list.
![]() To view the photos in a slideshow, tap Play. The slideshow begins to play in full screen. If some of the photos in the slideshow aren’t currently stored on your iPhone, there might be a pause while they’re downloaded (you see the Downloading status on the opening screen while this is done).
To view the photos in a slideshow, tap Play. The slideshow begins to play in full screen. If some of the photos in the slideshow aren’t currently stored on your iPhone, there might be a pause while they’re downloaded (you see the Downloading status on the opening screen while this is done).
![]() To view the slideshow in landscape orientation, rotate the iPhone. As the slideshow plays, you see effects applied to the photos; videos included in the memory also play.
To view the slideshow in landscape orientation, rotate the iPhone. As the slideshow plays, you see effects applied to the photos; videos included in the memory also play.
![]() Tap the screen to reveal the slideshow controls.
Tap the screen to reveal the slideshow controls.

![]() To pause the slideshow, tap Pause. (When paused, this becomes the Play icon you can tap to resume the slideshow.)
To pause the slideshow, tap Pause. (When paused, this becomes the Play icon you can tap to resume the slideshow.)
![]() Swipe to the right or left on the theme bar to change the slideshow’s theme. As you change the theme you might see changes on the screen, such as a different font for the title, and hear different music while the slideshow plays.
Swipe to the right or left on the theme bar to change the slideshow’s theme. As you change the theme you might see changes on the screen, such as a different font for the title, and hear different music while the slideshow plays.
![]() Swipe to the right or left on the duration bar to change the slideshow’s length. As you make changes, you see the slideshow’s current length just above the theme bar.
Swipe to the right or left on the duration bar to change the slideshow’s length. As you make changes, you see the slideshow’s current length just above the theme bar.
![]() Swipe to the left or right on the thumbnails at the bottom of the screen to move back or forward, respectively.
Swipe to the left or right on the thumbnails at the bottom of the screen to move back or forward, respectively.
![]() To restart the slideshow with the new settings, tap Play (not shown on the figures).
To restart the slideshow with the new settings, tap Play (not shown on the figures).
![]() Tap Back (<) to return to the memory.
Tap Back (<) to return to the memory.

![]() Swipe up and down the photos section to see all the photos the memory contains.
Swipe up and down the photos section to see all the photos the memory contains.
Show All, Tell All
If the memory has lots of photos, you might see only a summary view of them on the Photos section. Tap Show More to see all the photos. Tap Summary to return to the summary view.
![]() To see all of the memory’s photos, tap Show More.
To see all of the memory’s photos, tap Show More.
![]() Tap a photo to view it.
Tap a photo to view it.

![]() Use the techniques you learned in “Viewing Photos” earlier in the chapter to work with the photos in the memory.
Use the techniques you learned in “Viewing Photos” earlier in the chapter to work with the photos in the memory.
![]() Tap Back (<) to return to the memory.
Tap Back (<) to return to the memory.

![]() Swipe up the screen to see other collections related to the memory.
Swipe up the screen to see other collections related to the memory.
![]() Tap a collection to view its photos. (You learn about using locations to view photos in the next section.)
Tap a collection to view its photos. (You learn about using locations to view photos in the next section.)

Viewing Photos by Location
As you learned earlier, locations are associated with the photos and video that you take with your iPhone’s cameras. The Photos app can use this information to display photos by location.
As you move around in the Photos app, you see the Places section in various locations, such as in a memory. Within the Places section, you can use a map to find and view photos as follows:
![]() Open a memory or other collection of photos.
Open a memory or other collection of photos.
![]() Swipe up or down the screen until you see the Places section.
Swipe up or down the screen until you see the Places section.
![]() Tap a place. The map expands to fill the screen and you see more locations associated with photos in the memory.
Tap a place. The map expands to fill the screen and you see more locations associated with photos in the memory.

Nearby Photos
Tap Show Nearby Photos to show other photos that were taken near the locations that you’re viewing on the map but that aren’t currently included in the memory. Tap Hide Nearby Photos to hide those photos again.
![]() Unpinch your fingers on the screen to zoom in to reveal more detailed locations.
Unpinch your fingers on the screen to zoom in to reveal more detailed locations.

![]() Swipe around the screen to move around the map.
Swipe around the screen to move around the map.
![]() Tap a location with photos to see the photos associated with it.
Tap a location with photos to see the photos associated with it.

![]() Swipe up and down the screen to browse the photos taken at the location.
Swipe up and down the screen to browse the photos taken at the location.
![]() Tap a photo to view it.
Tap a photo to view it.

![]() Use the techniques covered in “Viewing Photos” earlier in the chapter to work with the photos you view.
Use the techniques covered in “Viewing Photos” earlier in the chapter to work with the photos you view.
![]() Tap Back (<) to return to the place.
Tap Back (<) to return to the place.

![]() Tap Back (<) to return to the map. (You might have to tap Back an additional time to return to the map depending on whether the location you viewed has multiple moments associated with it.)
Tap Back (<) to return to the map. (You might have to tap Back an additional time to return to the map depending on whether the location you viewed has multiple moments associated with it.)

![]() Tap other locations to view their photos.
Tap other locations to view their photos.
![]() Tap Back (<) to return to your previous location.
Tap Back (<) to return to your previous location.

Editing and Improving Photos
Even though the iPhone has great photo-taking capabilities, not all the photos you take are perfect from the start. Fortunately, you can use the Photos app to improve your photos. The editing tools available to you include the following:
Automatic Adjustments—This tool attempts to automatically adjust the colors and other properties of photos to make them better. You can change how much of the automatic adjustments are applied to an image.
Other Adjustments—You can adjust the exposure, brilliance, highlights, and other properties of your photos.
Filters—You can apply different filters to your photos for artistic or other purposes.
Straighten, Rotate, and Crop—You can rotate your photos to change their orientation and crop out the parts of photos you don’t want to keep.
Red-eye—This one helps you remove that certain demon-possessed look from the eyes of people in your photos.
Making Automatic Adjustments to Photos
To improve the quality of a photo, use the Enhance tool.
![]() View the image you want to adjust.
View the image you want to adjust.
![]() Tap Edit.
Tap Edit.

![]() Tap Adjust.
Tap Adjust.
![]() Tap AUTO. The image is enhanced and the AUTO icon is highlighted to show the AUTO adjustment is applied. If you are happy with the adjusted photo, skip to step 6.
Tap AUTO. The image is enhanced and the AUTO icon is highlighted to show the AUTO adjustment is applied. If you are happy with the adjusted photo, skip to step 6.

Undo
To remove the AUTO adjustment, tap the AUTO icon. The icon becomes unhighlighted and the adjustment is removed from the photo. You can also tap Cancel to leave the image unchanged.
![]() If you want to further adjust the photo, swipe on the gauge below the AUTO icon to the left or right to change the amount of adjustment applied to the image. As you swipe, you see the changes in the photo as you make them. The dot indicates the amount of adjustment that was applied when you tapped the AUTO icon.
If you want to further adjust the photo, swipe on the gauge below the AUTO icon to the left or right to change the amount of adjustment applied to the image. As you swipe, you see the changes in the photo as you make them. The dot indicates the amount of adjustment that was applied when you tapped the AUTO icon.

![]() Tap Done to save the adjusted image.
Tap Done to save the adjusted image.

Making Advanced Adjustments to Photos
There are many adjustment tools available to you in the Photos app. The steps to use these are similar to using the AUTO tool you learned about in the previous section:
![]() View the image you want to adjust.
View the image you want to adjust.
![]() Tap Edit.
Tap Edit.

![]() Tap Adjust.
Tap Adjust.
![]() Swipe to the left or right on the tool bar until you see the property of the photo you want to change, such as Exposure. As you swipe on the bar, the name of the current tool is shown.
Swipe to the left or right on the tool bar until you see the property of the photo you want to change, such as Exposure. As you swipe on the bar, the name of the current tool is shown.

![]() Swipe to the left and right on the gauge to change the amount of that property applied to the photo. As you make changes, you see the results in the image. You also see the amount of change you are making in the tool icon’s circle; the dot indicates the original amount of that property in the image.
Swipe to the left and right on the gauge to change the amount of that property applied to the photo. As you make changes, you see the results in the image. You also see the amount of change you are making in the tool icon’s circle; the dot indicates the original amount of that property in the image.

![]() Select other tools to make more adjustments to the image.
Select other tools to make more adjustments to the image.
![]() Use the resulting gauge to change the amount of the adjustment you selected in step 6 that is applied to the image.
Use the resulting gauge to change the amount of the adjustment you selected in step 6 that is applied to the image.
![]() When you’re done making changes, tap Done to save the adjusted image.
When you’re done making changes, tap Done to save the adjusted image.

Applying Filters to Photos
To apply filters to photos, do the following:
![]() View the image to which you want to apply filters.
View the image to which you want to apply filters.
![]() Tap Edit.
Tap Edit.

![]() Tap the Filter icon. The palette of filters appears. If you haven’t applied a filter, you see the current filter as Original, which is highlighted with a white box.
Tap the Filter icon. The palette of filters appears. If you haven’t applied a filter, you see the current filter as Original, which is highlighted with a white box.

![]() Swipe to the left or right on the filter palette to browse all of the filters.
Swipe to the left or right on the filter palette to browse all of the filters.

![]() Stop on the filter you want to apply so it’s highlighted. The filter is applied to the image and you see a preview of the image as it will be with the filter; the filter currently applied is highlighted with a white box.
Stop on the filter you want to apply so it’s highlighted. The filter is applied to the image and you see a preview of the image as it will be with the filter; the filter currently applied is highlighted with a white box.
![]() Swipe to the left or right on the gauge below the filter palette to change the intensity of the filter. You see the current intensity value within the white box.
Swipe to the left or right on the gauge below the filter palette to change the intensity of the filter. You see the current intensity value within the white box.
![]() When you are happy with the filter, tap Done. The photo with the filter applied is saved.
When you are happy with the filter, tap Done. The photo with the filter applied is saved.

Straightening, Rotating, and Cropping Photos
To change the alignment, position, and part of the image shown, perform the following steps:
![]() View the image you want to change.
View the image you want to change.
![]() Tap Edit.
Tap Edit.

![]() Tap Straighten/Crop. The tools you use to change the orientation and part of the image displayed appear. A white box appears around the image; this shows what part of the image you will keep if you crop it.
Tap Straighten/Crop. The tools you use to change the orientation and part of the image displayed appear. A white box appears around the image; this shows what part of the image you will keep if you crop it.

![]() To flip the image along its vertical axis, tap Flip.
To flip the image along its vertical axis, tap Flip.
![]() To rotate the image in 90-degree increments, tap Rotate. Each time you tap this icon, the image rotates 90 degrees in the clockwise direction.
To rotate the image in 90-degree increments, tap Rotate. Each time you tap this icon, the image rotates 90 degrees in the clockwise direction.
![]() To rotate the image within the white box, swipe on the toolbar until Straighten is in the center of the screen.
To rotate the image within the white box, swipe on the toolbar until Straighten is in the center of the screen.

![]() Swipe to the left or right on the gauge to rotate the image; within the icon, you see the current amount of rotation. The grid appears to help you see how the image aligns with vertical and horizontal lines.
Swipe to the left or right on the gauge to rotate the image; within the icon, you see the current amount of rotation. The grid appears to help you see how the image aligns with vertical and horizontal lines.

![]() To adjust the image in the vertical direction, swipe on the tool bar until Vertical is in the center of the screen and then swipe to the left and right to adjust the image.
To adjust the image in the vertical direction, swipe on the tool bar until Vertical is in the center of the screen and then swipe to the left and right to adjust the image.
![]() Use a similar process to adjust the image in the horizontal direction.
Use a similar process to adjust the image in the horizontal direction.

![]() To crop the image without respect to keeping a specific proportion, drag the edges of the box around the part of the image you want to keep so that part is inside the box; if you want to crop the image to a specific proportion, jump to step 12.
To crop the image without respect to keeping a specific proportion, drag the edges of the box around the part of the image you want to keep so that part is inside the box; if you want to crop the image to a specific proportion, jump to step 12.
![]() Drag on the image to move it around inside the crop box.
Drag on the image to move it around inside the crop box.
![]() Tap Constrain.
Tap Constrain.

![]() Swipe to the left and right on the toolbar to see the options, and then tap the proportion you want to use; the crop box assumes the current proportion. You can use this to configure the image for how you intend to display it. For example, if you want to display it on a 16:9 TV, you might want to constrain the cropping to that proportion so the image matches the display device.
Swipe to the left and right on the toolbar to see the options, and then tap the proportion you want to use; the crop box assumes the current proportion. You can use this to configure the image for how you intend to display it. For example, if you want to display it on a 16:9 TV, you might want to constrain the cropping to that proportion so the image matches the display device.
![]() Resize the box and position the image within it until the image is what you want it to be; as you drag the edges of the box, it remains in the proportion you selected in step 12.
Resize the box and position the image within it until the image is what you want it to be; as you drag the edges of the box, it remains in the proportion you selected in step 12.
![]() When the image is cropped and positioned as you want it to be, tap Done. The edited image is saved.
When the image is cropped and positioned as you want it to be, tap Done. The edited image is saved.

Auto Straighten and Crop
The Photos app can automatically straighten and crop some photos, usually photos that contain people. When this option is available, it’s applied automatically when you tap Straighten/Crop. In addition to the changes in the photo (such as it being cropped or the subjects repositioned in the frame), you see AUTO highlighted in yellow at the top of the screen. To remove the automatic changes, tap AUTO. The automatic changes are removed from the image, and AUTO is not highlighted any more. Tap AUTO to reapply the automatic changes. If you make any manual changes to the photo (for example, recrop it), the automatic changes are removed.
Removing Red-Eye from Photos
When you edit a photo with people in it, the Red-eye tool becomes available (if no faces are recognized, this tool is hidden). To remove red-eye, perform the following steps:
![]() View an image with people that have red-eye.
View an image with people that have red-eye.
![]() Tap Edit.
Tap Edit.

![]() Tap Red-eye.
Tap Red-eye.

![]() Zoom in on the eyes from which you want to remove red-eye; as you zoom in, drag the photo to keep the eyes you want to fix on the screen.
Zoom in on the eyes from which you want to remove red-eye; as you zoom in, drag the photo to keep the eyes you want to fix on the screen.

![]() Tap each eye containing red-eye. The red in the eyes you tap is removed.
Tap each eye containing red-eye. The red in the eyes you tap is removed.

![]() Repeat steps 4 and 5 until you’ve removed all the red-eye.
Repeat steps 4 and 5 until you’ve removed all the red-eye.
![]() Tap Done to save your changes.
Tap Done to save your changes.

Working with Photos
Once you have photos on your iPhone, there are a lot of things you can do with them, including the following:
Emailing one or more photos to one or more people (see the next task).
Sending a photo via a text message (see Chapter 11, “Sending, Receiving, and Managing Texts and iMessages”).
Sharing photos via AirDrop (see Chapter 17, “Working with Other Useful iPhone Apps and Features”).
Posting your photos on your Facebook wall or timeline.
Assigning photos to contacts (see Chapter 8, “Managing Contacts”).
Using photos as wallpaper (see Chapter 7, “Customizing How Your iPhone Looks”).
Sharing photos via tweets.
Printing photos from your printer (see Chapter 3, “Using Your iPhone’s Core Features”).
Deleting photos (covered later in this chapter).
Organizing photos in albums (also covered later in this chapter).
Copy ’Em
If you select one or more photos and tap the Copy icon, the images you selected are copied to the iPhone’s clipboard. You can then move into another app and paste them in.
Individual Versus Groups
Some actions are available only when you’re working with an individual photo. For example, you might be able to send only a single photo via some apps, whereas you can email multiple photos at the same time. Any commands that aren’t applicable to the photos that are selected won’t appear on the screen.
Sharing Photos via Email
You can email photos via iPhone’s Mail app starting from the Photos app.
![]() View the source containing one or more images that you want to share.
View the source containing one or more images that you want to share.
![]() Tap Select.
Tap Select.

![]() Select the photos you want to send by tapping them. When you tap a photo, it is marked with a check mark to show you that it is selected.
Select the photos you want to send by tapping them. When you tap a photo, it is marked with a check mark to show you that it is selected.
![]() Tap Share.
Tap Share.

Too Many?
If the photos you have selected are too much for email, the Mail icon won’t appear. You need to select fewer photos to attach to the email message.
![]() Tap Mail. A new email message is created, and the photos are added as attachments. If the photos need to be downloaded to your phone, this might take a few moments.
Tap Mail. A new email message is created, and the photos are added as attachments. If the photos need to be downloaded to your phone, this might take a few moments.

![]() Use the email tools to address the email, add a subject, type the body, and send it. (See Chapter 10, “Sending, Receiving, and Managing Email,” for detailed information about using your iPhone’s email tools.)
Use the email tools to address the email, add a subject, type the body, and send it. (See Chapter 10, “Sending, Receiving, and Managing Email,” for detailed information about using your iPhone’s email tools.)

![]() Tap the size of the images you want to send. Choosing a smaller size makes the files smaller and reduces the quality of the photos. You should generally try to keep the size of emails to 5MB or smaller to ensure the message makes it to the recipient. (Some email servers block larger messages.) After you send the email, you move back to the photos you were browsing.
Tap the size of the images you want to send. Choosing a smaller size makes the files smaller and reduces the quality of the photos. You should generally try to keep the size of emails to 5MB or smaller to ensure the message makes it to the recipient. (Some email servers block larger messages.) After you send the email, you move back to the photos you were browsing.

Creating New Albums
You can create photo albums and store photos in them to keep your photos organized.
To create a new album, perform these steps:
![]() Move to the Albums screen by tapping Albums on the toolbar.
Move to the Albums screen by tapping Albums on the toolbar.
![]() Tap Add (+).
Tap Add (+).

![]() To create a personal album, tap New Album or to share an album, tap New Shared Album. These steps show a personal album.
To create a personal album, tap New Album or to share an album, tap New Shared Album. These steps show a personal album.

![]() Type the name of the new album.
Type the name of the new album.
![]() Tap Save. You’re prompted to select photos to add to the new album.
Tap Save. You’re prompted to select photos to add to the new album.

![]() Move to the source of the photos you want to add to the new album.
Move to the source of the photos you want to add to the new album.
![]() Swipe up and down to browse the source and tap the photos you want to add to the album. They’re marked with a check mark to show that they’re selected. The number of photos selected is shown at the top of the screen.
Swipe up and down to browse the source and tap the photos you want to add to the album. They’re marked with a check mark to show that they’re selected. The number of photos selected is shown at the top of the screen.
![]() Tap Done. The photos are added to the new album and you move back to the Albums screen. The new album is shown on the list, and you can work with it just like the other albums you see.
Tap Done. The photos are added to the new album and you move back to the Albums screen. The new album is shown on the list, and you can work with it just like the other albums you see.


Playing Favorites
You can tap the Favorite icon (the heart) to mark any photo or video as a favorite. It fills in with blue to show you that the image you’re viewing is a favorite. Favorites are automatically collected in the Favorites album, so this is an easy way to collect photos and videos you want to be able to easily find again without having to create a new album or even put them in an album. You can unmark a photo or video as a favorite by tapping its Favorite icon again.
Adding Photos to Existing Albums
To add photos to an existing album, follow these steps:
![]() Move to the source containing the photos you want to add to an album.
Move to the source containing the photos you want to add to an album.
![]() Tap Select.
Tap Select.

![]() Tap the photos you want to add to the album.
Tap the photos you want to add to the album.
![]() Tap Share.
Tap Share.

![]() Swipe up the sheet.
Swipe up the sheet.
![]() Tap Add to Album.
Tap Add to Album.

![]() Swipe up and down the list to find the album to which you want to add the photos.
Swipe up and down the list to find the album to which you want to add the photos.
![]() Tap the album; the selected photos are added to the album. (If an album is grayed out and you can’t tap it, that album was not created on the iPhone, so you can’t change its contents.)
Tap the album; the selected photos are added to the album. (If an album is grayed out and you can’t tap it, that album was not created on the iPhone, so you can’t change its contents.)

Deleting Photos
You can delete photos and videos that you don’t want to keep on your iPhone. If you use iCloud to store them, deleting photos from your phone also deletes them from your photo library and from all the other devices using your library. So, make sure you really don’t want photos any more before you delete them.
![]() Open the source containing photos you want to delete.
Open the source containing photos you want to delete.
![]() Tap Select.
Tap Select.

![]() Tap the photos you want to delete. Each item you select is marked with a check mark.
Tap the photos you want to delete. Each item you select is marked with a check mark.
![]() Tap Trash.
Tap Trash.

Deleted Means Deleted
Be aware that when you delete a photo from your iPhone, it’s also deleted from your iCloud Library and all the devices sharing that library—not just from your iPhone. (After it has been deleted from the Recently Deleted album of course.)
![]() Tap Delete X Photos, where X is the number of photos you selected. The photos you selected are moved to the Recently Deleted album, where they remain until they’re automatically deleted (the amount of time they remain there depends on your storage space and other factors).
Tap Delete X Photos, where X is the number of photos you selected. The photos you selected are moved to the Recently Deleted album, where they remain until they’re automatically deleted (the amount of time they remain there depends on your storage space and other factors).

Deleting Individual Photos
You can delete individual photos that you’re viewing by tapping the Trash icon, and then tapping Delete Photo.
Finding and Viewing Videos
As explained in Chapter 15, you can capture video with your iPhone. Once captured, you can view videos on your iPhone, edit them, and share them.
Watching videos you’ve captured with your iPhone is simple.
![]() Move to the Albums screen.
Move to the Albums screen.
![]() Tap the Videos album (swipe up the screen until you see the Media Types section to see it). Video clips display their running time at the bottom of their thumbnails. (Videos can also be stored in other albums, in collections, and in memories. This Videos album just collects videos no matter where else they are stored.)
Tap the Videos album (swipe up the screen until you see the Media Types section to see it). Video clips display their running time at the bottom of their thumbnails. (Videos can also be stored in other albums, in collections, and in memories. This Videos album just collects videos no matter where else they are stored.)

Auto-Play
Videos automatically play when they appear in collections of photos, and at other times so don’t be surprised if they start playing without you doing anything to start them.
![]() Swipe up and down the screen to browse your videos.
Swipe up and down the screen to browse your videos.
![]() Tap the video you want to watch.
Tap the video you want to watch.

![]() Rotate the phone to change its orientation if necessary.
Rotate the phone to change its orientation if necessary.
![]() If the video doesn’t start playing automatically, tap Play (not shown on the figure). The video plays. After a few moments, the toolbars disappear automatically.
If the video doesn’t start playing automatically, tap Play (not shown on the figure). The video plays. After a few moments, the toolbars disappear automatically.

![]() Tap the video. The toolbars reappear.
Tap the video. The toolbars reappear.

Deleting Video
To remove a video from your iPhone (and all other devices that access your library), select it, tap the Trash icon, and then tap Delete Video at the prompt.
![]() Pause the video by tapping Pause.
Pause the video by tapping Pause.
![]() Jump to a specific point in a video by swiping to the left or right on the thumbnails at the bottom of the screen. When you swipe to the left, you move ahead in the video; when you swipe to the right, you move back in the video.
Jump to a specific point in a video by swiping to the left or right on the thumbnails at the bottom of the screen. When you swipe to the left, you move ahead in the video; when you swipe to the right, you move back in the video.

Watching Slow-Motion and Time-Lapse Video
Watching slow-motion video is just like watching regular speed video except after a few frames, the video slows down until a few frames before the end, at which point it speeds up again. Watching time-lapse is similar except the video plays faster instead of slower than real time.