8 Managing Contacts

In this chapter, you learn how to ensure that your iPhone has the contact information you need when you need it. Topics include the following:
➔ Creating contacts on your iPhone
You’ll be using your iPhone to make calls, get directions, send emails, and do many other tasks that require contact information, including names, phone numbers, email addresses, and physical addresses. It would be time-consuming and a nuisance to have to remember and retype this information each time you use it. Fortunately, you don’t have to do either because the Contacts app puts all your contact information at your fingertips (literally).
Getting Started
The Contacts app makes using your contact information extremely easy. This information is readily available on your phone in all the apps in which you need it, including Mail, Messages, and Phone. And, you don’t need to remember or type the information because you can enter it by choosing someone’s name, a business’s name, or other information that you know about the contact. You also can access your contact information directly in the Contacts app and take action on it (such as placing a call).
You can store information in the Contacts app in several ways. When you configure an online account on your iPhone—such as iCloud or Google—to include contact information, the contact information stored in that account is immediately available on your phone.
You should store your contacts in an online account (for example, iCloud or Google), because the information is accessible on many devices, and the online storage provides a backup for the information on your iPhone. If you don’t have an online account, contact information is stored only on your iPhone, which isn’t good because, if something happens to your phone, you can lose all of your contacts.
If you haven’t already configured an online account to store your contact information, move to Chapter 4, “Setting Up and Using an Apple ID, iCloud, and Other Online Accounts,” and do so before continuing here.
You can manually add more contact information to the Contacts app by capturing that information when you perform tasks (such as reading email). You also can enter new contact information directly in the Contacts app.
The Contacts app makes it easy to keep your contact information current by doing such things as adding more information, updating existing contacts, or removing contacts you no longer need.
Settings for Contacts
Like almost all apps on your iPhone, there are settings that determine how your contacts look or work. If your contacts look a bit different than those in the figures in this chapter, it’s likely your settings are not the same as mine. Refer to the Go Further sidebar “Contacts Settings,” at the end of this chapter to learn about the more important contacts settings and how to change them.
Creating Contacts on Your iPhone
You can create new contacts on an iPhone in a number of ways. You can start with some information, such as the email address on a message you receive, and create a contact from it, or you can create a contact by manually filling in the contact information. In this section, you learn how to create contacts in both ways.
Creating New Contacts from Email
When you receive an email, you can easily create a contact to capture email addresses associated with a message. (To learn how to work with the Mail app, see Chapter 10, “Sending, Receiving, and Managing Email.”)
![]() On the Home screen, tap Mail.
On the Home screen, tap Mail.

![]() Use the Mail app to read an email message. If your iPhone can associate a name with an email address, you see the name. If not, you see the email address instead.
Use the Mail app to read an email message. If your iPhone can associate a name with an email address, you see the name. If not, you see the email address instead.
![]() Tap the name or email address for which you want to create a new contact. The names or addresses turn blue to indicate you can work with them. If the names or addresses are already blue, skip this step.
Tap the name or email address for which you want to create a new contact. The names or addresses turn blue to indicate you can work with them. If the names or addresses are already blue, skip this step.
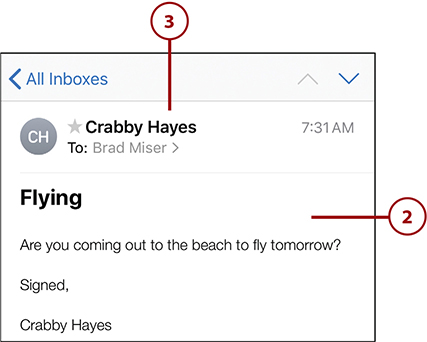
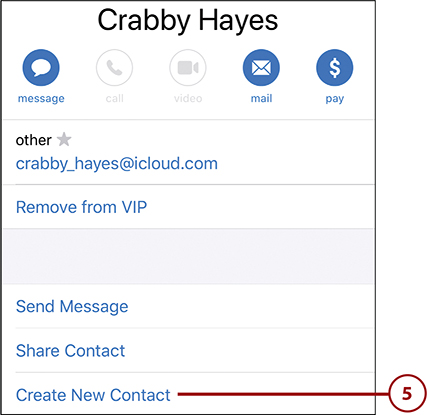
![]() Tap the name or email address that you want to capture as a contact. The contact’s Info screen appears. You see as much information as could be gleaned from the email address, which is typically the sender’s name and email address.
Tap the name or email address that you want to capture as a contact. The contact’s Info screen appears. You see as much information as could be gleaned from the email address, which is typically the sender’s name and email address.

![]() Tap Create New Contact. The New Contact screen appears. The name, email address, and any other information that can be identified are added to the new contact. The email address is labeled with iPhone’s best guess, such as other or home.
Tap Create New Contact. The New Contact screen appears. The name, email address, and any other information that can be identified are added to the new contact. The email address is labeled with iPhone’s best guess, such as other or home.
![]() Use the New Contact screen to enter more contact information or update the information that was added (such as the label applied to the email address) and save the new contact by tapping Done. This works just like when you create a new contact manually, except that you already have some information—most likely, a name and an email address. For details on adding or changing information for the contact, see the next task, “Creating Contacts Manually.”
Use the New Contact screen to enter more contact information or update the information that was added (such as the label applied to the email address) and save the new contact by tapping Done. This works just like when you create a new contact manually, except that you already have some information—most likely, a name and an email address. For details on adding or changing information for the contact, see the next task, “Creating Contacts Manually.”

Creating Contacts Manually
Most of the time, you’ll want to get some basic information for a new contact from an app, as the previous task demonstrated, or through an online account, such as contacts stored in your Google account. If these aren’t available, you also can start a contact from scratch and manually add all the information you need to it. Also, you use the same steps to add information to or change information for an existing contact that you do to create a new one, so even if you don’t start from scratch often, you do need to know how to make changes to existing contacts.
The Contacts app leads you through creating each type of information you might want to capture. You can choose to enter some or all of the default information on the New Contact screen, or add additional fields as needed.
The following steps show creating a new contact that contains the most common contact information you’re likely to need:
![]() On the Home screen, tap Contacts. (If you don’t see the Contacts app on the Home screen, tap the Extras folder to open it and you should see the app’s icon. You might want to move the Contacts icon from this folder to a more convenient location on your Home screen; see Chapter 7, “Customizing How Your iPhone Looks,” for the steps to do this.) The Contacts screen displays.
On the Home screen, tap Contacts. (If you don’t see the Contacts app on the Home screen, tap the Extras folder to open it and you should see the app’s icon. You might want to move the Contacts icon from this folder to a more convenient location on your Home screen; see Chapter 7, “Customizing How Your iPhone Looks,” for the steps to do this.) The Contacts screen displays.

If you see the Groups screen instead, tap Done to move to the Contacts screen. (Groups are covered later.)
![]() Tap Add (+). The New Contact screen appears with default fields. (You can add more fields as needed using the add field command.)
Tap Add (+). The New Contact screen appears with default fields. (You can add more fields as needed using the add field command.)

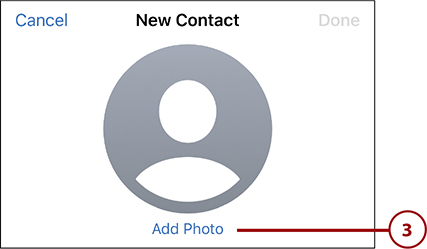
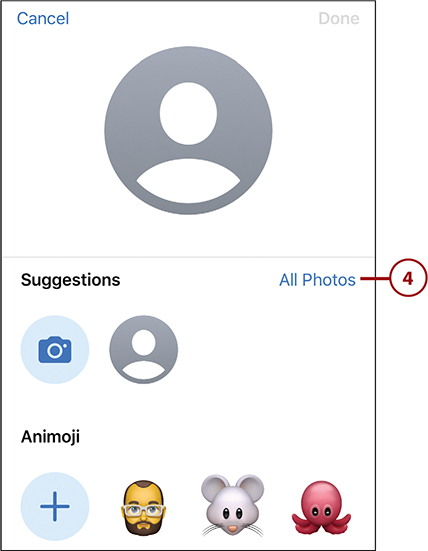
![]() Tap Add Photo to associate a photo with the contact. You can choose a photo already on your phone or take a new photo. These steps show using an existing photo. See the “Taking Photos” note for the steps to take a new photo.
Tap Add Photo to associate a photo with the contact. You can choose a photo already on your phone or take a new photo. These steps show using an existing photo. See the “Taking Photos” note for the steps to take a new photo.
![]() Tap All Photos to choose a photo stored on your iPhone.
Tap All Photos to choose a photo stored on your iPhone.
Options, Options
If one of the images in the Suggestions section is what you want to use, tap it and tap Assign to Contact. You can also create an animoji for the contact by tapping it and then following the onscreen directions to pose the animoji and assign it to the contact.
![]() Use the Photos app to move to, select, and configure the photo you want to associate with the contact (see Chapter 16, “Viewing and Editing Photos and Video with the Photos App,” for help with the Photos app). You can configure the photo by pinching or unpinching on it and dragging it around so that the part you want to use is shown within the circle.
Use the Photos app to move to, select, and configure the photo you want to associate with the contact (see Chapter 16, “Viewing and Editing Photos and Video with the Photos App,” for help with the Photos app). You can configure the photo by pinching or unpinching on it and dragging it around so that the part you want to use is shown within the circle.
![]() Tap Choose.
Tap Choose.

![]() Tap the filter you want to apply to the image.
Tap the filter you want to apply to the image.

![]() Tap Done. You return to the New Contact screen where the photo you selected is displayed.
Tap Done. You return to the New Contact screen where the photo you selected is displayed.

![]() Tap in the First name field and enter the contact’s first name; if you are creating a contact for an organization only, leave both name fields empty and skip to step 11.
Tap in the First name field and enter the contact’s first name; if you are creating a contact for an organization only, leave both name fields empty and skip to step 11.
![]() Tap in the Last name field and enter the contact’s last name.
Tap in the Last name field and enter the contact’s last name.
![]() Enter the organization, such as a company, with which you want to associate the contact, if any.
Enter the organization, such as a company, with which you want to associate the contact, if any.
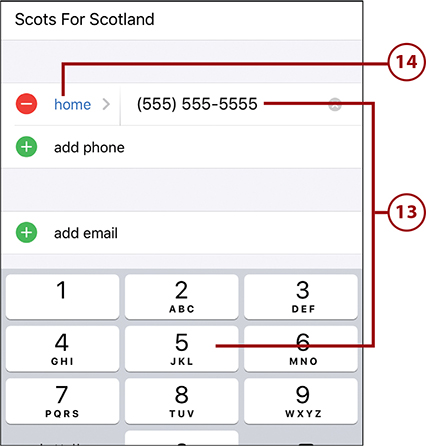
![]() Tap add phone to add a phone number (you might have to swipe up on the screen to see this). A new phone field appears along with the numeric keypad.
Tap add phone to add a phone number (you might have to swipe up on the screen to see this). A new phone field appears along with the numeric keypad.

Taking Photos
To take a new photo for the contact, tap the Camera icon in step 4. The Camera app’s screen appears. Use the camera to capture the photo you want to use (taking photos is covered in Chapter 15, “Taking Photos and Video with Your iPhone”). Use the Move and Scale screen to adjust the photo and then tap Use Photo.
![]() Use the numeric keypad to enter the contact’s phone number. Include any prefixes you need to dial it, such as area code and country code. The Contacts app formats the number for you as you enter it.
Use the numeric keypad to enter the contact’s phone number. Include any prefixes you need to dial it, such as area code and country code. The Contacts app formats the number for you as you enter it.
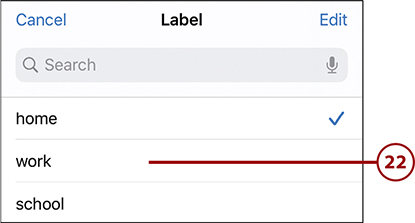
![]() Tap the label for the phone number, for example home, to change it to another label. The Label screen appears.
Tap the label for the phone number, for example home, to change it to another label. The Label screen appears.
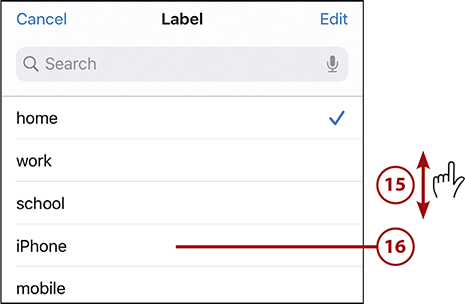
![]() Swipe up and down the Label screen to see all the options available.
Swipe up and down the Label screen to see all the options available.
![]() Tap the label you want to apply to the number, for example, iPhone. That label is applied and you move back to the New Contact screen.
Tap the label you want to apply to the number, for example, iPhone. That label is applied and you move back to the New Contact screen.
![]() Repeat steps 12–16 to add more phone numbers to the contact.
Repeat steps 12–16 to add more phone numbers to the contact.
![]() Swipe up the screen until you see add email.
Swipe up the screen until you see add email.
![]() Tap add email. The keyboard appears.
Tap add email. The keyboard appears.

A Rose by Any Other Name Isn’t the Same
The labels you apply to contact information, such as phone numbers, become important when a contact has more than one type of that information. For example, a person might have several phone numbers, such as for home, an iPhone, and work. Applying a label to each of these numbers helps you know which number is for which location. This is especially useful when you use Siri because you can tell Siri which number to use to place a call, such as “Call Sir William Wallace home” to call the number labeled as home on William’s contact card.
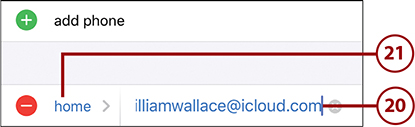
![]() Type the contact’s email address.
Type the contact’s email address.
![]() Tap the label for the email address to change it.
Tap the label for the email address to change it.
![]() Tap the label you want to apply to the email address.
Tap the label you want to apply to the email address.
![]() Repeat steps 19–22 to add more email addresses.
Repeat steps 19–22 to add more email addresses.
![]() If necessary, swipe up the screen until you see Ringtone.
If necessary, swipe up the screen until you see Ringtone.
![]() Tap Ringtone. The list of ringtones and alert tones available on your iPhone appears.
Tap Ringtone. The list of ringtones and alert tones available on your iPhone appears.

![]() Set the Emergency Bypass switch to on (green) if you want sounds and vibrations for phone calls or new messages associated with the contact you are creating to play even when Do Not Disturb is on.
Set the Emergency Bypass switch to on (green) if you want sounds and vibrations for phone calls or new messages associated with the contact you are creating to play even when Do Not Disturb is on.
![]() Swipe up and down the list to see all of the tones available.
Swipe up and down the list to see all of the tones available.
![]() Tap the ringtone you want to play when the contact calls you. When you tap a ringtone, it plays so you can experiment to find the one that best relates to the contact. Setting a specific ringtone helps you identify a caller without looking at your phone.
Tap the ringtone you want to play when the contact calls you. When you tap a ringtone, it plays so you can experiment to find the one that best relates to the contact. Setting a specific ringtone helps you identify a caller without looking at your phone.
![]() Tap Vibration and use the resulting screen if you want to set a specific vibration for the contact. When you are finished, tap Back (<) located in the upper-left corner of the screen.
Tap Vibration and use the resulting screen if you want to set a specific vibration for the contact. When you are finished, tap Back (<) located in the upper-left corner of the screen.
![]() Tap Done. You return to the New Contact screen.
Tap Done. You return to the New Contact screen.

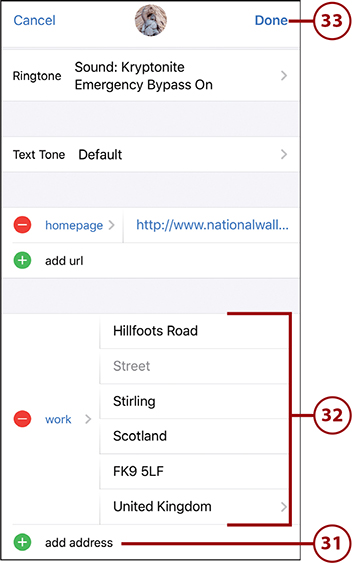
![]() Using the pattern you have learned in the previous steps, move to the next item you want to set and tap it. For example, tap add address to enter a physical address or add url to add a website.
Using the pattern you have learned in the previous steps, move to the next item you want to set and tap it. For example, tap add address to enter a physical address or add url to add a website.
![]() Use the resulting screens to enter the information you want to configure for the contact. After you’ve done a couple of the fields, it’s easy to do the rest because the same pattern is used throughout.
Use the resulting screens to enter the information you want to configure for the contact. After you’ve done a couple of the fields, it’s easy to do the rest because the same pattern is used throughout.
![]() When you’ve added all the information you want to capture, tap Done. The New Contact screen closes and the new contact is created and ready for you to use in Contacts and other apps. It’s also moved onto other devices with which your contact information is synced. See the Go Further sidebar, “Creating Contacts Expanded,” for additional information on syncing and maintaining contacts.
When you’ve added all the information you want to capture, tap Done. The New Contact screen closes and the new contact is created and ready for you to use in Contacts and other apps. It’s also moved onto other devices with which your contact information is synced. See the Go Further sidebar, “Creating Contacts Expanded,” for additional information on syncing and maintaining contacts.

Working with Contacts on Your iPhone
There are many ways to use contact information. The first step is always finding the contact information you need, typically by using the Contacts app. Whether you access it directly or through another app (such as Mail), it works the same way. Then, you select the information you want to use or the action you want to perform.
Using the Contacts App
You can access your contact information directly in the Contacts app. For example, you can search or browse for a contact and then view the detailed information for the contact in which you are interested.
![]() On the Home screen, tap Contacts. (If the Groups screen appears, tap Done. You move back to the Contacts screen.)
On the Home screen, tap Contacts. (If the Groups screen appears, tap Done. You move back to the Contacts screen.)
You can find a contact to view by browsing (step 2), using the index (step 3), or searching (step 4). You can use combinations of these, too, such as first using the index to get to the right area and then browsing to find the contact in which you are interested.
![]() Swipe up or down to scroll the screen to browse for contact information; swipe up or down on the alphabetical index to browse rapidly. When you see the contact you want to view, move to step 5.
Swipe up or down to scroll the screen to browse for contact information; swipe up or down on the alphabetical index to browse rapidly. When you see the contact you want to view, move to step 5.
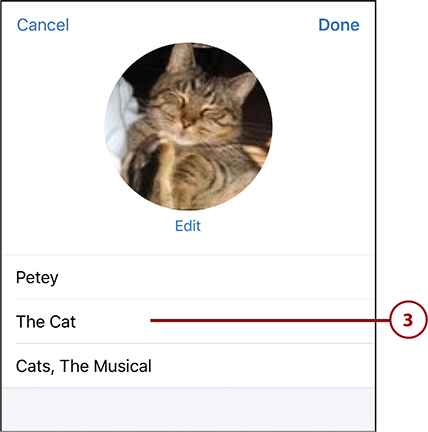
![]() Tap the index to jump to contact information organized by the first letter of the format selected in the Contact Preferences (last name or first name). When you see the contact you want to view, move to step 5.
Tap the index to jump to contact information organized by the first letter of the format selected in the Contact Preferences (last name or first name). When you see the contact you want to view, move to step 5.
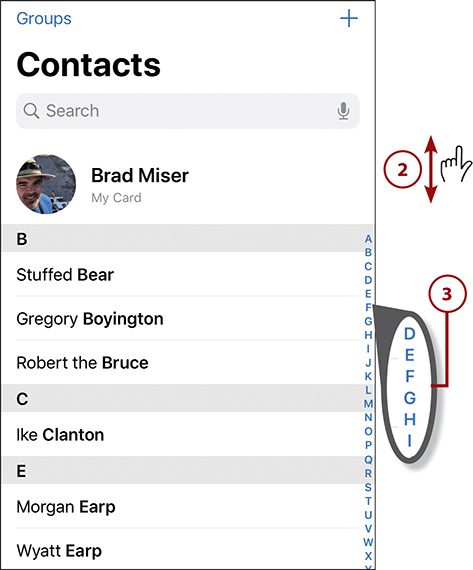
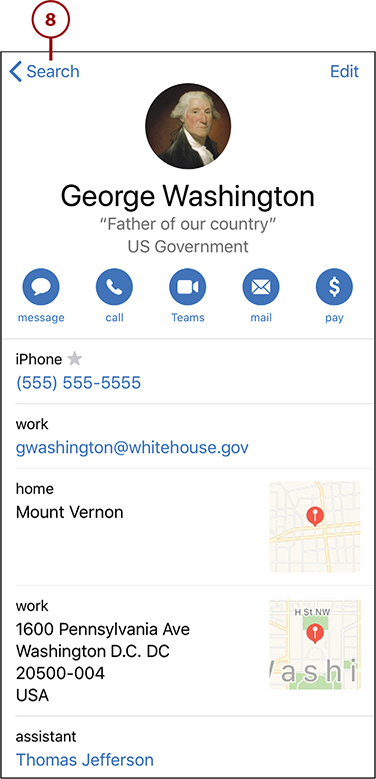
![]() Use the Search tool to search for a specific contact; tap in the tool, type the name (you can type last, first, company, or nickname) of the contact you want to find.
Use the Search tool to search for a specific contact; tap in the tool, type the name (you can type last, first, company, or nickname) of the contact you want to find.
![]() Tap a contact to view that contact’s information.
Tap a contact to view that contact’s information.

![]() Swipe up and down the screen to view all the contact’s information.
Swipe up and down the screen to view all the contact’s information.
![]() Tap the data or icons on the screen to perform actions, including the following:
Tap the data or icons on the screen to perform actions, including the following:
Phone numbers—Tap a phone number to call it. You can also tap one of the call icons just under the contact’s image to call that number. For example, to call the number labeled as iPhone, tap iPhone.
Email addresses—Tap an email address or the mail icon or the icon with the email address label (such as other for the email address labeled as other) on it to create a new email message to that address.
URLs—Tap a URL to open Safari and move to the associated website.
Addresses—Tap a physical address to show it in the Maps app.
FaceTime—Tap video or FaceTime to start a FaceTime call with the contact. (If an icon, such as video, is disabled, you don’t have that type of information stored for the contact.)
Text—Tap the message icon or tap Send Message and choose the phone number or email address to which you want to send a text message.
Share Contact—Tap Share Contact. The Share menu appears. To share the contact via email, tap Mail; to share it via a text, tap Message; or to share it using AirDrop, tap AirDrop. You can also share via Twitter or Facebook. Then, use the associated app to complete the task.
Favorites—Tap Add to Favorites and choose the phone number or email address you want to designate as a favorite. You can use this in the associated app to do something faster. For example, if it’s the Phone app, you can tap the Favorites tab to see your favorite contacts and quickly dial one by tapping it. You can also quickly access favorites from the FAVORITES widget by swiping to the right when you are on the Lock screen. You can add multiple items (such as cell and work phone numbers) as favorites for the same contact.
Emergency Contacts—Tap Add to Emergency Contacts if this person is someone you want to be contacted if you use the emergency features of the phone. When you activate that feature, your contacts receive notifications about the situation.

![]() To return to the prior screen without performing an action, tap Back (<) located in the upper-left corner of the screen.
To return to the prior screen without performing an action, tap Back (<) located in the upper-left corner of the screen.
Accessing Contacts from Other Apps
You can also access contact information while you’re using a different app. For example, you can use a contact’s email address when you create an email message. When you perform such actions, you use the Contacts app to find and select the information you want to use. The following example shows using contact information to send an email message; using your contact information in other apps (such as Phone or Messages) is similar.
![]() Open the app from which you want to access contact information (this example uses Mail).
Open the app from which you want to access contact information (this example uses Mail).

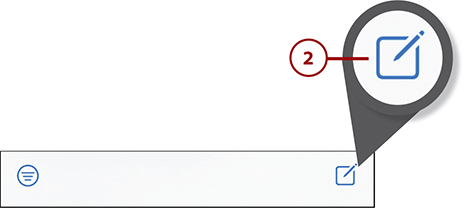
![]() Tap Compose.
Tap Compose.
![]() Tap Add (+) in the To field.
Tap Add (+) in the To field.

Another Way to Address
Rather than performing steps 3 through 5, you can type the contact’s name directly in the field and then choose the address you want to use from the list that’s presented.
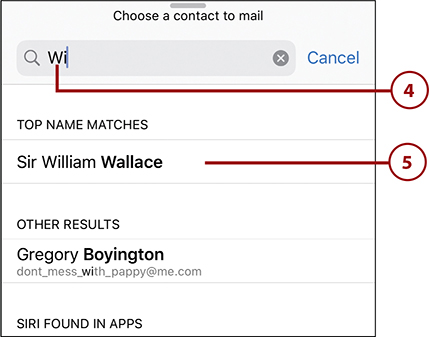
![]() Search, browse, or use the index to find the contact whose information you want to use. You see the results of your search under the Search bar. The text that matches your search is shown in bold. For example, if you search for Wi, you see people named William, Wil, and so on, and “Wi” is shown in bold in each result. The search looks within the contact too. For example, when you search for an email address within Mail, the email addresses are searched in addition to the name information.
Search, browse, or use the index to find the contact whose information you want to use. You see the results of your search under the Search bar. The text that matches your search is shown in bold. For example, if you search for Wi, you see people named William, Wil, and so on, and “Wi” is shown in bold in each result. The search looks within the contact too. For example, when you search for an email address within Mail, the email addresses are searched in addition to the name information.
![]() Tap the contact whose information you want to use. (If a contact doesn’t have relevant information; for example, if no email address is configured when you are using the Mail app, that contact is grayed out and can’t be selected.) You move back to the previous screen and the appropriate information is entered.
Tap the contact whose information you want to use. (If a contact doesn’t have relevant information; for example, if no email address is configured when you are using the Mail app, that contact is grayed out and can’t be selected.) You move back to the previous screen and the appropriate information is entered.
Multiple Contacts
If the contact has multiple entries of the type you’re trying to use, the contact’s information screen appears. Tap the specific information you want to use—in this scenario, the email address. The information is entered in the appropriate location on the new email screen.
![]() Complete the task you’re doing, such as sending an email message.
Complete the task you’re doing, such as sending an email message.

Managing Your Contacts on Your iPhone
When you sync contacts with an iCloud, Google, or other account, the changes go both ways. For example, when you change a contact on the iPhone, the synced contact manager application, such as Outlook, makes the changes for those contacts on your computer. Likewise, when you change contact information in a contact manager on your computer, those changes move to the iPhone. If you add a new contact in a contact manager, it moves to the iPhone, and vice versa. You can also change contacts manually in the Contacts app on your iPhone.
Updating Contact Information
You can change any information for an existing contact, such as adding new email addresses, deleting outdated information, and changing existing information.
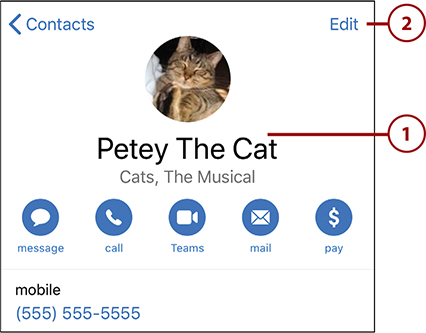
![]() Use the Contacts app to find and view the contact whose information you want to change.
Use the Contacts app to find and view the contact whose information you want to change.
![]() Tap Edit. The contact screen moves into Edit mode, and you see Unlock icons.
Tap Edit. The contact screen moves into Edit mode, and you see Unlock icons.
![]() Tap current information to change it; you can change a field’s label by tapping it, or you can change the data for the field by tapping the information you want to change. Use the resulting tools, such as the phone number entry keypad, to make changes to the information. These tools work just like when you create a new contact (refer to “Creating Contacts Manually,” earlier in this chapter).
Tap current information to change it; you can change a field’s label by tapping it, or you can change the data for the field by tapping the information you want to change. Use the resulting tools, such as the phone number entry keypad, to make changes to the information. These tools work just like when you create a new contact (refer to “Creating Contacts Manually,” earlier in this chapter).
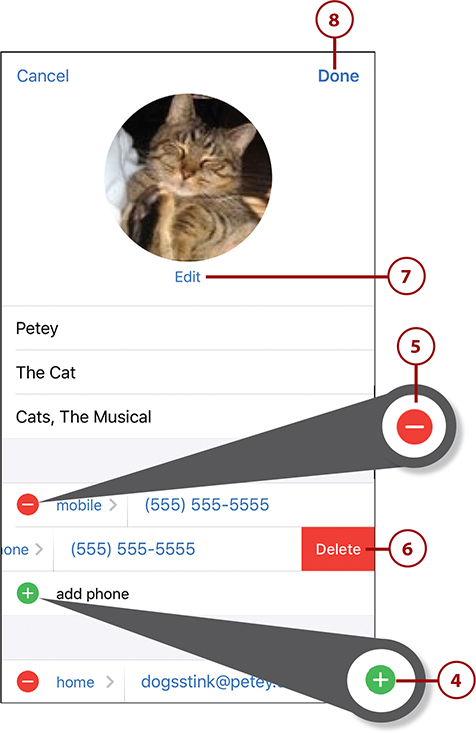
![]() To add more fields, tap add (+) in the related section, such as add email in the email address section; then, select a label for the new field and complete its information. This also works just like adding a new field to a contact you created manually.
To add more fields, tap add (+) in the related section, such as add email in the email address section; then, select a label for the new field and complete its information. This also works just like adding a new field to a contact you created manually.
![]() Tap a field’s Unlock (–) icon to remove that field from the contact.
Tap a field’s Unlock (–) icon to remove that field from the contact.
![]() Tap Delete. The information is removed from the contact.
Tap Delete. The information is removed from the contact.
![]() To change the contact’s photo, tap the current photo, or the word edit under the current photo, and use the resulting menu and tools to choose a new photo, take a new photo, delete the existing photo, or edit the existing photo.
To change the contact’s photo, tap the current photo, or the word edit under the current photo, and use the resulting menu and tools to choose a new photo, take a new photo, delete the existing photo, or edit the existing photo.
![]() When you finish making changes, tap Done. Your changes are saved, and you move out of Edit mode.
When you finish making changes, tap Done. Your changes are saved, and you move out of Edit mode.
Adding Information to an Existing Contact While Using Your iPhone
As you use your iPhone, you’ll encounter information related to a contact that isn’t currently part of that contact’s information. For example, a contact might send an email to you from a different email address than the one you have stored for her. When this happens, you can easily add the new information to the existing contact. Just tap the information to view it (such as an email address), and then tap Add to Existing Contact. Next, select the existing contact to which you want to add the new information. The new information is added to the contact. Depending on your iPhone model, tap Update or Done to save the new information or Cancel, if you decide not to add the new information.
Deleting Contacts
To get rid of contacts, you can delete them from the Contacts app.
![]() Find and view the contact you want to delete.
Find and view the contact you want to delete.
![]() Tap Edit.
Tap Edit.

![]() Swipe up to get to the bottom of the Info screen.
Swipe up to get to the bottom of the Info screen.
![]() Tap Delete Contact.
Tap Delete Contact.

![]() Tap Delete Contact to confirm the deletion. The app deletes the contact, and you return to the Contacts screen.
Tap Delete Contact to confirm the deletion. The app deletes the contact, and you return to the Contacts screen.
