2 Getting Started with Your iPhone

In this chapter, you learn fundamental skills for the major types of iPhone. Topics include the following:
➔ Getting started with iPhone X Models
➔ Getting Started with iPhone SE, 6s, 6s Plus, 7, 7 Plus, 8, or 8 Plus Models
➔ Using the split-screen on iPhone 11 Pro Max, Xs Max, or Plus Models
To get going with your iPhone, you need to understand how to use the features provided by your specific model. The differences between these models impact some fundamental tasks you do, such as moving to the Home screen. While these differences are significant, they are also limited in number. In this chapter, you learn about these fundamental tasks for the type of iPhone you have.
Getting Started
In Chapter 1, “Getting to Know Your iPhone,” you learned the major ways you interact with an iPhone to do things such as opening apps, moving among Home screens, and working with the Settings app. Almost all of these tasks are performed in the same way on all models of iPhone. In that chapter, you also learned that there are some differences in models that impact how you perform certain tasks. In this chapter, you learn how to perform fundamental tasks for the specific model of iPhone that you use.
In this book, iPhone models are grouped into the following major types that have corresponding sections in this chapter (you only need to read the sections that cover the model you have):
X Models—This group includes the newest generation of iPhone models, which are the iPhone 11, iPhone 11 Pro, and iPhone 11 Pro Max along with the older X, Xr, Xs, and Xs Max. The most distinguishable difference with the X models compared to prior generations is that the screen is almost as large as the frame. This means there is no longer a Touch ID/Home button. And, these models introduced facial recognition technology to the iPhone along with other improvements, in cameras, speed, and more. If you have one of these X models, you should read the section “Getting Started with iPhone X Models.”
Non-X Models—This prior generation of iPhones uses Touch ID and has a Touch ID/Home button as their major distinguishing external feature (compared to X models). Within this non-X group, there are a variety of models. The models with higher numbers have more features and capabilities than models with lower numbers. Models in the group are the SE, 6s, 6s Plus, 7, 7 Plus, 8, and 8 Plus. If you have one of these models, you should read the section “Getting Started with iPhone SE, 6s, 6s Plus, 7, 7 Plus, 8, or 8 Plus Models.”
Max and Plus Models—These models are larger than others and have both X and non-X variants. Because of their large size, these models have the ability to use a split-screen, which can make them easier and faster to use. The models in this group are 11 Pro Max, Xs Max, 8 Plus, 7 Plus, and 6s Plus. If you have one of these models, read “Using the Split-Screen on iPhone 11 Pro Max, Xs Max, or Plus Models” to learn how to take advantage of its split-screen capability.
Where’s My Model?
This book covers iPhones that can run iOS 13 (see Chapter 1). If you don’t see your iPhone model listed in any of the groups described here, it isn’t able to run iOS 13 and so isn’t covered in this book. Prior editions of this book cover earlier iPhone models, so if you aren’t going to upgrade your iPhone, you can obtain an earlier version of this book to match the phone you have.
Getting Started with iPhone X Models
The iPhone X models are the latest generation and feature larger screens relative to the physical size of the iPhone than prior models had. They also feature Face ID along with improved hardware that makes them work faster than older models. Except for the Xr, they have dual cameras on the back that provide for some amazing photographic capabilities, such as enhanced zooming and portrait photos.
Getting to Know Your iPhone X Model’s External Features
The X models have even fewer physical features than prior generations did. X models look like this:

Cameras—All X models have one camera on the front at the top near the center of the phone; this is the TrueDepth camera that you use for Face ID, selfies, and animojis (animated emojis).
All X models also have cameras on their backside that you can use to take all sorts of photos and videos. Different models have different camera configurations that provide a variety of capabilities. The iPhone 11 Pro and 11 Pro Max have three cameras that provide telephoto zoom, night mode, and wide and ultra-wide shots. The iPhone 11 has two cameras that provide night mode, wide, and ultra-wide shots but not telephoto. The Xs, Xs Max, and X have two cameras that provide wide and telephoto capabilities. The Xr has a single camera that can take wide shots.
The newest models (11, 11 Pro, and 11 Pro Max) have the highest quality cameras, but the photographic capabilities of all the X models are amazing.
When you take photos or video, you can choose the cameras on either side of the phone.
Side button—Press this button once to lock the iPhone’s screen and put it to sleep, and press it again to wake the iPhone from Sleep mode. When you hold it down for a couple of seconds, you activate Siri. When Face ID is enabled, you press it twice to use Apple Pay, or download apps from the App Store. Press this button and either Volume button at the same time to take a screenshot. Press and hold this button and either Volume button to turn the phone off or make an emergency call. When your iPhone is turned off, press and hold this until you see the Apple logo on the screen to turn it on again.
Mute switch—This switch determines whether the iPhone makes sounds, such as ringing when a call comes in or making the alert noise for notifications, such as for an event on a calendar. Slide it toward the front of the iPhone to hear sounds. Slide it toward the back of the iPhone to mute all sound. When muted, you see orange in the switch.
Volume buttons—Press the upper button to increase volume; press the lower button to decrease volume. These buttons are contextual; for example, when you are listening to music, they control the music’s volume, but when you aren’t, they control the ringer volume. When you are using the Camera app, pressing either button takes a photo. You also use these in combination with the Side button to perform various actions (refer to the Side button description).
Lightning port—Use this port, located on the bottom side of the iPhone, to plug in the EarPods or connect it to a computer or power adapter using the included USB cable. There are also accessories that connect to this port. The Lightning port accepts Lightning plugs that are flat, thin, rectangular plugs. It doesn’t matter which side is up when you plug something into this port.
Speakers and microphone—At the top center of the front of the phone is the speaker you use to listen when you have the phone held against your ear. There are two speakers located along the bottom edge of the phone. When you play audio without another device (such as wireless headphones) connected to your iPhone, you hear the audio from these speakers. If you’re having a hard time hearing (because of background noise for example), holding this edge to your ear can help.
There is also a microphone located along the bottom edge that captures sound, such as during a phone conversation, when you aren’t using another device (for example, EarPods).
Accessing the Home Screens on iPhone X Models

In Chapter 1, you learned the importance of Home screens because most of the tasks for which you use your iPhone start there. On X models, you move to the Home screens by swiping up from the bottom of the screen. You see a line indicating the area from which you start your swipe; you don’t have to swipe very far to open the Home screens. Just a quick upward gesture from this line will do it.
Configuring a Passcode and Face ID
A passcode is a series of characters that must be entered on your phone to perform specific actions, the most important of which is unlocking your iPhone so you can use it. At other times, you need to enter a passcode to change settings.
You can use an iPhone without a passcode, but I strongly recommend that you always use a passcode to protect your iPhone’s data.
When you use Face ID, you don’t need to type a passcode very often. Instead, you can simply look at your iPhone’s screen; when your face is recognized, the passcode is entered for you automatically.
Face ID can also be used to enter user account information, such as usernames and passwords. So, instead of having to type your passwords, you can simply look at your iPhone to sign into accounts, or download apps.
When you first started your iPhone, you were prompted to configure a passcode and Face ID. Even if you have already configured a passcode and Face ID on your phone, you should know how to change your settings in the event you want to make updates and to ensure you’re making the most of Face ID’s capabilities.
The steps to configure a new passcode and Face ID follow; you can use very similar steps to change existing passcode and Face ID settings:
![]() Tap Settings on the Home screen to open the Settings app and then tap Face ID & Passcode.
Tap Settings on the Home screen to open the Settings app and then tap Face ID & Passcode.

Already Have a Passcode?
If your iPhone already has a passcode set, when you perform step 1, you’re prompted to enter your current passcode. When you enter it correctly, you move to the Face ID & Passcode screen, and you can make changes to the current passcode, replace the current face used for Face ID, and so on. See the Go Further sidebar, “Be Secure with Face ID,” for some tips about updating existing settings.
![]() Swipe up the screen until you see Turn Passcode On.
Swipe up the screen until you see Turn Passcode On.
![]() Tap Turn Passcode On.
Tap Turn Passcode On.

![]() Enter a six-digit passcode.
Enter a six-digit passcode.

![]() Re-enter the passcode. If the two passcodes match, the passcode is set.
Re-enter the passcode. If the two passcodes match, the passcode is set.

![]() If you’re prompted to enter your Apple ID password, do so and tap Continue.
If you’re prompted to enter your Apple ID password, do so and tap Continue.

![]() Tap Set Up Face ID.
Tap Set Up Face ID.

![]() Tap Get Started.
Tap Get Started.

![]() Look at the iPhone and position your face within the frame. When the iPhone recognizes a face being in the frame, it starts recording your face.
Look at the iPhone and position your face within the frame. When the iPhone recognizes a face being in the frame, it starts recording your face.
![]() Move your head around in a circle. As you do, the green lines around the circle on the screen fill in, which indicates the part of the image that has been successfully recorded.
Move your head around in a circle. As you do, the green lines around the circle on the screen fill in, which indicates the part of the image that has been successfully recorded.

![]() Continue moving your head in a circle until all of the green lines are filled in. When the process is complete, you see First Face ID scan complete appear on the screen.
Continue moving your head in a circle until all of the green lines are filled in. When the process is complete, you see First Face ID scan complete appear on the screen.
![]() Tap Continue. Record your face a second time.
Tap Continue. Record your face a second time.

![]() Rotate your head until the circle is enclosed by green lines. When the second image has been recorded, Face ID is now set up appears on the screen.
Rotate your head until the circle is enclosed by green lines. When the second image has been recorded, Face ID is now set up appears on the screen.

![]() Tap Done. You return to the Face ID & Passcode screen.
Tap Done. You return to the Face ID & Passcode screen.

![]() If you don’t want to use Face ID for one of the options shown in the USE FACE ID FOR section, set its switch to off (white). You’ll need to enter the related passcode or password to complete an action if you disable Face ID for that action. For example, if you don’t want to be able to use Face ID when you download apps, set the iTunes & App Store switch to off (white); you’ll need to enter your Apple ID password when you download apps, instead of using Face ID. I recommend you leave all of these options enabled to make the most of Face ID.
If you don’t want to use Face ID for one of the options shown in the USE FACE ID FOR section, set its switch to off (white). You’ll need to enter the related passcode or password to complete an action if you disable Face ID for that action. For example, if you don’t want to be able to use Face ID when you download apps, set the iTunes & App Store switch to off (white); you’ll need to enter your Apple ID password when you download apps, instead of using Face ID. I recommend you leave all of these options enabled to make the most of Face ID.
![]() Tap Other Apps (you see this only after other apps have requested and been granted permission to use Face ID).
Tap Other Apps (you see this only after other apps have requested and been granted permission to use Face ID).

![]() To prevent one of the apps listed from using Face ID, set its switch to off (white). You need to enter your user account information to work with that app.
To prevent one of the apps listed from using Face ID, set its switch to off (white). You need to enter your user account information to work with that app.
![]() Tap Back (<).
Tap Back (<).

![]() If you want to enable someone else to use Face ID with your iPhone, tap Set Up an Alternate Appearance and follow steps 8 through 14 to record the other person’s face. You could also use this to capture an alternate appearance for yourself in the event your appearance changes so dramatically that it isn’t recognized by Face ID; this would be unusual, however, since Face ID can handle changes in appearance due to changes in haircuts, cosmetic applications, or other similar changes.
If you want to enable someone else to use Face ID with your iPhone, tap Set Up an Alternate Appearance and follow steps 8 through 14 to record the other person’s face. You could also use this to capture an alternate appearance for yourself in the event your appearance changes so dramatically that it isn’t recognized by Face ID; this would be unusual, however, since Face ID can handle changes in appearance due to changes in haircuts, cosmetic applications, or other similar changes.
![]() To remove the current face being used for Face ID and replace it with a new recording, tap Reset Face ID and follow steps 8 through 14.
To remove the current face being used for Face ID and replace it with a new recording, tap Reset Face ID and follow steps 8 through 14.

Glasses or Sunglasses? Facial Hair or Clean Shaven?
If you wear glasses or sunglasses, you don’t need to create an alternate appearance. Face ID recognizes you with glasses or sunglasses on or off. Routine facial changes, such as in facial hair or different applications of makeup, won’t faze it either. It’s very unlikely that you’ll need an alternate appearance for yourself. You typically use this to allow someone else to work with your phone.
![]() If you don’t want the additional security offered by the Face ID system by verifying you’re looking at the iPhone, set the Require Attention for Face ID switch to off (white). You should usually leave this set to on (green). However, if Face ID isn’t working well, try setting this switch to off to see if Face ID works better.
If you don’t want the additional security offered by the Face ID system by verifying you’re looking at the iPhone, set the Require Attention for Face ID switch to off (white). You should usually leave this set to on (green). However, if Face ID isn’t working well, try setting this switch to off to see if Face ID works better.
![]() If you don’t want the TrueDepth camera to check for your attention before the display is dimmed or the alert volume is lowered, set the Attention Aware Features switch to off (white). When this is on (green), if you’re looking at the iPhone, the display won’t be dimmed nor will the alert volume be lowered. This is useful because the iPhone can “tell” when you are looking at it so that it won’t dim the screen or lower the volume automatically.
If you don’t want the TrueDepth camera to check for your attention before the display is dimmed or the alert volume is lowered, set the Attention Aware Features switch to off (white). When this is on (green), if you’re looking at the iPhone, the display won’t be dimmed nor will the alert volume be lowered. This is useful because the iPhone can “tell” when you are looking at it so that it won’t dim the screen or lower the volume automatically.

![]() Swipe up the screen until you see the Voice Dial switch.
Swipe up the screen until you see the Voice Dial switch.
![]() To prevent Voice Dial from working, set the Voice Dial switch to off (white). (Voice Dial enables you to make calls by speaking even if you don’t use Siri.)
To prevent Voice Dial from working, set the Voice Dial switch to off (white). (Voice Dial enables you to make calls by speaking even if you don’t use Siri.)

![]() Use the switches in the ALLOW ACCESS WHEN LOCKED section to enable or disable the related functions used when your iPhone is locked. The options include Today View (the Today section of the Notification Center), Notification Center, Control Center, Siri, Reply with Message, Home Control, Wallet, Return Missed Calls, and USB Accessories. If you set a switch to off (white), you won’t be able to access the corresponding function when your iPhone is locked.
Use the switches in the ALLOW ACCESS WHEN LOCKED section to enable or disable the related functions used when your iPhone is locked. The options include Today View (the Today section of the Notification Center), Notification Center, Control Center, Siri, Reply with Message, Home Control, Wallet, Return Missed Calls, and USB Accessories. If you set a switch to off (white), you won’t be able to access the corresponding function when your iPhone is locked.
![]() If you want the iPhone to automatically erase all your data after an incorrect passcode has been entered 10 times, set the Erase Data switch to on (green) and tap Enable at the prompt (not shown in the figure).
If you want the iPhone to automatically erase all your data after an incorrect passcode has been entered 10 times, set the Erase Data switch to on (green) and tap Enable at the prompt (not shown in the figure).

Using Face ID
You can use Face ID to quickly, easily, and securely provide a password or passcode in many different situations, such as unlocking your iPhone, downloading apps from the App Store, signing into an account in a banking or other app, and just about any other situation in which you need to confirm your identify.
The First Time
The first time you do something after Face ID is enabled, such as downloading an app, you might still be prompted to enter your Apple ID or other password. The next time you perform that action, you can use Face ID to complete it.

For example, to download an app using Face ID, move to the app’s screen in the App Store app and tap Get (or the price if there is a license fee). At the prompt, press the Side button twice and look at the phone. When your face is recognized, the app is downloaded and installed. Most of the time, you won’t see the Face ID prompt as shown in the figure because you’re already looking at the screen and so the action happens automatically. If you see this prompt, look more directly at your iPhone’s screen to complete the action.
Using Face ID in other situations is similar. If you see the Face ID prompt, look at the phone. In other cases, you won’t see the prompt and the action you’re performing is completed as soon as your face is recognized.
The First Time, Part 2
The first time you sign into an app, such as a banking app, that supports Face ID, you’re prompted to allow that app to use Face ID to enter your password. If you allow it, you can sign into the app by just looking at the phone on the log-in screen. If you don’t allow it, you need to manually enter the password to be able to access your account.
Sleeping/Locking and Waking/Unlocking Your iPhone X Model
As you learned in Chapter 1, you can manually lock your iPhone, which also puts it to sleep. It’s a good idea to do this when you aren’t using your phone to both save battery power and secure your information. (You can configure this to happen automatically as explained in Chapter 7.)
To put your iPhone to sleep and lock it, press the Side button. The screen goes dark and the phone locks.

When an iPhone is asleep/locked, you need to wake it up to use it. You can do this in several ways: touch the screen, press the Side button, or raise the iPhone. (See Chapter 7 to learn how to enable or disable this Raise to Wake feature.) The Lock screen appears. If you are looking at the phone, it also unlocks immediately. On the Lock screen, you can tell if the phone is locked or unlocked by the Lock icon.
After your iPhone is unlocked, swipe up from the bottom of the screen. You move back to the screen you most recently used. For example, if you were using the Safari app right before your phone locked, you move back to that app.
No Face ID?
If you don’t have Face ID configured, you can wake your phone in the same ways. However, your phone remains locked. To use it, swipe up from the bottom of the screen. You’re prompted to enter your passcode. If you enter it successfully, you move to the screen you were most recently using.
No Passcode?
If you don’t have a passcode configured, which is not recommended, you can wake your phone and swipe up from the bottom of the screen to move to the screen you were most recently using.
Turning Your iPhone X Model Off or On

You seldom need to turn your iPhone off, but you might want to shut if off if you aren’t going to be using it for a while or for troubleshooting purposes.
To turn your iPhone off, press and hold the Side button and either Volume button. Several sliders appear on the screen; swipe the top slider to the right. The phone turns off.
To restart your iPhone, press and hold the Side button until the Apple logo appears on the screen, and then let go of the button.
After it starts up, you see the Lock screen. To use the phone, swipe up from the bottom of the screen. Assuming you have a passcode, you see the Enter Passcode screen. Enter your passcode to start using your phone; once your passcode is entered correctly, you move to the Home screen. (Even if you have Face ID enabled to unlock your phone, you must enter your passcode the first time you unlock it after a restart.)
Getting Started with iPhone SE, 6s, 6s Plus, 7, 7 Plus, 8, or 8 Plus Models
While these models might not be the newest generation, they are certainly packed with amazing capabilities. The primary distinguishing physical feature of these models compared to the X models is the presence of the Touch ID/Home button. Because of this button, the screens on these models are smaller relative to their case size than the X models.
This group also has a large range in physical size with the SE being the smallest and the 7 Plus and 8 Plus being the largest of this group.
Getting to Know the SE, 6s, 6s Plus, 7, 7 Plus, 8, or 8 Plus Model’s External Features

Non-X models have the following physical features:
Cameras—All of the non-X models have a camera on the frontside that you usually use to take selfies (you can use it for any kind of photo or video you want to take).
These models also have at least one camera on the backside; different models have different configurations of backside cameras that provide a variety of photographic capabilities.
The SE, 6s, 6s Plus, 7, and 8 have a single backside camera that provides wide shot capability.
The 7 Plus and 8 Plus have two backside cameras that provide wide and telephoto zoom functions.
You usually use the backside cameras to take photos and video of, well, anything you want.
These models have cameras of different quality, with the later models having higher quality cameras than earlier models. For example, the 8 Plus has higher quality cameras than does the 6s Plus.
Side button—Press this button (on the SE, this is called the Sleep/Wake button and is located on the top of the phone instead of on the side) to lock the iPhone’s screen and put it to sleep. Press it again to wake the iPhone from Sleep mode. You also use this button to shut down the iPhone and to power it up.
Mute switch—This switch determines whether the iPhone makes sounds, such as ringing when a call comes in or making the alert noise for notifications, such as for an event on a calendar. Slide it toward the front of the iPhone to hear sounds. Slide it toward the back of the iPhone to mute all sound. When muted, you see orange in the switch.
Volume—Press the upper button to increase volume; press the lower button to decrease volume. These buttons are contextual; for example, when you’re listening to music, they control the music’s volume, but when you aren’t, they control the ringer volume. When you’re using the Camera app, pressing either button takes a photo.
Lightning port—Use this port, located on the bottom side of the iPhone, to plug in the EarPods or connect it to a computer or power adapter using the included USB cable. Some accessories also connect to this port. The Lightning port accepts Lightning plugs that are flat, thin, rectangular plugs. It doesn’t matter which side is up when you plug something into this port.
Headphone jack (some models)—Some earlier models have a standard 3.5 mm jack that can be used for headphones (such as the older EarPods) and powered speakers. Most models don’t have this and instead use the Lightning port to connect to other devices, including EarPods.
Touch ID/Home button—This button provides multiple functions.
The Touch ID sensor recognizes your fingerprint, so you can simply touch it to unlock your iPhone, sign in to the iTunes Store, use Apple Pay, and enter your password in Touch ID-enabled apps.
You also use it for several other actions, such as waking and unlocking your phone, moving to the Home screens, opening the App Switcher, and opening the magnifier.
Speakers and microphone—At the top center of the front of the phone is the speaker you use to listen when you have the phone held against your head. There are two speakers located along the bottom edge of the phone. When you play audio without another device (such as wireless headphones) connected to your iPhone, you hear the audio from these speakers. If you’re having a hard time hearing (because of background noise for example), holding this edge to your ear can help.
There is also a microphone located along the bottom edge that captures sound, such as during a phone conversation, when you aren’t using another device (for example, EarPods).
Accessing the Home Screens on iPhone SE, 6s, 6s Plus, 7, 7 Plus, 8, or 8 Plus Models

In Chapter 1, you learned the importance of Home screens because most of the tasks for which you use your iPhone start there. On non-X models, you move to the Home screens by pressing the Touch ID/Home button. You move back to the Home screen you were using most recently.
Configuring a Passcode and Touch ID
A passcode is a series of characters that must be entered on your phone to perform specific actions, the most important of which is unlocking your iPhone so you can use it. At other times, you need to enter a passcode to change settings.
Although you can use an iPhone without a passcode, I strongly recommend that you always use a passcode to protect your iPhone’s data.
While typing a passcode is fairly quick and easy, when you use Touch ID, you don’t need to do that very often. (A passcode is always required when you restart your iPhone). Instead, you can simply touch the Touch ID/Home button and the passcode is entered for you automatically.
Touch ID can also be used to enter user account information, such as usernames and passwords. So, instead of having to type your passwords, you can touch the Touch ID/Home button to sign into accounts, download apps, or in just about any other situation in which you need to verify your identity.
When you first started your iPhone, you were prompted to configure a passcode and Touch ID. Even if you have already configured a passcode and Touch ID on your phone, you should know how to change your settings in the event you want to make updates and to ensure you are making the most of Touch ID’s capabilities.
The steps to configure a new passcode and Touch ID follow; you can use very similar steps to change existing passcode and Touch ID settings:
![]() Tap Settings on the Home screen to open the Settings app; then tap Touch ID & Passcode.
Tap Settings on the Home screen to open the Settings app; then tap Touch ID & Passcode.

![]() Tap Turn Passcode On.
Tap Turn Passcode On.

![]() Enter a six-digit passcode.
Enter a six-digit passcode.

Already Have a Passcode?
If your iPhone already has a passcode set, when you perform step 1, you’re prompted to enter your current passcode. When you enter it correctly, you move to the Touch ID & Passcode screen, and you can make changes to the current passcode, replace the current fingerprints used for Touch ID, add new fingerprints, and so on. See the Go Further sidebar, “Be Secure with Touch ID,” for some tips about updating existing settings.
![]() Re-enter the passcode. If the two passcodes match, the passcode is set.
Re-enter the passcode. If the two passcodes match, the passcode is set.

![]() If you have an Apple ID configured and are prompted to confirm it, enter your Apple ID password; if you don’t have an Apple ID configured or aren’t prompted to confirm it, skip to step 7.
If you have an Apple ID configured and are prompted to confirm it, enter your Apple ID password; if you don’t have an Apple ID configured or aren’t prompted to confirm it, skip to step 7.
![]() Tap Continue.
Tap Continue.

![]() Tap Require Passcode; when you use Touch ID to unlock your iPhone, you don’t have an option for when the passcode is required, so if you’re going to or already use Touch ID, skip to step 10.
Tap Require Passcode; when you use Touch ID to unlock your iPhone, you don’t have an option for when the passcode is required, so if you’re going to or already use Touch ID, skip to step 10.

![]() Tap the amount of time the iPhone is locked before the passcode takes effect. The shorter this time is, the more secure your iPhone is, but also the more frequently you’ll have to enter the passcode if your iPhone locks frequently.
Tap the amount of time the iPhone is locked before the passcode takes effect. The shorter this time is, the more secure your iPhone is, but also the more frequently you’ll have to enter the passcode if your iPhone locks frequently.
![]() Tap Back (<).
Tap Back (<).

![]() Tap Add a Fingerprint.
Tap Add a Fingerprint.

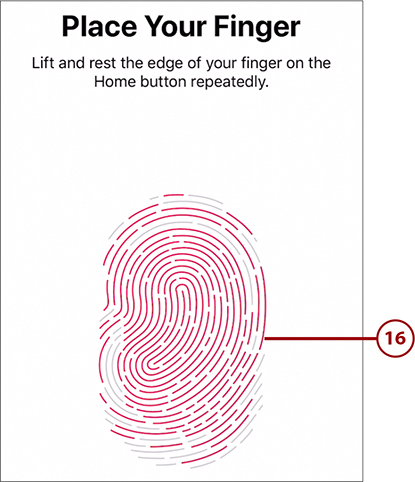
![]() Touch the finger you want to record to the Touch ID/Home button, but don’t press it. An image of a fingerprint appears.
Touch the finger you want to record to the Touch ID/Home button, but don’t press it. An image of a fingerprint appears.
![]() Leave your finger on the Touch ID/Home button until you feel the phone vibrate, which indicates part of your fingerprint has been recorded. The parts of your fingerprint that are recorded are indicated by the red segments; gray segments are not recorded yet. This step captures the center part of your finger.
Leave your finger on the Touch ID/Home button until you feel the phone vibrate, which indicates part of your fingerprint has been recorded. The parts of your fingerprint that are recorded are indicated by the red segments; gray segments are not recorded yet. This step captures the center part of your finger.

![]() Lift your finger off the Touch ID/Home button and touch the button again, adjusting your finger on the button to record other parts that currently show gray lines instead of red ones. Other segments of your fingerprint are recorded.
Lift your finger off the Touch ID/Home button and touch the button again, adjusting your finger on the button to record other parts that currently show gray lines instead of red ones. Other segments of your fingerprint are recorded.

![]() Repeat step 13 until all the segments are red. You’re prompted to change your grip so you can record more of your fingerprint.
Repeat step 13 until all the segments are red. You’re prompted to change your grip so you can record more of your fingerprint.
![]() Tap Continue.
Tap Continue.

![]() Repeat step 13, again placing other areas of your finger to fill in more gray lines with red. This step captures the fingerprints more toward the edges of your fingers. When the entire fingerprint is covered in red lines, you see the Complete screen.
Repeat step 13, again placing other areas of your finger to fill in more gray lines with red. This step captures the fingerprints more toward the edges of your fingers. When the entire fingerprint is covered in red lines, you see the Complete screen.
![]() Tap Continue. The fingerprint is recorded and you move back to the Touch ID & Passcode screen. You see the fingerprint that has been recorded.
Tap Continue. The fingerprint is recorded and you move back to the Touch ID & Passcode screen. You see the fingerprint that has been recorded.

![]() Tap the fingerprint you recorded.
Tap the fingerprint you recorded.

![]() Give the fingerprint a name.
Give the fingerprint a name.
![]() Tap Touch ID & Passcode (<).
Tap Touch ID & Passcode (<).

![]() Repeat steps 10–20 to record up to five fingerprints. These can be yours or someone else’s if you want to allow another person to access your iPhone.
Repeat steps 10–20 to record up to five fingerprints. These can be yours or someone else’s if you want to allow another person to access your iPhone.
![]() To be able to use Touch ID to unlock your iPhone, ensure the iPhone Unlock switch is set to on (green).
To be able to use Touch ID to unlock your iPhone, ensure the iPhone Unlock switch is set to on (green).
![]() If it isn’t enabled already and you want to also be able to enter your Apple ID password by touching your finger to the Touch ID/Home button, set the iTunes & App Store switch to on (green). You need to enter your Apple ID password and tap Continue to complete this configuration.
If it isn’t enabled already and you want to also be able to enter your Apple ID password by touching your finger to the Touch ID/Home button, set the iTunes & App Store switch to on (green). You need to enter your Apple ID password and tap Continue to complete this configuration.
![]() To use your fingerprint to make Apple Pay payments, set the Apple Pay switch to on (green).
To use your fingerprint to make Apple Pay payments, set the Apple Pay switch to on (green).
![]() To enable your passwords for various accounts to be entered with Touch ID, set the Password Autofill switch to on (green).
To enable your passwords for various accounts to be entered with Touch ID, set the Password Autofill switch to on (green).

Using Touch ID-Aware Apps
Apps that require you to sign into accounts can also use Touch ID to make signing in easier. When you have at least one app that uses Touch ID, you see the Other Apps option on the Touch ID & Passcode screen. Tap Other Apps to enable or disable Touch ID for those other apps.
![]() Swipe up the screen until you see the Voice Dial switch.
Swipe up the screen until you see the Voice Dial switch.
![]() To prevent Voice Dial from working, set the Voice Dial switch to off (white). (Voice Dial enables you to make calls by speaking even if you don’t use Siri.)
To prevent Voice Dial from working, set the Voice Dial switch to off (white). (Voice Dial enables you to make calls by speaking even if you don’t use Siri.)
![]() Use the switches in the ALLOW ACCESS WHEN LOCKED section to enable or disable the related functions when your iPhone is locked. The options include Today View (the Today section of the Notification Center), Notification Center, Control Center, Siri, Reply with Message, Home Control, Wallet, Return Missed Calls, and USB Accessories. If you set a switch to off (white), you won’t be able to access the corresponding function when your iPhone is locked.
Use the switches in the ALLOW ACCESS WHEN LOCKED section to enable or disable the related functions when your iPhone is locked. The options include Today View (the Today section of the Notification Center), Notification Center, Control Center, Siri, Reply with Message, Home Control, Wallet, Return Missed Calls, and USB Accessories. If you set a switch to off (white), you won’t be able to access the corresponding function when your iPhone is locked.
![]() If you want the iPhone to automatically erase all your data after an incorrect passcode has been entered 10 times, set the Erase Data switch to on (green).
If you want the iPhone to automatically erase all your data after an incorrect passcode has been entered 10 times, set the Erase Data switch to on (green).

![]() Tap Enable.
Tap Enable.

Using Touch ID
You can use Touch ID to quickly, easily, and securely provide a password or passcode in many different situations, such as unlocking your iPhone, downloading apps from the App Store, or signing into an account in a banking or other app.
The First Time
The first time you do something after Touch ID is enabled, such as downloading an app, you might still be prompted to enter your Apple ID or other password. The next time you perform that action, you can use Touch ID to complete it (no password required).

For example, to download an app using Touch ID, move to the app’s screen in the App Store app and tap Get (or the price if there is a license fee). At the prompt, touch the Touch ID/Home button. When your fingerprint is recognized, the app is downloaded and installed.
Using Touch ID in other situations is similar. When you see the Touch ID prompt, simply touch the Touch ID/Home button.
The First Time, Part 2
The first time you sign into an app, such as a banking app, that supports Touch ID, you’re prompted to allow that app to use your Touch ID to enter your password. If you allow it, you can sign into the app by touching the Touch ID/Home button. If you don’t allow it, you need to manually enter the password to be able to access your account.
Sleeping/Locking and Waking/Unlocking iPhone SE, 6s, 6s Plus, 7, 7 Plus, 8, or 8 Plus Models
As you learned in Chapter 1, you can manually lock your iPhone, which also puts it to sleep. It’s a good idea to do this when you aren’t using your phone to both save battery power and secure your information. (You can configure this to happen automatically as explained in Chapter 7.)
To put your iPhone to sleep and lock it, press the Side button. The screen goes dark and the phone locks.

To wake up and unlock the phone, press and hold on the Touch ID/Home button for a second or so. The phone wakes up and unlocks and you move to the screen you were most recently using. For example, if you were using Podcasts when the phone locked, you return to the Podcasts app when the phone unlocks.
If you don’t use your iPhone for a while, it automatically goes to sleep and locks according to the preference you have set for it (this is covered in Chapter 7).
No Touch ID?
If you don’t have Touch ID configured, you can wake your phone in the same ways. However, your phone remains locked. To use it, press the Touch ID/Home button. You’re prompted to enter your passcode. If you enter it successfully, you move to the screen you were most recently using.
No Passcode?
If you don’t have a passcode configured, which is not recommended, you can wake your phone by pressing the Touch ID/Home button to move to the screen you were most recently using.
Turning Your iPhone SE, 6s, 6s Plus, 7, 7 Plus, 8, or 8 Plus Model Off or On

You seldom need to turn your iPhone off, but you might want to shut if off if you aren’t going to be using it for a while or for troubleshooting purposes.
To turn your iPhone off, press and hold the Side button (the Sleep/Wake button on an SE) and either Volume button. Sliders appear on the screen; swipe the top slider to the right. The phone turns off.
To restart your iPhone, press and hold the Side button (Wake/Sleep button on an SE) until the Apple logo appears on the screen, and then let go of the button.
After it starts up, you see the Lock screen. To use the phone, press the Touch ID/Home button. Assuming you have a passcode, you see the Enter Passcode screen. Enter your passcode to start using your phone; once your passcode is entered correctly, you move to the Home screen. (Even if you have Touch ID enabled to unlock your phone, you must enter your passcode the first time you unlock it after a restart.)
Using the Split-Screen on iPhone 11 Pro Max, Xs Max, or Plus Models
The largest models of iPhone, including the 6s Plus, 7 Plus, 8 Plus, Xs Max, and 11 Pro Max, offer the split-screen feature in many apps (although not all apps support this function). To activate split-screen, rotate your iPhone so it’s in the landscape orientation. When you’re using an app that supports this feature, the screen splits automatically.

In split-screen mode, the screen has two panes. The left pane is for navigation, whereas the right pane shows the content selected in the left pane. The two panes are independent, so you can swipe up and down on one side without affecting the other.
You can browse the left pane to find what you want to work with. When you select that, its content appears in the right pane. For example, in the Settings app, you select a setting in the left pane and can use its controls in the right pane just as if you were using the phone in the single screen mode.

Split-screen makes it very easy to navigate because you can more easily and quickly jump to different areas by using the left pane (as opposed to having to tap Back (<) one or more times to change what you want to work with).
In some apps that support this functionality, there is an icon you can use to open or close the split screen. This icon changes depending on the app you’re using. For example, in the Mail app, you tap the Full Screen icon (two arrows pointing diagonally away from each other) to open or close the left pane.
Preinstalled apps that support this functionality include Settings, Mail, and Messages. Try rotating your phone with the apps you use to see if they support split-screen.

When you hold a Plus model horizontally and move to the Home screen, the Dock moves to the right side of the screen, and you see the Home screen’s pages in the left part of the window. Though this looks a bit different, it works the same as when you hold an iPhone vertically.