CHAPTER 15 Performance and Process Optimization
This chapter outlines some of the ways in which you can improve the speed, efficiency, and architecture of your portlet applications. A number of techniques are discussed: caching, data set size, builder calls, session size, profiling, Ajax, and Dojo. Also, an example at the end of the chapter demonstrates how to optimize the portlet development process by creating your own builder and new model wizard. By the end of the chapter, you will be aware of a family of techniques that should help you improve your portlets in a variety of different environments and conditions.
Each of the files in this chapter is available for download from ibmpressbooks.com/title/9780137134465 under the Chapter 15 folder (instructions for copying these files into your project are included in a readme.txt file in the same folder); however, to increase your understanding of the topics discussed, it is recommended that you create these files yourself by following the example in this chapter.
The following topics are covered in this chapter:
• Performance
• Custom builders
• Creating a new model wizard
Performance
This section discusses some common ways to improve performance in your WebSphere Portlet Factory (WPF) applications. Many of these suggestions do not apply in every scenario, so if you have a particular WPF application in mind—or a particular development scenario—feel free to skip to the sections more relevant to your requirements.
Caching
You can cache the output of specific actions in WPF by using the Cache Control builder. This builder is useful in scenarios where you have many users performing the same actions that produce the same results. Where the results are different for each user, you need to rerun the action each time.
If the results change over time but are the same for every user, then you should still consider using a Cache Control builder. In this scenario, you need to set the builder’s ‘Refresh Interval (secs)’ input so that the results from the builder are suitably up to date (this will, of course, be different in every scenario). In some scenarios, even a slight inaccuracy in the method’s output is unacceptable, so in these cases you should not use the Cache Control builder.
Several of the other WPF builders also have built-in caching features. For example, the Service Operation builder has a section called Result Caching that caches the results of the operation (this actually does the same thing as a Cache Control builder that points to the service operation call). Similarly, the Lookup Table builder has a ‘Refresh interval (secs)’ input that lets you configure when the contents of the Lookup Table should be updated. There is no difference in the caching used between these builders; however, in some cases, you may find it more convenient to use the built-in caching of certain builders instead of a Cache Control builder (for example, if you already have a Service Operation builder, you can cache its results directly from the builder call without having to add a Cache Control builder). Having said this, if you are making extensive use of caching, you might want to use Cache Control builders so that you can easily see where all of your model’s caching settings are.
A caveat worth noting is that cached data is profile-specific, which means that every different profile-model combination has its own cache. This probably won’t be a problem in most scenarios, but you should at least be aware that as the number of different profile-model combinations in your application increases, so do the corresponding memory requirements. Because of this, you should try to cache non-profiled models instead of profiled models wherever possible (although the degree to which you can do this depends on the requirements of your application).
Data Set Size
Retrieving large data sets can be slow and memory-intensive, particularly if the data isn’t cached and you have a lot of concurrent requests. Of course, if the performance of data retrieval is an issue, you can (and should) use the Cache Control builder on your data retrieval methods, but there are some other steps you can take to make your data source calls smarter. For example, you can increase the performance of data retrieval operations by reducing the size of the data sets returned (such as by only returning customers relevant to the current user, rather than returning an entire database of customers). In other words, any queries to your data should be as restrictive as possible, and you should design your interfaces in such a way that users don’t have to sift through unwanted data.
After you have done this, if you are still returning large data sets that have an impact on system performance, you should look at paging your data (pagination is covered in Chapter 5, “Customizing Portlet Appearance”). With pagination, you can opt to fetch your data in small chunks rather than all at once, which can greatly speed up your applications. For example, the SQL Statement builder has a Fetch Size input for this purpose, and the Domino Data Access builder has a Fetch Subsets of Data input for partial retrieval of Domino data. Alternatively, you can also write a custom data retriever in Java by extending the com.bowstreet.builders.webapp.methods.CustomDataRetriever class (an example using this approach is available on the Portlet Factory wiki page).
Builder Calls
As a general rule, the more builders in your model, the more strain you put on system resources, and large models (containing 50 builders or more) can definitely slow down your applications and make them harder to maintain. To prevent this from happening, try to separate your builder calls into different models wherever possible, and use backend processes to replace builder functionality where appropriate. For example, it is better to run a backend Java method or Domino agent to finalize changes to a new record rather than run a WPF Method directly from the front end (which the user has to wait for). Keep in mind, also, that whenever WebApps regenerate in your project the builders need to run their generation routines, and the more of these that you have, the more of an effect it will have on performance.
If you have problems with the execution or regeneration times of your models, you can use WPF’s debug tracing features to pinpoint problem areas. To do this, set the log4j.logger.bowstreet.system.modelActions property in the log4j.properties file to DEBUG level, and when you run the application, look at the corresponding metrics in the debugTracing.txt file (for more information on logging, see Chapter 14).
Session Size
User session size can be a contributor to poor performance, but there are a number of things you can do to prevent session sizes from spiraling out of control. The first is to reduce the use of variables that store large values that differ for each user. If your variables actually refer to constants, for example, you can mark your variables as ‘Shared (read-only)’, which prevents every user from having their own copy of the variable (of course, this is not always desirable).
Also, consider marking variables as request scoped rather than session scoped, which prevents the variable from being stored in the session. This is useful when your variable data is not needed across more than request; however, if the data is the same across all users, you should use the ‘Shared (read-only)’ option instead. The effect of this is most noticeable when working with XML variables. Note that you should not use request scope for XML variables that are used in multiple requests if the XML is hard coded into the builder, as this can result in the creation of separate copies of the XML data, and these copies are initialized every time the variable is used. If the XML is not hard coded into the builder, it is useful to use request scope if the data is to be retrieved dynamically and discarded after each request.
When designing WPF applications to reduce session size, you should also consider profiling. If you set user variables based on profiles, then you can share variables with all users in a given profile, rather than as session variables that differ for each user. For example, if admin users always have a particular set of parameters on a certain screen in your UI, you can set those parameters in variables marked as ‘Shared (read-only)’ with a value assigned by an admin profile. This still allows different users to have different settings, but the settings are based on profiles and shared across all users within each profile (for more information on profiling, read the “Profiling” section later in this chapter).
Session Tracing
If you are concerned about session size in your application, you can enable session tracing to find out how big your sessions actually are. To do this, open the bowstreet.properties file and change the bowstreet.diagnostic.trace.enabled property to true. Then uncomment and set the bowstreet.diagnostic.trace.sessionSize.interval to 1. This causes session information to be logged to the sessionsize.csv file in the logs directory of your deployed application every second, so every request will log session information (provided that at least one of the session variables changes). You can leave the bowstreet.diagnostic.trace.sessionSize.userName property blank. Restart the application server and then run your application to kick off the trace, recreating any potentially high-load scenarios that you would like to test.
A few caveats about session tracing should be noted:
• Running session tracing for long periods of time can affect performance (particularly if your sessionSize.interval is set to log information every second), so you should disable session tracing after you have gathered the desired information. To disable session tracing, set the bowstreet.diagnostic.trace.enabled property in the bowstreet.properties file to false, and then restart the application server.
• To ensure accurate metrics when running session tracing, it is important that only a single user accesses the traced application while the trace occurs.
After you have run your session tracing, check the contents of the sessionsize.csv file. The output is split into several columns, which are described in Table 15.1.
Table 15.1 Columns Used in the sessionsize.csv File
The Size metric is computed by counting the actual size of the object in memory, whereas the StringSize metric is computed by counting the number of characters returned by the toString method. Although these sizes are similar in many cases, there may be discrepancies for certain types of variables. In particular, in memory XML data is often much larger than the XML strings returned from the toString method (XML variables take up more space than String variables, so you shouldn’t use XML for simple single value strings).
The Scope metric provides a code that corresponds to a particular variable scope. The possible variable scopes are included in Table 15.2. Note that only variables with a scope of 0 or 1 are stored in the user session, so these are the only variables you need to be concerned about when analyzing session size.
Table 15.2 Variable Scopes Listed in the sessionsize.csv File
Profiling
The “Caching” section of this chapter has already outlined some potential performance issues with regard to using caching inside profiled models, but when using profiling in your WPF applications, you should also keep in mind how the profiling mechanism works behind the scenes—it creates separate WebApps depending on the values in your profiles. Because some WebApps can be quite memory-intensive, a large number of profiles can put strain on system resources, so you should try to keep the number of profiles to a minimum. In particular, you should avoid creating separate WebApps for every different user setting, which you might inadvertently do if you have an Edit mode in your portlet and you have allowed users to edit their own profiles (you can add an Edit mode to your portlet from the Portlet Adapter builder). If you are allowing users to edit their profiles, you should set the Execution Time field on your Profile Entries to true, which differentiates runtime values from values that require a separate WebApp. For more information on profiling in general, see Chapter 1, “Introduction to WebSphere Portlet Factory,” and for an example using profiling, see Chapter 12, “Profiling Portlets.”
Using Ajax and Dojo
Adding Ajax and Dojo to your portlets can improve performance and increase the usability and interactivity of your applications. For example, partially refreshing a page saves the entire portal page from reloading, when all you might want to do is kick off a server process or update a list on the screen. The main reason Ajax controls are used, however, is to increase interactivity, which they do by dynamically reacting to certain events (for example, a user clicking a button to open a Dojo dialog without reloading the page), which might otherwise be difficult or clumsy to implement without Ajax.
Keep in mind, however, that in some cases Ajax controls can actually decrease performance. For example, if you add Dojo dialog boxes to a form, which in turn, open large and complex forms that take a while to load, you may find that the time taken to initially load the page noticeably increases. If you have several different dialog boxes on a single page, then you might find that the performance hit increases to an unacceptable level, and you may have to look at providing the same functionality by other means (for example, by using page tabs). When using Ajax and Dojo, then, it is a good idea to performance test your applications under the slowest conditions in which they will be used and determine whether the applications are still usable at that speed.
Custom Builders
Custom builders enable you to extend the core WPF builder set with builders that are more suited to the unique demands of your development environment. Custom builders can be used to do anything from add a UI control to a page, to add entire models or Java classes to your WPF projects. If you find yourself using the same set of builders over and over again, you may decide to collate these builders into a single, high-level builder that will automate the process of adding that set of builders (custom builders can be used to call and create other builders). You may also decide to create builders to introduce new functionality, such as a builder to automatically implement a security mechanism used in your organization.
Custom builders benefit the development process in a number of ways:
• They help to automate the development process. Of course, it is likely that you will not be able to automate every aspect of the development process, but there is certainly room for a custom builder whenever you are faced with tasks that need to be performed more than once.
• They enable you to enforce architectural standards across a development team. For example, a custom builder can be used to create Java class skeletons or add UI controls in a particular way.
• Custom builders have a wizard-based interface so they are easy to use, which reduces the skill level required to use them. This is the case when custom builders are used to write Java code.
• Although there is an initial time commitment required to create a custom builder, after the builder is created, it is generally faster to use the custom builder than the methods that the custom builder replaces. As a result, custom builders can save developers a significant amount of time.
• Development with custom builders is less error prone than traditional development methods, as the process is mostly automated (of course, this also depends on the quality and power of the builder).
• Custom builders encourage reusability.
The rest of this chapter walks you through the process of creating a custom builder and a custom new model wizard. Both of these are used to create an information portlet, which displays information for a portal belonging to a fictional company. The builder automatically adds a link to an HTML page, which opens a terms and conditions page. The terms and conditions page contains some default text, but developers are also able to configure this text from the builder. The page also contains a Back button to navigate back to the original page. After the portlet is complete, a new model wizard is created so that the information portlet is added as one of the possible options when users create a new model, showing you just how easy it is to automatically add large amounts of functionality with a new model wizard. A screenshot of the custom builder is shown later in this chapter in Figure 15.2, and a screenshot of the new model wizard is shown in Figure 15.6. The finished portlet is shown in Figure 15.5.
Before you proceed with this section, you need a WPF project to house the model for the information portlet. If you have a project from a previous chapter, you can use it; otherwise, you should create a new WPF project (for more information on creating projects, see Chapter 1). The project will be published as a WAR file and deployed to a portal server, and you should also deploy the application to a local application server for testing (you can use the portal server if it runs on your local machine; otherwise, it is recommended that you use the IBM WebSphere Application Server Community Edition server [WAS CE] that comes with WPF).
After you have a project set up, you need to add the information model. This model uses the following builders to provide its functionality:
• Action List
• Page
• Portlet Adapter
• Terms & Conditions
The Terms & Conditions builder doesn’t exist yet, but you will create it as you progress through this section.
Creating a Model
Create a new model called information in your project, under the folder WEB-INF/models/chapter15. The model should be based on the Main and Page template, using a Page Type of Simple Page. For more information on creating models, see the example in Chapter 1. After it is created, your model should have two builders in it: an Action List called main and a Page called page1. The Action List runs automatically whenever the model is run and opens the page1 Page.
Modifying the Page
Open the Page builder, and change the contents of the Page Contents (HTML) input to the HTML listed here:
<html>
<body>
<div align=”center”>
<div style=”font:12pt Arial;font-weight: bold;color:
#336699”>Welcome!</div>
<br>
Welcome to the Acme portal. Use this portal to manage
your account, get the latest information on our
products, or browse our online store.
<br>
<br>
<span name=”terms”></span>
</div>
</body>
</html>
This page displays a simple information message to the screen. The terms span tag is replaced with a link created by the Terms & Conditions builder. Save the builder call when you are finished.
Adding a Portlet Adapter
Add a Portlet Adapter builder call to the model by selecting Portlet Adapter from the Builder Palette (you can open the Builder Palette by clicking the ![]() icon in Outline view) and pressing OK. This will surface the information model as a portlet on the portal server specified in your deployment configuration. Change the name of the Portlet Adapter to
icon in Outline view) and pressing OK. This will surface the information model as a portlet on the portal server specified in your deployment configuration. Change the name of the Portlet Adapter to information, and then change the Portlet Title to Information. Also, change the Portlet Description to This portlet displays information on the portal. This builder surfaces your model to the portal server as a portlet called Information. Save the builder call when you are finished.
Creating a Terms & Conditions Builder
The next step is to create the Terms & Conditions builder. Builders are actually comprised of XML definition files and Java code on the backend, but you don’t need to create these artifacts manually—in fact, you can use another builder (the Builder Skeleton) to do the work for you! Before you do this, you should create a new model to house the Builder Skeleton. You may want to recreate or reconfigure the builder later, and it is clearer if you do this from a dedicated builder creation model rather than from inside the information model.
Add a new, empty model to your project under the WEB-INF/models/chapter15 folder, and call it builderTermsAndConditions. Next, add a Builder Skeleton builder to the model. After you configure this builder call and save it, WPF creates the necessary builder definition and class files based on your settings (or, it updates them if they already exist).
Open the dropdown for the Builder Type input, and notice that there are four types of builders you can create (these types are briefly described in Table 15.3). In this section, you create a Page Control Builder because you want to be able to place content onto an HTML page. Select Page Control Builder for the Builder Type input, and notice that some of the other inputs in the builder (such as the Description) are automatically populated.
Table 15.3 Builder Types
Specify the ID for the builder as com.ibm.builders.TermsAndConditions. This ID uniquely identifies the builder and also determines the value used for the Builder Class input, which holds the name of the Java class that provides the builder’s functionality. Now, enter a Readable Name of Terms & Conditions, which is the actual name of the builder as it appears in the Model Editor and Outline view. For the mandatory Description input (this is different to the Description input at the top of the builder, which explains the builder type), enter This builder adds a link which opens a terms and conditions page. This description displays under the builder title when developers are using the custom builder in the Model Editor.
Underneath the Builder Class input is a checkbox for generating a coordinator. A coordinator in WPF is a Java class that lets you dynamically update a builder’s interface. In this example, you use a coordinator to show and hide an input that accepts custom terms and conditions. Enable the Generate Coordinator checkbox, and you should see the Coordinator Class input filled in with the value com.ibm.builders.TermsAndConditionsCoordinator.
The next checkbox enables you to generate a helper, which is essentially a utility class that can be called from your custom builder class. Helpers are useful when you are dealing with complex functionality that you don’t want to store in the builder class itself. In this case, you don’t need a helper, so leave the Generate Helper box unchecked.
The Category input defines the category under which your builder will display in the Builder Palette. Select Custom Builders. Leave the Help File input blank, as you will not provide a help file for the builder in this example (for future builders, you can create HTML pages based on the existing WPF help pages, copy them into your project, and link to them from this input). Also, leave the Required Version input with the default value of 5.6.0, which is the minimum version required to use your custom builder. If your custom builder uses other builders that are available only in certain versions of WPF (such as the Dojo builders, which are available only in versions of WPF later than 6.0.1), then you need to change the value of this input to the appropriate version.
The final input in the main section of the Skeleton Builder is for generating a builder API. This checkbox creates a Java class with the required get and set methods for each input in the custom builder, essentially enabling you to override the way WPF stores and retrieves these values. By default, each builder gets and sets its data based on the type of input used (String, XML, Date), which, in most cases, is all you need. However, you might want to modify this mechanism if you want your builder to be callable from other custom builders. For example, in the code later in this section, you will see how to access the builder API of the Button builder; if you generate a builder API for your custom builder, then you can access the builder from other builders in the same way. You can leave the checkbox disabled for the current example. Don’t save the builder call yet, as you still have to define the builder inputs themselves.
Defining Builder Inputs for the Custom Builder
The final area of customization for the Builder Skeleton is the Builder Inputs section at the bottom of the builder, which is, of course, where you need to specify all your builder inputs. In the Name section of the builder call, you can already see an input for PageLocation as a result of selecting the Page Control Builder for the Builder Type earlier in this section. For this builder, you need to define several other inputs as well, so add some extra inputs as shown in Figure 15.1 (make sure they are in the right order, as this order defines the order in which they appear in the interface). You can define new inputs simply by clicking on blank rows and typing in the input name, and you can move inputs by dragging and dropping them.
Figure 15.1 Defining builder input names.
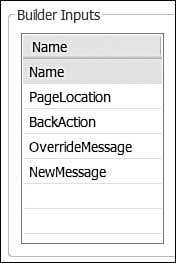
The first input, Name, defines the model-specific name of the builder as it appears in each model. Select the Name input, and then change the Input Type to ‘Builder name (required)’, which automatically gives the input the behavior of a standard name input in WPF. Also, enable the ‘Is Required’ box to make sure developers enter a name for the builder, and enter a Prompt of Name (this is the label that displays next to the input).
Select the Page Location input, and notice that the Input Type is set to Page location. This setting automatically adds the standard Page and Tag inputs for placing an element onto a page. After you have finished looking at the Page Location settings, select the BackAction input and change the Input Type to WebApp action picker, which enables users to open the Select Action dialog to fill in a value for the input. This input is used to specify an action to run when the user clicks a Back button on the terms and conditions page. Type Back Action for the Prompt, and enter Action to run when returning from the terms and conditions page for the Help Text. The Help Text displays when the cursor hovers over the input label.
Now, select the OverrideMessage input. This input is a checkbox that enables developers to specify whether they want to override the default terms and conditions text. When the checkbox is not enabled, the NewMessage input is hidden (the NewMessage input enables developers to specify the custom text). The mechanism to handle this functionality is added into the Java class created by the Skeleton Builder, which you do later in this chapter.
Change the Input Type for the OverrideMessage input to Checkbox, and for the Prompt, type Override Terms and Conditions. For the Help Text, specify Toggles whether you would like to override the default terms and conditions. Finally, select the NewMessage input and change the Input Type to Text area. Change the Prompt to New Terms and Conditions, and change the Help Text to Text to override the default terms and conditions.
Generating the Custom Builder Artifacts
When you are finished entering the custom builder settings, save the builder call. This automatically creates an XML definition file called TermsAndConditions.bdef in the WebContent/WEB-INF/builders/com/ibm/builders directory, it adds a Java source file for your builder (TermsAndConditions.java), and it adds a source file for your coordinator (TermsAndConditionsCoordinator.java) in the WebContent/WEB-INF/work/source directory.
The builder definition file contains the settings from your Builder Skeleton. You don’t need to change the builder definition file, but if you want to share the builder with others, you need to provide them with this file. You also need to provide them with the Java classes just mentioned (you don’t need to share the model with the Builder Skeleton). When sharing builders, it is a good idea to export these files into a WebSphere Portlet Factory Archive, which other developers can then easily import into their own projects (you can do this by right-clicking a project, and then selecting Export, Other, WebSphere Portlet Factory Archive).
Modifying the Custom Builder’s Functionality
Open the TermsAndConditions.java file and have a look at the default code added by WPF. There is one method in the TermsAndConditions class called doBuilderCall, which is executed whenever the WebApp is regenerated. If you scroll through the code, you can see that by default, the builder creates a Text builder and uses it to place some text at the page location specified by the PageLocation input. Notice also that several points in the code are marked in the following way:
/*##GENERATED_BEGIN*/
/*##GENERATED_BODY_END*/
Code that falls between these lines is overwritten by WPF whenever you update the Builder Skeleton builder call, so any modifications you make should be made outside these areas.
In the current example, you need to overwrite the code that creates the Text builder, so that the custom builder’s functionality is as follows:
1. Defines HTML for the terms and conditions page
2. Creates a terms & conditions page
3. Places a Back button onto the terms and conditions page
4. Inserts a link at the PageLocation specified
To do this, replace the contents of the doBuilderCall method so that it appears as shown in the following code snippet (note that you can also download this method fromibmpressbooks.com/title/9780137134465 under the Chapter 15 folder):
public void doBuilderCall(GenContext genContext, WebApp webApp, BuilderCall![]() builderCall, BuilderInputs builderInputs, PageLocation pageLocation)
builderCall, BuilderInputs builderInputs, PageLocation pageLocation)
{
// System.out.println(“builderInputs: “ + builderInputs);
/*##GENERATED_BODY_BEGIN#InputAccessorCode#*/
// Generated code to get all the builder inputs
String name = builderInputs.getString(Constants.Name, null);
String backAction = builderInputs.getString(Constants.BackAction, null);
boolean overrideMessage = builderInputs.getBoolean(Constants.OverrideMessage,![]() false);
false);
String newMessage = builderInputs.getString(Constants.NewMessage, null);
/*##GENERATED_BODY_END*/
//Define HTML for terms and conditions page
StringBuffer html = new StringBuffer(“<html><body><div align=’center’>![]() <div style=’font:12pt Arial;font-weight: bold;color: #336699;’>”+
<div style=’font:12pt Arial;font-weight: bold;color: #336699;’>”+![]() “Terms & Conditions</div><br>”);
“Terms & Conditions</div><br>”);
if (overrideMessage)
html.append(newMessage);
else
html.append(“Here are the default terms and conditions.”);
html.append(“<br><br><span name=’backButton’></span></div></body></html>”);
//Create terms & conditions page
com.bowstreet.builders.webapp.api.Page pageBuilder = new![]() com.bowstreet.builders.webapp.api.Page(builderCall, genContext);
com.bowstreet.builders.webapp.api.Page(builderCall, genContext);
pageBuilder.setName(“termsAndConditionsPage”);
pageBuilder.setPageData(html.toString());
pageBuilder.invokeBuilder();
//Place back button onto terms and conditions page
Button buttonBuilder = new Button(builderCall, genContext);
buttonBuilder.setActionType(“link”);
buttonBuilder.setAction(backAction);
buttonBuilder.setLabel(“Back”);
buttonBuilder.setPageLocation(“Page termsAndConditionsPage NameSearch![]() backButton”);
backButton”);
buttonBuilder.invokeBuilder();
//Insert link at pageLocation
Link linkBuilder = new Link(builderCall, genContext);
linkBuilder.setPageLocation(pageLocation);
linkBuilder.setText(“Terms & Conditions”);
linkBuilder.setActionType(“link”);
linkBuilder.setAction(“termsAndConditionsPage”);
linkBuilder.invokeBuilder();
}
The modifications to this method have been made under the generated text at the top of the class (which ends with ‘/*##GENERATED_BODY_END*/’), and replace the previous code to add a Text builder to the page. The first block of code defines a StringBuffer with the HTML to use for the terms and conditions page. If the OverrideMessage input is set to true, the NewMessage is inserted into the HTML; otherwise, a default message is used (notice that the first letter of each input in the code has been converted to lowercase, so that the names are consistent with Java naming standards). The second block uses a Page builder to create the terms and conditions page itself, and the third block uses a Button builder to place a Back button onto the page. The final block uses the Link builder to place a hyperlink onto page1, which is used to open the terms and conditions page. Notice that the invokeBuilder method for each builder kicks off that builder’s doBuilderCall method. For the javadoc on these classes, see the WebSphere Portlet Factory help file under the Reference, API documentation heading.
Save the class when you are done modifying it.
Modifying the Coordinator
The next step is to modify the coordinator so that the Terms & Conditions builder dynamically hides and shows the NewMessage input depending on whether the OverrideMessage input is enabled.
To do this, open the TermsAndConditionsCoordinator class. There are three main methods in the TermsAndConditionsCoordinator class: initializeInputs, which runs when the builder call is created or opened from the Outline view; processInputChange, which runs whenever an input value changes; and terminate, which runs whenever the OK or Apply buttons are pressed. Notice that there are large blocks of commented code telling you how to manipulate the initializeInputs and processInputChange methods, which you can modify to suit your needs.
You need to make two changes to this class, and both concern setting the visibility of the NewMessage input based on the visibility of the OverrideMessage input. The first change will be made to the initializeInputs method and will set the visibility of overrideMessage when the builder call is first opened. To make this change, enter the following code just after the ‘/*##GENERATED_BODY_END*/’ line in the initializeInputs method:
//toggle newMessage input if overrideMessage has changed
defs.newMessage.setVisible(defs.overrideMessage.getBoolean());
For the next change, add the following code just after the first curly bracket under the definition for the processInputChange method:
//toggle newMessage input if overrideMessage has changed
if (changed == defs.overrideMessage)
{
defs.newMessage.setVisible(defs.overrideMessage.getBoolean());
return true;
}
This checks to see if the OverrideMessage input has changed, and, if so, it sets the visibility of the NewMessage input accordingly.
Save the class when you are finished editing it. You can come back and modify this class at any time, and it will update any instances of the Terms & Conditions builder the next time the builders are used.
Using the Terms & Conditions Builder
Now that you have finished configuring the Terms & Conditions builder, you need to put it to use. Open the information model again, and open up the Builder Palette to add a new builder. If you scroll through the ‘All’ category, you should see the Terms & Conditions builder, and it should also display under the Custom Builders heading. Select the Terms & Conditions builder and press OK. The builder should display in the Model Editor, as shown in Figure 15.2. Notice that the NewMessage input is hidden; if this is not the case, make sure you configured the coordinator class correctly.
Figure 15.2 The Terms & Conditions Builder.
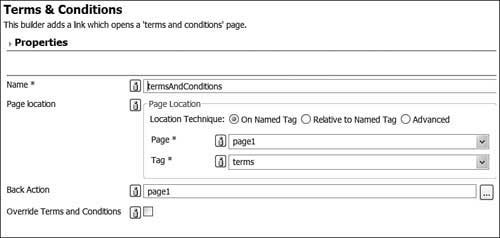
Change the name of the builder call to termsAndConditions, and then specify the Page and Tag as page1 and terms, respectively. For the Back Action, select page1 (notice that all of these inputs have the appropriate pickers available as a result of setting the Input Type input on the Builder Skeleton). Leave the Override Terms and Conditions input disabled for now, and save the builder call.
Testing the Information Model
To test the information model from your IDE, run your model from the WPF Designer by clicking the ![]() icon on the toolbar. This runs the information model with the last run configuration you used. If you have not set up a run configuration before, you are prompted to do so—create a new configuration under the WebSphere Portlet Factory Model category (if you want more information on setting up a run configuration, see the “Testing the Application” section in Chapter 1). An information page with a link to open the terms and conditions page should display, as shown in Figure 15.3.
icon on the toolbar. This runs the information model with the last run configuration you used. If you have not set up a run configuration before, you are prompted to do so—create a new configuration under the WebSphere Portlet Factory Model category (if you want more information on setting up a run configuration, see the “Testing the Application” section in Chapter 1). An information page with a link to open the terms and conditions page should display, as shown in Figure 15.3.
Figure 15.3 The information page.

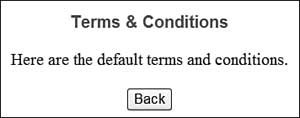
Click the terms and conditions page, and you should be taken to a new page, as shown in Figure 15.4. Clicking the Back button should return you to page1.
Figure 15.4 The default terms and conditions page.
Now open up the Terms & Conditions builder call again, and enable the box to override the terms and conditions. If you have set up the coordinator class correctly, the NewMessage input should now display. Enter some new terms and conditions text and save the builder. When you rerun the model, you should see that the contents of the NewMessage input have been added to the terms and conditions page.
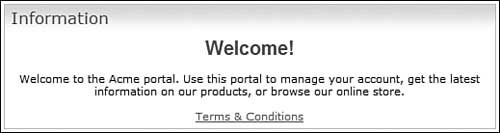
After you have tested your model, you should rebuild the application and test it on the portal server as a portlet (for instructions on how to do this, see the example in Chapter 1). After you have added the portlet to a page in the portal, your portlet should appear as shown in Figure 15.5.
Figure 15.5 The Information portlet.
Creating a New Model Wizard
Now that you have successfully created a Page Control Builder, you will create a new model wizard that adds the option to create information portlets in the New Model Wizard. This is a useful feature because it enables you to automatically build a model with certain builders in it, based on a template you create yourself. Any time you would like to create a new model based on the template, you have only to select it from the New Model Wizard.
Change the Builder Type of the builder call to Model-based wizard builder, which enables you to create new models based on your settings in the Builder Skeleton. For the Model Name input, specify chapter15/information, which links the custom builder to the information model you created earlier. Change the Builder ID so that it reads com.ibm.builders.Information, which also populates the Builder Class input. It is a good idea to make this change, as the default Builder Class will be taken from your model name, and the first letter of your model name is a lowercase letter (standard Java naming practice is to use an uppercase letter for the first letter of a Java class).
Change the Readable Name input to Information, the Category to Custom Builders, and the Description to Creates an information portlet with a terms and conditions page. All of these inputs define how the new Information option displays in the New Model wizard. Notice that there is a new input at the bottom of the main section called Builder Pages, which you can use to define a series of pages for your model wizard (similar to the pages you go through when adding a service provider or consumer). In this example, you don’t need any extra pages, so leave this checkbox unchecked.
Finally, remove the Name input from the Builder Inputs section at the bottom of the builder, as there is no need for developers to name the builder itself (they will be asked to name only the model by virtue of the fact that you are using the Model-based wizard builder option). You can remove an input by right-clicking the input name and selecting Delete Row. Save the builder call when you are finished.
Testing the New Model Wizard Builder
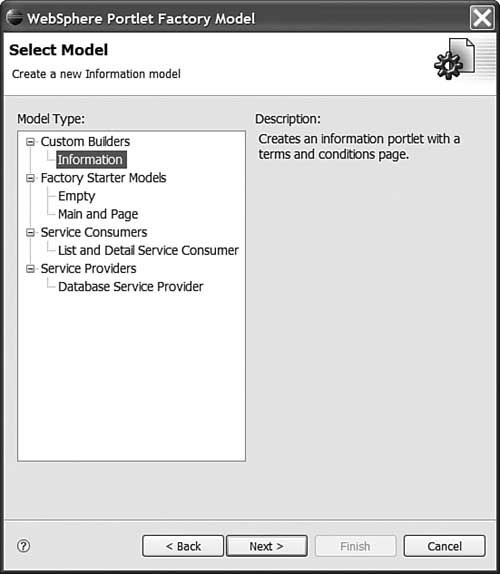
To test the new builder, create a new WebSphere Portlet Factory Model. Under the Custom Builders heading, there should be a new option for Information, as shown in Figure 15.6. Select this option and press Next. Name the model on the next screen and click Finish. If you have configured the builder correctly, you will have a new model in your project based on the information model template.
Figure 15.6 The Information option in the New Model Wizard.
Summary
In this chapter, you learned about the different ways in which you can optimize the performance of your WPF portlets. You learned about caching concerns, the proper use of Ajax and Dojo, data set and profiling considerations, session size testing, and performance logging. You also learned how to optimize the portlet development process using custom builders, and you built a simple information portlet using a custom page control and a custom model-based wizard.
Chapter 16, “More Techniques for Domino,” expands on the Domino example in Chapter 4 and introduces some ways in which you can interact with Domino databases from a portlet.
Important Points
• If used sparingly, Ajax and Dojo can improve the performance and usability of your applications.
• The Cache Control builder can be used to cache the output of any action in your model. Many WPF builders have built-in caching capabilities as well.
• Extensive use of profiling can drain system resources, so limit profile use to what you absolutely need. Cached information is profile-specific, so cache non-profiled models if possible.
• Speed up data set retrieval operations by fetching only the records that you need. Also, use WPF’s paging capabilities so that only a snapshot of the total data set is ever needed at one time.
• You can monitor your applications for performance using debug tracing (particularly the modelActions property) and by monitoring the serverStats.txt log.
• You can monitor session sizes in your application by setting the appropriate properties in the bowstreet.properties file, and then restarting your application server. Session information is written to the sessionSize.csv file.
• Custom builders enable you to extend WPF’s existing builder library with your own reusable, wizard-based components. These builders consist of an XML definition file and a set of Java classes.
• A builder coordinator class can be used to dynamically change a builder interface depending on developer input.