
6. Animating Layers
Lesson overview
In this lesson, you’ll learn how to do the following:
Animate a layered Adobe Photoshop file.
Create an expression using the pick whip.
Work with imported Photoshop layer styles.
Apply a track matte to control the visibility of layers.
Animate a layer using the Corner Pin effect.
View layer render times using the Composition Profiler.
Use time remapping and the Layer panel to dynamically retime footage.
Edit Time Remap keyframes in the Graph Editor.

This lesson will take about an hour to complete. If you haven’t already done so, download the project files for this lesson from adobepress.com/AfterEffectsCIB2022, following the instructions in the Getting Started section under “Accessing the lesson files and Web Edition.”

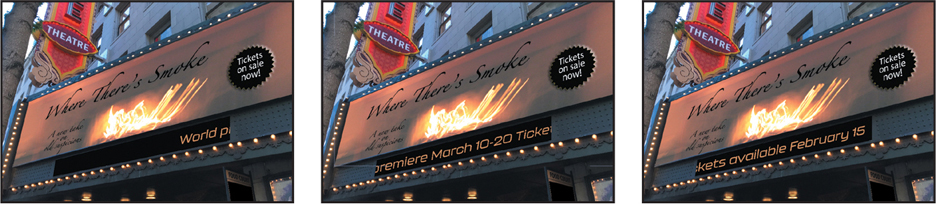
PROJECT: THEATER MARQUEE IN A FILM SHORT
Animation is all about making changes over time—changes to an object or image’s position, opacity, scale, and other properties. This lesson provides more practice animating the layers of a Photoshop file, including dynamically remapping time.
Getting started
Adobe After Effects provides several tools and effects that let you simulate motion video using a layered Photoshop file. In this lesson, you will import a layered Photoshop file of a theater marquee, and then animate it to simulate the marquee lighting up and text scrolling across its screen. This is a stylized animation in which the motion is first accelerated, and then reverses and moves forward again.
First, you’ll preview the final movie and set up the project.
Make sure the following files are in the Lessons/Lesson06 folder on your hard disk, or download them from adobepress.com now:
In the Assets folder: marquee.psd
In the Sample_Movie folder: Lesson06.mp4
Open and play the Lesson06.mp4 in Windows Movies & TV or QuickTime Player to see the final animation you will create in this lesson.
When you’re done, quit Windows Movies & TV or QuickTime Player. You may delete the sample movie from your hard disk if you have limited storage space.
When you begin the lesson, restore the default application settings for After Effects. See “Restoring default preferences” on page 3.
Start After Effects, and then immediately hold down Ctrl+Alt+Shift (Windows) or Command+Option+Shift (macOS) to restore default preferences settings. When prompted, click OK to delete your preferences file.
Click New Project in the Home window.
After Effects opens to display an empty, untitled project.
Choose File > Save As > Save As.
In the Save As dialog box, navigate to the Lessons/Lesson06/Finished_ Project folder.
Name the project Lesson06_Finished.aep, and then click Save.
Importing the footage
You need to import one source item for this lesson.
Double-click an empty area of the Project panel to open the Import File dialog box.
Navigate to the Lessons/Lesson06/Assets folder on your hard disk, and select the marquee.psd file.
Choose Composition – Retain Layer Sizes from the Import As menu, so the dimensions of each layer will match the layer’s content. (In macOS, you may need to click Options to see the Import As menu.)
Click Import or Open.

In the marquee.psd dialog box, make sure Editable Layer Styles is selected in the Layer Options area, and click OK.
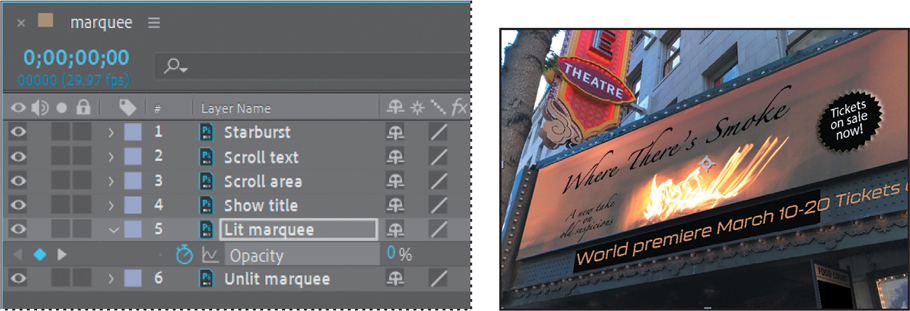
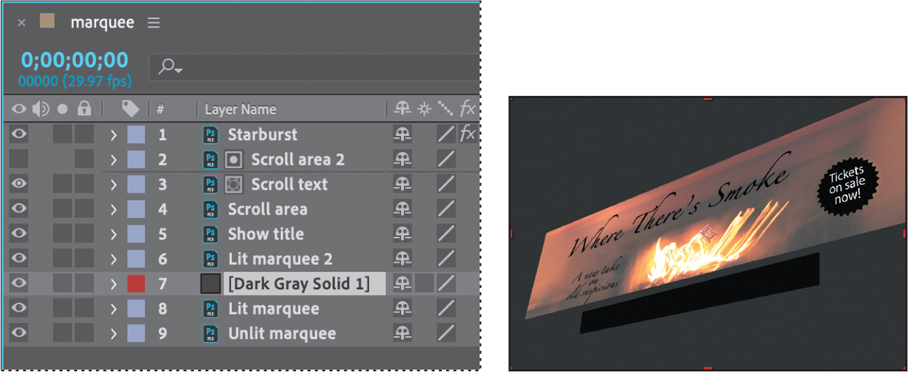
Before continuing, take a moment to study the layers of the file you just imported.
In the Project panel, expand the marquee Layers folder to see the Photoshop layers. Resize the Name column to make it wider and easier to read, if necessary.
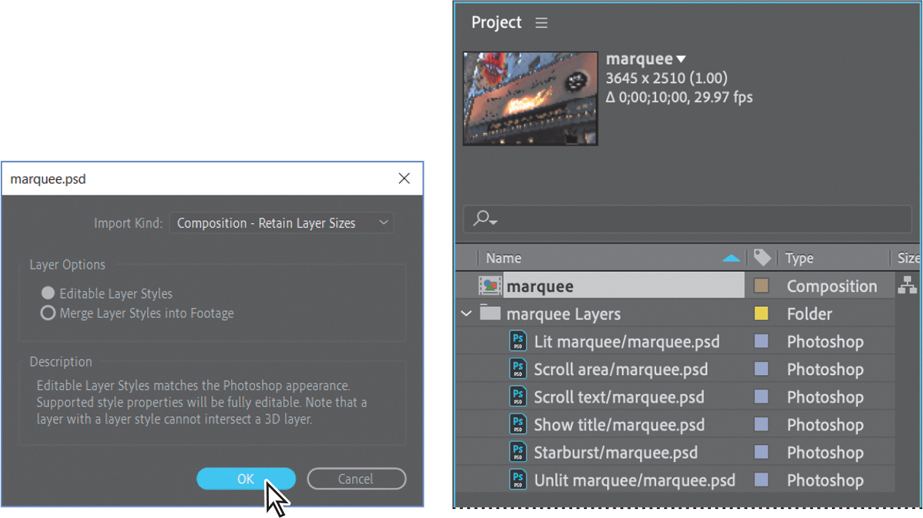
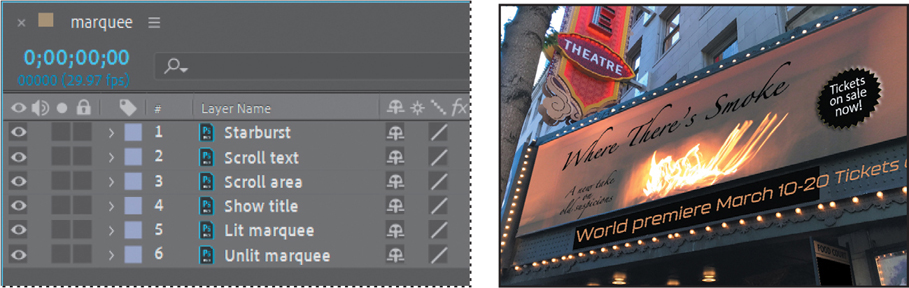
Each of the elements you’ll animate in After Effects—such as the starburst—is on a separate layer. In addition, there is one layer representing the initial marquee with plain light bulbs (Unlit marquee) and a second layer that represents the final marquee with the bulbs brightly lit (Lit marquee).
After Effects preserves the layer order, transparency data, and layer styles from the source Photoshop document. It also preserves other features, such as adjustment layers and type, which you don’t happen to be using in this project.
Creating the composition
For this lesson, you’ll use the imported Photoshop file as the basis of the composition.
Double-click the marquee composition in the Project panel to open it in the Composition panel and in the Timeline panel.
 Note
NoteIf you don’t see the full image, choose Fit from the Magnification Ratio pop-up menu in the Composition window.
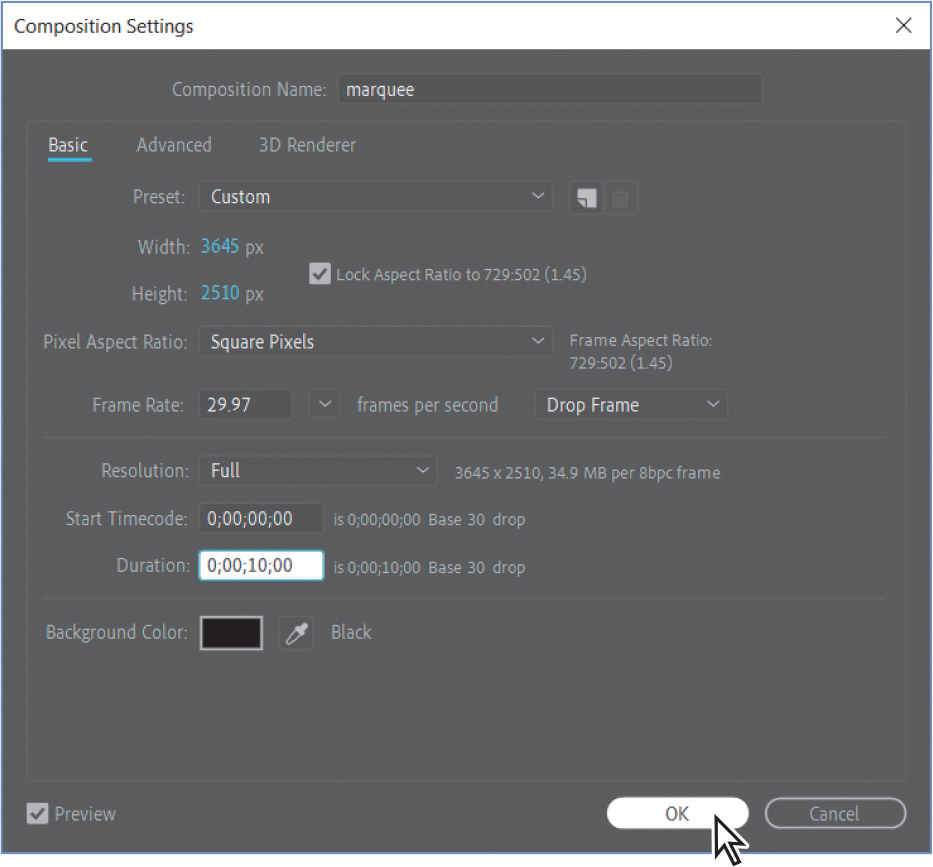
Choose Composition > Composition Settings.
In the Composition Settings dialog box, change the Duration to 10:00 to make the composition 10 seconds long, and then click OK.
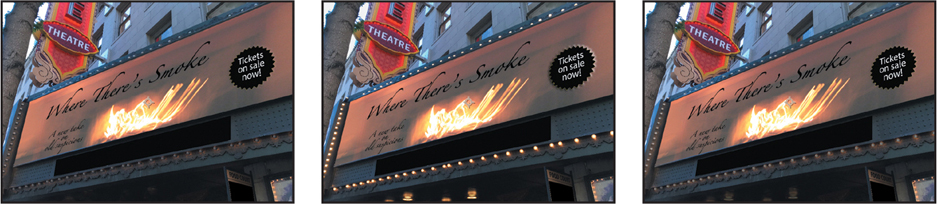
Simulating lighting changes
The first part of the animation involves lighting the marquee. You’ll use Opacity keyframes to animate the light.
Go to 4:00.
Currently, the lit background is on top of the regular (unlit) background, obscuring it so the initial frame of the animation is bright. However, you want the marquee to appear dark and then lighten. To accomplish this, you will make the Lit marquee layer initially transparent, and then animate its opacity so that the lights appear to turn on over time.
Select the Lit marquee layer in the Timeline panel, and press T to reveal its Opacity property.
Click the stopwatch icon (
 ) to set an Opacity keyframe. Note that the Opacity value is 100%.
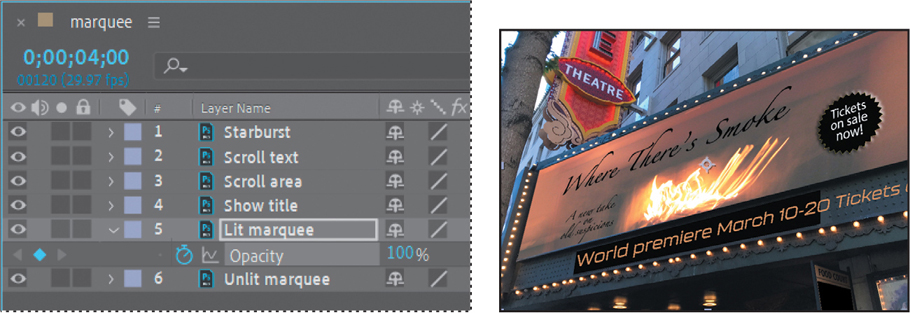
Press the Home key or drag the current-time indicator to 0:00. Then set the Opacity for the Lit marquee layer to 0%. After Effects adds a keyframe.
Now, when the animation begins, the Lit marquee layer is transparent, which allows the Unlit marquee layer to show through.
Click the Play/Pause button (
 ) in the Preview panel, or press the spacebar, to preview the animation.
The bulbs around the marquee transition until they are brightly lit.
Press the spacebar to stop playback at any time after 4:00.
Choose File > Save.
Duplicating an animation using the pick whip
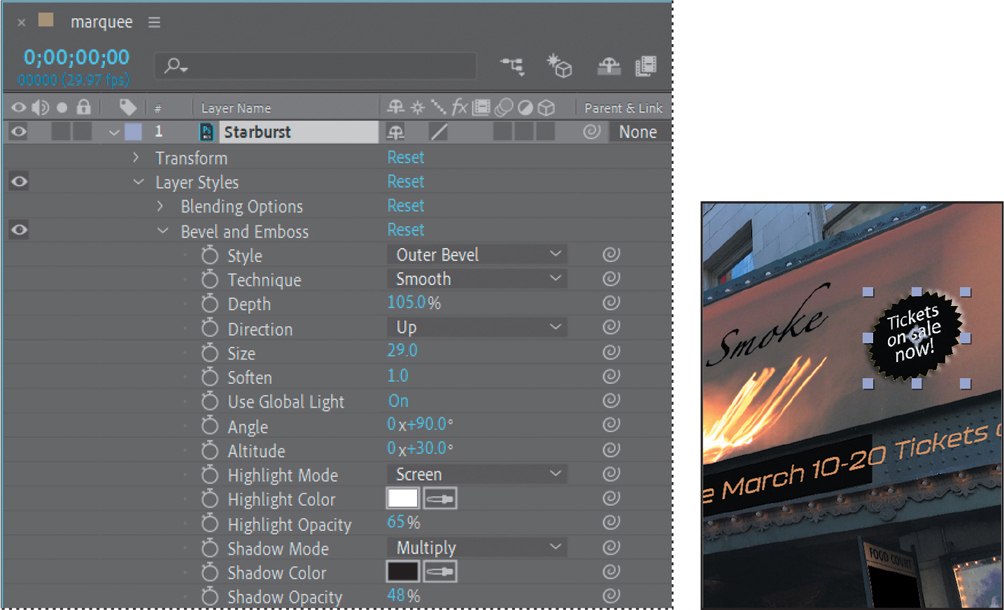
The Starburst layer includes the Bevel And Emboss layer style from Photoshop. You’ll animate the bevel, which makes the starburst appear backlit, so that it lights up as the marquee does.
To do this, you’ll use the pick whip to duplicate the animation you just created. You can use the pick whip to create expressions that link the values of one property or effect to another. In this case, you’ll link the opacity of the Lit marquee layer to the Depth property of the Bevel And Emboss effect in the Starburst layer.
Press the Home key or move the current-time indicator to the beginning of the time ruler.
Expand the Starburst layer, and then expand its Layer Styles > Bevel And Emboss properties.
If necessary, enlarge the Timeline panel so that you can see both the Lit marquee and Starburst properties.
Make sure the Opacity property is still visible for the Lit marquee layer.
Click the pick whip icon (
 ) for the Depth property in the Starburst layer, and drag it to the Opacity property name for the Lit marquee layer. When you release the mouse, the pick whip snaps, and the Depth property value is red.
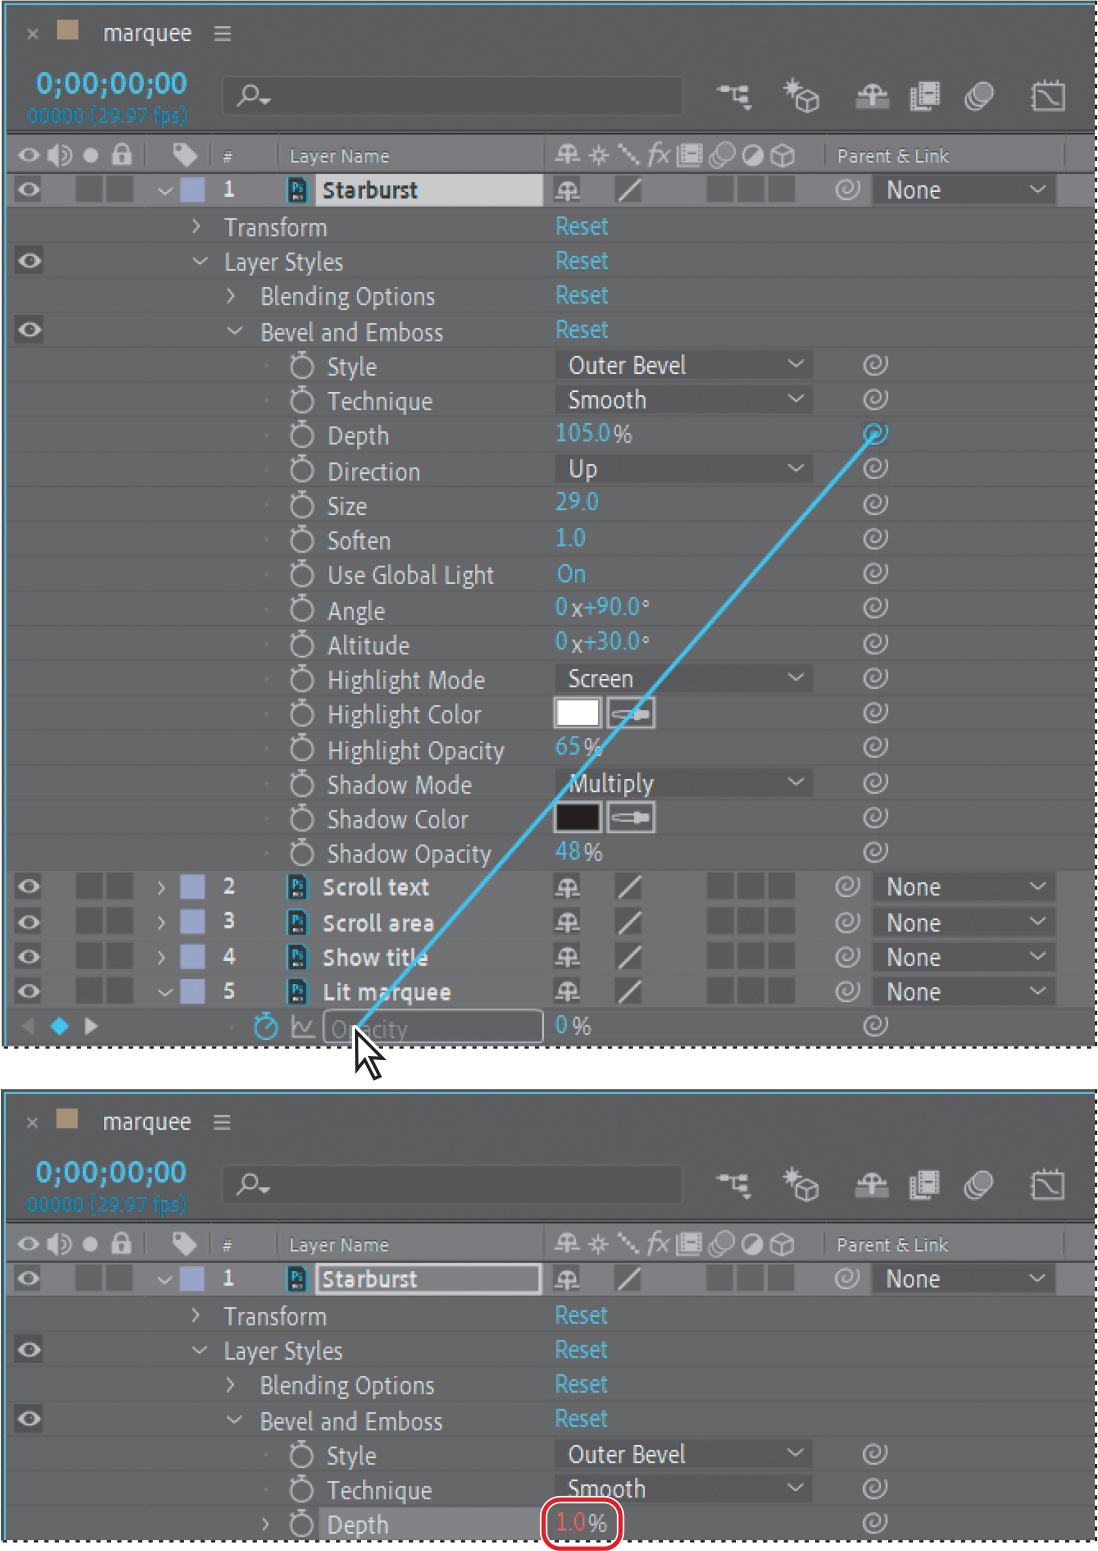
Expand the Depth property for the Starburst layer. An expression in the Starburst layer time ruler now reads “thisComp.layer(“Lit marquee”).transform.opacity.” This means that the Opacity value for the Lit marquee layer replaces the previous Depth value (105%) for the Starburst layer.

Drag the current-time indicator from 0:00 to 4:00. Notice that the Opacity value for the Lit marquee layer and the Depth property for the Starburst layer increase simultaneously. The area around the starburst and the marquee light bulbs brighten in sync.
Hide the properties for all layers to keep the Timeline panel tidy. If you enlarged the Timeline panel, return it to its original size.
Choose File > Save to save your project.
Using a track matte to confine animation
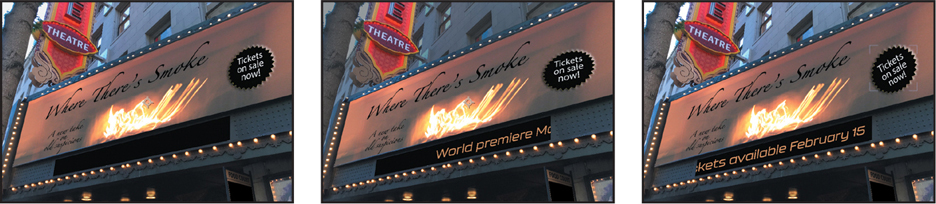
Text should scroll across the bottom of the marquee, but only in the black field. You’ll animate the text, and then create a track matte to confine it to the designated area, so that it appears to be an electronic ticker.
Animating the text
The text should start scrolling after the marquee lights up, and it should continue scrolling until the end of the clip.
In the Timeline panel, select the Scroll text layer.
Go to 4:10.
Press Alt+[ (Windows) or Option+[ (macOS) to set the In point to 4:10.
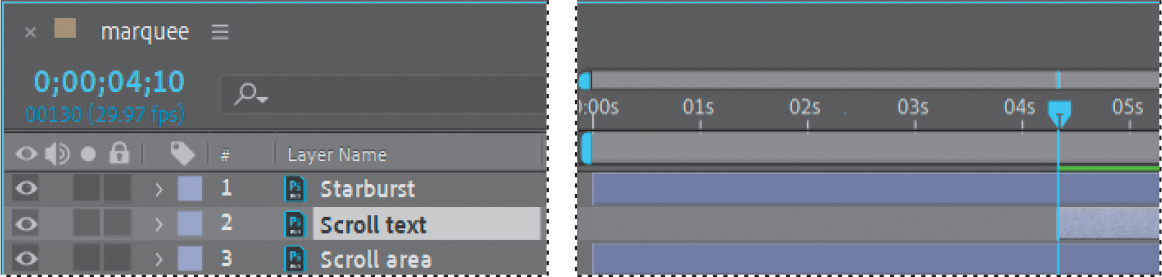
The text will appear on screen at 4:10, shortly after the marquee is fully lit.
With the Scroll text layer selected, press P to reveal its Position property.
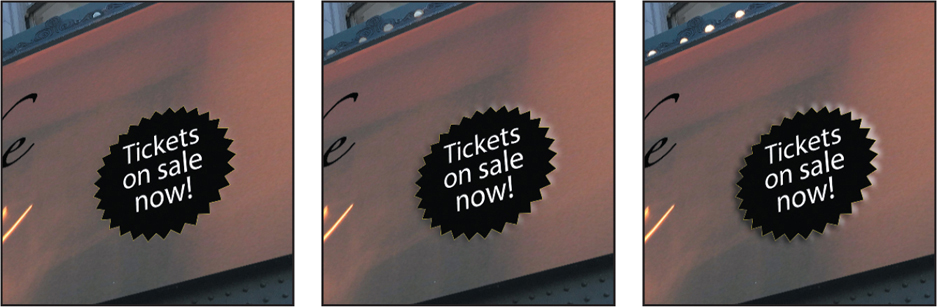
Change the Position property to 4994, 1106.
Only the first character of the text appears in the black ticker area.
Click the stopwatch icon (
) to create an initial keyframe.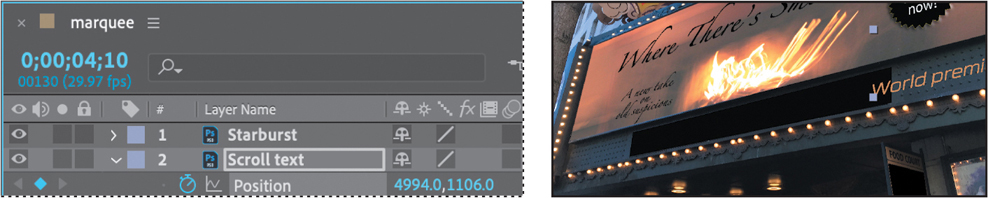
Go to 9:29, the last frame in the clip.
Change the Position property to 462, 2121.

After Effects creates a keyframe. The last character in the text is visible in the ticker field.
Press the spacebar to preview the scrolling text. Press the spacebar again to end the preview.
Creating the track matte
The text scrolls well, but it overlaps the rest of the marquee, and even the lights on the left side. You’ll use a track matte to confine the text to the black ticker field. To do that, you’ll duplicate the Scroll area layer and use its alpha channel.
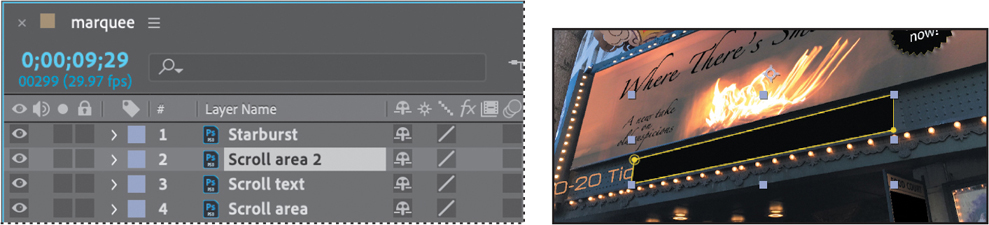
In the Timeline panel, select the Scroll area layer.
Choose Edit > Duplicate.
Drag the duplicate layer, Scroll area 2, up in the layer stack so that it’s above the Scroll text layer.
Click Toggle Switches/Modes at the bottom of the Timeline panel to display the TrkMat column, so you can apply the track matte.
Select the Scroll text layer, and choose Alpha Matte “Scroll area 2” from the TrkMat pop-up menu.
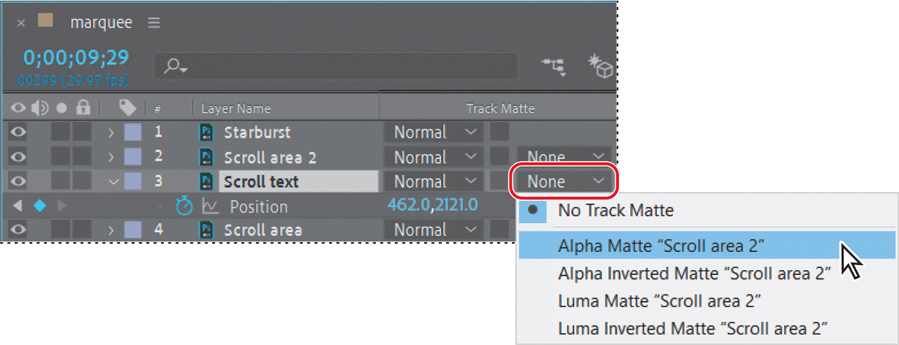
The alpha channel of the layer above (Scroll area 2) is used to set transparency for the Scroll text layer, so the contents of that layer appear only within the area defined by the Scroll area 2 layer. The video switch is automatically deselected for the Scroll area 2 layer when you apply the track matte.
Deselect all layers, and hide all layer properties.
Press the Home key or move the current-time indicator to the beginning of the time ruler, and then press the spacebar to preview the animation. Press the spacebar again when you’re done.

Choose File > Save to save your project.
Adding motion blur
The text’s movement will look more authentic if it includes motion blur. You’ll add the motion blur and then set the shutter angle and phase, which control the intensity of the blur.
Go to 8:00, so you can see the scrolling text well.
Click Toggle Switches/Modes at the bottom of the Timeline panel.
Click the Motion Blur (
 ) switch for the Scroll text layer.
After Effects enables Motion Blur for the entire composition, and the text layer appears less sharp in the Composition panel.
Choose Composition > Composition Settings.
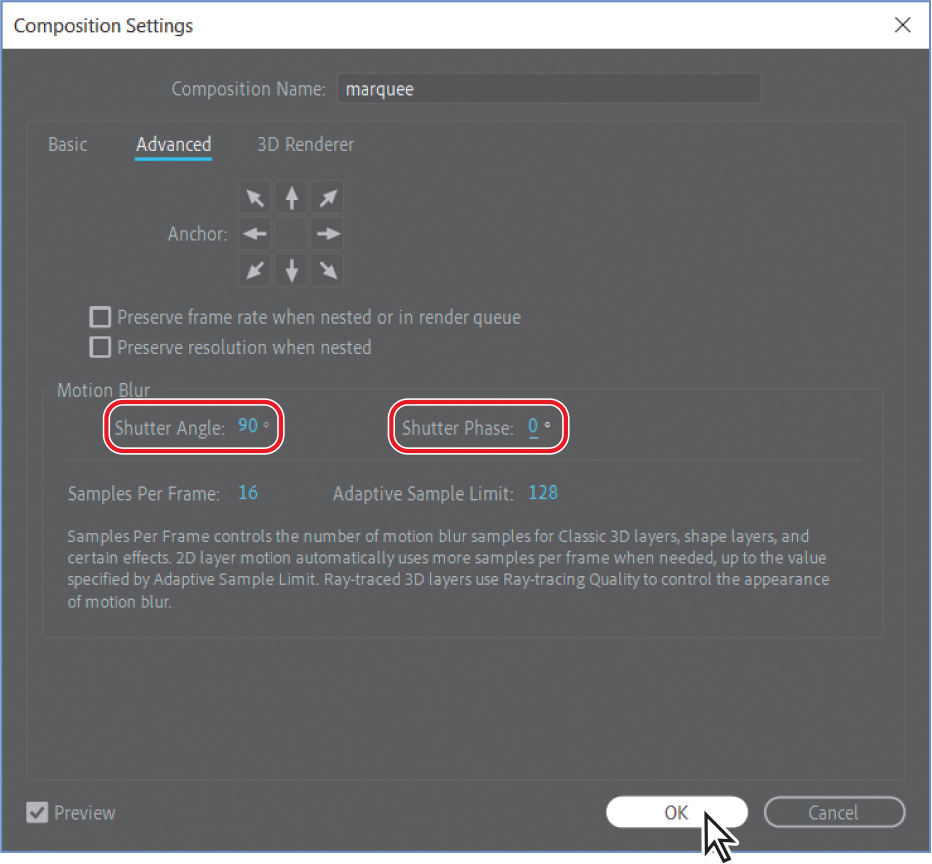
In the Composition Settings dialog box, click the Advanced tab, and reduce the Shutter Angle to 90 degrees.
The Shutter Angle setting imitates the effect of adjusting a shutter angle on a real camera, which controls how long the camera aperture is open, gathering light. Larger values create more motion blur.
Change the Shutter Phase to 0 degrees, and then click OK.
Animating using the Corner Pin effect
The marquee is looking pretty good, but the starburst isn’t terribly noticeable. You’ll use the Corner Pin effect to distort it over time and draw attention to it.
Using the Corner Pin effect is similar to animating with the Photoshop Free Transform tool—the effect distorts an image by repositioning each of its four corners. You can use it to stretch, shrink, skew, or twist an image, or to simulate perspective or movement that pivots from the edge of a layer, such as a door opening.
Go to 4:00.
In the Timeline panel, click the Solo switch (
 ) for both the Show title and Starburst layers.
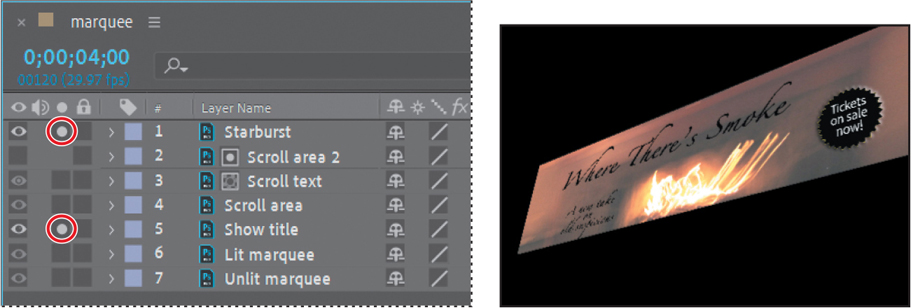
Soloing the layers isolates them to speed animating, previewing, and rendering.
NoteIf you don’t see the controls, choose View Options from the Composition panel menu. In the View Options dialog box, select the Handles and Effect Controls options, and then click OK.
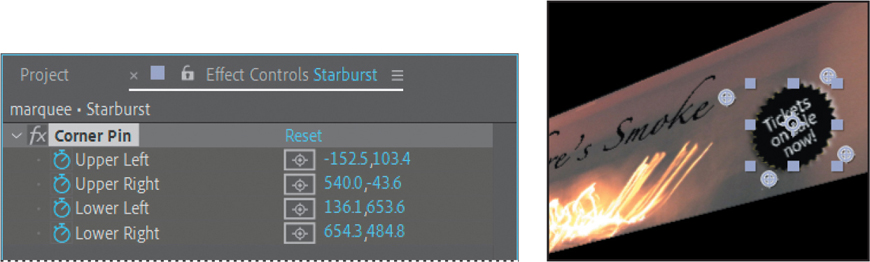
Select the Starburst layer in the Timeline panel, and then choose Effect > Distort > Corner Pin. Small circles appear around the corner points of the Starburst layer in the Composition panel.
You’ll start by creating initial keyframes at their current locations.
If the Effect Controls panel isn’t already open, choose Window > Effect Controls.
In the Effect Controls panel, click the stopwatch icon (
) next to each of the pins—Upper Left, Upper Right, Lower Left, and Lower Right—to set initial keyframes.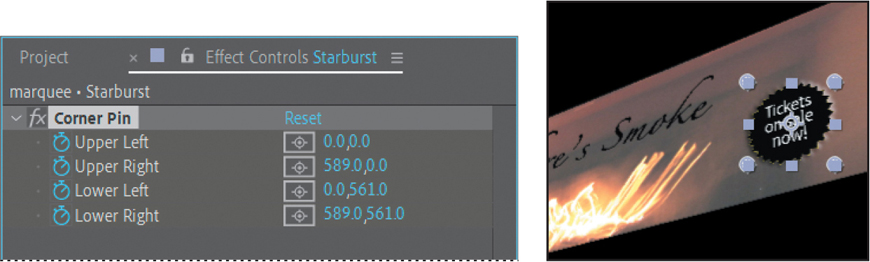
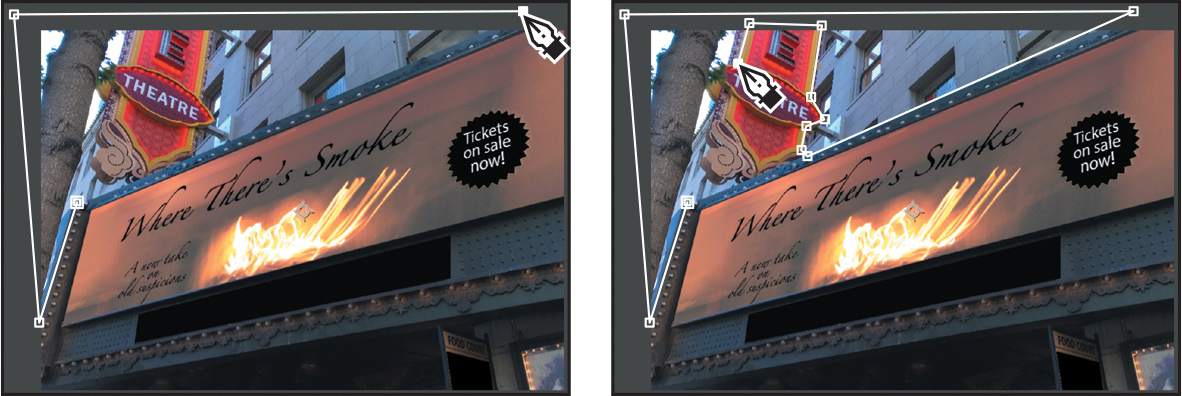
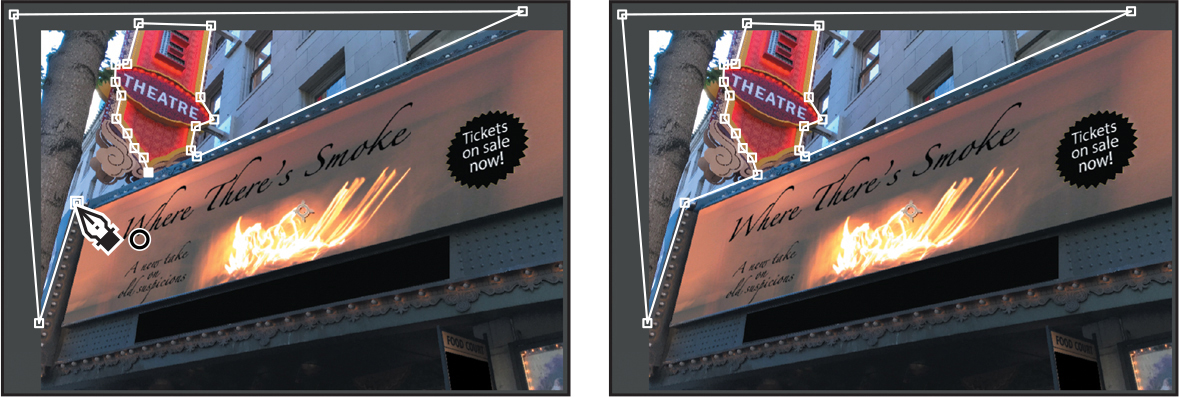
Go to 6:00, and then drag each of the four corner-pin handles outward. With the Corner Pin tool, you can move each handle a different amount. Notice that the x and y coordinates update in the Effect Controls panel. After Effects adds keyframes.
Instead of dragging the handles, you can manually enter the values shown in the following figure.

Go to 8:00, and then drag the corner-pin handles so that the text is tilted at an angle. Your corner-pin locations should be similar to those in the figure below. After Effects adds keyframes.
Press the Home key or move the current-time indicator to the beginning of the time ruler. Press the spacebar to preview the animation. When you’re done, press the spacebar again.
Click the Solo switches (
) for the Show title and Starburst layers to restore the view of the other layers.Go to 0:00, and then press the spacebar to preview the entire animation, including the corner-pin effect. When you’re done, press the spacebar again.


Choose File > Save to save your project.
Simulating a darkening sky
The lights come on, but the sky and building remain in daylight. The background should darken as the marquee lights up, showing off the marquee contents and creating a sense of excitement. You’ll use a mask, a solid layer, and a blending mode to provide the contrast.
Creating a mask
You want darkness to fall on the building and sky behind the theater sign. You’ll duplicate the layer, and then create a mask to isolate the area you want to darken.
Press the Home key or move the current-time indicator to the beginning of the time ruler.
In the Timeline panel, select the Lit marquee layer.
Choose Edit > Duplicate. After Effects adds a Lit marquee 2 layer to the layer stack, immediately above the Lit marquee layer.
Select the Pen tool (
 ) in the Tools panel.
With the Lit marquee 2 layer selected in the Timeline panel, click the upper left corner of the marquee to start drawing.
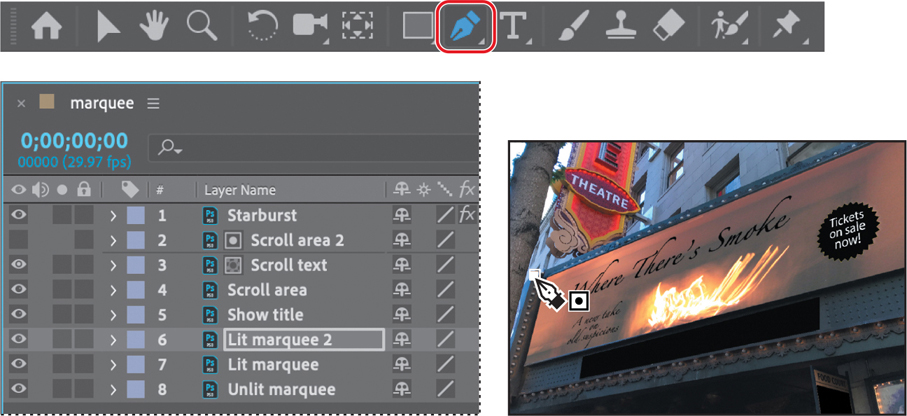
Click additional points to continue the mask around the left edge of the marquee, the left and upper edge of the background, and the theatre sign, as in the image below. You’ll need to create some points of the mask on the pasteboard outside the image.
Continue around the theatre sign, and then click your starting point again to close the mask.
Adding a solid layer
Now that you’ve masked the background, you’ll add the layer that will affect it, and then animate the opacity of that layer.
Select the Lit marquee layer in the Timeline panel.
Choose Layer > New > Solid.
In the Solid Settings dialog box, make sure a dark gray color is selected, click Make Comp Size, and then click OK. After Effects adds a layer named Dark Gray Solid 1 between the Lit marquee and Lit marquee 2 layers.
With the current-time indicator at the beginning of the time ruler, most of the image will darken, because neither the Lit marquee layer nor the Lit marquee 2 layer (with its mask) are visible yet. Don’t worry; you’ll animate the solid layer’s opacity to account for that.
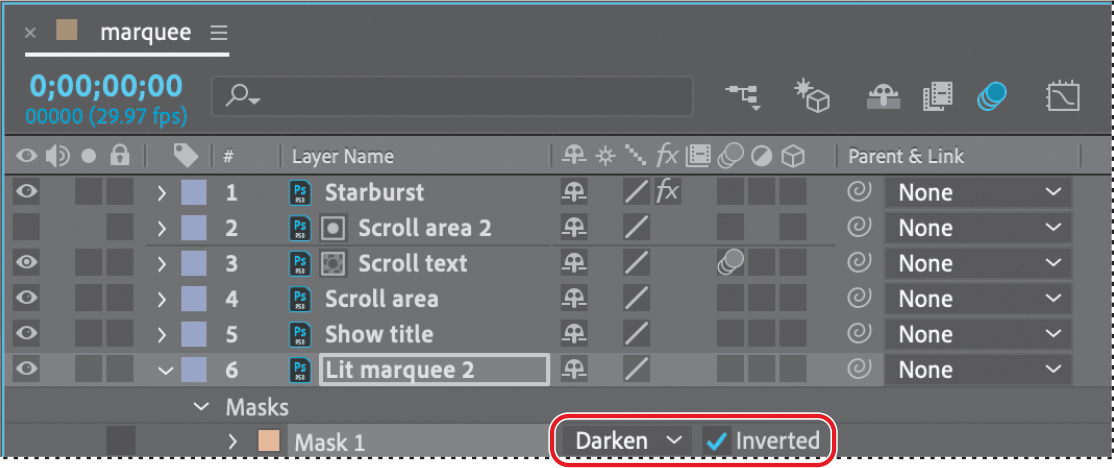
Select the Lit marquee 2 layer, and press M if the Mask property isn’t already displayed.
Choose Darken from the Mask Mode menu, and select Inverted.
You drew around the background, but that’s the area you want to remain unmasked. When you invert the mask, the unselected area becomes masked instead.
Select the Dark Gray Solid layer, and press T to display its Opacity property.
Make sure the current-time indicator is at the beginning of the time ruler (0:00). Then, change the Opacity to 0%, and click the stopwatch icon (
) to create an initial keyframe.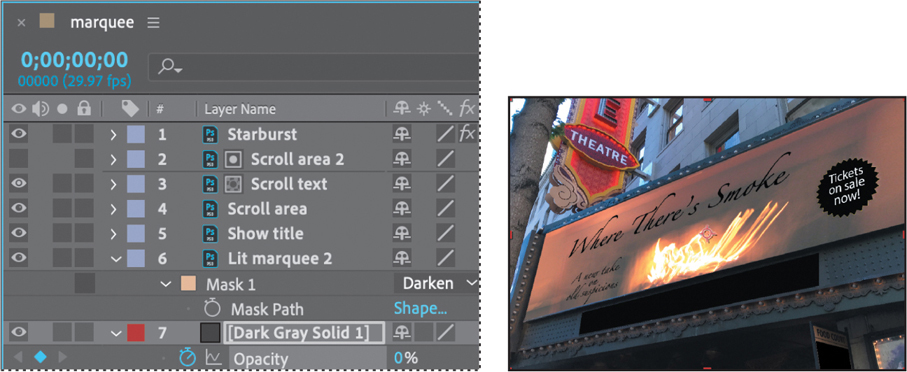
Go to 1:23, and change the Opacity to 5%.
Go to 4:09, and click the Add Or Remove Keyframe button to create an additional keyframe with Opacity at 5%.
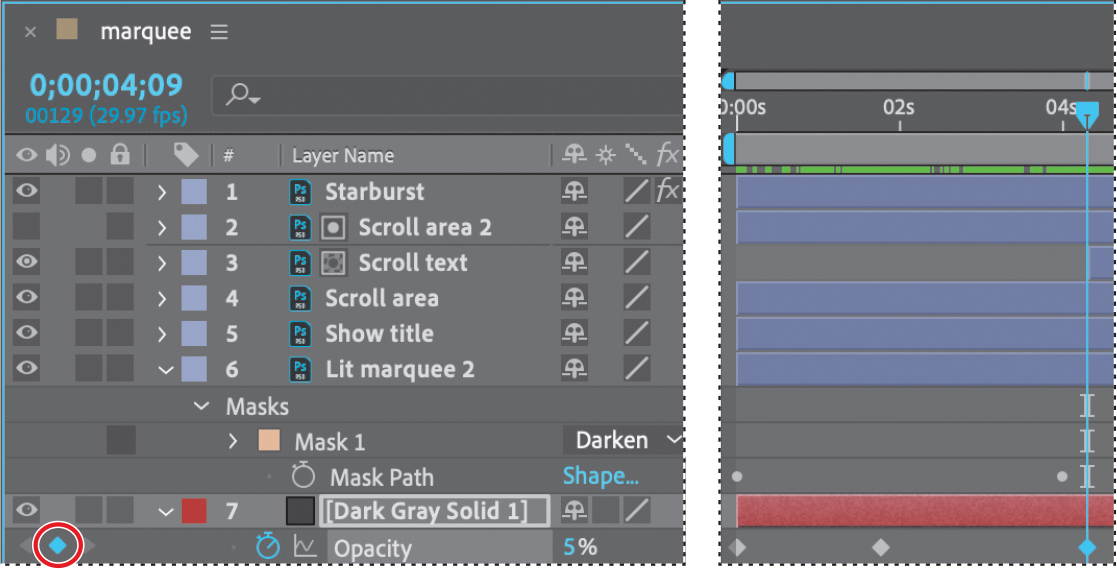
Go to 7:00, and change the Opacity to 75%.

Press the Home key or move the current-time indicator to the beginning of the time ruler. Press the spacebar to preview the animation. When you’re done, press the spacebar again.


As the lights brighten and the text begins to move, the surrounding building and sky gradually darken. Your scene is complete.
Hide the properties for all layers, and save your work.
Viewing render times for layers
In a complex project, it can be helpful to know which components are contributing to long render times. For example, you may find it helpful to turn off some layers or specific effects while you work on other aspects of your project.
You can see the overall render time for the current frame at the bottom of the Timeline panel. When you turn on the Composition Profiler, you can see the rendering time of each layer, effect, mask, and layer style in the current frame in the Render Time column.
Click the snail icon (
 ) at the bottom of the Timeline panel.
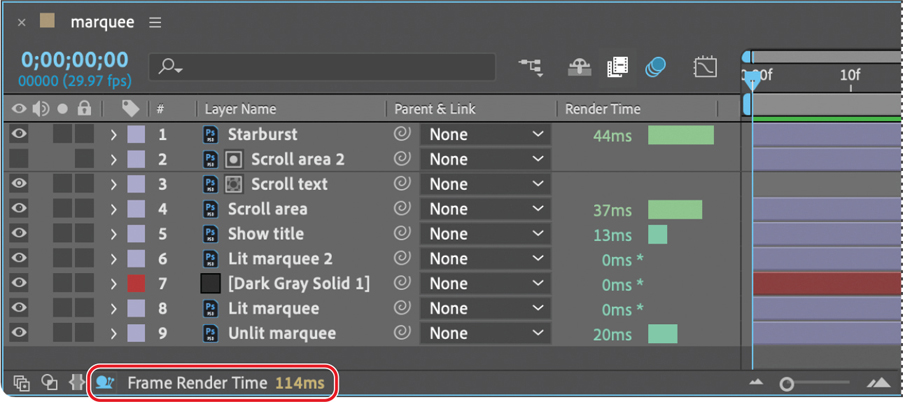
The Render Time column appears in the Timeline panel, displaying the render time for each layer active in the current frame.
Drag the current-time indicator across the time ruler to see how render times differ for each layer on different frames.
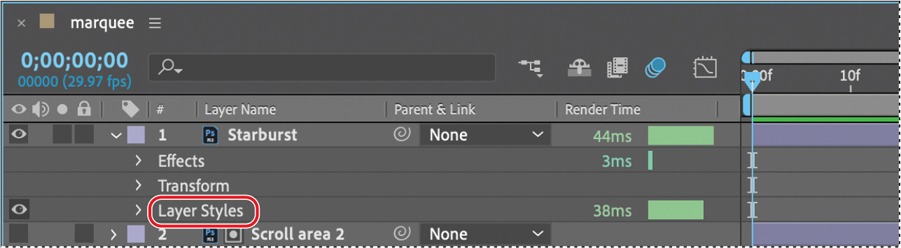
Expand the Starburst layer. Notice that the layer styles that were applied in Photoshop increase the render time.
Hide layer properties. Click the snail icon again to turn off the Composition profiler, or leave it on if you want to see the effect of changes you make on rendering times.
Retiming the composition
So far, you have created a straightforward time-lapse simulation. That’s fine, but After Effects offers more ways to play with time using the time-remapping feature. Time remapping lets you dynamically speed up, slow down, stop, or reverse footage. You can also use it to do things like create a freeze-frame result. The Graph Editor and the Layer panel are a big help when remapping time, as you’ll see in the following exercise, when you retime the project so that the time-lapse speed changes over the course of the movie.
![]() Tip
Tip
You can get even finer control with the Timewarp effect, which you’ll use in Lesson 14, “Advanced Editing Techniques.”
Precomposing layers
For this exercise, you’ll duplicate the composition and then precompose the layers, which will be easier to remap than the original.
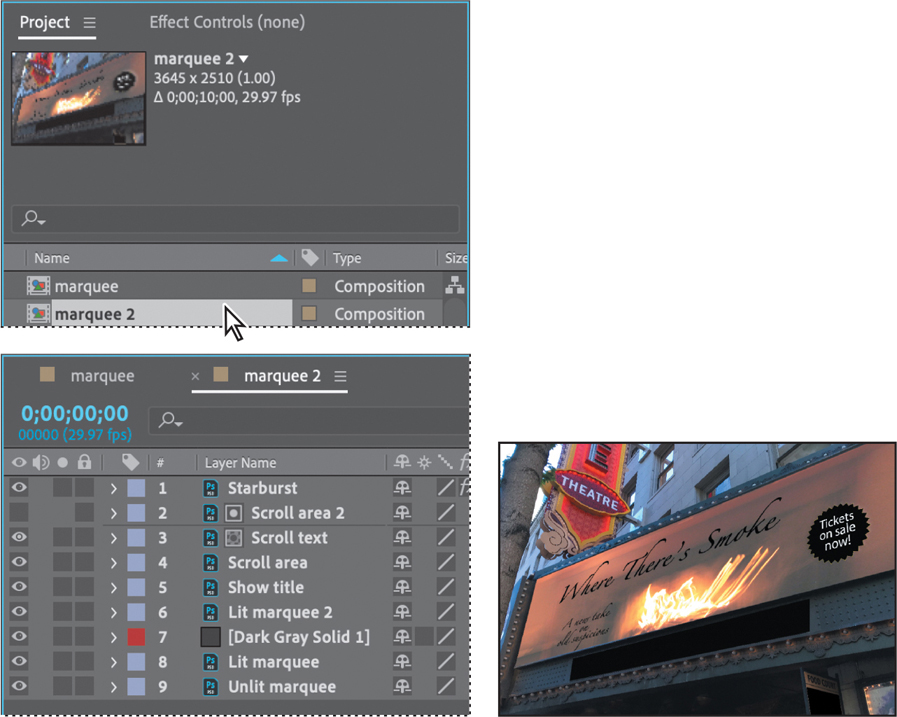
Select the marquee composition in the Project panel, and choose Edit > Duplicate.
A marquee 2 composition appears in the Project panel.
Double-click the marquee 2 composition to open it in the Composition and Timeline panels.
In the marquee 2 Timeline panel, select the Starburst layer and then Shift-select the Unlit marquee layer, so that all the layers are selected.
Choose Layer > Pre-compose.
In the Pre-compose dialog box, make sure Move All Attributes Into The New Composition is selected, and then click OK.
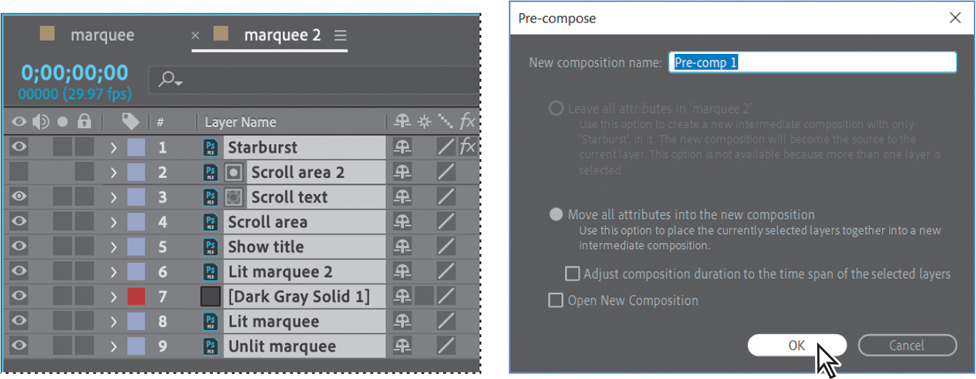
After Effects creates a new composition named Pre-comp 1, which replaces the layers you selected in the marquee 2 composition. Now you can remap all of the elements of the project at once.
Remapping time
You’re ready to manipulate the speed and direction of time in your project.
With the Pre-comp 1 layer selected in the Timeline panel, choose Layer > Time > Enable Time Remapping.
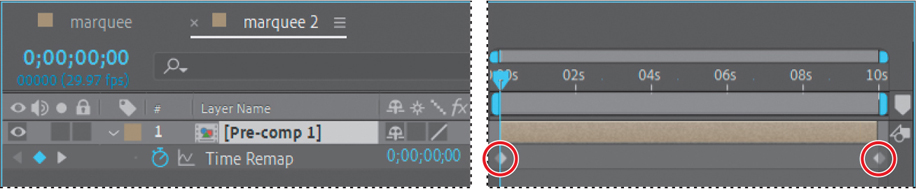
After Effects adds two keyframes, at the first and last frames of the layer, visible in the time ruler. A Time Remap property also appears under the layer name in the Timeline panel; this property lets you control which frame is displayed at a given point in time.
With the Pre-comp 1 layer active, choose Layer > Open Layer to open it in the Layer panel.
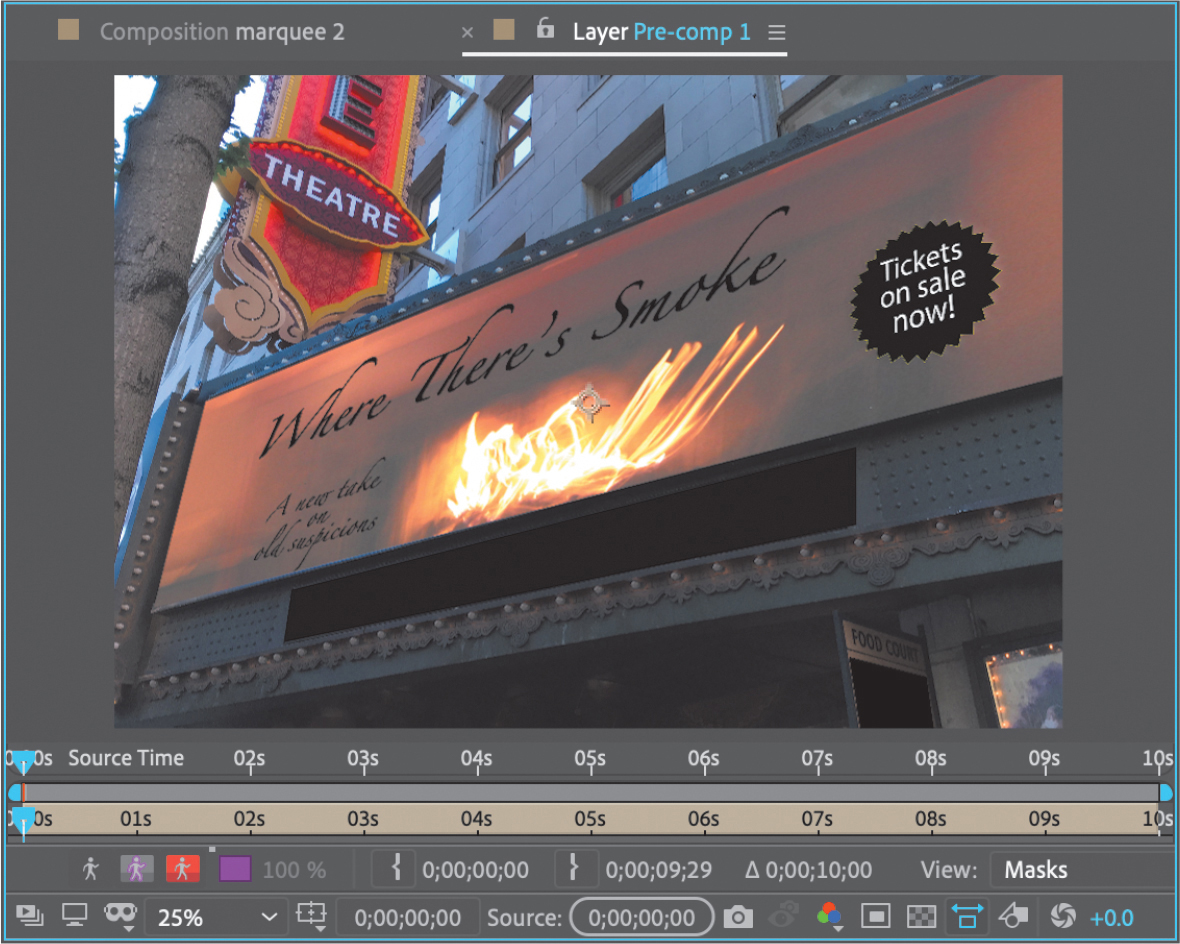
The Layer panel provides a visual reference of the frames you change when you remap time. It displays two time rulers: The time ruler at the bottom of the panel displays the current time. The Source Time ruler, just above the time ruler, has a remap-time marker that indicates which frame is playing at the current time.
Press the spacebar to preview the layer, and notice that the source-time and current-time markers in the two Layer panel rulers are synchronized. That will change as you remap time.
Over the first four seconds, the lights come on slowly. You’ll speed that section up so that the lights come on twice as fast.
Go to 2:00, and change the Time Remap value to 4:00.
This remaps time so that frame 4:00 plays at 2:00. In other words, the clip now plays back at twice the speed for the first two seconds of the composition.

Press the spacebar to preview the animation. The composition now runs at double-speed until 2:00, and at a slower speed thereafter. Press the spacebar again when you have finished previewing the animation.
Viewing time remapping in the Graph Editor
Using the Graph Editor, you can view and manipulate all aspects of effects and animations, including effect property values, keyframes, and interpolation. The Graph Editor displays changes in effects and animations as a two-dimensional graph, with playback time represented horizontally (from left to right). In layer bar mode, in contrast, the time ruler represents only the horizontal time element, without a graphical display of changing values.
Make sure the Time Remap property is selected for the Pre-comp 1 layer in the Timeline panel.
Click the Graph Editor button (
 ) to display the Graph Editor.
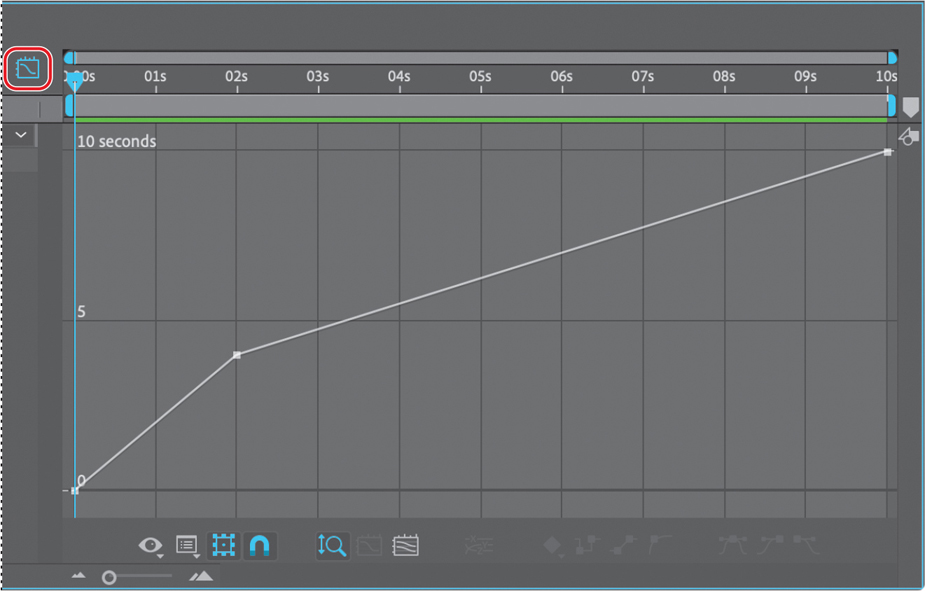
The Graph Editor displays a time-remap graph that shows a white line connecting the keyframes at 0:00, 2:00, and 10:00. The angle of the line is steep up to 2:00, and then becomes shallower. The steeper the line, the faster the playback time.
Using the Graph Editor to remap time
When remapping time, you can use the values in the time-remap graph to determine and control which frame of the movie plays at which point in time. Each Time Remap keyframe has a time value associated with it that corresponds to a specific frame in the layer; this value is represented vertically on the time-remap graph. When you enable time remapping for a layer, After Effects adds a Time Remap keyframe at the start and end points of the layer. These initial Time Remap keyframes have vertical time values equal to their horizontal positions.
By setting additional Time Remap keyframes, you can create complex motion effects. Every time you add a Time Remap keyframe, you create another point at which you can change the playback speed or direction. As you move the keyframe up or down in the time-remap graph, you adjust which frame of the video is set to play at the current time.
You’ll have some fun with the timing of this project.
![]() Tip
Tip
Watch the Info panel as you drag to see more information as you adjust the keyframe.
Select the Selection tool in the Tools panel.
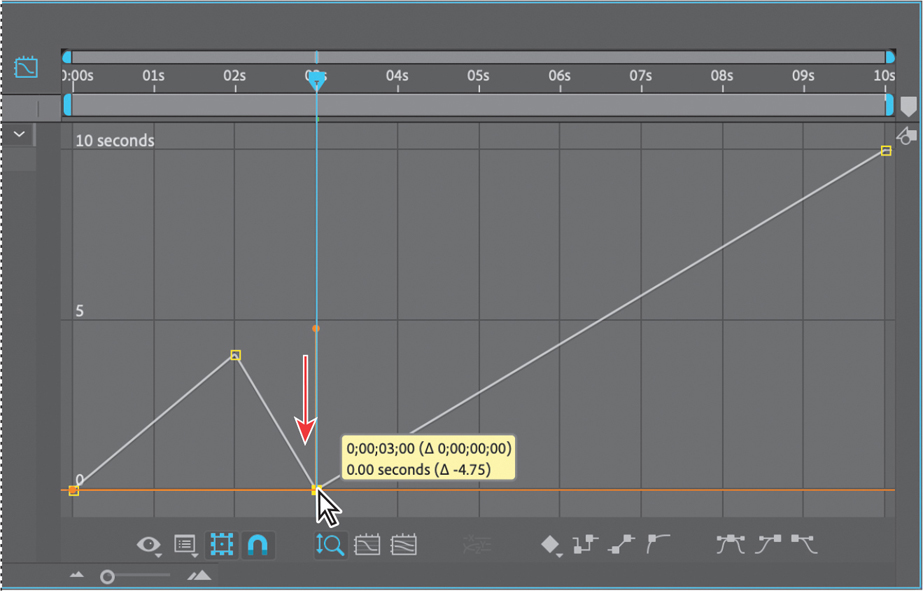
In the Timeline panel, go to 3:00.
In the time-remap graph, Ctrl-click (Windows) or Command-click (macOS) the line at 3:00 to create a new keyframe.
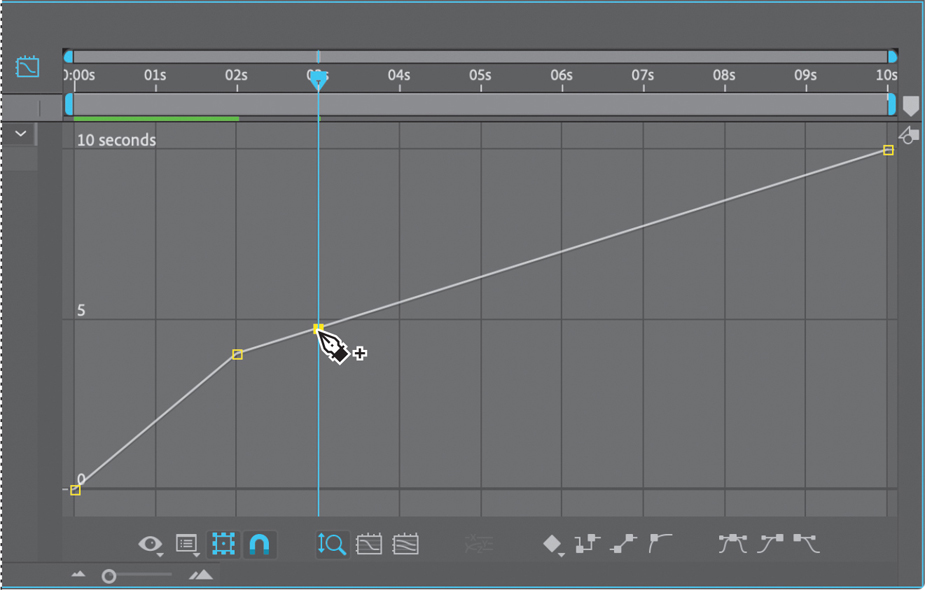
Drag the new keyframe down to 0 seconds.
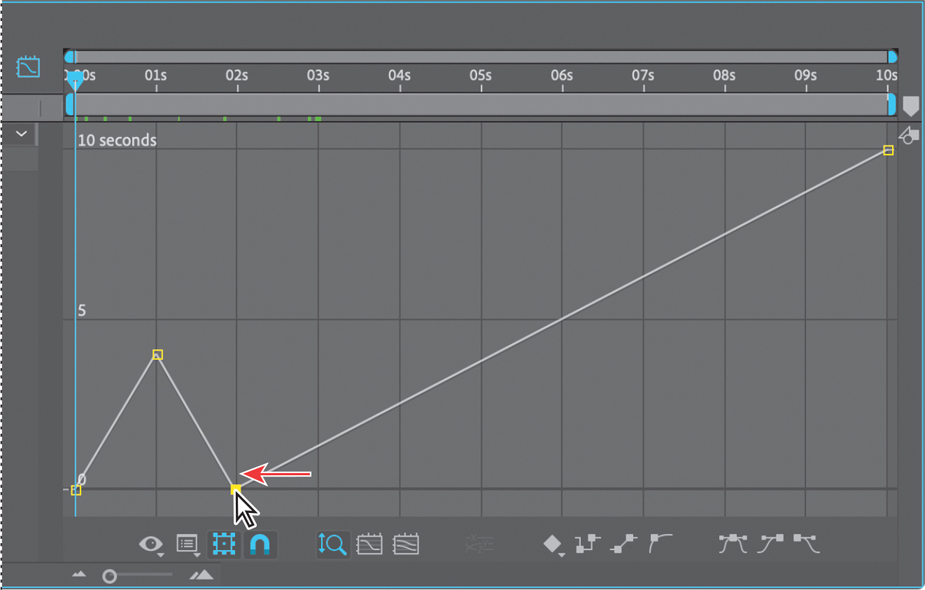
Go to 0:00, and then press the spacebar to preview the results. Watch the time ruler and Source Time ruler in the Layer panel to see which frames are playing at any given point in time.
The animation progresses rapidly over the first two seconds of the composition, and then plays in reverse for a second, and the lights go out. The entire animation plays again.
Press the spacebar to stop the preview.
Having fun yet? Keep going. You’ll adjust the timing so that the lights blink twice before coming on permanently.
Drag the keyframe from 2:00 to 1:00, so that the lights come on in the first second. Then move the next keyframe to 2:00, so that the lights blink off.
Shifting the keyframe affects the timing for the rest of the clip as well. Currently, it’s set to play the 10-second point in the composition at ten seconds, so the angle of speed adjusts accordingly.
You’ll set the lights to blink one more time before continuing the animation. Notice how the angle for the rest of the animation changes as a result; it becomes steeper because there is more animation to cover in less time.
 Tip
TipYou can scale the entire animation in time: Click the Time Remap property name to select all of its keyframes, so that you see a free-transform selection box. Then resize the selection box.
Ctrl-click (Windows) or Command-click (macOS) the line to create additional keyframes at 3:00 and 4:00, moving them to the 4-second and 0-second marks, respectively, so that the lights blink on and off again before the animation begins to play in full.
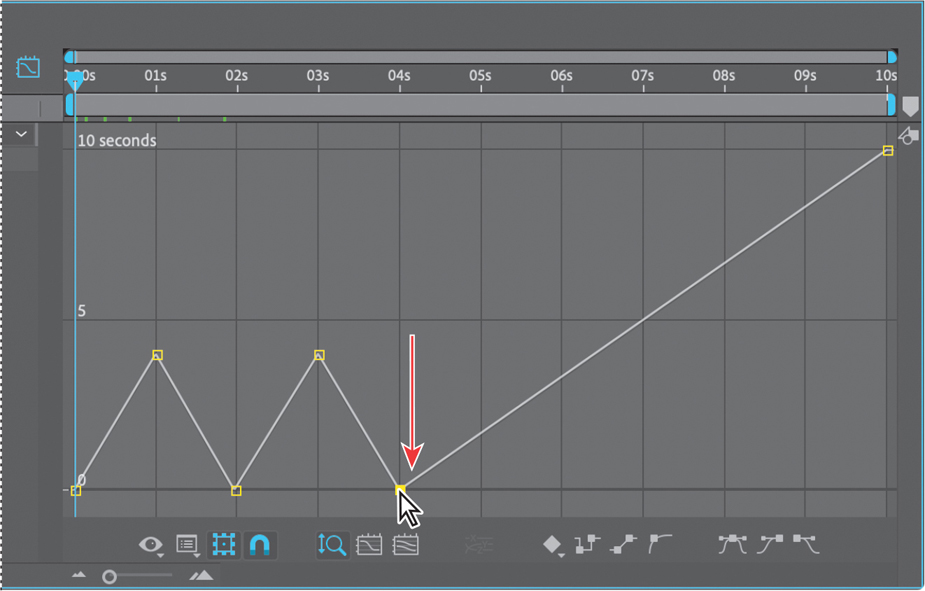
Press the spacebar to preview the animation, and press it again to stop it.
The lights blink on and off, but the text scrolls across the ticker too quickly. You’ll adjust the timing so that it moves more slowly, even though it means the entire text won’t appear before the end of the clip.
Go to 10:00. Then enter 7:00 for the Time Remap value.
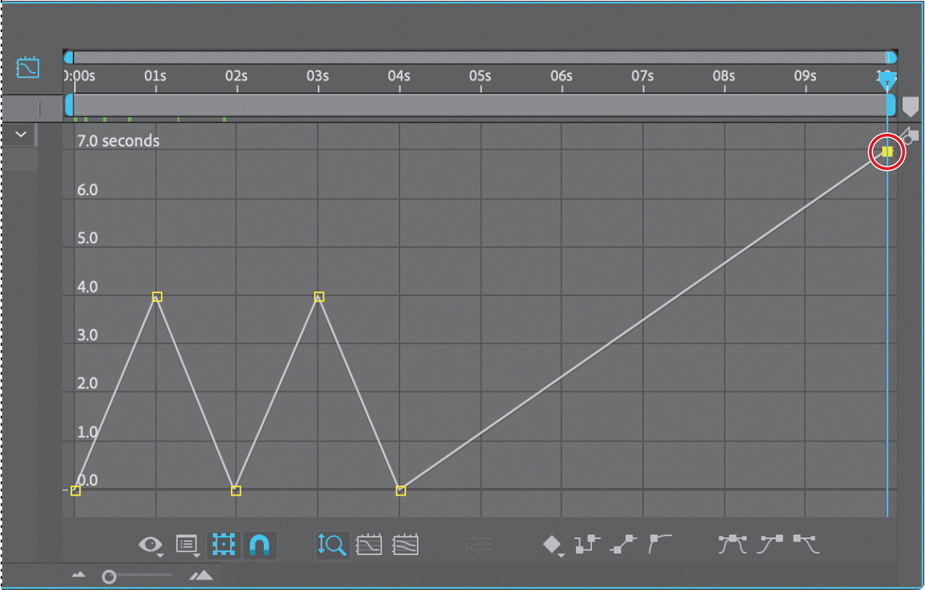
Press the Home key or move the current-time indicator to the beginning of the time ruler, and then press the spacebar to preview the animation. Press the spacebar again when you’re done.
The clip plays for ten seconds, but it ends at the 7-second point in the composition. Now the text moves more slowly—and much more realistically—across the ticker.
Choose File > Save to save your work so far.
Adding Easy Ease
You’ll soften the shift in time that occurs when the lights blink with Easy Ease.
Click to select the keyframe at 1:00, and then click the Easy Ease icon (
 ) at the bottom of the Graph Editor. This slows the shift into reverse so that the lights stay bright just a little longer.
Click to select the keyframe at 3:00, and apply Easy Ease for the same effect.
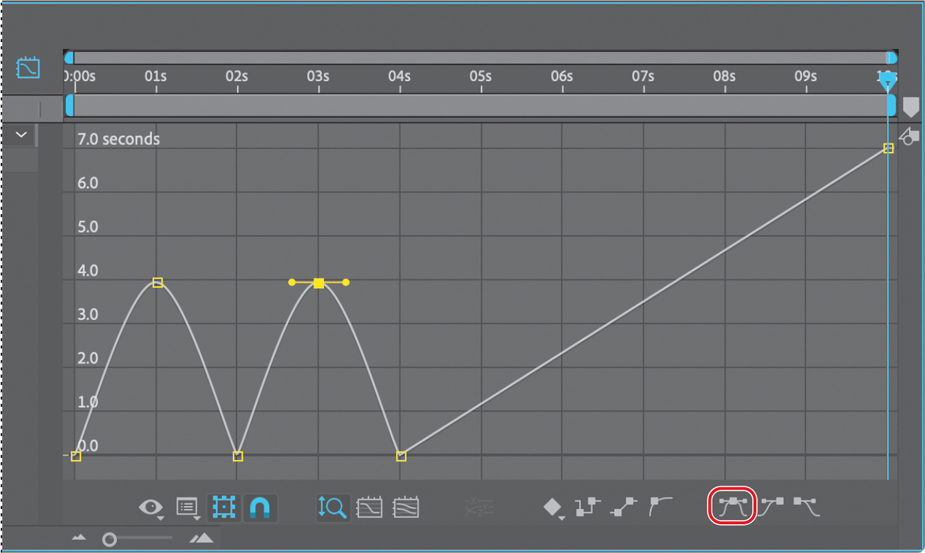
Notice that there are Bezier handles where you added ease. You can refine the amount of ease on a transition further by dragging the Bezier handle. If you drag the handle further from the keyframe, the transition is softer; if you drag it down or closer to the keyframe, the transition is more pronounced.
Go to the beginning of the time ruler, and preview the entire movie.
Choose File > Save to save the final project.
Congratulations. You’ve completed a complex animation, including shifts in time. You can render and export the time-remap project if you’d like. See Lesson 15, “Rendering and Outputting,” for detailed instructions on rendering and exporting a composition.
Review answers
1 When you import a layered Photoshop file into After Effects as a composition, After Effects preserves the layer order, transparency data, and layer styles from the source Photoshop document. It also preserves other features, such as adjustment layers and type.
2 The pick whip creates expressions that link the values of one property or effect to another layer. The pick whip is also a way to create parenting relationships. To use the pick whip, simply drag the pick whip icon from one property to another.
3 When you want one layer to show through a hole in another layer, you can use a track matte. To create a track matte, you need two layers: one to act as a matte, and another to fill the hole in the matte. You can animate either the track matte layer or the fill layer. When you animate the track matte layer, you create a traveling matte.
4 There are several ways to remap time in After Effects. Time remapping lets you dynamically speed up, slow down, stop, or reverse footage. When remapping time, you can use the values in the time-remap graph in the Graph Editor to determine and control which frame of the movie plays at which point in time. When you enable time remapping for a layer, After Effects adds a Time Remap keyframe at the start and end points of the layer. By setting additional Time Remap keyframes, you can create complex motion effects. Every time you add a Time Remap keyframe, you create another point at which you can change the playback speed or direction.