
12. Using 3D Features
Lesson overview
In this lesson, you’ll learn how to do the following:
Create a 3D environment in After Effects.
Look at a 3D scene from multiple views.
View a 3D ground plane.
Create 3D layers.
Rotate and position layers along x, y, and z axes.
Use the 3D Transform Gizmo.
Animate a camera layer.
Add lights to create shadows and depth.
Extrude 3D text and shapes in After Effects.
Use Cinema 4D with After Effects.

This lesson will take about an hour to complete. If you haven’t already done so, download the project files for this lesson from adobepress.com/AfterEffectsCIB2022, following the instructions in the Getting Started section under “Accessing the lesson files and Web Edition.”

PROJECT: TITLE CARD FOR A PRODUCTION COMPANY.
By clicking a single switch in the Timeline panel in After Effects, you can turn a 2D layer into a 3D layer, opening up a whole new world of creative possibilities. Maxon Cinema 4D Lite, included with After Effects, gives you even greater flexibility.
Getting started
Adobe After Effects can work with layers in two dimensions (x, y) or in three dimensions (x, y, z). So far in this book, you’ve worked primarily in two dimensions. When you specify a layer as three-dimensional (3D), After Effects adds the z axis, which lets you move the object forward and backward in space. By combining this depth with a variety of lights and camera angles, you can create animated 3D projects that take advantage of the full range of natural motion, lighting and shadows, perspective, and focusing effects. In this lesson, you’ll explore how to create and animate 3D layers as you create a title card for a fictional production company. You’ll use the Cinema 4D renderer to extrude text.
First, you’ll preview the final movie and set up the project.
Make sure the following files are in the Lessons/Lesson12 folder on your hard disk, or download them from adobepress.com now:
In the Assets folder: Sky.jpg
In the Start_Project_File folder: Lesson12_Start.aep
In the Sample_Movie folder: Lesson12.mp4
Open and play the Lesson12.mp4 sample movie in Windows Movies & TV or QuickTime Player to see what you will create in this lesson. When you’re done, close Windows Movies & TV or QuickTime Player. You may delete the sample movie from your hard disk if you have limited storage space.
When you begin this lesson, restore the default application settings for After Effects. See “Restoring default preferences” on page 3.
Start After Effects, and then immediately hold down Ctrl+Alt+Shift (Windows) or Command+Option+Shift (macOS). When prompted, click OK to delete your preferences. Click Open Project in the Home window.
Navigate to the Lessons/Lesson12/Start_Project_File folder, select the Lesson12_Start.aep file, and click Open.
Choose File > Save As > Save As.
In the Save Project As dialog box, navigate to the Lessons/Lesson12/Finished_Project folder. Name the project Lesson12_Finished.aep, and click Save.
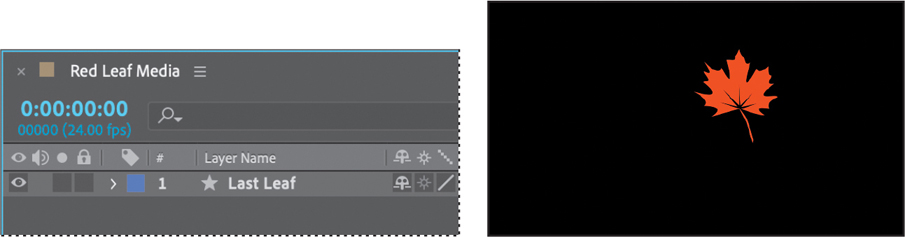
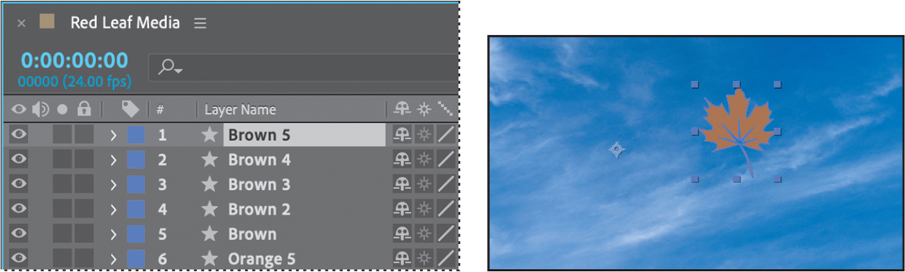
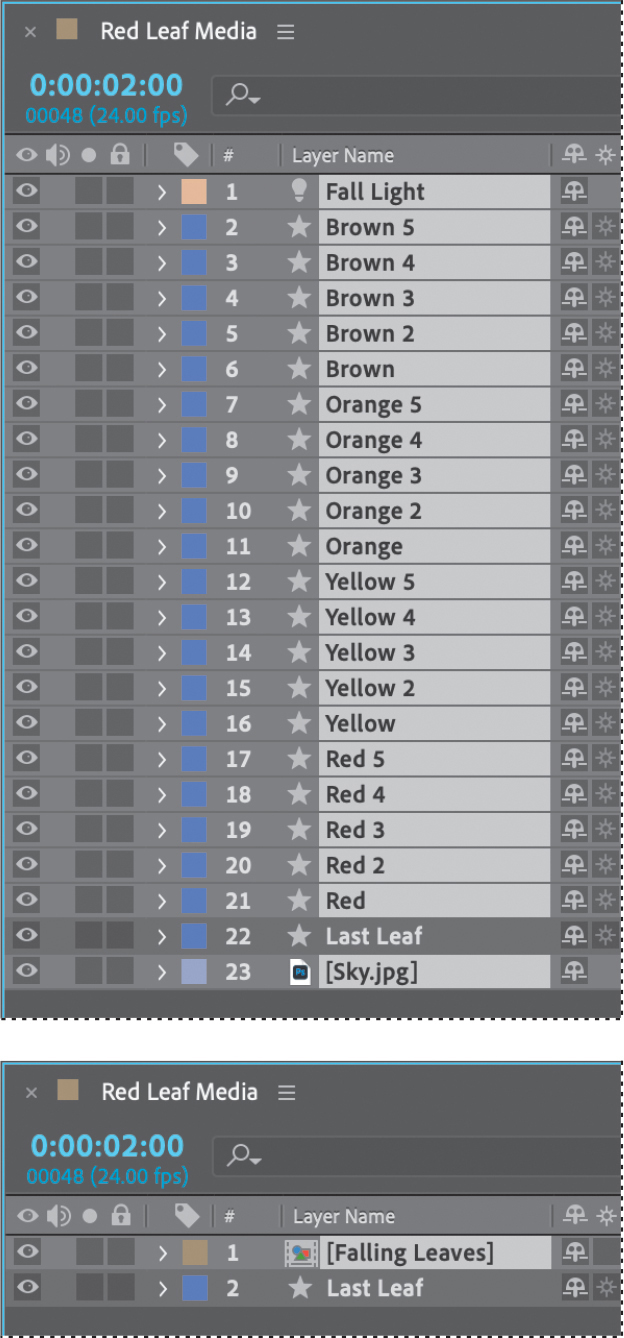
The project file includes one composition named Red Leaf Media, which contains the Last Leaf shape layer.
Choose File > Import > File, and navigate to the Lessons/Lesson12/Assets folder. Select the Sky.jpg file, and click Import or Open.
Drag the Sky.jpg file into the Red Leaf Media Timeline panel, placing it at the bottom of the layer stack.
Select the Sky layer, and choose Layer > Transform > Fit to Comp.
Click the Lock switch (
 ) for the Sky layer to prevent accidental changes to the layer for now.
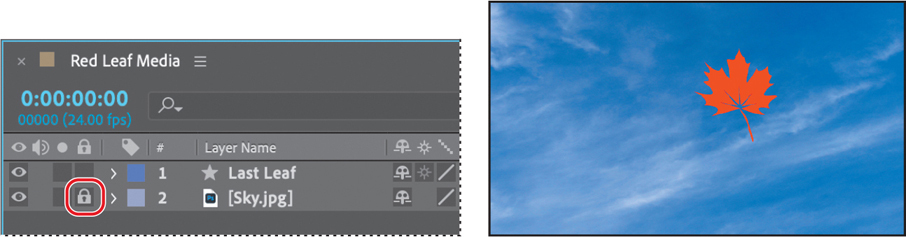
Choose File > Save.
Creating 3D layers
In order to move something in 3D space, you need to make it a 3D object. Initially, any layer has only x (width) and y (height) dimensions, and can be moved only along those axes. But all you have to do to move a layer in three dimensions in After Effects is to turn on its 3D layer switch, which lets you manipulate the object along its z axis (depth). You’ll create shape layers, and then make them 3D so you can animate them to appear to swirl and tumble across the sky.
We’ve provided the Last Leaf shape layer to get you started.
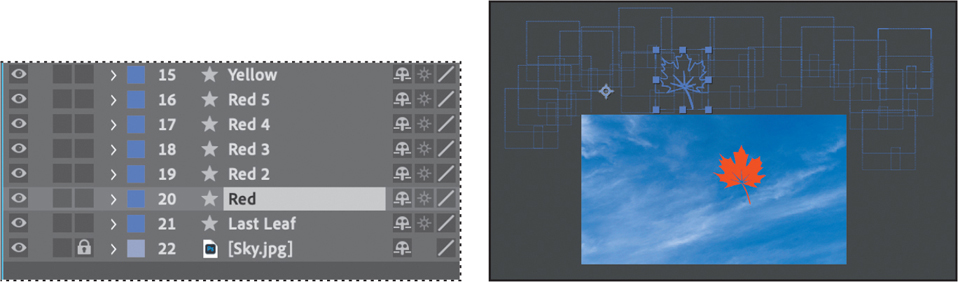
Duplicating shape layers
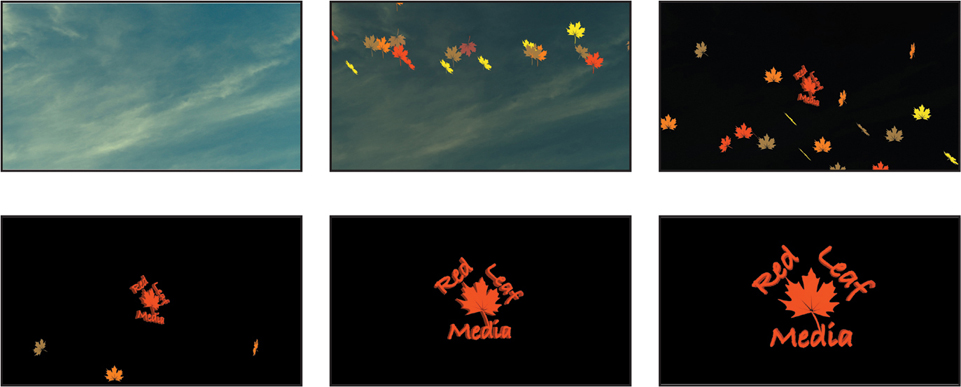
The title card ends with a single leaf as part of the production company’s logo. But you’ll create several copies of that leaf in different colors to swirl around the sky before the logo appears.
Select the Last Leaf layer, and choose Edit > Duplicate.
Select the Last Leaf 2 layer, press Enter or Return, rename the layer Red, and press Enter or Return again.
Select the Red layer, and press Ctrl+D or Command+D five times to make copies named Red 2, Red 3, Red 4, Red 5, and Red 6.
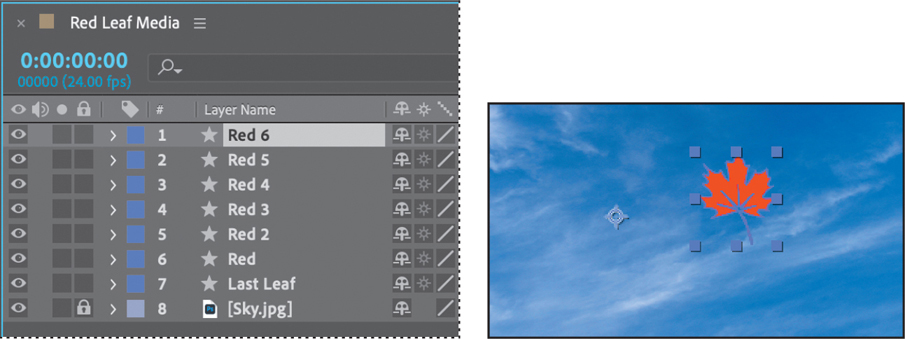
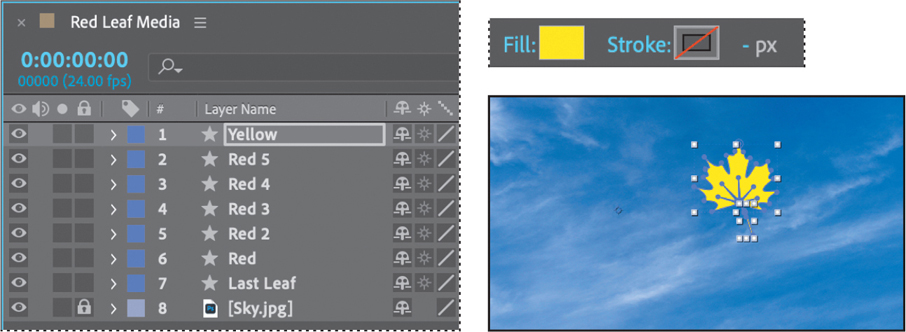
Rename the Red 6 layer Yellow.
With the Yellow layer selected, click the Fill Color box in the Tools panel, and select a yellow color (we used R=255, G=238, B=0). Then click OK.
Repeat step 3 to duplicate the Yellow layer five times. Then, rename the Yellow 6 layer Orange, and change its fill color to orange (we used R=255, G=120, B=0).
Repeat step 3 to duplicate the Orange layer five times. Then, rename the Orange 6 layer Brown, and change its fill color to a light brown (we used R=164, G=122, B=85).
Select the Brown layer, and press Ctrl+D or Command+D four times to make additional copies.
Converting 2D layers to 3D
The leaves are currently standard shape layers. Converting them to 3D layers is as simple as clicking a box.
You want the leaves to be off-camera when the scene starts. It’s easier to drag layers quickly when they’re two-dimensional, so you’ll drag them to the pasteboard before converting them. Then, you’ll make the layers 3D and set initial keyframes for all the leaves in their current positions.
Choose 33.3% from the Magnification Ratio pop-up menu at the bottom of the Composition panel so you can clearly see the pasteboard surrounding the frame.
Drag each leaf from the stack onto the pasteboard outside the frame, so that the leaves surround the top of the composition. Place some leaves of each color at the top and on each side of the frame.
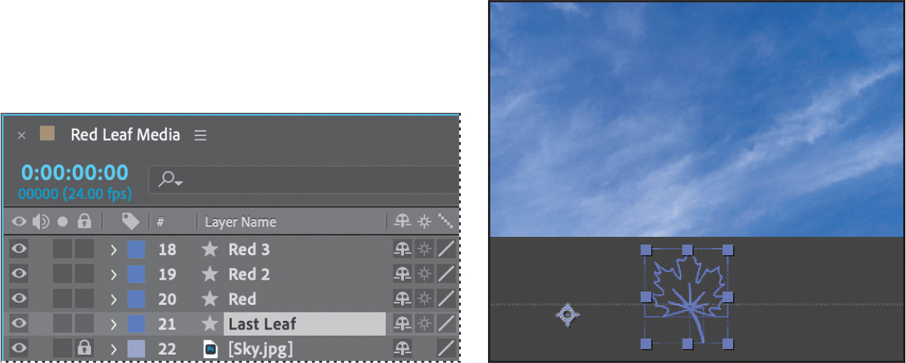
Move the Last Leaf layer onto the pasteboard below the composition, separate from the other leaves. You’ll return to it later.
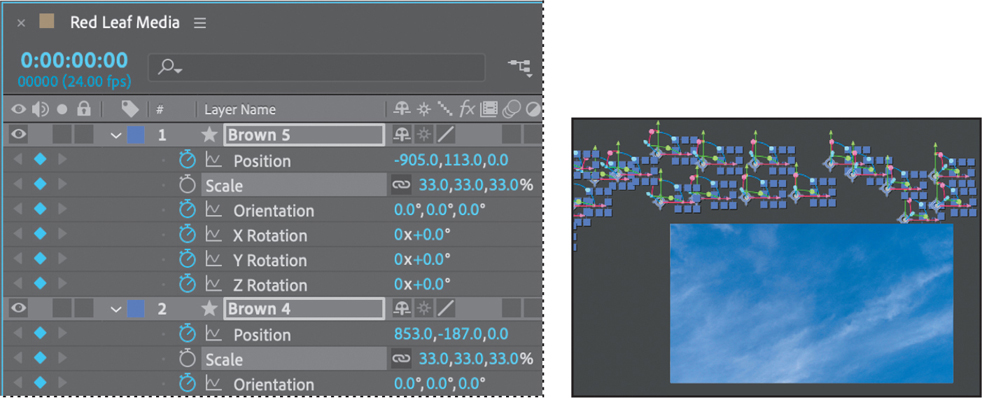
In the Timeline panel, select the Red layer and then Shift-select the Brown 5 layer, so that all the shape layers except the Last Leaf layer are selected.
Select the 3D Layer switch (
 ) for one of the selected layers to give them all three dimensions.
All of the selected layers become 3D layers. When a 3D layer is selected, the 3D Transform Gizmo appears over the layer’s anchor point in the Composition panel. The red controls manipulate the x axis, the green controls manipulate the y axis, and the blue arrow controls manipulate the z axis. The letter x, y, or z appears when you position the Selection tool over the corresponding controls. When you move or rotate the layer while the pointer is over a particular axis, the layer’s movement is restricted to that axis.
While the layers are still selected, press P, Shift+S, and then Shift+R to reveal the Position, Scale, and Rotation properties for all the layers.
Three 3D Rotation properties, as well as an Orientation property, appear in the Transform property group for the layer, and properties that previously supported only two dimensions now display a third value for the z axis.
Make sure the current-time indicator is at the beginning of the time ruler. Then, in one of the selected layers, click the stopwatch icon (
 ) for the Position, Orientation, and Rotation properties to create initial keyframes.
With the layers still selected, change the Scale property for one of the layers to 33%, so that all the shapes are one-third their original size. The leaves may shift when they’re resized. Make sure all the leaves are on the pasteboard.
Go to 1:20.
With the layers still selected, change the Rotation X, Rotation Y, and Rotation Z values for one of the layers to 2x+0.00°.
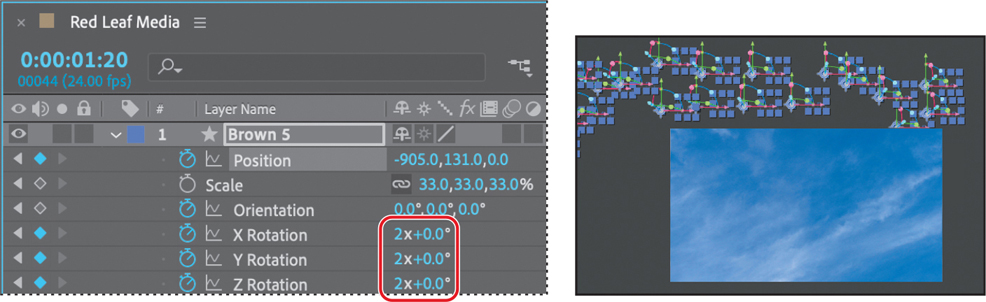
The property values change for all the layers. Each layer will make two full rotations along each axis.
Press U to hide all properties, and then press F2 or select an empty area of the Timeline panel to deselect all layers.
Choose File > Save to save your work so far.
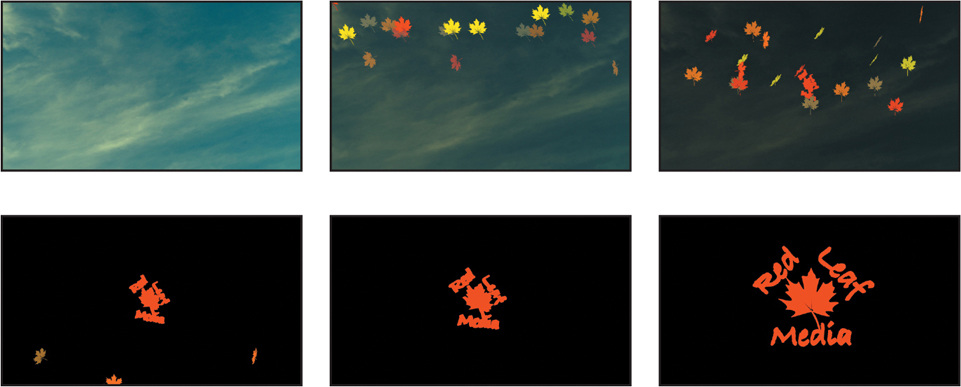
Animating 3D layers
As you’ve seen, the properties for 3D layers include additional options, but you create keyframes for them just as you do any other layer. You’ll use the 3D Transform Gizmo and Rotation properties to animate the leaves so that they appear to swirl through the sky.
With the current-time indicator still at 1:20, select a leaf on the pasteboard in the Composition panel, and drag it onto the frame.
Drag each of the remaining leaves onto the frame, positioning them so that they appear random, with the colors intermixed. Each leaf should travel at least halfway across the frame so it will have room to twirl.

Go to 2:10.
Select the Red layer and then Shift-select the Brown 5 layer to select all the leaves currently in the frame.
In the Timeline panel, press P to reveal the Position properties for all the layers.
Select the Y Position value for one of the layers, and increase it until all the layers are completely below the frame on the pasteboard. To increase the Y value, scrub it by clicking and holding the mouse button over the value and then dragging the mouse to the right.
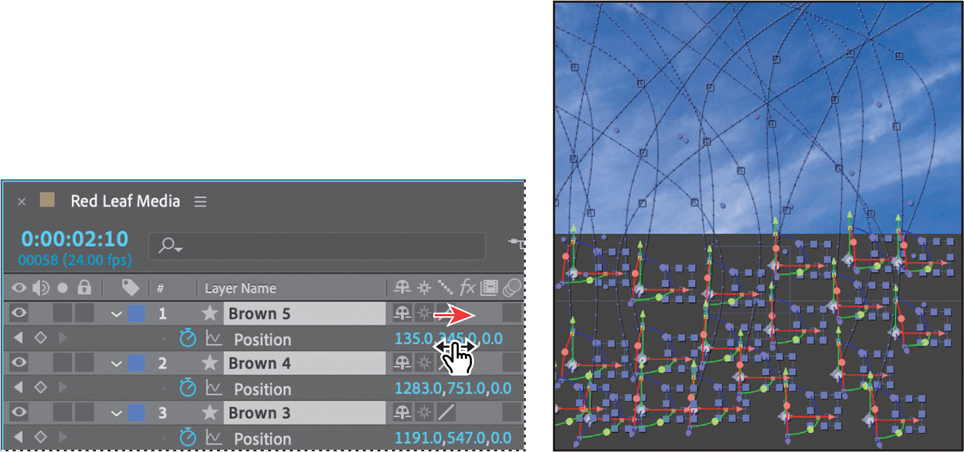
Because you’ve selected all the layers, increasing the Y value for one shifts all of them the same relative amount.
Press P to hide the Position layers, and then deselect all layers.
Press the Home key or move the current-time indicator to the beginning of the time ruler. Press the spacebar to preview the animation. When you’re done, press the spacebar again.
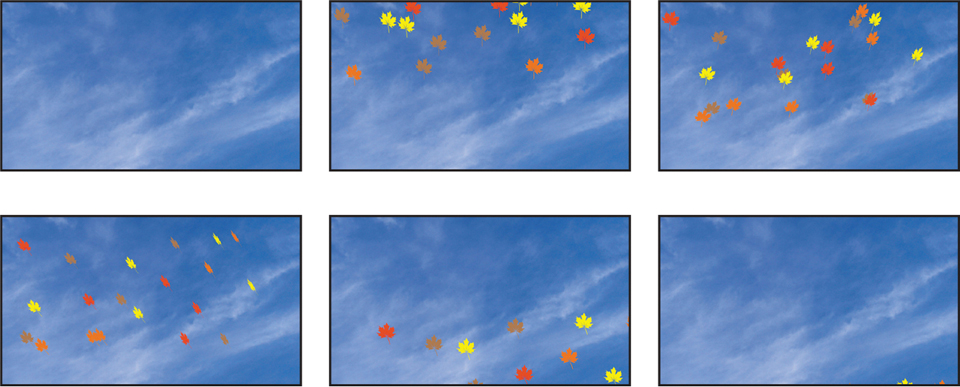
The leaves tumble and fall, but because you’ve set all the properties together, their movements are synchronized. You’ll adjust individual leaves’ paths for a more natural effect.
Go to 1:20. Make sure the Selection tool is selected. In the Composition panel, Shift-click to select multiple leaves from different areas of the screen.
Use the red, blue, and green arcs on the 3D Transform Gizmo to change the rotation angles for the selected leaves.
With multiple leaves still selected, press R to display the Rotation values. Change the X Rotation value to 2x+15°, the Y Rotation value to 2x+300°, and the Z Rotation to 1x+325°.
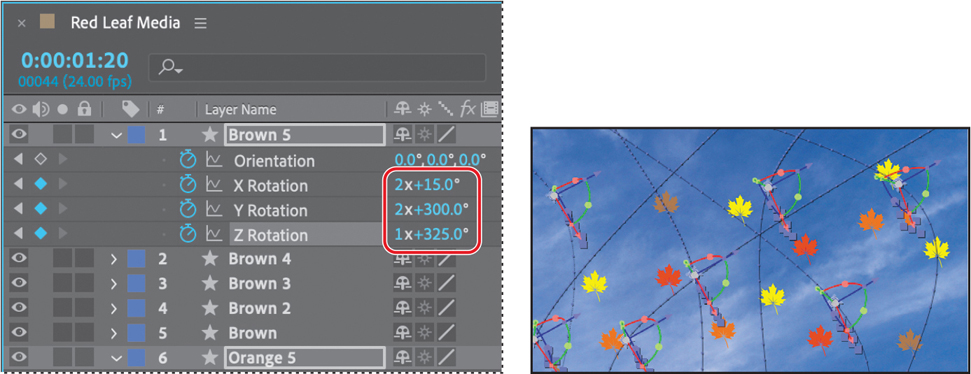
Rotation values cause the layer to rotate completely multiple times, plus the additional degrees, between keyframes.
Repeat steps 9–11 for different selections of leaves, using different values for each set of leaves you adjust. It doesn’t matter how you shift their orientation with the 3D Transform Gizmo or what Rotation values you use, as long as they’re different from the other sets.
 Tip
TipIf you want 3D layers to interact with each other and render together, keep them together in the Timeline panel. When a 2D layer is between 3D layers in the Timeline panel, you create separate 3D bins. Layers in one 3D bin render and interact separately from layers in another 3D bin.
Hide all layer properties, and then deselect all layers. Press the spacebar to preview the changes you made. When you’re done, press the spacebar again.

The leaves should appear to swirl more naturally. If you want to further adjust their paths and angles, you can make changes using the 3D Transform Gizmo at other points in the time ruler.
Choose File > Save to save your work so far.
Adding ambient light
In After Effects, a light is a type of layer that shines light on other layers. You can choose from among four different types of lights—Parallel, Spot, Point, and Ambient—and modify them with various settings. Lights, by default, are directed toward a point of interest, which is the focus area of the scene.
You’ll add a pale yellow ambient light that casts shadows to make this scene a little moodier, like a windy fall day that promises rain.
Press the Home key or move the current-time indicator to the beginning of the time ruler.
Make sure no layers are selected.
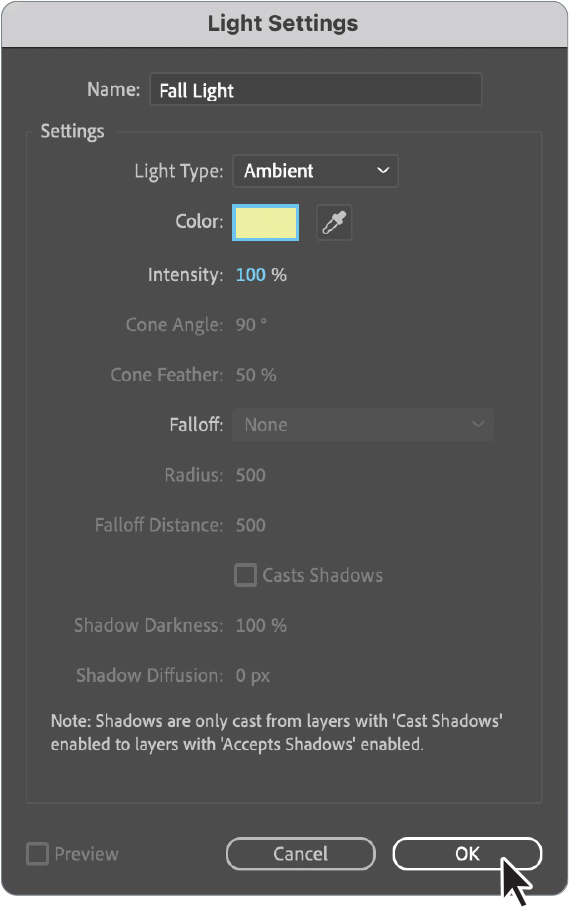
Choose Layer > New > Light.
In the Light Settings dialog box, do the following:
Name the layer Fall Light.
Choose Ambient from the Light Type menu.
Set Color to a light yellow (we used R=239, G=244, B=161).
Click OK to create the light layer.
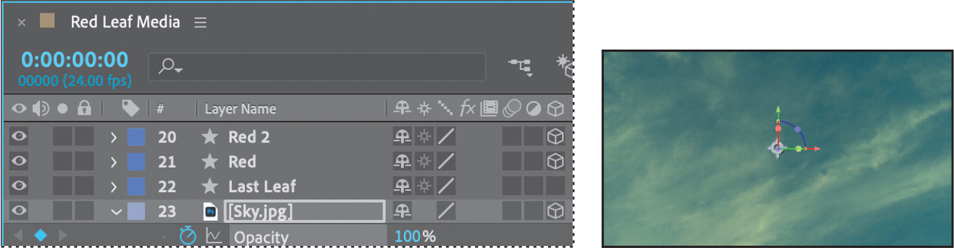
In the Timeline panel, click the Lock switch (
) to unlock the Sky layer. Then select the 3D Layer switch () to make the Sky layer 3D as well.Select the Sky layer, press T to reveal the Opacity property, and then create an initial keyframe at 100%.
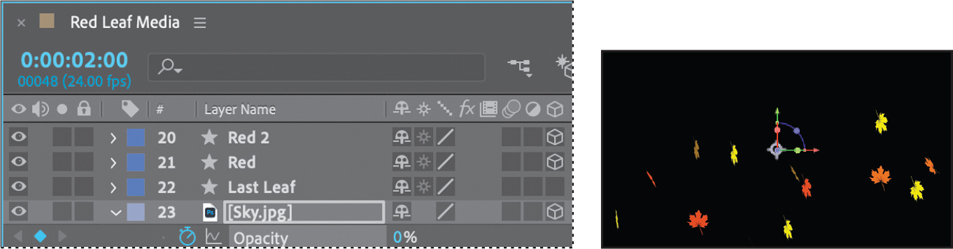
Go to 2:00, and change the Opacity value to 0.
Choose Fit from the Magnification Ratio pop-up menu at the bottom of the Composition panel so you can see the composition clearly.
Press the Home key or move the current-time indicator to the beginning of the time ruler. Press the spacebar to preview the animation. When you’re done, press the spacebar again.
Precomposing layers
You have a lot of layers in this project. To keep the Timeline panel tidy, you’ll move the layers from the falling leaves scene into a new composition, nested inside the project.
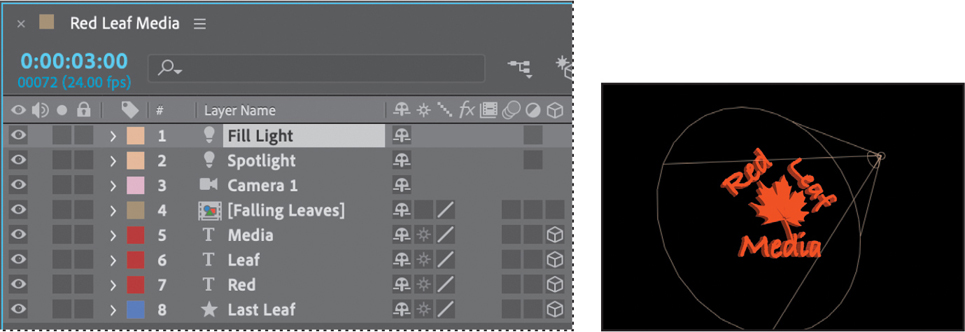
In the Timeline panel, select the Red layer, Shift-select the Fall Light layer, and then Ctrl-select or Command-select the Sky layer so that everything but the Last Leaf layer is selected.
Choose Layer > Pre-compose.
Name the composition Falling Leaves, make sure Move All Attributes Into The New Composition is selected, and click OK.
The layers you selected in the Timeline panel are replaced by a single Falling Leaves layer.
Select the Falling Leaves composition in the Project panel, and choose Composition > Composition Settings.
Change the Duration to 2:15, and click OK.
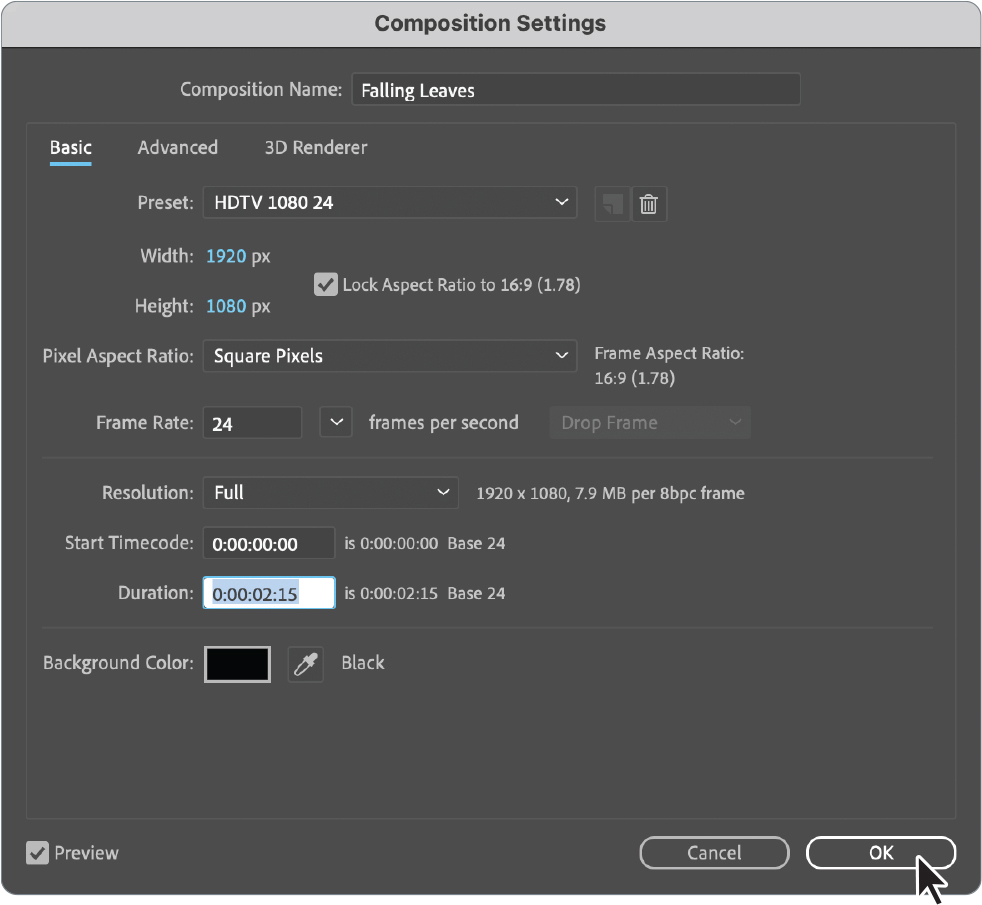
In the Timeline panel, the Falling Leaves layer ends at 2:15, by which time all the leaves are off the screen and the Sky layer is fully transparent.
Creating 3D text
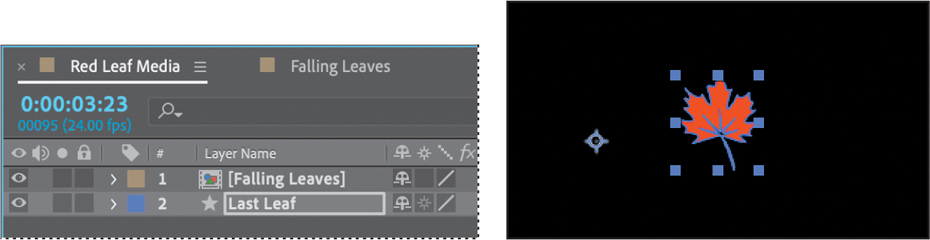
When the leaves have fallen, the final logo—including the Last Leaf layer and extruded text—should appear and move to the center of the screen. First, you’ll move the Last Leaf layer into its final position, and then you’ll create the text to go with it.
Go to 3:23, the last frame in the composition.
Zoom out to see the pasteboard. Use the Selection tool to drag the Last Leaf layer to the middle of the composition, centering it on the black background.
Choose Fit from the Magnification Ratio pop-up menu to zoom back in.
Creating text layers
You’ll add text for the production company’s name around the leaf.
Select the Horizontal Type tool (
 ) in the Tools panel.
After Effects opens the Character panel.
 Note
NoteIf a script font is not available, install one using Adobe Fonts. Choose File > Add Fonts From Adobe, select Script from the Classification filters, and activate the font. You may need to close the Character panel and reopen it to see a newly activated font.
In the Character panel, select the following settings:
Font: Bradley Hand or another script font
Stroke: None
Font Size: 200 px
Select the Fill swatch in the Character panel, and then use the eyedropper to match the red of the leaf.
Click an insertion point in the Composition panel, and type Red.
Deselect all layers, and then type Leaf using the same settings.
Deselect all layers, and then type Media using the same settings.

Select the Red layer, and then choose Layer > Transform > Rotation. Type –45 in the Degrees field. Click OK.
Select the Selection tool in the Tools panel. Then drag the Red layer to the top left corner of the leaf, and adjust the word Red so that it is parallel to the leaf.
Repeat steps 7–8 to position the Leaf layer on the right side, but type 45 in the Degrees field.

Move the word Media below the leaf.
Adjust the text size and positioning as needed. Depending on the font you use, you may need to make the text smaller or larger.
Extruding text and shapes in After Effects
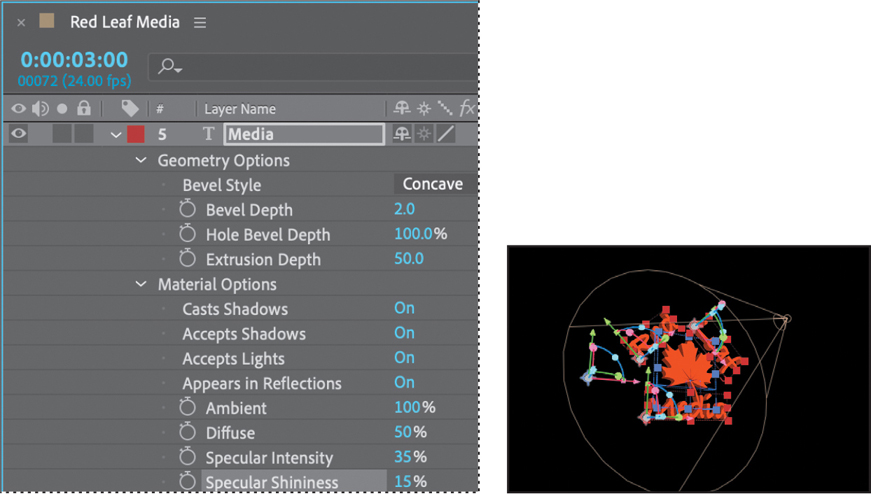
The camera will approach the logo from an angle, and you want the text to stand out. Using the Cinema 4D renderer, you can extrude text and shapes within After Effects. You’ll use the Geometry Options properties to make the logo a little more interesting. First, you’ll make all the logo layers 3D.
In the Timeline panel, move the Falling Leaves layer to the top of the layer stack if it isn’t there already.
Select the Last Leaf layer, and then Shift-select the Media layer.
Click the 3D Layer switch (
) in the Media layer.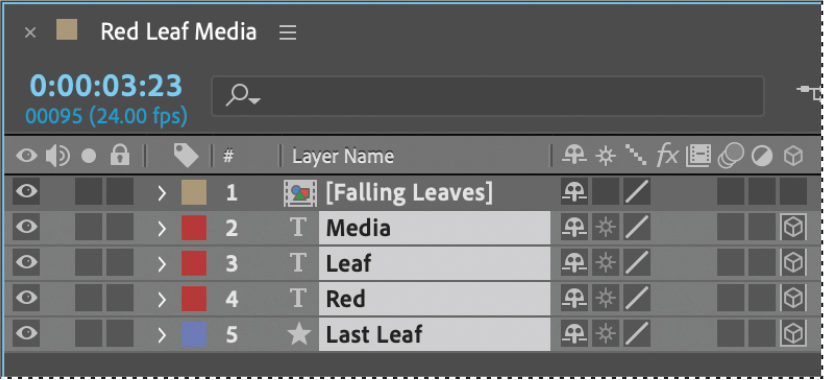
All four selected layers become 3D layers.
Expand the layer properties for one layer. All four layers’ properties are expanded.
Expand Geometry Options for the Media layer.
NoteIf Geometry Options is dimmed, click Change Renderer, choose Cinema 4D from the Renderer menu in the Composition Settings panel, and then click OK.
Choose Concave from the Bevel Style menu.
Change the Extrusion Depth to 50.
Hide all properties, and deselect all layers so you can see the results clearly.
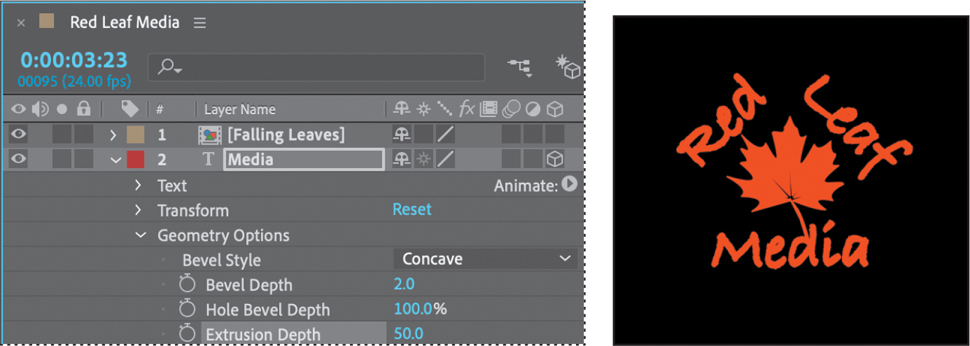
All four layers are extruded. They appear a little puffier on screen, but you can’t tell that they have depth from the front.
Using 3D views
Sometimes the appearance of 3D layers can be deceptive. For example, a layer might appear to be scaling smaller along its x and y axes when it’s actually moving along the z axis. You can’t always tell from the default view in the Composition panel. The Select View Layout pop-up menu at the bottom of the Composition panel lets you divide the panel into different views of a single frame, so you can see your work from multiple angles. You specify different views using the 3D View pop-up menu. You’ll view the logo from different angles so you can see the effect of the extrusion.
At the bottom of the Composition panel, click the Select View Layout pop-up menu, and choose 4 Views, if your screen is large enough to display them. Otherwise, choose 2 Views.
With 4 Views selected, you can view the scene from four different perspectives. The Top view displays the scene along the y axis. There, you can see the z axis, and it’s clear that the layer has depth, but it just looks like a rectangle from here. The Active Camera view displays what the camera sees, which is currently the same as the Front view. The Right view shows the scene as if you were observing it along the x axis. Like the Top view, the depth appears rectangular.
If you chose 4 Views, click the Front view to make it active; if you chose 2 Views, click the view on the left to make it active. (Blue corner tabs appear around the active view.) Then, from the 3D View pop-up menu, choose Custom View 1 to see the scene from a different perspective.
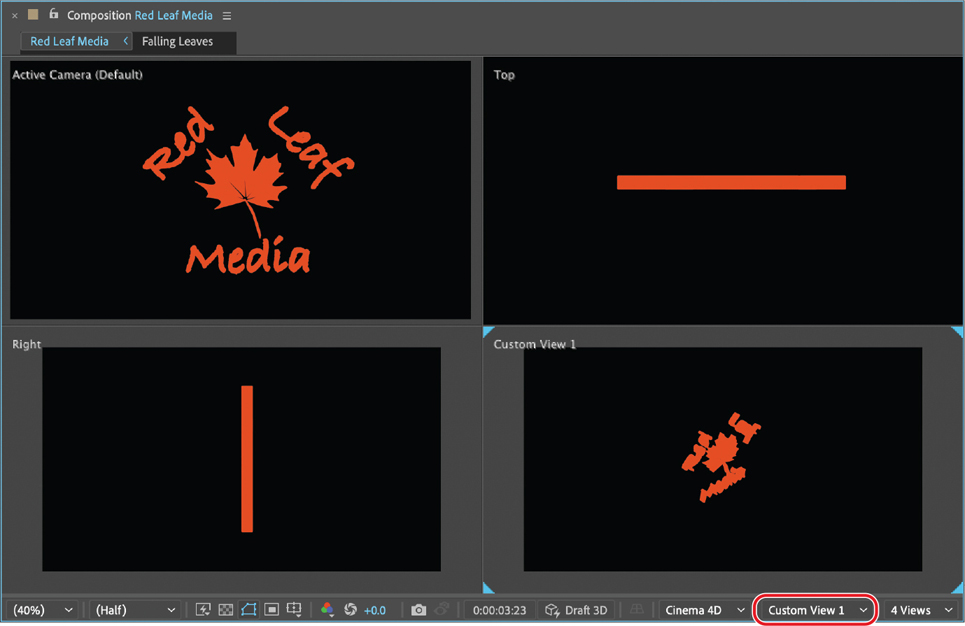
From this angle, you can see more definition in the extrusion. Viewing your 3D scene from different perspectives can help you align elements more accurately, view how layers are interacting with each other, and understand how objects, lights, and cameras are positioned in 3D space.
Viewing the 3D ground plane
A ground plane represents the ground relative to the 3D objects. Viewing the ground plane can make it easier to align objects and determine their relationships to each other. In After Effects, you can view the 3D ground plane when the Real-time Draft 3D preview mode is enabled. Real-time Draft 3D preview mode speeds up real-time playback in heavy scenes; it’s intended only for draft quality and not final output.
With the Custom View 1 window active, click the Draft 3D button at the bottom of the Composition panel to enable it.
Click the 3D Ground Plane button if it’s not already enabled.
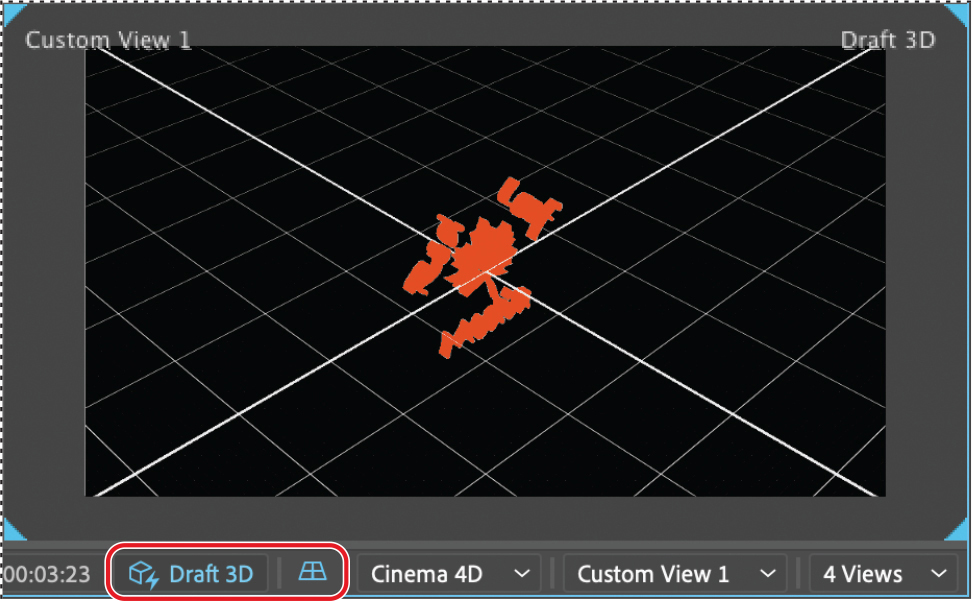
The 3D ground plane is displayed in the Custom View 1 window. You can enable or disable it for each view separately. Leave it visible as you explore the camera tools.
Using the camera tools
When you create a 3D layer, the camera tools become available in the Tools panel. You can use the camera tools to change the perspective on the scene and to manipulate existing cameras.
![]() Note
Note
Because the camera tools change the perspective, they work only in custom views, not in fixed views, such as Front or Top.
The Orbit tools (
 ) orbit around the cursor, scene, or camera point of interest.
The Pan tools (
 ) pan the camera under the cursor or in the center of the screen.
The Dolly controls (
 ) move the camera toward the cursor, to the cursor, or to the point of interest.
You’ll experiment with each tool to see how it changes your perspective.
Select the Orbit Around Cursor tool (
 ) in the Tools panel.
Drag the Orbit Around Cursor tool across the Custom View 1 window to change the angle from which you’re viewing the scene.
Select the Pan Under Cursor tool (
 ), and drag it across the Custom View 1 window to see its effect.
Select the Dolly Towards Cursor tool (
 ), and drag it around the Custom View 1 window to see its effect.
As you use the camera tools, the view in each of the other windows is unchanged. The layers themselves haven’t moved at all; only your perspective of them has changed. It’s as if you were able to fly around the stage and view the scene from different angles.
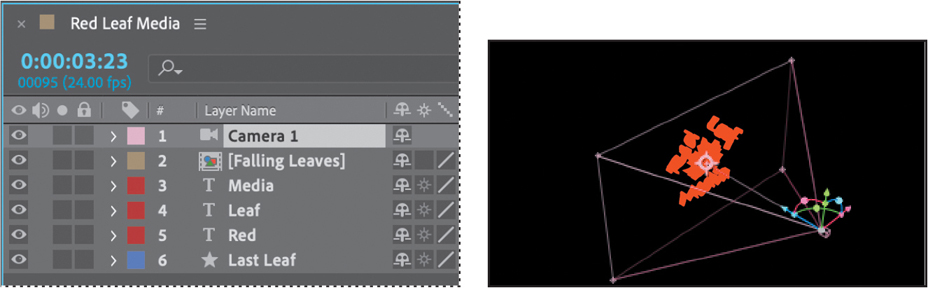
Adding a camera
You’ve seen that you can view a 3D scene from different perspectives. You can also view 3D layers from various angles and distances using layers called cameras. When you set a camera view for your composition, you look at the layers as though you were looking through that camera. You can view a composition through the active camera or through a named, custom camera. If you have not created a custom camera, then the active camera is the same as the default composition view.
If you’ve used the camera tools to create a custom view, you can create a camera from that view by choosing View > Create Camera From 3D View.
For this project, you’ll create a custom camera.
Deselect all layers, and then choose Layer > New > Camera.
In the Camera Settings dialog box, choose 20mm from the Preset menu, and click OK.

The Camera 1 layer appears at the top of the layer stack in the Timeline panel (with a camera icon next to the layer name), and the Composition panel updates to reflect the new camera layer’s perspective. The view should change slightly, because the 20mm preset shows a wider field of view than the default. If you didn’t notice the scene change, toggle the visibility of the Camera 1 layer to see it, and then make sure it’s visible.
TipAfter Effects displays the wireframes for cameras by default. To see wireframes only when cameras (or spotlights) are selected, or not at all, choose View Options from the Composition panel menu, and then choose the options you want from the Camera Wireframes and Spotlight Wireframes menus. Then click OK.
If four views are open, choose 2 Views from the Select View Layout pop-up menu at the bottom of the Composition panel.
Change the view on the left to Right, and set the view on the right to Active Camera (Camera 1).
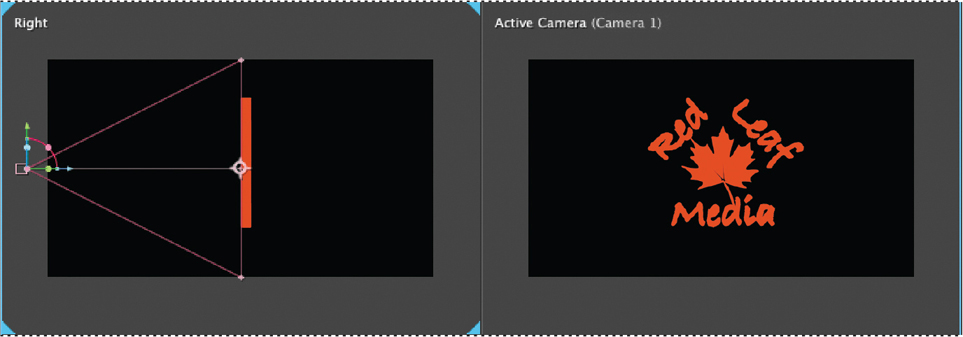
Like light layers, camera layers have a point of interest that can be used to determine what the camera looks at. By default, the camera’s point of interest is the center of the composition. That’s where the logo currently is, so that point of interest works well.
Make sure the current-time indicator is at the end of the time ruler. Select the Camera 1 layer, and press the P key to reveal the Position property for the layer. Create an initial keyframe by clicking the stopwatch icon (
) next to the Position property.Go to 1:08, where the leaves are tumbling around the screen.
Change the Position values to -2000, 2000, -2000.
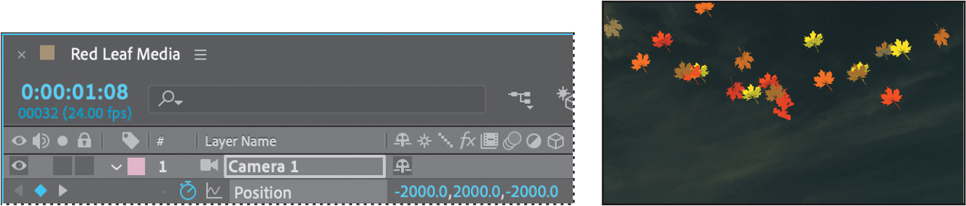
The camera starts at an angle to the logo, and it’s farther away than it will be in the final view. The camera will move around the logo, so that it appears that the logo itself is spinning into position. It’s much easier to animate the camera than to coordinate the movements of all four 3D layers in the logo.
Right-click or Control-click the second Position keyframe for the Camera 1 layer (the one at 3:23), and choose Keyframe Assistant > Easy Ease In.
Hide the Position property for the Camera 1 layer.
Still at 1:08, select the Media layer, and then Shift-select the Last Leaf layer. Press Alt+[ (Windows) or Option+[ (macOS) to set the In point for the selected layers.
Select the Camera 1 layer, and press Alt+[ or Option+[ to set its In point, too.
Press the Home key or move the current-time indicator to the beginning of the time ruler. Press the spacebar to preview the animation. When you’re done, press the spacebar again.
Lighting a scene
The red logo is sharp against the black background, but it isn’t all that interesting. You’ll add lighting and adjust the material properties to give it more character.
Adding a spotlight
First, you’ll add a spotlight to add some depth to the logo.
Go to 3:23, the last frame in the time ruler.
Deselect all layers, and then choose Layer > New > Light.
In the Light Settings dialog box, do the following:
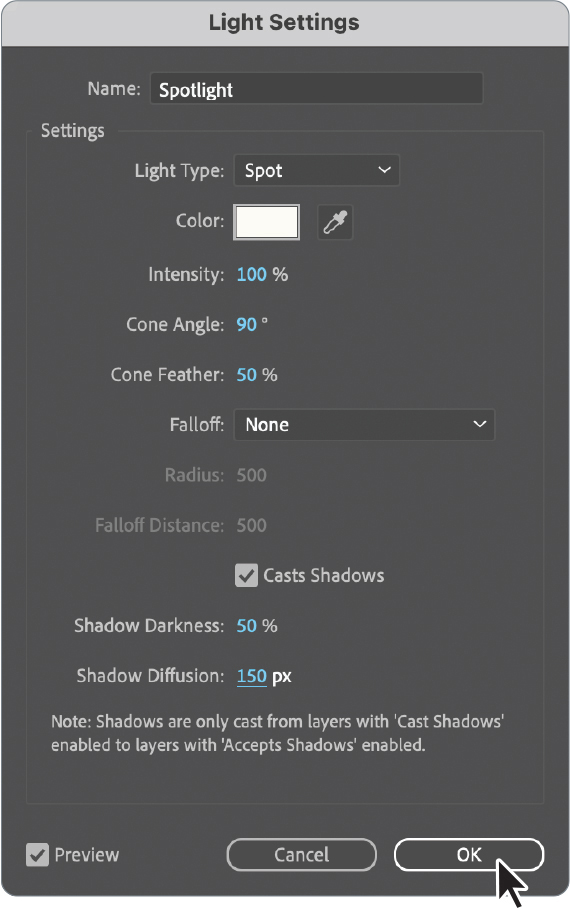
Name the layer Spotlight.
Choose Spot from the Light Type menu.
Set Color to a white tint (we used R=248, G=249, B=242).
Make sure Intensity is set to 100% and Cone Angle to 90 degrees.
Make sure Cone Feather is set to 50%.
Select the Casts Shadows option.
Set Shadow Darkness to 50% and Shadow Diffusion to 150 pixels.
Click OK to create the light layer.
In the Timeline panel, the light layer is represented by a light bulb icon (
 ).
).In the Composition panel, a wireframe illustrates the light’s position, with a cross-hairs icon (
 ) representing the point of interest.
Creating a fill light
The spotlight adds some drama to the logo, but the extrusion isn’t obvious as the camera moves into place. You’ll add a fill light so the extrusion effect is visible.
Choose Layer > New > Light.
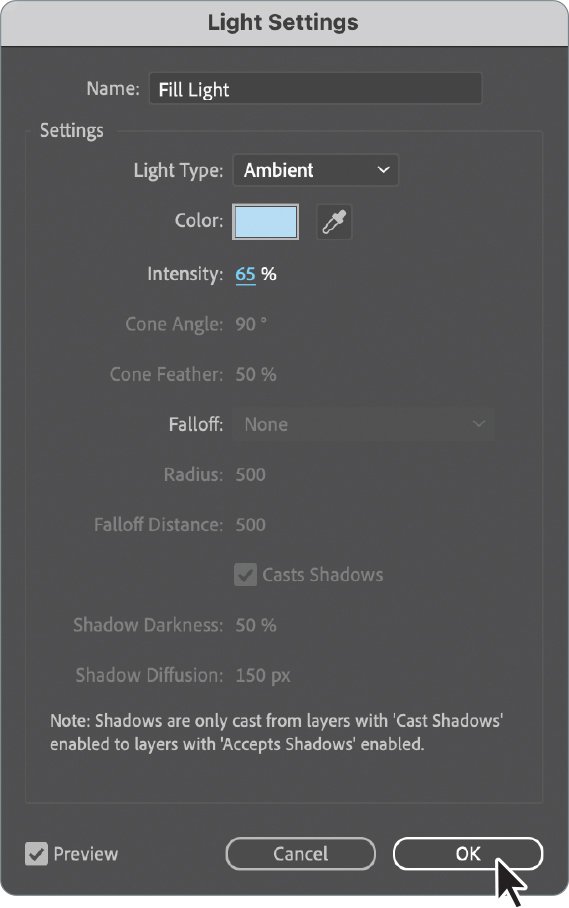
In the Light Settings dialog box, do the following:
Name the layer Fill Light.
Choose Ambient from the Light Type menu.
Set the Color to a light blue (we used R=179, G=221, B=244).
Set Intensity to 65%.
Click OK to create the light layer.
Go to 3:00.
The extrusion is more obvious now, giving all the logo components more depth.
Choose File > Save.
Casting shadows and setting material properties
The scene is looking better, but you can make it more obviously three-dimensional still. You’ll change the Material Options properties to determine how the 3D layers interact with the lights and shadows.
Select the Last Leaf layer, and then Shift-select the Media layer to select all four layers in the logo. Press the A key twice (AA) to reveal the Material Options properties for the layers.
The Material Options property group defines the surface properties of a 3D layer. You can also set shadow and light transmission values.
For Casts Shadows, click the word Off to toggle the setting on. (Make sure it says On, not Only.)
The logo layers now cast shadows based on the lights in the scene.
Change the Specular Intensity to 35% so that the logo layers reflect less of the light in the scene.
Increase the Specular Shininess to 15% to give the surfaces a slightly more metallic shine.
Hide the properties for all layers. Deselect all layers.
Choose 1 View from the Select View Layout pop-up menu, and make sure Active Camera View is selected.
Press the spacebar to preview the entire movie. The leaves swirl onto the screen, twirl around, and exit as the logo appears to spin into place. Press the spacebar again when you’re done previewing your work.
Review answers
1 When you select a layer’s 3D Layer switch in the Timeline panel, After Effects adds a third axis, the z axis, to the layer. You can then move and rotate the layer in three dimensions. In addition, the layer takes on new properties that are unique to 3D layers, such as the Materials Options property group.
2 The appearance of 3D layers can be deceptive, depending on the view in the Composition panel. By enabling 3D views, you can see the true position of a layer relative to other layers in the composition.
3 You can view After Effects 3D layers from any number of angles and distances using layers called cameras. When you set a camera view for your composition, you look at the layers as though you were looking through that camera. You can animate a camera’s position and angle.
4 In After Effects, a light is a type of layer that shines light on other layers. You can choose from among four different types of lights—Parallel, Spot, Point, and Ambient—and modify them with various settings.