
13. Working with the 3D Camera Tracker
Lesson overview
In this lesson, you’ll learn how to do the following:
Track footage using the 3D Camera Tracker.
Add camera and text elements to a tracked scene.
Set a ground plane and origin.
Create realistic shadows for new 3D elements.
Lock elements to planes using solid objects.
Remove rolling shutter distortions from DSLR footage.

This lesson will take about an hour and a half to complete. If you haven’t already done so, download the project files for this lesson from adobepress.com/AfterEffectsCIB2022, following the instructions in the Getting Started section under “Accessing the lesson files and Web Edition.”

PROJECT: TV AD
The 3D Camera Tracker effect analyzes two- dimensional footage to create a virtual 3D camera that matches the original. You can use this data to add 3D objects that merge realistically with your scene.
About the 3D Camera Tracker effect
The 3D Camera Tracker effect automatically analyzes the motion present in existing 2D footage, extracts the position and lens type of the real camera that shot the scene, and creates a new 3D camera in After Effects to match it. The effect also overlays 3D track points onto the 2D footage, so you can easily attach new 3D layers onto the original footage.
These new 3D layers have the same movement and perspective changes as the original footage. The 3D Camera Tracker effect even helps create “shadow catchers,” so your new 3D layers can appear to cast realistic shadows and reflections onto the existing footage.
The 3D Camera Tracker performs its analysis in the background. Therefore, you can work on other compositions while the footage is being analyzed.
Getting started
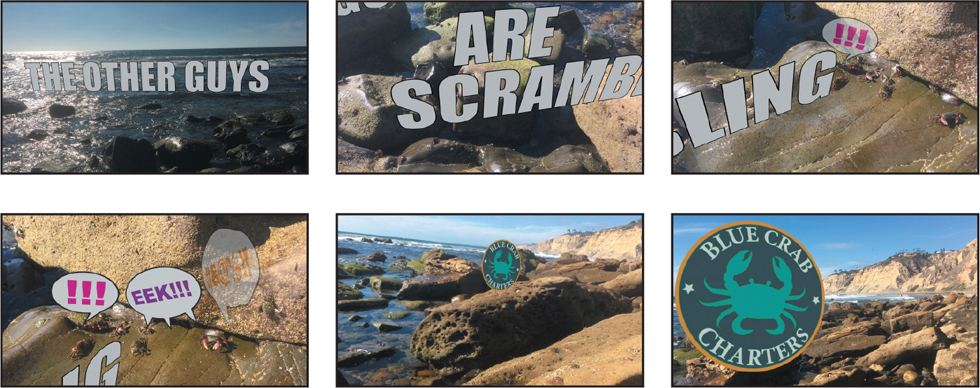
In this lesson, you’ll create a short ad for a tourism company. You’ll begin by importing the footage and tracking it with the 3D Camera Tracker effect. Then you’ll add 3D text elements that track precisely with the scene. You’ll add images using similar techniques. Finally, you’ll use an effect to quickly add more character to the scene.
First, you’ll preview the final movie and set up your project.
Make sure the following files are in the Lessons/Lesson13 folder on your hard disk, or download them from adobepress.com now:
In the Assets folder: BlueCrabLogo.psd, Quote1.psd, Quote2.psd, Quote3. psd, Shoreline.mov
In the Sample_Movie folder: Lesson13.mp4
Open and play the Lesson13.mp4 sample movie in Windows Movies & TV or QuickTime Player to see what you will create in this lesson. When you are done, close Windows Movies & TV or QuickTime Player. You may delete the sample movie from your hard disk if you have limited storage space.
When you begin this lesson, restore the default application settings for After Effects. See “Restoring default preferences” on page 3.
Start After Effects, and then immediately hold down Ctrl+Alt+Shift (Windows) or Command+Option+Shift (macOS). When prompted, click OK to delete your preferences. Click New Project in the Home window.
After Effects opens to display an empty, untitled project.
Choose File > Save As > Save As.
In the Save As dialog box, navigate to the Lessons/Lesson13/ Finished_Project folder.
Name the project Lesson13_Finished.aep, and then click Save.
Importing the footage
You’ll import five assets for this lesson.
Choose File > Import > File.
Navigate to the Lessons/Lesson13/Assets folder. Shift-click to select the Quote1.psd, Quote2.psd, Quote3.psd, and Shoreline.mov files, and then click Import or Open.
Double-click an empty area in the Project panel to open the Import File dialog box again.
Select the BlueCrabLogo.psd file, and click Import or Open.
In the BlueCrabLogo.psd dialog box, select Merged Layers, and then click OK.
Creating the composition
Now, you will create a new composition based on the aspect ratio and duration of the Shoreline.mov file.
Drag the Shoreline.mov item onto the Create A New Composition button (
 ) at the bottom of the Project panel. After Effects creates a new composition named Shoreline and displays it in the Composition and Timeline panels.
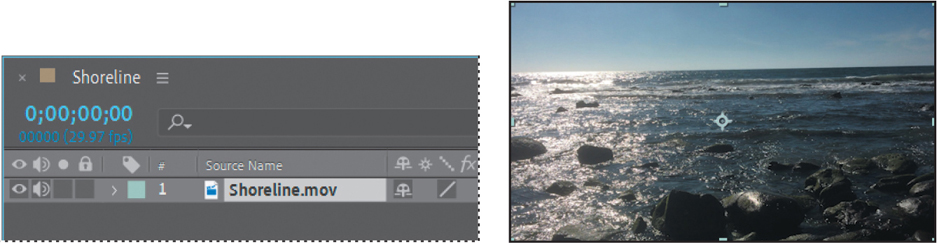
Drag the current-time indicator across the time ruler to preview the shot.
The camera moves around a beach scene, with a close-up of some scurrying crabs before it zooms back out to a shot of the ocean and rocks. You’ll add text, quotes for the crabs, and the company logo.
Choose File > Save to save the file.
Tracking the footage
The 2D footage is in place. Now you’ll have After Effects track it and interpolate where a 3D camera should be placed.
Press the Home key or move the current-time indicator to the beginning of the time ruler.
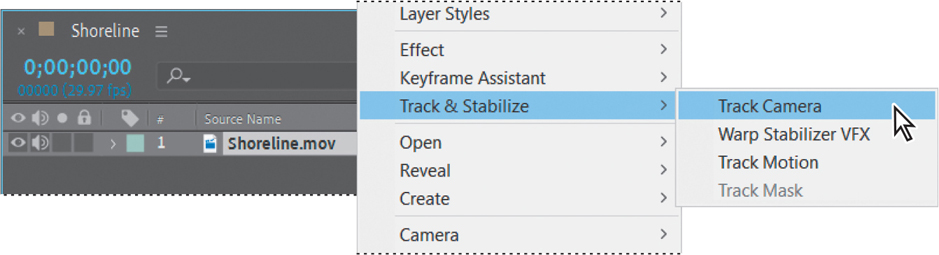
Right-click (Windows) or Control-click (macOS) the Shoreline.mov layer in the Timeline panel, and choose Track & Stabilize > Track Camera.
 Tip
TipThe default analysis is usually sufficient, but you can perform a more detailed analysis to better solve the camera position. The Detailed Analysis option is in the Advanced area of the Effect Controls panel.
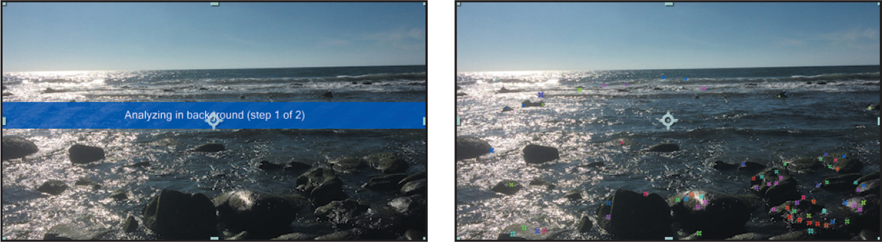
After Effects begins tracking the camera and displays messages as it analyzes the footage in the background. When the analysis is complete, many tracking points appear in the Composition panel. The size of a tracked point indicates its proximity to the virtual camera: Larger points are closer, and smaller points are further away.
When the analysis is complete, choose File > Save to save your work so far.
Creating a ground plane, a camera, and the initial text
You have a 3D scene, but it needs a 3D camera. You’ll add a camera when you create the first text element.
![]() Note
Note
You can also add a camera by clicking the Create Camera button in the Effect Controls panel.
Press the Home key or move the current-time indicator to the beginning of the time ruler.
In the Composition panel, hover the cursor over the water next to the large rocks until you see the displayed target similar to the one in the image below. (If you don’t see the track points and target, click the 3D Camera Tracker effect in the Effect Controls panel to make it active.)
When you hover the cursor between three or more neighboring track points that can define a plane, a semitransparent triangle appears between the points. Additionally, a red target shows the orientation of the plane in 3D space.
Right-click (Windows) or Control-click (macOS) the plane, and choose Set Ground Plane And Origin.
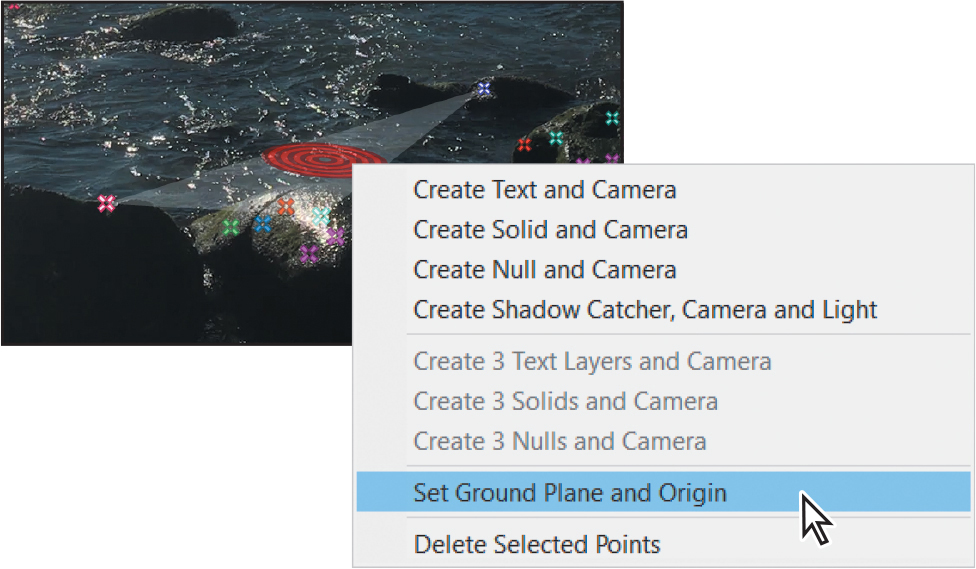
The ground plane and origin provide a reference point, setting a point where the coordinates are (0, 0, 0). Though nothing appears to change in the Composition panel using the Active Camera View, the ground plane and origin make it easier to change the camera’s rotation and position.
Right-click (Windows) or Control-click (macOS) the same plane, and choose Create Text And Camera.
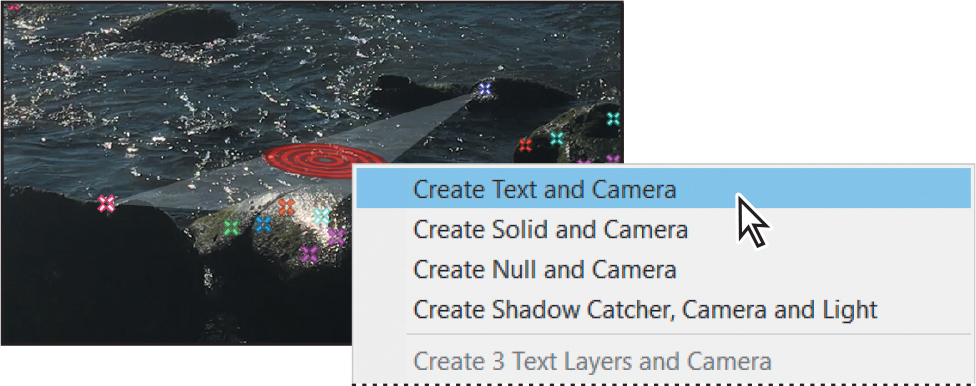
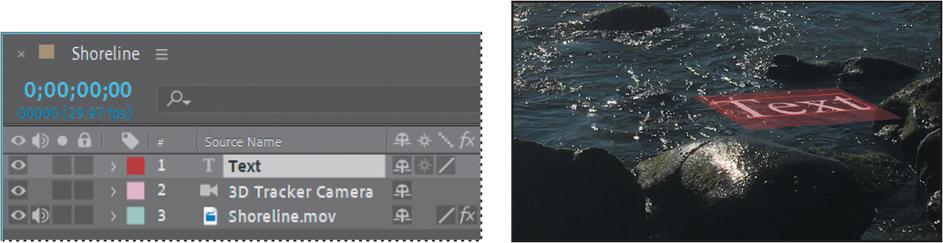
After Effects displays a large text item lying flat in the Composition panel. It also adds two layers to the Timeline panel: Text and 3D Tracker Camera. The 3D switch is enabled for the Text layer, but the Shoreline.mov layer remains 2D. Because the text elements are the only ones that need to be positioned in 3D space, there is no reason to make the background footage layer a 3D layer.
Move the current-time indicator along the time ruler. The text remains in position, tracking with the camera. Return the current-time indicator to the beginning of the time ruler.
Double-click the Text layer in the Timeline panel to open the Character panel in the stacked panels on the right.
In the Character panel, change the font to Impact Regular. Then change the font size to 48 px, the stroke width to .5 px, and the stroke type to Stroke Over Fill. Make sure the fill color is white and the stroke color is black (the default colors), and that Tracking is set to 0.

The text looks great, but you want it to stand on end. You’ll change its location in space, and then replace it with the advertisement text.
 Note
NoteIf you selected a different target for your ground plane, you will need to use different values. Instead of entering values, you could use the 3D Transformation Gizmo to adjust the individual axes in the Composition panel.
Select the Text layer in the Timeline panel to exit text-editing mode. Then, press the R key to display the Rotation property of the layer, and change the Orientation values so the text is upright. (We used 12, 30, 350 degrees.)

Any new 3D layer you create uses the ground plane and origin to orient the layer in the scene. When you change the Orientation values, the text changes its orientation in space.
Double-click the Text layer in the Timeline panel to make it active in the Composition panel.
When the text is editable, it appears to have a light red mask surrounding it.
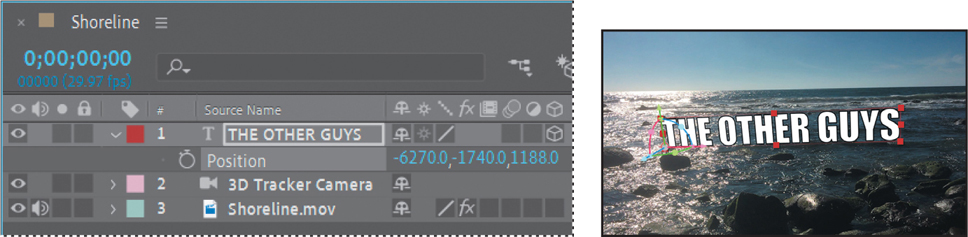
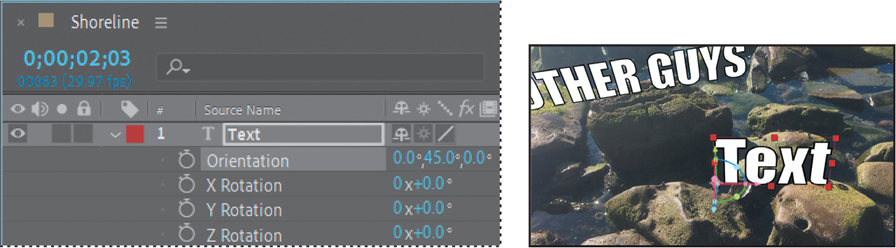
With the text selected in the Composition panel, type THE OTHER GUYS to replace it. Then select the THE OTHER GUYS layer to exit text-editing mode.
So far, so good. But you want the text to be centered in the scene. You’ll reposition the text.
Press P to display the Position property for the text layer. Using the Selection tool, drag the text up the screen, so that it is over the water. Or, if your ground plane matches ours, you can type –6270, –1740, 1188 for the Position property.
If the text stays in the same position, it won’t be visible as the camera moves away. You’ll animate it to remain visible a bit longer.
Click the stopwatch icon (
 ) to create an initial keyframe for the Position property.
Go to 2:03. Change the Position property to –7115, 1800, –1150, or use the Selection and Rotation tools to position it as it appears in the image below.

Manually scroll through the timeline to preview the text. Then close any open properties, and choose File > Save to save your work so far.
Creating additional text elements
You created the initial text for the advertisement. Now you need to perform the same tasks to create the rest of the ad. You’ll use the same steps to create each label, but because the text appears in different places in the video and needs to shift in relationship to the scene, you’ll need to use different position, orientation, and scaling values.
Go to 2:03.
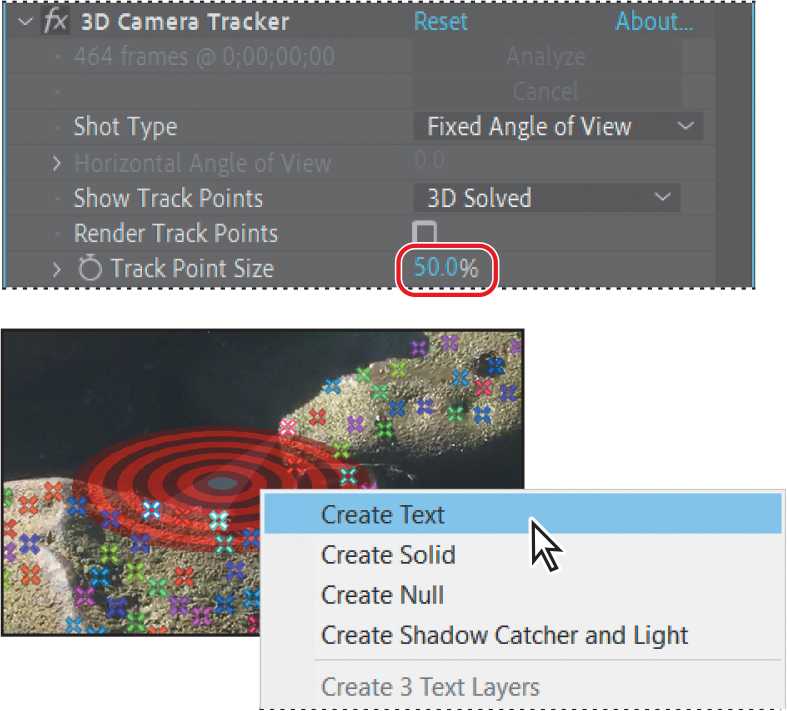
In the Timeline panel, select the Shoreline.mov layer, and press E to reveal its effects. Then select the 3D Camera Tracker to make it active.
NoteMake sure you select the 3D Camera Tracker effect in the Shoreline.mov layer, not the 3D Tracker Camera layer.
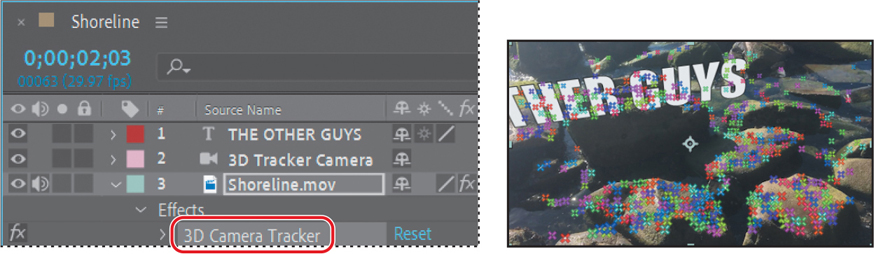
In the Effect Controls panel, change the Track Point Size value to 50% so you can see the track points more clearly.
Make sure the Selection tool is selected. Then, in the Composition panel, hover over an area so that the red target lies flat across the rocks, right-click or Control-click the target, and choose Create Text.
Select the Text layer in the Timeline panel, and press the R key to reveal the Rotation values. Rotate the text as shown. (Our Orientation values are 0, 45, 0.)
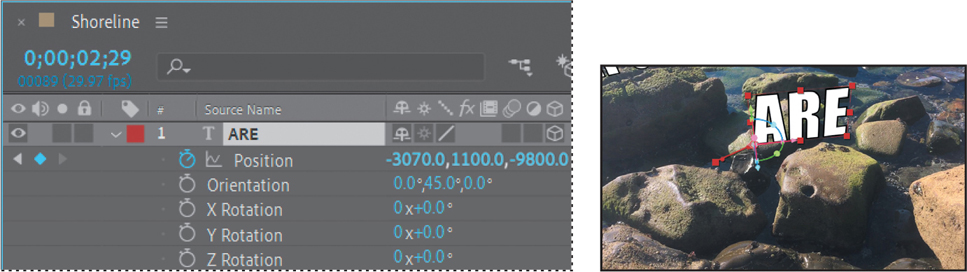
Double-click the Text layer to make it editable, and then type ARE in the Composition panel. Click the ARE layer to exit text-editing mode.
Press Shift+ P to display the Position property. Then click the stopwatch icon (
) to create an initial keyframe.Go to 2:29, and use the Selection tool to move the text so that its position is similar to the text in the image below. Your values may differ from ours.
Go to 4:14. Use the Hand tool (
 ) to move the composition so that you can see the text box outside the frame, and then use the Selection tool to drag it so that the bottom of the text is visible, as shown in the image below. Or, you can adjust the Position values. Your values may be different than ours.
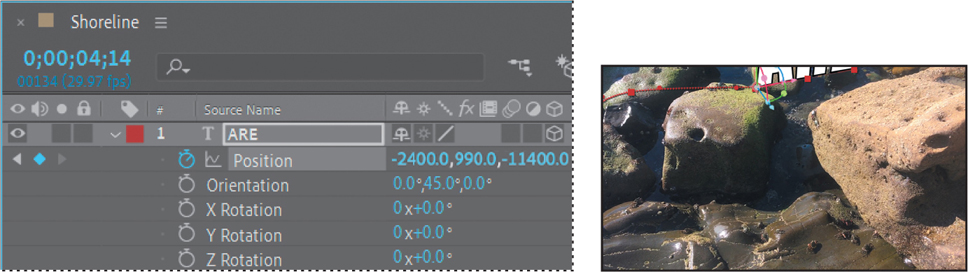
Hide the properties for the layer. If you used the Hand tool to reposition the image, move it back now. Then select the Selection tool, and manually preview the text animation.
Go to 4:14, and activate the 3D Camera Tracker track points again by selecting the Shoreline.mov layer in the Timeline panel, and then either selecting 3D Camera Tracker under the Shoreline.mov layer or selecting 3D Camera Tracker in the Effect Controls panel.
With the Selection tool (
 ), select a target for a flat plane against the large rock on the right. Then right-click the target, and choose Create Text.
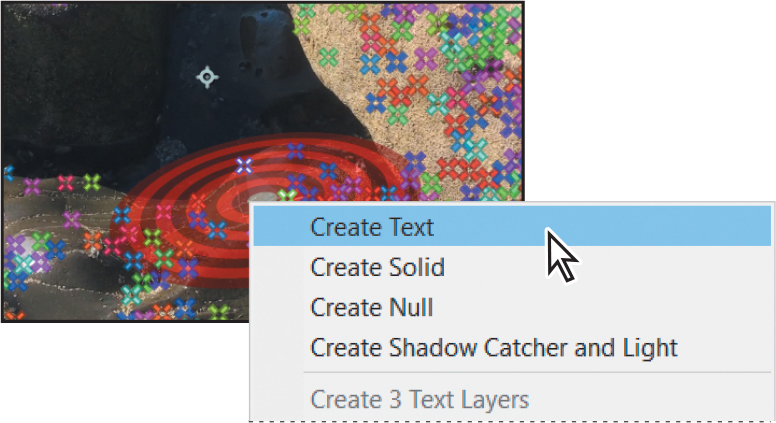
Select the Text layer in the Timeline panel, and press R, and then Shift+P+S to see the Rotation, Position, and Scale properties. Rotate the text as shown. (Our Orientation values are 0, 45, 10.) Change the Scale property to 2000%.
Double-click the Text layer, and then type SCRAMBLING in the Composition panel.
Go to 3:10, where this text should first be visible. Use the Selection tool to drag the text so that it starts below “ARE” and continues offscreen. You can also use the Rotation tool or the 3D Gizmo. When you’re satisfied with its position, click the stopwatch icon (
) to create an initial keyframe for the Position property.
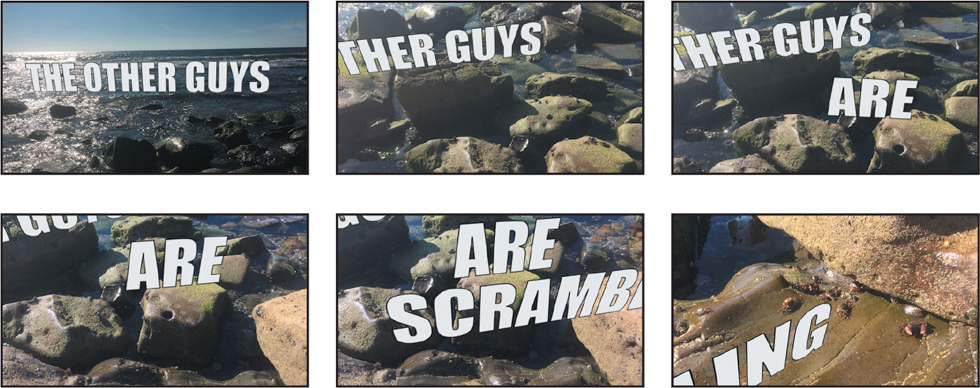
Go to 4:21, and use the Selection tool to move the text as it appears in the image below. Then do the same at 6:05 and 7:04, so that the text continues to move down and toward the left.

4:21 6:05 7:04
The text is in position, but you want it to appear suddenly on the screen. You’ll trim the layers to stagger their appearance.
Go to 2:03, select the ARE layer, and then press Alt+[ (Windows) or Option+[ (macOS). Then go to 3:10, select the SCRAMBLING layer, and press Alt+[ or Option+[ again.
Hide the properties for all layers, and then choose File > Save to save your work.
Press the spacebar to preview the text animation. Press the spacebar again to stop playback.
Locking an image to a plane with a solid layer
You created the advertising copy in After Effects, but the crabs’ expressions are in quotation bubbles, which are easier to include as images. You’ll attach the PSD files to solid layers in After Effects to lock them to specific planes.
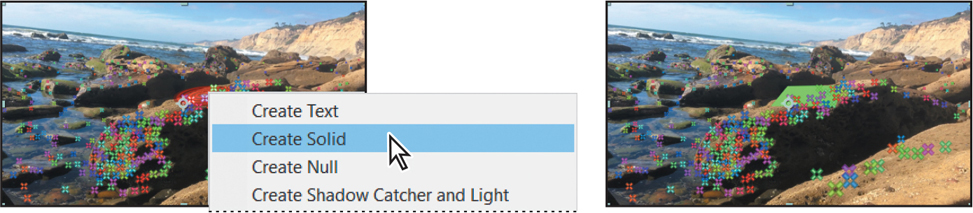
Go to 6:06, select the Shoreline.mov layer in the Timeline panel, and select the 3D Camera Tracker effect in the Effect Controls panel.
With the Selection tool, move the cursor so that the target is on a vertical plane as in the image below. Right-click the target, and choose Create Solid.
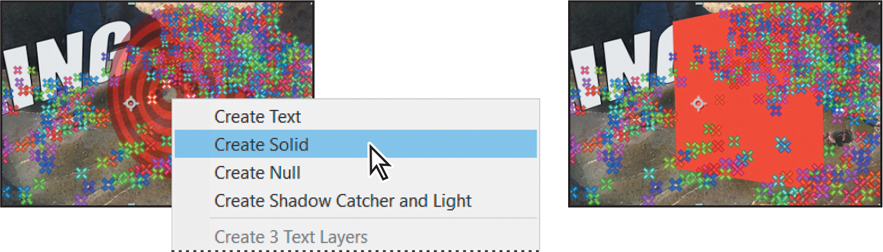
After Effects creates a Track Solid 1 layer, and a colorful solid square appears in the Composition panel.
Right-click or Control-click the Track Solid 1 layer in the Timeline panel, and choose Pre-compose. Then, in the Pre-compose dialog box, name the layer Crab Quote 1, and click OK.
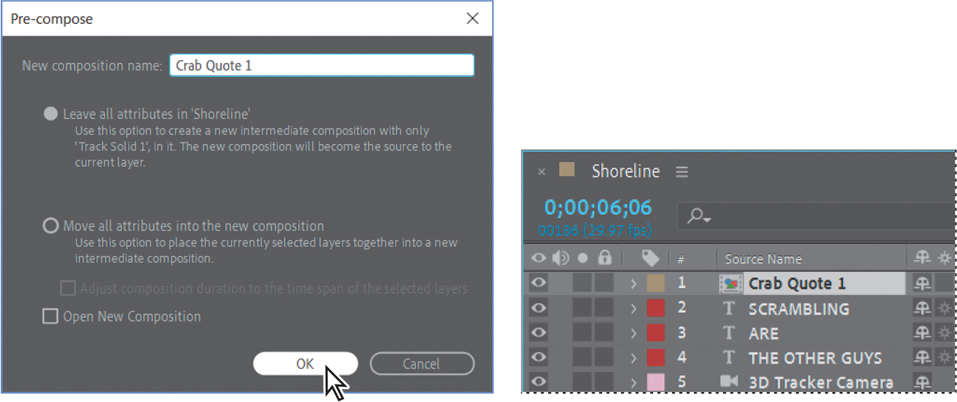
After Effects creates the Crab Quote 1 composition, which contains the Track Solid 1 layer.
Double-click the Crab Quote 1 composition to open it. In the Timeline panel, delete the Track Solid 1 layer.
Drag the Quote1.psd file from the Project panel into the Timeline panel.
Choose Layer > Transform > Fit to Comp Width.

Select the Shoreline Timeline panel.
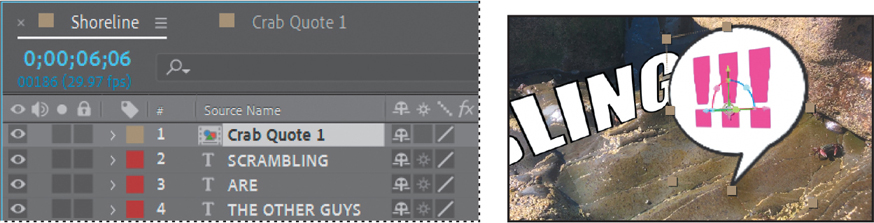
After Effects displays the Quote1.psd image where you created a solid layer.
Use the Selection tool and the 3D Gizmo to position and scale the quote so that it appears to relate to a cluster of crabs.

Go to 7:15, select the Shoreline.mov layer in the Timeline panel, and select the 3D Camera Tracker effect again. In the Effect Controls panel, reduce the Track Point Size to 25% so you can see the track points more clearly. Then, find a vertical plane against the rock, right-click the target, and choose Create Solid.
Right-click or Control-click the Track Solid 1 layer, and choose Pre-compose. In the Pre-compose dialog box, name the composition Crab Quote 2, and then click OK.
Double-click the Crab Quote 2 composition to open it. Delete the Track Solid 1 layer, drag the Quote2.psd file to the Timeline panel, and choose Layer > Transform > Fit To Comp.
Return to the Shoreline Timeline panel, and then adjust the position, rotation, and scale of the quote to match the crabs’ position.

Go to 9:01, select the Shoreline.mov layer, and select the 3D Camera Tracker effect again. In the Effect Controls panel, reduce the Target Size to 50%. Right-click a target, as shown on the next page, and choose Create Solid.
Right-click or Control-click the Track Solid 1 layer, choose Pre-compose, name the composition Crab Quote 3, and click OK. Then, double-click the Crab Quote 3 composition to open it, delete the Track Solid 1 layer, drag the Quote3.psd file into the Timeline panel, and choose Layer > Transform > Fit To Comp.
Select the Shoreline Timeline panel, and then adjust the position, rotation, and scale of the quote to match the position of the crabs.

Choose File > Save to save your work so far.
Tidying the composition
You’ve done some complex work to create a scene that merges the added components with an existing tableau. You’ll preview it to see it in action.
Press the Home key or move the current-time indicator to the beginning of the time ruler.
Press the spacebar to preview the movie. Let it play through completely once to cache the video and audio; once it’s cached, it should play in real time.
Press the spacebar again to stop playback.
It’s looking pretty good, but the word ARE may show up unexpectedly toward the end, and the crab quotes all appear at once. You’ll adjust layers to ensure they appear when you want them to.
Go to 5:00, select the ARE layer, and press Alt+] or Option+].
Go to 6:06, select the Crab Quote 1 layer, and press Alt+[ or Option+[.
Go to 7:15, select the Crab Quote 2 layer, and press Alt+[ or Option+[.
Go to 9:01, select the Crab Quote 3 layer, and press Alt+[ or Option+[.
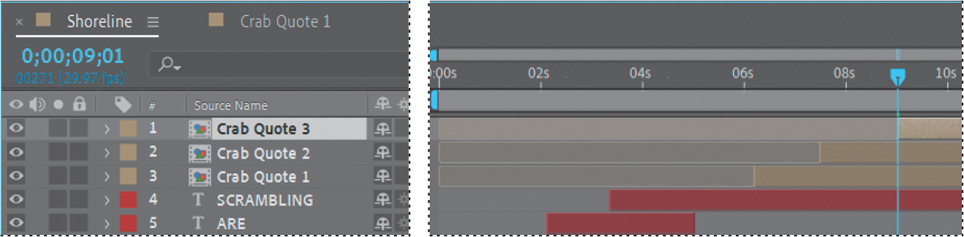
Press the spacebar to preview the movie again. Now the text and quotes appear when you expect them to.
Press the spacebar again to stop playback.
Choose File > Save to save your work so far.
Adding a final object
Without the company logo, no one will know who has the competition scrambling. You’ll add the logo to the end of the movie using another solid layer.
Go to 11:15, select the Shoreline.mov layer, and select the 3D Camera Tracker effect in the Effect Controls panel again. Change the Track Point Size and Target Size back to 100%.
Find a plane that is relatively flat on a rock, right-click the target, and choose Create Solid.
Right-click or Control-click the Track Solid 1 layer, choose Pre-compose, name the composition Logo, and click OK.
Double-click the Logo composition to open it. Delete the Track Solid 1 layer, and then drag the BlueCrabLogo.psd file into the Timeline panel. With the BlueCrabLogo.psd layer selected, choose Layer > Transform > Fit To Comp.
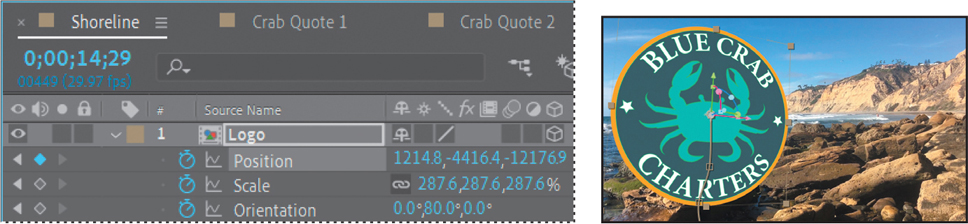
Select the Shoreline Timeline panel, and then select the Logo layer.
Press R to reveal the Rotation property. Use the 3D Transformation Gizmo to rotate the logo as shown. (Our Orientation values are 0, 60, 0.) Use the Selection tool (
) to drag the logo up to rest on the rock.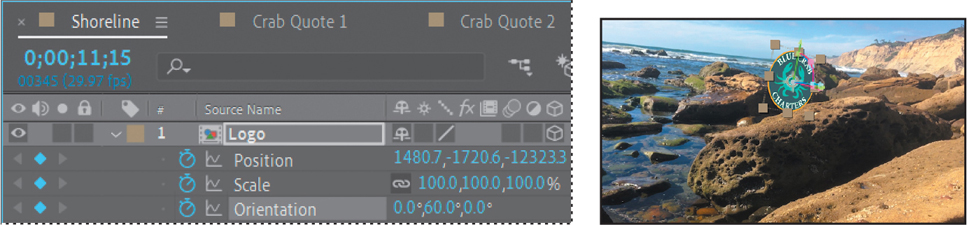
Press Shift+P+S to reveal the Position and Scale properties, too. Click the stopwatch icons (
) to create initial keyframes for the Position, Scale, and Orientation properties.Go to 12:03, and increase the Scale value (we used 190.5%). Adjust the position and orientation as needed to match the image below.
Go to 13:04, and increase the Scale value again (we used 249%). Adjust the position if necessary to match the image below.
Go to 13:25, and increase the Scale value again (we used 285.2%). Adjust the orientation so that the logo faces forward; adjust the position to match the image below.

12:03 13:04 13:25
Go to 14:29, and adjust the position for the final shot. Hide all layer properties.
Creating realistic shadows
You’ve set up your elements, but unlike true 3D objects, they aren’t casting any shadows. You’ll create a shadow catcher and a light to add depth to your video.
Go to 5:00, select the Shoreline.mov layer in the Timeline panel, and select the 3D Camera Tracker effect in the Effect Controls panel.
NoteBe sure to select the 3D Camera Tracker effect in the Shoreline.mov layer, not the 3D Tracker Camera layer.
Select the Selection tool in the Tools panel. Then, in the Composition panel, hover until you find a plane that is horizontal against the rocks.
Right-click or Control-click the target, and choose Create Shadow Catcher And Light.
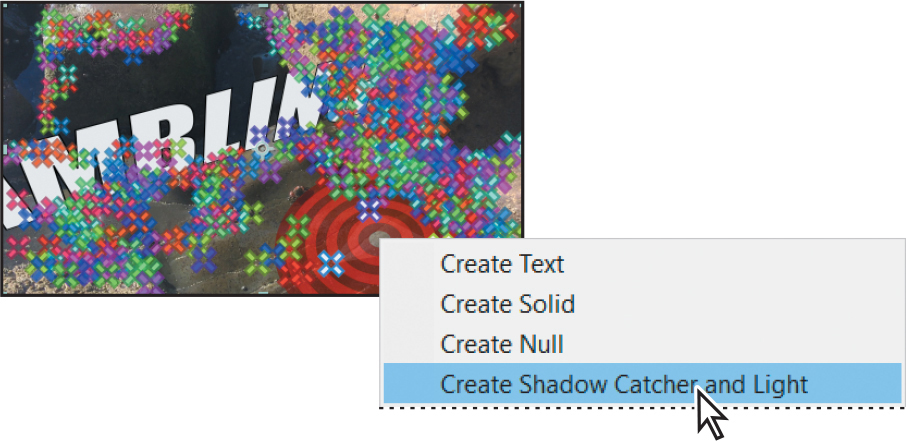
After Effects adds a light source to the scene. The default settings are applied, so a shadow appears in the Composition panel. However, you’ll need to reposition the light to match the light in the source footage. The Shadow Catcher 1 layer that After Effects adds to the Timeline panel is a shape layer that has its material options set so that it accepts shadows only from the scene.
Select the Light 1 layer in the Timeline panel, and press the P key to reveal the Position property for the layer.
TipIn a real-world project, it’s ideal to work with the lighting plan that was used to shoot the original 2D scene. The goal is to have the new 3D lights match the original source lighting as closely as possible.
Enter the following values for the Position property to reposition the light: 939.6, 169.7, 23.7.
Choose Layer > Light Settings.
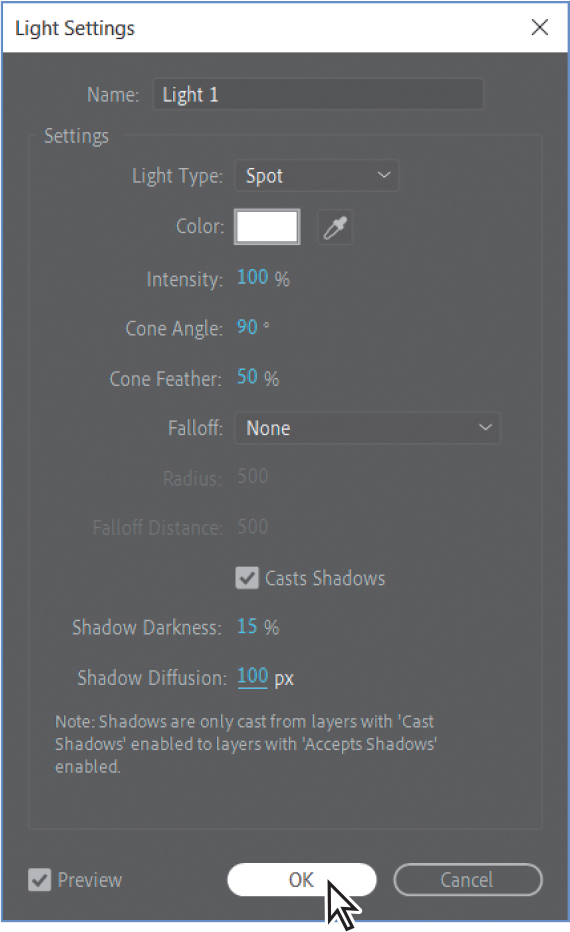
You can change the intensity, color, and other attributes of the light in the Light Settings dialog box.
Choose Spot from the Light Type menu. Make sure the light color is white. Then change the Shadow Darkness to 15% and the Shadow Diffusion to 100 px. Click OK.
Select the Shadow Catcher 1 layer in the Timeline panel, and press the S key to reveal the Scale property.
Change the Scale value to 340%.
Scaling the Shadow Catcher 1 layer changes the area in which shadows can appear for the light that was created with it.
Adding ambient light
The shadow looks better after the adjustments you made to the light, but it’s now causing the text to appear black. You’ll add ambient light to address this. Unlike a spotlight, ambient light creates a more diffuse light throughout the scene.
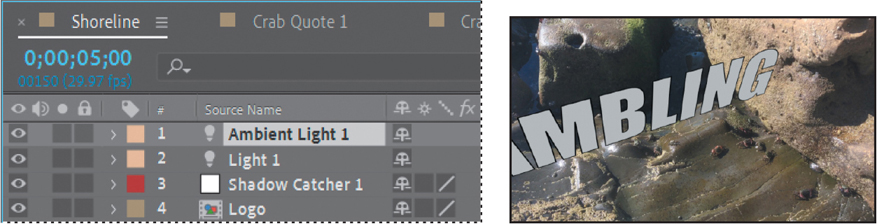
Deselect all layers, and then choose Layer > New > Light.
Choose Ambient from the Light Type menu, and change its Intensity value to 80%. Make sure the light color is white, just like the spotlight.
Click OK to add the light to the scene.
Adding an effect
The 3D elements, camera, and lighting are all complete, but you can make the video more interesting by adding a ripple effect to the quotes.
Go to 6:06.
Choose Window > Effects & Presets to open the panel. In the Effects & Presets panel, type Ripple in the search menu.
Select the Dissolve-Ripple effect from the Transitions-Dissolves category, and drag it onto the Crab Quote 1 layer in the Timeline panel.
The crab quote disappears, but it will gradually appear and ripple on the screen.
Go to 7:15, and repeat step 3 for the Crab Quote 2 layer.
Go to 9:01, and repeat step 3 for the Crab Quote 3 layer.
Previewing the composition
All of the elements are in place, along with cameras, lighting, and effects. You’ll preview the composition to see the results of your work.
Press the Home key or move the current-time indicator to the beginning of the time ruler.
Press the spacebar to preview the movie. Let it play through completely once to cache the video and audio; once it’s cached, it should play in real time.
Press the spacebar again to stop playback.
Choose File > Save to save the final project!
Review answers
1 The 3D Camera Tracker effect automatically analyzes the motion present in existing 2D footage, extracts the position and lens type of the real camera that shot the scene, and creates a new 3D camera in After Effects to match it. The effect also overlays 3D track points onto the 2D footage, so you can easily attach new 3D layers onto the original footage.
2 To make an added 3D element appear to recede, so that it looks like it’s farther from the camera, adjust its Scale property. Adjusting the Scale property keeps its perspective locked with the rest of the composition.
3 The Rolling Shutter Repair effect attempts to correct the “rolling” shutter problem that commonly occurs when you use digital cameras with CMOS sensors, which capture a frame of video one scan line at a time. Due to time lag between scan lines, not all parts of the image are recorded at exactly the same time, causing motion to ripple down the frame. If the camera or the subject is moving, the rolling shutter can cause distortions, such as leaning buildings and other skewed images. To use the effect, select the problem layer in the Timeline panel, and choose Effect > Distort > Rolling Shutter Repair.