
Chapter 5
Advanced Editing

Introduction
This chapter looks at a variety of advanced techniques that supplement traditional editing and trimming, including several that are unique to Final Cut. You may not need these very often, but it is helpful to know what they are and how they work. Why? Because they can save time, simplify editing, and make your projects look better.
Definitions for This Chapter
Angle. One layer (track) within a multicam clip. Angles can hold multiple clips.
Audition. A group of clips that you preview to select only one clip for the timeline. Auditions are designed for previewing in the timeline but are created or viewed in the timeline or Browser.
Lower-third. Text that appears at the bottom of the frame and is permanently displayed as part of the image. Permanent titles have the greatest amount of formatting flexibility.
Closed captions. Text that can be turned on or off. Formatting is limited, but the number of supported languages is not. Final Cut can create, time, format, and output captions as separate files or burn one of them into video.
Compound clip. A “mini-project.” An organizational tool grouping clips located on one or more layers of the timeline into a single “nest.” You can store compound clips inside other compound clips. Compound clip settings do not need to match the project settings.
Multicam clip. A set of two or more video clips connected using a common sync point and grouped into a single clip. Multicam is most often used for editing performances. FCP supports up to 64 camera angles in a multicam clip, but only one angle is visible at a time. Most commonly combined with a finished audio mix, multicam clips can contain clips of different frame sizes, frame rates, and codecs.
Grayscale. The shades of gray in an image. This ranges from pure black to pure white. Every pixel has its own grayscale value.
Video scopes. Analytical tools that display real-time technical grayscale and color values of each frame during playback. FCP has three scopes: Waveform Monitor, Vectorscope, and Histogram. (It also provides an RGB Parade, which is a variation of the Waveform Monitor.)
You won’t need all of these, but each can save you time.
Ingenious Techniques
This collection highlights specialized techniques, such as modifying source clips, smart conform, and Auditions, that solve tricky editing problems.
241 Modify a Source Clip
Add effects to a clip before editing it into the timeline.
Often, adjusting a clip before you edit it can save a lot of time. For example, let’s say you plan to use a variety of segments from the same clip and you don’t want to waste time color grading individual clips later. Easy.
Open Clip is a fast way to modify a clip before editing starts.
Select the clip in the Browser and choose Clip > Open Clip.
This opens the clip in the timeline, just as though you edited it there, but it isn’t in any project—yet. Add whatever effects you want, for example, color correction. To close the clip when you are done, open any project into the timeline. Those changes are now saved into the Browser clip and will travel with it when it is edited into the timeline.
242 Reframe Clips Using Smart Conform
Smart Conform converts the aspect ratios of selected clips.
Smart Conform takes an existing clip, or a group of clips, and intelligently crops it to fit into a different aspect ratio—for example, converting media shot at 16:9 into 1:1 for Instagram or 9:16 for vertical advertising. Here’s how this works:
After editing a project in the correct aspect ratio, for example 16:9, create a new project with the aspect ratio you need, for instance, Vertical (which uses 9:16). It is important that the frame size of the new project not match the existing project.
From the existing project, copy the clips you want to convert.
Copying leaves the original project untouched.
Paste them into the new project.
Select those clips in the new project, and choose Modify > Smart Conform.
Final Cut applies Spatial Conform and selectively crops each clip to contain what it feels is key content. To see an overlay of the original clip (see FIGURE 5.1), enable the Transform on-screen controls (lower-left red arrow), then click the Dual Boxes icon in the top-right corner of the Viewer (upper red arrow). This shows the current framing, plus a grayed-back view of the entire image so you can easily adjust framing if necessary.

FIGURE 5.1 A 16x9 image in a vertical project, with Smart Conform enabled.
Choose Transform > Position settings in the Video Inspector to adjust the horizontal (X) position. Or, more often, add keyframes to shift the horizontal position during playback.
243 Auditions Preview Possibilities
Auditions group clips for preview and comparison prior to editing.
Auditions organize clips into sets, which are easily reviewed in the timeline, to select which one to use in an edit. Auditions:
Can contain different clips to compare different takes
Can include the same clip multiple times, each with a different effect, to see which effect works the best
Can include audio, video, or both
Can include clips with different durations
Here’s an easy way to create an Audition in the Browser:
If you want to use only a portion of a clip, mark the range in the Browser.
Cmd-click to select the Browser ranges you want to add to an Audition.
Choose Clip > Audition > Create (shortcut: Cmd+Y).
A new Audition clip appears in the Browser with a spotlight icon in the top-left corner.
Edit the new Audition clip into the timeline.
Auditions are a fast and flexible way to preview multiple clips.
To switch between clips:
Select the Audition in the timeline and press Y.
The Pick window appears; see FIGURE 5.2.
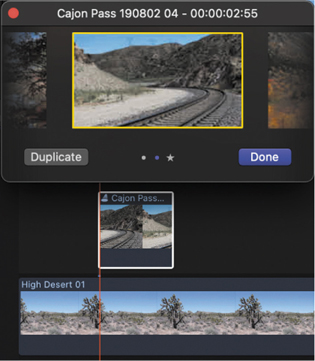
FIGURE 5.2 The Audition pick window above an Audition clip in the timeline. Click grayed images on either side to switch the preview.
Play the timeline, and the clip in the Pick window plays.
Click the clip on either side of the center image, and play the timeline again.
The new clip now plays. The timeline duration changes to reflect the new clip, as well.
Auditions preserve alternate edits without affecting the other clips in the timeline. When you’re not reviewing the clips in an audition, the audition functions like an individual clip. You can trim an Audition, apply transitions between Auditions and other clips, and even add keywords and markers.
Review the clips in the Audition and decide which one works best in your project.
Click Done.
This hides the unwanted clips and keeps the selected clip in the timeline. It also retains the duration, plus any keywords, markers, or effects applied to the Audition.
244 Create Auditions in the Timeline
Here’s a fast way to create an Audition in the timeline.
Let’s say you have clips edited into a project, except one doesn’t feel quite right. Hmm…which clip to replace it with? Auditions can help you choose.
To create an Audition directly in the timeline, drag one or more Browser clips on top of a timeline clip; see FIGURE 5.3.
Add to Audition. This creates an Audition containing both the timeline and the Browser clips without changing the image displayed in the timeline.
Replace and Add to Audition. This replaces the timeline clip with the first clip you selected in the Browser then builds an Audition.
Press Y to open the Audition for editing.
To break apart an Audition in the timeline, select it, then choose Clip > Break Apart Clip Items (shortcut: Shift+Cmd+G).
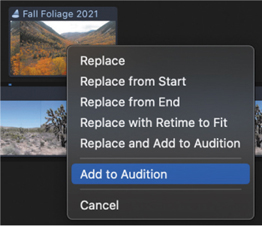
FIGURE 5.3 Drop a Browser clip on top of a timeline clip to reveal this menu.
Compound Clips
Compound clips are mini-projects that do things regular projects can’t. They are a useful tool in timeline organization, repeating elements, and visual effects.
245 What’s a Compound Clip?
A collection of clips, grouped and treated as a single clip.
A compound clip (see FIGURE 5.4) is, essentially, a project with its own settings and properties that can be placed inside other projects. It groups multiple clips into a single entity and can hold audio, video, still images, even other compound clips, placed on one or more layers. It can be created in either the Browser or the timeline but is most commonly created in the timeline.

FIGURE 5.4 Compound clip icons: (Top) Browser. (Bottom) Timeline. (Jewelry image ©2022 EmilyHewittPhotography.com)
It is amazingly powerful, flexible, and deep. You can edit them into a project, trim them, change their speed, and add effects and transitions. They are dynamic; change the contents of any compound clip and all iterations of that compound clip change as well. Once created, you work with them the same as any clip.
You can use a compound clip to:
Simplify a complex section of the timeline or an entire project by consolidating all clips into a single compound clip.
Combine a video clip with one or more audio clips to avoid moving elements out of sync.
Group multiple Browser clips into a single compound clip.
Create a section of a project with different settings than the project itself.
Create special effects that aren’t easily created in the timeline alone.
To create a compound clip, select the clips you want to group in the Browser or timeline and choose File > New > Compound Clip (shortcut: Option+G). If you are creating a compound clip in the timeline, the clips can be on different layers.
When you create a new compound clip, you can select in which event it will be stored. I prefer creating a specific event for compound clips—which makes them easier to find—and storing them there.
246 Use Compound Clips to Organize Clips
Compound clips are great at organizing complex timelines.
A common use for a compound clip is to organize the timeline. FIGURE 5.5 illustrates a complex, multilayer timeline section.
Select the clips you want to group.
Choose File > New > Compound clip (shortcut: Option+G).
Give the compound clip a name, pick the event to store it in, and click OK.
Double-click a compound clip to edit its contents.
To modify the settings of a compound clip, select it in the Browser, go to the Info Inspector, and click Modify. Compound clip settings are similar to those used to create projects.
To close a compound clip, open another project into the timeline, or use the Timeline History arrows.
To disassemble a compound clip, choose Clip > Break Apart Clip Items (shortcut: Shift+Cmd+G).
The clips are coalesced into a single clip and displayed in the timeline. During playback, a compound clip will play back exactly as the clips did before the compound clip was created.
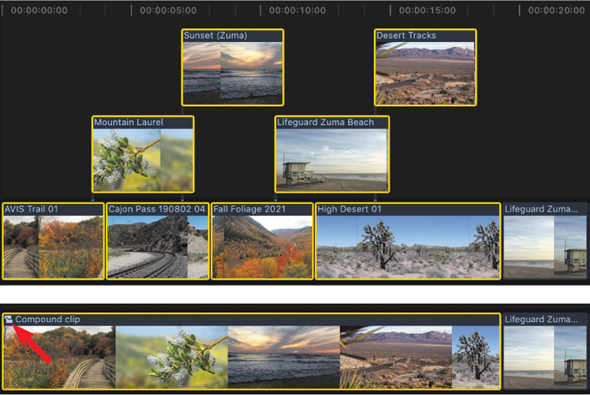
FIGURE 5.5 (Top) Timeline clips selected for a compound clip. (Bottom) The compound clip. Note the compound clip icon in top-left corner of the lower clip (red arrow).
Note
The duration of a compound clip is set in the timeline. You can’t adjust the In or Out of a compound clip from inside the compound clip.
247 Compound Clips Are Dynamic
Change any compound clip and all its iterations also change.
In addition to its organizational skills, compound clips have a secret power: They are dynamic. This makes them different from projects, because we can’t put one project inside another project. But we can add compound clips into one or more projects.
For example, let’s say you created a transitional bumper to separate different sections of your project. Convert that bumper into a compound clip, then edit it into your project as many times as you need. Oops, the audio was wrong, and there’s a typo in the title.
Compound clips are dynamic. Change one, and they all change.
Double-click a compound clip in the Browser or timeline to open it in the timeline. Make your changes. As soon as you close the compound clip, all its iterations in the timeline are instantly updated.
248 Make a Compound Clip Independent
Independent compound clips do not change each other.
By default, all compound clips are dynamic. Change one, and all its iterations change. Most of the time, this is what you want. However, sometimes, you may want to use the video in a compound clip but change the text each time it is used.
Normally, you can’t—until you know this secret.
Edit a second iteration of the compound clip into the timeline. Then, make this compound clip independent:
Select the compound clip in the timeline.
Choose Clip > Reference New Parent Clip.
Two things happen: A copy of the compound clip appears in the Browser (with the same name, with “copy” added at the end), and the compound clip in the timeline is replaced with this independent copy.
Now, when you make changes to the independent copy—which you can rename—the original compound clip and any other iterations in the timeline do not change.
Make compound clips independent to prevent unexpected changes.
249 Caution: Compound Clip Audio
Be careful when using mono audio in a compound clip.
Compound clips cannot output mono audio, only stereo or 5.1 surround. If the audio in a compound clip is stereo or surround, everything is good. However, if the compound clip contains a mono audio clip, adding that compound clip to a stereo project will cause the audio levels to drop –6 dB.
This may seem weird, but it’s normal due to how mono audio is treated in a stereo mix. The easiest way to prevent this is make sure the number of audio channels in your compound clip match the number of audio channels in your project.
250 Caution: Compound Clips Hide Markers
Markers inside a compound clip are not visible in the timeline.
If you add markers of any type (general, to-do, or chapter) to one or more clips inside a compound clip, when you close that compound clip and edit it into the timeline, those markers and their notes are not visible.
The simplest work-around is to open the compound clip into the timeline then use Timeline Index > Tags (see FIGURE 5.6) to note the position of each marker. Finally, add them manually to the compound clip in the timeline or Browser.
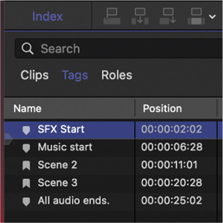
FIGURE 5.6 Use the Timeline Index to determine marker location.
However, this works only when the compound clip timecode of the compound clip matches the project timecode.
When the timecodes don’t match, here’s the workaround:
Copy the clips inside the compound clip.
Step outside the compound clip and temporarily paste them above the compound clip in the timeline (shortcut: Option+V).
With the compound clip selected and snapping turned on, move the playhead to each marker in the individual clips above it.
Right-click the marker and choose Copy.
Select the compound clip in the timeline and press Command+V to paste the marker.
When all markers are copied, delete the top-line clips.
251 Create a Transition Between Compound Clips
Unlike normal clips, you can make compound clips longer!
When you create a compound clip, Final Cut ignores any media outside the compound clip and locks the duration. This means that, by definition, the In and Out of a compound clip are also the start and end of the media. In other words, compound clips have no handles.
Although we can always trim a compound clip shorter to create handles, sometimes we don’t need it shorter—we need it longer. When we double-click a compound clip to open it in the timeline for editing (see FIGURE 5.7), the white lines at each end define the duration of the compound clip. The problem is we can’t drag these white lines to extend the clip.

FIGURE 5.7 The two white lines define the duration of a compound clip.
Here’s the workaround (the Out is easy, the In is not). To change the Out:
Double-click the compound clip to open it for editing.
Drag the clip at the end of the Primary Storyline to the right to extend video past the Out. Now, when you drag the Out of the compound clip in the timeline, you’ll have extra handles.
The key is to extend the clip in the Primary Storyline of the compound clip, not a clip above it on a higher layer.
Note
I should mention that the easiest solution, if you expect to use transitions with compound clips, is to make the compound clip longer than you need when you create it, so you have handles when you need them.
However, the position of the In can’t be moved earlier. Instead:
Trim the In of the compound clip in the timeline to create the handle you need.
Open the compound clip and, using the Trim tool, slip the contents of the first clip to display the images you need. (See Tip 232, A Slip Trim Optimizes B-Roll.)
252 Create Oversized Compound Clips
Interesting effects are possible when compound clips are larger than the project.
A compound clip is a “mini-project.” Unlike connected storylines, compound clips don’t need to match the project settings. This provides an opportunity for interesting effects. For example, create a very large compound clip, then have it slowly travel through the frame of the project—like text scrolling horizontally displaying the name of a movie.
Note
I cover effects in more detail in Chapter 8, “Visual Effects.”
The secret is to create an extra-large compound clip. Here’s how:
Make sure nothing is selected in the Browser.
Choose File > New > Compound clip (shortcut: Option+G).
Give it a name.
Click the Use Custom Settings in the lower left. (Custom settings don’t need to match any specific aspect ratio.)
Set the Video menu to Custom; see FIGURE 5.8.
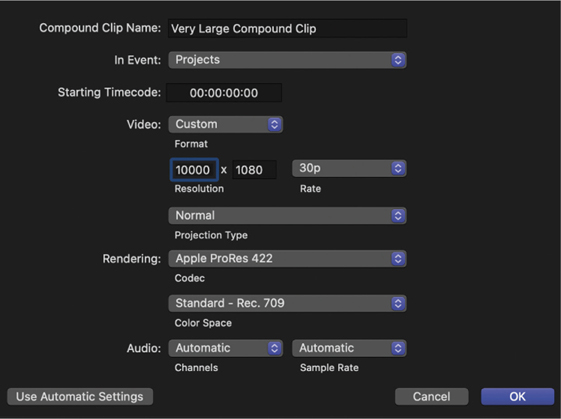
FIGURE 5.8 These custom Compound Clip settings are available only when creating an empty compound clip.
Enter a large horizontal dimension, for example, 10,000 in Figure 5.8.
Make sure the frame rate matches the project frame rate.
Set any other parameters you need.
Click OK.
A compound clip is a mini-project.
Double-click the compound clip to open it in the timeline and add whatever elements you want it to contain. In my example, to get text to fly across the screen, you would also keyframe the horizontal (X) Position setting of the compound clip.
Compound clips can contain text, clips, generators, effects, even audio.
253 Apply Effects to Compound Clips
Effects are applied inside or outside a compound clip.
FIGURE 5.9 illustrates a very wide compound clip (10,000x1080 pixels) with text in it, edited into a layer in a 1080p project over an image of the desert in the Primary Storyline. (Text and titles are covered in Chapter 7, “Transitions & Titles.”)

FIGURE 5.9 A split-screen showing the contents of a compound clip (left) and the final effect applied in the timeline (right).
The text inside the compound clip has a blend mode (Stencil Alpha) applied to insert a gradient color into the text. Then, the compound clip itself has an Effects > Stylize > Drop Shadow added to make the text stand out from the background.
I show this effect here simply to expand your thinking about what’s possible with compound clips.
Multicam Editing
As cameras become cheaper, shooting productions with multiple cameras becomes more popular. Final Cut Pro provides tools for editing multicam projects that are both powerful and easy to use.
254 Multicam Clips Are for Editing
Multicam is like directing a live show, not for creating effects or audio mixes.
Multicam is the editing equivalent of directing a live production, where you get to pick which camera the audience will see at any one time. Many editors think that multicam is used to create projects where multiple images appear on-screen at the same time. It isn’t.
Multicam editing displays multiple cameras that recorded the same scene at the same time from different angles so you can decide which one of them you want to view in the timeline at any given instant.
Multicam editing does not create split screens, multiple images, or similar effects. It is simply a way of choosing between different shots.
Multicam editing does not create audio mixes. You can hear the audio from only one angle at a time. In fact, most multicam editing is done after the audio is mixed.
Multicam is not used for editing scenes shot using multiple takes in front of one camera; such as traditional single-camera film production.
If you are editing a longer performance, it helps to break one long multicam clip into smaller chunks, such as a song or scene, to keep the editing process manageable.
Don’t use multicam to display multiple images at the same time in the timeline. Instead, stack the different clips vertically, then adjust image size to see more than one image at once.
Note
Multicam is not used for switching a live event. All video needs to be recorded before it can be edited.
Multicam editing is more similar to editing a live production than a film shoot. (Except it isn’t live.)
The best way to think of multicam editing is editing a live show from a variety of simultaneous video inputs with the audio coming from an audio mixing board. The benefit to multicam, though, is the ability to view all angles simultaneously, decide which one you like, edit it, then change your mind until you are happy with the results.
255 Multicam Clips Require Lots of Bandwidth
The more clips in the multicam clip, the faster the storage required.
A multicam clip plays multiple video clips simultaneously. Although the video streams playing in the Angle Viewer are optimized for smooth playback and are not using the full bandwidth of the original clips, still multicam clips require high-speed storage with a fast connection to the computer. Although the display of the clips is handled by the CPU, actual playback performance depends upon the speed of your storage. A system that happily edits 4K single-camera video may choke editing 4K multicam.
TABLE 5.1 compares the bandwidth requirements for editing different frame sizes of ProRes 422/30. Keep in mind that the Angle Viewer relies on a combination of CPU, GPU, and the media engine streaming multicam clips for editing. It doesn’t use the full bandwidth. Other codecs will require different bandwidth, but you get the idea: Storage bandwidth matters. This rapid increase in bandwidth is the key reason I recommend editing multicam clips using proxy files.
TABLE 5.1 Bandwidth requirements for multicam editing
MULTICAM STREAMS | 1080P PRORES PROXY | 1080P PRORES 422 | UHD* PRORES 422 |
|---|---|---|---|
2 | 11.25 MB/s | 36.75 MB/s | 147.25 MB/s |
4 | 22.5 MB/s | 73.5 MB/s | 294.5 MB/s |
8 | 45 MB/s | 147 MB/s | 589 MB/s |
12 | 67.5 MB/s | 220.5 MB/s | 883.5 MB/s |
*UHD is considered a 4K image: 3840 x 2160 pixels. True 4K is 4096 x 2160 pixels.
Source: Apple ProRes white paper (January 2020)
256 Prep Multicam Clips Before You Start
Label camera clips to keep things organized during an edit.
You don’t need to label multicam clips, but it helps keep things organized if you do. Often, clip names are cryptic, so adding more readable text helps during the actual edit. In the Browser, select each multicam clip, then go to the Info Inspector and add the camera angle and name; see FIGURE 5.10.
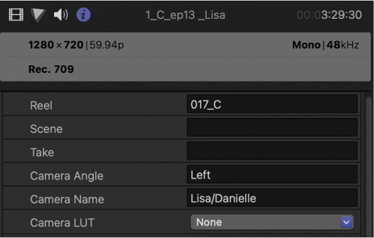
FIGURE 5.10 Add an optional camera name and angle to a video clip in the Info Inspector.
Note
Once a multicam clip is created, camera angle names can be changed only in the Angle Editor, not in the Inspector.
Camera angle names are automatically displayed in the Angle Editor and Angle Viewer; see FIGURE 5.11. These names can use any text—whatever helps keep the different cameras straight in your mind during an edit.
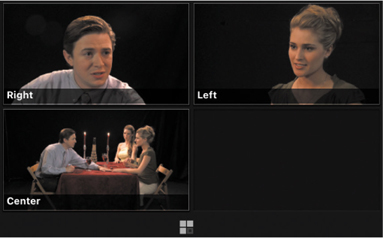
FIGURE 5.11 Camera angle names are displayed automatically in the Angle Viewer.
257 Sync Multicam Clips the Easy Way
Syncing a multicam clip isn’t hard, provided you have audio.
Although there are a variety of sync options when you create a multicam clip, here is an easy way to do it. However, it requires that you record essentially the same audio on every camera. To create a multicam clip automatically:
Select the clips you want to group into a multicam clip in the Browser.
Choose File > New > Multicam Clip.
In the dialog shown in FIGURE 5.12, fill out the usual name and event fields.
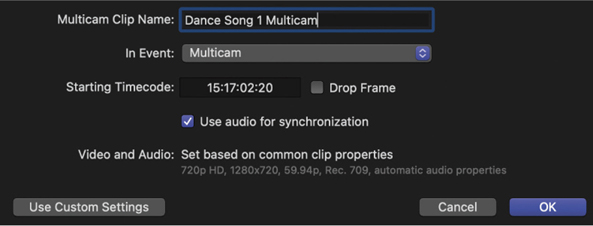
FIGURE 5.12 The Automatic Settings panel for a multicam clip.
Click OK.
As long as every camera records the same audio—either from an audio mixing board or from camera mics—when you click OK, Final Cut will sync all angles by aligning the audio in each clip.
Syncing multicam clips using audio is easy, but it assumes every camera recorded the same audio at the same time during production.
Depending upon the number and length of each clip, syncing could take a few seconds to a few minutes, so be patient. Notice, also, that the multicam settings are based on the file format of the clips inside it.
However, this system breaks down if one or more cameras does not contain audio, if the cameras contain different video formats, or if the camera format does not match the project settings. In that case, you need to use the Advanced Settings, covered in the next tip.
258 Advanced Multicam Syncing
Here’s what to do if the automatic multicam settings don’t work.
The benefit to using audio for syncing multicam clips is that it is easy. But reality often interferes.
Deselect “Use audio for synchronization” to disable automatic syncing.
For more complex situations, click the Custom Settings button, see Figure 5.12, to reveal the Custom Settings; see FIGURE 5.13.
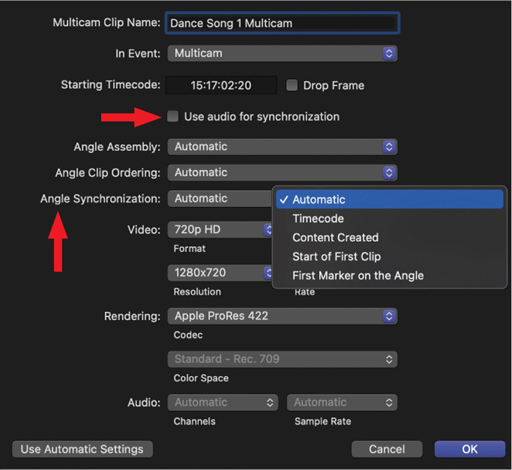
FIGURE 5.13 Custom multicam sync settings. Timecode and First Marker are the fastest sync options.
In Angle Synchronization:
Automatic. Syncs using audio. Use this only if all cameras have the same audio recorded on it.
Timecode. This is the fastest and most precise way to sync multicam clips. However, it requires that all cameras record the same timecode; plus you would need a timecode generator, timecode distribution system, and cameras capable of recording external timecode on set during production.
Content Created. This syncs based upon the content creation date and time of a clip. It’s accurate only to ± one second. Don’t use it.
Start of the first clip. This assumes that all cameras start at the same time. They never do. Don’t use this either.
First Marker on [Each] Angle. This is also an extremely fast way to sync clips and, for my low-budget productions, is the best and simplest choice.
Rather than invest in timecode gear that costs a lot, I invest in a slate (see FIGURE 5.14), which is cheap. Position a production assistant so that all cameras can see the slate, start recording, and clap the slate. On larger productions, you can use a camera flash, provided you don’t shine it in the lens of a camera. In the worst case, record someone clapping their hands in a highly visible fashion. Anything to provide a clear sync point for all cameras.
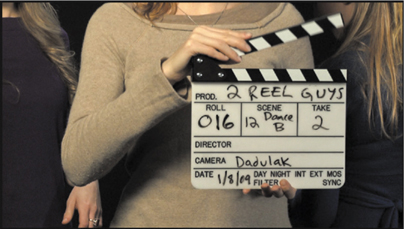
FIGURE 5.14 A typical film slate. Set markers in each multicam clip at the clap.
Then, before you create the multicam clip, in the Browser set the first marker in each clip where the clapper comes down. You can then verify the sync point and, if necessary, adjust it in the Angle Editor. (See Tip 259, The Multicam Angle Editor.)
259 The Multicam Angle Editor
The Angle Editor is where you adjust multicam clips.
Once clips are synced, double-click the multicam clip to open it in the Angle Editor; see FIGURE 5.15. This is where you can tweak (adjust) the contents of a multicam clip before editing starts. (An “angle” acts like a layer in the timeline.)
If you use markers to indicate the In and Out, there’s a chance they may be off a frame or two. Select the clip in the angle, then press , [comma] or . [period] to shift the clip one frame left or right. Press Shift+, [comma]/. [period] to shift in ten-frame increments. I frequently need to tweak alignment to get the most accurate sync.
Click the Video Monitor icon (1) to select the video clip you want to see in the Viewer before editing starts. This is called the monitoring angle. You can monitor only one video clip at a time. The video monitor has no impact on the edit. Blue means active.
Click the Audio Monitor (2) to determine which audio clips you hear before editing starts. While this can monitor audio from multiple clips, during and after editing you can hear only one audio clip at a time. Audio monitoring has no impact on the edit. Blue means active.
Click the down chevron (3) to reveal the multicam contextual menu with more options.
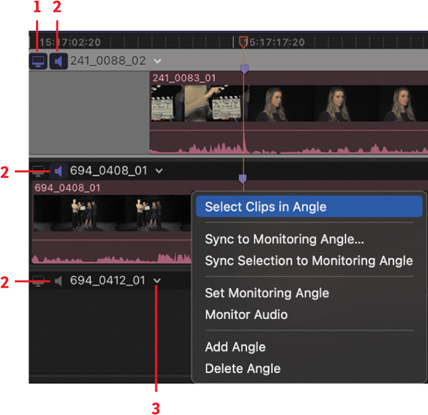
FIGURE 5.15 The Multicam Angle Editor: 1. Video monitor button, 2. Audio monitor button, and 3. chevron. The contents of the menu are displayed on the right.
260 Change the Display Order of Multicam Clips
Clips display in the order they are stacked in the Angle Editor.
Notice in Figure 5.11, the two close-ups are next to each other on the top row. This makes it easier to cut their dialogue. However, that was not how the multicam clip was first constructed.
Clips always display in the Angle Viewer in the order they are stacked in the Angle Editor. To change the stacking order, drag the thumb (red arrows) of an angle up or down; see FIGURE 5.16. I regularly change the grouping of shots to place related shots next to each other during an edit.
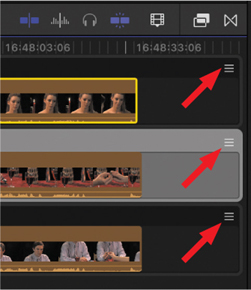
FIGURE 5.16 Drag a thumb (red arrow) to change the stacking order of clips in the Angle Editor.
261 Set a Multicam Clip for Editing
Editing is simple—the setup is tricky.
Editing a multicam clip is easy, but setting it up in the Angle Viewer (see FIGURE 5.17) is often confusing. Trim the multicam clip in the Browser, the same as any other clip, then edit it into the timeline. (You can, of course, also trim it in the Timeline.) For all the details on multicam editing, please refer to the Final Cut Pro Help files. Here are the key steps to get you started:
Press Shift+Cmd+7 (or choose View > Show in Viewer > Angles) to display the multicam Angle Viewer.
When the Angle Viewer opens, it shows the first four clips in your multicam clip. To see more clips, if they exist, click the “bank switcher” (lower red arrow in Figure 5.17).
When preparing to edit a multicam clip, click the waveform button (top red arrow in Figure 5.17) to select it, then click the angle image that has the audio you want to use. FCP draws a green box around it.
Note
If you need to switch both audio and video during the edit, click the left button at the top left (red arrow in Figure 5.17). This cuts both audio and video, with the active angle surrounded by a yellow box.
Click the middle edit only video icon and select the first video clip you want to use in the edit. Final Cut draws a blue box around it. As long as the middle icon remains active, you can edit video as much as you want, without editing the audio.
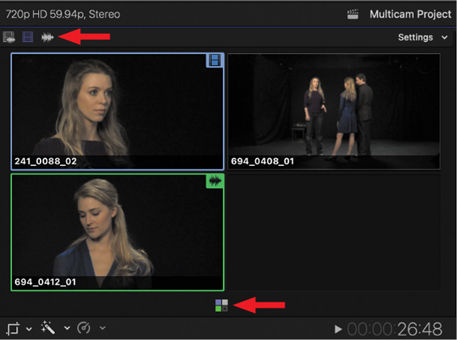
FIGURE 5.17 By default, the multicam Angle Viewer displays the first four images in a multicam clip.
The three icons in the top left choose (from left to right): editing audio and video, just video or just audio.
The reason this is important is that multicam clips do not create audio mixes. Instead, most multicam editing is done to a fully mixed audio track stored in one audio clip. Select and set the audio clip before setting the video clip to assure that multicam edits affect only the video.
262 Change the Multicam Viewer Display
The default is four angles; the maximum is 16.
By default, the Angle Viewer (see Figure 5.17) displays only the first four angles in your multicam clip. But if you have a larger screen, you can display up to 16 angles at once. Click the Settings chevron in the top-right corner to reveal the menu shown in FIGURE 5.18.
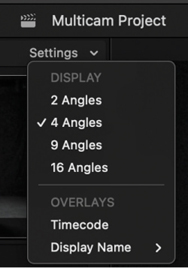
FIGURE 5.18 The Angle Viewer Settings menu, part of a multicam edit.
You can also use this menu to display clip timecode overlaid on the image, as well as the camera angle or clip name. These are entered in the Info Inspector; see Tip 256, Prep Multicam Clips Before You Start.
If you have two monitors on your system, switch the Viewer to the second monitor (see Tip 60, Expand the Interface with Two Computer Monitors). This displays both the Viewer and the Angle Viewer on a second monitor. By moving these to a second display, the individual clips in the multicam are larger and easier to see.
263 Editing a Multicam Clip
Editing is as easy as point-and-click.
With the Angle Viewer open, begin playback of the multicam clip. When you see a shot you like, click its image in the Angle Viewer. This cuts the multicam clip in the timeline and changes the downstream shot to the one you clicked; see FIGURE 5.19.
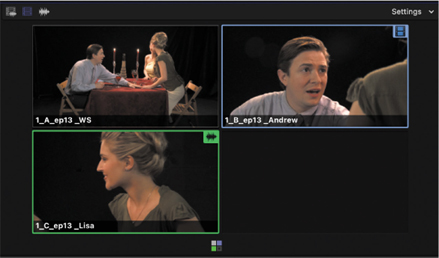
FIGURE 5.19 Click an image to cut between multicam angles. Option-click to switch shots without cutting.
Click a multicam angle to cut and change the shot. Option-click to change the shot without cutting.
However, you don’t need to decide in real time. Put the playhead where you want to make a change and click the angle you want to use. FCP cuts the multicam clip and changes the angle.
Hmm…except, in reviewing a shot later, you decide that another angle is better. Put the playhead in the timeline shot you want to change and Option-click the new angle. This switches the shot, without cutting it. (Essentially, this does a replace edit without the folderol.)
264 Trim a Multicam Edit Point
Only roll trims are supported.
Multicam edits can be trimmed, like any other clip in the timeline. Using the Arrow (Select) tool, select the edit point then drag, or use the keyboard, to adjust the position of the edit.
However, see FIGURE 5.20, notice that only a roll trim is supported—both the In and Out are selected. That’s because if you trimmed just one side (a ripple trim), it would knock the multicam clip out of sync. To prevent that, Final Cut allows only roll trims.
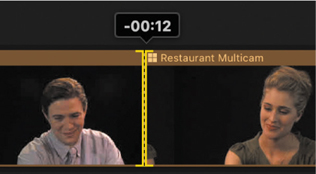
FIGURE 5.20 Any multicam edit point can be trimmed using a roll trim to adjust timing while protecting the audio and video sync. Ripple trims are not allowed.
265 Don’t Flatten a Multicam Clip
Final Cut has a better way.
One of the differences between multicam clips in Final Cut versus Adobe Premiere Pro is that, in Premiere, multicam clips can be flattened when editing is complete. Flattening disconnects all the unused clip segments, so only the segment in the timeline plays. Flattening significantly reduces storage bandwidth when you are done editing the multicam clip.
Final Cut doesn’t offer that option. Instead, FCP flattens automatically.
If the Angle Viewer is visible and you are editing a multicam, all angles stream.
If the Angle Viewer is closed and you are playing a multicam clip in the timeline, only the visible angle is streamed.
Final Cut flattens multicam clips automatically.
This means that once editing is complete, Final Cut treats multicam clips as though they were flattened. However, if you ever need to re-edit a multicam clip, simply open the Angle Editor, and all clips in the multicam clip are linked, online, and ready to edit.
266 Put Multiple Clips in One Multicam Angle
This is another way to create a montage.
It is easy to think of a multicam clip as one clip per angle. However, that’s not true. As FIGURE 5.21 illustrates, you can checkerboard multiple clips, alternating clips between angles. Then edit the multicam clip, changing shots as needed. Finally, after editing is complete, select the edited multicam clip in the timeline and press Cmd+T.
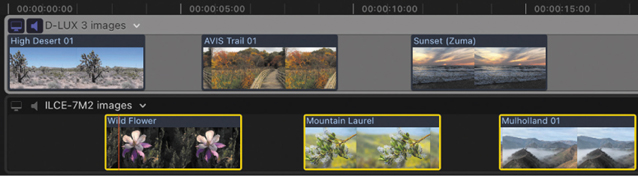
FIGURE 5.21 One multicam angle (track) can hold multiple clips.
Ta-dah! Dissolves instantly appear between all segments.
Another use for this might be adding B-roll shots above an interview, but, frankly, B-roll and cutaways are easier to edit directly in the timeline.
267 Modify a Multicam Clip After It’s Built
Multicam clips can be changed, even after they are edited.
There’s a quick and easy way to modify a multicam clip, even after editing is complete. In the timeline, not the Browser, double-click the multicam clip. This opens it in the Angle Editor (see Tip 259, The Multicam Angle Editor).
Multicam clips can always be modified, even after editing.
A hidden feature of the Angle Editor is that you can delete an existing clip from the multicam clip, replace it with a different clip, or add an angle so you can add a forgotten clip to the multicam, for example, to add a shot that you missed when the multicam clip was first assembled.
To do so:
Click the down chevron; see FIGURE 5.15.
Select Add Angle.
This creates a new angle.
From the Browser, drag the clip you want to add and sync it manually.
You can also use this procedure to add audio clips or graphics.
268 Add Effects to a Multicam Clip
The most popular use for this tip is color correction.
You can add effects to individual clips inside a multicam clip before you start editing, or after it, for that matter. The most common reason to do so is color correction; see FIGURE 5.22. Color correct the source clip in the multicam clip, and all the shots derived from it in the timeline are instantly color graded. This saves a ton of time.
Double-click the multicam clip to open it in the Angle Editor.
Select the clip in the camera angle you want to color correct/grade.
Press Control+Cmd+1 to hide the Browser.
Press Cmd+7 to display the video scopes.
Open the Color Inspector and adjust the color of the clip until you are happy.
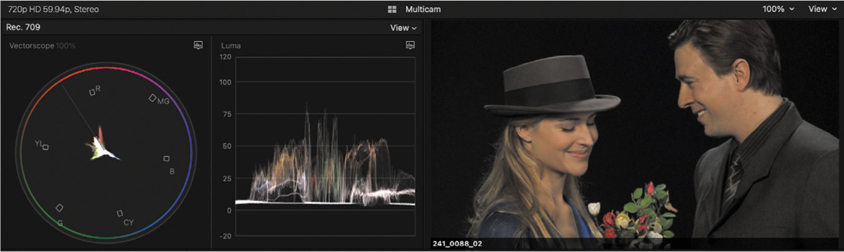
FIGURE 5.22 Vectorscope (left), Waveform monitor, and the image they are analyzing (right).
Note
The Comparison View can help match shots when grading a multicam clip; see Tip 111, The Comparison View.
To add effects to a clip, other than color grading, open the Effects Browser and drag the effect you want on the clip inside the Angle Editor. (Chapter 8 covers effects in detail.)
269 Access Audio Channels Inside a Multicam Clip
You can’t mix audio in a multicam clip, but you can access channels.
Although you can’t mix audio from different clips in a multicam clip, you can access individual audio channels within the currently active clip.
Double-click the multicam clip to open it in the timeline.
Select the clip that contains the audio channels you want to access.
In the Audio Inspector (see FIGURE 5.23), change Audio Configuration from Stereo (the default) to Dual Mono. This displays all the individual audio channels in the clip.
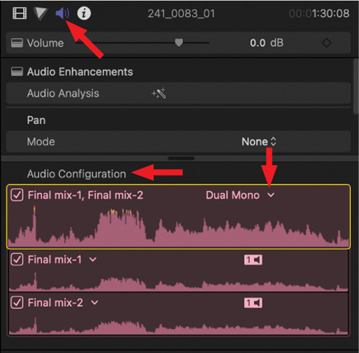
FIGURE 5.23 Audio Inspector icon (top red arrow). To reveal individual audio channels, change Stereo to Dual Mono (lower-right red arrow).
Close the multicam clip and go back to the timeline.
Select the multicam clip segment you want to access.
Choose Clip > Expand Audio Components (shortcut: Control+Option+S). Each audio channel is displayed separately under the video clip; see FIGURE 5.24. You can trim, silence, or adjust levels on each individual channel in the timeline.
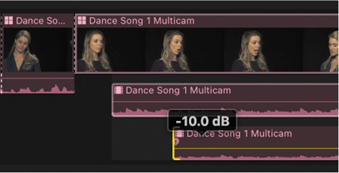
FIGURE 5.24 Individual audio channels for the active clip can be trimmed and adjusted. However, you can’t hear audio from more than one clip.
To close the expanded clip, choose Clip > Collapse Audio Components.
You can adjust these audio channels at any time during your edit.
Closed Captions
Captions are already required for many productions and helpful for all others. However, captions are not titles. This section explains what you need to know to use them well.
270 Not All Captions Are Alike
Caption formats vary widely, but none look as good as a title.
Captions are “timed text,” visible text on-screen that appears and disappears in sync with audio or video. They are used for subtitles (language translations) and closed captions (text for the hearing impaired). Captions can be turned on or off under the viewer’s control. The viewer can select between languages, assuming captions for more than one language are supplied. Captions appear above all other elements on the screen.
Final Cut supports three different caption formats: SCC, SRT, and iTT. All three are designed for readability. Only one caption (language) can be visible at once and captions can be turned on or off at any time. The U.S. Federal Communications Commission’s rules about closed captioning include details about caption accuracy, placement, and synchronicity. They don’t say anything about formatting. In fact, captions are not designed for styling.
CEA-608 (also called SCC and EIS-608). This was the original caption format. They are embedded in the video stream. It’s the only caption format that can be embedded. They are stored in hexadecimal format that permits only 32 characters per line, and up to four lines per frame. There is very limited support for formatting or position adjustment. An embedded SCC file supports only one language.
SRT (SubRip Text). This is probably the most popular caption format, supported by most online services and broadcasters. It is always exported as a “side-car file,” which is a file separate from the video file. As such, SRT supports multiple languages, one language per side-car file. SRT supports basic formatting changes including font, color, placement, and text formatting. However, there is no clear standard for these style changes. Even if you apply them to your captions, there is no guarantee that the software playing your movie will know how to interpret them. It is best not to format SRT captions.
ITT (iTunes Timed Text). According to Apple’s Help, “The iTT standard features formatting, color, and placement options, including a wider range of alphabets, making it the best choice for languages with non-Roman characters. iTT captions are imported or exported as separate files, but they can’t be embedded in an output media file the way CEA-608 captions can.” This caption format supports the greatest amount of formatting, but is supported by the fewest platforms.
When in doubt, create SRT captions and treat them as plain text.
When in doubt, create SRT captions and think of them as plain text.
271 Two Ways to Import Captions
The easiest way to create captions is to import them.
Although you can create captions individually inside Final Cut, it is far more likely that captions are created by the service that transcribes the audio from your program into text. Then, all you need to do is import the captions and make sure the timings are correct.
The easiest way to create captions is to create them outside of Final Cut, then import them.
One of the questions the transcription service will ask is what caption format you need. Captions are not easily converted between formats, so make sure the format you are ordering is the format required by your distributor.
To import a caption file, choose File > Import Captions.
You could also export and import captions using an XML file. However, an XML file contains the entire project, including captions, media, and timeline. When importing a caption file, you are just importing the captions themselves and placing them on the timeline.
272 Enable Captions Using the Timeline Index
Enable or disable languages with a single mouse click.
You can display only one caption track (called a language subrole) at a time. Displayed captions are called active. However, you can edit or modify any caption whether the caption track is active or not.
Captions are controlled from the Roles section of the Timeline Index; see FIGURE 5.25.
To enable/disable displaying all captions, click the Captions checkbox at the top left.
To display a caption subrole, select the box to the left of the name (Spanish in Figure 5.25).
To select that language subrole, click the language name. You can select a caption track without displaying it.
To show or hide that caption subrole in the timeline, click the small monitor box on the right. You can hide extra languages without removing them from the project.
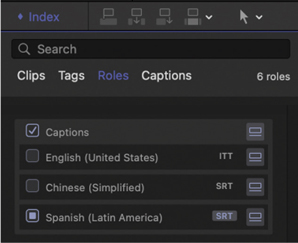
FIGURE 5.25 Captions are enabled, or disabled, using the Timeline Index.
You can display only one caption track at a time.
273 Start with the Right Role
Captions require roles.
Before you create your first caption, create the right role for it. Choose Modify > Assign Caption Roles > Edit Roles; see FIGURE 5.26. From this menu, select the caption format you need.
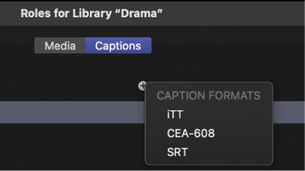
FIGURE 5.26 Create a role using Modify > Assign Caption Roles > Edit Roles before creating individual captions. Roles determine the caption format.
Once the Caption role is created, click the small plus icon to select the language; see FIGURE 5.27. It defaults to the language you set for your computer in System Preferences > Language & Region. Languages are set by the Caption role, not the individual caption.
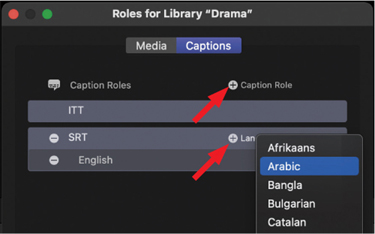
FIGURE 5.27 Click the Caption Role button to create a new role. Click the Language button to select the language for that caption track.
When you add a new caption, you also assign it to the appropriate Caption role.
274 Modify Captions
Most of the time, treat captions like clips.
Once you create (Edit > Captions > Add Caption) or import a caption file, you can add, modify, trim, or delete individual captions. The only difference between clips and captions is that captions using the same language can’t overlap, be too short, or be too near each other. Fortunately, FCP warns you if there’s a problem by changing the color of the offending caption clip to red.
To add a caption, put the playhead where you want the caption to appear and choose Edit > Captions > Add Caption.
To edit the contents of a caption, double-click the caption clip; see FIGURE 5.28.
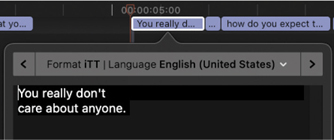
FIGURE 5.28 Double-click a caption to modify the text.
To assign a caption to a different language, click the chevron next to the name at the top of the caption.
To adjust the timing of when a caption appears, drag it horizontally in the timeline.
To adjust its duration, trim the edge.
To delete a caption, select it so it is surrounded by a gold box, then press Delete.
275 Easily Edit SRT Captions
SRT captions are easily edited outside of Final Cut.
SRT captions are stored in a simple text file; see FIGURE 5.29. You can open these in any text editing program. I use Applications > Utilities > Text Edit. You could also use BBEdit.

FIGURE 5.29 This is a typical SRT caption file. Note the simple, rigid formatting, including the weird arrows.
The format of the data is very specific:
Caption number. This unique, sequential number is placed on the first line of a caption.
Timecode. This indicates the start and end of the caption, with the last set of numbers set off by a comma and representing milliseconds, not frames.
Caption text. This is one or two lines of text. Notice that this text file does not contain any text formatting.
Note
If you format the SRT caption, you’ll see formatting instructions included using HTML-style formatting. In general, the more you avoid formatting, the more compatible the caption.
As long as the text lines don’t run too long, you can easily correct spelling, fix punctuation errors, or move words between captions directly in this text file.
276 Caption Translation Tip
SRT captions are also easy to translate.
This tip was first provided by Carsten Ress and posted to my website.
Carsten was looking for a way to export subtitles (in a closed captions format) from FCP as text, send it to translation, then import it back again as subtitles. Here’s what he did:
Export the subtitles from Final Cut as an SRT file. (Although the extension is .SRT, you can open the file in any text editor.)
The translator replaced the text with the translation, leaving caption numbers and timecode untouched.
Import the translated SRT file into a new language role.
The subtitles can be translated while retaining the original timing.
Be careful with the TXT document, as small changes in the format (for example, adding additional text) can result in error messages during the reimport of the subtitles.
Also, Spherico.com makes a series of caption plugins that can import, export, and convert captions. These can also help if you want to burn the subtitles into the video file with more formatting options.
Color Basics & Video Scopes
Understanding color and the video scopes will make a huge impact on the quality of your visuals. This section covers color and the video scopes. Chapter 8 shows how to put these tools to work.
277 Grayscale, Even More Than Color, Drives Emotions
SDR grayscale values are defined by regions.
Brightness levels in an image, called grayscale values, define how light or dark each pixel is. These levels are displayed by the Waveform Monitor and loosely categorized into seven regions; see FIGURE 5.30. For SDR video, these levels are:
Super-white. Values greater than 100 IRE.
White. Values equal to 100 IRE.
Highlights. Values between 66–100 IRE.
Mid-tones (also called Mid-gray, or just Mids). Values between 33–66 IRE.
Shadows. Values between 0–33 IRE.
Black. Values exactly equal to 0 IRE.
Super-black. Values below 0 IRE.
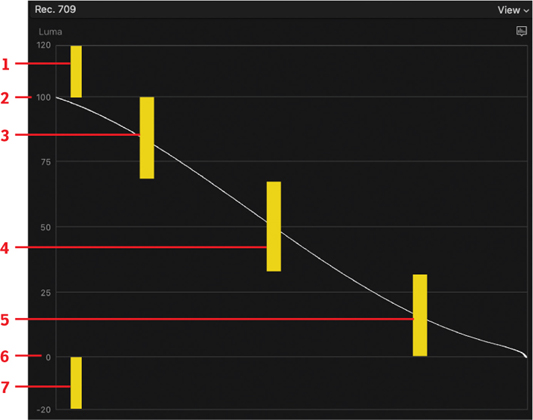
FIGURE 5.30 SDR (Rec. 709) grayscale values are displayed in the Waveform Monitor and grouped into seven regions. While this displays IRE values, the concept is the same for millivolts.
Both super-white and super-black are illegal levels. Although you can post media containing these levels to the web, they are not allowed in media destined for broadcast, cable, digital cinema, DVD, or commercial streaming media. Adjusting these levels is part of the color correction/grading process. It’s a good habit to practice controlling these levels regardless of distribution.
We will use these terms constantly when describing an image and color. (HDR has similar ranges, but not the same values.)
278 Color Is Like a Grapefruit
Hue, saturation & luminance are easiest to imagine in 3D.
Grayscale is two-dimensional. Color is 3D. When our eye sees a color, it says, “Ah…blue!” But with video, we need more precision than that. All digital images and video define color using RGB (red, green, and blue) values, each with three components:
Hue. The shade of a color—red, cyan, purple, and so on.
Saturation. The amount of a color, where gray is unsaturated and bright red is fully saturated.
Luminance (also called luma or brightness). How light or dark a pixel is. These were the grayscale values discussed in Tip 277, Grayscale, Even More Than Color, Drives Emotions.
The easiest way to visualize how these color are organized is to imagine a grapefruit; see FIGURE 5.31. Connect a line from the north pole to the south. Then, along that line, sort every shade of gray starting with pure white at the north and smoothly flowing to pure black at the south. Now, every shade of gray, its luminance value, is defined by where it’s located on that vertical line.
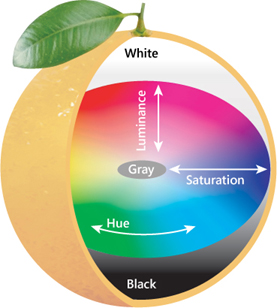
FIGURE 5.31 Think of colors as a grapefruit containing three axes: hue (angle around grapefruit), saturation (distance from center), and luminance (distance north or south).
Saturation radiates out from that center line. Saturation, the amount of a color, increases as distance from the center line increases.
Finally, hue is defined as an angle. In the grapefruit illustration, red is in the upper left; blue is on the right; while green is in the lower left. Each of these three primary colors is 120 degrees apart, which also matches how colors are displayed in the Vectorscope.
We can now precisely describe each color using three numbers:
Its angle around the grapefruit (hue)
Its distance from the center (saturation)
Its height from north to south (luminance)
We refer to these as HSL for hue, saturation, and luminance.
279 Colors, Like Grayscale, Are Defined Using Regions
Colors are grouped by primary and secondary colors.
If we cut the grapefruit, introduced in Tip 278, Color Is Like a Grapefruit, at its equator and look inside, we would see the color range shown in FIGURE 5.32.
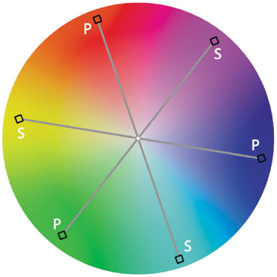
FIGURE 5.32 Primary colors (P) and secondary colors (S). See how this emulates the interior of the grapefruit? We will see this color organization again when we look at the Vectorscope.
Luminance (brightness) is perpendicular to the page, so every shade of gray is a single dot in the center of the circle. Saturation increases as distance from the center increases. And hue varies by angle.
There are three primary (P) colors: red, green, and blue. There are also three secondary (S) colors: cyan, magenta, and yellow. Secondary colors are the exact opposite of their primary.
280 Intro to Video Scopes
Of the three scopes in Final Cut, two are really important.
Final Cut has three principal video scopes; see FIGURE 5.33. Each of these analyzes and displays the value of every pixel in the current frame displayed in the Viewer.
Waveform Monitor. In Luma mode, the Waveform Monitor displays grayscale values.
RGB Parade. This is a variation of the Waveform Monitor, though it is often described as though it was a separate video scope. It displays color values separated into the three primary color channels of red, green, and blue.
Vectorscope. In YUV mode, this displays color hue and saturation values.
Histogram. This, like the Histogram in Photoshop, displays the grayscale range from dark (left) to light (right).
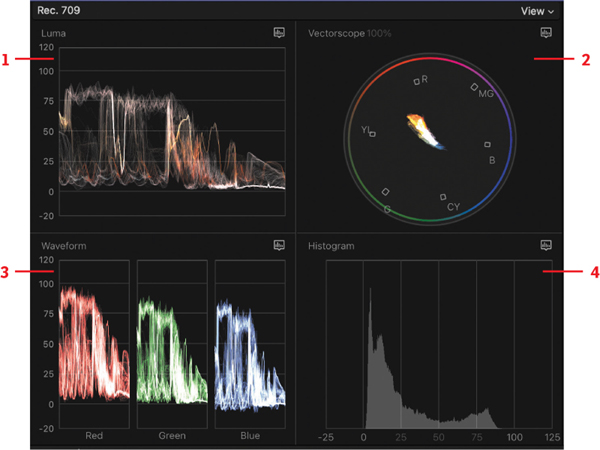
FIGURE 5.33 FCP video scopes: 1. Waveform Monitor, 2. Vectorscope, 3. RGB Parade, and 4. Histogram.
Note
The RGB Parade is the default display for the Waveform Monitor. But changing the Waveform Monitor to Luma is much more helpful. See Tip 285, Video Scope Icon.
Choose View > Show in Viewer > Video Scopes (shortcut: Cmd+7) to display or hide the scopes. The brightness of each scope is adjustable in the View menu in the top-right corner of the scope display. (See Tip 284, The Video Scope View Menu.)
281 The Waveform Monitor
The Waveform Monitor displays the grayscale values of an image.
The Waveform Monitor is one of the two most important video scopes. It displays the grayscale value of every pixel in the frame displayed in the Viewer, but nothing about color.
However, by default, the Waveform Monitor displays an RGB Parade which is not very helpful. Instead, using the Video Scope Icon, change this to Luma. (See Tip 285, Video Scope Icon.)
When looking at the Waveform Monitor, unlike any other scope, we can use terms like “on the left of the image” or “in the center.” We can refer to an image from left to right. But we can’t use up or down since these define brightness levels in the scope.
Darker pixels are toward the bottom; brighter pixels are toward the top. Looking at the screen shot in FIGURE 5.34, we can say:
The center of the image is brighter than the two sides.
The left side has something brighter than the right side.
No values exceed 100 IRE.
No values go below 0 IRE.
The blue bar on the right is darker than the red bar on the left.
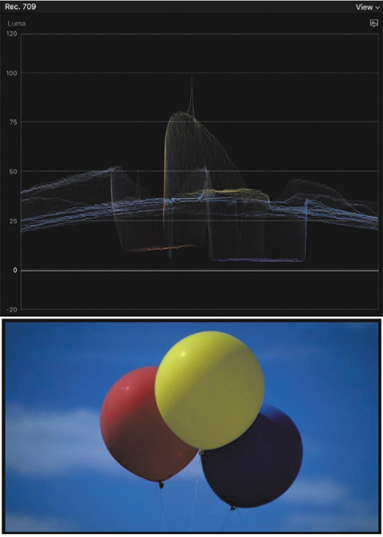
FIGURE 5.34 The Waveform Monitor (top) displays the grayscale values of every pixel in this balloon image (bottom).
What we can’t say, though, is what the image is. The Waveform Monitor describes an image by its brightness, not its content.
282 The Vectorscope
The Vectorscope displays the colors values of an image.
The Vectorscope is equal to, but opposite of, the Waveform Monitor. The Waveform Monitor displays grayscale values. The Vectorscope displays the color values of every pixel displayed in the Viewer. This is the technical equivalent of looking at the equator of the grapefruit we first saw in Tip 278, Color Is Like a Grapefruit; see FIGURE 5.35.
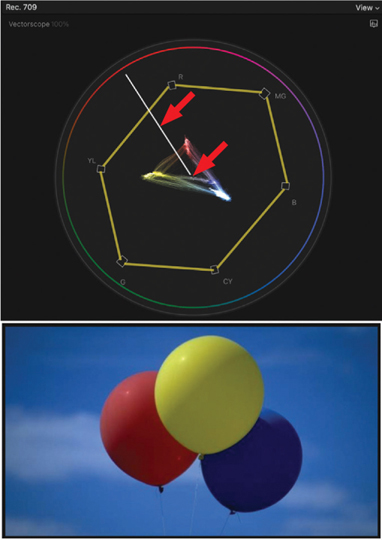
FIGURE 5.35 The Vectorscope displays the color values of every pixel in this balloon image. The yellow lines were added by me to indicate color saturation limits between targets.
Gray is in the center. Saturation increases from the center to the edge. Hue varies by angle around the Vectorscope, with red at 11:30 (near the top). However, the Vectorscope tells us nothing about grayscale values. That’s why we use the Vectorscope in tandem with the Waveform Monitor.
In this image, the Vectorscope shows the colors from the balloon image. The lower red arrow points to the single dot for grayscale values running perpendicular to the scope. The upper red arrow displays the skin tone line, which is the color of red blood under skin. (We’ll talk more about the use of that in Chapter 8.) As you look at the scope, saturation increases as you extend out from the center, and hue changes with the angle.
Looking at the Vectorscope, we can say:
There’s a clump of red in the image.
There are two clumps of blue in the image, one small and one big.
That big blue clump is generally where blue sky appears and is a different color blue from the small blue clump.
There’s also a lot of yellow there, but almost no magenta, green, or cyan.
However, like the Waveform Monitor, we can’t use the Vectorscope to describe content, even though our eyes tell us we are looking at balloons when we see the image itself.
Also, notice the small boxes. Those are called color targets. (The small letters label the colors, from the top clockwise, red, magenta, blue, cyan, green, and yellow.) They represent maximum saturation values for each of the three primary and secondary colors. It is good practice to make sure that saturation levels never exceed those lines. (Those pale yellow lines are not actually displayed in the scope; I added them to illustrate saturation limits between targets.)
283 Display Video Scopes on a Second Monitor
Scopes are displayed along with the Viewer on a second monitor.
One of the benefits to using a second monitor to edit video is displaying both the Viewer and video scopes (they travel together) on a larger screen. This provides greater detail to see what’s inside the frame, or scope, more clearly.
To do so:
Press Cmd+7 to display the scopes.
From the chevron drop-down menu displayed in FIGURE 5.36, select Viewer.

FIGURE 5.36 Click the Dual Monitor button to display a portion of the interface on a second monitor.
Click the Dual Monitor icon indicated by the red arrow.
The Viewer and video scopes now appear on a second monitor.
Switch the scopes to vertical using the View menu.
To consolidate the interface back to a single monitor, click the Dual Monitor button again.
284 The Video Scope View Menu
You can display from one to four scopes—horizontally or vertically.
The View menu, in the top-right corner of the video scopes panel, determines how many scopes will be displayed and how they are arranged; see FIGURE 5.37. My preference is the side-by-side option in the top-right corner. I like seeing both the Vectorscope and Waveform Monitor at the same time.
Vertical Layout. This puts the scopes under the Viewer. Although this is really cramped for a single monitor, it is often the preferred choice when using two monitors and displaying the Viewer on the second monitor.
Show Guides. This displays a thin, white, horizontal line on the Waveform Monitor and Histogram that measures and displays gray scale values. Hover over the scope to quickly read a value. Or click to fix the line in place, then drag the line up or down. Drag the line off the top or bottom of the scope to make it float with the cursor again.
Monochrome. This converts the colors displayed in the scopes to grayscale, though it does not alter media or the timeline.
The slider, at the bottom, determines the brightness of the display trace in the video scope display.

FIGURE 5.37 The Video Scope View menu determines how many scopes are displayed, how they are arranged, and the look of the display.
285 Video Scope Icon
Select and customize the video scope display.
The small icon just below the View menu determines which scope is selected and how it’s configured; see FIGURE 5.38.
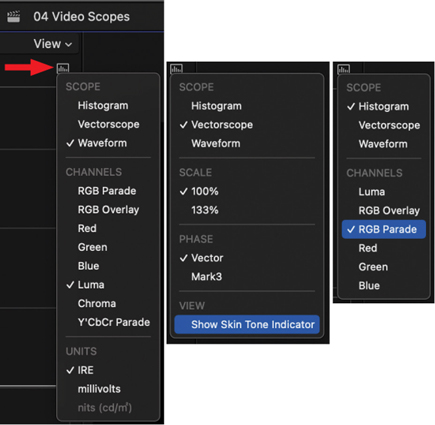
FIGURE 5.38 The video scope selection and configuration menus: (L-r) Waveform Monitor, Vectorscope, and Histogram.
My recommendations are:
Set Waveform Monitor to Luma. This provides the most accurate grayscale display.
Most US editors are comfortable using IRE for all SDR video. European editors may be more comfortable using millivolts. You get to pick.
Set Histogram to either Luma or RGB Parade.
Set Vectorscope to 100%, Vector, and Show the Skin Tone Indicator. (That indicator is very important, as you’ll learn in Chapter 8.)
Chapter 5—Advanced Editing Shortcuts
CATEGORY | SHORTCUT | WHAT IT DOES |
|---|---|---|
Trimming | Cmd+G Cmd+Y Y Shift+F Option+F | Group clips on the same layer into a storyline Create an Audition from selected clips Open an Audition for selection Reveal match frame in Browser Edit match frame into timeline |
Compound Clips | Option+G Shift+Cmd+G | Create a compound clip Break apart a compound clip |
Multicam | Shift+Cmd+7 1–9 Option+1–9 Shift+V Shift+A Control+Option+S | Display the Angle Viewer Cut and switch to one of the first nine angles in a multicam clip Switch, without cutting, to one of the first nine angles in a multicam clip Set the angle for the Video Monitor Set the angle for the Audio Monitor Expand audio or compound clip components |
Captions | Option+C Control+Shift+C Control+Option+Cmd+C Shift+Cmd+2 | Add a caption Edit the selected caption Split the selected caption Open the Timeline Index |
Video Scopes | Cmd+7 Control+Cmd+W Control+Cmd+V Control+Cmd+H | Display the video scopes Display the Waveform Monitor Display the Vectorscope Display the Histogram |
Chapter Wrap
Many of these tools are unique to Final Cut Pro, which means that learning them gives you a competitive advantage. You may not need all the tools we’ve covered, however, they are fun to play with and simplify editing complex projects. Plus, understanding color and the video scopes will make all your projects look better.