
Chapter 10
Special Cases

Introduction
Not surprisingly, Final Cut Pro is filled with power tools and shortcuts that simplify editing. So many that they more than fill the printed pages of this book.
This chapter includes more than an overflow of tips, though. It also includes a section on the business of media. There’s no value in doing something you love if you starve in the process.
The Business of Media
Editing video is fun. But for many of us, it is also a business—the way we earn our living. Here are ideas to help you be more productive, more efficient, and sleep better at night.
498 15 Principles for a Media Career
Career guidance to help you succeed in media.
We spent this entire book finding ways to get organized to work faster and better. Now, I want to talk about getting your life organized. I’ve produced, directed, edited, or taught video for more than 50 years. As I look back on my career, these are the principles I wish I’d learned a whole lot sooner than I did:
Don’t lose hope and never give up; though, sometimes, you may need to change your direction.
Creating media is easy and often fun. Making a living creating media is hard.
Working in media is a life of peaks and valleys. The good days never last as long as you want, and the bad days never last as long as you fear.
The most important person to your career is a mentor you trust. If you don’t have one, find one. If you have one, keep them informed on what you are doing. Don’t try to navigate your career alone.
A video editor needs four sets of skills: creative, craft, technical, and people. All are equally important, but people skills are the hardest to learn.
Keep exploring new ideas; failure is the only way we learn anything.
Telling stories is as old as time. Telling stories in an interesting way remains forever new.
Great gear does not tell great stories. Great stories require a great storyteller.
The gear we use to edit video makes the process fun. The stories we tell make the process worthwhile.
If you aren’t interested in the story you are telling, your audience won’t be interested either.
No one really knows what makes a program successful. We’re all just taking shots in the dark.
It isn’t bad to ask for help; it’s a sign of wisdom.
Collaboration does not diminish your role in a project; it expands it. Choose your collaborators carefully.
You will never know “enough”; technology requires lifelong learning.
If you find yourself in a bad situation, analyze it to determine what makes it bad so you know what to avoid in the future. Then get out.
Don’t lose hope and never give up; though, sometimes, you may need to change your direction.
499 A Workflow That Works
A good workflow saves you time and stress.
This book is about efficiency, and nothing creates efficiency like a workflow. This is especially true for video editing. There is so much to do in a video edit that the work quickly becomes overwhelming. Our time is limited; we need to make the most of it.
A workflow is an explicit, usually written, series of steps for completing a task efficiently. In general, don’t start a new step until the prior step is complete. Although there is some overlap between steps (especially steps 5 and 6 in the following workflow), it makes no sense to spend time adding and polishing transitions when you aren’t yet sure what your final shot order is. The time you spend adjusting a transition is wasted when you delete one of the shots it’s attached to.
A workflow is an explicit, usually written, series of steps for completing a task efficiently.
Here’s a Final Cut Pro workflow I’ve used and taught for years:
Plan the project. Planning is never as much fun as editing, but it is essential to successfully completing a project.
Gather the media. Figure out what’s on hand, what’s coming, and what you need to create.
Organize the media. Use file names, events, keywords, and favorites to organize your media so you can quickly find it later.
Build the story. Don’t worry about precision yet. Just make the basic decisions to get the ideas in your head roughly edited into the timeline.
Polish the story. Carefully rewatch your project and make decisions on the order of your clips. Add B-roll, cutaways, and stills. Polish the overall presentation. Don’t worry about making each edit perfect. Concentrate on improving the flow of the clips in your story.
Trim the story. Once your story is complete and the clips are in essentially the right order, it’s time to start trimming. I recommend you trim to improve the story first, then worry about getting everything to fit for time.
Add transitions. Transitions are fun and sexy, but you have limited time. Focus on your story first. Then add transitions as necessary. Most of your edits should be cuts.
Add text and effects. Now that your story is complete, add text and effects. If you aren’t careful, adding and modifying effects will suck up all the remaining time between now and your deadline, plus about a week. It is easy to get carried away creating effects. Remember, people are watching your story, not your effects.
Mix the audio. The best way to improve the quality of your picture is to improve the quality of your sound. Once the picture is locked, it’s time to add sound effects, music, background, and atmosphere.
Color grade the video. This is the last step of a project—adjust the colors to make your images look great.
Output the project. When everything is done—or the deadline arrives—output your project as a high-quality finished file. This is also called exporting or sharing.
Archive the project. It is amazing how often you come back to old projects. Save that which needs saving and trash that which can be trashed. Remember to export an XML version of both library and project.
Our editing time is limited; make the most of it.
500 What to Discuss with a Client Before Production Starts
Prevent problems by making sure everyone is on the same page.
We sell our skills and time to create a product. When it comes to production and post, there are three options: Good/Fast/Cheap. Clients can pick only two.
Many of us work in corporate or client-based video. As you start a new project, here are key topics to discuss with your client to resolve issues before the project starts. Ideally, document these with a contract or other written agreement. The purpose here is to set expectations and prevent problems due to misunderstandings.
Operational
Who’s the final decision-maker?
Who’s the primary day-to-day contact?
What’s the budget?
What’s the deadline?
What happens if the deadline is missed?
What’s the delivery format—or, where will the video be used?
Who approves the finished project?
Does pre-production start without the first payment?
What in-progress reports does the client expect, who writes them, and who receives them?
Since what you sell are your skills and time, these issues should be resolved before you start.
Content
Who determines the objectives of the video?
What is the planned duration for the video?
Who is writing the script or outline?
Who needs to review it?
Who selects cast members?
Does production start before the script/outline is approved?
Production
If this video requires special facilities or locations, who obtains them?
Is liability insurance required, and if so, who obtains it?
Who, if anyone, from the client is allowed on set?
What authority does the client have on set?
If changes to the script are necessary, who approves them?
If changes affect the budget, who approves the extra money?
Editing
Who reviews the edited version?
How many revisions are allowed without affecting the budget?
Who approves the final version?
To whom is the final version sent?
Who’s responsible for archiving project files and media?
Who can make changes after the initial project is finished?
Budgets & Payments
What will the project cost?
Who approves the budget?
What will cause the costs to change?
What changes are allowed without changing the budget?
If changes affect the budget, who approves the extra money?
What’s the payment schedule?
One payment schedule that I like is 30% at the start, 30% at approval of the rough cut, and 40% with delivery of the final master. As Mark Suszko wrote on my website: “Alarm bells should go off in your head if they demand a clean copy ‘for final review, because the watermark is too distracting’ and you don’t have their money in hand.”
Clearly there are more tasks than this associated with any project. My goal here is to list those tasks that affect the working relationship between the client and you. Resolving these before you start is far better than arguing about them afterward.
501 Plan the Technology of Your Project
Determine the media technology before you start shooting.
When I posted the list of questions to discuss with clients (see Tip 500, What to Discuss With a Client Before Production Starts), Tim D. commented: “Something I face often these days is multiple deliverable formats. For example, a vertical version and a square version for various social media, a shorter version for social media. And burned-in captions are becoming very popular for social media so folks can read the captions before they click the video to get audio. All of these add time in post, but if they’re considered ahead of time, they are easy to accomplish in modern NLEs.”
Be clear on the final delivery specs before you start editing. Ideally, before you start shooting.
So here are several important technical questions that need answers before you start:
What are the final, delivered audio and video codecs?
What’s the final, delivered video frame size?
What’s the final, delivered video frame rate?
What’s the final, delivered audio format?
What’s the precise duration, if any?
What’s the final delivery deadline?
How is the finished media file to be delivered?
These are extremely easy to control before production starts. Some, like frame size, are easily adjusted during editing. But others, like frame rate, are very hard to change after the fact.
In general, shoot the frame size you need to deliver or one that’s larger. Never shoot a smaller frame size and expect to enlarge it; you will always degrade the image quality. Scaling a video smaller than 100% is easy. Scaling it larger is not.
It is always best to shoot and edit the video frame rate you need to deliver. Changing frame rates always causes problems, most often resulting in jittery playback. Changing frame rates is never easy or fun. Avoid it if at all possible.
As we’ve seen, different codecs are designed for different purposes. Make sure you are able to deliver the codec the client needs, or know how to convert the codec you are using into the one they require.
Many projects don’t require a specific duration, but for those that do, matching the expected duration is critical. Be clear on the final duration for your project. Then deliver it.
Clarity on the deadline helps you determine how much time to put into a project. If the project is due in a week, you can’t do the same amount of polishing, sound mixing, and color grading that you could if you had a month. Or two.
502 Make Sure Your Media Is Licensed
If you didn’t shoot it, you don’t own it. Licensing is essential.
It is way beyond the scope of this book to properly discuss audio, video, and image copyright and licensing. In short, it’s a mess. If you didn’t shoot it, didn’t write it, or didn’t compose it, you probably don’t own it.
The licensing of stock image, video, and music media is growing increasingly complex. Simply because you found it on the web does not mean it is free to use!
If stock footage is part of your project, get someone who knows licensing to license it properly.
Scott Newell is an editor with national television credits. When he reviewed an early version of this book, he commented: “For example, one large image licenser says you can’t show any person in a situation where you may be saying they are ill. Yet, clearly, the image shows them lying in a hospital bed. I find that even talking to people at these licensing companies yields conflicting responses. The last thing you want is to use an image or music then, when the project is complete and uploaded onto a platform, someone comes after you or your client and demands money.”
If stock footage is an essential part of your project, get someone who knows licensing to license it properly. There is nothing worse than a rejected project because one music cue was not properly licensed.
Clip Speed Changes
Changing the playback speed of a clip is another form of visual effects. By default, all video clips play at “normal” speed. This section shows a variety of ways you can change that.
503 What’s a Speed Change?
Clip speed changes are a good way to attract the viewer’s attention.
Speed changes can make a clip run faster, slower, or stop all together. It can make a clip run in reverse or create special effects. Speed changes always start by selecting a clip, then doing something to it. They use either the speedometer icon in the lower left of the Viewer (see FIGURE 10.1) or the Modify > Retime menu in the menu bar.

FIGURE 10.1 Access speed changes from the speedometer icon under the Viewer, red arrow, or use the Modify > Retime menu.
Changing the playback speed of a clip is another form of visual effects.
Slow and fast motion change the speed of the entire clip. Speed ramps and Blades change the speed of a portion of a clip.
504 The Retime Editor
This controls all speed changes.
Key to all speed changes is the Retime Editor. To reveal or hide the Retime Editor, select a timeline clip and press Cmd+R. The Retime Editor displays four color bars; see FIGURE 10.2.

FIGURE 10.2 The Retime Editor color bars indicate clip speed.
Green. The clip is playing at normal, 100% speed.
Orange. The clip is playing slower than normal (“slowmo”).
Blue. The clip is playing faster than normal (uh, no, not “fastmo”).
Red. The frame is frozen; a hold frame. (See Tip 507, Create a Hold Frame.)
The Retime Editor controls clip speed. The chevron menu provides speed control options.
To reset clip speed to normal, select the clip and choose Modify > Retime > Normal (shortcut: Shift+N).
To change the speed of a clip, either select a choice from the chevron menu or drag the black vertical “thumb” at the right end of the upper bar.
505 Create a Match Frame
A match frame “matches” a timeline clip back to its source clip.
A match frame is a source clip in the Browser that “matches” the In, Out, and position of the playhead (skimmer) of a timeline clip. A match frame is useful for replacing audio, creating still frames, or just finding the source clip.
To create a match frame:
Put the playhead (skimmer) in the timeline clip. You don’t need to select the clip.
Press Shift+F.
The source clip is instantly opened, marked, and highlighted in the Browser.
506 Create a Still Frame
Still frames are independent clips with an adjustable duration.
A still frame (also called a freeze frame) is an independent media clip that you can position anywhere in the timeline and set to any duration. (Another version is a hold frame, which is covered in Tip 507, Create a Hold Frame.)
Still frames are easy to create and use a technique similar to a match frame. (As a note, if the skimmer is active, it takes precedence over the playhead.) My recommendation is to place still frames on a layer above the Primary Storyline.
Put the playhead (skimmer) on the frame you want to freeze.
Press Shift+F.
This creates a match frame in the Browser.
Press Option+F.
This edits the match frame in the Browser into the timeline as a connected clip at the same position as the playhead (skimmer). The default duration is four seconds. You can change this duration in Final Cut Pro > Preferences > Editing.
Still frames are stand-alone media clips with an adjustable duration.
You can move this still frame wherever you want, use any duration you want, and even delete it, without affecting any other clips. If effects are applied to the timeline clip prior to creating the still frame, the effects will also be applied to the still frame.
Note
Once a still frame is created and edited into the timeline, it is independent from the source clip from which it was created.
507 Create a Hold Frame
This embeds a still frame in the timeline clip itself.
A hold frame is a still frame (“freeze frame”) that’s embedded in a timeline video clip. The big benefit to a hold frame is that when you move the timeline clip, the hold frame moves with it. By default, hold frames are two seconds long. To create a hold frame (see FIGURE 10.4):

FIGURE 10.4 (Top) A new hold frame. (Bottom) Click the chevron for more options. Drag a black “thumb” to change the duration (top right arrow).
Put the playhead (skimmer) on the frame in the timeline you want to freeze (top image, left red arrow).
Press Shift+H.
Or—choose Modify > Retime > Hold.
Or—select Hold from the speedometer icon in the lower left of the Viewer.
A two-second hold frame appears with a red bar in the Retime Editor over it.
To adjust the duration of the hold frame, drag the black thumb line (top right red arrow).
To apply a speed ramp at the end, click the chevron (lower image, red arrow) and select Smooth End Transition.
To remove a hold frame, select the entire clip and press Shift+N.
To toggle the Retime Editor on or off, press Cmd+R.
508 Create a Stills Montage
This uses the Still Image duration preference setting.
The Still Image duration preference (see Figure 2.19) sets a default four-second duration—the distance between the In and the Out—for imported still images. Although this is easily overridden when you review a clip in the Browser, there’s a reason to harness it.
If you are importing still images for a music montage, calculate the duration between major beats in the music. Then, change this duration preference to match that time. Now, when you import a group of still images, each clip is automatically marked to match the duration between beats.
Select the Browser clips in the order you want them to appear, then edit them as a group into the timeline. They will edit in the order in which they were selected. Plus, all the durations should now match the beats in the music without additional trimming.
509 Convert a Clip to Slow Motion
Slow motion stretches the duration of each frame.
Slow motion slows the playback of each frame while extending the duration of the clip.
To tell Final Cut to play an entire clip in slow motion (slowmo):
Select the clip.
From the speedometer icon (see FIGURE 10.6), choose Slow and a percentage; for example, 25%.

FIGURE 10.6 Apply slow motion to a clip from the speedometer icon and choose Slow and a percentage.
Note
Slowing the playback speed of a clip holds each frame longer; it does not create new media between frames.
The duration of the clip expands and the clip plays at 1/4 speed. What’s actually going on here is that Final Cut extends the playback duration of each frame. For 50% slowmo, each frame lasts for the duration of two frames, 25% holds the frame for four frames, and 10% holds the frame for 10 frames. However, you are not limited to just these three speed percentages.
To adjust the speed of a clip further, grab the black vertical “thumb” at the right end of a clip (right red arrow) and drag. The percentage is shown in the orange Retime Editor. (See FIGURE 10.7.)

FIGURE 10.7 Drag the black thumb icon (right red arrow) to change the speed of a clip. To reset, click the chevron and select Normal (100%).
To reset the clip speed to normal, click the chevron (left red arrow) and select Normal (shortcut: Shift+N).
510 Frame Blending Smooths Slowmo
Frame Blending & Optical Flow create “new media” for slow motion.
Unless you shoot at a high-frame rate to create high-quality slow motion (see Tip 511, Automatic Speed Creates Glossy Slow Motion), when you apply slowmo to a clip, all you are doing is slowing the playback of existing frames. For speeds 25% or higher, that will be fine. But as you slow clips even more, you’ll start to see “jerkiness” in the playback because you are watching each individual frame play without providing the illusion of motion.
There are two options that can help smooth this: Frame Blending and Optical Flow.
Frame Blending. This adds a short dissolve between each frame. I recommend using it for slowmo percentages between 10–25%.
Optical Flow. This looks at each individual frame and attempts to create new intermediate media based on the changes between frames. Sometimes, this works great. Other times, not so much. There’s nothing to tweak; you either like it or not. It makes sense to add Optical Flow when slowmo speeds go below 10%. However, most of the time, I find I don’t like the results.
Both Frame Blending and Optical Flow require rendering. Optical Flow will take longer.
To apply either setting, choose it from Video Quality in either the speedometer menu or Modify > Retime menu; see FIGURE 10.8.

FIGURE 10.8 The Video Quality settings in the speedometer menu. For slowmo speeds of 25% or more, Normal is the preferred setting.
511 Automatic Speed Creates Glossy Slow Motion
Automatic speed requires shooting a clip at a high-frame rate.
Normally, slow motion requires playing every frame of a clip more slowly. However, that tends to lower image quality and cause jerkiness in the playback. A much better option—though it requires planning ahead—is to shoot high-frame-rate video then play every frame at the normal speed of the project. This yields the highest image quality and the smoothest playback.
Fortunately, Final Cut makes this easy.
When you import a high-frame-rate clip, Final Cut displays a special clip badge in the Browser; see FIGURE 10.9. This indicates it’s a high-frame-rate clip, in this case 240 fps shot on an iPhone.

FIGURE 10.9 The white badge in the corner indicates this is a high-frame-rate clip.
Edit the timeline clip into the timeline like any other clip. Then, from the speedometer menu, choose Automatic. This plays every frame in the source clip at the frame rate of the project, yielding lovely slow motion.
To reset, select the timeline clip and press Shift+N. This plays the clip such that the speed looks normal.
512 Increase Clip Playback Speed
Increasing clip speed is easy and doesn’t damage image quality.
Note
Increasing the playback speed of a clip always shortens its duration.
To speed up a clip, select it in the timeline, then do one of the following:
Display the Retime Editor, click the chevron, and choose Fast and a percentage; see FIGURE 10.10.

FIGURE 10.10 One way to change the speed of a clip is to click the chevron menu. The blue bar indicates it is going faster than normal speed.
Or—from the speedometer icon, choose Fast and a percentage
Or—from the Modify > Retime menu, choose Fast and a percentage.
To adjust the speed, drag the black vertical thumb on the right side.
To reset a clip to normal speed, select the clip and press Shift+N.
Fast motion is one way to achieve a simple time-lapse effect.
To increase the speed of a clip, Final Cut drops frames. For example, to play a clip at 200%, FCP plays every other frame. Although faster, this is not true time-lapse video. This also means that the duration of a clip played faster than normal will be shorter than the duration of the same clip at normal speed.
513 Use Reverse to Play a Clip Backward
This option is available using the Custom menu in the Retime Editor.
The Custom menu in the Retime Editor provides options to play a clip in reverse, set a specific duration, or set a specific speed for a clip. To access it, open the Retime Editor, click the chevron menu, and choose Custom; see FIGURE 10.11.

FIGURE 10.11 The Custom dialog, accessed from the chevron menu (lower red arrow), enables setting a specific clip duration or playing a clip in reverse (top red arrow). When a clip is reversed, the orange bar highlights with a chevron hash.
In this menu you can select to play a clip in reverse, set a specific speed rate (fast or slow), or set a specific duration for a clip. When you set the duration, Final Cut will figure out what clip speed is necessary to match that duration.
514 Speed Ramps Vary Playback Speed
Speed ramps change the playback speed of a portion of a clip.
Speed ramps must be contained in a single clip. To apply ramps across multiple clips, first combine the clips into a compound clip.
So far, all speed changes affect the entire clip. However, speed ramps (see FIGURE 10.12) can vary a portion of a clip or the entire clip. They can slow a clip down, speed it up, or both. They do this by slowing, or speeding, a clip in segments.

FIGURE 10.12 Selecting a range and applying a speed ramp (top). The results of the speed ramp (bottom). The red frames under the right arrow are a hold frame.
To create a speed ramp:
Using the Range tool (shortcut: R), select the portion of the clip you want to slow (top image).
From the speedometer icon (or Modify > Retime), choose Speed Ramp > to 0%
Orange bars with speed transitions appear (lower image).
Although you can adjust the duration of each ramp level using the thumb (left red arrow) my recommendation is to leave them alone.
If you want only to slow a clip, this procedure is fine. If you want to slow a clip to pause it on a freeze frame that you can adjust for duration, create a hold frame first and then apply the speed ramp to the edge of the hold frame. This is shown in the lower portion of FIGURE 10.11.
Note
If you are slowing speed to or from a hold frame, create the hold frame first, then create the speed ramp.
515 Create Speed Transitions Manually
Use the Blade Speed tool and speed transitions for custom speeds.
Speed ramps are a fast way to create a speed change. But you can also use the Blade Speed tool to cut the Retime Editor at any location, then select a custom speed for each segment.
To use the Blade Speed tool:
Put the playhead where you want to make a speed change.
Select the Blade Speed tool from the speedometer icon
Or—choose Modify > Retime > Blade Speed
Or—use the shortcut: Shift+B
Click to cut the Retime Editor.
Either select a new speed from the Retime Editor chevron menu or drag the thumb.
To adjust the duration of a speed transition (gray), drag an edge.
To disable it, double-click in the gray transition (not the thumb) to reveal the dialog shown in FIGURE 10.13, and deselect Speed Transition.

FIGURE 10.13 Drag the edge of a gray speed transition to adjust its duration. Double-click the transition to reveal this dialog.
To remove the speed change, select the clip and press Shift+N.
516 Instant Replay and Act Like a Sportscaster
This combines a speed change, animated title, and special effect.
Instant Replay is fast, fun, and easy to create.
Use the Range tool to select the area you want to repeat.
From the speedometer menu, or Modify > Retime, choose Instant Replay and a playback speed; see FIGURE 10.14.

FIGURE 10.14 To create an instant replay, select a range within a clip, then choose Instant Replay from the speedometer, or Modify > Retime, menu.
Final Cut repeats the range, slows it down, and flies in a title saying “Instant Replay.”
To make this more interesting, you can add a Rewind effect from this menu before Instant Replay.
Advanced Export
Chapter 9, “Share & Export,” presented a variety of tips covering the most common ways of exporting media. In this section, we look at several advanced export methods.
517 Export Multiple Projects At Once
Final Cut now supports batch export.
Batch export means you can queue and export multiple projects at one time, while you busily continue to edit another project in the foreground.
In the Browser, select the projects you want to export.
Choose File > Share X Projects, where X is replaced by the number of projects you selected.
In the Export Files window, set the export settings.
These settings are applied to all projects in this batch. If you need different settings for each project, export them separately.
Note
The upper-right Share button options and the default-share shortcut also work, unless the default share is Save Current Frame.
518 Export a Timeline Range
This is a fast way to test export settings without wasting time.
To export a section of the timeline, called a range:
To export a range, define it using the Range tool. Selecting clips won’t work.
Set an In and Out in the timeline using the Range tool, or press I and O.
Selecting clips won’t work; you must set an In and Out.
Choose File > Share > Export File.
519 Export Multiple Ranges at Once
This option is hidden in the Browser.
Although you can export only one range at a time from the timeline, the Browser is not so limited.
Switch the Browser to thumbnail view.
Set Ins and Outs for the ranges you want to export. See Tip 195, Select Multiple Ranges in One Clip.
These selections could be in a single clip, multiple clips, or a project.
Cmd-click to select each range, in the order you want to export them.
With the ranges selected, choose File > Share > Export File. The menu reflects the number of ranges you want to export.
Export files are named the same as clip files.
520 Change the Poster Frame for a Movie
The poster frame is the small movie image displayed in the Finder.
There are several ways to change the poster frame for a movie. Here’s the fastest and easiest:
Copy the image you want to use to the clipboard (shortcut: Cmd+C).
Select the movie file in the Finder.
Press Cmd+I to open the Get Info panel; see FIGURE 10.15.

FIGURE 10.15 Paste a new poster frame image here in Get Info.
Select the small icon in the top-left corner (red arrow).
Paste the new poster frame into that selected icon (shortcut: Cmd+V).
This changes the icon displayed in the Get Info window and in the Finder.
521 The Action Menu
This tells Final Cut what to do with the exported file.
The Action menu, which is part of the Export > Settings window, provides options on what to do with the exported file; see FIGURE 10.16.

FIGURE 10.16 The Export Actions menu. I use Save only whenever I export a project.
QuickTime Player. This is the default action. FCP exports the movie then opens it in QuickTime Player so you can review the export.
Save only. This saves the file and does nothing else with it.
Open With. This displays a list of recently opened applications. Compressor is displayed here because I use it in conjunction with Final Cut. Not all displayed applications in this section may be appropriate for a media file.
Other. This displays a list of applications to open when the export is complete.
Add to TV. If you have an Apple TV, this sends the file to the Apple TV menu.
My choice, most often, is Save only. However, automatically loading it into Apple Compressor (which is sold separately) saves time when creating compressed versions.
522 Check File Compatibility
At the bottom of the Export Files window is a compatibility icon.
At the bottom right of the Export Files window is an icon that displays a menu showing which devices can play the exported file.
If you export ProRes, it can be played only on Macs and PCs that have ProRes video codecs installed.
If you export MP4 (the Apple Devices choice using File > Share), it can be played on most mobile devices and websites. (See FIGURE 10.17 for a partial list.)

FIGURE 10.17 Green indicates devices that can play the exported file. The red arrow indicates the “Check compatibility” icon.
Note
If you plan to reedit the file, export as ProRes. If you plan to send the file to the web, use H.264. For other distribution outlets, confirm with them which codec they need.
523 The Role Menu
This panel was vital in the past. Now, it’s mostly informative.
In earlier versions of Final Cut, the Roles menu—part of Export Files—was where roles were turned on or off for export. Today, roles are handled either by the Timeline Index (see Tip 233, The Timeline Index) or by File > Export Captions (see Tip 526, Export Captions) for both the timeline and export. This panel provides information, not access.
Note
This Roles icon appears only when there are disabled roles in the exported project.
In the lower-right corner of the Roles panel (see FIGURE 10.18) is a small icon (red arrow). Click it to see which roles are disabled for that project.

FIGURE 10.18 This icon displays all roles that are disabled for the export.
524 Create a Share Bundle
Bundles help you do more things at the same time.
A bundle is a group of Share destinations that are stored in a single place; see FIGURE 10.19. When you select the bundle using File > Share, Final Cut creates a separate file for each destination in the bundle for each project or clip you are exporting.

FIGURE 10.19 A customized Share bundle created in Preferences > Destinations. Click a name and press Return to change the name.
For example, you could use bundles to simultaneously create:
A high-quality ProRes finished file
A compressed version for YouTube
An MP4 version for all Apple devices
These are created in Preferences > Destinations. To add destinations to the bundle, drag an existing destination into it from the Destinations list (on the left), or select Add Destination and drag destinations from the area on the right into the bundle.
To rename any item in the bundle:
Select it and press Return (or click the name).
Select each destination in the bundle and customize it with the settings you need.
To share a project to a bundle:
Select the project, then choose File > Share > [bundle name].
FCP will ask you to confirm the settings for the first setting in the bundle, then use the default settings for all other destinations.
Give the output file a name and location, and click Save and Final Cut to output all versions in the bundle in the background.
525 Export a Smaller File
There are lots of reasons to create a smaller file.
Note
H.264 files compress audio using the AAC codec.
If you don’t need the highest image quality, save storage space by exporting a compressed file. These are useful for client review, audio mixing, posting to the web, or wherever file size is more important than image quality or editing efficiency.
When small file size is more important than image quality, export using H.264.
Select the project to export.
Choose File > Share > Export File.
Change Video Codec to H.264.
Click Next.
Give the file a name and storage location.
Click Save.
This exports a file with the same frame size and frame rate as the project but at a fraction of the size of a ProRes file.
526 Export Captions
Almost all captions must be exported as separate files.
Only one language of CEA-608 (SCC) captions can be embedded into the video. All other caption files are exported as “sidecar” files. A sidecar file is a separate file, containing one language per file.
Open a captioned project into the timeline.
Choose File > Export Captions.
This is a different menu from File > Share > Export File; see FIGURE 10.20.

FIGURE 10.20 The Export Captions window. Each selected caption exports as a separate file.
Check the languages you want to export. Each is exported to a separate file. You can export multiple languages at the same time.
Relative to Timeline. Each caption’s start time is calculated by subtracting the project’s start time.
Absolute. Use each caption’s start time, regardless of the project time.
SRT. These captions support formatting; however, most caption players don’t display formatting consistently. I recommend you leave this unselected.
This menu exports captions without exporting the project.
527 How to Export Files with Transparency
Transparency data is stored in the alpha channel.
Use ProRes 4444 to include the alpha channel with video during export.
If you are creating files in Final Cut that contain transparency, you need to export them so that transparency data is retained. This data is stored in the alpha channel. Only two video codecs include the alpha channel with the video file:
ProRes 4444 with alpha
ProRes 4444 XQ with alpha
Keep in mind that a ProRes 4444 file is roughly double the storage size of ProRes 422. ProRes 4444XQ is roughly 2.5 times larger than ProRes 422. You can encode the alpha channel into HEVC video using Apple Compressor.
528 Use QuickTime Player to Check Movie Specs
I use this technique to quickly see the technical specs of a movie.
Note
Another software option is MediaInfo from MediaArea.net. This free software (also available in the Mac App Store) does an excellent job of displaying and exporting media metadata.
The fastest and easiest way to determine the technical specs of a movie is to use QuickTime Player.
Open the movie in QuickTime Player.
Press Cmd+I.
This displays the specs of the movie file; see FIGURE 10.22.

FIGURE 10.22 A sample QuickTime Player Info panel. Note this is an MPEG-2 file, not QuickTime.
Twirl down different sections to learn more about the video, audio, timecode, and caption settings (if any) in the movie.
The fastest and easiest way to determine the technical specs of a movie is to open it in QuickTime Player, then choose File > Get Info.
529 Select Different Compression Settings
Final Cut provides direct access to Apple Compressor presets.
If you have Apple Compressor installed on your system, you have the option to send files directly from Final Cut to Compressor.
In Preferences > Destinations, when you drag Compressor Settings from the right side to the left, a window appears listing all current default and custom compression settings; see FIGURE 10.23. Although we can’t create custom settings inside Final Cut, we can access any default or custom settings that Compressor has already installed or created.

FIGURE 10.23 Custom and default Apple Compressor options are displayed when selecting Compression Settings as a destination.
530 Send Files to Apple Compressor
Final Cut can’t create custom compression settings.
Note
This menu option only appears if you have Apple Compressor installed on your system.
One of the options in File > Share > Export File is to send the exported file to Apple Compressor. Why? Because Apple Compressor provides significant benefits that extend the power of Final Cut:
Compressor, like Motion, is an inexpensive utility that greatly extends the capability of Final Cut Pro.
Compressor can create custom compression settings.
Compressor provides more compression options and compression flexibility.
Compressor can process files in batches.
Compressor can add watermarks without altering the source file.
Compressor can add captions after the movie is edited.
Compressor can retain alpha channel settings in HEVC video.
Compressor, like Final Cut, supports captions.
Compressor costs only $50.
I use Compressor, along with other media compression tools, almost every week. Final Cut is designed for editing; Compressor is designed for media compression.
531 Burning DVDs or Blu-ray Discs
Optical media is supported, but not well, in Final Cut Pro.
The Share menu in Final Cut supports burning a clip, range, or project to a standard-definition DVD or HD Blu-ray Disc. However, this feature has been problematic for years. Nothing in Final Cut is comparable to DVD Studio Pro, which was part of the Final Cut Pro 7 suite.
FCP supports burning a single movie, with chapter markers and a customized menu, to disc. It also supports creating an IMG (disk image) file that can be burned to disc using other software, such as Roxio Toast. See Final Cut’s Help files more details.
However, don’t expect DVD or Blu-ray Disc burning to work well or reliably.
360° Video
360° video puts the viewer in the center of a sphere looking out at the image that surrounds them. Shooting and editing 360° video is more like working in theater than shooting a movie.
532 What Is 360° Video?
This is also called 360/VR and 360° VR.
The easiest way to imagine shooting 360° video is that you are creating theater, not film.
The easiest way to imagine shooting 360° video is that you are creating theater, not film. 360° VR puts the viewer in the center of a sphere where they can look up, down, left, or right as they choose. Unlike traditional video where the filmmaker controls what the audience sees, in 360° video the filmmaker provides the environment for the audience to explore on their own. This is just like creating a play in the theater. The audience can look wherever they want, but they can’t leave their seats.
The other side of VR is a 3D world, where the viewer is able to explore a space and even walk around objects to see what’s behind or around them. Final Cut supports the first option, but not the second. 3D worlds are created solely in software. 360° video is recorded by a camera.
533 Create a 360° Video Project
Creating a 360° VR project is similar to creating any other project.
To create a 360° video project, choose File > New > Project (shortcut: Cmd+N); see FIGURE 10.25. Autoconfigure the project by dragging a 360° video clip into an empty project, or customize the project by clicking the Use Custom Settings button.
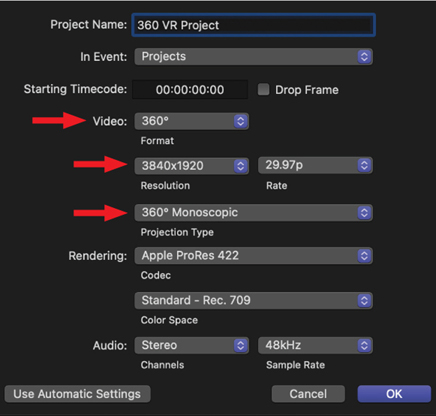
FIGURE 10.25 New project settings for 360° VR. In general, have the project frame size match the video.
360° video puts the viewer at the center of a sphere looking out into the world.
360° video project settings are the same as a “normal” Final Cut project with three additions:
Video format. Use 360°. Nothing else will work.
Resolution. Verify the resolution of your clip by selecting it, then looking at the top of the Video Inspector. This displays both frame size and frame rate. As with any video, you can make the image smaller, but not larger than the size at which it was shot. However, most of the time, match the project frame size to the video.
Projection Type. Mono contains a single image that is viewed on either a computer monitor or a VR headset. Stereo contains two images, one for each eye, which is viewed only on a VR headset.
534 How to View 360° Video
Viewing support is built into Final Cut.
Final Cut supports the display, editing, and export of 360° VR, but by default, the Viewer does not display it properly.
To display 360° VR:
Create a new project, and make sure the settings match your 360° VR clip; see Tip 168, Quick Specs Check.
Choose View > Show in Viewer > 360° (shortcut: Option+Cmd+7); see FIGURE 10.26.

FIGURE 10.26 The 360° Viewer is on the left (shortcut: Option+Cmd+7). (Photo credit: Allynn Wilkinson.)
Two images appear. The standard Viewer on the right, and a 360° Viewer on the left.
Drag inside the left image to change the angle of view.
Although you can adjust the angle of view using the slider in the top-left corner, this is best left at the default setting of 90°.
535 Adjust the Angle of View
If necessary, reset the default angle.
Most of the time, 90° is the best choice.
To change the viewing angle, drag the slider in the top-left corner of the 360 Viewer; see FIGURE 10.27.

FIGURE 10.27 To change the angle of view, drag the slider (left red arrow). To reset the view, click the hooked arrow (right red arrow).
To reset the view to the default angle, click the hooked arrow (right red arrow in Figure 10.27).
To display the horizon line:
Go to the View menu at the top right of the Viewer (not the menu bar) and choose Show Horizon; see FIGURE 10.28.

FIGURE 10.28 The yellow horizon line simplifies adjusting the vertical and horizontal alignment using the Reorient settings in the Video Inspector. (Photo credit: Allynn Wilkinson.)
In the Video Inspector, change the Reorient settings as necessary.
These settings show up only when a 360° VR clip is selected in the timeline.
To change the default opening angle for a 360° VR clip, adjust the Reorient settings in the Video Inspector.
536 Most 360° Video Is Shot on a Tripod
However, if you shoot handheld, you must stabilize it.
The best way to shoot 360° video is using a tripod. When you can’t, it must be stabilized.
Motion sickness is not the reaction you want when an audience watches your video. It is always a good idea to stabilize your images when you shoot handheld!
Select the 360° clip in the timeline, not the Browser.
Go to the Video Inspector and select the Stabilization checkbox. There’s nothing to adjust.
537 Editing & Transitions in 360° Video
With 360° video, edit as little as possible.
The key concept in editing 360° video is that because the video is a sphere that contains the viewer, you should edit as little as possible.
Never assume where the viewer is looking.
In traditional film, we bring the camera closer to the actor. In 360° VR, we bring the actor closer to the camera. This sphere-ness also affects transitions. A traditional transition doesn’t understand that there’s an up, down, or around to the image. With normal video, most transitions start at the edge of the frame. But with 360 VR, there is no edge; the entire image is a sphere. Moving in for a close-up on one side means moving away from a close-up on the other side of the sphere.
Pick transitions from the Transitions > 360° category. Then, go to the Inspector and adjust the Longitude (starting point), Direction, and Speed settings to get the effect you want.
538 Use 360° Generators for 360° Video
Generators must be designed for 360° video in order to look right.
Just as you need to use 360° transitions, you also need to use 360° generators; see FIGURE 10.29. You can use these generators without creating seams, distortions, or other artifacts.

FIGURE 10.29 Final Cut provides two 360° generators. Each defaults to blue, but changing colors is easy.
360° Color Solid. The default color is blue. In the Generators inspector, select any color using a standard color picker.
360° Gradient. The default gradient is blue. In the Generators inspector, select any range of colors using the standard gradient color picker.
539 Use 360° Titles for 360° Video
Position 360° titles using the Reorient, not Text, settings.
In traditional film, titles are fixed in location relative to the frame. In 360 VR, they are locked to a specific position in the spherical image. This means titles don’t “float” in the frame. They are seen or not seen depending upon where in the VR sphere the viewer is looking; see FIGURE 10.30. This makes adding titles tricky because you can’t assume the viewer will actually see them if they are looking somewhere else. As well, because you don’t know when or if a viewer will see a title, it is a good idea to avoid adding animation.
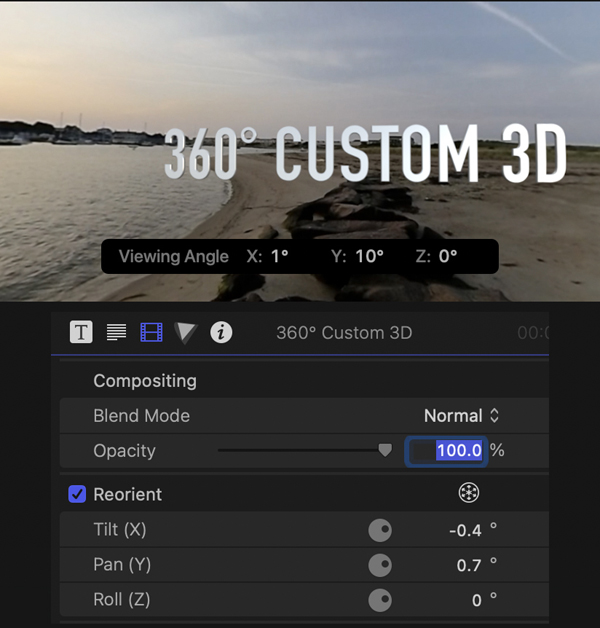
FIGURE 10.30 A 360° title, along with the Reorient settings that placed it into location. Avoid using animation, and hold titles onscreen much longer than normal.
Final Cut includes seven 360° title templates. These are essentially the same, except for their built-in animation. Unlike other titles, though, you position them using the Video Inspector > Reorient settings.
Keep in mind that if the viewer is looking somewhere else in the frame, they won’t see your title. For this reason, keep titles onscreen far longer than you would use for a “normal” film.
360° titles work best when used as labels.
540 Add HD Video to a 360° Video Project
Yes, you can easily integrate non-360° video.
When you add standard (non-360°) video to a 360° project, it looks flat in the Viewer. When you view it in a 360° viewer, it looks as if it is pasted inside the sphere. (Think of watching a movie inside a movie theater. The HD movie is on the screen, while the rest of the theater is part of the overall 3D environment.)
To add a “standard” movie into a 360° project:
Edit the clip as normal into the timeline.
Select the timeline clip.
Select 360° Transform in the Video Inspector; see FIGURE 10.31.

FIGURE 10.31 To properly display HD/4K video in a 360° project, make sure 360° Transform is selected.
Position the video using the settings inside 360° Transform.
541 Add 360° Video to an HD/4K Project
360° video works fine in an HD/4K project.
You can also add 360° video to an HD or 4K project:
Edit the 360° clip into the timeline as normal.
Select the timeline clip.
Adjust the Video Inspector > Orientation settings to make the picture look “normal”; see FIGURE 10.32.

FIGURE 10.32 Adjust a 360° video clip when placed in an HD/4K project using the Orientation settings.
542 Export 360° Video or Stills
Exporting 360° video is the same as exporting any other project.
To export a 360° video project, choose File > Share > Export Movie. The process is the same as exporting an HD/4K project; see Tip 485, Export a High-Quality Finished File. View the movie in QuickTime Player or on a VR headset.
To export stills from a 360° project, choose File > Share > Save Current Frame. However, 360° metadata is not exported with the still frame. This means that you’ll need to use other tools to get the still frame to look correct on a VR headset.
Additional Resources
These are tools I use on a regular basis that support, simplify, or extend what I can do with Final Cut Pro. I recommend all of them.
Websites for Final Cut Pro Editors
The Final Cut community is worldwide.
While there are far too many websites devoted to Final Cut to list all of them, these are my favorites:
LarryJordan.com—larryjordan.com/free-tutorials/. More than 2,600 free tutorials on everything related to video editing.
Apple Final Cut Pro Support—support.apple.com/final-cut-pro.
Audio Design Desk—add.app. An extension for Final Cut that simplifies adding, modifying, rearranging, and timing sound effects and music cues.
Blastwave FX—www.blastwavefx.com. High-quality sound effects for just about everything.
Creative Cow—CreativeCow.net. Covers virtually every known creative tool. It is worth visiting on a regular basis.
Digital Anarchy—DigitalAnarchy.com. Excellent skin retouching and video cleanup software.
EditStock—EditStock.com. Provides sample scenes and footage for practicing storytelling.
EditMentor—EditMentor.com. Online training for the craft of editing.
FCP.CO—FCP.co. A web resource covering Final Cut Pro.
FilmIndependent—www.filmindependent.org. Nonprofit arts organization that supports independent film and filmmakers.
Frame.io—frame.io. Cloud-based collaboration platform that enables you to stay connected with your teams—with videos, images, and more—from anywhere on the planet.
FXFactory.com—fxfactory.com. A huge library of effects for Final Cut Pro.
Indiewire—www.indiewire.com. Movie news, reviews, union developments, and industry gossip.
Izotope.com—izotope.com. State-of-the-art audio cleanup software. I recommend the Standard bundle.
L. A. Post-Production Group—lappg.com. User group that covers post-production, without being tied to any specific software or hardware.
MotionArray.com—motionarray.com. All-in-one video and filmmakers platform.
NoFilmSchool—nofilmschool.com. Stories that make us better filmmakers—no film school required.
Pexels.com—www.pexels.com. Free images and video for projects and posts.
Philip Hodgetts Blog – www.philiphodgetts.com. Probably the most insightful blog on the post-production industry.
Post Magazine—www.postmagazine.com. A weekly magazine covering the entire post-production industry.
Post-Perspective.com—postperspective.com. Interesting interviews with filmmakers who matter. Edited by Randi Altman.
PremiumBeat.com—www.premiumbeat.com. Royalty-free music licensing website, with a great blog.
ShutterStock.com—www.shutterstock.com. Royalty-free stock media.
SmartSound.com—www.smartsound.com. High-quality, royalty-free music with adjustable durations and instrument mixes.
2 Reel Guys—2ReelGuys.com. The art of making a film, without going to film school. Hosted by Larry Jordan and Norman Hollyn.
As a quick word count estimator, use three words for each second.
Count Words for Voice-Over Timing
Media is more like poetry than prose.
When it comes to media, every word needs to carry more than its weight. Because we have so few words for the time we have, each word becomes essential. In other words, scripts are more like poetry, with lots of images and far fewer words than novels.
TABLE 10.1 is a guide to how many words fit in a specific amount of time. This assumes a “normal” rate of speech with a basic “announcer” read.
TABLE 10.1 Word Count Timings
SECONDS | WORDS |
|---|---|
3 seconds | 7 words |
5 seconds | 12 words |
7 seconds | 17 words |
10 seconds | 23 words |
15 seconds | 35 words |
20 seconds | 45 words |
30 seconds | 70 words |
60 seconds | 140 words |
CommandPost: A Utility That Extends Final Cut
This free utility is one I use in every edit.
CommandPost is a handy, free, open source, native macOS application that acts as a bridge between control surfaces and software that doesn’t natively support control surfaces, such as Apple’s Final Cut Pro and Adobe After Effects.
CommandPost requires macOS Sierra 10.12.1 or later and supports Final Cut Pro 10.4.4 and later. Although I don’t use control surfaces, many features in this utility make it worth using in Final Cut. My favorites include:
Scrolling timeline!
Exporting the contents of the currently active panel in the Timeline Index
Multiple and shared clipboards
Extended keyboard shortcuts
Many other features for both FCP and the Finder make CommandPost an essential utility. It’s one I use every time I open Final Cut.
Website: commandpost.io
Final Cut Library Manager
An essential utility, especially for larger library collections.
Final Cut Library Manager (FCLM) instantly displays all the Final Cut Pro libraries it finds on all Spotlight-indexed drives. When a library references external media, Final Cut Library Manager will automatically create a group to clearly present the distribution of these media files across your system. You can also add other sources including external disks or folders, even those not indexed by Spotlight.
Anything that Final Cut can regenerate can be deleted with just a few clicks. For example, delete render files, optimized media, proxies, and analysis files for one or more libraries at a time. And for extra safety, FCLM verifies that all optimized media still references the original media before deleting it.
You can search for event names, project names, notes, comments, media keywords, media file names, and even customized names in Final Cut Pro. All search matches are highlighted in yellow in the list of internal or external media, accessible with a single click. You can then preview it using QuickLook, display it in the Finder, or in the case of media stored on the internal drive, copy it to the location of your choice.
Another powerful feature is the ability to create library templates for repeating projects.
I’ve used Final Cut Library Manager for years and find it incredibly useful.
XML Conversion Utilities
Three extremely useful conversion utilities.
These utilites convert FCP XML files for import into other applications.
SendToX converts Adobe Premiere Pro or Apple Final Cut Pro 7 XML files into a format compatible with Final Cut Pro (X). It is simple to use, fast, and translates sequence data such as media, edits, bins, subclips, and sequences. However, most effects and color grading settings don’t convert due to substantial differences in how different software creates effects.
XtoCC is an all-in-one tool to convert an FCP XML file into a format compatible with Adobe Premiere Pro, Audition, Final Cut Pro 7, or After Effects. Like SendToX, almost everything about media and the edit converts, but most effects and color grading do not.
X2Pro, from Marquis Broadcast, converts FCP XML into an Avid Pro Tools AAF session file. This is used to mix FCP audio projects in ProTools.
apps.apple.com/us/app/x2pro-audio-convert/id501688639?ls=1&mt=12
All are available through the Mac App Store.
Neat Video
This is state-of-the-art for video noise reduction.
Neat Video is a digital filter designed to reduce visible noise, flicker, and other imperfections found in footage from digital video cameras, DSLRs, TV-tuners, and even digitized film or VHS. Neat Video is available as a plug-in for many popular video editing applications such as Adobe Premiere and Final Cut Pro.
Digital noise appears as fine, dancing speckles or static in certain areas of a video clip. It is caused by a range of factors including low-light levels, high-sensor gain, electronic interference, and aggressive compression of video data.
Jerry Thompson, one of the editors who reviewed an early version of this book, adds: “Neat Video is the walking dog for video noise. I’ve tried them all. I use this one religiously. It plugs directly into FCP and shows up in the Effects browser.”
Website: NeatVideo.com
Chapter 10—Special Cases Shortcuts
CATEGORY | SHORTCUT | WHAT IT DOES |
|---|---|---|
Speed Changes | Shift+F Option+F Shift+H Shift+B Shift+N Cmd+R | Create a Browser match frame for a timeline clip Edit the active Browser frame into the timeline Create a hold frame at the position of the playhead Create a speed edit in the Retime Editor Return a clip to normal speed Toggle the Retime Editor on or off |
360° Video | Option+Cmd+7 Control+Option+Cmd+Up arrow Control+Option+Cmd+Down arrow Control+Option+Cmd+Left arrow Control+Option+Cmd+Right arrow Control+Option+Cmd+Right bracket Control+Option+Cmd+Left bracket | Display 360° Viewer Look up in Viewer Look down in Viewer Look left in Viewer Look right in Viewer Roll clockwise Roll counterclockwise |
Chapter Wrap
While this chapter covered a wide range of subjects, the section I find most valuable is “The Business of Media.” Although it’s great to be a Final Cut Pro power user, it is even better to be paid well while editing. Never forget that media is a business; you still need to buy groceries.
Probably the most important tip, though, is thinking about editing as a process. Editing is stressful, blending high creativity with high technology, driven by tight deadlines. The more organized you are, the easier it is to think and be creative.
Workflows rule!