
16
Tweaks
Computer programs always have options that allow you to tweak how they work so that you can make them easier to use. Adobe Audition 2.0 is no exception.
16.1 Mouse options
Your choice of mouse will make a difference to Adobe Audition 2.0 as it exploits a wheel mouse so that the wheel can be used to zoom in and out in the single wave view and to move up and down the tracks of the multitrack view. Within the Effects transform windows you can use the mouse wheel to alter settings. This is done simply by holding the mouse cursor over a slider and rotating the wheel.
The way the right mouse button works in Edit View can be customized – Edit/Preferences/General tab has the options for ‘Edit View Right clicks’ of Popup Menu or ‘Extend selection’ (Hold Control for popup menu).
The default action is that when you right click in the wave editor you will get the popup shown in Figure 16.1 giving useful options. The downside of this is that the massively useful right click to extend a selection is accessed by having to press control as well. The options in the popup are available directly from the top menu so many people prefer to use the original Cool Edit option of reversing the functions so that a right click extends the selection and you press control to get the popup.
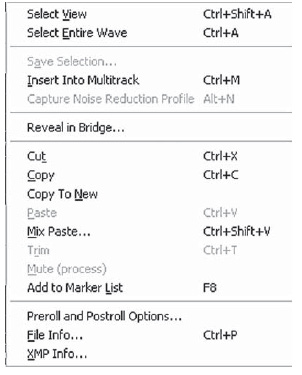
Figure 16.1 Right Click Popup
16.2 Hardware controller
The disadvantage of all computer-based editors is that you only have ‘one finger’; the mouse pointer. With the availability of Universal Serial Bus (USB) and Firewire ports it is becoming increasingly practical to have an external control surface to provide you with extra controls that are dedicated to your program. Windows 98 onwards provides ‘Human Interface’ drivers that are allowing a degree of standardization.
Controllers can actually be full-scale mixers with faders and equalization (EQ) controls but these are understandable expensive although they are beginning to come down. Some use Musical Instrument Digital Interface (MIDI) rather than USB.
Syntrillium, who produced Cool Edit Pro, Adobe Audition's predecessor, designed an optional extra of a dedicated USB controller called ‘Red Rover’ (Figure 16.2). This is still available and works with Adobe Audition. This is largely aimed at users that want to record themselves. For example, a guitarist would have problems with the electric pick up also picking up the electrical interference from the computer monitor, or even the computer itself. Moving a few metres away can eliminate this. Red Rover provides transport controls and level indication. These can also be useful when editing. Additionally cue markers can be added on the fly and the metronome switched on or off.
In the Multitrack View, it provides an easy direct control of the master volume. Another knob is used to select any single track. That track's volume can also be changed. Its Mute, Solo and Record Enable buttons are available along with indication of their current settings.
The ‘External Controllers’ tab in the ‘Edit Preferences’ (F4) allows you change the settings of hardware controllers. At the time of writing, Red Rover has just the one option that allows you to change the step value of the gain control knobs between 0.1 and 0.5 dB in 0.1 dB steps. However, the ‘Add Cue’ and ‘Metronome’ buttons are reassignable.
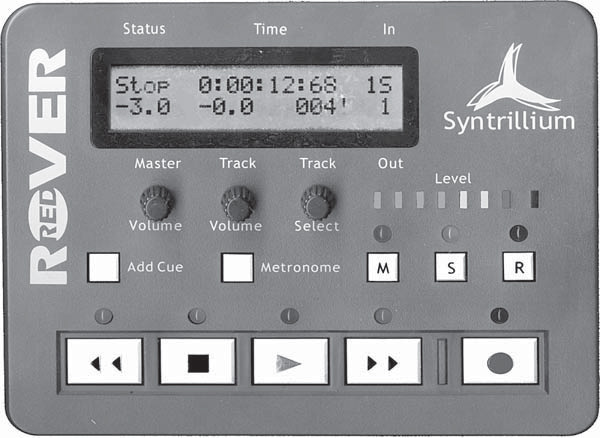
Figure 16.2 ‘Red Rover’ controller for Cool Edit Pro
16.3 Keyboard shortcuts
Adobe Audition 2.0 comes with some keyboard shortcuts already defined. You can change these or add more with the ‘Edit/Keyboard Shortcuts and Midi Triggers’ dialog. Set up the actions you use most as simple key press combinations.
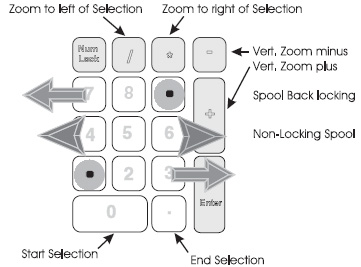
Figure 16.3 In a multitrack session, you can override the defaults for a particular track. (See assigning inputs and outputs to audio tracks. Figure 7.22)
If you do a lot of editing it would be useful to give yourself some spool controls on your keyboard. The settings I use are illustrated in Figure 16.3. This allows me to play a file and then go into continuous fast forward with a single press of the ‘3’ key on the numeric keypad. Hitting ‘1’ reverts me to play. ‘7’ and ‘9’ do the same for reverse wind. ‘4’ and ‘6’ become momentary reverse and forward spool buttons.
I also allocate the ‘+‘ and ‘-’ keys on the numeric keypad to operate the vertical zoom controls.
You may also wish to consider reallocating the ‘Selection anchor left when playing’ and ‘Selection anchor right when playing’ controls from ‘[’ and ‘]’ to ‘0’ and ‘.’ on the numeric keypad (‘.’ is shown as ‘decimal’ on the shortcut list). These keys are easier to find than ‘[ ]’ which sit on little used keys.
16.4 MIDI triggering
Shortcuts can also be set to MIDI commands. These could be from a specialist MIDI controller box, a sequencer like Cubase. or even a MIDI keyboard.
In effect, you can turn Adobe Audition 2.0 into a simple sampler (trigger playback from a MIDI keyboard), or even save your files with a foot pedal if you really wanted to.
To assign a MIDI trigger, click inside the Press New MIDI Note box, and press the desired key on a MIDI keyboard, or adjust a MIDI controller (such as a foot pedal).
To enable MIDI triggering
From the Options menu, choose ‘MIDI Trigger Enable’ (F6). You should now be able to trigger Adobe Audition 2.0 from your MIDI device.
16.5 SMPTE synchronization
Through Society of Motion Picture and Television Engineers (SMPTE) time code, you can effectively control Adobe Audition 2.0’s transport from a device such as a MIDI sequencer, or with the appropriate hardware such as a VCR, or tape deck. When slaved to SMPTE, Adobe Audition 2.0 will synchronize with frame accuracy to the master device which is generating the time code. It needs about 5 seconds pre-roll to lock.
Adobe Audition 2.0 can also generate time code to synchronize external device (see also Appendix 3 ‘Time Code’).
16.6 Favorites
The Favorites menu can be built to make a collection of your most commonly used actions. Use Edit Favorites to create, delete, edit and organize items appearing in the Favorites menu.
Edit Favorites can instantly call up any customized Adobe Audition 2.0 Effect Transform or Generate effect, Script or even many third-party tools. The menu can also contain submenus for easy organization.
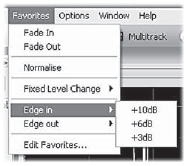
Figure 16.4 Showing resulting menu
Figure 16.4 shows an example how Favorites can be laid out using submenus. Figure 16.5 shows the edit dialog that created that menu. The ‘’ character creates a submenu. Further entries in that submenu are created by repeating the text up to the ‘’ and then adding a new name. A menu division is created by using multiple dashes as a name. The figure at the end is to make the dashes different texts so as not to confuse the engine that makes the menu.
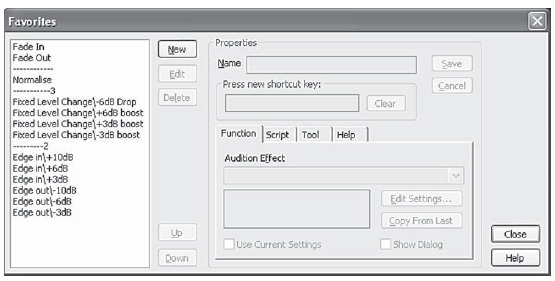
Figure 16.5 Favorites dialog
16.7 Preferences (F4) (Figure 16.6)
This tabbed dialog is the key to customization of Adobe Audition 2.0. This varies from what colors are used by the display to the arcane settings of MIDI and SMPTE parameters. The General tab shown contains most of the settings that can annoy. It is here that the action of the right click in the waveform editor can be changed to the way it worked originally. Using the right mouse button to extend the selection is such a frequent event that having to press control is a major slow down.
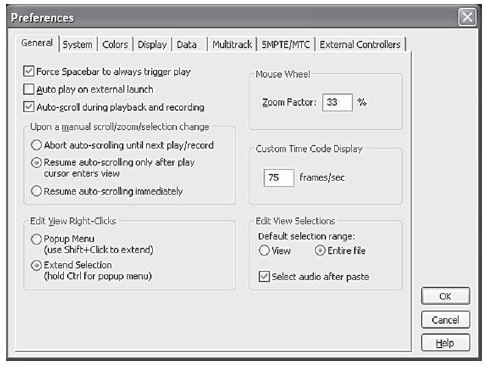
Figure 16.6 Preference dialog
If you have a mouse with a wheel then the ‘Mouse Wheel Zoom Factor’ controls how much the window zooms for each turn of the mouse wheel. The default is ‘33 per cent’.
‘Default Selection Range’ selects what happens when you double-click on a waveform to select it. The area that is highlighted can be limited to the area you can currently see on screen or select the entire waveform, even if you're only viewing a portion of it.
It is often useful to have something you have just pasted to be highlighted as you will usually want to do more work on it so ticking ‘Highlight after Paste’ makes sense.
The colors tab (Figure 16.7) allows you to change appearances. Personally I find that the default look for Audition is rather drab. Moving the ‘UI Brightness’ slider fully right brightens things considerably.
Now that Audition is so flexible in floating, moving and hiding panels, the ‘Workspace’ drop down in the top right of the screen is a boon (Figure 16.8). Not only can you get back to the original settings but also you can create and save your own.
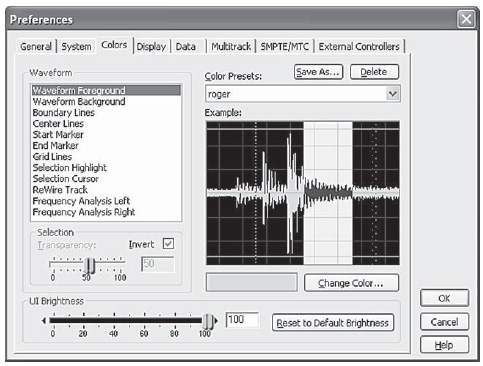
Figure 16.7 Color tab
When you set inputs and outputs for recording and playback, Adobe Audition can use two kinds of sound card drivers: DirectSound and Audio Stream In/Out (ASIO). Some cards support both types of drivers.
ASIO drivers are preferable because they provide better performance and lower latency. You can also monitor audio as you record it and instantly hear volume, pan and effects changes during playback. The main advantage of DirectSound is that you can access one card from multiple applications simultaneously.
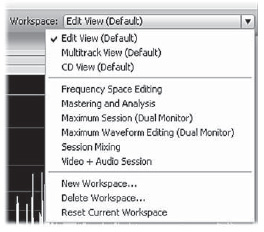
Figure 16.8 Edit/Audio Hardware Set-up
Click the Edit View, Multitrack View or Surround Encoder tab (Figure 16.9).
For Audio Driver, choose a driver for the sound card you want to use. (Choose an ASIO driver if one is available; otherwise, choose the DirectSound driver, Audition Windows Sound.)
Click Control Panel, set driver properties and then click OK (optional).
Do any of the following (see Figures 16.10-16.12):
• Under Edit View, choose stereo ports from the Default Input and Default Output menus.
• Under Multitrack View, choose stereo or mono ports from the Default Input and Default Output menus. In a multitrack session, you can override the defaults for a particular track. (See assigning inputs and outputs to audio tracks. Figure 7.22)
• Under Surround Encoder, choose output ports for each surround channel in the Output Channel Mapping area.
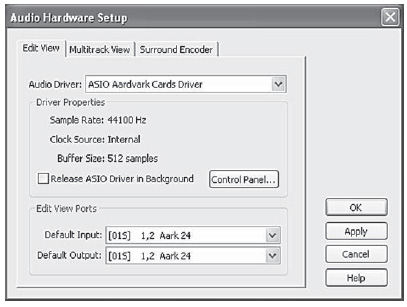
Figure 16.9 Edit View Hardware Set-up
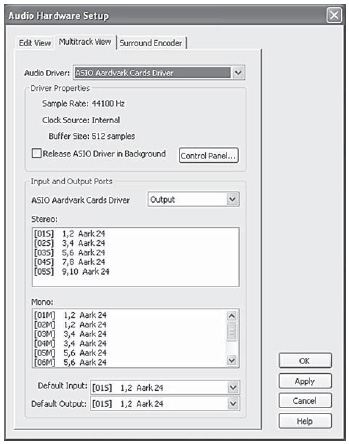
Figure 16.10 Multitrack card shown in Multitrack View
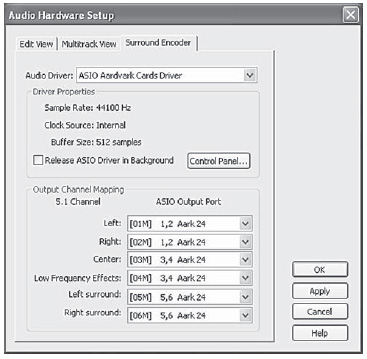
Figure 16.11 Multitrack card in Surround View
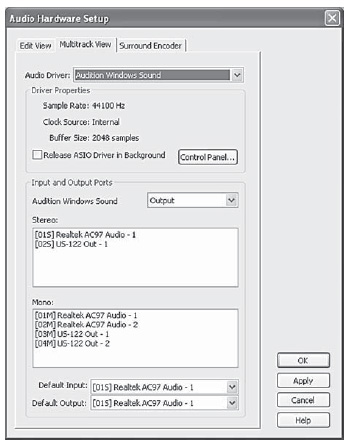
Figure 16.12 On Board AC97 with USB card
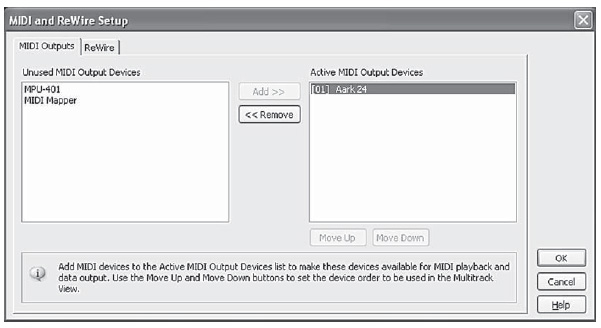
Figure 16.13 MIDI and Rewire Set-up
On board sound cards, like the common AC97 can be difficult to combine with other cards. The Tascam US 122 has to be enabled using the AC97 control panel so that they appear together as DirectSound sources (Audition Windows Sound). ASIO drivers seem not to be supplied with the AC97 so you need to try third-party ASIO drivers like ASIO4ALL.
MIDI and Rewire Set-up allow you to select the appropriate sources and destinations (Figure 16.13).
16.8 Icons
Some people love icons, others stare at them uncomprehending. If you like icons then you can choose which groups of icons for shortcuts will be shown at the top of the screen. At the very least, you will probably want to keep the file group as this includes the icon to toggle between single wave view and multitrack. If you hate icons then you can remove them altogether. Normally the easiest way to tweak the icons is right clicking on the toolbar but, if you have no icons selected, then this is not possible and you need to use the View/Shortcut Bar menu item. You can toggle the bar on and off without changing your selection.