
5
Quarrying material
5.1 Introduction
Returning to base with material of exactly the right duration and needing no editing is a rare occurrence. If your recording is of a continuous event then simply cutting it to time is all that is required.
With unscripted speech-based items, you can return with substantially more than you will ever use, especially if you have recorded a series of interviews which you plan to ‘quarry’ out as extracts, rather than use them complete.
However, I cannot stress too much that the very best way to edit an interview is to have asked the right questions in the first place! A well-structured interview will also be easier to edit for duration. However, circumstances can force returning with far too much material, especially if vox pop (in the street interviews) have been recorded.
Once upon a time there was no alternative; quarter inch tape had been used and the only way to edit was with a razor blade, wax pencil and sticky tape. Copy editing added extra time and was avoided.
5.2 Blue bar blues
No matter how fast your computer and its hard drives, audio files consume a vast amount of data compared with a word processor, and take time to be saved. Most editors have a very useful UNDO facility. This works by saving a copy of the section of the file you are changing onto hard disk.
All this takes time and slows down the editing process. This means that you should structure your material so as to avoid long audio files of more than 3-5 minutes. Put plainly a single edit within a 30-minute file takes much longer to do because of the time taken to save that long file. A 5-minute file takes one-sixth as long to save. A strategy of one or two files per item within a longer piece will speed things along nicely. Having said this, by using clever programming, Adobe Audition avoids many of the delays. Even so you can be caught by the ‘flushing buffer’ alert when saving files. This is where Audition is rescanning the file and reorganizing itself before actually saving the item and can double the time you were expecting it to take.
Extracting sections of a file to new separate files is most easily achieved by highlighting the section and using the ‘File/Save Selection’ menu option.
Where you just want to copy and paste, then use the clipboard where, as with all modern operating systems and programs, Control/C will save the selected area. Control/X will cut it out and Control/V will paste it to the current cursor position. Adobe Audition, as well as using the Windows clipboard, also provides you with five clipboards of its own. These can be selected by using Control/1 to Control/6 inclusive with Control/6 being used to select the Windows clipboard. This is slower but allows cutting and pasting to other programs. They can be set to keep the material when the program is closed and, for example, could be used to store commonly used audio ‘stings’.
However, there will be things you will want to do to long files which will take time, such as noise reducing an archive recording. It is inevitable that you will spend some time staring at the screen as the blue progress bar slides slowly from 0 to 100 per cent. Ironically, the time is much less than used to be taken with the mechanics of razor blade editing. However, it feels much longer because you, personally, are not doing anything while the process is taking place.
You can improve your efficiency by having a number of other tasks that you can do while the processing is going on; telephone calls to make, facts to check, or even letters to write, as the processing can carry on in the background while you use your word processor on the same PC. You can push Audition into the background by clicking the triangle symbol in the top right corner of the process alert (Figure 5.1).
Figure 5.1 Process alert background icon
Some routine operations, such as normalization, can often be done using ‘batch’ files. These allow you to leave computer to get on with the task while you do something else.
You will very often want to load many files at the same time. Please remember that the Windows file selector allows you to select many files Process alert which will all be loaded when you click OK.
One way is to use the ‘rubber band’ method of multiple selection (Figure 5.2).
The mouse point is placed by a track and the left mouse button pressed and held down. With the left button still held down, moving the pointer will produce a rectangular ‘rubber band’ which will select any files included within it. You can include all the available files by starting the rubber band at the first file and then dragging downwards and rightwards. The file selector window will scroll the list so that you can include everything.
If you want to select a number of individual files then click on each file you want (Figure 5.3).
Normally selecting a new file will deselect the previous selection, but if you hold the control key down while you do this then this will not happen. The control key also introduces a toggle action so that clicking on a selected file will deselect it. This is particularly useful if you want to make a minor modification to a number of files as, once loaded, switching between them is rapid. Once you have made all the changes you can SAVE ALL and all your changes will be preserved.
Obviously, loading and saving a large number of files takes an appreciable time but by triggering this with one action you can be doing something else that is useful while this is happening. If you are saving 10 files each taking 15 seconds to transfer you have given yourself 2½ minutes to make a phone call or whatever.
Many programs will include material from CD. This can be commercial music but also sound effects, or even from your own personal archive. Here considerable time can be saved as a properly set-up computer will be able to ‘rip’ the audio data from the CD much faster than real time. This means that 10 minutes of material can be transferred in less than 1 minute. You don't even have to listen to it! The quality will be better as the audio is not converted back to analog and then back to digital again by your sound card.
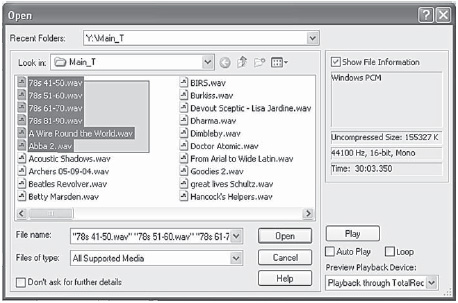
Figure 5.2 File selection using ‘rubber band’
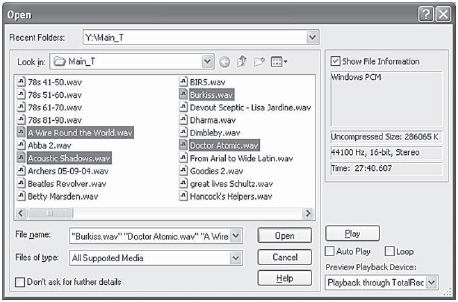
Figure 5.3 Individual file selection using mouse with control key held down
The easiest way is to use a background program that modifies the Windows desktop so that audio CDs appear in the desktop window with their tracks showing as .WAV files. These are usually named ‘track1.wav’, ‘track2.wav’, etc. This allows you to copy the audio files as if they are normal data files. Desktops without this feature will open a CD drive containing audio, but the tracks will be shown as ‘TRACK1.CDA’, etc. They are not normally directly accessible as audio. Adobe Audition has CD Ripping software built-in and can access the CD audio directly using the .CDA files as if they were the actual audio files.
5.3 Copy, cut and paste
Adobe Audition gives you the option of six separate clipboards, as mentioned. It has five of its own, plus the standard Windows clipboard. These are selected, whether through the ‘Edit/Set current clipboard’ menu option or by using control/1 to control/5 for Adobe Audition's own clipboards and control/6 for the Windows one.
This means you can work with multiple pieces of audio ‘in memory’ at the same time; so you can, for example, copy different jingles or link music sections to each clipboard, and place them in your file at chosen locations. The current clipboard can also be set to be the Windows clipboard. This is available to other programs and is a convenient way to copy audio from Adobe Audition to another program or vice versa.
These internal clipboards save audio in your temporary directory as wave files, and they can be retained even after Adobe Audition closes. The ‘Delete clipboard files on exit’ setting in the Edit/Preferences/System tab switches this on or off.
As well as using the normal paste function to insert material you can create a new file from the clipboard using Edit/Paste To New (Shift/Control/N). Save selection will usually be quicker as you do not have to copy to the clipboard first. Edit/Copy to New will create a copy of the entire current file with (2) or (3), etc. added to the end. This is in memory and makes no assumptions about the format. It is down to you to choose when you save it.
Edit/Mix Paste (Shift/Control/V) will add material to the file on top of existing audio; the length is not changed except if the insert option is used. If the format of the waveform data on the clipboard differs from the format of the file it is being pasted into, Adobe Audition converts it before pasting.
There are four mix paste modes (Figure 5.4):
• Insert, inserts the clipboard at the current location or selection, replacing any selected data. If no selection has been made, Adobe Audition inserts clipboard material at the cursor location, moving any existing data to the end of the inserted material.
• Overlap, the clipboard wave does not replace the currently highlighted selection, but is mixed at the selected volume with the current waveform. If the clipboard waveform is longer than the current selection, the waveform will continue beyond the selection.
• Replace, will paste the contents of the clipboard starting at the cursor location, and replace the existing material thereafter for the duration of the clipboard data. For example, pasting 1 second of material will replace the 1 second after the cursor with the contents of the clipboard.
• Modulate, modulates the clipboard data with the current waveform. I suspect that this option is here because they can do it. It is yet another way of producing weird noises. This has the potential to do magical things. The classic use for this sort of facility is to make every day sound talk by modulating them with speech. However, the Dynamics Effects Transform can generate a modulation envelope. This can be used to modulate the level of a file as if it were being compressed using the audio from another file.
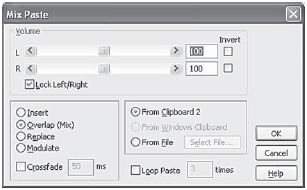
Figure 5.4 Four mix paste modes
Loop paste allows you to multiply paste the same clip. This can be useful for music samples or for extending backgrounds and atmospheres for documentary work. You can choose to copy from the current Adobe Audition clipboard, Windows or a file. The cross fade allows you to smooth the transition of the mix.
The invert tick boxes turn the waveform upside down. Sometimes mixes work better if this is done. You can use this to compare nominally identical copies. By making sure that the starts match, mixing the two, with one file inverted, should give total silence. Any noise or audio that is left corresponds to errors. It can be fascinating to do this when one of the files has been created using a lossy method, Minidisc for example. What you end up with is the audio that was ‘thrown away’.