
12
CD burning
12.1 Types of CD
The audio CD, designed in the late 1970s, is now quite an old format. Today, its specification quirks can be quite frustrating. The audio CD was never designed as a filing system and fetching data to bit accuracy is not straightforward. CD-ROM adds the necessary file system information but at the expense of reducing data capacity. Yet, it remains a robust format and has spawned a large number of other formats, including DVD, using the same sized optical disk.
The audio CD is what we would now call a streaming format. It was designed to provide a continuous bit stream to a CD player. It was also designed to allow errors. It is not a filing system, that role is taken by the CD-ROM. This can be confusing if you are new to making your own CDs. You can make either from the same blanks. They look the same but one will be played by a CD player and the other spat out, played silently or, at worst, played with tweeter searing loud noise that in no way resembles your audio. CDs play from inside to out and start with ‘Table of Contents’ to tell the player where the tracks are.
It all comes down to error correction. A 74-minute CD blank can record 720 Mbytes of audio but just 650 Mbytes of data. The audio tracks are allowed to have errors which the CD player will correct sometimes but more often as not it makes a guess at the missing value (interpolation). Otherwise, it just mutes what might well be a loud click. The CD-ROM uses the ‘missing data’ to apply more robust error correction techniques. For more information on error correction see the section ‘Errors’ in Chapter 2 ‘Some technical bits’, Page 10.
The CD-ROM can contain a very large number of files. These can be any type of data including audio of any format. For example, using very low bit rates, you can get 500 or so MP3 music files onto a single disc. CD audio discs are much more restricted. They have an absolute maximum of 99 tracks. Each track must be at least 4 seconds long. The first track should start 2 seconds into the disc. The tracks must be stereo and use 44 100 kHz sampling rate with 16-bit resolution.
Each track can have up to 99 index marks, the first one being the beginning of the track. The original idea was that a track would contain a single classical work, with each movement marked by index marks. Although this is part of the original CD specification, many CD players do not make use of this facility. The corollary of this is that not many commercial CDs have them either. Even so, they are used by many sound effects collections which cram many more than 99 sounds onto each CD. So, for example, a track of 20 door slams would have each slam marked with an index mark.
12.2 Audio CDs
Because of the streaming nature of CD audio, the tracks do not have file names and were not designed so that points within the track could be found with bit accuracy.
The first has been addressed partially by an addition to the CD specification which allows text to be associated with each disc and each track so that information can be added rather like on a Minidisc. Again many CD players ignore this information.
The second has made CD copying and recording problematical. The ‘easy’ way of copying a CD is merely to play it and use the CD-ROM drive's audio output to record. This can only be done in real time and includes the limitation of the analog section of your sound card. Reading the CD digitally has to be done in blocks. But when the CD-ROM drives go back for the next block it cannot find where it finished to sample accuracy. This can lead to what is often called ‘jitter’ as the resulting files can have bits of audio missing along with sections where there is an overlap. The normal way of dealing with this is for the software deliberately to fetch overlapping blocks and then line them up to find identical sections and electronically splicing the blocks together on the fly. This software can be in the computer or contained within the CD-ROM drive's firmware.
Not being able to find exact points within a CD track also causes the traditional problem with recording CDs. CD burning is not something that can usually be interrupted and this means that many computers cannot be used for anything else while the CD is being made. However, the good news is that the CD can be burnt in less than real time. Computer CD recorder drives that can handle x24, and faster are common. In itself, a fast drive is not enough; the computer system itself must be fast enough to be able to provide the data without a break.
Everything is fine provided a continuous bit stream can be sent to the recorder. However, computers can be doing other things and there may be a delay before the next block of data is sent. To counter this CD recorders have memory buffers of several megabytes so that they can continue to work on the buffered data during any gaps from the computer. As you can record CDs at much faster than real time even quite large buffers of several megabytes are often not large enough. While a buffer may be able to contain the equivalent of 40 seconds of audio, if you are burning the CD at 16 times real time then it is only proof against a break in data of 2/2 seconds. Running out of data in the buffer is known as a ‘buffer under run’.
With older CD burners, the only option is to ensure that the computer is doing as little as possible in the background with software like virus checkers switched off. Ideally the audio should be on a hard disk that has been freshly defragmented to speed up the supply of data. Over time, data files are fragmented around the surface of the hard disk. This means that the head has to dodge about collecting the data. Unfragmented files allow the head to run continuously from beginning to end of the file. The Windows software utility to defragment files is usually found from the Start menu under:
Programs/Accessories/System Tools/Disk Defragmenter.
Routine defragmentation of files is good practice anyway and helps prevent your computer slowing down over a period of weeks. If the buffer empties – even only momentarily – then the CD recording process fails and you are left with a useless disc often dismissively referred to as a ‘coaster’ or ‘table mat’ as it is good only for protecting your desk from your cup of coffee. However, recorder speeds of up to x4 should be well within the capabilities of all but the most ancient of machines.
Fortunately technology has come to the rescue and CD recording drives are coming with improved techniques of dealing with this, such as Burnproof® technology. With this, the CD burner monitors the input buffer. If it falls below a certain capacity, say 10 per cent, it stops the recording process in an orderly way. Once the buffer has filled again, it can match the data in the buffer against the last block it recorded, playback what it has already recorded then drop in to record and continue without a gap. Actually there will be a tiny gap, but it is within the tolerance specified from the very beginning of CD manufacture so all CD players should have no problem. This technology also works for data being recorded as a CD-ROM.
12.3 Multi-session CDs
Most CD blanks, CDRs, can only be written to once. There is no way of erasing them and starting again. There is a half-way house where you can make ‘Multisession’ CDs. This allows you to add tracks in separate sessions. In order to achieve the table of contents for the CD is written in a different place. The effect of this is that most audio CD players will not recognize the disc while most computer CD-ROM drives will. The capacity of the disc is reduced as there is recording space lost each time for internal housekeeping. When you have finished adding tracks you can ‘fix’ or ‘close’ the disc. What this does is to copy the latest Table of Contents to the place on the disc where ordinary CD players expect to see it. At this point no more tracks can be added but ordinary CD players can play the tracks. This made a lot of sense when the cost of a CD blank was measured in tens of pounds or dollars but nowadays with blanks being so cheap creating multi-session CDs is losing its usefulness. The exception to this is if you want to create a mixed-mode CD which combines data with a CD-audio disc that will play on a CD player and show data on a computer.
12.4 Rewritable CDs
Rewritable and erasable CD blanks, CD-RWs, are easily available at quite low prices. At first glance, these seem to be a panacea. However, they are still more expensive than CDR and have several disadvantages. The major one is that they cannot be played by most ordinary CD players. They have a lower reflectivity compared with standard pressed CDs and need a stronger laser to read them. Many DVD players can read them as a by-product of being able to read DVDs.
CD-RWs have to be erased before reuse although this usually only means wiping the table of contents and is quite quick. You cannot erase a single track as such. Using CD-RWs as ‘large floppies’ is a very attractive idea and there is software that allows you to do this. How successfully it does this seems to be very machine dependent. Some people have used CD-RWs in this way with no problems at all while others have had nothing but ‘blue screens of death’ as their computers crash. The capacity of the disc is much reduced by the need to format it. This takes time and a large amount of data is taken by the formatting information and cannot be used to record. Quite often other machines using nominally the same software cannot read the discs so the portability of CD is lost. Similar software is available for DVD-RW which of course has much higher capacity.
As with multi-session CDs, many people take the view that CDRs are so cheap that the extra hassle of CD-RW is not worth it. Others compromise and only use them written as if they were CDRs only making use of their erasability.
12.5 CD recording software
Normally basic CD software requires you to specify if you are burning an audio CD, a CD-ROM or a mixed format. Tracks are dragged into a window and the CD burnt. If you are planning to produce actual audio CDs then more sophisticated software is needed. Simple software works on the basis of one wave file per track.
This need not necessarily be so; Audition can also have tracks ‘marked up’ in a single file and use individual files for all of the tracks of a CD. For CDs of events, some burners can vary the length of each inter-track gap or have none at all. You can even continue the audio through the inter-track gaps. For a CD of a concert you can arrange for each song to begin each track but for speech links and so on to be in the gaps between the tracks (the CD player counts down the seconds in the gap). The CD will play through continuously, but a track skip will take you directly to the next song. If you do a lot of this sort of thing, then you will need something Sony's CD-Architect which can create complex structures very easily (Figure 12.1).
If you have access to professional or semi-professional CD players which will make use of them, you can also add index marks. These can be useful to you for archival purposes, allowing you to mark individual items without starting a new track. You can mark individual contributions within a feature or program. Unlike tracks, index marks do not appear in the table of contents and the CD player literally has to scan through the track to find them, so index searches are slower than track searches.
Traditionally CD burning software offers various options as to how the disk is recorded. You decide whether you want to record the whole disc at once or go for the multi-session option. If you do, you often have to remember to ‘Import’ the last session so that the new recording is added to the previous Table of Contents.
Adobe Audition 2.0 CD software
Adobe Audition 2.0 provides audio-only CD burning. Audition's CD burner does not burn indexes, at present, but Audition's index markers within files are recognized by other software such as Nero so that everything up to the actual burning process can be prepared on Audition. A single wave file can be split into several CD tracks, not necessarily in their order in the wave file. Remember MP3 files count as data and cannot be placed on an audio CD. The booby trap is that it might look if you can, but Audition will convert the MP3s to WAV files before burning thus substantially reducing the number of tracks that can be put on one disc.
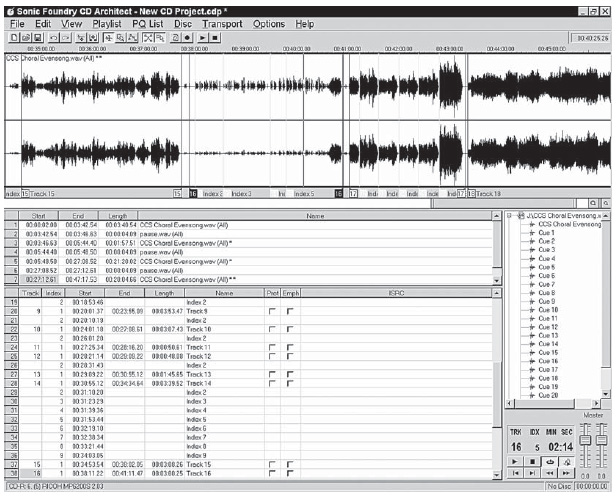
Figure 12.1 CD Architect
The CD burner is integrated into Audition as the third option to Edit and Multitrack views (Figure 12.2).
CD burning dialog in use
On the left of the screen is a list of files or a single file. These can be loaded into the editor or imported into the CD burner (File/Import). If the file has internal markers for tracks then a plus symbol will appear on the left. If this is clicked then a list of the marked tracks will be shown. These can be dragged onto the main panel individually. Alternatively the file itself can be dragged. This will provoke a dialog asking how you want to handle any markers within it (Figure 12.3). Some CD burner programs can read the available duration information of the disc. Adobe Audition 2.0 only has selectable assumptions of 74 or 80 minutes (CD View menu). The normal Free Space indicators for time and megabytes at the bottom of the screen use this.
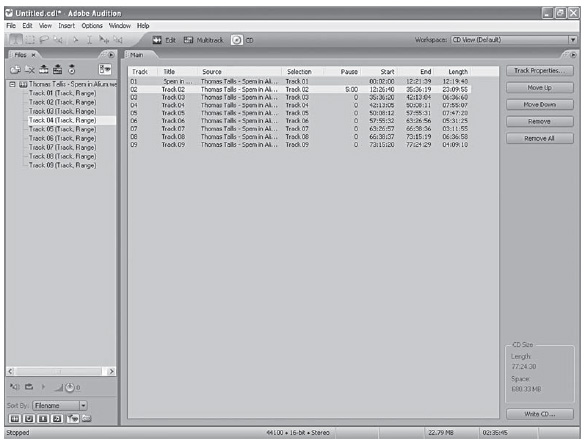
Figure 12.2 Audition CD view
Files shorter than 4 seconds are ignored as tracks must be 4 seconds or longer to conform to the CD specification. The file uses a different marker from ordinary ‘Cue’ markers. The track marker is created using Ctrl/Shift/F8. This will create a track that corresponds to the current selection or a track marker at the current cursor if there is no selection. (This is different from previous versions of the program which used Shift/F8.) This now selects the workspace session window. Ctrl/F8 still selects an index. You may wish to consider changing the shortcuts through ‘Edit/keyboard shortcuts and Musical Instrument Digital Interface (MIDI) triggers’ (Alt/K).
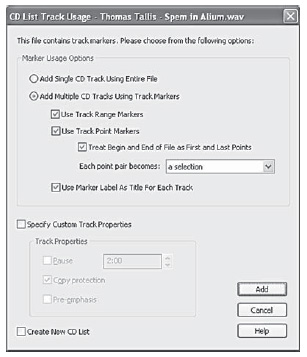
Figure 12.3 How to handle markers
Both point and region markers have their uses. If you have a continuous recording, say of a live performance then all you may want to do is to mark particular event in the recording so that listeners can find their way around easily. This is easily done by marking a track at the current cursor position (Figure 12.4). However, it may be that you want to extract clips from a recording. Mark them as regions by track marking a selection then these clips will become available as separate tracks. You can mix regions and cue points in the same wave file. The point markers can be converted to regions in the marker list window. (Alt/8 toggles) using the Merge selected icon at the bottom of the panel (second from right) (Figure 12.5).
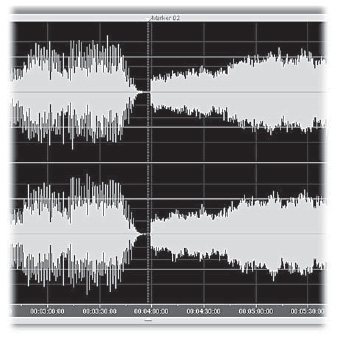
Figure 12.4 Point marker at current cursor position
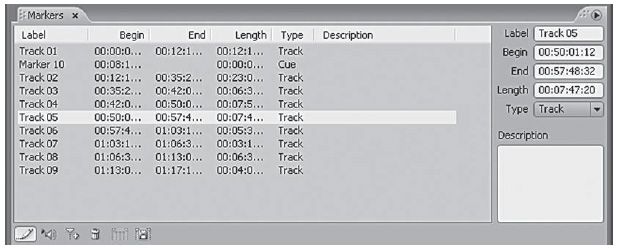
Figure 12.5 Markers panel: Bottom icons; Edit Marker Info (toggle), Auto Play (toggle), Add Marker, Delete Selected, Merge Selected and Batch Process Marker regions
You can see the point markers as they have zero length. Select the ones you want to merge into regions and click ‘merge selected’. The conversion does not assume that you want to start at the beginning of the file so if you are making CD-tracks then make sure you put a point marker at the beginning and end of the file (Figure 12.6).
You will end up with one less track than you had point markers which are analogous to ‘posts’ supporting the panels of a fence (Figure 12.7). The start and finish values can be tweaked either by editing the times using the marker list editor, or more easily by sliding the markers within the file. Figure 12.8 shows a close-up of the markers. The start marker is headed by a triangle with a right facing hypotenuse whereas the end marker is the other way round. In the illustration we see the junction between two tracks so the end marker for the previous track is shown before start marker for the next track. The playback cursor is topped by an equilateral triangle. If the transport ‘go to next marker’ button has been pressed, this often end up on top of and hiding a marker. Normally all three are set to different colors.
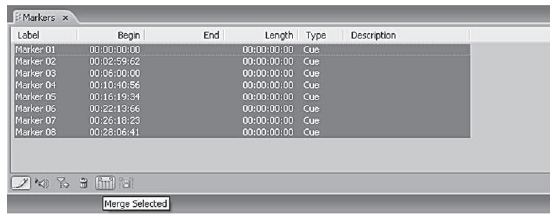
Figure 12.6 Point markers

Figure 12.7 Point markers posts supporting the panels of a fence
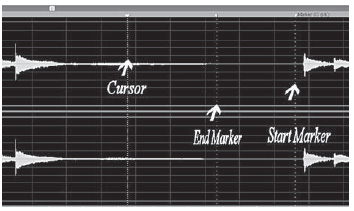
Figure 12.8 Marker close-up
Selecting a track and clicking the Track Properties button (or Track Properties on the right click menu), allows you to vary how the tracks are placed (Figure 12.9). You can also set the Title and Artist used by CD-Text, if you are using it. Normally a track will use the default properties but you have the option of an individual setting with the Use Custom Properties option.

Figure 12.9 Track Properties
You can select whether there will be a pause at the beginning of the track and how long it will be. The copy protect and pre-emphasis flags can set although neither has much value these days. Most CD copying software will ignore the copy protect flag so merely takes on the role of asserting copyright for you. CD has an option of using a top boost or pre-emphasis. The idea is that on playback a top cut is applied which further improves the signal to noise ratio. However, with modern audio tastes for a lot of high frequencies in the mix this is often counterproductive. Further, the CD burner will not apply the pre-emphasis for you; you have to apply it yourself. Ticking the ‘Same for all tracks’ box will set the other tracks to the same setting without changing the default. You can make your new setting the default by clicking the ‘Set as default’ button. For professional use, you also have the option of giving individual tracks an ISRC number. Theoretically this should conform to the International Standard Recording Code format but there is nothing to prevent you having your own coding system for personal use.
Clicking the ‘Write CD’ gives you more options including selected which CD burner to use if you have more than one (Figure 12.10).
‘Write mode’ gives you the option of ‘Write’, ‘Test’, ‘Test & Write’ (Figure 12.11). When you first use the system rehearsing the burn using the test mode can save blanks. In practice, once the system has proved itself, you will leave the ‘Write’ option set.
You can set to make more than one copy and to eject the disc once it is done. Depending if your drive can handle CD-Text you can disable or enable it; adding in a title and an Artist description for the overall CD.
‘CD Device Properties’ (Figure 12.12) allows you change the buffer size from a drop down list. Depending on the CD burner, you may be able to specify the write speed although the single option ‘Optimal’ may be all that is available. A tick box selects ‘Buffer Underrun prevention’ on or off.
You can also add a Universal Product Code/European Article Number (UPC/EAN) number to give the CD a catalog number. Theoretically this should conform to the UPC/EAN standards, sometimes known as bar codes. However, you can use your own numbering system for personal use if you wish.
If the disc is for someone else, you may want to check it before sending it to them. Do not use the CD burner you used to record it! If you have a separate CD-ROM then use that or, better, use a domestic CD player. If you are paranoid about the quality you can rip the newly created CD and compare the resulting files with the originals.
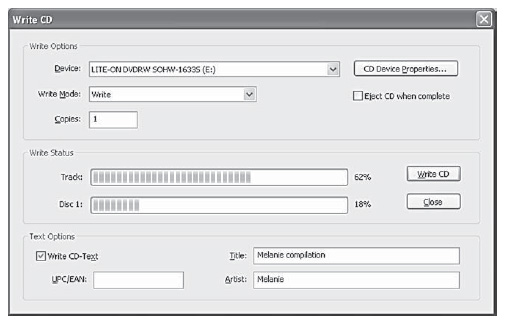
Figure 12.10 Options in clicking Write CD
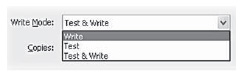
Figure 12.11 Options in Write mode
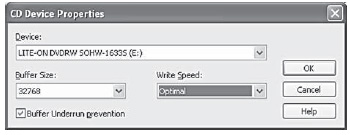
Figure 12.12 CD Device Properties
12.6 Recording codes
UPC/EAN Code
EAN or UPC codes identify products and manufacturers. Sometimes known as bar codes, they are usually only required for professional CD mastering. Codes are assigned on a country-by-country basis.
In the UK:
Association for Standards and Practices in Electronic Trade
EAN UK Ltd.
10 Maltravers Street, London WC2R 3BX
Uniform Code Council, Inc.
8163 Old Yankee Street, Suite J, Dayton, OH 45458
Not all drives support the writing of bar codes. Consult your CDR drive documentation to determine this.
ISRC Codes
The tracks can have individual codes. They use another system called Industry Standard Recording Codes (ISRC). These are designed to provide an easy way to log the play of specific CD tracks by broadcasters.
In the UK, for further information about the ISRC system, please contact:
PPL; http://www.ppluk.com or telephone: 020-7534-1122
In the USA, the RIAA handles the allocation and have more information on their web site, including a description of how the code is formatted: http://www.riaa.org/Audio-Standards-3.cfm or telephone 1-202 775-0101
Not all drives support the writing of ISRC codes. Consult your CDR drive documentation to determine this.