
1
Visual editing
Anyone who is used to editing audio using quarter inch tape may approach editing on a PC with trepidation. PCs allow you to edit visually rather than using your ears to ‘scrub’ the audio back and forth to hear the edit point. Some Digital Audio Workstations provide a simulation of scrub editing, either using special hardware in the form of a search wheel, or an option to use the computer's mouse. This option is provided by some PC and Mac software such as Pro Tools, and now also by Adobe Audition 2.0. I find that these scrub options are usually unsatisfactory because of tiny, but noticeable, processing delays between the mouse movements and hearing the result. As a professional tape editor I used to find that the delay caused by having loud-speakers more than 2 metres away was sufficient to cause problems and that corresponds only to 6/1000ths of a second!
Editing on a PC is using a different medium and techniques change. After 25 years of quarter inch tape editing, I found that I took to editing visually like the proverbial duck to water. I did, however, have to overcome an emotional resentment at what seemed like a ‘de-skilling’ of the task.
My analogy is with word processing. In the days of manual typewriters, using carbon paper to make copies, there was a high premium on accuracy. It was also important to be able to type each key with an even pressure, so that the document had a professional look. This was a skilled thing to do and was not learnt in a day.
When word processors were introduced, the rules changed. It was soon discovered that it was more efficient to type as fast as possible and to clean up typos afterwards. Printouts take no notice of the key pressures that the typist has used. This has meant that even a person with no keyboard skills can – given a great deal of time – produce a document with a professional appearance.
So it is with audio editing; with plenty of experience and good training to become a skilled tape editor, it is possible to find the precise edit point very quickly, mark, cut and splice, to get a good edit every time. It is a skill. It has to be learned.
While this book concentrates on Adobe Audition, a great deal of its information applies to other audio editors. As with all technology there is a great deal of convergence and different editors begin to look and operate alike. At college, I offer my students the analogy of the time I had to drive my then boss from Cardiff to Swansea. The easy bit was the Cardiff to Swansea journey but first I had to ask him how to reverse his car so I could get out of the car park bay! If I had had to retune his radio presets, I might have had to look up the car's manual. Thus a good knowledge of Adobe Audition will see you in good stead for other programs.
The PC offers visual tools to aid your editing. It also has the potential to be much more accurate. With reel-to-reel quarter inch analog tape at 15 ips, using 60° cuts, the effective best accuracy is 1/120th of a second. 90° cuts can improve this but, in practice, not by much. Most edits are made using much lower accuracy.
In contrast, the PC can offer ‘sample-rate’ accuracy. This means that you can edit down to the resolution of a single number (sample) in the digital data. Using the standard professional sampling rates of 32 kHz, 44.1kHz or 48 kHz, this gives a possible accuracy of 1/32 000th, 1/44 100th or 1/48 000th of a second! As I have already observed, most edits don't need this accuracy, so it is as well that you are not forced to work to this resolution! Most editors will provide a cross fade across the edit. This corresponds to the cross fade provided by slanting the cut on quarter inch tape. The digital editor has the advantage that it can do this with stereo recordings without the risk of image ‘shimmying’ caused by the right-hand channel being cross faded before the left-hand channel.
When viewing the sound file, as a whole, the PC offers you a static graphical display of your audio with level represented by the width of a line. For stereo, there are two variable width lines, side by side, representing the left and right channels. You can choose at what resolution you want to look at the audio. The width of the screen can encompass several hours or 1/1000th of a second.
Illustrated (Figure 1.1) is a 4-second chunk of mono audio. The text of what is being said has been added to the illustration. PC audio editors are not (yet) clever enough to transcribe speech from your recording!

Figure 1.1 A 4-second chunk of mono audio, with text added
At this sort of resolution, you can easily see the rises and falls in level corresponding to individual syllables. Yet we can zoom in to even more detail. The usual way to do this is to select the area by dragging the mouse – just as you would to select text in a word processor. You then zoom to the selection. In this example, using the word ‘and’ (Figure 1.2) is enough to show the individual vibrations (Figure 1.3). The ‘D’ sound at the end is now extremely easy to see.
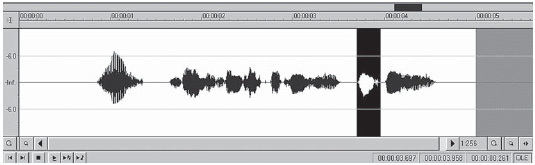
Figure 1.2 The word ‘and’ selected
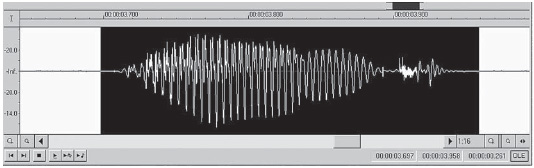
Figure 1.3 Zoomed in on the word ‘and’
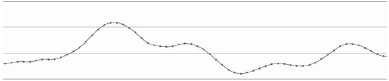
Figure 1.4 Audio zoomed in to showing samples as dots. The line joining them is created by the computer
Cutting a section of audio is as easy as selecting it with a mouse and pressing the delete key, just as in word processing. Also, like word processing, you can cut, or copy, audio to a clipboard and then paste it elsewhere.
There is usually an option for a ‘mix’ paste, where the copied audio is mixed on top of existing audio rather than being inserted. With several attempts and much use of the UNDO function, this can be a way of adding a simple music bed to speech but it lacks the sophisticated control available from using a non-linear editing mode giving you multitrack operation.
Most audio editors allow you to zoom to the sample level (Figure 1.4), but this is rarely of much value, except where you are manually taking out a single click from an LP transfer or some glitch picked up on the way. In general, noise reduction and de-clicking is more quickly done by software, although this will let through some clicks that have to be dealt with individually. Too high a setting on de-click software will ‘over-cook’ the audio introducing distortion where it starts attacking the sharp peaks of the audio.