
CHAPTER 3
Adding Images to Your Library
There are two primary ways to get your images into Aperture – either directly from your camera or memory card, or from an attached drive or folder on your Mac. We will cover cameras and memory cards here, and move on to internal and external drives in the following section.
Whatever your source, photos are always added to the Aperture Library using the Import dialog. This may appear automatically when you connect your camera – if you have Mac OS X set to do that – but if not, it can be activated using the Import button on the Toolbar.
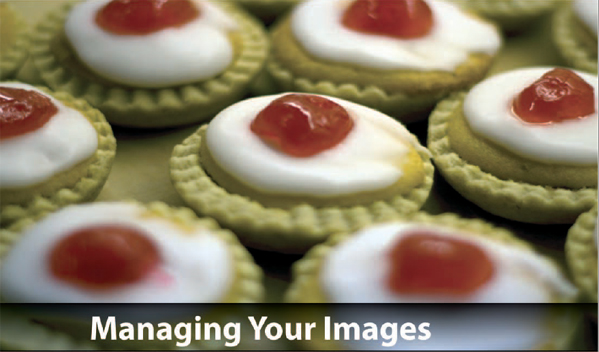
The setting that controls whether or not it appears every time your Mac detects that a camera or card has been connected is found in Preferences (![]()
![]() ) or through Image Capture, the utility that manages cameras and scanners at the system level. This is found in the Applications folder (Figs 3.1 and 3.2).
) or through Image Capture, the utility that manages cameras and scanners at the system level. This is found in the Applications folder (Figs 3.1 and 3.2).
The Import dialog is split into three key sections, and links your source media, which appears at the top of the Projects pane, with the Projects themselves, showing the flow of your images from your external sources into your established Library.
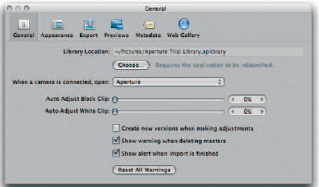
Fig. 3.1 Use Aperture’s Preferences dialog to specify what should happen when a camera is connected to your computer. Select Aperture in the pop-up beside ‘When a camera is connected, open:’ to automatically launch the Import dialog.
Fig. 3.2 Image capture gives you great control over how your images are imported and where they are stored. It also works with local and network-connected scanners.
You can move either end of this workflow by clicking in the appropriate pane of the Inspector at the new origin or destination point. To switch from a memory card or camera to your internal hard drive, for example, simply click the drive. To change the Project into which your photos will be imported, click on an alternative, or create a new one using the New button on the Toolbar (Fig. 3.3).
Importing from Your Camera
Cameras organize their images into folders, usually defined by the number of photos they have captured since they were new. Each folder is usually restricted to holding just 100 images and so a day-long shoot can often end up split across several folders. Even if you have taken less than 100 images, you can still sometimes find that they are split across more than one folder. This is because your camera may have taken, say, 3690 images in all time. If you then take a further 50, the first 10 will fall into one folder and the remaining 40 into another (Fig. 3.4).
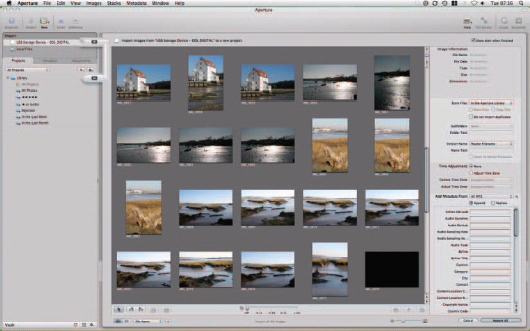
Fig. 3.3 The Import dialog is split into three logical sections – the Projects pane, which defines the destination of your images, the Preview of the images themselves in the central thumbnail area and the Metadata box to the right that lets you assign data and tags to your photos before they appear in the Library.
Aperture’s Import From Camera dialog ignores these artificial subdivisions and instead presents you with a single grouping of all of your photos. Aperture is compatible with almost all current digital cameras, so it is unlikely that you will be unable to access your photos in this way, and even if you have trouble now, the chances are that in time your camera will eventually become compatible, as it draws its Raw processing tools from the operating system.
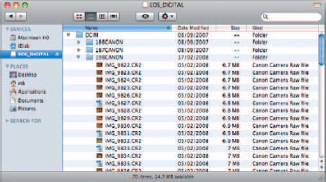
Fig. 3.4 Digital cameras maintain a strict filing system, splitting up images into different folders depending on their sequence number. This number is counted from the time when the camera was first manufactured, with most models creating a new folder for every 100 images shot.
Raw format files are simply a dump of all of the data gathered by the sensor of your camera. These data have not been edited or refined in any way, and so although metadata such as your ISO setting, shutter speed and exposure compensation are also recorded, only physical attributes such as the length of time the shutter was open will have any affect on the image. This leaves you free to change the other settings once you get them into Aperture.
The simplest course of action when importing your pictures is to click the Import all Images button at the bottom of the interface, or the arrow pointing at the project into which you’re importing your photos. Alternatively, you can select a range of images by dragging a marquee around several pictures in the Import dialog’s Browser area, clicking one end of a range and ![]() clicking the other, or holding
clicking the other, or holding ![]() while clicking to pick several non-consecutive photos. You then use the same Import button to bring them into the Library, although by now it will indicate the number of images in the selection ready to be imported.
while clicking to pick several non-consecutive photos. You then use the same Import button to bring them into the Library, although by now it will indicate the number of images in the selection ready to be imported.
Although they are speedy fixes, neither of these actions should be considered your primary way of working, as they skip several key steps that will help to manage your assets later. The more work you do at the Import stage, the less you will have to do once your photos are inside your Library, and so the more time you will have for creative activities.
Sort Your Images Before Import
You may think that Aperture’s Import dialog looks similar to the Browser, and it does. That’s no mere coincidence. Although it deals with images that don’t yet exist in your Library, it still gives you access to many of the same sorting and organizing tools as the Browser does for those you have already imported.
At the bottom of the dialog is a facsimile of the Browser toolbar, allowing you to switch between grid and list views and sort by name, date or file size in either ascending or descending order. A slider lets you vary the size of each thumbnail, while on the line immediately above you can rotate your images and create Stacks based on the interval between each shot. That interval is measured in seconds, and specified by dragging a slider from 0 to 1 minute. By default this is set to 0, effectively disabling stacking and graying out the Stack Control buttons (Fig. 3.5).
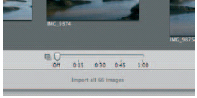
Fig. 3.5 Use the time-based slider at the bottom of the Import dialog to automatically stack your images. The Stacks are determined by the interval between each photo, on a scale of 1–60 seconds. Moving the slider to the extreme left – 0 – turns off automatic stacking.
Stacks can also be created manually, on any basis that you like, and are not restricted to time-based controls. Selecting several images – either consecutive or disparate – and tapping ![]()
![]() , or clicking the Stack button, which looks like a roll of sticky tape, will gather the selected images into a Stack. Stacks can be opened and closed using the buttons to the left of the time slider, dismantled by using the Unstack all Stacks button at the far right of the Toolbar, and split by choosing the point at which the split should occur and tapping
, or clicking the Stack button, which looks like a roll of sticky tape, will gather the selected images into a Stack. Stacks can be opened and closed using the buttons to the left of the time slider, dismantled by using the Unstack all Stacks button at the far right of the Toolbar, and split by choosing the point at which the split should occur and tapping ![]()
![]() or pressing the Split Stack button.
or pressing the Split Stack button.
However, there are several things you can’t do that you can in the Browser, the most obvious being renaming files in their source location. All renaming should be done at the point of import, using the Image Information dialog to the right of the Image thumbnails.
Organizing Your Images Before Importing Them
The Image Information panel to the right of the import dialog is used to attach the first user-defined metadata to each photo added to your Library. This information is supplementary to the data written by your digital camera, such as Aperture size, shutter speed and shooting conditions, which are untouchable and uneditable.
You won’t apply any changes to your images at this stage, but simply define a range of attributes that will be added to Aperture’s extensive underlying database and help you organize, sort and filter your assets once you start working with them inside the program system itself.
The first and most basic task is to decide where your images should be kept.
Choosing Where to Store Your Images
Whenever you import an image to the Library from another location on your Mac or network, you have the option of adding it to your local Aperture Library or leaving it in its original location. Your choice will largely depend on how the image is used. If you work alone, then there is no problem with moving it to your local drive, but users on a network should be careful here, as changing its location could make it unavailable to others on the network.
You can, however, change the location of your Aperture Library. By default it is stored on your local hard drive in the Pictures folder (~/Pictures/Aperture Library.aplibrary). To change this click Aperture > Preferences … and in the General section, click the Choose button and navigate to a new location. Note that if you do this, you’ll then have to re-launch the application.
The option to move your files or leave them where they are is found in the Sidebar. Your options are In the Aperture Library, In their Current Location, Pictures, Desktop and Choose…. The latter option is the most flexible, allowing you to store your images in a stand-alone format anywhere on your hard drive, rather than in the complex directory structure inside the Aperture Library package. Pictures and Desktop speak for themselves, although we would strongly advise against storing photos on the desktop. This part of the Mac OS X interface is intended only as a transport area, or for hosting a very small number of frequently used files, folders or links to applications. For maximum system efficiency – and maximum personal productivity – it should remain as clutter-free as possible (Fig. 3.6).
Images stored anywhere other than in your Aperture Library are called Referenced images (as opposed to Managed images inside the Library), because the application has to look elsewhere to get the full resolution photos to work on. When importing images, but leaving them in their original location or saving them anywhere other than inside the application itself, Aperture merely creates references to and thumbnails of the originals, and so it’s imperative that the original is also available whenever you want to make edits.
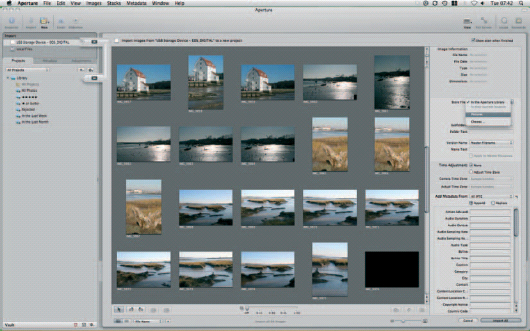
Fig. 3.6 Although most users will want to keep their images within the Aperture Library, and hence benefit from the access this gives to backing up using Vaults, you can also store them elsewhere on your hard drive. Photos stored in this way are known as ‘referenced images’.
You should also ensure that you have a suitable backup system in place to protect your referenced images, as they can’t be stored in Vaults, Aperture’s own internal backup spaces. As such, any serious system failure or a hardware fault that impacts on an external drive holding your referenced images will make them unavailable for use in Aperture. This is a serious issue, as they are used as the basis of Versions stored within your Library. As Versions don’t actually exist in image format but are, rather, data files telling the application what changes to apply to a Digital Master in order to render each one, they would effectively be lost at the same time as your originals, leaving you with no assets at all. For more information on implementing an effective backup routine, see p. 96
Even if you choose to store the images in your Aperture Library, or in another folder on your Mac, the originals remain exactly as they are. Aperture will never delete them unless you specifically tell it to, with any originals simply copied – not moved – from one media or location to another.
Saving Referenced Images
Should you choose not to import your images into the Aperture Library but store them elsewhere on your system you will obviously need to specify where and how they should be filed. Even if you choose to place them in the Pictures folder, Apple doesn’t expect you to drop them there loose, and so the import dialog lets you specify a directory structure to keep them separate from your other assets, and help you manually navigate through them using the Finder.
This is done using the drop-down Sub-folders menu, which gives you a range of logical options that, if applied to every subsequent import, will build a logical filing system that will be immediately obvious not only to you, as the owner of the photos, but also anyone else who wants to work with them in the future, even if they haven’t been involved in taking or filing them themselves (Fig. 3.7).
By default the subdirectory used to store your images will be based on the name you give to the Project holding your imported photos, but the sub-folders drop-down gives you the option of defining a folder of your own based on, among other things, the current date or the date on which each image was created, or a custom name with an automatically incrementing filename. Picking None would drop them loose either onto the Desktop or into the Pictures folder (neither of which is recommended) while a flexible Edit … option lets you build your own directory structure using a wide range of metadata drawn from the image.
This takes you to the folder naming presets dialog, which lets you construct a multi-level structure by dragging and dropping various metadata variables into an input box, which will then be replaced by live data from your images.
Creating Folder Naming Presets
The rules for creating presets for Folder names are similar to those for creating names, covered below, although the metadata at your disposal differ slightly. Notable through their inclusion are Folder names and Project names, which incorporate some of your manual filing measures into the resulting output and, perhaps most importantly, the forward slash. This cannot be used when specifying filenames.

Fig. 3.7 Aperture’s Import dialog includes a range of commonly used folder constructs for directing the location of referenced images. This selection can be expanded by defining your own presets.
It is used here as a separator for sub-folders. So, if you wanted to import (or later export) a batch of photos taken over the course of an extended journey through several countries, with each country batch stored in a separate Project, you might want to file them by both time and geographical location. Assuming that you are interested in telling a story in chronological order you might therefore create a nested folder structure by typing the words ‘Asia Tour’ into the Format bar and then dragging the relevant variables in to follow it (Fig. 3.8). You can type the forward slash rather than drag it in if you want to save time, but either way you’d end up with something along these lines:
Asia Tour / Image Year / Image Month / Image Day / Project Name / Sequence #

Fig. 3.8 Folder name presets can be built quickly and easily by dragging the various available tags from the Include section to the Format bar at the top of the dialog. You can also type into this bar, thus specifying set words that should appear in every folder name. In this example we have done that with the words ‘Asia Tour’.
We have used the ISO standard reverse dating convention here, rather than European or North American for the very good reason that it is the most effective means of narrowing a large group of files sequentially. If we took one picture every day for a year and filed them using this structure we would end up with 365 files and 378 folders (one folder for the year, 12 for the months and 365 for the days). Reversing the order so that we had day/month/year would leave us with 761 folders and 365 files, adding a massive 1126 entries to the file system and greatly complicating the task of manually sorting through those files at a later date.
It works out to 31-day folders, inside 28 of which we would find February folders; folders for September, April, June and November in 30 of them; and folders for January, March, May, July, August, October and December in them all. Inside each month there would be a redundant folder given the number of the year – 2009, for example – and only then would we get to our files.
That’s logical enough, but why put Project Name so far down the list? Because you would probably cross any international borders you need to negotiate during the course of a day rather than overnight, and so you could easily be in two or more countries in one single day. As each country is stored in a separate Project, putting Project Name in advance of the other elements in the chain would see duplicate date entries further down the nested folder structure, which will become confusing when you return to it in the future.
You could drag the unified Image Date element into the chain, particularly if your travels all took place in a single month, but by separating it out by year, month and then day you will be able to more quickly, isolated groups of images taken with a specified timeframe in the Mac OS X Finder. You would know that all of the images taken in May, for example, are found in sub-folders within a single folder and that opening that folder isolates them all. The alternative would be to select up to 31 individual folders to achieve the same thing if we had not separated them out.
Creating Filename Presets
Open the Naming Presets dialog and you’ll see that Aperture ships with nine filename presets in place, but you can create an almost unlimited number of variations by dragging 16 different elements into the Format box. The elements include Version and Master filenames, current time and date, creation time and date, counters and index numbers and, perhaps most useful of all, the option to create a custom name.
The custom name must be set at the point of creating the preset, or else Aperture will interpret it as incomplete, and it will not be available for use in the Export dialog. However, you can go back and change it at any time if you find that your needs change at a later point.
The other variable that accepts user input at the point of creation is Counter. In this instance the input isn’t compulsory, but it does let you specify an initial value and how many digits should be included in the Counter. Note that this digit length isn’t a maximum beyond which the numbers will be capped (so no more than 999 for a three-digit length or 9999 for four) but the number of digits will be included in every filename. So pick 6 and even your first digit will be assigned 000001, along with any other variables you specify (Fig. 3.9).
You can split your filename into more manageable parts by inserting spaces and other special characters such as hyphens between the constituent parts. However, there are a number of reserved characters that cannot be used in filenames. The forward slash (/) is one, as this is used as a directory separator, and you’ll not be able to enter it when creating your preset. However, you can enter a colon (:), although again this should be avoided as it is conventionally assigned to marking out drives by many operating systems. When the file is saved out, Aperture substitutes it for a forbidden forward slash.
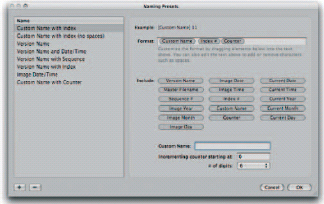
Fig. 3.9 The filename preset creation tool works in a similar way to the tool for defining folder name presets, but gives you access to fewer punctuation marks, and adds in sequential tools, such as Sequence number, which will specify the number of the image and where it appears in the overall collection, for example, 117 of 203.
Depending on the file type and which application is designated to open it, this could cause the file to self-replicate every time it is accessed. A PNG export including this character opened up in Preview, for example, will do just this, littering its folder, or the Desktop if that’s where it is saved, with one duplicate edition for each opening. Another quirk permitted by Aperture, but which should be avoided, is the use of a full stop at the start of a preset filename. Do this and your exported file will never appear, as it is an indicator used to denote a hidden file. The export will take place, and the file will be saved exactly where you said it should, but you’ll never see it without using FTP software, changing your system settings or rooting around with Terminal.
Completing the Import Workflow
The Import dialog defines a logical workflow for adding photos to your Library, and it is best to take a top-down approach to the Import panel, which brings us to time stamping and metadata, both of which are keys to effective file management within the application.
The modern photographer is no longer confined to a studio. Location assignments, reportage and international photo journalism have long called for a mobile freelance workforce, and who has time to be resetting their camera clock every time they arrive on site?
Using the Time Adjustment feature, you can have Aperture take care of this for you. Leave your camera set to your local time zone – or GMT (Greenwich Mean Time)/UTC (Coordinated Universal Time) for simplicity – and specify on each import the zone in which the photos were taken. Aperture understands the time relationships between key world cities, allowing you to select your camera time zone and assignment location geographically, rather than chronologically. Do this and it will make the necessary changes to the metadata of the imported Digital Masters without any further intervention on your part (Fig. 3.10).
By now you have reached the last step of importing your photos: adding metadata. This works on a batch basis, adding the same variables to all of the images you import in one session. You should therefore only specify data that applies to every image in your selection, and then further personalize them once they have been safely stored or referenced in your Library.
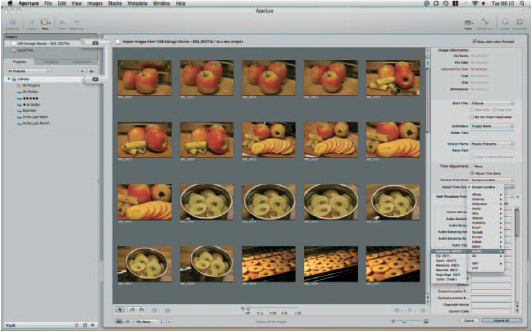
Fig. 3.10 Aperture is time zone aware, allowing you to leave your camera’s clock set to your home time zone, and change the date and time stamps on your images at the point of import by picking the name of the country or city in which the images were taken from the Actual Time Zone drop-down menu.
Aperture ships with a range of pre-defined Metadata sets, which can be selected from the pop-up Metadata menu. The most important of these are the variations on the industry-standard IPTC (International Press Telecommunications Council) standard data set, which lets you assign rights, add captions and give instructions to picture editors who may want to use your work.
If none of the sets exactly meets your needs, you can create new sets by temporarily stepping out of the Import dialog.
Creating Metadata Presets
A lot of the metadata that you apply to your images will be identical from photo to photo. Your by-line will always be the same; your copyright notice will only change once a year; you may use a common set of keywords across several images because you specialise in one particular area or type of photography.
Rather than having to type all of these details anew each time you import a fresh set of photos, therefore, Aperture lets you define them just once as sets and then add them by picking the appropriate set from the pop-up Metadata menu. You can define as many sets as you need, which allows you to duplicate a great deal of common information in all of your presets, and adjust only those parts that vary between clients or shoots. In this way you can precisely tailor the data you pass on to each client, providing them with just what they need, without either overburdening them, or leaving any blanks.
Unfortunately these sets cannot be set up from the Import dialog, and you must set up your first preset after importing your first images. This will let you create a preset based on existing data and append any changes you want to make.
With any image selected, switch to the Metadata Inspector. Click the Shortcut button and create a new view, giving it a meaningful name, which will later appear on the Import dialog’s pop-up Metadata menu. This will open up the Tag Selector, a window that slides up from the bottom of the Metadata Inspector. This is split into five sections for Keywords, Exif data, IPTC, Other and Archive, which only includes information about the last time each image was backed up in a Vault. This last detail cannot be user defined, but checking the Include in Summary box will add it to the attached Metadata view nonetheless.
Progress through the various sets, checking the boxes of the variables you want to include, remembering to only ever include those that will be common to every image you import using that set. You can clear out individual fields at the point of import, but it saves a lot of work in the long term to define accurate Metadata sets at this point that you know you can rely on in the future.
Once you have selected your tags, use the text boxes that appear beside each one to enter their variables, following any conventions specified by your clients.
Obviously not all metadata variables can be edited in this way, as any that already exist will have been set by the camera, and so are immutable facts, rather than judgement calls on your part. These can be included in a Metadata view so that you can call them up at a later point to examine a specific range of data in one place, but including them in a preset is unnecessary as they will already be imported with your images anyway. In the interests of speed, therefore, they should be excluded at this point (Figs 3.11 and 3.12).
Although you have entered data in your chosen fields, this set remains nothing more than a view. To apply it automatically to imported photos, you must save it as a preset. Return to the Shortcut menu and choose Save as Preset …, then give it a name and open the Import dialog again. It will now appear on the Add Metadata from … pop-up menu. Selecting it will add the predefined data to the import workflow and attach it to your photos when you finally import them (Fig. 3.13).
You will see that there are two Radio buttons between the pop-up menu and the fields themselves to either append or replace the data that already apply to your photos. Their functions speak for themselves, but you should be careful when choosing between them. Appending data can lead to bloat, where a lot of insignificant information is attached to your files. However, replacing existing data can lead to key facts being lost.
Importing Your Pictures
By now you have reached the end of the import workflow, and all that remains is to bring your images into your Library by clicking the Import button at the bottom of the Import dialog.
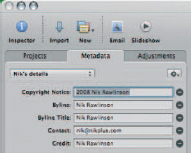
Fig. 3.11 Setting up a Metadata preset cuts the amount of time you’ll spend tweaking photos with similar themes when you come to import them into Aperture.
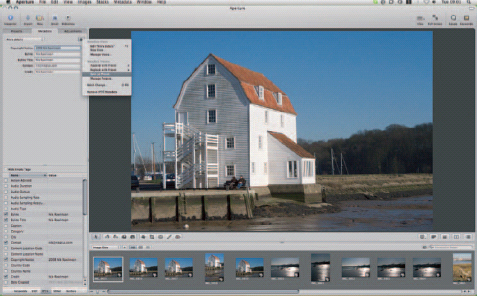
Fig. 3.12 Once you have defined a view and entered your commonly used metadata, use the Save as Preset … option and it will appear in the Import dialog the next time you come to import images.
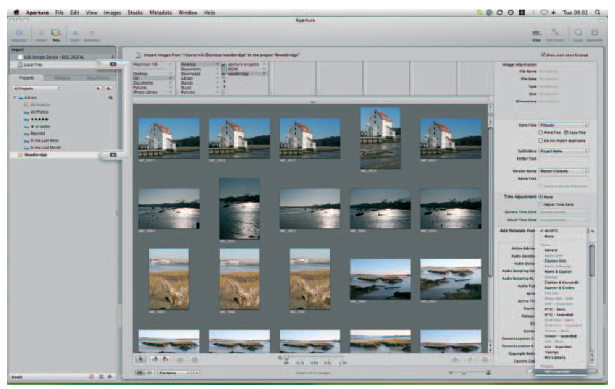
Fig. 3.13 Both your saved views and your presets will appear in the Add Metadata from drop-down in the Import dialog, allowing you to quickly append commonly used information to every image you add to your Library. Alternatively, you can opt to replace any data that are already in place with those stored in your presets.
Aperture will either copy your pictures into the Library package that it stores in your Pictures folder or reference them within the Library.
Importing from Other Sources
Images can also be imported from a folder, stored either locally on your hard drive, or on any networked drive. The principle is the same as importing from a memory card, except that it requires a little more manual intervention.
Opening the Import dialog and clicking any available volume will open up the Import screen which, as when you import from a camera or card, slides out from the drive and links it to the top of your Library.
Aperture can handle a wide range of image formats, including Gif, Jpeg, Jpeg2000, PNG, Photoshop PSD, Digital Negative (DNG) files, TIFF and Raw. This latter option will not be available for all cameras, since each manufacturer maintains its own Raw format, but Aperture keeps up with the leading manufacturers, including Canon, Nikon and Pentax. Apple maintains a list of supported cameras at apple.com/aperture, and there’s a chance that even if your camera is not supported right now, it would be in the near future, as it frequently adds to the range when it updates the operating system. Bear in mind that some manufacturers give their cameras different names in different territories. This is usually an internal marketing convention derived through research that shows which name would perform best in different territories. A prime example is the Canon EOS 350D, which took this numeric name in Europe, was the Digital Rebel XT in the USA, and in Japan masqueraded under the title EOS Kiss Digital N. Each has – ostensibly – the same specification, but because the naming convention is included in the files used to decode the Raw data, using mis-matched Raw definitions will not work. As such, you should only ever assume that your camera will work flawlessly when the title of your specific model of the camera is included in the range of Raw-parsing updates delivered by Mac OS X’s Software Update.
Assuming your camera is supported, then any Raw files you have saved onto a drive can be imported as quickly and easily from here as they can from a memory card.
Importing Without the Dialog
If your images already exist on your system – whether internally or on an attached external drive – then it is possible to bypass the Import dialog altogether when adding images to the Library, by selecting an existing Project (or creating a new one with ![]()
![]() ) and dragging the images to it from a Mac OS X Finder window. Aperture will then run through the regular import routine itself, saving you the time of working through the process step by step.
) and dragging the images to it from a Mac OS X Finder window. Aperture will then run through the regular import routine itself, saving you the time of working through the process step by step.
By default it will copy them to the Library, where they will become Managed images. If you would rather leave them where they are and use them as Referenced images, then hold down ![]() and
and ![]() while dragging them into Aperture.
while dragging them into Aperture.
This is a speedy shortcut, but it carries with it one very significant disadvantage: bypassing the Import dialog means you won’t have applied any user-defined metadata to your images, and so they will only carry with them information about your camera, settings and shooting conditions. They will not have any keywords attached, any captions, copyright notices, rights information or credits, and so these must be added manually at a later point. For a single folder of images, therefore, using drag and drop to import them into your Library can actually be a false economy.
If you are importing several folders, though, it can pay significant dividends – particularly if you are setting up Aperture for the very first time. Over several years of use, you may have built up a significant collection of images elsewhere on your Mac – say, for example, your Pictures folder. Importing these using the Import dialog would be a time-consuming affair, which by necessity would have to be done in stages, with a new Project created for each group, and Albums created within these for individual subsections. In an instance such as this, you may want to import existing folders as Projects in their own right (Fig. 3.14).
Aperture will recognize each folder’s name and use this as a Project name, with sub-folders used as Albums inside the Projects. You can then select the contents en masse and apply a pre-defined Metadata set to them before moving onto the next Project. You can do this using the Batch Change command on the Metadata menu (![]()
![]()
![]() ) to call up a subset of the Metadata Inspector (Fig. 3.15).
) to call up a subset of the Metadata Inspector (Fig. 3.15).
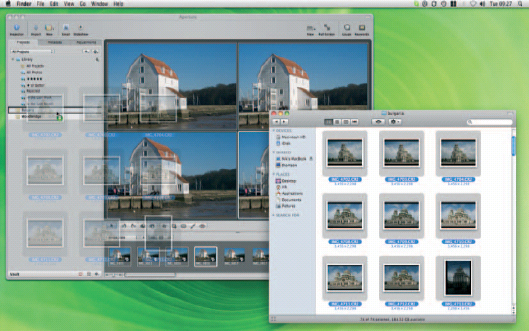
Fig. 3.14 If you need to import multiple images already stored on your hard drive, you can bypass the Import dialog by dragging them into the projects pane from a Finder window. They can be dropped into an existing Project, but dragging a folder will create a new Project, with all sub-folders used as the basis of Albums inside the Project.
When importing images in this way, Aperture will take the name of the folder from which you are importing as the name of the Project into which it should drop the pictures once it gets them inside its Library, with any sub-folders used as Albums within the Project.
Renaming Files
Your images’ names, as they appear in the Library, will be determined at the point of import. If you would rather that they don’t just use the name specified by your camera, which will be a prefix followed by an incremental counter that marks the number of shots taken since it was new, you can specify a more appropriate name based on various internal metadata or criteria that you specify yourself. This is selected through the Import dialog, using the settings at Aperture > Presets > File Naming…
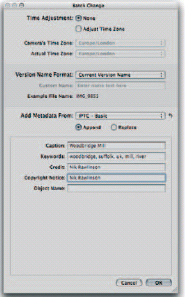
Fig. 3.15 After importing photos by dragging them from a Finder window into the Aperture Projects Inspector, you can apply metadata changes to them as a group using the Batch Change dialog.
You can likewise change the names of your images when they are exported, again by specifying a pattern derived from metadata and an optional custom field of your choice, using the presets at Aperture > Presets > Image Export … The settings defined here will appear in the Export dialog.
However, there are times when you will want to change the names of your files as you work with them in the Library. This is done by switching to the List view by using the shortcut ![]()
![]() and then double-clicking on the name of the file you want to change, typing your replacement and hitting
and then double-clicking on the name of the file you want to change, typing your replacement and hitting ![]() . Note that while you will see a new name in the Library, only the Version would have been changed, as under the surface Aperture sticks to its promise not to interfere with your Digital Masters and leaves their names intact.
. Note that while you will see a new name in the Library, only the Version would have been changed, as under the surface Aperture sticks to its promise not to interfere with your Digital Masters and leaves their names intact.
Backing Up Raw Files
Your Raw files are the most valuable assets in your photography workflow. More important, even, than your Mac, your Aperture installation, or your camera. Each of those can be replaced with a little expenditure, but your Raw images are irreplaceable originals. Even if you were to spend time recreating each scene and re-shooting them individually, they would never be exact replicas of the originals.
Further, any adjustments you have made would apply to those originals, which would now have been lost, leaving you to repeat your time-consuming work on new photos, with no guarantee of achieving the same end result.
As such, it is vital that you implement a regimented backup procedure that safeguards your Raw Digital Masters and any Versions derived from these. The recommended process would be to implement this within Aperture itself using the Vaults system (see Managing Vaults, p. 99). However, there are issues here surrounding Raw images that are not stored within your Aperture Library, as Vaults can only contain images found within the Library itself. With referenced files, only adjusted Versions and associated metadata will be saved.
To ensure you have adequately protected your originals, then, you should either relocate your images within the Library itself or, if you’ve already set up your Library with your images stored externally, implement a third-party backup tool, or the tools within Mac OS X itself to properly protect your assets.
Backup and Time Machine
Apple ships the appropriately named Backup application as part of its MobileMe online service. This simplifies the process of backing up files and folders to archive media, including external hard drives and optical media such as CDs and DVDs. It will also let you back up your files off-site to your MobileMe iDisk, which gives you access to 10 GB of storage in the default configuration, and up to 20 or 40 GB for an additional £30 or £59 annually, respectively.
Backup can be downloaded by accessing your iDisk using the entry in your Mac OS X Finder sidebar and navigating to the Software folder. Here you’ll find two Backup sub-folders; one for Mac OS X 10.3.9, and one for 10.4.2 or later, and 10.5.
In Mac OS X 10.5 Leopard, Backup is supplemented by Time Machine, Apple’s automated backup tool, which saves incremental copies of your file system to an external, attached hard drive or Time Capsule, the company’s integrated router and network-attached storage drive (Figs 3.16–3.19).

Fig. 3.16 Time Machine automates the process of creating incremental system backups on an external hard drive or network-based Time Capsule device. Ensure you are running the most recent Version of Mac OS X 10.5 to have your Vaults and Libraries included in the Time Machine archive set.
However, while Time Machine will make a good job of backing up all of your files at regular intervals, irrespective of their location, and Backup can be set to run at specified intervals, combining them with tools like Mac OS X’s Smart Folders, Automator and Folder Actions can further secure your backup procedure and place more of the burden for safeguarding your files on the file system itself.
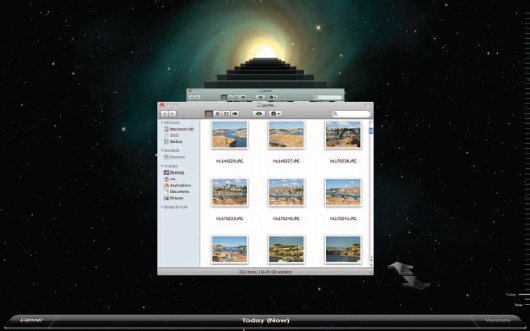
Fig. 3.17 Time Machine makes backup both friendly and easy, by presenting a history of your files in a graphical, easily understood interface that lets you ‘roll back’ your system state through time.
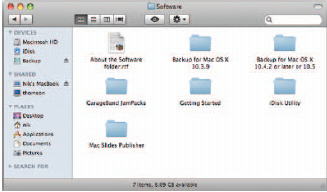
Fig. 3.18 Backup is a free utility for all MobileMe subscribers. Download it from your iDisk by clicking its entry in your Finder sidebar and navigating to the Software folder.
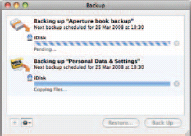
Fig. 3.19 Backup can be set to create backups at set intervals by defining a data set to store and specifying a schedule to which it should conform.
Managing Vaults
Aperture has its own Backup tool in the form of Vaults. These are virtual copies of your Library that are stored, like Time Machine archives, on an attached external hard drive. However, unlike Time Machine backups, these are managed directly from within Aperture, and they are dedicated specifically to rebuilding a corrupted Library, not scrolling backwards through time and extracting individual changes. So important are the Vaults maintained by Aperture, that they even have an entry on the application splash screen, showing how many images and projects are not yet backed up.
If you are running Leopard and plan to use Time Machine to secure your Library, ensure you have updated your system with the most recent patches, as early releases were incapable of handling Aperture Vaults properly, and these had to be specifically excluded from backup sets.
For more information on backing up your Library, see the section on Moving Libraries (p. 106) and apply the same principles to your primary image store.
Creating Your First Vault
Vaults are managed through their own panel at the bottom of the Aperture Inspector. Expand it by clicking the Show or Hide Vaults button at the bottom of the interface (![]()
![]() ). This opens a blank pane where your Vaults will be organized.
). This opens a blank pane where your Vaults will be organized.
Connect an external drive to any one of your Mac’s available ports and then click the Shortcuts button (the cog beside the show Vaults button) and choose Add Vault, then navigate to the newly attached drive (Figs 3.20 and 3.21).
Once added, the drive will show as a new, empty Vault. Its capacity will be reported, and a capacity bar will show how it is currently being used and what space remains. The portion colored light gray is free and available for use. The darker gray section is already occupied, but not by Aperture files, and the green-colored progress meter shows how much of the free space is used to store your Aperture backup.
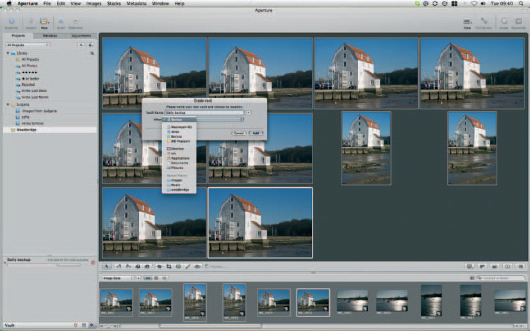
Fig. 3.20 Every Vault should have an easily recognized name that will help you identify it every time it is connected to your Mac. You should also ensure that you never store more than one Vault on a single physical drive.
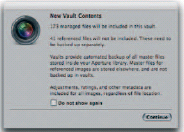
Fig. 3.21 When you create a new Vault, Aperture tells you what will be included and what excluded from the backup set it contains. Only images stored within the Aperture Library package can be backed up using Vaults. All referenced files must be backed up using external tools, such as Time Machine or Backup.
As we’ll explain below, you can manage several Vaults through Aperture, which can be connected either simultaneously or in sequence as you perform different types of backup at different times. You should therefore give each one a meaningful name, which for ease of identification would ideally match a physical name attached to the casing of the drive itself. You can do this at the time of creation, but if you later find you want to change it, then click on the progress bar to open up the existing name for editing. You are now ready to create your first backup (Fig. 3.22).
You’ll see that the circular synchronization arrows to the right of the Vault are red. This indicates that there are Digital Masters in your Library that have never been stored in any Vault. It is a serious warning that can only be remedied by synchronizing the whole Library to the Vault, which you’ll do by clicking either these arrows, or their duplicates at the bottom of the Inspector. Why two sets of arrows and warnings? Because the Vaults panel eats into valuable Inspector space, yet most of the time is unnecessary. As such, you’ll spend most of your working time inside Aperture with the panel minimized so that you can devote as much space as possible to navigating your Projects. In this way you can perform backups by clicking the button at the bottom of the panel without first opening it up and save breaking your creative flow.
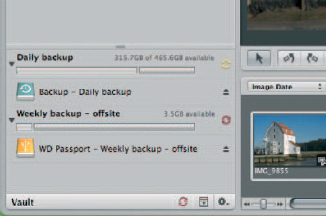
Fig. 3.22 Aperture color codes the Synchronization buttons in the Vaults pane. Red circular arrows indicate that there are Digital Masters in your Library that have never been backed up in a Vault. Yellow shows that all Digital Masters have been backed up, but not all Versions are saved in the Vault. A black icon shows that everything has been backed up and your Vault is up to date.
Should the arrows show amber, rather than red, Aperture is giving you a less serious warning. In this instance, all of your Digital Masters are backed up, but you have unsecured data in your Library, such as Versions or changes made to the metadata attached to an image. Again, manual synchronization will remedy this.
The only time you don’t need to pay your Vaults any attention is when the icon is black, indicating that all Digital Masters and Versions are backed up. Even this can be deceiving, however, as there are two exceptions that could lull you into a false sense of security.
The first is that you may have no Vaults set up at all. In this instance, the icon would remain black, despite the fact that your images exist in only one location. It would be hard to imagine a situation when you might think that this meant you had no cause for concern. However, the latter reason – that your images reside outside of your Aperture Library – is more obscure.
Aperture will only store managed images in your Vault. If you choose, when importing originals into your Library, to leave them in their original folders or store them anywhere else on your Mac and instead simply refer to them in Aperture, it will be unable to store them in a Vault. Instead, it will back up only derivative Versions. Adjustments made to the originals will cause the icon to glow amber, but on no occasion will it show red, as your Digital Masters don’t actually exist within the Aperture environment. As such, deleting them from the Finder or through any other application will make them inaccessible to Aperture, and you will be unable to restore them from a Vault. A secondary backup procedure to secure the folder in which they reside must be implemented as a matter of course.
You can connect several Vaults at once and run an incremental backup procedure, with daily backups to be kept onsite and weekly or monthly backups to be stored in a separate building, to keep them safe in case of fire or flood.
Of course, size quickly becomes a consideration when working with Raw files, which are larger than the relatively conservative JPEG images written by consumer cameras. Combine these with all of the adjustments, Versions and keywords that you’ll add, and a single Vault can quickly consume a small drive. For this reason, you should always buy the most capacious drive you can afford after considering the average size of each Raw file that you shoot, and how many you expect to take in a single year.
Maintaining Your Vaults
Each Vault assigned to your Aperture Library should be a living, constantly developing resource. It’s no good performing a backup at the end of January and then not doing another until mid-June, by which point you could have added 1000 or more Digital Masters and 5000 Versions to your Library. The chances of you losing them are – admittedly – slim, as hard drives are generally reliable units, but the cost if you did could be considerable if they pertain to possible work and contracts. Even if they don’t, your originals will still be difficult to recover without the assistance of expensive data recovery specialists, and impossible to recreate, as each one will be a record of a unique moment in time.
For these reasons, it is essential that you are assiduous in your backup routine, and you update your daily Vaults every time you import new images to your Library, at the end of every working session when the synchronization icon glows amber, and on a weekly or monthly basis – as appropriate – for your off-site copies.
You should never store more than one Vault on a single drive in separate partitions, as this will do nothing to reduce your chances of losing your backups. When creating more than one backup at a time, then, you should either connect all relevant external drives at one time, and click the Synchronize button on the bottom of the Vaults panel, to update them simultaneously, or connect them one after the other and perform the updates in sequence. There is no option to have a Vault update automatically when you have finished each session of working with Aperture.
As a Unix-based operating system, Mac OS X doesn’t take kindly to drives being removed without warning, as it likes to close things off neatly. Not giving it the chance to do this could corrupt your data, and expose you to the risk of losing your valuable backups, making the images stored on your Mac’s internal hard drive your only copies.
To reduce the risk of this happening, always eject any drive holding a Vault by clicking the Eject icon beside its name within the Vaults panel (click the Disclosure triangle to show this if it isn’t visible), or use the same Eject function in the Mac OS X Finder. When it disappears from the Finder or Vaults panel, it can be safely removed. The next time it is connected it will automatically remount and reappear.
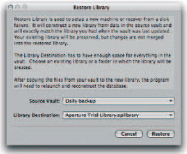
Fig. 3.23 You can restore your Library from a Vault following a hardware failure. If your Vaults are kept up to date this should mean that you never risk losing more than a few hours’ work following any disruption.
Restoring Your Library from a Vault
With any luck, you will never need to restore your Library from a Vault. If you do, it usually means you have suffered a serious internal hard drive failure. Fortunately, if you have been keeping your Vaults up to date, you should be able to recover all of your work, except that which you have done since your last backup (which really should be no more than a day). If you ensure that you do not delete your photos from your memory card before they are stored in a Vault, you should be able to recover any new images imported since the last backup by returning to your original media (Figs 3.23 and 3.24).
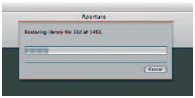
Fig. 3.24 Aperture keeps you updated on the progress of any restoration options when you rebuild your Library from a previously stored Vault.
Following a fresh format and install of the operating system, the creation of a new Mac OS X user, or the replacement of a faulty drive, open Aperture and press ![]()
![]() to open the Vaults panel. Ensure your most recent backup is attached to the system and pick Restore Library from the Shortcuts menu (the button with the cog icon). Aperture will explain what it is going to do, and let you choose a source Vault and a destination location. By default the destination will be your current Aperture Library, but by opening the drop-down menu you can pick a new location, such as a separate folder. This is more than just good disk-keeping niceties; by picking a folder separate from the one that contains your current Library you can import the photos in the Vault into an entirely separate location, and thus run the Libraries side by side, switching between them using the Preferences dialog (
to open the Vaults panel. Ensure your most recent backup is attached to the system and pick Restore Library from the Shortcuts menu (the button with the cog icon). Aperture will explain what it is going to do, and let you choose a source Vault and a destination location. By default the destination will be your current Aperture Library, but by opening the drop-down menu you can pick a new location, such as a separate folder. This is more than just good disk-keeping niceties; by picking a folder separate from the one that contains your current Library you can import the photos in the Vault into an entirely separate location, and thus run the Libraries side by side, switching between them using the Preferences dialog (![]()
![]() ) or by holding
) or by holding ![]() while launching the application.
while launching the application.
Once you have finished restoring your Library from a Vault, Aperture will restart and run through a recovery procedure to rebuild and validate your Projects.
Transferring Your Library to a New Mac
You can also resort to your Vaults to transfer your Library to a new Mac. This is a fine solution if, when importing your photos into your Library, you transfer them wholesale into Aperture’s directory structure. If you instead leave them in referenced locations, such as a folder elsewhere on your drive, or a different drive entirely, however, they will not be stored in the Vault. In this case, restoring from a Vault would leave you with an incomplete Library, featuring any Versions you have created but lacking the Digital Masters from which they are derived.
On this occasion, you could manually copy your entire Pictures folder, including your Aperture Library and referenced originals. This is a common solution, but in itself it can introduce further problems if the relevant permissions applied to the files prevent the user account on your new Mac from manipulating them.
A smarter solution is to copy your existing user folder from the old Mac to your new machine. Do it the right way and it will also transfer your existing applications and settings, so you are up and running right away. As an added bonus, when the files and settings are written to the new machine they can be defragmented and optimized, allowing your new machine to run more efficiently than your old one.
To do this, switch off your old machine, and on the new one launch Applications > Utilities > Migration Assistant. Click through the dialogs until asked to connect your two Macs by FireWire cable and switch on the old Mac. This will mount it as a drive on your new system and Migration Assistant will start to copy across all of the relevant data from your old drive. By the time it is finished, the drive on your new system will exactly match that on your old machine. Your folder structure will be identical, your email client will be pre-populated with your messages and your Mac OS X Desktop will still show the same files as it did before. More importantly, though, your Aperture Library will also be imported with the correct permissions, allowing you to step right back in where you left off (Figs 3.25 and 3.26).
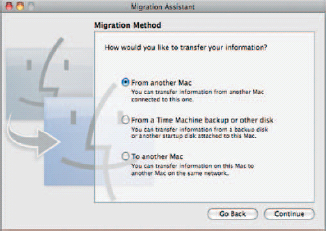
Fig. 3.25 Migration Assistant makes it easy to transfer your data and settings from your old Mac to a new one when you come to replace your hardware. If you stored your Aperture Library in your user folder, it will be transferred along with the rest of your data.
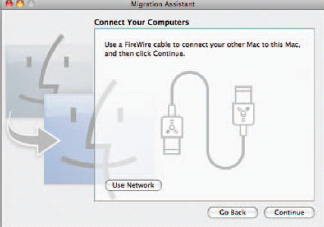
Fig. 3.26 Files are transferred by connecting your two Macs together using a FireWire cable. Your old Mac will then be used as a mounted drive by the new host machine.
If you stored your original assets as referenced images on an external drive, you can now attach this to your new Mac, and give Aperture access to the Digital Masters from which the Versions in the newly imported Library were created.
We’ll cover moving Libraries in more detail in the next section.
Moving Libraries
By default, your Aperture Library is stored in the Pictures folder of your user account. It is a package called Aperture Library, the contents of which can be viewed by right-clicking and picking Show Package Contents. You should never mess with this Package’s contents, but you can safely move it wholesale to another location on your Mac, or to an external drive connected by FireWire or USB.
This is particularly important when you have been using Aperture for some time and your Managed Library starts to grow. Even a fairly conservative Library containing a little over 1000 photos can total more than 4 GB. Several years of work, then, can swamp a notebook hard drive for those running Aperture on a MacBook, MacBook Pro or PowerBook, and start to feel somewhat cramped on even a desktop machine.
When this starts to happen, you should consider a more capacious location, such as an external hard drive, in which to store it. Prices for these are falling all the time, and so it is well worth buying a well-known brand such as LaCie or Western Digital rather than a cheap no-name device.
Research your drive before buying it, paying particular attention to Mean Time Between Failures (MTBF) statistics, which give an indication of the life of the drive. The longer the mean time, the better.
Other factors to consider include seek time and transfer rates, which measure how quickly a drive can move its read and write head to a specific point on the platters where a required piece of data can be found, and how quickly that data can then be passed from the drive to your Mac. Both of these factors will affect how responsive Aperture feels, particularly when scrolling through extensive Libraries. Fortunately, switching to Quick Preview mode when scrolling through your Library helps greatly here, and once you have found your required image, you can switch back to the regular Management mode.
Whichever drive you choose, don’t be tempted to store any externally hosted Library on the same drive as your Vault. The Vault is designed to be a safe backup of the Versions and Digital Masters stored in your Library, and can be used to rebuild it should your master Library be lost due to disk corruption or any other hardware, software or user malfunction. To store your Library and Vault on the same drive would open you up to the risk of losing both your Master File store and your backup resource, and should be avoided at all costs.
Fortunately, almost all well-specified external drives allow for daisy chaining of further drives, saving you from using up all of the ports on your system that would otherwise be used for peripherals. This would enable you to store your Library on a connected drive, and your Vaults on a separate connected drive, connected via the first, should you choose.
To move your Library from your Pictures folder to an external drive, quit Aperture, and copy the Library package to its new location.
Now re-launch Aperture while holding down ![]() , and you will be asked to select the Library you want to use, at which point you will select your new location.
, and you will be asked to select the Library you want to use, at which point you will select your new location.
Don’t be tempted to delete your old Library right away. Although you will know immediately whether the transfer has been successful, it is good practise to work with it for a few days before deleting what you know for sure is a good original copy on your local drive.
Splitting Up Your Library
There are real benefits to dividing your Library into smaller parts, particularly if you can confine the contents of each to specific, highly differentiated subjects or clients. You might, for example, have a Library for wedding shoots, another for personal projects and a third for portraits. All are very different subject areas, and one is purely personal, rather than commercial. As such there will be little in the way of overlap, and so grouping them into discrete Libraries makes sense in terms of both convenience and performance.
The simplest way to do this is to quit Aperture and rename your existing Library (to, say, weddings.aplibrary) before restarting. Given the option of creating or choosing a Library, create a new one using the default name (Aperture.aplibrary), and then repeat the above action, quitting and renaming it (as personal.aplibrary) and repeat the process for a third time, this time creating a Library using the name portraits.aplibrary.
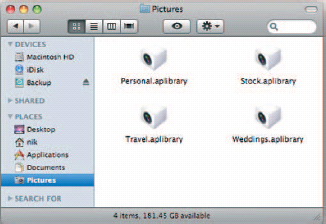
Fig. 3.27 You can easily split your Library into distinct parts along subject lines and then choose between them by holding the ![]() key while launching Aperture. The result will be several Libraries existing side by side.
key while launching Aperture. The result will be several Libraries existing side by side.
You’ll now find yourself in an empty portraits Library. Should you want to change to one of your other two Libraries, switch them using Aperture Preferences (![]()
![]() ) and then quit and restart.
) and then quit and restart.
From now on, hold down the ![]() key whenever you launch Aperture and you’ll be asked to choose the Library you want to use. As Aperture will always restart with the Library active in the Preferences the last time you quit, this will save you from having to quit and restart again should you find that it’s not launching with the one you need (Fig. 3.27).
key whenever you launch Aperture and you’ll be asked to choose the Library you want to use. As Aperture will always restart with the Library active in the Preferences the last time you quit, this will save you from having to quit and restart again should you find that it’s not launching with the one you need (Fig. 3.27).
Moving Referenced Images
There are many reasons why you may want to move referenced images on your system. If they are stored on an external drive that is approaching its maximum capacity you will probably want to transfer them to a larger drive. If you have upgraded a server on which they were always held you will certainly need to move them. Perhaps you’re just having a spring clean of your file system, or you are working simultaneously on both a laptop and desktop. In any of these scenarios, Aperture may lose contact with your original files, because they won’t be stored in the locations you originally specified. In this case, you need to show it where they can now be found. You do this by managing your referenced images. At the same time, however, you may want to import a series of external, referenced files into your Aperture Library so that you can take advantage of the Vaults system to back them up with your other Digital Masters, any metadata you have applied and any Versions you have created. This is called Consolidating Masters.
Managing Your Referenced Images
Ordinarily, when you move some referenced Digital Masters in the file system, Aperture will keep track of them itself. It works hand in hand with the operating system to ensure that changes made in one don’t have an undesirable impact on the other. You can also check that it has been recognized that they have moved by right-clicking on any referenced file in the set you have moved and picking Manage Referenced Files. This will show you where it is reading the files from and, if you have only renamed the folder holding them, it should show that its records have been updated. Any listed in red pose a problem. Those in black are properly located.
However, if the badge in the lower-right corner of each thumbnail in the Browser shows a yellow warning triangle, this indicates that Aperture knows where the image should be, and can find the folder where it should be found, but that it is not there. You will still be able to view the previews of each one, which are stored in the Library itself, but all of the editing options in the Adjustments Inspector will be grayed out and inaccessible. This most often happens when you have copied your images to an alternative location and then deleted the originals. In this instance you need to give Aperture a helping hand by pointing to the new location for the files it is using.
To do this, select all of the images in the moved collection, right click and pick Manage Referenced Files. The dialog that appears will show which images are posing problems. Select all of these and then navigate to their new home using the folder structure in the lower half of the dialog, and then click Reconnect All. This will reassociate your referenced images with those found in the target directory, with a bar monitoring the progress of the operation (Fig. 3.28).
To avoid having to manage your Masters in this way in the future, you should use Aperture’s own Relocate Masters tool, found on the File menu whenever you want to move referenced files on your hard drive. Select all of the images you want to move before picking the tool, and then use the dialog that appears, to point to a new location on your system (Fig. 3.29).
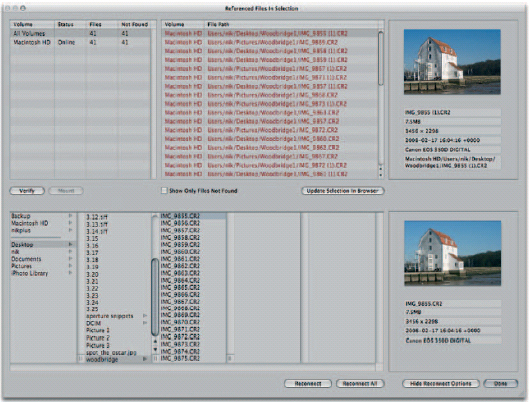
Fig. 3.28 Using Aperture’s Manage Referenced Images dialog allows you to reconnect your Library with referenced images that have been moved since they were added to Projects in the Library.
Use the pop-up menus for sub-folder and name formats, following the guidelines in the importing section for defining these variables (p. 84). Once you click the Relocate Masters button, the new folder structure will be built, and populated with your images. At the same time, Aperture will update its database to take account of the change.
Consolidating Your Masters
When you consolidate your referenced Digital Masters, you place them in the directory structure maintained by Aperture inside its Library package. You can either do this wholesale – by moving them – or you can copy them so that a Version of the originals will remain in their current location. Obviously if you move them rather than copying they will be inaccessible to the file system without navigating through the Library package’s folders, and so shouldn’t be touched by any application other than Aperture.

Fig. 3.29 Rather than moving your referenced images using the Mac OS X Finder, you should relocate those files using the Relocate Master command within Aperture. This will allow you to define a folder structure and naming convention in line with that used in other parts of the Aperture working environment.
Aperture already knows where the images can be found, as this was defined when they were originally added to the Library, or when you relocated your Masters following a folder move, and so once you have chosen whether you want to copy or move them it will go about the task of bringing them into the Library itself without any further intervention from yourself (Fig. 3.30).
Aperture will remove the referenced image badge from the lower-right corner of each thumbnail to indicate that they are now stored internally, rather than referred to in an external folder.
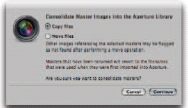
Fig. 3.30 Aperture’s Consolidate Master function moves referenced images from external folders into the Aperture Library package, allowing you to back them up using the Vaults system. Aperture already knows where your referenced images are stored, so this is a one-step procedure.
Image Migration
One of the improvements Apple delivered with the move from Aperture 1 to Aperture 2 was a set of enhanced Raw processing algorithms, which the company claims will produce better end results. Images imported into the Library after upgrading will use this new routine to ensure the best output.
However, as the company recognizes that all of its upgrading users will already have an extensive Library in place it respects your existing settings, and will let the two formats exist quite happily side by side, and give you access to the same editing and adjustment tools on each, regardless of the underlying settings for your various images.
As such, you might not immediately see the benefits of a wholesale upgrade of your existing images from one architecture to another, particularly as this can be a time-consuming business, and so there are two different ways of performing this automated process. One is quicker, and one is more flexible; which you choose will depend very much on how much time you have, and whether or not you want to experiment as you go along.
Migrating Images the Quick Way
The quickest way to migrate your images is to select a group – a Project, Album, Smart Album or your whole Library – in the Projects Inspector and pick Migrate Album, Migrate Smart Album or Migrate Project from the File menu. If you have just one image selected, you’ll be given the opportunity to do a single photo from there too. You can also migrate images on a case-by-case basis by right-clicking their thumbnails in the Browser.
When you do this, you’ll be given the option of upgrading your images as they are so that you see only one edition in your Library – the new Digital Master – or creating upgraded Versions of your Raw images, in which case, the photo’s existing state will be treated as a Digital Master, and a new edition with updated Raw processing will be created as a Version. The two will then be stacked in the usual way. You can also choose whether all images should be migrated, or just those either with or without adjustments.
Whatever option you choose, the selected files will all be migrated to use the Version 2 Raw decoder (Figs 3.31 and 3.32).
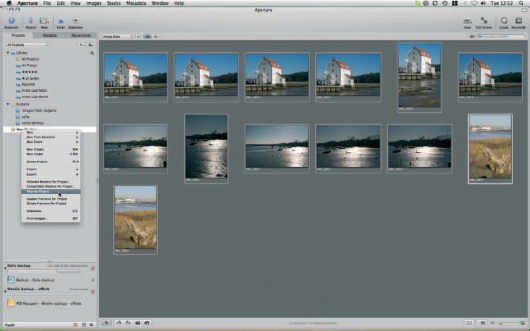
Fig. 3.31 The quickest way to upgrade the Raw decoding of your images is to right click a Project and pick ‘Migrate Project…’. This will convert all of your images en masse, although you can opt to restrict the conversion to only those pictures either with or without adjustments, and to make copies of your originals.
Migrating Images the More Flexible Way
You can also migrate images from the Adjustments Inspector in the same way that you would apply, say, a color temperature change or levels tweak. So long as you have a Raw image selected, a Raw fine tuning section will appear on the Inspector immediately below the Histogram. This lets you select the Version of the Raw processor that you want to use, with options for Versions 1, 1.1 and 2 (Fig. 3.33).
Version 2 is of course the most flexible and Version 1 the most rigid (it tells you only the model of camera used, and doesn’t allow you to make any changes).
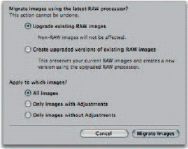
Fig. 3.32 The quickest way to upgrade the Raw decoding of your images is to right click a Project and pick ‘Migrate Project…’. This will convert all of your images en masse, although you can opt to restrict the conversion to only those pictures either with or without adjustments, and to make copies of your originals.
Version 1.1 opens up basic exposure adjustments (Boost), overall or edge sharpening, and chroma blur correction. Version 2 dispenses with chroma blur, but retains boost and sharpening with a supplemental hue boost option, and adds in controls for Moiré correction (Figs 3.34–3.36).
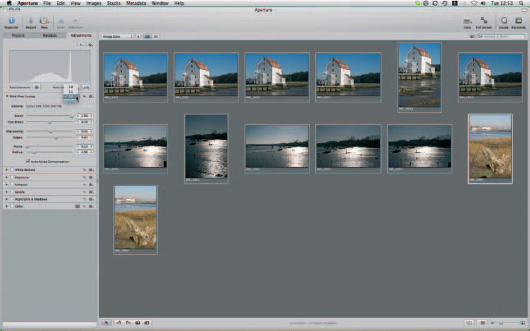
Fig. 3.33 You can specify the Raw decoding tool used to render your files within Aperture using a pop-up menu in the Adjustments Inspector.
![]()
Fig. 3.34 The three Raw decoding options – Versions 1, 1.1 and 2.0 – progressively add more features and flexibility to the Raw fine tuning tools at your disposal. The most basic, Version 1, offers no options at all.
Whichever method you choose when migrating your images, the option is only available if you are actually working with Raw files. Picking an image of any other format in the Browser will still give you the migration option in the File menu, but when you come to the end of the process you’ll be told that no Raw images were found to migrate.
Hard Disk Management
If you have chosen to store all of your images in your Aperture Library rather than referencing them from elsewhere on your hard drive, then it will take care of the management of your photos for you, and you need to follow only basic advice for keeping your hard disk in good shape. The most important is to back up regularly, which we cover elsewhere. Next is to always make sure that you leave at least 10% of the total capacity of your drive unused, so that Mac OS X can effectively shuffle and optimize your files. With less than 10% free you will notice a considerable performance hit.
However, if you have chosen to leave your photos in existing locations, or store them in a series of folders outside of the Aperture Library, you will have the option to access them directly from the file system itself. It also means you can use the operating system’s built-in search tools to find them.
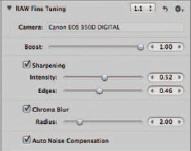
Fig. 3.35 The three Raw decoding options – Versions 1, 1.1 and 2.0 – progressively add more features and flexibility to the Raw fine tuning tools at your disposal. The most basic, Version 1, offers no options at all.
Smart Folders
Smart Folders are special directories that intelligently update their contents by examining the attributes of files on your system and change their listings to reflect these. Whenever you add files to your system that match the search attributes set for the Smart Folder, they will be listed in the folder without being moved out of their original location, allowing you to see all matched files across your system regardless of their actual location.
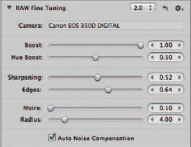
Fig. 3.36 Switching to the version 2 Raw decoder gives you far finer grained control over the rendering of your images.
Opening a Smart Folder and then executing or opening one of its contents will open it from the original location, saving you from having to search through your system to find it. The files themselves will never be moved, as the Smart Folder contains only links to each source.
You can therefore set a Smart Folder to list all of your Raw images, regardless of where they are stored, and you can use this as the basis of a backup routine, without having to set multiple source locations within your backup software.
To create a new Smart Folder, open any Finder window (or make the Desktop visible) and press ![]()
![]()
![]() . This opens a Mac OS X search folder. Use this to search for files sporting the extension used by your camera (say .CR2, or .DNG). Leave ‘This Mac’ selected on the search bar, but change ‘Contents’ to ‘File Name’ so that the specified extension only applies if found in the name of a file, rather than within it. Leaving it set to Contents would include word processed files in which you have typed those characters. Mac OS X will show a live preview of your search results. Once you have applied whatever refinements you need to hone your results, clicking Save will write the search terms to a new Smart Folder and give it a name. Every time you add new images to your system and reopen the folder, its contents will reflect current state of play, with the new images included alongside those that existed when the folder was defined (Fig. 3.37).
. This opens a Mac OS X search folder. Use this to search for files sporting the extension used by your camera (say .CR2, or .DNG). Leave ‘This Mac’ selected on the search bar, but change ‘Contents’ to ‘File Name’ so that the specified extension only applies if found in the name of a file, rather than within it. Leaving it set to Contents would include word processed files in which you have typed those characters. Mac OS X will show a live preview of your search results. Once you have applied whatever refinements you need to hone your results, clicking Save will write the search terms to a new Smart Folder and give it a name. Every time you add new images to your system and reopen the folder, its contents will reflect current state of play, with the new images included alongside those that existed when the folder was defined (Fig. 3.37).
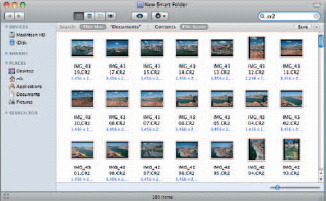
Fig. 3.37 Smart Folders are shortcuts to live search results, showing files that match user-defined variables. By using the file extension written by your camera as a search term, and searching on File Name, rather than Contents, you can easily isolate all Raw files on your system.
You can refine it further by using the ‘+’ button before saving it to define several tiers of conditions that must all be met before an image qualifies for inclusion. Say you want an easy way to monitor which Raw photos you have added to your system each day; in that case you would want to restrict the contents of the Smart Folder to just those files created in the last 24 hours. As far as Mac OS X is concerned, a file was ‘created’ when it first appeared in its catalog, not when a scene was captured by the camera, and so changing the first pop-up menu on the second tier of search terms from Kind to ‘Created date’, and the second to ‘today’, will trim down the list of results to something more relevant to your own particular needs (Figs 3.38 and 3.39).
The results shown in your Smart Folder are just that: results. They are not files in themselves, but links to the originals elsewhere on your system. Copying or backing up the Smart Folder, therefore, will save only a notional file of around 4 KB in size telling your system how to find the originals, not the several-hundred gigabytes of Raw files you want to preserve. Smart Folders are not intended, therefore, to be used as the first step in a manual backup process. For this you should use them as a pick list for dragging files to a separate, perhaps online location.
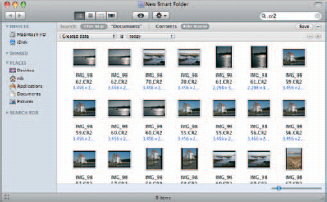
Fig. 3.38 By further refining your Smart Folder search terms you can restrict the results to show only those files added to your system in the last working day, making it easy to see which files still need to be backed up.
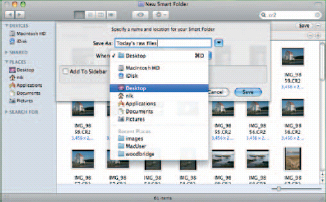
Fig. 3.39 Save your Smart Folder in an easy-to-find location. By default, Mac OS X suggests a Saved Searches directory and the option to pin it to the Sidebar so that it can be found quickly.
Alternatively, you can create a Burn Folder, which you’ll use in conjunction with this Smart Folder.
Burn Folders
Burn Folders are manually updated collections of files you want to copy to CD or DVD which, despite questions over their long-term durability, remain an easy short- to medium-term backup and a convenient way to transport large collections of sizeable files between computers or users.
You can use Burn Folders in conjunction with a date-based Smart Folder by using the Smart Folder to identify recently created files, which can then be dragged from there to an appropriately named Burn Folder elsewhere on your system (Fig. 3.40).
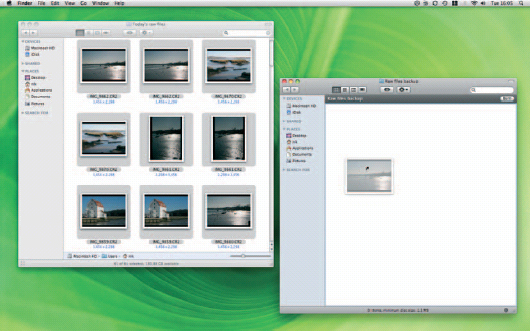
Fig. 3.40 By combining Smart Folders with Burn Folders, you can set up a simple manual backup workflow by dragging the contents of the Smart Folder to the empty Burn Folder and then writing the results to optical disk.
As you are creating aliases within the Burn Folder to the original files referenced in the Smart Folder, these references will show up in the Smart Folder, as they will carry the same file extension – assuming that is the criterion you have used to identify them. As such, you should delete the contents of the Burn Folder after creating your disk to avoid bloating the Smart Folder with irrelevant files.
If you regularly find yourself working beyond midnight and want to use Smart and Burn Folders in this way to run a manual, ad hoc backup system, you should change the date criterion in the Smart Folder set up to identify no files created ‘today, but those that first appeared on the file system within the last day by specifying ‘Created date’ is ‘within last’ 1 ‘day’, with the sections in quote marks picked from the pop-up menus.
You can adjust an existing Smart Folder in this way by opening it to view its contents and picking ‘Show search criteria’ from the Shortcuts menu button.
Folder Actions
Apple introduced Automator in Mac OS X 10.4 Tiger and updated it for Version 10.5 Leopard. It is a simple programming environment that allows you to construct fairly complex routines by dragging and dropping elements into a workflow. The workflow can then be saved as an application, an AppleScript to be called from within an application, an iCal event to run at a specified time or, of most interest to Aperture users manually managing their images, a Folder action.
Folder actions are routines attached to folders on your system that monitor the contents of the folder and perform a range of tasks when they spot any changes. These can be as simple as copying the files from one place to another, launching an application to execute them, or changing their filenames and dropping old Versions in the Trash.
Each workflow routine is built using so-called Automator actions. Mac OS X ships with a wide range of these already installed, which can be expanded either by downloading new ones from apple.com/downloads/macosx/automator or installing applications accompanied by specific actions that expose their internal functions for exploitation inside Automator. Aperture is one such application (Fig. 3.41).
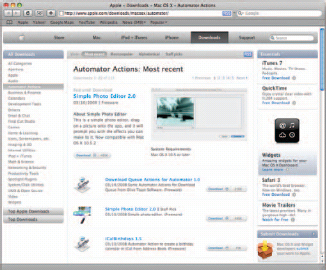
Fig. 3.41 Automator is a highly extensible application. Additional actions can be downloaded for free from Apple’s website.
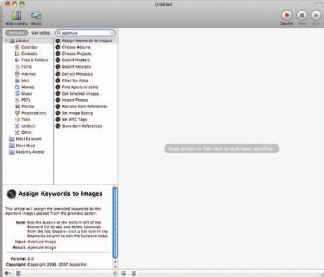
Fig. 3.42 The Automotor workspace is split into three sections showing actions and categories, alongside a large workflow creation space. A Help panel explains in more detail what each action can do.
Launching Automator and Accessing Aperture’s Actions
Automator is found in your Applications folder. Opening it up you will see three distinct panes. The two on the left organize your Actions (column 2) into categories (column 1), below which a descriptive window explains what each Action does when you click on it. The larger window to the right is where you build your workflow by dragging and dropping individual Actions into it, in the order in which you want them to run. As you can pass the output of one Action into the input of another, laying out your Actions in the correct order will let you build surprisingly complex routines (Fig. 3.42).
Aperture’s actions aren’t shown by default, but typing Aperture into the search box at the top of the second column, while you have Library selected in the first, will bring up those Actions that it adds to the list. These Actions range from adding keywords and choosing Albums to extracting metadata and filtering images for use as Picks in Stacks.
Building an Aperture Workflow
We are going to build a workflow that will automatically rate and import into Aperture only our very best images. This lets us drag and drop individual images from a folder or media card into the system and have them appear in the Library with a certain number of metadata already applied, to cut processing time once they are there. It also means that we aren’t having to import a whole raft of pictures and then sort them in situ.

Fig. 3.43 Workflows are created by dragging elements from the actions list into the workflow area to the right of the application window. Here we are building a workflow that will first take the contents of a folder and then pass them on through the workflow for manipulation.
As we will be adding images to our Mac while doing this, it makes sense to attach this workflow to a folder, as that will also provide a space in which the images can be stored once transferred to our machine.
We want our Automator workflow to grab any new images dropped into this folder and use them as the basis of what it does next. To do this, click on Files & Folders in the first column, and then drag Get Folder Contents from the second into the main window on the right (Fig. 3.43).
Click on Library and type Aperture into the search box to call up the Aperture Actions, and then drag Import Photos into the workflow window beneath Get Folder Contents. You will see that the border surrounding the Get Folder Contents box changes to include an arrow at the bottom, which points into a tab at the top of the Import Photos box. This indicates that Automator will take whatever it finds in the specified folder (which we’ll define in the very last step) and pass it to the next step in the process: importing it into Aperture (Fig. 3.44).
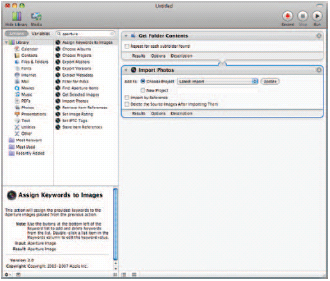
Fig. 3.44 Automator’s Aperture actions are written to work in partnership with Aperture itself. This gives it access to the list of Projects maintained by the application. By dragging a second element into the workflow space, we have told Automator to pass the results of our first action to the second as a selection to work upon.
The various elements of Aperture’s Import dialog have been split up among several different Actions, and the only options available to you, even if you click the Options lozenge at the bottom of this section of our workflow, are where the images should be saved, whether they should be imported wholesale or used as reference files, and whether they should be deleted after they have been imported.
We have created a new Project in Aperture called Latest Import and are using this as the dumping ground for our imported photos. We will largely be importing batches of similar image types from a single shoot, so we should be able to select them as a group and move them en masse. As such, we will return to Aperture before we start importing photos of a different subject each time we use this routine and reorganize the images into their final Projects and folders.
So, we’ve selected Latest Import as the destination folder, chosen from the drop-down menu of Projects which is automatically populated by Automator after examining your Aperture Library. If you don’t already have a Project sporting the name you want, you’ll have to create one inside Aperture: Automator can’t create one itself unless you use the New Project option to create a new Project on every import.
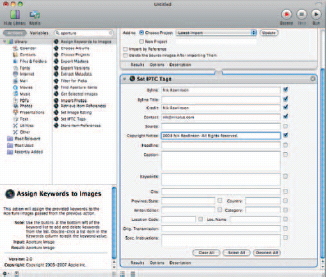
Fig. 3.45 Be careful when setting IPTC metadata in your workflow. We want the results of our workflow to be applicable to the widest possible range of imported images and so will only fill in those fields that we know for sure will be universally relevant.
Because we want the images to appear in our Aperture Library rather than being referenced from the folder into which we’re dropping them, we have left the Import by Reference box unchecked. We also don’t want the images deleted after import, as in this case we want a separate copy of the originals kept in the Mac OS X file system for use in other applications.
We’ll now set some relevant metadata. Unfortunately you don’t have access to pre-defined metadata sets here, but drag the Set IPTC Tags action into the workflow area and you’ll see a range of attributes with which you’ll already be familiar. Fill in only those sections that will be relevant to all of the images you’ll import by this method at any time. Don’t specify anything that is specific to just your next import session, or else you’ll have to go back and change it every time you use the workflow, which defeats the object of setting it up just once as a timesaving measure (Fig. 3.45).
You should be quite safe entering a by-line, credit, contact details and copyright notice, but avoid filling in headlines, captions and keywords at this stage; they are better handled within Aperture itself.

Fig. 3.46 The final step in our workflow is to rate our images with five stars. This rating is passed to Aperture and can be used as a search element. However, it will not be accessible to Spotlight searches.
These data will only apply to the images inside your Aperture Library, not the copies stored on your hard drive in the file system. As such they can’t be used as Spotlight search terms to point to the originals.
Finally, as we are going to use this workflow to import only the best images into our Aperture Library as we come across them, we can safely assume that everything we import is the best of the best. So, we’ll drag Set Image Rating into the workflow beneath the Set IPTC Tags section and set the Image Rating drop-down to ‘5’ (Fig. 3.46).
Our workflow is now complete and we need to save and test it. Pick Save As Plug-in … from the File menu or use the shortcut ![]()
![]()
![]() and give it a name. You then need to assign it to a folder, so click the ‘Plug-in for’ drop-down and pick Folder Actions, then choose Other … from the Attached to Folder drop-down.
and give it a name. You then need to assign it to a folder, so click the ‘Plug-in for’ drop-down and pick Folder Actions, then choose Other … from the Attached to Folder drop-down.
Navigate to the parent folder you want to use and create a new folder to which you will attach your workflow. We would recommend placing it somewhere easy to find, such as your Pictures folder or the Desktop. We have called ours 5 stars and saved it on the Desktop. Using a logical name like this means we can set up additional folders for images rated with four, three, two or one star if we also want to import those in the same way.
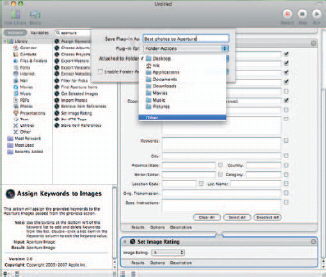
Fig. 3.47 Save your workflow as a Folder action and attach it to a folder on your system. Whenever Mac OS X spots a change to the contents of that folder, such as images being dragged into it, it will run through the workflow and, in this case, import the additional files to Aperture, set the metadata and rate them.
Ensure Enable Folder Actions is checked and then click Save (Fig. 3.47).
You can now close Automator and import your first photos. Choose one or more of your best images and drag them onto the new folder. You should see the Automator workflow icon – a smaller Version of the Automator application icon – briefly appear in the Dock, and an explanatory line appear in the Menu bar, telling you what it is doing. If Aperture isn’t already open, it will launch, and the images will be imported into the application, have metadata attached and be rated as appropriate.
You can check that it worked by clicking in the Latest Import folder to see that they have arrived safely, and then on the 5-star smart album at the top of the Library to check that the rating was correctly applied.