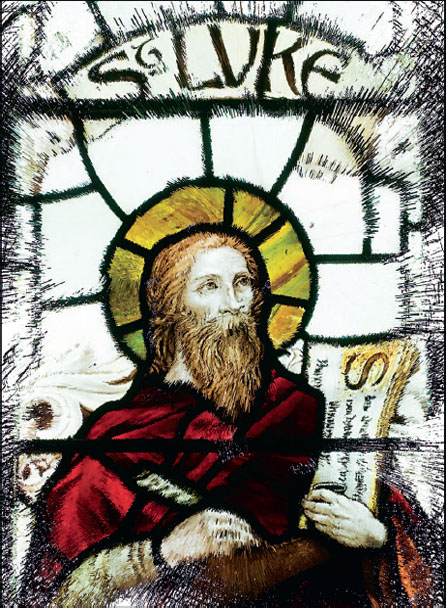
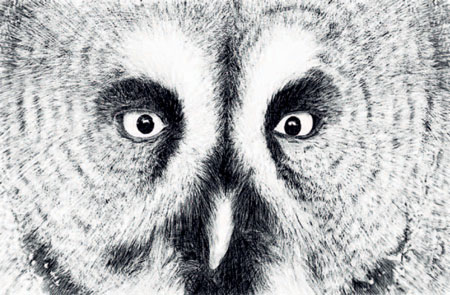
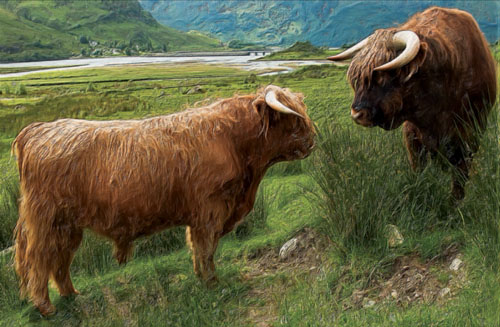
FIG 3.1 St Luke. This picture was painted using the Graphic Bristle brush in the Liquid Ink brush category
When faced with the hundreds of brushes which come with Painter, how do you know which one to choose? This large chapter devotes two pages to every brush category in Painter 11 and can be used as an invaluable reference for when you are unsure as to which brush to use for a particular painting.
Each two page layout contains:
An overview of the brush category.
A finished picture made with brushes from the brush category.
An edited step by step example of how it was created.
Examples of eight different variants from the category.
In addition to the edited step by step instructions included in this chapter there are more detailed instructions with interim illustrations included on the DVD. I recommend that you use these in preference to the ones in the book. The files are in pdf format and can be viewed on screen or printed for reference. The original photographs for all these pictures are also on the DVD so that you can follow them using my originals. The step by step instructions on the DVD amount to over 130 additional pages of instructions and illustrations.
Selecting brushes in Painter 11
Before you start checking the brush categories, it is worth being aware of the terminology used in Painter to describe each brush. The category and variant name will usually give a good idea of what to expect so this is a brief overview of what the names mean.
First select the category
The category name gives the first clue. Most of them are easily recognizable – Airbrush, Oil, Watercolor, Chalk, Pencils – and they speak for themselves. Categories such as Chalk and Conte have very hard finishes and are good for picking up paper textures.
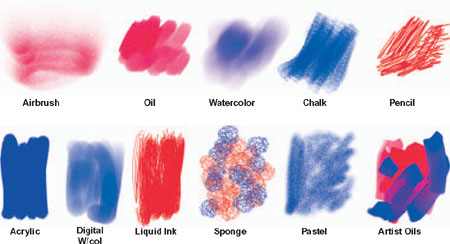
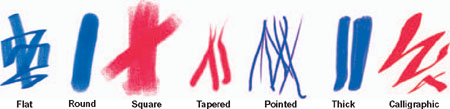
Understanding the shape
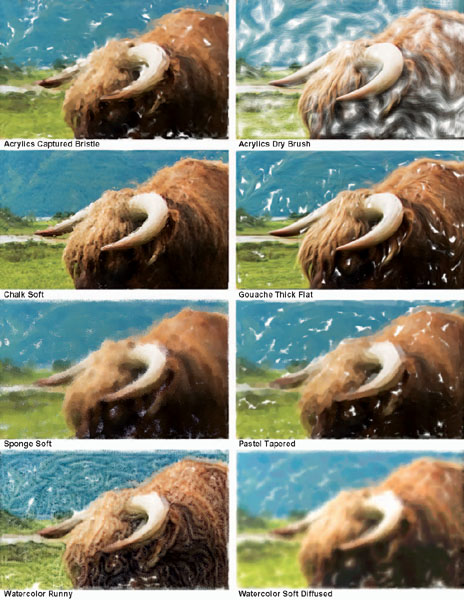
These are also fairly obvious – flat, round, square, tapered, pointed, thick, calligraphic, and so on. Another way of recognizing the shape is to check the tiny dab illustration alongside each variant, which will show you the basic shape of the brush.
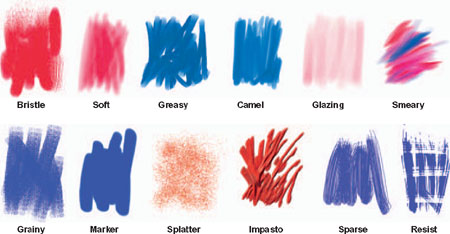
Now for the texture
The texture has a major impact on the appearance of the brush and the examples below show the main types. Look out for variants named Greasy and Smeary – these will smear the photograph, painting in a similar way to blenders. Camel hair brushes are very smooth while Glazing brushes are set up to paint very gently without hiding what is underneath. The Resist brushes are unique to the Liquid Ink category and are used to protect areas which are not to be painted over. Impasto brushes add a shadow to the brush strokes in order to give a three-dimensional appearance while Markers are very flat and solid.
Blenders for smoothing and mixing
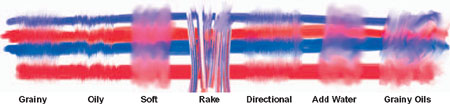
There are many diffusers and blenders in various categories and they each have different ways of blending existing paint or imagery in your picture.
When the description says Grainy, then the mix will take on some characteristics of the paper texture currently selected; the Oily and Directional blenders will pull the paint in a particular direction. A soft finish will result from using blenders such as Just Add Water and ones with Soft in their name. For more information on blenders refer to the detail later in this chapter and also in Chapter 9 where they are used to paint a child’s portrait.
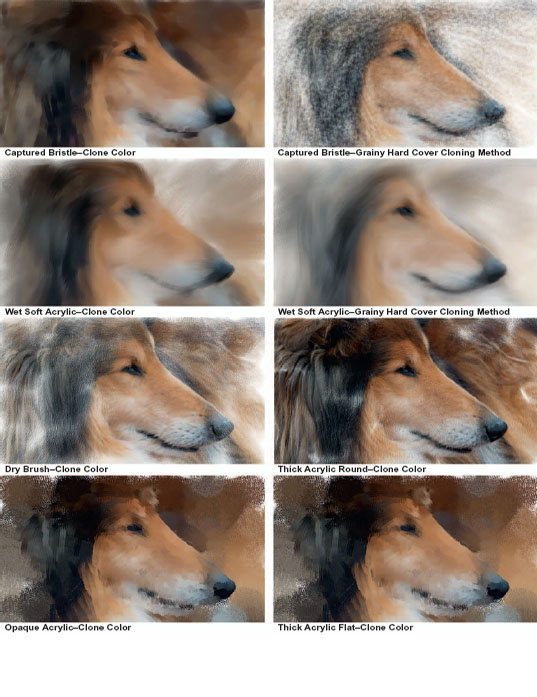
Acrylics
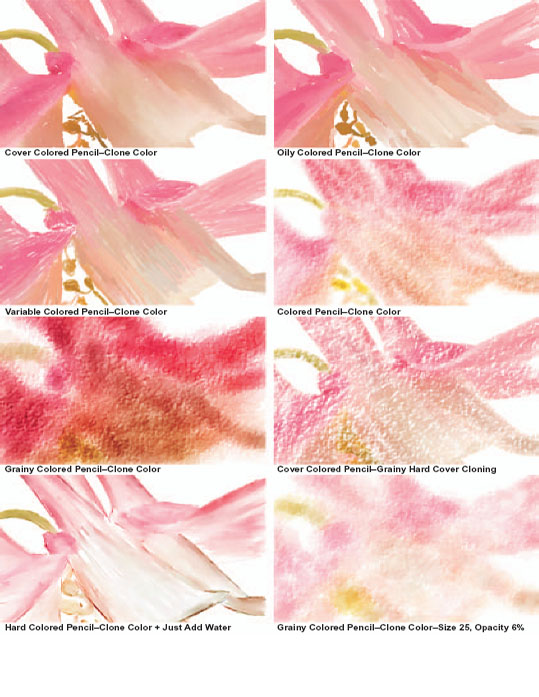
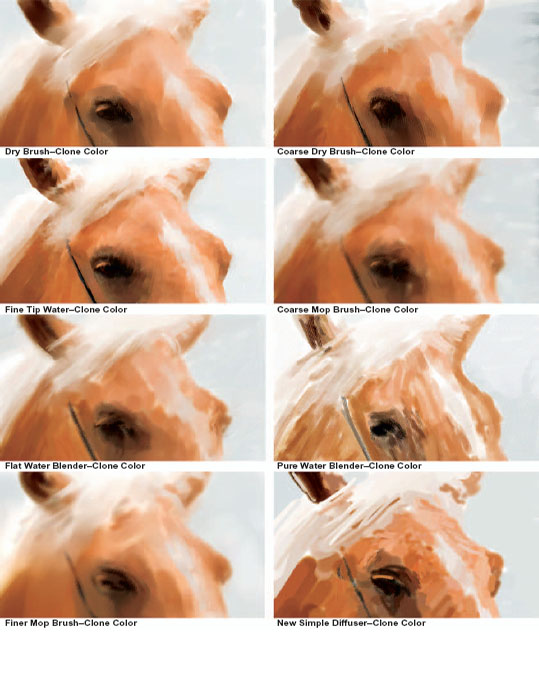
The Acrylics brush category contains some very useful brushes, many of which display strong brush strokes. The Captured Bristle is one of the most useful brushes in Painter; using it in Grainy Hard Cloning Method at a reduced Opacity (say 10%) will give a light but distinctive texture based on the paper chosen, while in Clone Color mode the same opacity will give an attractive smeary finish. Try cloning with Clone Color first and then bringing back detail by changing to Grainy Hard Cloning Method.
The Soft Wet Acrylic brush is another favorite; it gives beautifully soft strokes when used in Clone Color mode.
Open ‘ Sheltie ’ and make a Quick Clone. Select the Captured Bristle brush. Click the Clone Color option and using brush size 72 and Opacity 70% clone the picture. Paint with short brush strokes and follow the lines of the hair and shape of the head. Continue until the whole picture has been covered. Turn the Tracing Paper off and continue to paint until all the white areas are filled in. Change the Method to Cloning and the Subcategory to Grainy Hard Cover Cloning. Change the brush size to 72 and Opacity to 30%. Gently paint again; this time select areas which will benefit from detail being added. Continue over the head; follow the lines of the hair very carefully, particularly where it goes in several directions. Change the brush size to 32.2 and Opacity 100% and selectively paint over again. Concentrate mainly on the areas around the eyes and nose and also on some tufts of hair.

Full step by step instructions for this picture are on the DVD.
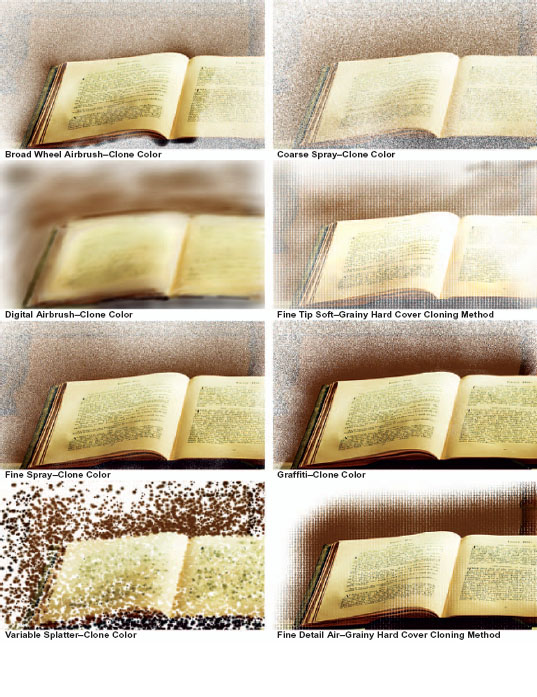
Airbrushes
Airbrushes used non-digitally often give an ultra smooth finish to an illustration and for the photographer this is perhaps too smooth and realistic. It is more interesting to use the textural finish of this brush category as in the picture below.
Airbrushes like Graffiti and Pepper Spray give a very rough finish while the Variable Splatter is the most striking and can be utilized to help enhance texture in the background of a picture.
Soft airbrushes, which include the Soft Airbrush, Fine Tip Soft Air and the Fine Detail Air are very smooth and difficult to use when cloning.
This is a very simple and quick picture to make. Make a Quick Clone and select the Broad Wheel Airbrush, size 127 and Opacity 47%.
Click the Clone Color option in the Colors palette. Lightly paint over the central parts of the picture to establish the outlines. In common with most airbrushes, this brush will spray paint outwards in the direction that your pressure sensitive pen is held. Use this characteristic and hold the pen inside the area of the book and spray outwards. Change to the Graffiti brush, size 128 and Opacity 48%. Click the Clone Color option. Brush over the book to bring more detail to the text. Change to the Fine Spray brush, size 52 and Opacity 44%. Click the Clone Color option in the Colors palette. Paint over the book to get more clarity. When the picture is finished add a touch of sharpening to add to the texture.
Full step by step instructions for this picture are on the DVD.
Art Pen
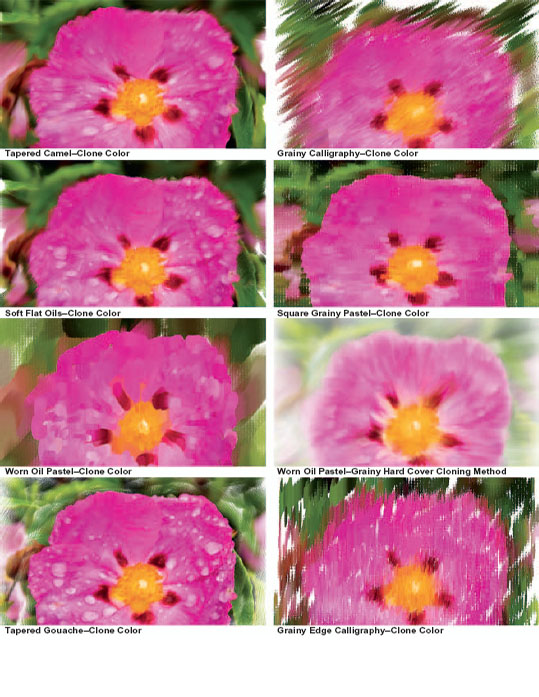
The Art Pen brushes were originally introduced to be used with the Wacom 3D Art Pen, however they can equally be used with any other graphics tablet. Most of the brushes can be used very successfully when cloning from photographs. All the Grainy types will pick up the selected paper texture – in the examples opposite I have used the Artists Canvas Paper.
Several of the brushes can also be customized to use the Grainy Hard Cover Cloning Method; this will give a more accurate clone and, depending on the brush, will often pick up the paper texture.
This picture of the attractive Cistus flower was created using the Worn Oil Pastel. Make a Quick Clone. Select the Worn Oil Pastel, brush size 148 and Opacity 12%. Click the Clone Color option in the Colors palette.
Change the paper to Artists Canvas. Clone the entire picture. This will give an attractive pastel finish; leave some small areas not fully painted to allow the canvas texture to show through. The rest of the work is to add detail to the flower. Use brush size 53, Opacity 53% and then size 18 to bring in the detail; emphasize the petal edges and variations of light and dark in the petals.
To finish the picture reduce the brush size to 11 and increase the Opacity to between 50% and 100%. If this is too sharp, smooth off with a larger brush size at a low opacity. I also painted out the pink flower on the right which was in the original image.
Full step by step instructions for this picture are on the DVD.
Artists
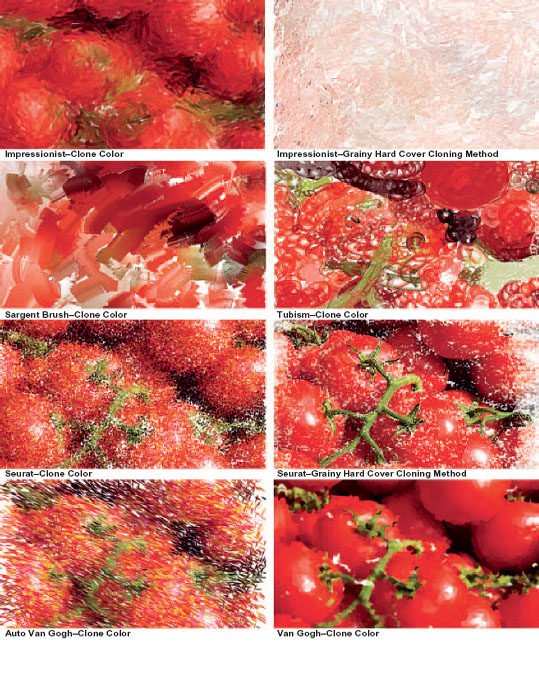
This brush category is unusual in the sense that it does not represent a range of brushes of one type, but rather includes a small selection of brushes designed to work in the style of some great painters. Probably the most appealing brush is the Impressionist brush and the picture below was created with this brush. It has a very distinctive texture which emphasizes brush strokes and can be used for many types of picture.
The Sargent brush is ideal for the early stages of a clone, when you want to completely break up the photographic texture and replace it with a mass of rough strokes.
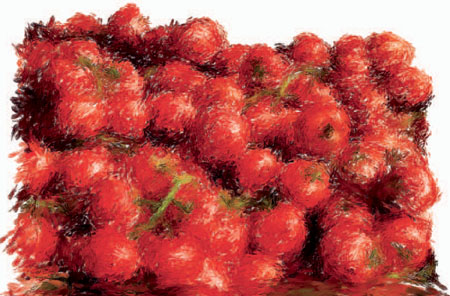
The Impressionist brush was used for this group of tomatoes and it has given the picture a very strong sense of depth and texture.
Create a Quick Clone.
Select the Impressionist brush, size 92 and Opacity 100%.
Click the Clone Color option in the Colors palette.
Paint loosely over the tomatoes, leaving the outer area blank.
Change the brush size to 38 and paint over the tomatoes individually, following the shape of the tomatoes and the spaces between them.
Use a size 18 brush to emphasize the stalks and the edges of the tomatoes.
The Impressionist brush is an easy brush to use but at smaller sizes, as used in this picture, it does take quite a while to complete.
Full step by step instructions for this picture are on the DVD.
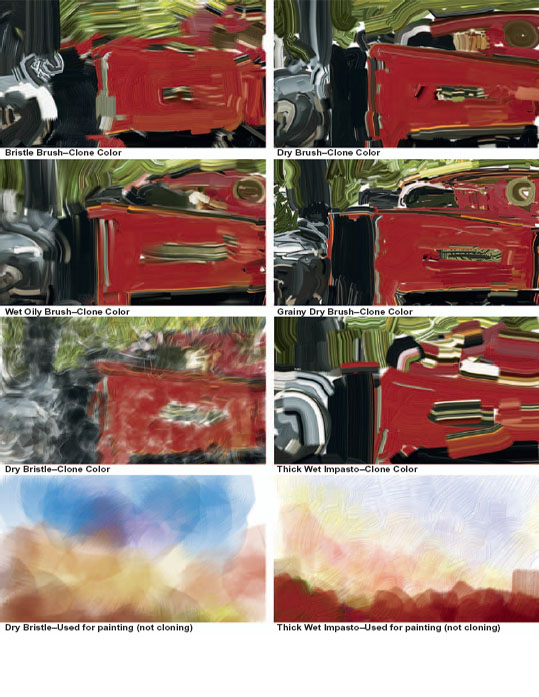
Artists Oils
The Artists Oils brush category is a beautiful set of brushes for painting; they will pick up multiple colors from the Mixer and display many of the properties of real oil brushes. They run out of paint just like a real brush and leave very attractive bristle marks depending on the brush being used.
Unfortunately they are very difficult to use when making clone copies from photographs. (Look at the examples at the bottom of the opposite page to see the difference between cloning and painting). The one distinguishing feature all the brushes have is that they drag out the clone colors in one continuous line; this makes it very difficult to make a cloned picture.
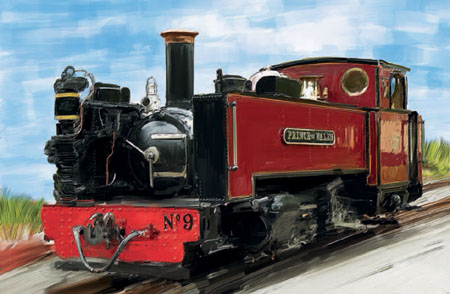
Make a Quick Clone and create a new layer to clone onto. Select the Wet brush, size 20, Opacity 100% and click the Clone Color option.
Paint the locomotive using short strokes but leave the background for now. Reduce the brush size to 11 and later to 4 to bring out detail. It is very difficult to retain detail using Artist Oils brushes as cloners so you will continually need to refine each side of a line to keep the colors in the right place. Create a new layer and move it beneath the layer on which you have been painting. Using the Dry Bristle brush, size 74 and Opacity 27% clone the rails and the grass. Create another new layer, also beneath the locomotive layer, and paint the sky. Use the same brush as before, untick the Clone Color box, and paint the sky by choosing blue and white in the Color palette.
Full step by step instructions for this picture are on the DVD.
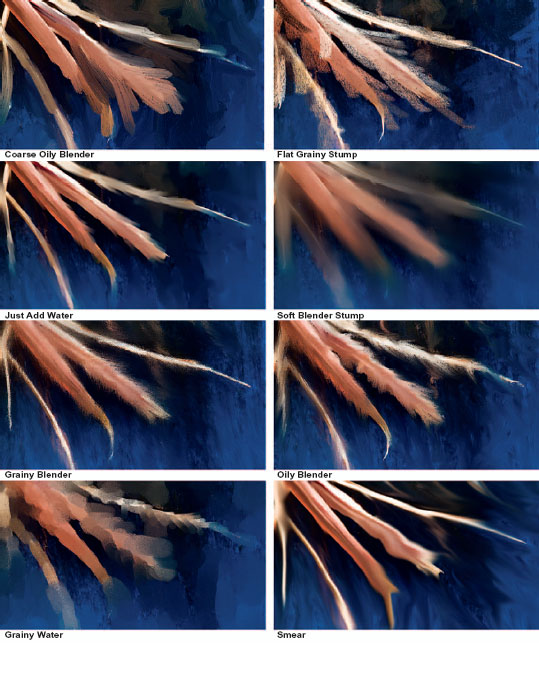
Blenders
The Blenders category contains some really useful brushes and they can all be used successfully on photographs. They are not cloning brushes and should be used to paint over photographs leaving a textured finish.
The range is quite wide and contains brushes that will blend softly and others that create textures which look like oils, pastel and watercolor. Although this category has been created to bring together a range of blenders, there are actually many more scattered throughout the other categories. It is also worth remembering that many regular brushes can be changed into blenders by reducing the ReSat value to zero and increasing the Bleed value.
Start by making a clone (File>Clone) to make a second identical copy. Select the Water Rake size 4.5; the Opacity will be 100% throughout.
Paint the blue background by making short strokes at angles to each other which will create a brushy texture. Paint the plant leaves using various brush sizes between 1.6 and 2.5 depending on the width of the stalk.
When painting the stalks it helps to turn the canvas on one side; do this by clicking and holding the Hand symbol in the Toolbox, which will change to a turning icon, then click and drag in the picture to turn the canvas around. Double-click in the centre to return to normal orientation.
When painting the panel on the left use brush size 2.5 and follow the colors with the brush, making lots of small movement again to create texture.
Full step by step instructions for this picture are on the DVD.
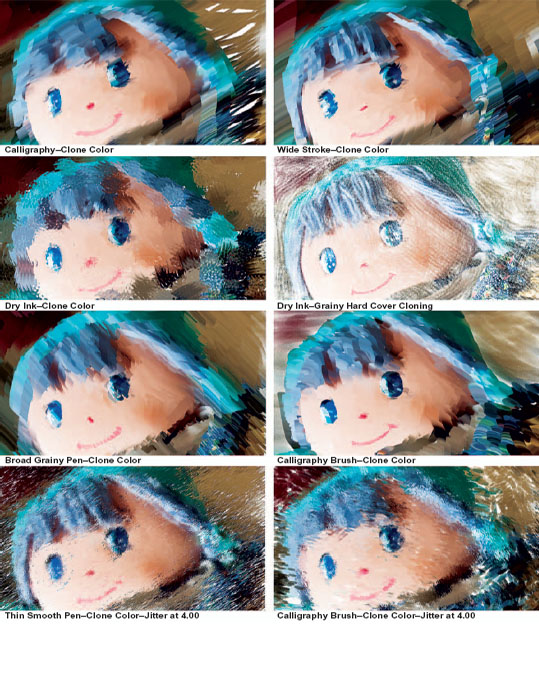
Calligraphy
At first sight this rather small and specialized brush category does not offer much for the photographer. It is perhaps ideal for handwritten text or painting in the Chinese style, however the brushes will produce some very attractive textures when used in the right way. The selections of examples opposite illustrate some of the ways in which they can be used. When the Clone Color option is active most brushes will give a very distinctive calligraphic brush stroke, however by making the brushes smaller than the default sizes quite a lot of detail can be brought in. All the brushes will pick up the paper texture when changed to the Grainy Hard Cloning Method.
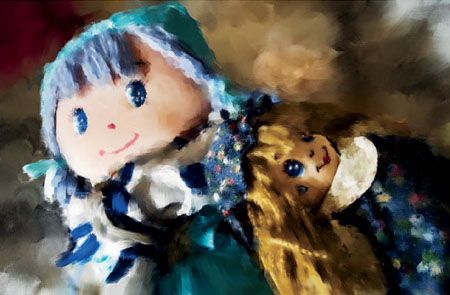
Make a Quick Clone, select the Dry Ink brush and click the Clone Color icon in the Colors palette. Paint over the dolls with brush size 32 and Opacity 100%. Use short brush strokes for the main areas, long strokes for the golden hair, and dabs for the patterned dress. Reduce the size to 11.3 and refine the face and eyes. Change to brush size 85 and Opacity 100%, and roughly paint the background, then reduce the Opacity to 13% and brush over the background to soften and texture. Fill in all the white gaps with brush size 32 and Opacity 15% and generally improve any areas which need improving. Reduce the brush to size 11 with a 50% Opacity to paint in the areas that will improve the depth and detail, for example down the left side of the doll’s face where the darker line needs to be emphasized.
Finally, you may need to adjust the contrast to give the picture a boost.
Full step by step instructions for this picture are on the DVD.
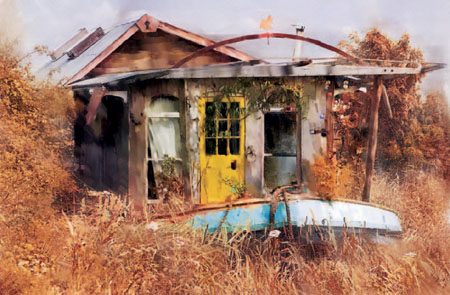
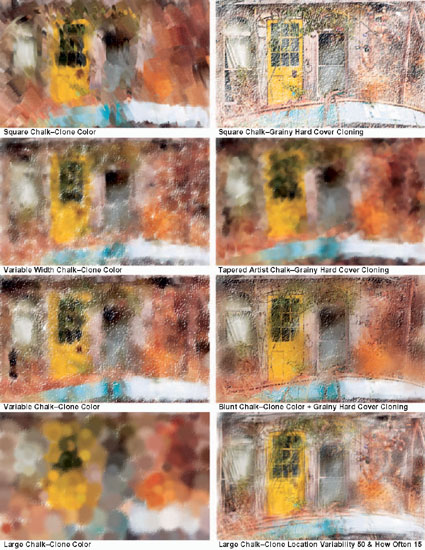
Chalk
The Chalk brushes are particularly useful for showing the paper texture, and the Square Chalk brush is my favorite in this category. All the brushes will work in Clone Color mode and also in Grainy Hard Cover Cloning Method. It is generally necessary to reduce the opacity and reduce the Grain slider to bring out the grain. In the examples opposite the paper chosen was the French Watercolor paper, which gives an attractive dappled surface texture.
Chalk brushes are excellent for creating a rough background for a clone painting and although it is difficult to bring in fine detail while in Clone Color mode, this can be achieved by changing to Grainy Hard Cover Cloning Method.
Make a Quick Clone and select the Square Chalk brush, size 149 and Opacity 13%. Click the Clone Color icon in the Colors palette and paint over the entire picture to give an overall background color. Create a new layer, change the brush size to 99 and start to bring in some more shapes. Reduce the brush to size 23 and increase the Opacity to 54% to add more detail. Reduce the size further to 12 and paint along the lines of the picture to enhance the lights and darks. Create another new layer, un-tick the Clone Color, and in the General palette change the Method to Cloning and the Subcategory to Grainy Hard Cover Cloning. Use brush size 32 and 28% Opacity and Grain at 6% to gently bring some extra detail into the picture. Finally, return to the Clone Color mode and use brush sizes between 10 and 35 with 54% Opacity to bring back some painterly strokes over the more realistic elements.
Full step by step instructions for this picture are on the DVD.
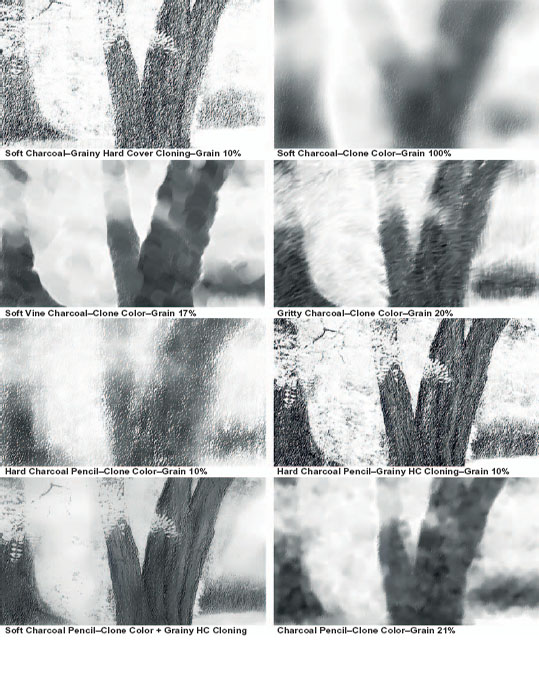
Charcoal
In traditional painting Charcoal is usually just black with shades of gray and the examples shown here are just that; however, this being Painter you can of course use these brushes to clone in full color from photographs. In many ways they are similar to the Chalk category in that they are excellent at picking up a paper texture. When used in Clone Color mode it is hard to resolve fine detail but they do produce some really good rough textures. All the brushes will work in Grainy Hard Cover Cloning Method but the brushes do not vary very much in texture. You will need to reduce the Grain slider and usually the Opacity to show the paper texture at its best.

Make a Quick Clone and select the Charcoal brush, size 72, Opacity 100% and Grain 10%. In the General palette change the method to Cloning and the subcategory to Grainy Hard Cover Cloning. Choose the Rough Charcoal Paper and paint over the tree trunks to get a good density. Switch to the Soft Charcoal brush, size 78 and change to the Grainy Hard Cover Cloning as above. Make the Opacity 17% and Grain 15%. Clone the rest of the picture; this will be softer and lighter than the trunks. Using the Sharp Charcoal Pencil (also in Grainy Hard Cover Cloning Method) size 24, Opacity 100% and Grain 10%, paint over the tree trunks and smaller branches to darken them further. Return to the Soft Charcoal brush used previously and paint over any areas that require more detail. Make a copy of the canvas (Select>All, Edit>Copy, Edit>Paste In Place), then change the Layer Composite Method to Multiply.
Full step by step instructions for this picture are on the DVD.
Cloners
If you are new to Painter, this is the ideal place to start cloning from photographs. All the brushes in this category have been created specially for cloning and will work well without any modification. There is a wide variety of finishes; brushes like the Bristle Brush Cloner, Wet Oils Cloner and the Thick Bristle Cloner will drag out the color into attractive textures. They will also react differently depending on the speed the brush is moved. Try moving the brush fast and it will smear the image, move it very slowly and the clone will appear very clearly. The Soft Cloner is used regularly in conjunction with other brushes to return some detail to a picture.
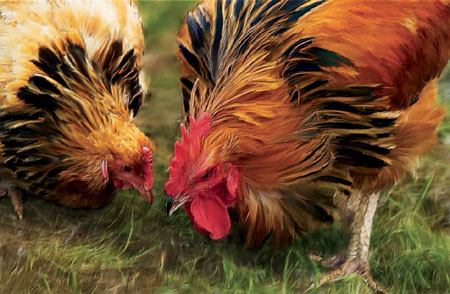
Make a Quick Clone and select the Wet Oils Cloner, brush size 29 and Opacity 39%. Create a new layer to paint on and paint the chickens with the brush strokes, tracing the lines of the feathers. Create a new layer and place it under the layer just painted. Change to the Chalk Cloner, size 68, Opacity 20% and paint the grass; because this is below the top layer you can paint quite freely without affecting the birds. Change the layer opacity to 80%. Create another new layer, on top of the previous one, and using the Wet Oils Cloner, size 27, Opacity 6% paint a rough texture over the grass. Create a further layer, just under the chickens layer and reduce the Wet Oils Cloner to size 10, Opacity 100% and paint in some tufts of grass. Change this layer’s Opacity to 80%. Finally, paint over the chickens again; use brush size 22 with Opacity 20% and soften down any rough edges.
Full step by step instructions for this picture are on the DVD.

Colored Pencils
Pencils tend to be small and sharp, and when used to draw a detailed picture it takes a long time to complete. Painter pencils are no different. If you want a picture with delicate tones and crosshatching it can be done by using a very small size brush, but you will need a lot of patience. The examples shown here use larger brushes and the result is not like the traditional pencil, but it is certainly worth exploring some of the different effects. One feature is that most of the brushes use the Build-up Method and this means that the color will very rapidly go dark; this can be a problem but may be avoided by changing the Method to Cover.
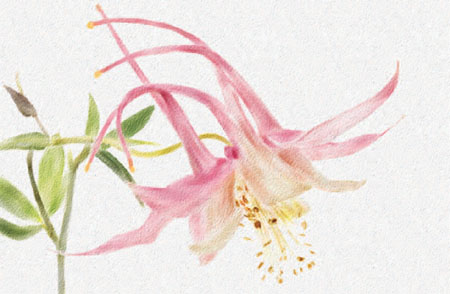
Make a Quick Clone, select the Hard Colored Pencil, size 20, Opacity 8%, Grain 26%, and choose the French Watercolor paper and click the Clone Color option. Clone over the picture; use brush strokes to indicate the edges of the petals only, do not fill the centres of the petals. You will need to use many different brush sizes depending on the size of each petal.
Change the brush to Blenders>Just Add Water, size 21, Opacity 23% and blend over the petals to get a smooth finish. Drag out the painted color and spread it across the surface. As before, you will need to use different sizes of brush to blend the various areas. Return to the colored pencil to emphasize darker lines then blend again. The result should be something like a traditional watercolor pencil which has had water applied to the pencil marks to blend and soften. I applied a texture based on the watercolor paper used.
Full step by step instructions for this picture are on the DVD.
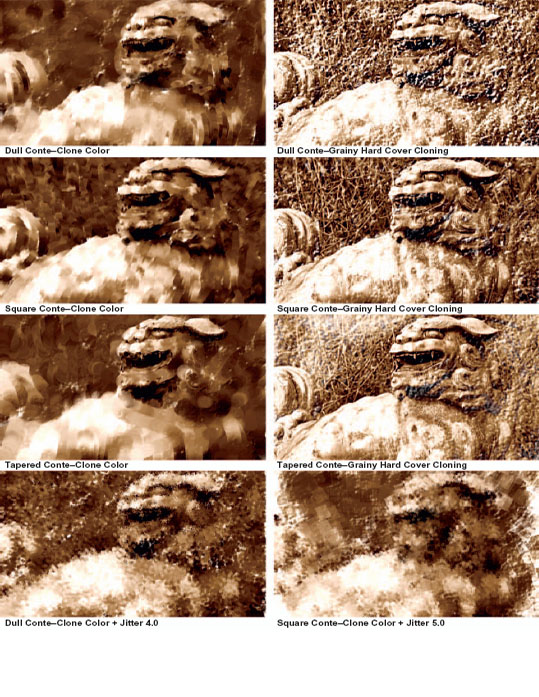
Conte
Conte is the smallest brush category in Painter, with just three variants. They work rather like Chalks or Pastels and traditionally are used in brown, black or red.
When used in Clone Color mode they smear the image and only produce detail when the brush is very small. The brush strokes are attractive, however, and do show the active paper texture quite clearly.
They can also be used in Grainy Hard Cover Cloning Method when they will produce a clear cloned image. Reduce the Opacity and the Grain to make the best use of these brushes. When the Jitter control is increased, the brush dabs are placed randomly and this can make an attractive texture.
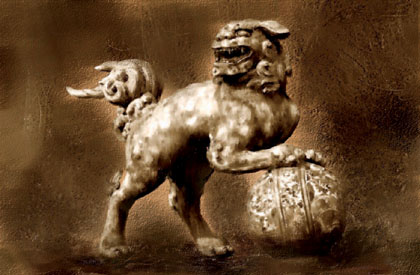
Make a Quick Clone and select the Square Conte brush, size 190, Opacity, 5% Grain 1%. Use Clone Color. Choose the French Watercolor Paper. Fill the picture with color, Edit>Fill>Current color, and choose a mid brown in the Colors palette. Paint over the background with rough strokes and make it fairly dark. Paint the stone beast with brush size 22, Opacity 16%; keep the Grain at 1% throughout. Reduce the brush size to 10, Opacity 60% and bring out areas of light and dark to make the shapes clearer; then reduce to size 5 and 100% Opacity to paint over the head and other important details. The smaller brush leaves very hard lines which do not look good against the looser background, so change to a blender brush, Blenders Soft Blender>Stump, size 10, Opacity 37%, and blend the hard edges, but don’t soften everything; leave plenty of brush strokes to keep the texture varied.
Full step by step instructions for this picture are on the DVD.
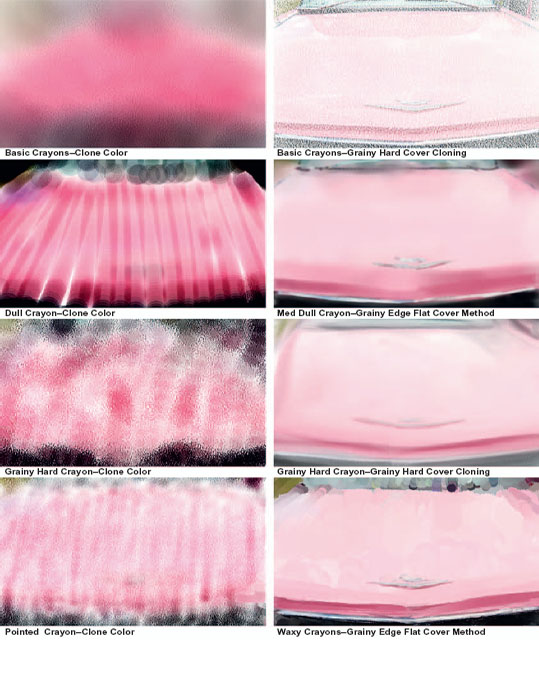
Crayons
In their default state these brushes are very difficult to use as cloners. The reason is that they all use the Build-up Method, which makes the brush strokes darker as they overlap; check the example for the Dull Crayon opposite. You will find that they go to black extremely quickly. The way around this is to change the method to Cover, which makes them much more manageable. You do this in the General palette; change the method to Cover and the subcategory to Grainy Edge Flat Cover. It is worth experimenting with the different settings; by changing from Clone Color to Grainy Hard Cover Cloning Method most brushes by default will give a very soft smeary effect.
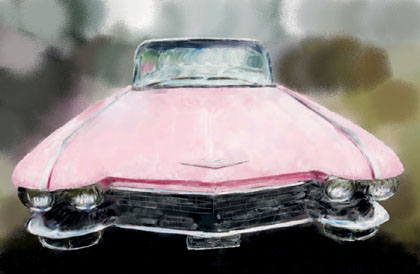
Make a Quick Clone and select the Grainy Hard Crayon. Open the General palette and change the Method to Cover and the Subcategory to Grainy Edge Flat Cover. Click the Clone Color option. Create a new empty layer and, using brush size 334 and Opacity 100%, roughly paint the background. Create a new layer above the previous one and with brush size 161, paint over the car to bring out some general shapes.
Continue to build more detail with smaller brush sizes – use size 48 and then 23 each on their own layers. To bring out some stronger detail go down to brush size 4 and paint around the headlamps and other details.
You may need to darken the foreground. If so, create a new layer just above the very first layer on which you painted and change the Layer Composite Method to Gell; the brush marks will then appear dark.
Full step by step instructions for this picture are on the DVD.
Digital Watercolor
When used for painting rather than for cloning, these brushes give a beautifully gentle watercolor finish with wonderful translucent colors. Sadly, when used as cloners the effect is lost and at the default settings many of the brushes are harsh and hard to use. The key to using them as cloners is to reduce the Opacity right down and to bring in detail by using smaller brushes. The Dry brushes are the easiest to use with photographs as they give a very attractive texture. Several of the blenders will also work as cloners and can give a strong feeling of watercolor although it is often difficult to resolve much fine detail. There is more information on Watercolor in Chapter 7.
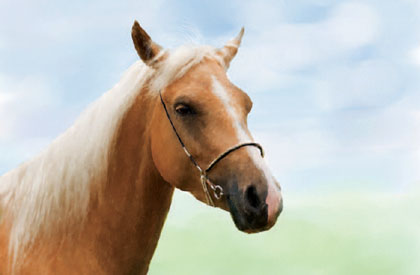
Make a Quick Clone and select the Dry brush, size 242, Opacity 11%. Make a new layer on which to paint the background colors. Choose a very light blue in the Colors palette and paint the sky with horizontal brush strokes. Add some white to indicate clouds then paint a light green for the grass. Switch off the visibility of this layer for the moment. Make a new layer, use the Dry brush again, size 19, Opacity 65%, and this time click the Clone Color option in the Colors palette. Paint the horse and then reduce the brush to size 6, Opacity 100%, and paint the harness; keep the detail fine by painting the harness first then painting each side to reduce the width of the stroke. Switch to the Flat Water Blender, size 8.2, Opacity 9% in Clone Color mode and blend in any rough areas and soften down parts of the mane. Return to the Dry brush, size 7, Opacity 100% to refine details, particularly around the head and eye.
Full step by step instructions for this picture are on the DVD.
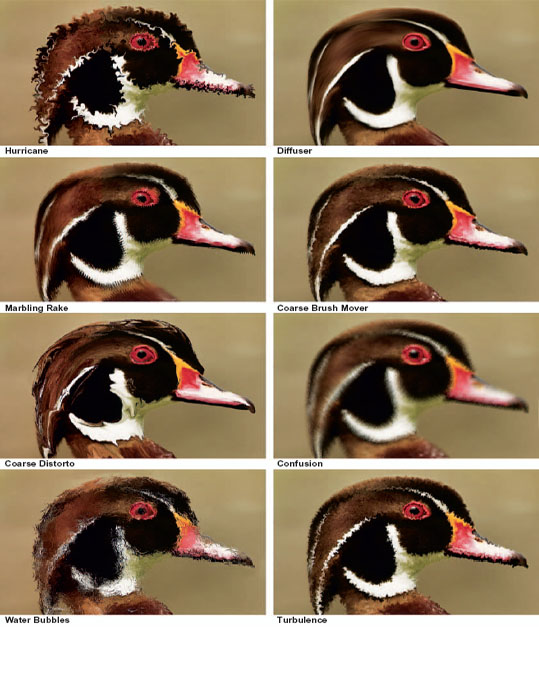
Distortion
As the name suggests, the brushes in this category all distort images to some extent. Variants like Hurricane and Turbulence create wild patterns, while the Distortion and Marbling Rake will pull the detail in the direction of the stylus.
Brushes such as Pinch and Bulge also distort the picture.
All the brushes are used directly on the image and not via cloning.
This could be seen as just a set of effects brushes but they can be used in the course of a painting; the Diff user will soften areas which are too rough and Confusion will create a Watercolor Edge effect. Another use for these brushes may be to create a diff use background at the start of a painting.
Make a Clone copy (not a Quick Clone) and select the Grainy Mover brush, size 150, strength 50%. Choose the Artists Rough Paper in the Papers palette. Paint over all the background except the grass; this will increase the diff use look of the area and give a light texture. Paint the grasses using brush size 66 and Opacity 26%; pull the brush strokes upwards to follow the grass stalks. Switch to the Diff user brush, size 10, Opacity 50%, and carefully brush over the head of the bird following the lines and shapes of the feathers.
Return to the Grainy Mover brush, size 20, strength 25%, and paint the remainder of the bird; follow the lines of the feathers at all times and keep the brush strokes fairly short. Reduce the brush to size 3 and, after enlarging the picture on screen, paint over the eye and other fine details in the feathers to finish off the picture.
Full step by step instructions for this picture are on the DVD.
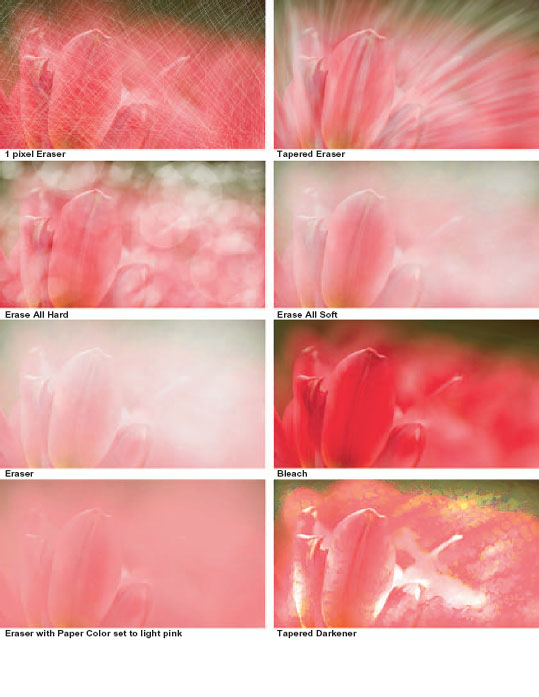
Erasers
The erasers are primarily for correcting brush marks made in error and for removing unwanted areas. For the purposes of these examples, however, I have looked at the creative possibilities for using erasers for tonal changes and textural overlays. As you can see, they can be used to lighten areas in order to give the picture a very light appearance.
When using the Tapered erasers, directional lines can easily be introduced, while the 1 pixel eraser can create a distressed finish. Should you be using a Paper Color other than the default white, you need to remember that erasers will erase to paper color while bleaches always go to white.
In the picture above the eraser has been used to delicately remove all darker areas and lighten the whole picture to create a soft, high key image.
Make a Clone copy (not Quick Clone) and select the Gentle Bleach eraser, size 310 and Opacity 10%. Using a graphic tablet paint very gently over the picture, concentrating on the outer areas of the picture; if you are using a mouse reduce the Opacity to around 3%. The whole picture should become much lighter and delicate but you will find that the yellow at the base of the picture is not affected much by the eraser, so switch to the Erase All Soft eraser, size 234, Opacity 6%, and gently lighten that area. You need to be careful about burning out any areas to white, as this is easily done. Should this occur, change to the Soft Cloner, size around 245, Opacity 3%, and clone back in from the original picture.
Full step by step instructions for this picture are on the DVD.
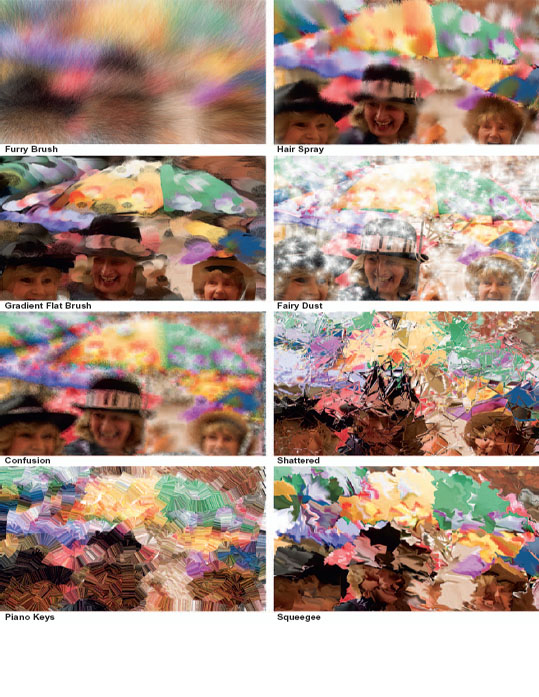
F-X
As the name indicates, this brush category has lots of special effect brushes – some more useful than others. Two of the most attractive and fun ones are the Furry Brush and Hair Spray, which spray out colors from the picture using an airbrush effect. You will find that some of the brushes act as cloners, while others have to be used directly on the picture.
Fairy Dust is a useful brush for adding highlights to a picture – use at low opacity for a subtle result. Glow is also useful to add a warm glow to an object. This category is certainly worth exploring and several of the brushes are useful for backgrounds.
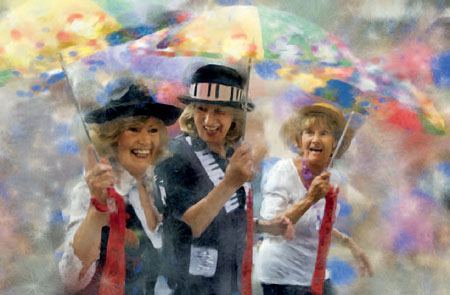
Make a Quick Clone and select the Gradient Flat brush, size 92 and Opacity 29%. Click the Clone Color option in the Colors palette. Paint over all the picture using short brush strokes; this will leave a vibrant, very colorful mosaic. You will very quickly notice that this brush deposits blobs of color at the start and end of each stroke. This color comes from the Additional color swatch which is behind the Main color in the Colors palette. Reduce the brush size to 27 for the main figures and continue to use a range of smaller sizes right down to 4 for the eyes to bring in detail. Make a new layer and change to the Fairy Dust brush, size 162, Opacity 9%; choose white in the Colors palette and paint stars over the picture. Make several new layers and paint stars of different sizes and colors on each; adjust the layer opacities until you are happy with the effect. Use the Soft Clone brush to clone back some detail on the faces and arms.
Full step by step instructions for this picture are on the DVD.
Felt Pens
In their default settings these brushes are not very rewarding when used as cloners. The main reason is that they all use the Build-up Method which causes the brush strokes to build in intensity and go dark very quickly.
In the examples shown on these pages the Method has been changed from Build-up to several other alternatives. In this way some interesting textures and finishes can be created.
Most of the examples tend to be very graphic, as befits the category; in several of the examples the paper texture has been increased in size to roughen the finish.
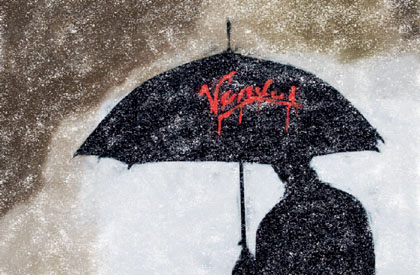
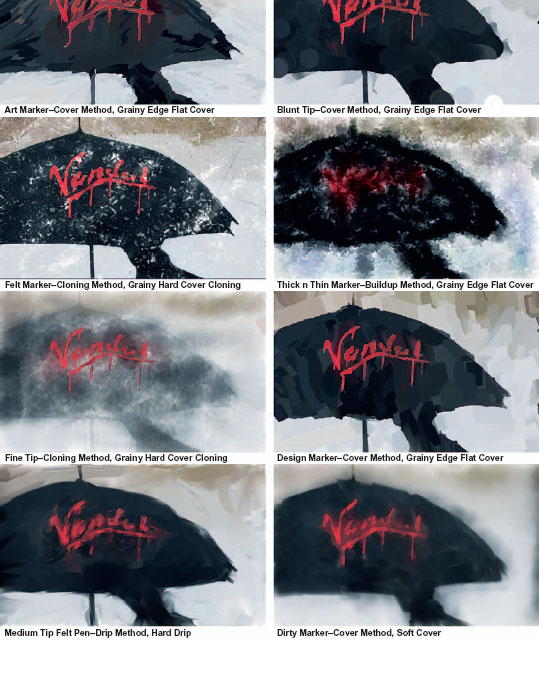
Make a Quick Clone and select the Fine Point Marker, size 155, Opacity 45% and Grain 10%. In the General palette change the Method to Cloning and the Subcategory to Grainy Hard Cover Cloning. In the Papers palette select the Worn Pavement Paper. Change the Paper Scale slider to 261%.
Change the Paper Contrast slider to 137%. Clone in the whole of the picture; the finish will be rough due to the paper chosen and the increased size and contrast. Reduce the brush size to 29.7 and change the Opacity to 60%.
Paint over the edges of the umbrella to make them more defined. Reduce the brush further in size to bring in the handle and spike. Make a new layer and change to the Design Marker, size 10, Opacity 7%, Build-up Method and Grainy Hard Build-Up Subcategory. On the new layer, clone over the graffiti on the umbrella.
Full step by step instructions for this picture are on the DVD.
Gouache
The Gouache brushes tend to give rich accurate detail when used as cloners.
By reducing the Opacity and choosing a suitable paper they will show the paper texture quite clearly. My favorite is the Wet Gouache Round brush which smears the picture while giving rich colors, as you can see in the picture below. The Feature slider controls how the bristles are separated, and increasing the amount will result in the brush marks showing through clearly. The Jitter slider has been substantially increased in the example showing the Detail Opaque brush on the next page and the result is a very heavily textured finish. The Jitter slider is in the Random palette.
Make a Quick Clone and select the Wet Gouache Round brush, size 30 and Opacity 100%. Use the Clone Color option. Clone the picture with the bridge and the surrounding trees, reduce the brush opacity to 13% and clone the lighter trees at the top of the bridge. Continue cloning the remainder of the trees and grass. Keep the brush moving all the time and use short strokes in different directions to keep the textures interesting. Increase the brush Opacity to 60% and go over the painted areas and bring in more density and detail. Cover most of the area, but leave some small areas of white canvas. Paint the water with the same brush, 60% Opacity using horizontal brush strokes. Reduce the brush size to 30 and the Opacity to 22% and paint the reflections by making small strokes in a downwards direction. Emphasize the reflection of the bridge and the colourful trees.
Full step by step instructions for this picture are on the DVD.
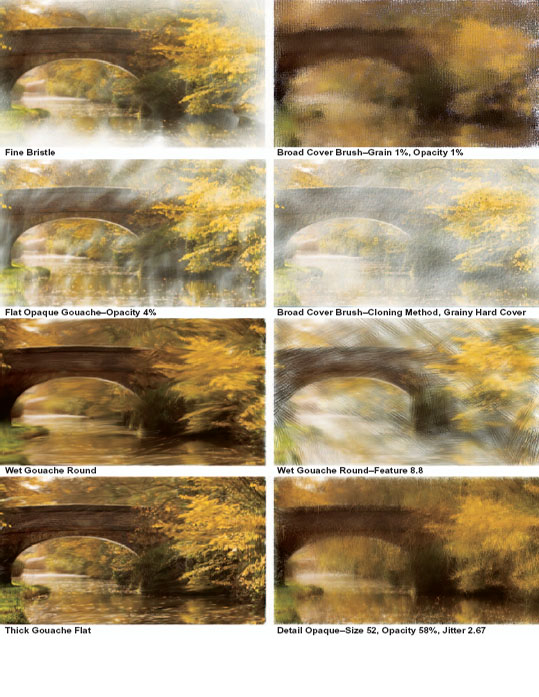
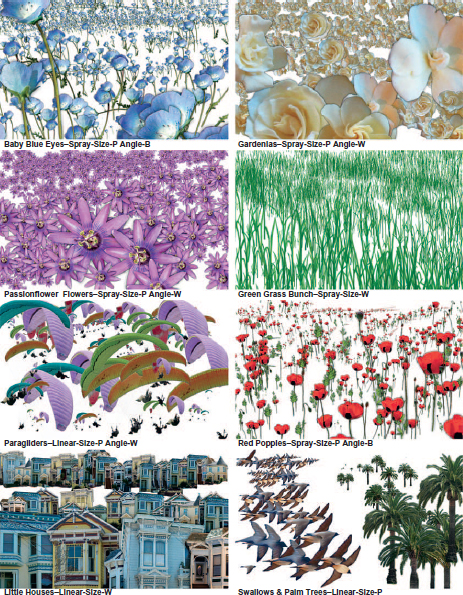
Image Hoze
The Image Hoze brush category is unlike any other in Painter; the brush uses images which it sprays onto the canvas in various ways.
The sources for these assembled images are called nozzles. There is a collection included in Painter and they are accessed from the Toolbox, bottom right. Select the nozzle you plan to use and the Image Hoze brush in the Brush Selector and paint into a document.
The list of brush variants are different ways of applying the images: Linear paints in a line while Spray does exactly what it says. The letters P, R and D refer to Pressure, Random and Direction.
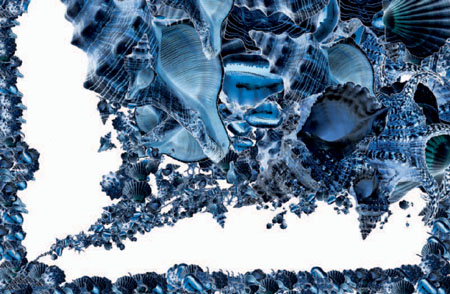
In addition to the Image Hoze nozzles which come with Painter 11, it is also possible to create nozzles with your own images. The picture above was created from six photographs of shells; the original photographs are on the DVD so you can use these to create the picture above if you wish, or use your own images.
The process of creating nozzles is quite complex but can produce subtle and interesting results. The example created above has been kept quite simple and uses a single rank nozzle. Nozzles can be created with two or three ranks. The steps involved are preparing the original photographs, changing the color to negative, moving the photographs onto layers in a new document, grouping the layers, and creating, loading and using the nozzle.
Full step by step instructions for this picture are on the DVD.
Impasto
Impasto is the term used when paint is applied very thickly and in this brush category all the brushes utilize this feature, but in a variety of ways.
Brushes such as Opaque Flat are normal brushes with the impasto added (this is done by adding highlights and shadows to each brush stroke). Brushes with names like Grain Emboss and Smeary Varnish will work directly on top of photographs to create an embossed effect. The Texturizer variants spray on an embossed texture, while Acid Etch does the reverse and cuts into the photograph. Distorto Impasto and Gloopy smear and pull the picture while cloning, rather like the Distortion brush category.
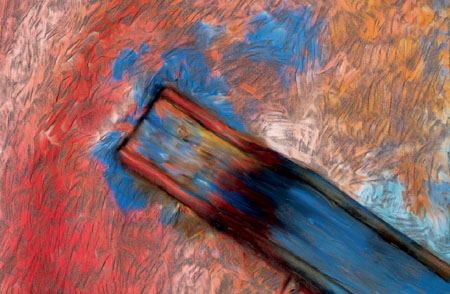
This is a very simple picture to make. Open the original photograph from the DVD and make a Quick Clone copy. Select the Smeary Bristle brush, size 35, Opacity 63%, and click the Clone Copy option in the Colors palette.
This brush smears the image and at the same time adds a very strong impression of the brush marks and impasto effect.
Clone the photograph starting with the handle. Follow the lines of the handle using short brush strokes and you will quickly see the effect. Continue with the background, varying the length and direction of the brush strokes to create variety.
It is difficult to assess the strength of the impasto effect on screen; the best way is to check the view at 100% enlargement as lower views distort the way the effect is shown. When it is printed the effect is often less than it appears on screen, so you will need to do some tests before printing.
Full step by step instructions for this picture are on the DVD.
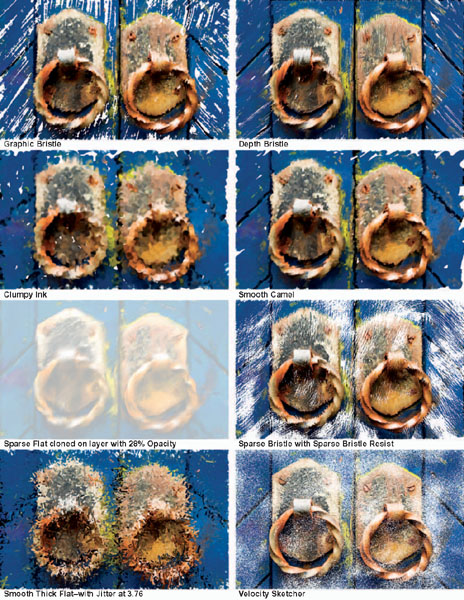
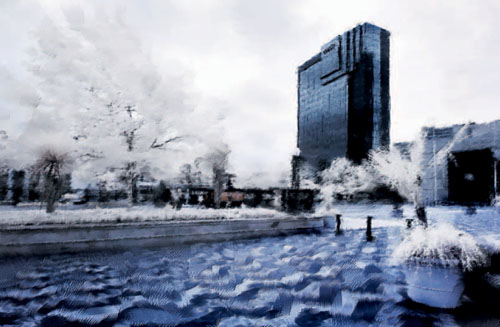
Liquid Ink
Liquid Ink is a large group of brushes which replicate the use of ink based artists materials. The ink flows very fast and covers the paper quickly, and has a graphic appearance. All Liquid Ink brushes use a special layer and a new Liquid Ink layer is created automatically when you use one of the brushes.
Resist brushes are used to reserve areas on which paint is not required in the same way as masking tape might be used.
The Liquid Ink section in the Brush Creator has many controls for adjusting the brushes, in particular the amount of ink. If this slider is very high the inks spills over the paper in pools. Try moving some of the sliders and see the result.
Open the file from the DVD and make a Quick Clone. Select the Sparse Bristle brush, size 34.9, Opacity 50%. Use the Clone Color option. In common with many of the brushes in this section the brush will have a streaky appearance if you paint lightly. Paint over again and they will disappear, but I prefer the texture, so in this example you will need to paint lightly and leave some white paper showing.
Paint the left and right panels first, angling the brush strokes to follow the direction of the wood. Continue with the remainder of the wood.
When painting the handles allow the brush to spray out over the picture to increase the textural finish.
This is a simple and fast picture to make so, when it is complete, try another brush and see the difference. It is also worth experimenting with the sliders in the Liquid Ink palette – they can have a huge effect on the finished picture.
Full step by step instructions for this picture are on the DVD.
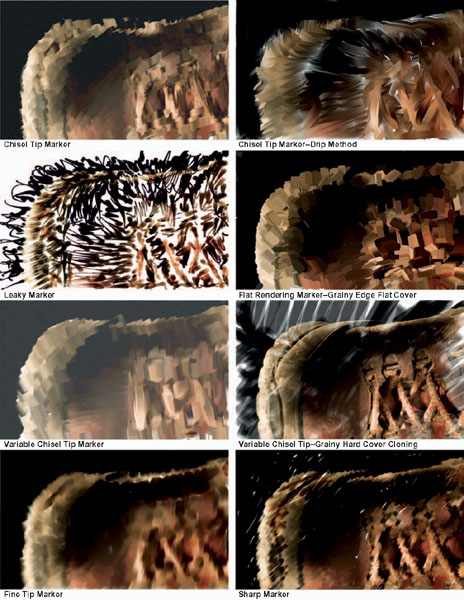
Markers
The Markers brush category is a new introduction in Painter 11 and all feature the properties which you would expect of the real world markers, that is they have flat strokes which build up density when overlapped.
This causes difficulties when used as cloners as each additional brush stroke becomes darker so it is difficult to get a satisfactory clone picture. However with a bit of perseverance and by altering some settings, it is possible to use some of them. In the examples on the right-hand page, some of the brushes are on default settings while others use different methods, which can be changed in the General palette.
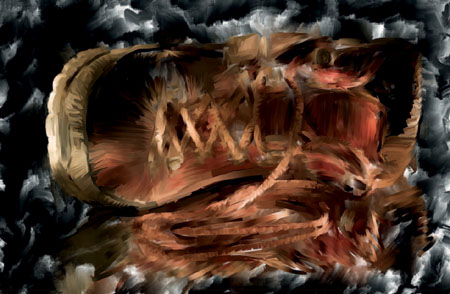
Open ‘ Boots ’ from Chapter 3 on the DVD. Make a Quick Clone. Select the Chisel Tip Marker, size 45 and Opacity 30%. Select the Clone option in the Colors palette. In the General palette or in the Brush Selector change the Method to Drip and the Subcategory also to Drip. The Drip category makes the brush drag and distort the image. In the Random palette move the slider full to the right, this will break up the image and provide the base for the picture. Paint the whole picture using dabs and short brush strokes.
Make a copy of the canvas (Select>All, Edit>Copy, Edit>Paste in Place).
Return the Random slider full to the left and then in the copy layer paint the boots (brush size 30) following the lines of the picture. With this brush the detail is limited, but the result is interesting and should be easily recognizable.
Full step by step instructions for this picture are on the DVD.
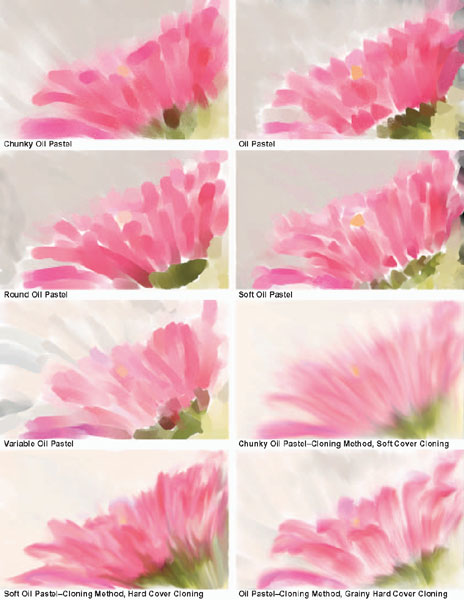
Oil Pastels
There are very few variants in this brush category but they are all very attractive brushes. Used in their default settings they display the distinctive pastel finish. The Variable Oil Pastel is one of the most useful and blends well with existing paint on the canvas. This is due to the Resaturation and Bleed settings (Resaturation is just 2%, while Bleed is 92%).
One of the best papers to use with these brushes is Sandy Pastel, which has a very gritty finish. To make the paper texture more noticeable, decrease the Grain slider. It is worth mentioning that the brushes paint beautifully when not used as cloners, especially if the Opacity is kept low.
Make a Quick Clone; select the Soft Oil Pastel, size 140, Opacity 80%. In the General palette change the Method to Cloning and the Subcategory to Soft Cover Cloning. Paint the background first by pulling the brush strokes from the top left-hand corner; don’t include the flower as far as possible.
Paint the flower at 45% Opacity. Pull the brush strokes from the bottom right corner and in the direction that the petals run. When everything has a light covering of color, make the brush size 40 and increase the Opacity to 80%.
Paint over the petals, turning the tracing paper on and off to check where to paint. Build up the density in the petals; concentrate on one petal at a time and paint using small strokes, keeping the brush on the canvas and working sideways across the petal. Emphasize the edges of the petals to bring out the detail and then work the areas close to the edges to make the transitions smooth.
Full step by step instructions for this picture are on the DVD.
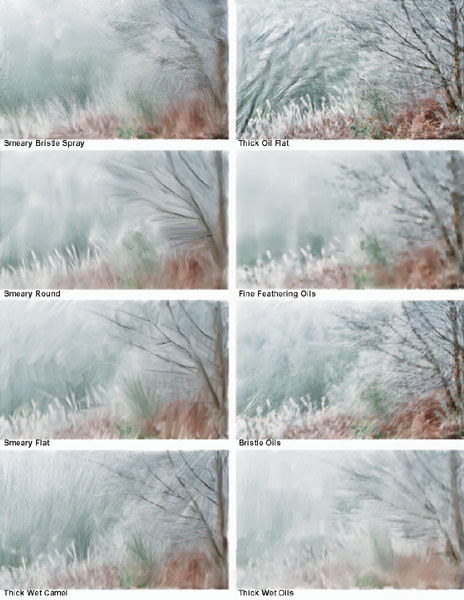
Oils
The Oils brush category has some very attractive brushes which can be used for cloning photographs. I particularly like the Smeary variants as the new brush strokes will merge with paint already placed on the canvas.
The best way to use these brushes for cloning is to paint over the picture first with a Smeary brush, which will provide the necessary underpainting, then use smaller brushes to bring in more detail. Several brushes such as Thick Oil Flat use an Impasto effect to indicate that a thick paint is being used. All the brushes have that thick luscious painterly finish which is the great attraction of traditional oils.
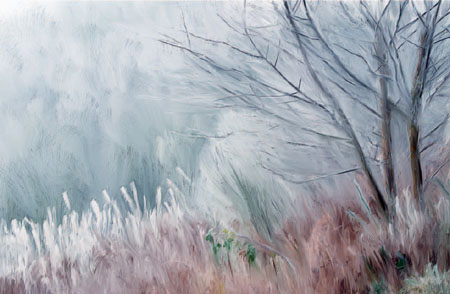
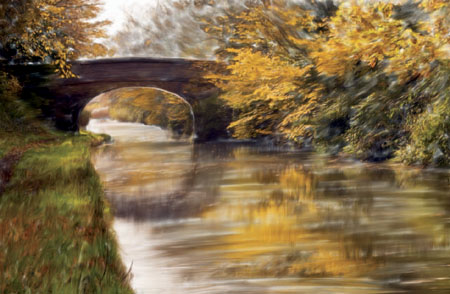
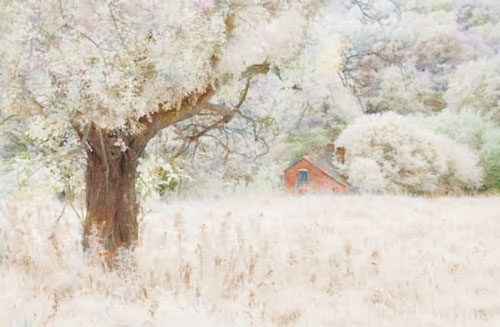
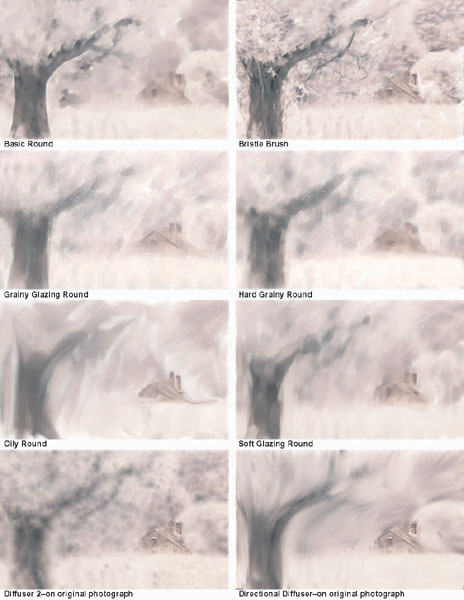
FIG 3.26 Frost on the Malvern Hills
Make a Quick Clone and use the Smeary Bristle Spray, size 78, in Clone Color mode to paint over the whole picture. Paint downwards on the left then follow the lines of the tree on the right. Change to the Smeary Flat, size 32, in Clone Color mode and paint in the seed heads on the left and the grasses at the bottom. Continue with the brush and paint over the branches, following each main branch from the trunk until the end. Use the Bristle Oils brush in Clone Color mode to bring back more detail in the twigs and inside the tree; blend with the Smeary Flat brush at 50% Opacity to remove any photographic textures that may be apparent. Return to the Smeary Flat brush, size 16 at 100% Opacity, and paint over the entire picture to bring back more detail; this will also increase the contrast of the picture. Finally, make a copy of the canvas and apply an embossing effect to the brush strokes.
A more detailed step by step example is on the DVD.
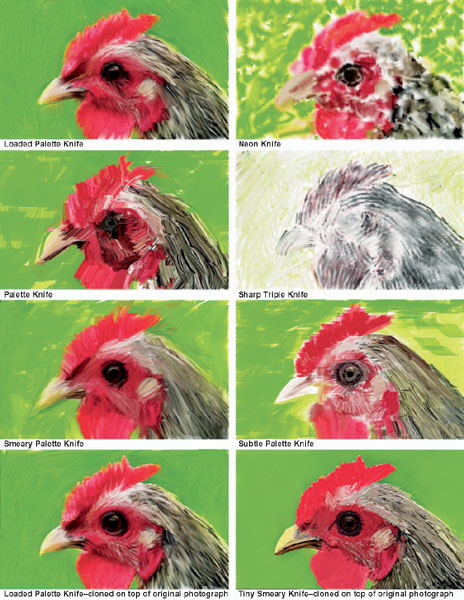
Palette Knives
This is a small brush category and in the main the brushes are not ideal for cloning from photographs. The exception is the Loaded Palette Knife which does give a very satisfactory result with some good textures.
All the brushes can be used directly on the top of photographs in which case they act very much like blenders and can make some great backgrounds prior to cloning in more detail.
Extra depth can be added by changing to Color and Depth in the Impasto palette or the Brush Creator.
Make a Quick Clone; select the Loaded Palette Knife, brush size 61.4, Opacity 30%. In the Colors palette click the Clone Color option. Paint the green background using a variety of brush strokes in different directions. Continue to paint over the top until the background is fairly smooth but still has some marks left by the Palette Knife. Reduce the brush size to 22 and increase the Opacity to 100%. Paint the hen, starting with the head and moving down the feathers. Reduce the brush size to 3.5 and paint the eye. Make the brush size 12.5 and with the Opacity still at 100% paint over all the head to bring out detail and definition. Keep the brush moving in the direction of the feathers. Watch out for the feathers which flick out, they need careful painting to keep the shapes correct. When you are happy with the result, add some texture to enhance the brush strokes.
A more detailed step by step example is on the DVD.
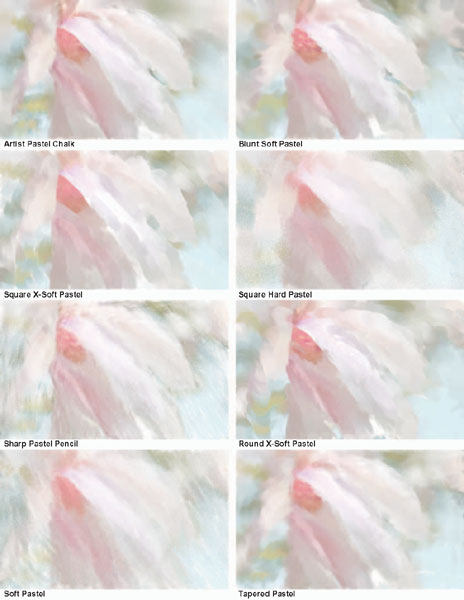
Pastels
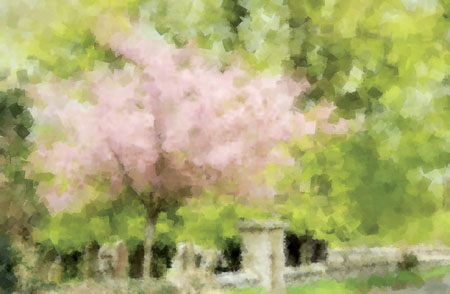
The pastel brushes in this category work very successfully with photographs. The textures are quite beautiful and ideally suited to light delicate pictures such as the one below.
The Artist Pastel Chalk is one of my all-time favorite brushes in Painter, but most of the others work extremely well. The hard pastels pick up the paper grain more strongly than the soft pencils which show the grain primarily on the edges of the brush strokes. I tend to use the Sandy Pastel Paper for these brushes as the gritty texture suits the brush strokes. As the name suggests, the Pencil Pastels are for very detailed work.

This picture is a little more complex than most in the chapter as it involves cloning from two separate originals. Open the two original photographs and then create a Quick Clone. Select the Square X-Soft Pastel, size 137 and Opacity 7%. Click the Clone Color option in the Colors palette. Paint the whole picture very lightly then reduce the Resat slider to zero and use this as a blender to soften everything. Clone from Magnolia A with the same brush, size 30, Opacity 46%. Resat 60%; paint the petals but not the background. Change the clone source to Magnolia B and do the same with that.
Reduce the brush size to 8.8, Opacity to 60% and paint over the edges of the petals to clarify the shapes. Do this from both originals. Change the brush size to 72, Opacity to 11% and Resat to 7%. Blend in the brush strokes across the picture, particularly those in the background.
A more detailed step by step example is on the DVD.
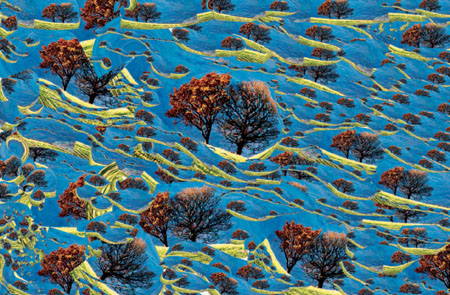
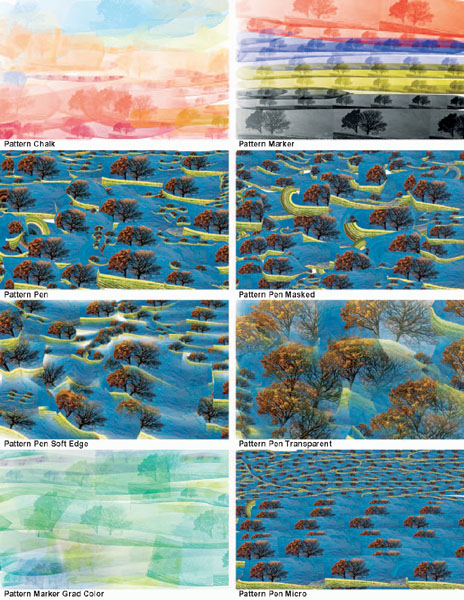
Pattern Pens
The Pattern Pens use a pattern to paint with, therefore they are of limited use when using direct from photographs.
By default they use the patterns already in the Painter program, which can be selected from the Patterns palette. Try a few of them as they are quite fun and can certainly be used as part of a design project.
In addition to the default patterns, it is easy to make your own from photographs; they can be used for montages or backgrounds. The Pattern Pen Soft Edge is very useful for making backgrounds; capture a subtle pattern and by overpainting at low opacities the result can be very pleasing.
Start by creating the pattern to use. Open the file on the DVD and Select>All. Open the Patterns palette (Window>Library Palettes>Patterns) and click on the tiny triangle top right to reveal the drop down menu. Select Capture Pattern. A dialog box opens and asks for a name; leave all the sliders on default settings. In the Patterns palette click on the icon which shows the patterns to reveal another drop down menu; select the pattern you have just captured from the list.
Now create a new document (File>New) and make the dimensions: width 20 cm and height 13 cm, and Resolution 200 pixels per inch.
Select the Pattern Pen and paint into the new document. Use various sizes. You will immediately notice that if you paint from right to left the trees are vertical, while a right to left movement turns the trees upside down.
Full step by step instructions for this picture are on the DVD.
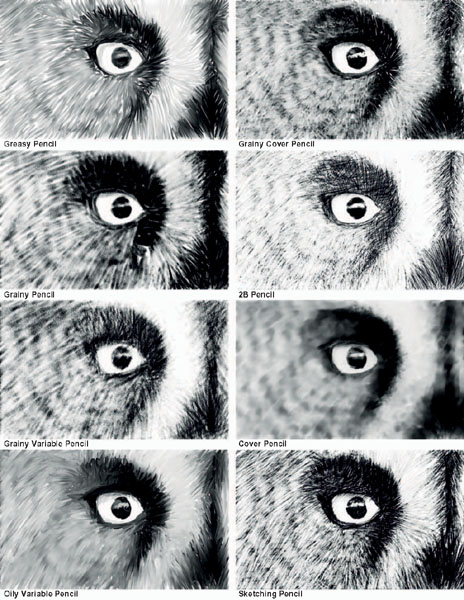
Pencils
Whether drawing traditionally or using these pencils in Painter, it is likely to take quite a long time to finish a quality painting so you need to bear this in mind. Try using the pencils at a larger size to save time and you will find that the result will no longer look like a pencil drawing.
Although the examples on these pages are in monochrome, you can of course clone from a color original just as easily. The main differences between the pencils are described in their names; greasy pencils will pull the image round while the grainy pencils show the grain well. The old favorite 2B is the equivalent of the traditional pencil.
A step by step tutorial using the new Red pencils is included in the Landscape chapter.
The first step is to turn this picture to monochrome. Reduce the Saturation slider in the Underpainting palette to zero. Select the Sketching Pencil, size 3.0, and Opacity 40%. Use Basic Paper and the Clone Color option. Make a Quick Clone, turn the tracing paper on and clone in the picture. Start below the eye, painting in medium strokes. Turn the tracing paper off to get an indication of the textures that are showing and build up that area so that the section is fully cloned.
In the darker areas around the eye you can use crosshatching; this is a traditional technique where lines are drawn across each other to create a dense but not black area. When the eye and surrounding area is done, reduce the brush opacity to 20% and add some shading in the white of the eye. This should be kept lighter than anything else. Continue with the rest of the picture ensuring that the bands of darker feathers are clearly shown.
A more detailed step by step example is on the DVD.
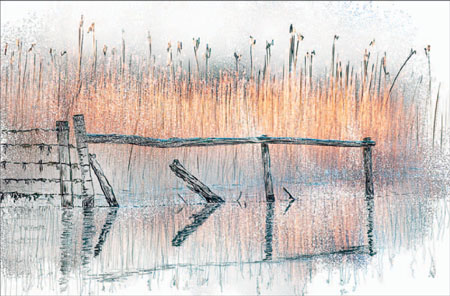
Pens
As you might expect, the Pens brush category contains a fair number of different variants, but they are nearly all designed for small-scale use and do not work well when cloning at a larger size.
The Nervous Pen is very useful when cloning water as the irregular brush stroke is very reminiscent of water ripples. The Barbed Wire Pen has a strong fibrous texture and is very useful for creating backgrounds or overlays in montages; this is one pen that also works well at larger sizes. The Leaky Pen is rather fun as it leaves blobs of ink across the page and is also good for creating textures in montages.
Make a Quick Clone. Select the Smooth Ink Pen, size 1.5 and Opacity 100%.
Select black in the Colors palette. Create a new layer and paint over the posts and fence; trace the posts and wires and outline them with the pen. Change to the Nervous Pen, size 5.4 and Opacity 100%. Use Clone Color and paint the reflections. Make a new layer under the layer on which you have been painting. Select the Smooth Ink Pen in Clone Color. Paint the reeds with brush size 1.5 and Opacity 100%. When the painting of the outlines is complete, make a new layer under the other layers. Change to the Airbrush>Graffiti, size 128, Opacity 48%. Click the Clone Color option. Paint the warm colors in the reeds and surrounding area. Adjust the Opacity of the layer to around 75%.
A more detailed step by step example is on the DVD.
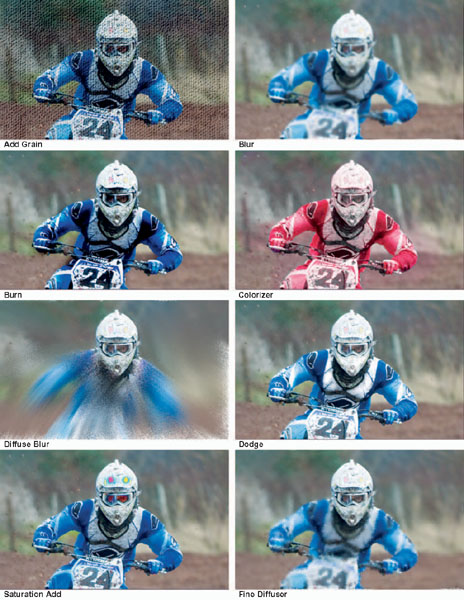
Photo
The Photo brushes are used for adjusting small areas of photographs.
The Burn and Dodge brushes are very useful for lightening or darkening areas, which adds local contrast. There are four brushes which diff use to varying degrees. Diff use Blur is the strongest and has a grainy finish; Fine Diff user works in a similar way but more gently. Blur diff uses in a smooth manner while Scratch Remover can blend imperfections or be used as a small blender. Colorizer changes the color based on the current color in use, and Saturation Add is self-explanatory, as is Sharpen. Be careful of these last three brushes as overapplication can easily ruin a picture.
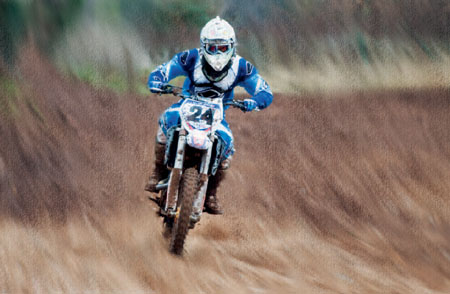
File>Clone, then make a copy of the Canvas. Select the Rough Charcoal Paper in the Papers palette. Select the Diff use Blur brush, size 85, strength 49% and paint over all the background area. Select the Blur brush, size 42, strength 57% and paint over the blended areas to remove most but not all of the rough texture. Select the Scratch Remover, size 8.5, strength 75%. Use this brush to slightly diff use the edges of the motorcycle and the rider. Select the Dodge brush, size 45, Opacity 3%. Paint over the white areas of the clothing to brighten them. Select the Sharpen brush, size 21.5, strength 2%. Paint over the helmet and parts of the clothing to add a touch of sharpness. Select the Saturation Add brush, size 19.6, strength 65%. Paint over the eyes and parts of the clothing to add a little extra saturation. Select the Add Grain brush, size 99.6, strength 3%. Paint over the entire picture to add a paper grain texture.
A more detailed step by step example is on the DVD.
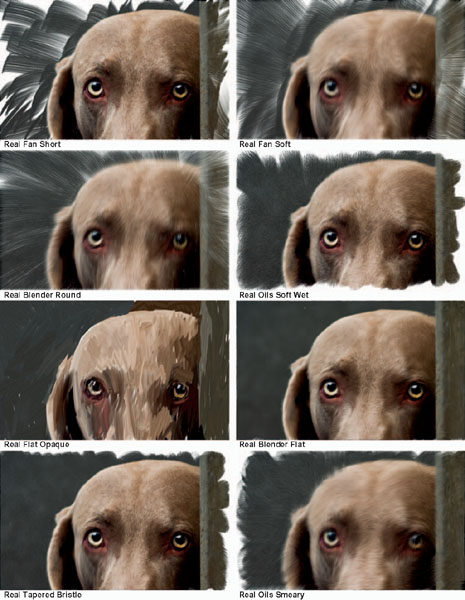
RealBristle
The RealBristle brushes all display very beautiful brush strokes and are all very suitable for cloning. The brush marks are quite subtle, however, so when the picture is reproduced at a small size they are not always very obvious.
The two fan brushes are my favorites; apart from the attractive textures when cloning they are also very useful for painting on top of pictures.
The Real Flat Opaque brush is different from all the others and works more like the Artists Oils category in that it continues to paint with the colors first picked up rather than reflecting the clone source. The Oil brush variants all have good brushy strokes.
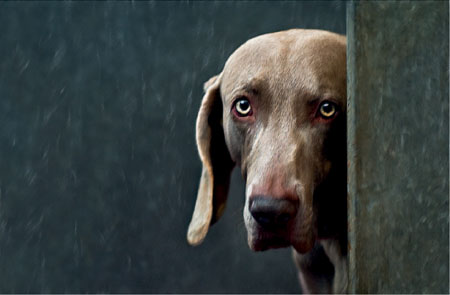
File>Quick Clone. Select the Real Fan Soft brush, size 50, Opacity 20%. Click the Clone Color option in the Colors palette.
Paint over all the background and around the dog; make it a fairly solid cover, but leave some lighter areas to show the texture of the bristles. Reduce the brush size to 40 and Opacity 50% and paint the dog. Make sure that you follow the direction of the hair. Reduce the brush size to 7.3 and Opacity 100% and paint the centers of the eyes. The picture is largely complete, so now to add some embossing to make the brush strokes more prominent. Create a new layer. Select>All, Edit>Copy, Edit>Paste in Place; this will copy the Canvas. Effects>Surface Control>Apply Surface Texture. Select Image Luminance in the option in the Using box. Make the Amount 52%. Reduce the layer opacity to 50%. You could also apply a paper texture.
A more detailed step by step example is on the DVD.
Smart Stroke
These brushes have been designed to work with the Auto-Painting palette and all the examples shown on these two pages have been used in that way. They can of course also be used as normal cloning brushes and they all work very well.
The range of variants covers many of the main categories and includes popular types such as Acrylics Captured Bristle, Chalk and Watercolor.
The Auto-Painting palette can be very useful for creating underpaintings. Let the program do the work of creating the basic textures in the painting style you would like and then you can do the more interesting details by hand.
Make a Quick Clone and turn the Tracing Paper off. Select the Gouache Thick Round brush, size 20, Opacity 74%. Open the Auto-Painting palette (Window>Show>Auto-Painting). In the Auto-Painting palette, click the Smart Stroke Painting box. Start the Auto-painting by clicking the Play button at the bottom of the palette. Allow the Auto-painting to continue until most of the white areas are covered. You can stop the Auto-painting at any time by clicking in the picture; to start it again press the Play button. Change the brush size to 10 and start the Auto-painting again. When you have finished the Auto-painting there will still be quite a few white gaps – how many depends upon how long you left the Auto-painting running. Use the same brush to paint over the white areas, and also over the heads and horns of the animals if they need to be any more distinct. Add a surface texture to enhance the brush strokes.
A more detailed step by step example is on the DVD.
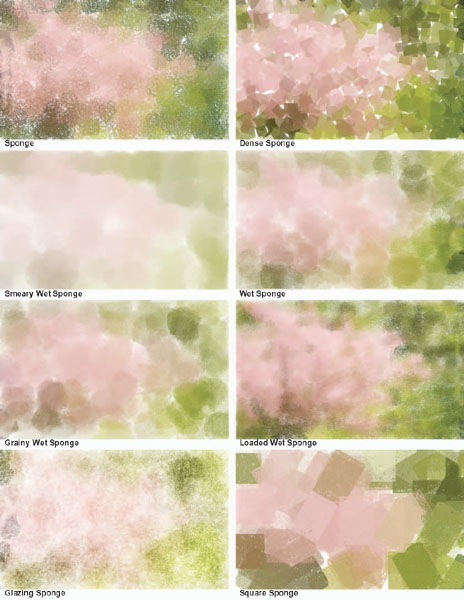
Sponges
In traditional painting sponges are often used to dab on wet paint and add a textured finish so they are not obvious candidates for use with photographs. However they have a very beautiful painterly appearance and they can be used in several ways. The painting below has a very attractive finish and it was created solely with sponges. Other excellent uses are for preparing backgrounds and adding textures to montages, which will help create layering effects. The Dense Sponge and the Square Sponge have hard edges but will still give reasonably fine detail if used in small brush sizes.
The Sponge variant is a good brush for adding texture.
Make a Quick Clone. Turn off the Tracing paper as you will not need it for this painting. Select the Sponges>Dense Sponge, size 60, Opacity 82%, other settings on default. Click the Clone Color option in the Colors palette.
Open the Auto-painting palette and click the Smart Stroke Painting option.
Start the Auto-painting by clicking on the Play button. Allow the Auto-painting to continue for a few minutes until all the canvas is covered. Make a new layer. Change the brush size to 30 and run the Auto-painting again. Make a new layer. Change the brush size to 15 and run the Auto-painting again. You should now have three layers of painting at different brush sizes. These can now be blended using layer masks and layer opacities.
A more detailed step by step example is on the DVD.
Sumi-e
Sumi -e is an unusual and distinctive brush which uses the Rake dab in most of its variants. The Digital Sumi-e and the Tapered Digital Sumi-e brushes both use a very thin rake stroke to gradually build up the picture. This can take a long time so it is often better to use the Auto-painting palette to get the bulk of the picture painted and then finish off by hand.
The new Real Sumi-e Dry brush has an excellent texture and is very easy to use. Quite a few of the brushes use the Build-up Method which makes cloning from photographs very difficult as the brush strokes build very rapidly to black.
Make a Quick Clone and select the Real Sumi-e Dry brush, size 123, Opacity 77%. Click the Clone Color option. Create a new layer. Open the Auto-Painting palette, leave the Smart Stroke option unticked, and choose Zig Zag in the Stroke drop down menu. Start the clone and allow the Auto-painting to fill the picture. Fill in any white gaps by painting over them; this should give you a roughly painted picture. Create two new layers and make two more Auto-painting versions using brush sizes 61.4 and 30.6. You will now have three versions of the clone, in three different levels of detail. They can now be blended together using layer masks. Create a new layer and clone directly onto this layer by hand to finish the picture.
A more detailed step by step example is on the DVD.

Tinting
The Tinting category is a strange mix of brushes, blenders and erasers. As their name indicates, the brush variants are very suitable for hand tinting, having low opacities in most cases. Even at these low opacities I still find them too strong for delicate work and have developed a procedure of painting on a layer and immediately reducing the layer opacity to around 25%, then adjusting it as necessary.
In addition to the brushes there are several very useful blenders; the two diff users are particularly good for softening paint into the canvas and can of course be used with many other brushes.
In this step by step the procedure is to paint every element of the picture on separate layers so that the layer opacities can be adjusted at any time. The intended effect is a very soft gentle coloring and this is achieved by keeping the brush opacity low, reducing the layer opacity, and selecting delicate colors from the Colors palette. (File Open Tinting-Cottage in the Wood).
Select the Tinting>Hard Grainy Round brush, size 24, Opacity 10%.
Select the French Watercolor Paper from the Papers palette.
Make a new layer; change the layer composite method to Colorize and the layer opacity to 25%. Choose a warm brown color for the grass and paint the lower part of the picture. Continue to make new layers with the opacity and composite methods as above, and choose suitable colors for the picture.
A more detailed step by step example is on the DVD.
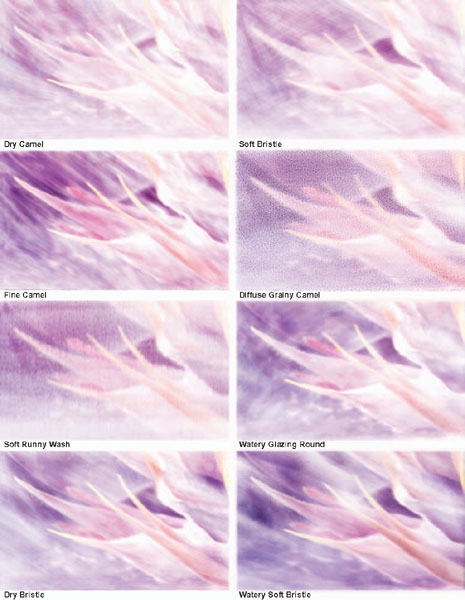
Watercolor
Watercolor is one of the most popular painting styles for artists and this brush category has some beautiful brushes for painting, but unfortunately most of them are not very satisfactory for use with photographs. The main problem when cloning is that the brush strokes build to black very quickly at the default settings. One way to avoid this happening is to reduce the opacities right down to around 5%. All the examples on the opposite page are using between 5% and 10% Opacity. Another way to avoid the build up of color is to paint on multiple layers. This allows the layer opacity to be reduced at any time, see the example below.
Open ‘ Clematis ’ and make a Quick Clone. Select the French Watercolor Paper and the Soft Bristle brush, size 41, Opacity 11%. Click the Clone Color option in the Colors palette. Using the tracing paper as a guide, paint the picture, making sure that your brush strokes follow the lines in the flower petals. Paint very lightly and don’t overwork any area or it will darken too much. You will notice that this brush works very slowly, even on a modern computer. Watch the water icon in the Layers palette. Once it has finished moving you can start painting again. When you complete an area, create a new Watercolor layer by clicking on the new Watercolor layer icon in the Layer palette (the blue droplet with a+beside it). Continue to paint over the picture on different layers to build up the density very gradually; this will take a long time.
A more detailed step by step example is on the DVD.