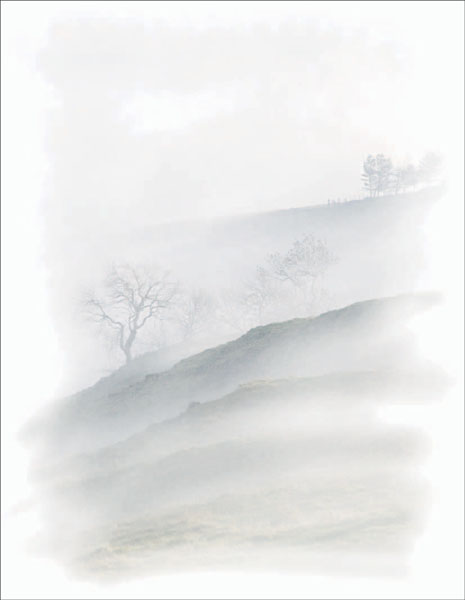
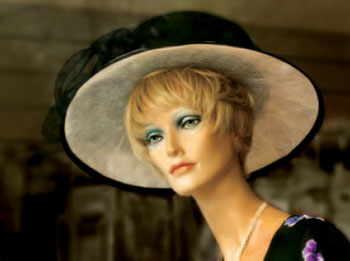
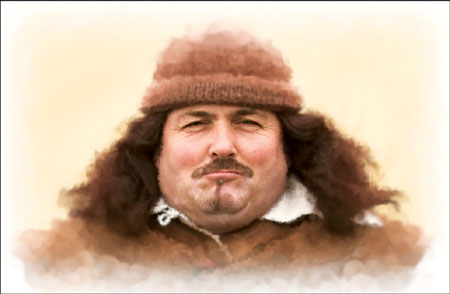
FIG 2.1 Castleton in the Mist, painted with the Soft Cloner
T here are many ways to create artistic pictures with Painter: painting from scratch in a blank document, using plug-in filters to change photographs in various ways, and using a method called cloning.
The major part of this book deals with cloning techniques of all kinds, so it is worth explaining just what cloning means in this context. The term has a different meaning in other graphic programs such as Photoshop where cloning tools are chiefly used for retouching images. It can mean this in Painter too, as there are tools which do just that, however when I discuss cloning photographs I am referring to the process which takes the imagery from an original photograph and reinterprets it in an artistic manner through the use of Painter brushes and paper surfaces.
In this chapter you will learn, through step by step examples, the basic clone types in Painter. They are very easy to create and by the end of the chapter you will understand how to make artistic clones from photographs. The remainder of the book builds on these basic techniques and will gradually introduce more complex ideas and other ways to reinterpret your photographs.
Basic cloning techniques
The steps needed to create a clone copy are easy to follow.
Open and select your picture then File>Quick Clone; this will carry out several steps which in earlier versions had to be done separately. A copy of the original picture is created, all the contents are removed ready to clone, a brush from the Cloners category is selected, and the Tracing Paper option activated. Figure 2.2B shows the screen after the Quick Clone command has been used.
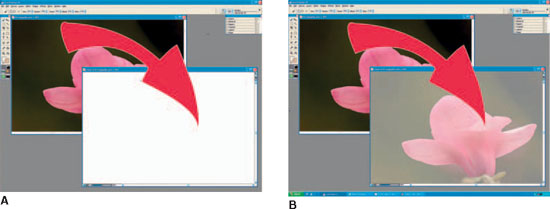
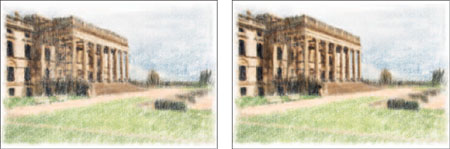
FIG 2.2 A Tracing Paper off B Tracing Paper on
The steps which the Quick Clone carries out can be customized to your preference by going to the Preferences which are explained in Chapter 1. For instance I prefer that this command does not revert to the Cloner brushes each time so I untick that option, but I tick the option for Clone Color which will turn most brushes into cloners. There is a lot more information on individual brushes which are suitable for cloning in Chapter 3.
You can save your clone copy and continue on another day. Save the clone picture as normal. When you want to continue cloning, open the original image first, then the clone copy. With the clone copy active, go to File>Clone Source and click on the name of your original image.
File>Clone is a different process; this makes a second copy of your original, which can be blended or painted rather than cloning into an empty document.
Tracing paper
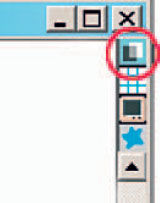
Tracing Paper is a semi transparent overlay of the original picture that assists in the early steps of making a clone copy. The overlay can be clearly seen in Figure 2.2B; when the Tracing Paper option is turned off the clone copy will be shown as an empty document (which it is) (as in Figure 2.2A). The overlay is created automatically when the default Quick Clone procedure is used and can be turned on and off at any time. To turn the Tracing Paper on and off click the top icon on the right of the document window, just above the grid icon as shown in Figure 2.3. The keyboard shortcut is Ctrl/Cmd+T, which is a toggle action. It is important to note that the overlay is purely there to help you start the painting; it is not part of the picture and will not be part of the final image if you print it.
The default opacity for Tracing Paper is 50%, but this can be changed.
Click and hold on the Tracing Paper icon and a drop down menu will reveal a set of opacities from which you can choose.
This is really useful if you just want a low level view to help with the early stages of cloning
Auto-Painting
The Auto-Painting feature allows you to make fast painterly clones using a vast number of brush variants and is a very easy way to get started with cloning photographs. There are three parts to this process – Underpainting, Auto-Painting and Restoration – and each of them has their own palette and controls (Figure 2.6).

If you are a complete beginner to Painter it is worth trying one of the Auto-Painting clones before looking at the palettes in more detail.
1. Open ‘ Mannequin ’ from Chapter 2 folder on the DVD.
2. Open the Auto-Painting palettes (Window>Auto-Painting); this will open all three Auto-Painting palettes.
3. In the Underpainting palette, select ‘ Classical ’ from the drop down menu under Color Scheme. Click Apply and save a copy under a different name.
4. In the Auto-Painting palette make sure that the Smart Stroke box is not ticked. Select Scribble Large in the Stroke box.
5. Select the Smart Stroke Brushes>Sponge Soft.
6. Click the Quick Clone button in the Underpainting palette.
7. Turn off the Tracing Paper (Ctrl/Cmd+T) so that you can see the clone working.
8. Click the Play button to start the painting and watch the picture build up. Stop it after a couple of minutes by pressing the Stop button or clicking in the document window.
9. The final version is shown in Figure 2.5.
When you apply an effect from the Underpainting palette to an original photograph prior to cloning, as in the Auto-Painting example, it is always worth saving a copy of the picture under a different name. This will keep your original image unaltered but allow you to work with the changed image again in the future
FIG 2.5 Auto-Painting was used to paint this picture, using the Classical Scheme as the underpainting
Underpainting palette
The Underpainting palette has features for both preparing a photograph prior to cloning and also for making adjustments to pictures that have been finished.
The Color Scheme options are used to enhance or change the color of a photograph prior to cloning. When first applied the color schemes may not look very good, but the color change looks better after the clone is finished. They are most useful when you want to create an artistic rather than realistic picture. Figure 2.7 shows some color schemes.
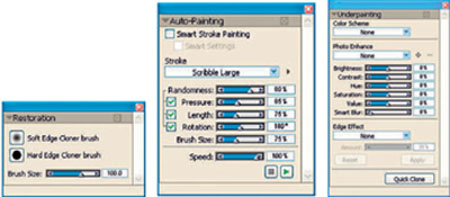
FIG 2.6 The three palettes which make up the Auto-Painting system
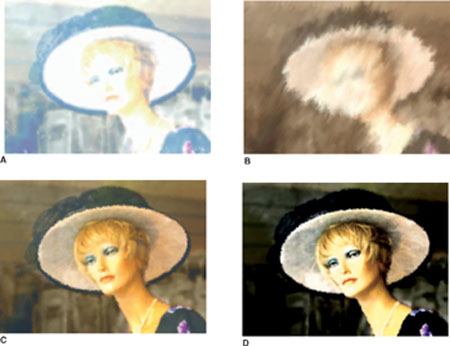
FIG 2.7 Four other color schemes from the Underpainting palette.
A Watercolor
B Sketchbook
C Chalk
D Modern
Photo Enhance offers shortcuts to alterations in color and tone. There is a drop down menu list of changes available, and this is an alternative to making the changes yourself with the sliders. You can apply more than one of these by selecting an effect and clicking Apply, and then adding more in the same way.
The six sliders are all self-explanatory and can be easily tried; small changes can be made by clicking on the arrows at each end of the sliders. There are illustrations of these sliders being used in Chapter 7 ‘ Using Color ’.
These effects are often used on the original photograph prior to cloning to brighten the picture, as the cloning process tends to lose some of the original brightness and contrast. Naturally they can also be used at the end to finish the image.
Edge Effects can also be applied from this dialog box and some examples of these effects can be seen in Figure 2.8 and in Chapter 12 ‘ Printing and Presentation ’. These effects could be applied either before or after cloning.
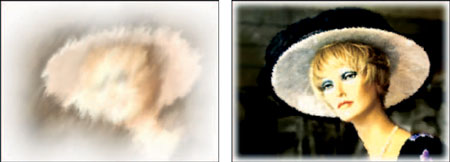
FIG 2.8 Two of the Edge effects available in the Underpainting palette
Auto-Painting palette
The Auto-Painting dialog box allows you to use an automated process when cloning from a photograph. Sometimes the result can be very good but more often extra work needs to be done by hand to finish the picture.
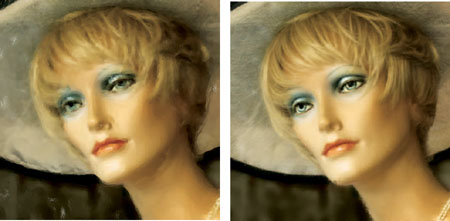
FIG 2.9 Smart Stroke painting on the left and non-Smart Stroke painting on the right. Check the differences in texture
The first option is the tick-box for Smart Stroke Painting – this changes the brush strokes from random application to following the lines in the photograph. This works well in some cases but less well in others so try both before deciding which option is best for the picture you are making. The main problem with using Smart Stroke is the contour lines which the brush marks create; this does not happen with the random strokes. Although the process is quite fast for most brushes, you can try this quickly by making a selection in the clone copy and working only within this area. The Auto-Painting process is started by clicking on the Play button in the Auto-Painting palette and stops when the Stop button is pressed. Press the Play button to start it again.
When you have ticked the Smart Stroke option another tick-box will appear below. Smart Settings makes the process even more automated as the brush sizes start large and get progressively smaller as the process continues, so more detail is being revealed. The process stops automatically when the smaller brushes have finished cloning.
The Smart Stroke brush category has been specially developed to work with the Auto-Painting palette so they are a good place to start; however nearly all brushes can be used with Auto-Painting.
When the Smart Stroke Painting option is not selected, other options in the palette become available. The Stroke drop down reveals a large choice of brush strokes (Figure 2.10) which will modify the choice of brush previously selected in the Brush Selector. There is also the chance to customize the brush further by altering the five sliders in the palette.
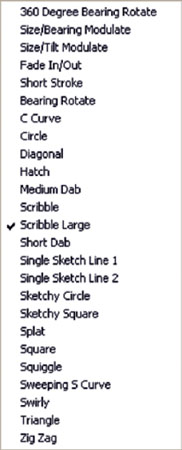
FIG 2.10 The list of options in the Stroke drop down menu
Restoration palette
The last of the three Auto-Painting palettes makes it easy to restore some of the original photograph to the clone copy. This is useful when the clone needs more clarity, and the Soft Edge Cloner brush is the brush to use.
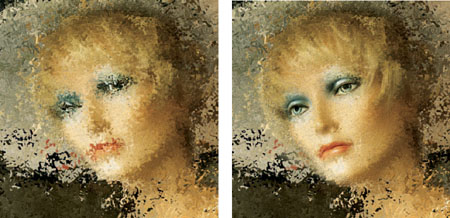
FIG 2.11 Using the Restoration palette
Auto-Painting – Tough Guy?

1. Open ‘ Tough guy? ’ from Chapter 2 folder on the DVD.
2. Open the Underpainting palette (Window>Underpainting).
3. In the Color Scheme drop down menu select the Sketchbook Scheme – this will make the colors more muted.
4. In the Photo Enhance menu select Increase Contrast to further enhance the clone. Click Apply to apply the changes and save a copy under a different name. This will enable you to return to this altered version should you wish to work with it later, and also leave your original intact.

FIG 2.12 Original photograph is on the left and on the right is the result of applying the edge effect in step 5.
5. Select an edge effect to soften the edges. Use Rectangular at 32%.
6. File>Quick Clone.
Stage 1
7. Select the Smart Stroke Painting>Pastel Chalk. Use size 52.2 and opacity 100%.
8. Click the Clone Color option in the Colors palette.
FIG 2.13 After the first Auto-Painting
9. In the Auto-Painting palette select Scribble Large in the Stroke drop down menu. Ensure that the Smart Stroke Painting is unticked.
10. Start the Auto-Painting and allow it to run until the whole picture is covered. Paint out any remaining white gaps with the same brush (Figure 2.13).
11. The next few steps will use smaller brush sizes, but will restrict them to certain areas so that the outer areas will remain rough and the central areas more detailed.
Stage 2
12. Use the Oval Selection Tool from the Toolbox and draw an oval selection to include the face, hair and part of the hat (Figure 2.14).
13. Select>Feather and enter 40 into the dialog box; this will soften the transition between the different brush sizes of the cloning.
14. Change the brush size to 25 and run the Auto-Painting until the central areas have smaller brush strokes.
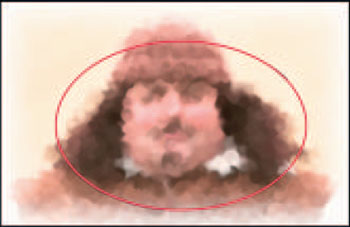
FIG 2.14 Oval selection created in step 12

15. With the selection still active, increase the saturation slider to 10% in the Underpainting palette; this will emphasize the centre (Figure 2.15).
16. Select>None.
Stage 3
17. Use the Oval Selection tool again and select the face, neck and hair. Feather the selection as before (Figure 2.16).
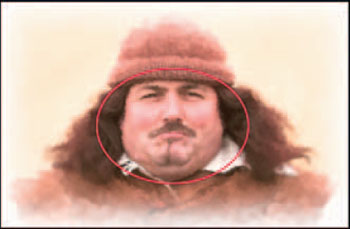
FIG 2.16 Oval selection created in step 17
18. Change the brush size to 12 and run the Auto-Painting again.
19. Increase the Saturation slider to 10% with the selection still active (Figure 2.17).
20. Select>None.

Stage 4
21. Use the Lasso and select the eyes, mouth and chin. Feather the selection as before.
22. Change the brush size to 6.4 and run the Auto-Painting again. This will define the face very clearly.
23. Increase the Saturation slider to 10% with the selection still active.
24. Select>None.
As you will have discovered in the last few pages, the Auto-Painting process is very flexible and far from being just something for beginners to Painter – it has real applications for making pictures.
The ability to use selections makes it possible to restrict the varying brush sizes to the areas where they are required. Another way of achieving this effect with more flexibility is to make each different clone on a separate layer which can then be blended using layer opacity and layer masks. The use of layers is covered in Chapter 6.
Although it has not been done in this example, it is very often necessary to switch from Auto-Painting to painting by hand at the later stages of a clone, as this allows you to bring back clarity and detail with greater precision.
The Restoration palette is also often used at the end of the cloning. After you have saved this picture, click on the Soft Edge Cloner Brush button in the Restoration palette and gently paint in the eyes and around the mouth. You will see that the original detail from the photograph has been restored. In this particular case the detail is sufficient in the picture without carrying out this step. This is a useful option when you need more detail, but do not overdo the restoration as you want to avoid making this obvious.
Soft cloning
Having explored the benefits and ease of the Auto-Painting system, it is time to create some clone pictures by hand; Auto-Painting is useful, but the key techniques which you will be using for most of your work in Painter will be created with individual brush strokes.
This example is what is called a soft clone, which is a clone that does not use any paper texture and which has a very smooth finish. It is a simple clone that can result in a beautiful delicate picture and is a good one to start with. Try it with the picture that is on the DVD – it has been tested with this image so it will be easier to follow. Throughout the book the precise settings will be given for each brush and it is most important that you follow these carefully to achieve the desired result with the picture provided. Remember that if you are using a mouse you will need to use lower opacity settings. When you try this with your own pictures the settings will vary depending upon the content and size of the image; generally the larger the file size, the larger the settings you will need.
This particular cloning brush (Cloner Soft Cloner) is used extensively throughout the book. Not only can it be used for creating a picture, as in this example but it is often used to bring back parts of the original image to a picture made with more painterly brushes. This is the same brush that was used from the shortcut in the Restoration palette in the step by step example on the preceding pages.
To avoid any potential problems with brushes working differently to those indicated I suggest that you return the brushes chosen to their default settings. To return a single brush to its default setting first select the brush you are using and then click on the brush icon on the far left of the Properties bar. To return all the brushes to their default settings click on the small triangle in the Brush Selector palette (top right of the screen) and select Restore All Default Variants.

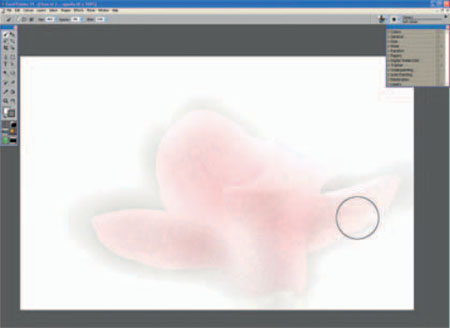
1. Open ‘ Magnolia ’ from Chapter 2 on the DVD.
2. File>Quick Clone. If you still have the Quick Clone settings on their default this should have created a new document, cleared the picture information, and overlaid the Tracing Paper.
3. Click on the bar at the top of the clone document and drag it to see the original beneath. The Tracing Paper overlay is hiding what is now an empty canvas; click the Tracing Paper icon in the top right corner of the clone document window to check that this is indeed empty, and click again to reapply the tracing paper. Remember that the original image must stay on the screen at all times, as the brush strokes you are about to make will be coming from that linked photograph.
4. Go to Window>Screen Mode Toggle to put the picture in Full Screen mode which allows the picture to spread across the whole screen. I prefer to paint in this mode as it hides the original picture and makes it very easy to move the picture around. The keyboard shortcut for this is Ctrl/Cmd M which is a toggle action.
5. The Brush Selector is on the right of the Properties bar and is seen in Figure 2.20. The brush category should now be Cloners and if it is not, click the brush icon on the left and select Cloners in the drop down menu.

To select a brush variant click the icon to the right and a long list of variants in the Cloners category will drop down. All these brush variants have been set up to work as Cloners with no adjustments needed, which means they are ready for use immediately. Select the Soft Cloner; this variant will give a very smooth and gentle effect. Click the brush icon on the left of the Properties bar (Figure 2.21) to return the brush to its default settings.
![]()
6. Check the Properties bar at the top and change the settings to those in Figure 2.21. Enter 223.0 in the Size box. This can be done either by clicking on the arrow to the right of the figures and using the slider, or by typing the amount in and pressing Enter. This is a very large brush size, which will work well with the low opacity set in the next step.
7. Change the Opacity to 3%; small adjustments of the slider can be made by clicking on the arrows at either end. Very low opacities are common when cloning from photographs but each type of brush will need a different setting so you will need to experiment with each picture before starting to paint. Make a few light strokes in the clone copy – start in the lower right corner and sweep out the strokes in the direction the magnolia petals take. You will probably not see any difference immediately because the Tracing Paper hides the very light strokes you are making. Turn off the Tracing Paper to see what you have painted so far. The Tracing Paper is usually only needed for the first few strokes and then it is better to remove it as it hides the result. Switch it back on every now and then if you need to check progress. Just paint the petals at this stage and leave the background till later.
8. Continue to paint the image into the clone copy; the low opacity brush will allow you to do this very gradually. The effect to aim for is a very soft, delicate and dreamlike quality. Check Figure 2.22 to see where you should be at this point.
If you need to undo any step use the keyboard shortcut Ctrl/Cmd+Z or go to the File menu and click Undo. The Undo function will continue to undo the previous action until it reaches the limit set in the Preferences section. Setting the preference limit is covered in Chapter 1.
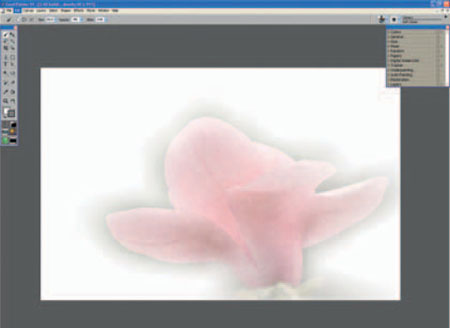
9. Reduce the brush opacity to 1% to paint the background. We need just the hint that there is a background present without really showing what it is. Sweep your brush out from the petals but leave the outer edges white.
10. If you need to enlarge any part of the picture to see more clearly, use the slider at the base of the document window. The keyboard shortcuts are Ctrl/Cmd++ to enlarge and Ctrl/Cmd+- to reduce. To move the enlarged section around the screen press and hold the Spacebar and click and drag in the picture. Figure 2.23 shows an interim stage.
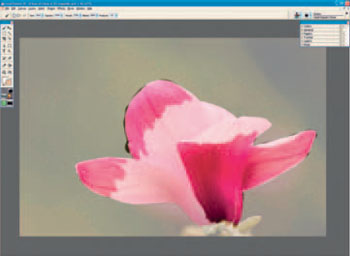
11. A very light smooth finish is required to create the soft ethereal effect, but even by painting with great care there are often areas which are rather darker than is ideal. This is very easy to correct by some erasing of the area that you have cloned. Go to the Brush Selector and choose the Erasers brush category and select the Eraser as the variant. Change the brush size to around 223.0 and make the Opacity 1%; leave the other settings unchanged.
12. Lightly paint over the dark areas in your picture until the finish is very smooth and even. If you overdo this stage simply change back to the Soft Cloner brush and clone some imagery back from the original picture. The whole process is very flexible and can be repeated as often as necessary.
Now it is time to find some photographs of your own on which to try the technique. Choose a picture that will benefit from the very soft treatment. An important part of making successful images is matching the right picture with the right technique. You may wish to save your picture for future reference.

Camel Impasto clone
For this next clone we will use the same original photograph of the magnolia but use a very different brush to illustrate how the choice of brush variant can dramatically change the final result.
1. Open ‘ Magnolia ’ from Chapter 2 folder on the DVD.
2. File>Quick Clone.
3. Ctrl/Cmd+M to go into Full Screen mode.
4. Select the brush icon in the Toolbox.
5. From the Brush Selector bar choose the Cloners brush category and the Camel Impasto Cloner variant.
If you are not familiar with traditional painting, the impasto effect implied in the name of this brush refers to paint applied very thickly to the canvas giving the picture a three-dimensional finish. In Painter this effect is achieved through the use of shadows added automatically to the brush strokes as the picture is painted.
6. Change the brush size to 20 and the Opacity to 72%.
7. With the Tracing Paper turned on, start painting the flower; make your brush strokes follow the lines of the petals. After a few minutes take the tracing paper off to view what you have painted and increase the size of the picture on the screen to 100% (Ctrl/Cmd+0) which will enable you to see clearly the three-dimensional brush strokes. The direction of each brush stroke is critical to the success of the picture so paint over any areas which have the brush strokes going the wrong way.
8. Continue painting the petals until they are complete but avoid painting any background as far as possible. This is unavoidable at times and the dark green will appear around the edges; however this will be dealt with later.
9. If you feel that the brush strokes are too strong, they can be softened quite easily. Go to the Brush Selector bar and choose the Impasto brush category and the Depth Smear variant. Use brush size 37 and Opacity 15%; paint lightly over the brush strokes and the impasto effect is reduced.
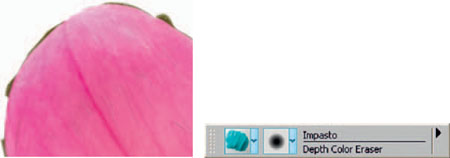
FIG 2.26 Cleaning the edges with the Depth Color eraser
10. Let’s deal with the edges now. Select another variant from the Impasto brush category, this time the Depth Color Eraser. Change the size to 15 and the Opacity to 66%. Put the screen size to 100% again and carefully go around the edges of the petals and remove all the dark edges. Start with the brush well outside the edge and gradually bring the brush inwards; it is quite tricky to get a smooth edge which looks right and you may have to use larger or smaller brush sizes.
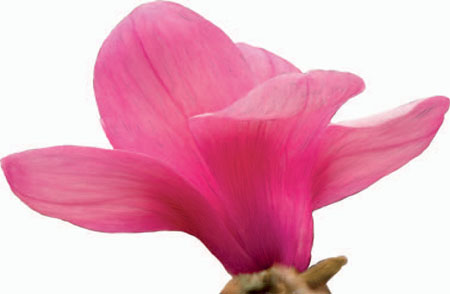
FIG 2.27 Magnolia Impasto clone
Impressionist clone
This clone uses a very different brush; the Impressionist brush is one of several that are specific to a particular artist and therefore very distinctive and recognizable. This brush is in the Cloners category and the other similar brushes are in the Artists brush category.
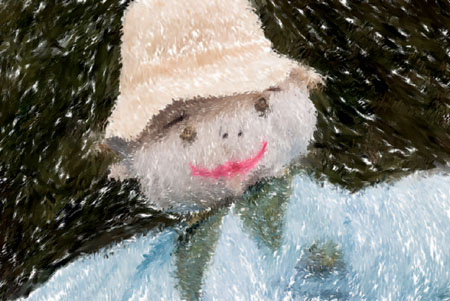
1. Open ‘ Scarecrow ’ from Chapter 2 on the DVD (Figure 2.28).

2. File>Quick Clone.
3. Select the brush icon in the Toolbox.
4. From the Brush Selector bar select the Cloners Impressionist Cloner, size 48, Opacity 100%.
5. Use the Tracing Paper as a guide throughout this picture.
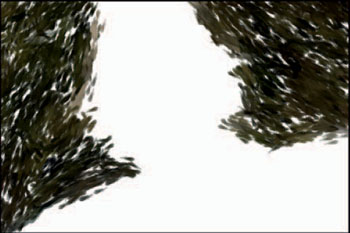
FIG 2.29 Painting the background
6. Paint the dark background of trees. If you are using a pressure sensitive tablet rather than a mouse, you will notice that the brush strokes are angled in the direction that the pen is pointed. Paint close to the scarecrow but not too much over the edges. There is no need to paint the area with solid color; leave streaks of white visible (Figure 2.29).
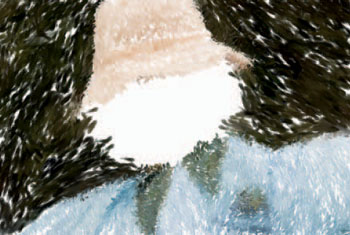
FIG 2.30 Painting the hat and shirt
7. Reduce the brush size to 25 and paint the shirt and the hat (Figure 2.30).
8. Reduce the brush size to 19 and paint the face.
9. Reduce the brush size to 6 and paint the eyes, mouth and nose to give them more definition.
This has (hopefully) been an easy picture to make; individual brushes vary considerably in the time needed to create a picture.
An introduction to Paper Grain
Before a painter using a ‘ traditional ’ , i.e. non-digital method starts to paint, two important decisions have to be made. Firstly, which medium to use (which might be oil, watercolor, pencil, pastel, and so on) and then the surface on which to paint, perhaps paper, board, pastel paper, etc.
What Painter does is to replicate as closely as possible the result of the chosen combination. A soft camel hair brush on a smooth board will give a clean edged smooth color, whereas when using a piece of hard chalk on a heavily textured paper the chalk will skim the surface leaving the paper indentations with no paint, in other words a very rough effect. These choices will have a major influence on the finished look of the artwork.
It is very similar when a photograph is cloned using the brushes and surfaces available in Painter; the huge range of brushes and papers cover virtually every type available to the traditional artist and many that are not.
There is something like 600 different papers in Painter, some of which have to be loaded separately from the program disc, so the combination of 900 brushes combined with 600 papers is pretty mind-boggling. Figure 2.32 shows a few of the hundreds of textured papers available. Chapter 5 deals with this subject in a lot more depth but this introduction will give you a quick understanding before you start on the next step by step.

FIG 2.32 Some of the paper textures in the Painter program
Creating texture
This step by step example will look at how to use paper textures when making clones. You will learn how to change the appearance of a photograph to give the impression of painting on a coarse textured paper. The range of paper textures and how to use them in various ways is explored in more detail in Chapter 5.
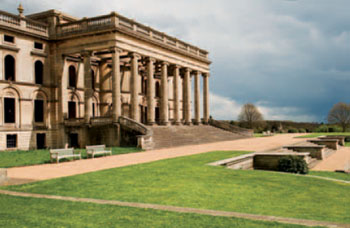
1. Open ‘ Witley Court ’ from Chapter 2 folder on the DVD (Figure 2.33).
2. In the Underpainting palette (Window>Underpainting) increase the Contrast by 10% and the Saturation by 15%.
3. We now need to add some white space around the photograph. This helps to create a softer edge; the Clone brush will smear the edges.
4. Canvas>Canvas Size. Add 100 pixels to each dimension (Figure 2.34A).
5. File>Quick Clone.
6. Select the Chalk>Real Hard Chalk brush, size 80, Opacity16% and Grain 20%. This is one of the new brushes introduced in Painter 11. Almost all of the ‘ Real ’ brushes work well when cloning from photographs.
7. Select the Rough Charcoal Paper from the Papers palette (Window>Library Palettes>Papers, or from the shortcuts at the bottom of the Toolbox) (Figure 2.34B).
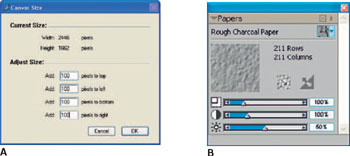
FIG 2.34 A Increasing the Canvas size B The Papers palette
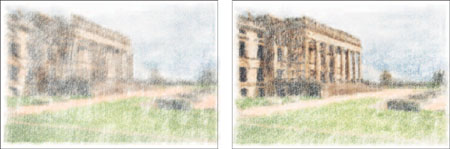
FIG 2.35 The early stages of cloning
8. Click the Clone Color option in the Colors palette.
9. Paint the whole picture. At this stage it will be a light texture due to the opacity and grain settings (Figure 2.35).
10. Change the brush size to 40 and the Opacity to 40% and paint the picture again, concentrating mainly on the building and main features.
11. In the Papers palette change the Paper Scale to 70% (the Paper Scale slider is the top slider). This will allow more paint to sink into the canvas which therefore will darken more quickly.
12. Paint over the buildings again and lightly paint the grass to strengthen the color.
13. Change the brush size to 20 and the Opacity to 50%.
14. Change the paper to Basic Paper; this will allow more paint to sink into the paper.
15. Paint over the building. Keep the brush moving following the lines of the architecture; the density will build up more quickly now. Keep the painting away from the edges as they need to fade out gradually to the white edge.
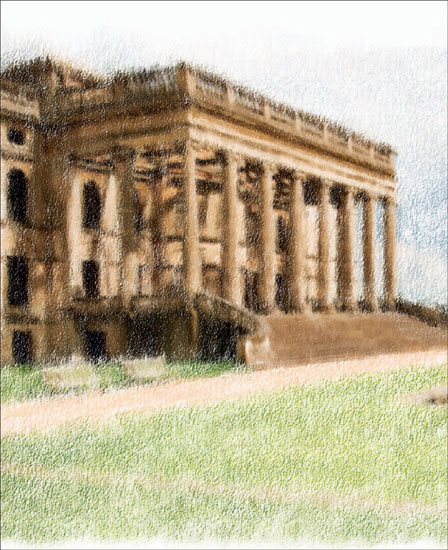
FIG 2.37 Detail of the finished picture
‘ Real ’ Watercolor
Painter 11 introduced some excellent new Digital Watercolor brushes and this step by step example uses one of them.
The early stages of the painting can be completed by hand, or in this case I have used the Auto-Painting palette to make it quicker.
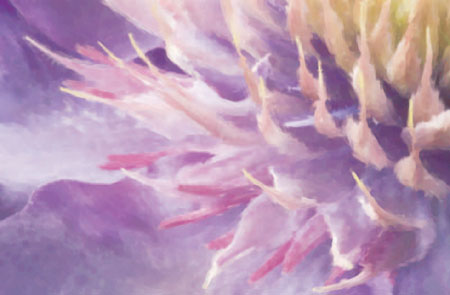
1. Open ‘ Clematis ’ from Chapter 7 folder on the DVD (Figure 2.38).
2. Make a Quick Clone.
3. Turn the Tracing Paper off.
4. Select the French Watercolor Paper.
5. Select the Watercolor>Real Filbert brush, size 30, Opacity 10%, Grain 85%, Diffusion 20, Wet 5%.
FIG 2.39 After the Auto-Painting
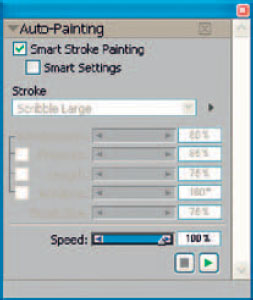
FIG 2.40 Auto-Painting palette
6. Click the Quick Clone option in the Colors palette
7. Open the Auto-Painting palette (Window Show Auto-Painting).
8. In the Auto-Painting palette, click the Smart Stroke Painting box (Figure 2.40).
9. Start the Auto-painting by clicking the Play button at the bottom of the palette.
10. Allow the Auto-Painting to continue until most of the white areas are covered.
11. You can stop the Auto-painting at any time by pressing the Stop button or by clicking in the picture. To start it again press the Play button.
12. When you have finished the Auto-Painting there will still be quite a few white gaps; how many depends upon how long you left the Auto-painting running (Figure 2.39).
13. Use the same brush to paint over the picture; turn the Tracing Paper on and off to check where you need to paint. The object is to turn the rather contoured strokes of the Auto-Painting into shapes that better reflect the shapes in the photograph. In the early stages the brush should be generally moving in the direction of the petals and painting over all the white areas. Don’t overwork any area as the watercolor can build up unattractive textures, so a good way is the keep the pen on the tablet for some time and then let the diffusion finish (Figure 2.41).
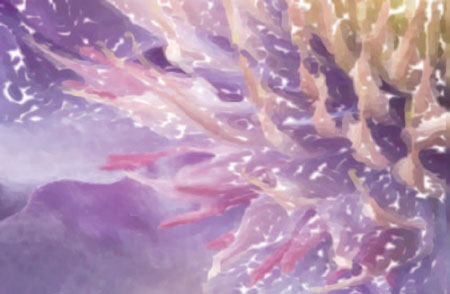
14. Reduce the brush size to 15 and start to refine the shapes. Paint over the bright stalks to make them stand out; sometimes the edge is too hard so paint each side of the brush stroke and the diffusion will soften the edges.
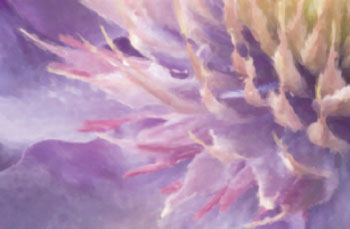
I find that a good method is to paint an area with the Tracing Paper turned on and then soften the edges with it turned off. There is no need to soften all the edges however, just those that need it.
Continue until you are happy with the result.
Pastel flower
This is a really simple and quick to make picture which uses a pastel chalk. The main difference between this brush and the ones used previously is that we are changing settings in the General palette; this will make an accurate clone copy which will show paper textures very clearly.
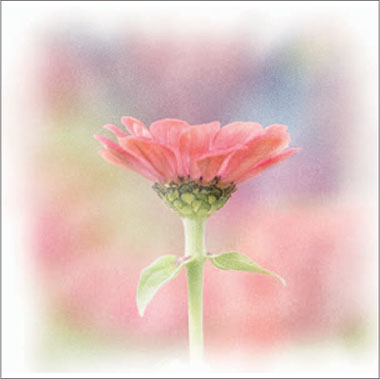
1. Open ‘ Flower ’ from Chapter 2 folder on the DVD (Figure 2.44).
2. In the Underpainting palette select the Jagged Edge Effect, amount 33% (Figure 2.45). Save this version under a different name.
3. Make a Quick Clone.
4. Select the Pastels>Artist Pastel Chalk, size 190 and Opacity 8%.
5. In the General palette change the category to Cloning, the subcategory to Grainy Hard Cover Cloning and the Grain to 16%.
6. Select the Sandy Pastel Paper from the Papers palette.
7. Paint the flower; the alteration made to the Grain slider will emphasize the paper texture.
8. Change the brush size to 82 and the Opacity to 23%, and paint the flower head to strengthen the colors.
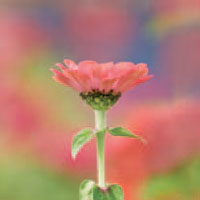

FIG 2.45 Applying the Edge effect