
Layers are an important part of Painter and they give considerable additional flexibility both in cloning and in bringing together elements from different photographs. If you are already familiar with using layers in Photoshop you will find that the Painter Layers palette looks very similar, however there are some differences which you will need to be aware of.
This chapter is in four distinct sections:
Part I takes the form of a reference section that introduces all the main functions which will enable you to follow and understand the step by step examples in the later sections.
Part 2 is a step by step example of a family history montage which involves collating and assembling images on many different layers and blending them together with various composite methods.
Part 3 explains how to use layers as part of the cloning process. This will enable you to make several different versions and merge them together to make the final picture.
Part 4 covers the subject of making montages using cloning techniques from several different original photographs.
The Layers palette

The Layers palette will be in use throughout this chapter so if the palette is not already visible on screen go to Window Show Layers.
Open the file that is on the DVD called Multi-layer file which is shown in Figure 6.2. This file has several layers already present which you can use to follow the examples.
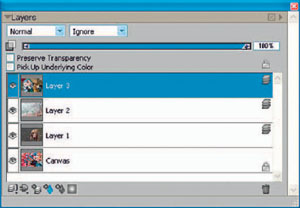
Layers can be thought of as clear sheets of acetate stacked on top of the Canvas. The layer stack is being viewed from the top so that when the top layer is full of imagery none of the layers beneath are visible.
Active layer
Click on any layer and it becomes the active layer, which means that it can be edited, moved or painted on. Normally only one layer can be active at any one time and the active layer is colored dark blue.
Layer visibility
Click the eye icon to the left of the top layer; this will turn the visibility of the layer off and reveal the layer below. Continue to turn off the eye icon ofeach of the layers until you reach the Canvas layer at the bottom of the stack. When a layer has its visibility turned off it does not contribute to the picture, and if the picture is printed the layer would be ignored.
Canvas
The Canvas is always at the bottom of the stack and is similar, though not identical, to the background in other graphics programs. This layer cannot be moved or have layer masks applied, and is restricted in some other ways.
Making new layers
New layers can be made either by going to Layers New Layer and selecting the type of layer required, or by clicking the third icon from the left at the bottom of the Layers palette.
There are several types of layers, all of which have their own special characteristics. To make a new standard layer, click the third icon from the left. Standard layers can be painted on with most types of brush and are the ones that are mainly used for cloning.
The second icon will make a Dynamic Plug-in layer, which is a special effects layer that will make adjustments to the layer beneath. They are a bit like adjustment layers in Photoshop as the settings can be changed at a later date; this type of layer is described in Chapter 11.
The fourth icon from the left, which has the blue droplet design, makes a new Watercolor layer; these are described in Chapter 7 and can only be used with Watercolor brushes.
The fifth icon from the left makes a new Liquid Ink layer, which may only be used for Liquid Ink brushes.
Renaming a layer
When you create several layers in a document it is often helpful to rename them to aid in identification.
To rename an existing layer, open the palette menu and click on Layer Attributes and type the name there. You can also double-click on the layer to bring up this dialog box.
Deleting layers
Layers that are active can be deleted by clicking on the Trash can on the far right of the layer icons. This will immediately delete the currently active layer – there is no warning given, so be careful!
Merging and flattening layers
Generally I recommend that you keep the layers intact rather than flattening the picture. However if you do need to, click the icon on the far left and select Drop. This will merge the active layer with the Canvas. If you need to flatten all the layers go to either the palette menu and select Drop All or to Layers>Drop All. When you need to merge the visible layers, hold down the Shift key and click on the layers you want to merge, then, in the Layers palette menu, click on Collapse.
Layer compatibility
When moving image files from Photoshop to Painter and vice versa, most of the elements stay intact including the layers, layer masks and selections. However, there are some special elements that do not work in the same way of which you need to be aware. A table showing Painter/Photoshop compatibility is contained in Chapter 1.
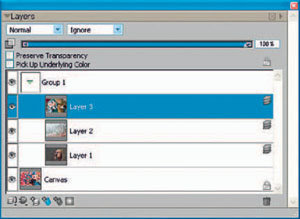
FIG 6.3 The Layers palette showing three layers in a group
Grouping layers
It is sometimes convenient to store layers in groups; this is rather like keeping them in folders. Hold down the Shift key and click on the layers you want to group together, then click the first icon at the bottom of the Layers palette and select Group. These commands are also available from the Layers menu and the palette menu. Open and close the group by clicking on the Group layer in the Layers palette. To ungroup the layers, highlight the layer group and click on Ungroup in the same place as before.
The Collapse command will merge all the layers that are highlighted within the group. In Figure 6.3, Group 1 contains three layers and they are off set in the layer stack to show that they are contained in a group.
Layer masks
Layer masks work very much like their counterparts in Photoshop. By painting into the mask with black the contents of the layer are hidden. If you have not used masks before you may want to try the short step by step example below.
1. Open ‘ Multi-layer File ’ from Chapter 6 on the DVD.
2. Click the top layer to make it the active layer.
3. Make a layer mask by clicking on the layer mask icon at the bottom of the Layers palette. This is the sixth icon from the left.
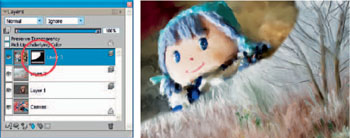
FIG 6.4 Using a layer mask on layer 1. The result is shown on the right
4. Click on the layer mask itself to make it active – the mask thumbnail will have a black line around it. You must do this or you will be painting on the image itself rather than the mask.
5. Select the Pencils>Grainy Cover Pencil 3 with a size of about 65.0 and Opacity 100%. In the Colors palette make the painting color black.
6. Paint with the brush in the picture area – you will see the face disappearing and the layer below being revealed. The painted layer mask and the resulting picture can be seen in Figure 6.4.
7. Reduce the brush opacity to 25% and paint again. Note that these strokes have only partially hidden the top layer – black hides the picture but shades of gray only partially hide the layers below.
8. Change the painting color to white and paint over the masked area; this will reveal the original picture again.
To delete a layer mask, click on the layer mask to activate it then click on the Trash can which will delete the mask and leave the original layer intact.
If the copy and paste does not work, there are other ways of doing this: Copying the canvas:
1. Select>All.
2. Make the Layer Adjuster tool active.
3. Hold down the Alt/Opt key and click in the picture.
Copying between two documents:
1. Select>All.
2. Make the Layer Adjuster tool active.
3. Click in the source document and drag into the destination document.
Duplicating layers
To duplicate a layer go to Layers Duplicate Layer or you can right-click the layer and select duplicate from the pop up menu.
The procedure to make a duplicate copy of the Canvas layer is different and is shown below.
1. Make the Canvas active.
2. Select All (Ctrl + A).
3. Edit>Copy (Ctrl + C).
4. Edit>Paste in Place (Ctrl + V).
This will make a copy of the Canvas on a new layer at the top of the layer stack leaving the Canvas layer intact.
Locking a layer
To lock a layer, click on the layer then depress the Padlock symbol just above the layer stack. Locking is useful to prevent accidental erasure or painting on the wrong layer. Click the padlock icon again to unlock.
Preserve Transparency
This option is used to protect areas of a layer that has no imagery and is often used to paint over objects on that layer without affecting the surrounding empty space.
To see how this works, make a new empty layer (Layers>New Layer) and select the Pencils>Grainy Cover Pencil 3 with a size of about 35% and Opacity 100%. Paint into the picture with any color but leave plenty of blank areas. Tick the Preserve Transparency box and change the paint color. Paint across the whole layer and you will see that the paint has only recorded in the areas that already have some imagery while the areas that were transparent have been preserved untouched, hence the name. Now turn off the Preserve Transparency option and paint again. This time the paint is laid down wherever the brush is used.
Layer opacity
The slider near the top of the Layers palette controls the layer opacity – move the slider to the left to gradually reveal the layer beneath. With multi- layer images it is very useful to be able to fine-tune the opacity ofeach layer with this slider.
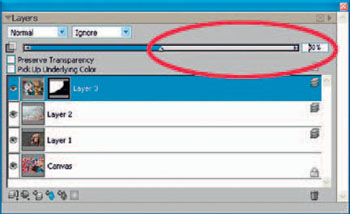
FIG 6.5 The Layer Opacity slider
Layer Composite Depth
The box to the right of the layer blend mode is the Layer Composite Depth control. The default here is Ignore. This set of options is active when using brushes that have Impasto strokes which show depth and a three-dimensional appearance. To try the effect now, use the Impasto Thick Wet Round 20 brush with a brush size of about 40. Select a bright red color and paint into the picture; you will see how shadows have been added to the paint strokes which give them a three-dimensional appearance. The Layer Composite Depth option will have changed automatically to Add when you used this brush; change it to Ignore and see the brush strokes flatten. Figure 6.6 shows the Impasto effect on the brush stroke shown on the left. The example on the right has had the effect removed.

FIG 6.6 This shows the result when the Layer Composite Depth is changed
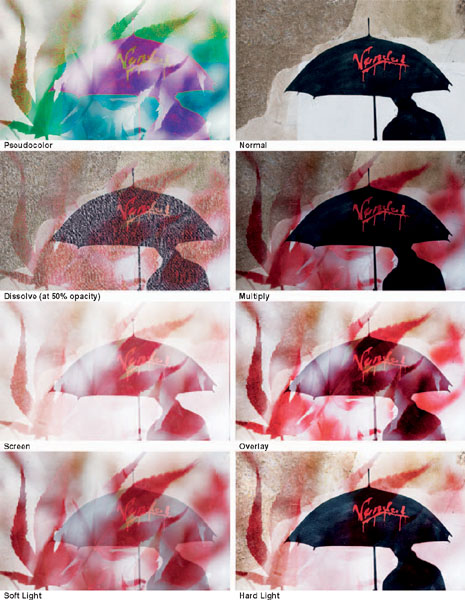
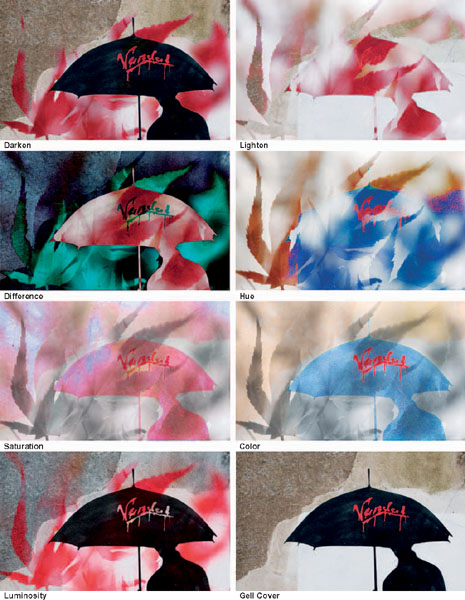
Layer Composite Method
The Layer Composite Method controls how a layer will interact with the layer beneath and offers a lot of creative opportunities when using multi-layer files. The Layer Composite Method box is at the top of the Layers palette and is highlighted in Figure 6.7 where it is shown in the Normal mode.
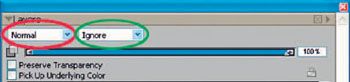
FIG 6.7 The Layer Composite Method drop down menu is shown highlighted in red and the Layer Composite Depth is highlighted in green
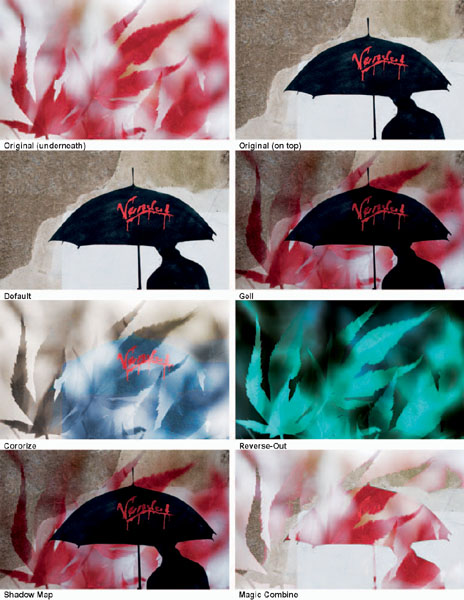
The examples illustrate how the Layer Composite Methods will combine layers with different images on each layer. This is extremely useful when making montages as it allows you to mix image layers in ways that are not possible by any other method. Often this can spark off new directions in which to develop your image.
The examples on the following pages will provide an insight into how each composite method works. The effect of the composite method will differ considerably depending upon the content of the two layers that are combined. The opacity setting will also change the appearance.
The two images are on the DVD in the Chapter 6 folder so you can experiment with these, or try your own pictures.
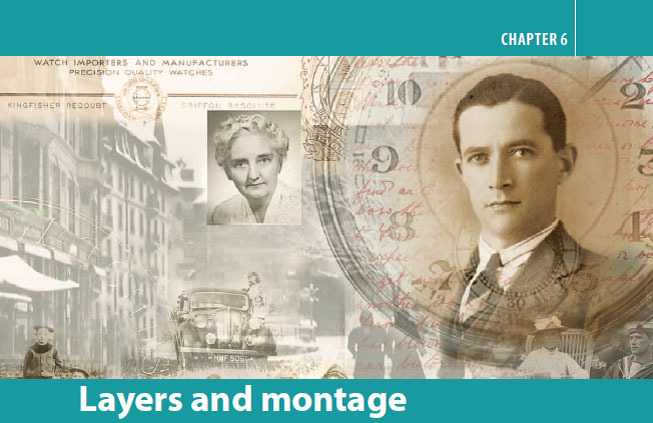
Family history montage
In recent years there has been an explosion of interest in genealogy and alongside this a desire to collect and display old photographs in imaginative ways; this includes both scrapbooking and creating montages on the computer.
Painter is an ideal tool for this as it allows both the collation of the pictures, together with the ability to add some artistic embellishment yet leaving the originals intact for future generations.
In this step by step example the montage is made using various aspects of layers, including layer masks, layer blending modes and color adjustments.
All the files necessary for this are on the DVD; when you create your own montage the material will vary but the techniques described here should provide you with lots of ideas on how to combine images.
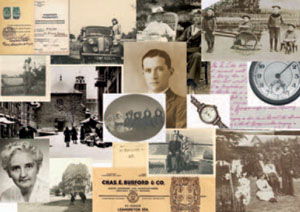
FIG 6.8 Assembling the source material
The first step is to collect together all the material which you may need. This could include photographs, letters, materials and personal effects which may need to be scanned using a flat bed scanner or photographed. In this case of course I have already made the selection for you.
The next step is to work out a rough plan of the design. It can be tempting to throw things together as you go, but it really helps a lot if you have a plan to start with. The plan does not need to be very detailed, and will almost certainly change as you develop your ideas. When you make your own picture, decide on the most important elements which are relevant to the person or family and concentrate on fitting those together – other less important elements can be added in later. There is a tendency to put too much in, so if you have a lot of good pictures it is often better to make a series of pictures, each illustrating a particular aspect. For an example of how this can be achieved, look at my personal website (www.martinanddoreen.co.uk) where my wife has created a series of panels illustrating her own family history. These were made in Photoshop several years ago, but could have been made in Painter.
This tutorial uses copy and paste extensively; however, should the process not work correctly, please read the sidebar note earlier in this chapter (Duplicating layers), which gives alternative ways of copying from one document to another
Open all the pictures in a browser. I used Bridge but any browser will do; alternatively you could use the originals and lay them out on the floor. Having selected the ones which are the most important to the story, sketch out a quick layout on a piece of paper – this will help with the overall design. For this project I opened a blank document in Photoshop and dragged the pictures in and moved them to roughly the correct position – some I resized to fit. After moving things around quite a bit, this gave me a reasonable idea of how the picture might look. The result is on the DVD as ‘ Rough plan ’. I printed a copy of this to act as a guide, but you have the finished version to use – as you will see, I made lots of adjustments as I built the picture, but the contents and overall design are very similar.
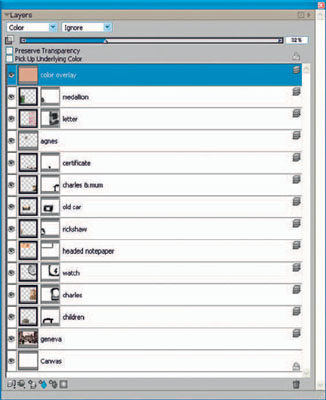
1. Open the folder entitled ‘ Family History montage ’ from the DVD and move all the files on to your computer for easy access.
2. Create a new document in Painter – width 27.7 cm, height 21.0 cm and Resolution 150 dpi. Give it a name and save it.
3. Open ‘ 01 geneva ’.
4. Select>All, Edit>Copy.
5. Click back into the new empty document and Edit>Paste to drop in the picture, then move into position. Close down the ‘Geneva’ file.
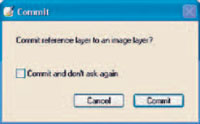
6. You may get a warning (Figure 6.10) regarding whether to commit the layer; if you do, click on Commit to remove this.
7. Reduce the layer opacity to 37%.
8. Open ‘ 02 children ’.
9. Select>All, Edit>Copy and then paste into your montage document and move into position as previously.
10. The white border needs to be removed so use the Magic Wand in the Toolbox. On the Properties bar change the Tolerance to 47 and click in the white area. This will select the white and Edit Cut will delete it.
11. This picture is too large so use the Transform tool from the Toolbox to reduce to the size you can see in the finished picture. The Transform tool is new in Painter 11 and is hidden behind the Layer Adjuster tool. Hold down the Shift key and click and drag the corner handles to change the size. Holding the Shift key stops the picture from distorting. Click the tick on the Properties bar to accept the transformation. Other options for scaling and distorting are also on the Properties bar.
12. Activate the Layer Adjuster tool and move the picture down to the bottom.
13. Change the Layer Opacity Method to Hard Light. Using this method removes a lot of density from the layer. It has however revealed a black line in the snow on the Geneva layer. Remove this by clicking the eye icon off in the Children layer and clicking in the Geneva layer to activate. (Figure 6.11).
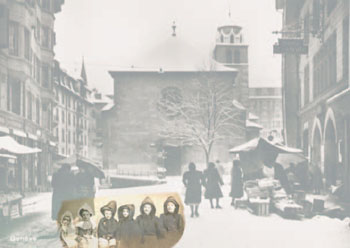
FIG 6.11 Bringing in the Children layer
14. Use the Rubber Stamp tool from the Toolbox, click in the snow just above the mark to set the source point and clone until the mark has disappeared.
15. Returning to the Children layer, make a layer mask by clicking the icon at the bottom of the Layers palette; this is the sixth icon from the left.
16. Click in the layer mask thumbnail to activate it. Be very sure that you do this every time you make a layer mask otherwise you will find yourself painting into the layer by mistake. (It is very easy to do this!)
17. You now need to paint in the layer mask and to do so you need a soft light brush. Sadly there does not seem to be one as a default variant in Painter, but it is easy to make one. Select the Cloners Soft Cloner brush and set it back to default settings. In the General palette change the Method to Cover and the Subcategory to Soft Cover. Make the Opacity 20% and the size 78 – this will be ideal. Because it is such a useful brush for masks, and because you will often use the Soft Cloner for other purposes, I suggest that you save this variant with the name ‘ Layer Mask brush ’. See Chapter 4 if you do not know how to save brush variants.
18. Use the new brush you just created and select black in the Colors palette. Paint in the image (with the layer mask active you will actually be hiding parts of the layer) and paint over the top and sides of the layer leaving only the children visible.
19. It is a good idea to label the layers as you go, as this will make it easier later to make the final adjustments. Do that now by double-clicking the layer in the Layers palette and naming the layer. Don’t forget to save the document frequently!
20. Open ‘ 03 Charles ’.
21. Copy and paste as before, move into position, and resize if necessary.
22. Make a layer mask and paint out the edges to make a rough oval. All the masks created will be adjusted later, so there is no need to be too precise at this stage (Figure 6.12).

FIG 6.12 Charles layer after masking
23. Open ‘ 10 watch ’.
24. Copy and paste as before, move into position, and resize if necessary.
25. Remove the white areas with the Magic Wand as before.
26. Position the layer so that his head is enclosed within the inner part of the watch face.
27. Change the Layer Composite Method to Hard Light and reduce the layer opacity to 47%.
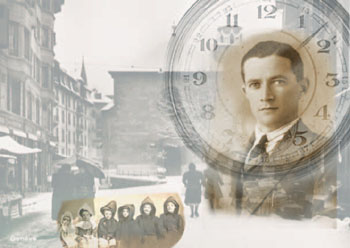
28. Make a layer mask and with the new masking brush, paint out the center of the watch to make the face clear (Figure 6.13).
29. Open ‘ 05 Headed notepaper ’.
30. Copy and paste as before, move into position, and resize if necessary.
31. Change the Layer Composite Method to Hard Light and reduce the layer opacity to 47%.
32. Create a layer mask and paint along the bottom and right edge to make a soft edge.
33. Open ‘ 04 rickshaw. ’
34. Copy and paste as before, move into position, and resize if necessary.
35. Change the layer opacity to 85%.
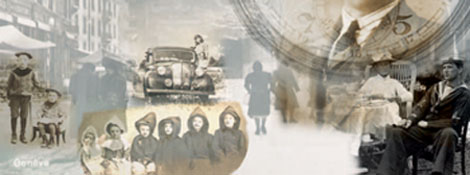
FIG 6.14 Old Car layer after masking
36. Create a layer mask and paint out most of the top and right and also the bottom to reveal the word ‘Geneve’ if that is hidden.
37. Open ‘ 06 old car ’.
38. Copy and paste as before, move into position, and resize if necessary.
39. Change the Layer Composite Method to Hard Light and reduce the layer opacity to 79%.
40. Move the layer until it is positioned just over the six children. Create a layer mask and paint out the area around the top and sides of the car. Soften the lower edge to keep it clear of the children (Figure 6.14).
41. Open ‘ 08 Charles & mum ’.
42. Copy and paste as before, move into position, and resize if necessary.
43. Change the Layer Composite Method to Luminosity and reduce the layer opacity to 67%.
44. Create a layer mask and paint out the space to the top and left of the Figure to soften the edges.
45. Open ‘ 11 certificate ’.
46. Copy and paste as before, move into position, and resize if necessary.
47. Change the Layer Composite Method to Darken and reduce the layer opacity to 58%.
48. Create a layer mask and paint out the crest on the left.
49. Open ‘ 12 Agnes ’.
50. Copy and paste as before, move into position, and resize if necessary.
51. Adjust the layer opacity to 66%
52. Open ‘ 09 letter ’.
53. Copy and paste as before, move into position, and resize if necessary.
54. Change the Layer Composite Method to Darken.
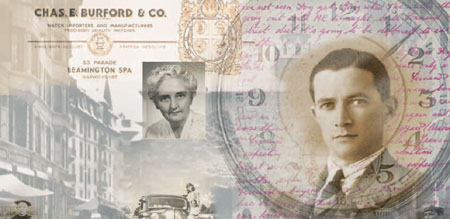
FIG 6.15 Letter and Agnes layers
55. Resize it to the size you see in the finished file.
56. Create a layer mask and paint out the edges, and also where the letter overlaps the face. Paint lightly over most of the layer to lighten the overall appearance of the text. It should be visible, but not obtrusive (Figure 6.15).
57. Reduce the layer opacity to 75%.
58. Open ‘ 13 medallion ’.
59. Copy and paste as before, move into position, and resize if necessary.
60. Change the Layer Composite Method to Lighten and adjust the layer opacity to 66%
61. Create a layer mask and paint out the center of the layer.
62. Because these pictures have come from different sources and have different colors, it is usually better to harmonize the colors by adding a color layer.
63. Create a new layer.
64. Choose a color in the Colors palette; it should be as close as possible to the sepia color present in the main picture. I used Red 205, Green 161 and Blue 87; this color can be accurately selected by moving the sliders in the Colors palette.
65. Edit>Fill with Current Color.
66. Change the Layer Composite Method to Colorize and adjust the layer opacity to 32%; this will reduce the level of the color to a light overlay.
67. Finally, it is time to step back and review the picture and then to adjust the opacities, size and position of the many layers and make any adjustments you feel are necessary. One example of this fine-tuning is that the layer for Agnes has a building showing from a lower layer in the stack. This spoils the portrait, so to correct this create a new layer beneath the Agnes layer and then paint on this layer with white until the portrait is clear.
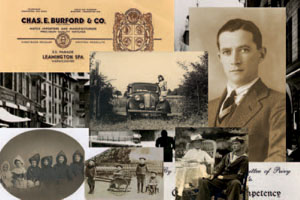
That completes this example of a family history montage. You may well like to try one of your own – I am sure that your relatives would be very pleased to have a copy.

Cloning onto layers
In this step by step example the clone source is a single photograph which is cloned onto several layers using different brushes, and the layers are then blended or adjusted to create the final picture. This technique is often more flexible than using different brushes on the canvas as the layers can more easily be changed at a later stage.

1. Open ‘ Wooden Statue ’ from Chapter 6 folder on the DVD.
2. Make a Quick Clone.
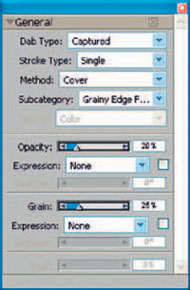
3. Select the Markers>Flat Rendering Marker, size 43.9, Opacity 20%.
4. In the General palette change the Method to Cover and the Subcategory to Grainy Edge Flat Cover (Figure 6.19). The brush strokes made by the default brush will build to black very quickly but by changing to Cover Method this will not happen. It is worth remembering this option as this build up to black happens with brushes in several brush categories.
5. Click the Clone Color icon in the Colors palette.
6. Clone outwards from the statue making long strokes moving out and up. Paint the entire picture quite quickly. The statue will be very broken up and the outer areas will streak out from the center. (Figure 6.20)
7. Create a new layer.
8. Change to the Cloners>Colored Pencil Cloner, size 56.6, Opacity 39%.
9. Click the Clone Color icon in the Colors palette.
10. Paint over the background area to soften some of the marks made by the previous brush. Don’t paint all over, just enough to take off some of the very hard edges (Figure 6.21).

FIG 6.21 Softening the background
11. Create a new layer.
12. Change to the Palette Knives>Loaded Palette Knife, size 55.9, Opacity 100%.
13. Click the Clone Color icon in the Colors palette.
14. Drag the Palette Knife out from the statue towards the edge; this will create a striking graphic effect which highlights the statue (Figure 6.22).
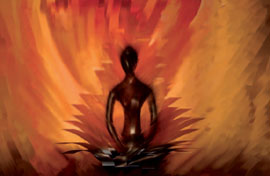
FIG 6.22 Adding emphasis to the statue
15. Paint over the figure with a smaller brush size to make the shape and the light reflections better defined.
16. This is quite striking but the effect needs strengthening, so two additional copies of this layer are to be created and the contents enlarged.
17. Make sure the Palette Knife layer is active then right-click the layer and select Duplicate layer.
FIG 6.23 The Transform tool and the Transform Properties panel
18. Click and drag the layer underneath the Palette Knife layer.
19. Use the new Transform tool introduced in Painter 11, this is top right in the Toolbox and hidden behind the Layer Adjuster tool (Figure 6.23).
20. When you have the tool active go to the Properties bar at the top of the screen and select the Scale symbol (Figure 6.23).
21. Pull the handles at the top to the size shown on Figure 6.24.
FIG 6.24 Making the first transform
22. Accept the transform by clicking the tick on the Properties bar.
23. Change the Layer Composite Method to Overlay and the layer opacity to 58%. This will make it less obvious but it will add to the design.
24. Duplicate the layer you have just transformed and drag it underneath.
25. Use the Transform tool again and drag out the handle further than previously (see Figure 6.25).
26. Change the Layer Composite Method to Screen and the layer opacity to 36%.
FIG 6.25 Making the second transform
27. The background is rather unbalanced, with warmer tones and better shapes on the left side, so the next step is to correct this.
28. Click on the Canvas and using the Rectangular selection tool from the Toolbox select the right half of the picture.
29. Edit>Copy and Edit Paste. This will copy the selection and place it in a new layer at the top of the layer stack.
30. Move the new layer down until it is just over the Canvas.
31. Edit>Flip Horizontal.
32. Use the Layer Adjuster tool to move it across to the right-hand side.
33. As this is under the other layers it blends in fairly well; the only sign of the join is at the top where, if you look carefully, a straight line can be seen.
34. To remove this line, create a layer mask (Layers Create Layer Mask), click on the mask to activate and then, using the same Palette Knife, paint over the join.
35. Crop the sides and bottom to finish the picture.
Figure 6.26 shows the final Layers palette.
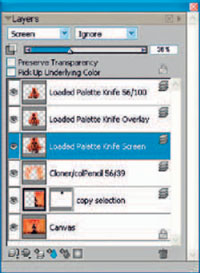
FIG 6.26 The final Layers palette
Cloning from three images
Try to visualize what you want to achieve before you start making a clone montage. These three elements were carefully selected to work together; the overall subject is trees, but using three very different scales will add a sense of mystery to the final picture.
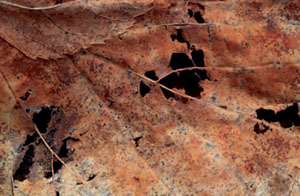
The holes in the old leaf are particularly interesting, and the way this hole punches through the more realistic landscapes will also emphasize the sense ofunreality.
1. File>Open Leaf from Chapter 6 folder on the DVD.
2. File>Open Tree from Chapter 6 folder on the DVD.
3. File>Open Sky from Chapter 6 folder on the DVD.
4. File>Clone with the Leaf as the active document. This will make a clone copy of the Leaf picture without clearing the picture.
5. Change the clone source to the Tree picture (File Clone Source Tree).
6. Choose the Graffiti brush from the Airbrush brush category. In the Colors palette click the Clone icon and make the brush size 190.0 and the Opacity 61%.

7. Paint over the Leaf picture; the graffiti brush will spray dots that will give the picture an attractive texture. Emphasize the lines of the tree trunk and branches as seen in Figure 6.31.
8. Change the clone source to the Sky picture (File Clone Source Sky).
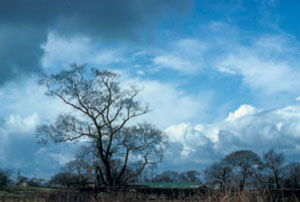
9. Change the brush to Airbrush Fine Tip Soft Air 50, brush size 150.0 and Opacity 4%. In the General palette change the Method to Cloning and the Subcategory to Grainy Soft Cover Cloning. Paint in the sky and tree giving it a dreamlike quality by cloning in some areas but not in others.
10. In the previous step it is difficult to get exactly the right amount of blue; it can also result in the texture being too smooth. If this is the case, change back to the Leaf picture as your clone source and return to the Graffiti brush used earlier. Brush over with this to get the right balance between the three images.
FIG 6.31 Using the Graffiti brush in step 7
11. Continue to swap between the three original pictures by using the Clone Source option until the picture is to your satisfaction.
12. Finally, you will need to crop the picture as the originals are not exactly the same size – you can see this by the line down the right side of the picture.
13. Select the Crop tool in the Toolbox, click in the top left corner and dragging down to the bottom right include the entire picture you want to keep. Adjust the edges by dragging them to the desired position and click in the picture to crop.
The final picture (Figure 6.32) has been cropped at the top and right quite substantially, which has strengthened the balance of the picture.
In this example we used three separate images from which to clone. It is also possible to clone from a multi-layered image so these three pictures could have been in a single document.
The way to change the clone source in this case is to make the original picture the active document and to turn the layers on and off. Whatever is visible on the screen is what you will be cloning. This also works when a layer is only partially visible.
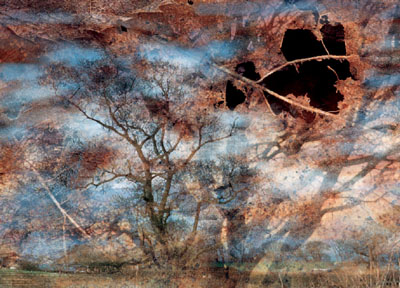
FIG 6.32 Tree and leaf montage
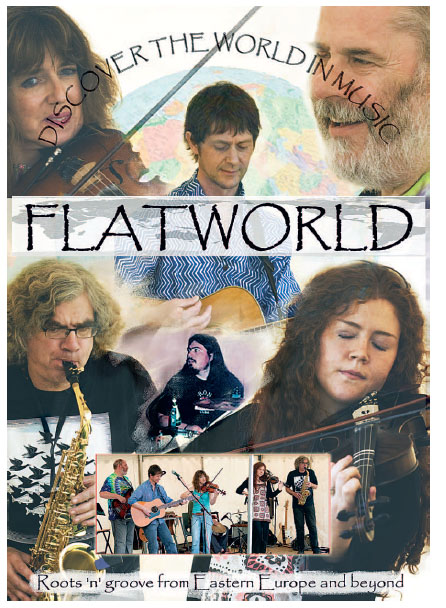
Designing a poster
This step by step example will demonstrate how Painter can be used as a graphic tool to create a poster. The project explains how Painter handles text and some of the many ways in which it can be manipulated to get the required effect.
Before starting work on any design, sketch out some ideas of what you might include and plan the design. This will save a lot of time. I have made a rough plan of the required text and identified some pictures which I think might work.
This tutorial uses Copy and Paste extensively; however, should the process not work correctly, please read the sidebar note earlier in this chapter (Duplicating layers) which gives alternative ways of copying from one document to another
1. File>New. Enter width: 1240 pixels, length: 1750 pixels and resolution: 150 dpi.
2. Open ‘ World ’ from Chapter 6 folder on the DVD. All the pictures are in the folder named Poster.
3. Copy the picture (Select All, Edit Copy) then change to the main document and paste the picture in. (Edit Paste).
4. The picture is too small so click on the Transform tool in the Toolbox, hold down the Shift key and drag a corner handle out until it is approximately the size that you can see in Figure 6.35. Accept the transformation by clicking the tick on the Properties bar.
5. Select a suitable font which you have on your computer and type in capitals ‘ DISCOVER THE WORLD IN MUSIC ’ across the top of the document.
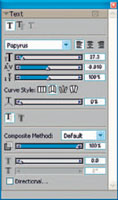
6. Window>Text will bring the Text palette on screen (Figure 6.33).
7. Click the second icon of the Curve Style icons. This will bend the text; try the other options to see how they too change the text.
8. Click the Shape Selector in the Toolbox and you will see a blue line protruding from the text. Click on the end and move it to see the text moving and changing shape. Look carefully and you will see a blue line under the text and a dot at each end. Click on the other end to activate that control; these two control points can be moved to reshape the text. The ends can be pulled out to change the shapes further. The control points are circled in red in Figure 6.34. If you have not used shapes previously, it can take a while to understand how they work. The object is to make the text into a semicircle, but if you find this very difficult just skip this step.
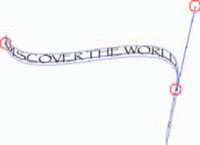
FIG 6.34 Using the Shape Selector to distort the text
9. Use the Type tool again and type FLATWORLD across the centre of the world picture. Adjust the size using the slider in the Text palette and click the External Shadow icon at the top of the palette to make it bolder. Click on the previous Type layer and do the same for that. At this point reduce the layer opacity of the world picture to 50%. Figure 6.35 shows the poster at this point.

10. Open ‘ The Band ’ from Chapter 6 folder on the DVD.
11. Copy and paste it into the poster document.
12. Use the Transform tool and reduce the size to that seen in the finished poster, on page 166.

FIG 6.36 The poster at step 13
13. Add another piece of text, at the bottom of the poster. Use type size 23, type ‘ Roots ‘ n ’ groove from Eastern Europe and beyond ’
14. Open ‘ World outline ’ from Chapter 6 folder on the DVD.
15. Copy and paste the picture into the main document and move the layer beneath the FLATWORLD Text layer.
16. Stretch the layer across the page; use the Transform tool as before. Pull the right and left handles to stretch the image, and the top and bottom handles to squash the image. Reduce the layer opacity to 65%.
17. Now to bring in the individual photos of the band members. Name all the layers as you bring them in. (Double-click the layer to rename).
18. Open ‘ Georgina ’ , and copy and paste it into the main document.
19. Reduce the Opacity to about 50% and drag to the lower right.
20. Open ‘ Tim ’ and place on the left.
21. Open ‘ Kimberly ’ and place top left.
22. Open ‘ Vo ’ and place top right.
23. Open ‘ Neil ’ and place in the center. Reduce the size of the picture to fit.
24. Open ‘ Eric ’ and place lower center.
25. When you reduce the Opacity of these layers to 50% you can see that the design is starting to come together. Leaving the layers at reduced opacity helps a lot in deciding where each element should go. Figure 6.37 shows the poster and Layers palette at this stage.
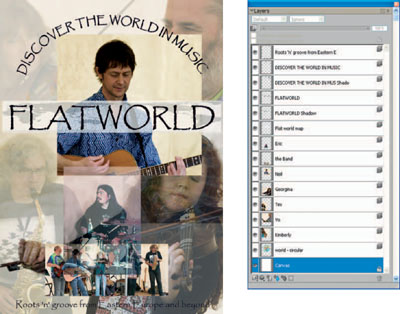
FIG 6.37 The poster with all the photographs roughly in place, with the Layers palette at that stage
26. The next stage uses layer masks to blend the various elements.
27. Select the Chalk>Square Chalk brush, return to default settings and use brush size 83.3 and Opacity 45%. Select black in the Colors palette.
28. Click on the layer named Neil to activate it, increase the layer to 100% opacity, and then click on the layer mask icon at the bottom of the Layers palette.
29. Click the layer mask to activate it and paint out the edges of the picture. The Chalk brush leaves an attractive edge; paint in from the edges so that the edges blend. If you paint out too much, change to white and paint again; this will remove the masked area. The advantage with using layer masks is that they can be adjusted as often as necessary until the poster is complete.
30. Now for the Vo layer. Increase the opacity, create a layer mask and paint out unwanted imagery. To check where you need to paint, turn the layer visibility off and on again.
31. Continue with the other layers and when you have finished, reduce the opacities of the band members to around 80%. Remember to click on the layer mask each time – it is easy to forget this and paint on the picture instead.
32. The round map is currently hidden so move the layer up the layer stack until it is sitting under Neil. Change the layer opacity to 37%.
33. The layers look a little dull, so open the Underpainting palette and increase both the contrast and brightness for each layer.

FIG 6.38 Highlighting the text at the bottom
34. The text at the bottom of the picture needs highlighting, so create a new layer under the layer and use the Chalk brush to paint with white behind the text; leave the edges rough. Reduce the layer opacity to 87%.
35. Right-click the text layer ‘ Discover the world... ’ and select Commit – this will prevent the text from being editable but also allow the layer opacity to be changed. Reduce it to 50%.
36. Continue to adjust the layer opacities and position until you have finished the picture.
The final poster is shown at the start of this chapter.