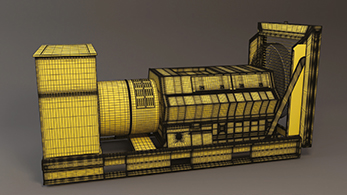
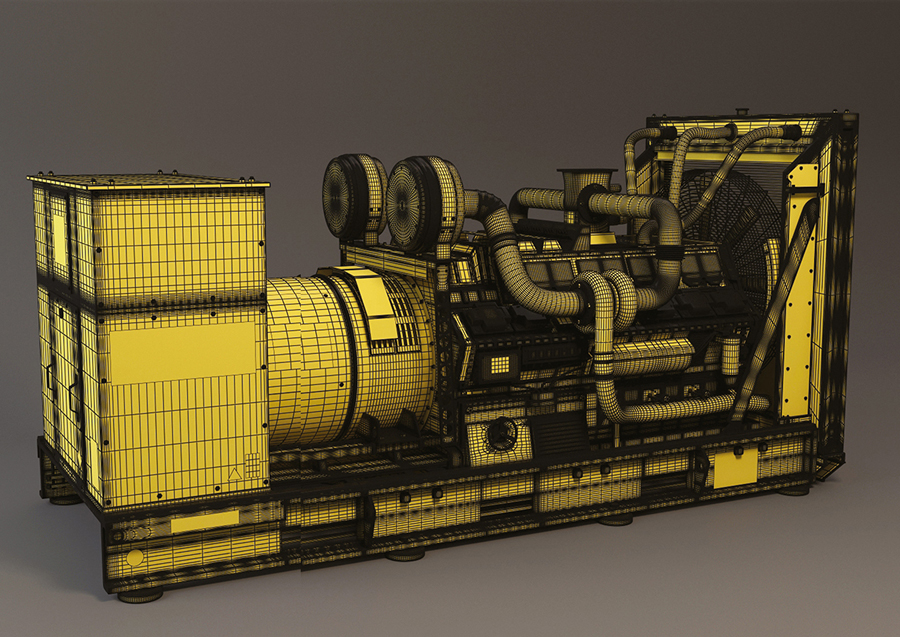
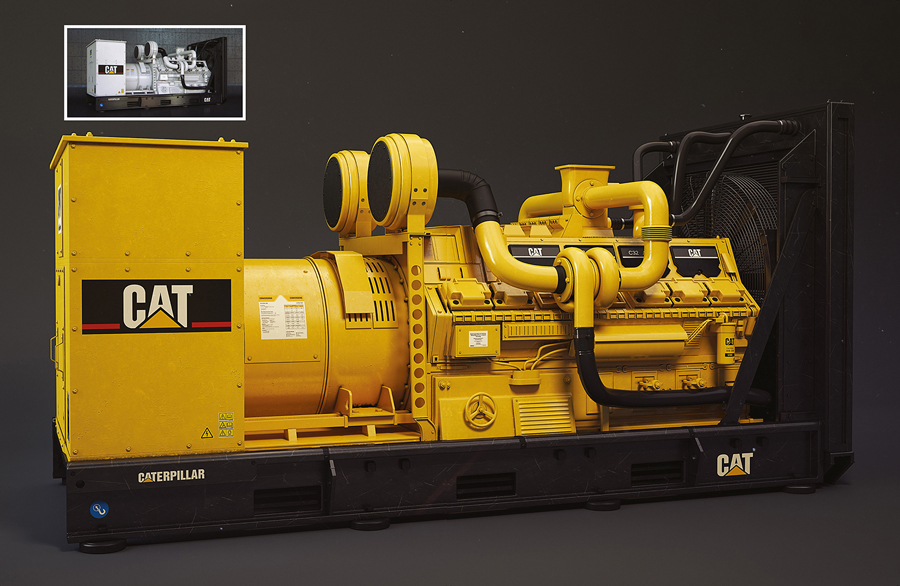
![]() I like to create industrial style machines so decided to make this diesel generator. It was also good practice for my modelling skills to add all the fine detail and pipes.
I like to create industrial style machines so decided to make this diesel generator. It was also good practice for my modelling skills to add all the fine detail and pipes.![]()
| PROJECT | DIESEL GENERATOR CAT |
| SOFTWARE USED | 3DS MAX 2013, V-RAY, PHOTOSHOP |
| RENDERING TIME | 1 HOUR |
| ARTIST | IGOR KULKOV |
| COUNTRY | RUSSIA |
The model under construction. Here the basic tube shape is ready for the details.
![]() This is another project for my idea of a robot-animal hybrid heavy duty machine. The initial idea was to create a bird-like robot. Then I developed the idea further into the welding machine. The overall concept is the walking machine which is handmade by survived humans in a post-apocalyptic future. The robot is completely peaceful and made to be a helper in construction works. The biggest amount of time was spent on developing the model itself. First I drew it as a sketch. Then I was searching for photos of parts of existing machines and was putting them on top of the sketch to fit the shape. The next stage was developing the idea further in Maya. I was modelling and designing it simultaneously. What you can see on the final image is the third or fourth version of the model as I remodelled most of the parts several times.
This is another project for my idea of a robot-animal hybrid heavy duty machine. The initial idea was to create a bird-like robot. Then I developed the idea further into the welding machine. The overall concept is the walking machine which is handmade by survived humans in a post-apocalyptic future. The robot is completely peaceful and made to be a helper in construction works. The biggest amount of time was spent on developing the model itself. First I drew it as a sketch. Then I was searching for photos of parts of existing machines and was putting them on top of the sketch to fit the shape. The next stage was developing the idea further in Maya. I was modelling and designing it simultaneously. What you can see on the final image is the third or fourth version of the model as I remodelled most of the parts several times.![]()
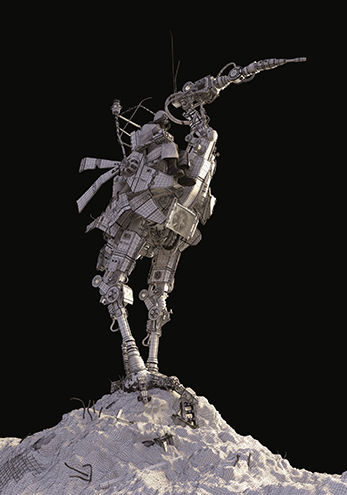
The model was developed from a combination of the bird form and heavy duty engineering parts.
| PROJECT | EGR-8 MOBILE WELDING MACHINE |
| SOFTWARE USED | MAYA, ZBRUSH, MUDBOX, V-RAY, PHOTOSHOP, NUKE |
| RENDERING TIME | 10 HOURS |
| ARTIST | DANIIL ALIKOV |
| COUNTRY | RUSSIA |
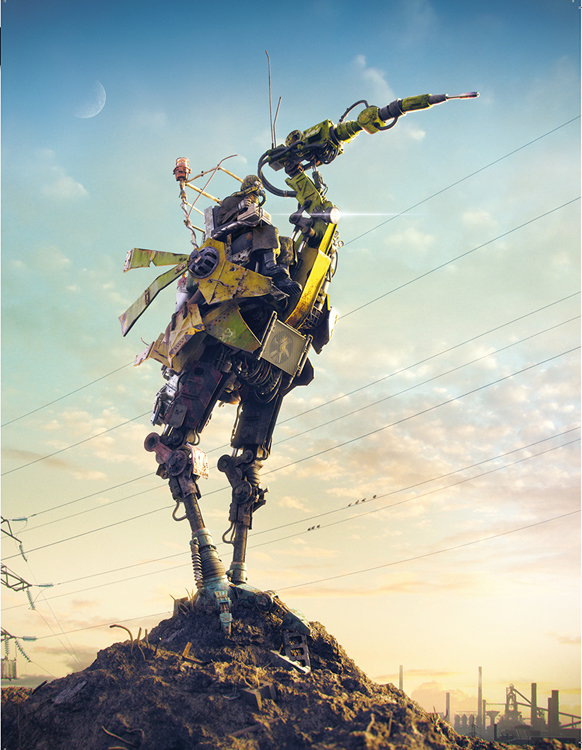
![]() Spider Crane was a project loosely based on a lot of Japanese Mech artworks. I had wanted to do a construction mech project for a long time and finally got the nerve to take it on. The biggest feat in this piece was making something that looked cool but could also function properly in the real world. The end result has hydraulic legs and a typical industrial paint scheme.
Spider Crane was a project loosely based on a lot of Japanese Mech artworks. I had wanted to do a construction mech project for a long time and finally got the nerve to take it on. The biggest feat in this piece was making something that looked cool but could also function properly in the real world. The end result has hydraulic legs and a typical industrial paint scheme.![]()
| PROJECT | SPIDER CRANE |
| SOFTWARE USED | 3DS MAX 2013, KEYSHOT 4, PHOTOSHOP CS6 |
| RENDERING TIME | 1 HOUR |
| ARTIST | TIMOTHY DIAZ |
| COUNTRY | UNITED STATES |
Taking inspiration from Japanese art, the Spider Crane married functionality with imagination.
INDUSTRIAL POWER
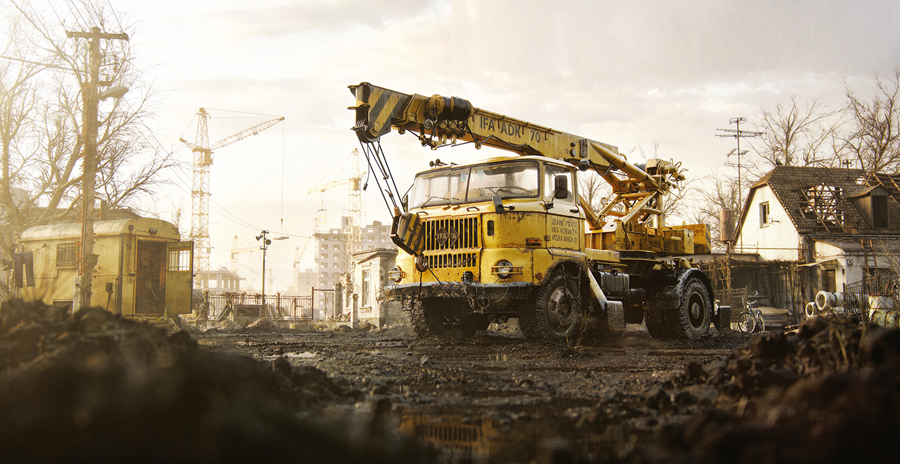
Marcel Haladej reveals how he created a heavy lifting vehicle in the midst of urban renewal.
DEVELOPING THE STORY
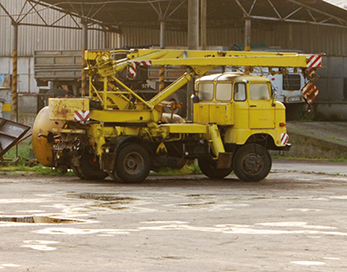
I have always been interested in various old, often timeworn, industrial or agricultural vehicles. Machines which are way past their expiration date, but they still work and remain useful. The story of this picture did not begin in a town under construction, but one morning, on a journey to visit my girlfriend. It was then that I noticed, out of the corner of my eye, an old crane in an agricultural society facility. The morning sun battling through the haze left over by the night rain was setting the tone. At first sight I just went by, but after a while I turned around and came back to take a picture of this machine, knowing that it would make a good base for a new piece of work.
Another source of inspiration were photos from one borough of my hometown. This borough used to be a small village, but the political forces of the recent past had decided that this peaceful village had to change within a few years into one huge public housing area. So that's where the inspiration came from. All that was left was to choose the right composition and place the picture into the time of year and time of day.
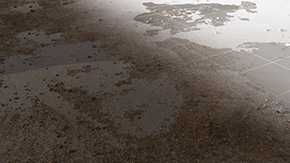
My favourite season is autumn – full of colours and morning fog. Mornings when the sun rays are peeping through the tree branches and the world reflects in the puddles of rainwater. I wanted to train my skills while working on this project, to play with the materials, especially misted glass, ground covered by mud and also try to simulate the depth-of-field effect of a real camera, which divides the scene nicely into layers of foreground, middle, background. I would like to take this opportunity to thank my girlfriend for supporting me and putting up with my night shifts at the computer.
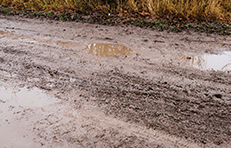
It was an ugly rainy day, but I knew that even a random picture full of mud like this one could come in handy at some point

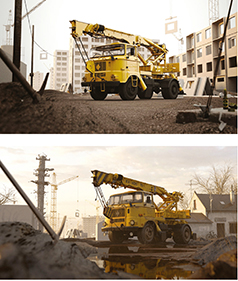
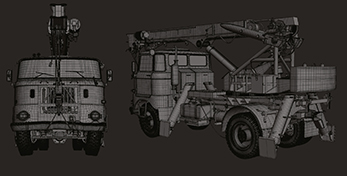
IFA – finished image
| PROJECT | IFA |
| SOFTWARE USED | 3DS MAX, V-RAY, PHOTOSHOP, MARI |
| RENDERING TIME | 1 YEAR WITH A LOT OF BREAKS |
| ARTIST | MARCEL HALADEJ |
| COUNTRY | SLOVAKIA |
I wanted to model this weird old machine and create a CG version of it.

TOP TIP – FLIP IMAGE
When you get to a stage that you don’t know what to do next with the image or you are beginning to miss some things, just flip the image horizontally and you will get a whole new perspective.

I was trying to achieve a hazy morning atmosphere in the new project.
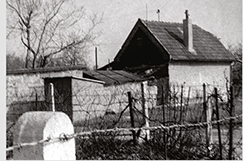
A picture taken long ago by my father, the house represented the contrast between the old housing and the communist-built tower blocks which were slowly taking over.
TOP TIP – COMPOSITION
Try to create a nice composition in the image even if there are a lot of objects in the scene. It should always be clear which object is dominant and which objects are supporting. You can highlight the dominant object using a suitable composition, perspective or by more vivid colors at the expense of the other objects.
This is how the original composition looked like before the final image was put together.
All the objects in the scene have been modelled by myself, so there are no purchased models and that’s why the production took so long. The only object which was not modelled in the scene is the last plane with a picture of hills and clouds.
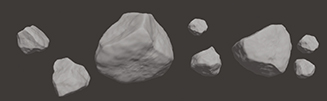
Modelling is not any kind of special activity, it is just a relaxing routine. The biggest problem is always with blueprints, because they are pretty hard to find for some specific models. Some models from my older projects have been used, for example my favourite old bicycle or the never completed model of a Trabant.
Models from older projects, including this unfinished one of a Trabant car, were used.
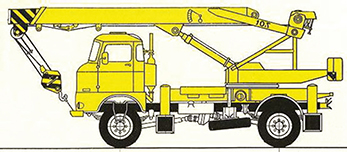
The blueprints of the crane which were the basis for the modelling construction.
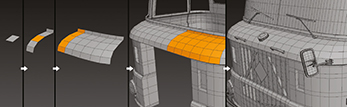
Creating planes and then pulling out the edges to add new polygons and build up the model.
I used the basic modelling tools offered by 3ds Max. The first step when modelling real objects is the incorporation of blueprints into the scene. I almost always start from the most basic geometric primitives, usually from one plane, from which the edges are pulled out, thus creating new polygons and a more complex geometry. I always try not to go too far with the complexity of base geometry and only add details where necessary.
The Turbosmooth modifier was applied to the base model, which made the geometry smoother, but the disadvantage was the necessity to create support loops around the edges which needed to be kept sharp. The option was then to either apply a Chamfer modifier to these edges or better yet use the Extrude Edges option in Edit Poly Modifier with zero Extrusion Height value and various Extrusion base widths. The advantage of this method was that it didn’t totally destroy the original edge. I planned to texture the mobile crane in Mari, so mapping was superfast. I divided the model into four parts and then I applied Auto-unwrap on them while each of the four parts was in its own mapping square.
Support loops needed to be created on the edges to keep them sharp.
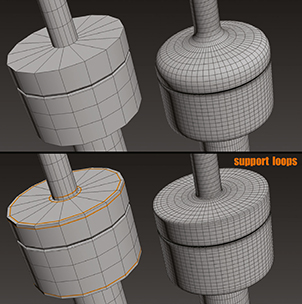
Using the Extrude Edges option in order to retain the shape of the original edge.

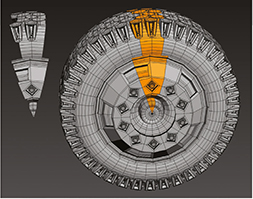
The model was divided into four parts for unwrapping prior to texture work in Mari.
The wheels were modelled by a classic and very popular method. One part of the tyre was modelled and it was copied around the Y axis via radial symmetry. Finally, the parts were welded together into one piece.
The upper part of the concrete mixer was modelled by a method which is most often used to model glasses. I created a profile line and then extruded it into a deformed cylinder model using the Lathe modifier. The bottom part was made up of simple boxes and circles. Small screws were placed on the model which added nice extra detail after the lighting of the scene.
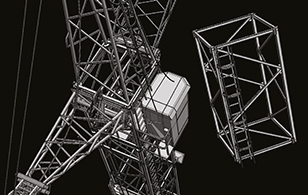
The construction of the crane was made up of a vast number of lines. One sector of the crane was created, which was then copied, one on top of another. The sweep modifier was used with various profiles for lines. Some small details such as a lightning rod at the top, different wheels on the construction and headlights were added to create variety. The base of the crane wasn’t modelled because I didn’t expect that it would be visible in the end result.
The cranes consisted of large numbers of lines that were initially duplicated.
Don’t waste time modelling the entire tyre, create part of it then duplicate it radially.
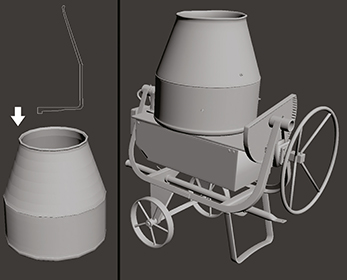
The concrete mixer was created using traditional glass modelling techniques.
The family house was created by a method of extruding edges from one plane, because I knew the house would only be part of the scenery in the background. Only the visible parts have been modelled. The shelter for the car was built from scaffolding pipes, which were covered by the awesome ivy generator free plug-in.
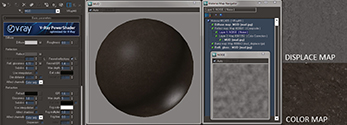
The ground model was nothing remarkable. A Displace modifier was applied to the dense plane with a modified smoke map which created the basic puddles. The geometry was then modified by simple sculpting using the 3ds Max sculpt tools. The V-Ray Displacement mod was used on top of the modifier stack with tileable textures. Small pieces of the ground were scattered on the surface.
MODELLING RULES
I have one simple rule when modelling. The objects closer to the camera are modelled in greater detail. The more distant objects are simple models, but I like to add small random details on them such as TV antennas, lightning rods, railings, small lumps, etc. A quick way to make the object more detailed is application of the displacement modifier where I placed various textures or modified procedural maps. The model mesh must, of course, have dense meshes, either by Tesselate modifier or the Turbosmooth modifier. The high level of the Turbosmooth comes only during rendering. I have used this method on many objects because it allowed me to quickly and procedurally distort the perfection of the models. Of course, the disadvantage is high memory usage. The relatively large scene begs the question of how to manage it wisely. The easiest method was by using layers and nested layers via an older but excellent free script, the Onion.


Only the parts of the house that were going to be visible in the scene were actually modelled.
A modified smoke map with a Displace modifier was used to create the ground plane.
Extra chunks of rock were scattered around the ground plane to break it up.
Mari from The Foundry was used to texture the crane model. This software excels in the texturing of complex organic/mechanic models when you need to work with a lot of layers, masks and large textures. As mentioned before, the model was divided into four parts, each with its face ID. The individual parts had a texture resolution of 4096 § 4096 px. This method was much more flexible than working with one large 16384 § 16384 px texture for all the objects.
It is possible to create a preview shader in Mari, in this case made up of layers of metal, rust and mud. The masks of rust and mud were drawn manually using various pre-sets and my own brushes. Work in Mari is quick and user friendly, after one gets used to it. A bit like Photoshop, but you can see painted textures on the model on the fly.
The individual textures and masks were exported from Mari and then used in VRayBlendMtl.
Unwrapping the crane into four areas for texturing using Mari rather than one large texture.
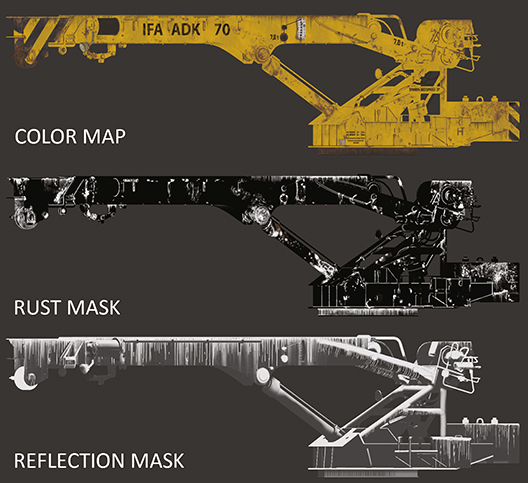
Creating a preview Shader in Mari using layers of metal, rust and mud.
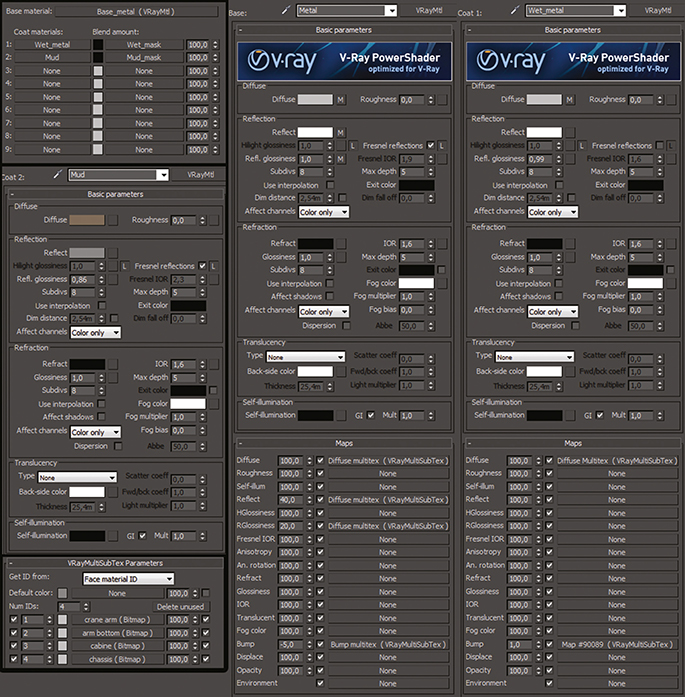
The Base material for the crane with layers of grunge on top to make it look realistic.
The main material of the crane consisted of the Base material of metal covered by Coat materials of rust, mud and water streams. There were four textures for each material of Blendmaterial from Mari which needed to be included into the final material. That’s exactly the reason why there was VRayMultiSubTex in Vray, which assigns the texture according to the face ID. The only disadvantage is that you can only see one texture applied in viewport, so it looks kind of funny.
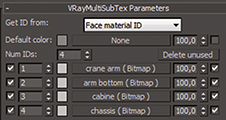
The VRayMulitSubTex in Vray was used to assign textures according to the face ID.
The base of the wheel material was VRayBlendMtl, where the Base layer was made up of the wet tyre with a layer of mud applied using a manually drawn map. VRayDisplacement modifier was applied to the wheel with a drawn displace map.
The ground material was a simple Vray material with ground texture and reflections. The diffusion channel was copied to the Reflect, Rglossiness slot with 30 per cent opacity.
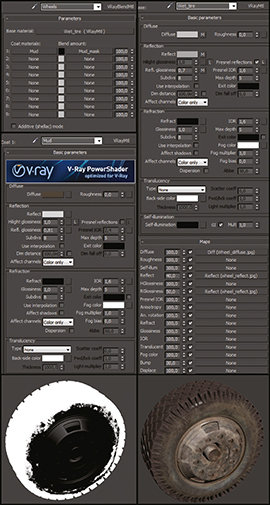
The Base layer of the wheel material was a wet tyre with a layer of mud over the top.
The ground material used a ground texture with reflections and a simple material.
CREATING REALISTIC LIGHTING
When creating the scene I experimented with various types of lightings. Whether it was the classic direct light with Global Illumination or Image Based Lighting with various HDRI maps. In the end I used the proven V-Ray physical system with VRaySun, VRaySky and VRayPhysicalCamera. This setting allows you to achieve realistic lighting in a simple way. It also allows you to control the exposure of the whole scene using camera parameters as if it were a real-life environment.
The value of Turbidity was changed in the V-Ray sun, which added a yellow-orange tint to the main light. The size parameter was tweaked which softened the shadows. The sun was placed outside the picture on the left, a little above the horizon to replicate the traditional lighting effect known as the golden hour, when the sun is relatively dim, the objects throw long shadows and the scene has a golden tint. Additional lights weren’t used to fill the shadows, which 3D artists often do. Here I wanted it to look as natural as possible.
When creating a V-Ray sun system, 3ds Max automatically assigns a V-Ray sky map into the environment slot. If you want to modify it, just drag it to the Material editor and set the necessary parameters. For this scene the value of indirect horizontal illumination was modified, which had a decisive influence on the exposure of the sky.

The exposure of the sky was influenced using the indirect horizontal illumination.
TOP TIP – RULE THE LIGHT
It might be a good idea to experiment with light before each render. You can move it by a bit, play with the colour temperature, intensity or adjust the size of shadow. When you work with the same light for a long time, even such small changes can improve the render.
To add a touch of reality to the picture, a caustics pass was used. The pass was rendered with grey materials and only materials which had a decisive influence on the caustics were used, namely transparent materials and metals. This effect was most visible on the front part of the crane cabin lit up by reflected rays from the puddles in front of it and on the doorframe of the yellow caravan.
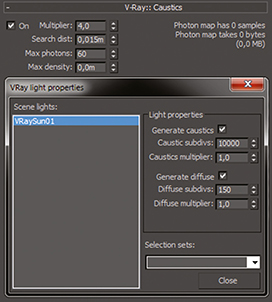
A caustics pass was used to create extra detail in the cabin and puddles.
To get the most out of the V-Ray physical lighting method, it is important to use the proper setting for the Linear workflow. In the 3ds Max settings, under Preference Settings, Enable Gamma needs to be selected and set to 2.2. The options to Affect Material editor and Color Selectors also need ticking. The Input Gamma should be set to 2.2 and Output gamma to 1.0, because the renders were going to be saved in 32-bit exr format. In VRay>Color Mapping the Gamma was set to 2.2, Linear Multiply and Affect Background was selected. To display the render the V-Ray frame buffer was used where the render can be previewed with applied LWF by activating the small sRGB button.
TOP TIP – WORLD AROUND US
Observe the world around you, observe what materials, light and quality of light can do. It is best to take a reference photo, even if it is just with a cell phone. You never know when you're going to use it. If you have good references, especially when it comes to materials, their creation in 3D is much easier.
RENDERING THE SCENE
The V-Ray renderer was used for rendering with some fairly standard settings. Set image sampler to adaptive DMC, Max. Subdivs to 100 and Min. Subdivs to 1, Primary and secondary GI engine to Brute Force. With these settings it is possible to get an excellent quality render, without artefacts in the GI calculation and with clean reflections. The qualities of the whole render can be changed thanks to one single parameter: Noise threshold in DMC sampler.
The Dynamic memory limit in the V-Ray System was set to 0, which means that V-Ray takes as much RAM as it needs. But only use this setting if you have sufficient amount of RAM, because in large scenes the render time could increase significantly.
The whole scene was submerged into the morning haze, which was achieved thanks to VRayEnvironmentFog. The results offered by this atmospheric effect are really awesome so it is worth using despite the incredible computing demands. In the VRay>System the Optimized atmospheric evaluation option was selected, which reduced the render time a little bit.
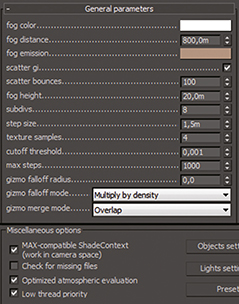
The environment fog option in V-Ray was used to help create the early morning atmosphere.
The environment fog option in V-Ray was used to help create the early morning atmosphere.
More render time was required by the rendered depth-of-field. The settings were left on default values. This depth-of-field divided the scene into foreground made up of mud heaps, middle with the mobile crane and background with the blocks of flats. The whole render time in the 5000 px resolution was 17 hours. The RAM usage was approaching 50 GB, mainly thanks to detailed displacement on the ground.
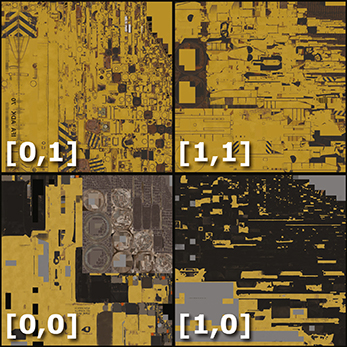
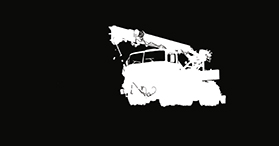
An important part of rendering was exporting the black and white masks of objects which were going to be worked on during post production. One of the methods is the application of white material on the object which we want to have in the mask, while the other objects get a black material. However, this means the rendering has to be run several times. A much more flexible method was using the V-Ray render element VRayExtraTex, where objects that will be included in the mask could be marked with the include button, while a clear white colour was assigned to the texture slot. This way multiple masks could be exported with a single render. For this image a Beauty pass and Render Elements and masks were rendered into 32-bit exr format.

Some of the render elements arranged in one screenshot to show what they were for.
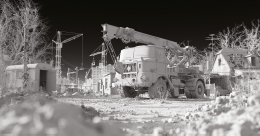
The clay render showing the scene without any textures.
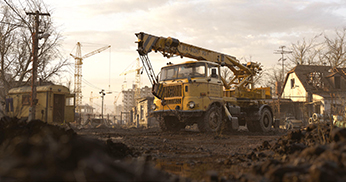
The final image out of the render engine, but without any post production work.
COMPOSITING FINAL ELEMENTS
The renders were stored in 32-bit exr format, which allows better work with the light and dark areas for a larger dynamic range than the standard 8-bit images. For example, it allows you to reduce the overexposure of some places without the loss of quality.
The final image was completely composed of render elements - render passes. The base layer was a Diffuse pass, then I applied Global Illumination pass above it, Reflect pass, and so on until I achieved a picture that matched the Beauty pass. This method of assembling the elements gives you the option to locally modify individual components of the image. For example, lowering the intensity of reflections on the ground only, completely removes specular on the building. This 32-bit project was saved as a Photoshop Smart object, which enables editing later, in a new 16-bit project, where the colour grading could be fine tuned. Small details in the image were retouched, such as adding some rust on the crane.
Colour grading was handled with the usual PS tools of Hue, Saturation, Color Balance. This included duplicating a layer, desaturating it and then setting the blend mode to Overlay. Rendered masks were applied on the individual groups of adjustments. That way the grading was linked to only certain objects in the scene. In the end a bit of lens flare and dirt on the lens were added.
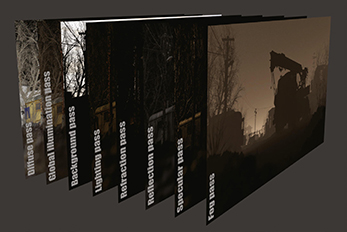
The different passes were combined in Photoshop to enable specific elements to be tweaked.
Individual objects could be identified and treated separately from the others in the scene.