
![]() The Racer A was developed by American artist Doug Chiang. He loves old race cars, so he simply took an old Autounion Bergrennwagen and switched the front and bottom end. I loved it the moment I saw it, so I decided to make it a special image using 3D, photography and sugar. The racing course itself is built of sugar cubes, we ended up using 46 pounds of sugar, because it reminded us of a snowy and icy landscape. The racer was created in CINEMA4D while the pilot was photographed – it was my assistant at the time, Johannes. We showed the image to Doug who liked what we had done with the concept.
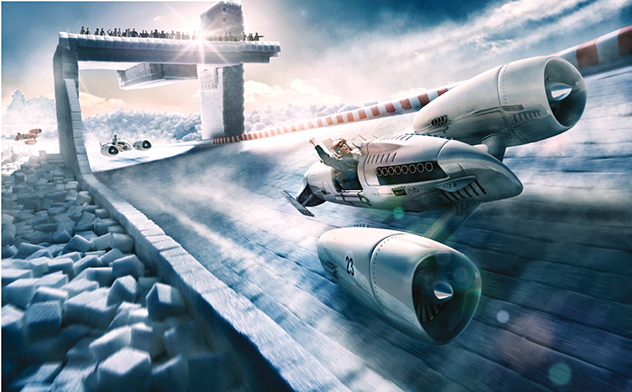
The Racer A was developed by American artist Doug Chiang. He loves old race cars, so he simply took an old Autounion Bergrennwagen and switched the front and bottom end. I loved it the moment I saw it, so I decided to make it a special image using 3D, photography and sugar. The racing course itself is built of sugar cubes, we ended up using 46 pounds of sugar, because it reminded us of a snowy and icy landscape. The racer was created in CINEMA4D while the pilot was photographed – it was my assistant at the time, Johannes. We showed the image to Doug who liked what we had done with the concept.![]()
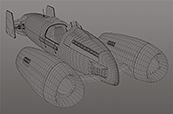
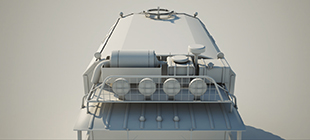
The wireframe of the racer car.
| PROJECT | RACER A |
| SOFTWARE USED | CINEMA4D, ADOBE PHOTOSHOP CS5 |
| RENDERING TIME | ABOUT 7 HOURS |
| ARTIST | ULI STAIGER |
| COUNTRY | GERMANY |
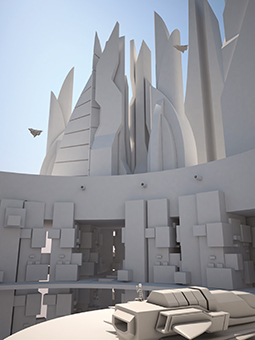
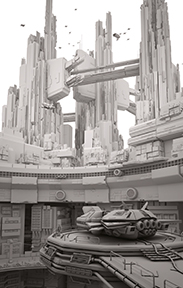
After some sketches I made this base 3D concept which shows the layout of the city.
| PROJECT | CRATER CITY |
| SOFTWARE USED | 3DS MAX, V-RAY, PHOTOSHOP |
| RENDERING TIME | 3–4 HOURS |
| ARTIST | MACIEJ DRABIK |
| COUNTRY | POLAND |
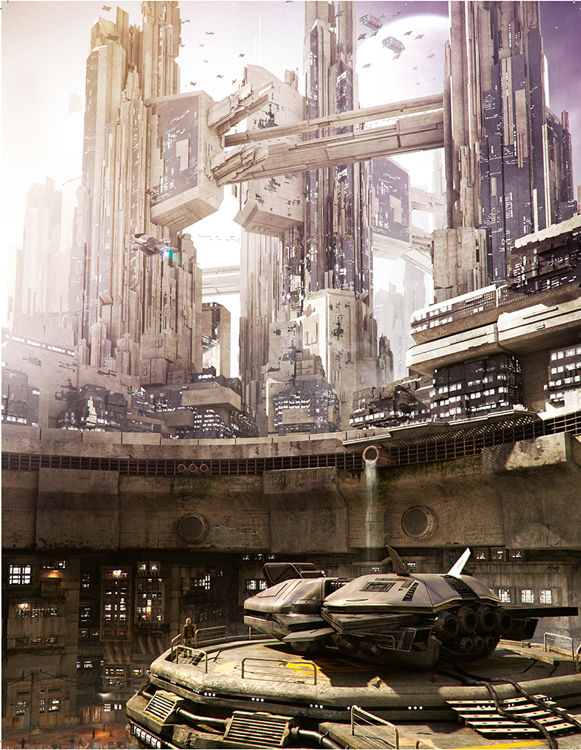
![]() I always want to create sci-fi environments that are somehow reflecting my vision of the future but also carry impressions of current events. In the comic book INCAL you can find futuristic cities that contain many levels and, as you can imagine, the lowest are for the poor and highest for the aristocracy. That was my main inspiration. Another inspiration was the beautiful works of Stefan Morrell.
I always want to create sci-fi environments that are somehow reflecting my vision of the future but also carry impressions of current events. In the comic book INCAL you can find futuristic cities that contain many levels and, as you can imagine, the lowest are for the poor and highest for the aristocracy. That was my main inspiration. Another inspiration was the beautiful works of Stefan Morrell.![]()
This is the final scene from inside 3ds Max, showing the completed model and lighting.
A clear model, or ambient occlusion pass, to show off the structure.
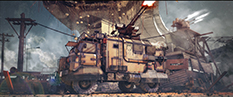
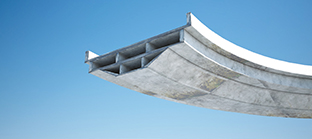
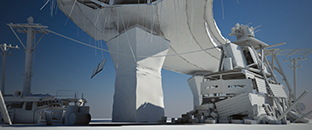
![]() This work is a 3D concept that I made for my personal portfolio, inspired by the amazing concept work of Ian McQue, http://mcqueconcept.blogspot.com and http://ian_mcque.cghub.com. In order to achieve the specific style of the concept that uses old junkyard pieces as building blocks, I used several parts from different 3D library models. They were then assembled together along with other parts made from scratch, to construct my concept ship. For the rendering in Softimage, I used multiple passes of colour information, shadows, speculars for the actual ship, the crew members and the seagulls. The final compositing was done in Photoshop, where I used the rendered passes, along with quite a few layer masks, heavily altered photographic bits from free online galleries and also some hand painting, to produce the final image.
This work is a 3D concept that I made for my personal portfolio, inspired by the amazing concept work of Ian McQue, http://mcqueconcept.blogspot.com and http://ian_mcque.cghub.com. In order to achieve the specific style of the concept that uses old junkyard pieces as building blocks, I used several parts from different 3D library models. They were then assembled together along with other parts made from scratch, to construct my concept ship. For the rendering in Softimage, I used multiple passes of colour information, shadows, speculars for the actual ship, the crew members and the seagulls. The final compositing was done in Photoshop, where I used the rendered passes, along with quite a few layer masks, heavily altered photographic bits from free online galleries and also some hand painting, to produce the final image.![]()


| PROJECT | AIRSHIP 3D CONCEPT |
| SOFTWARE USED | SOFTIMAGE XSI, PHOTOSHOP |
| RENDERING TIME | ROUGHLY 6 HOURS |
| ARTIST | NICK G. GIZELIS |
| COUNTRY | GREECE |
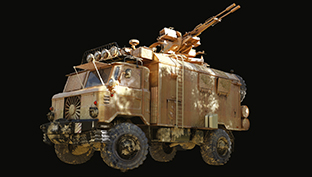
POST-APOCALYPTIC WARFARE
Michael Tshernjajew explains how he created a Mad Max-style fighting machine from the near-future
SETTING THE SCENE
This image is one of a series of ten that I wanted to make for personal use.
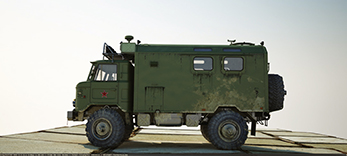
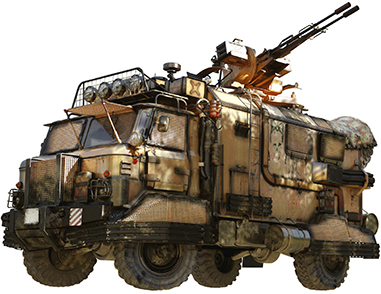
They were all to be set in a post-apocalyptical world. Usually I model cars and trucks from the former USSR and modify them so they fit into the world-theme that is being created. For this image I modelled the original GAZ66 truck first, including every little detail because I was not sure at the time that I wanted to make a Mad Max version out of it.
Finally I decided to build the post-apocalyptical version, with some modifications like guns, exhausts, cables and stuff like that. For the background I wanted to create a pile of trash, which is actually a wall that guards a base behind. The truck itself was part of that wall defence, more like a mobile watchtower, which could be moved. The scene takes place somewhere in a very hot region, under an old highway bridge, as the wall and base are coming under attack. That's why the gunfire is happening.
I didn't make any sketches of this piece, I just collected reference images via Google Search for blueprints of the original truck as well as some photographs. For the scene itself I had something in my mind as to how it should look.
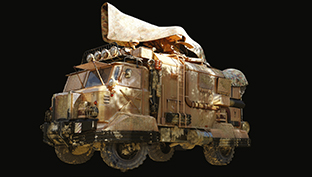
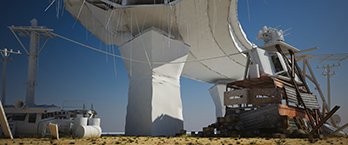
Outpost 2031
– final image
| PROJECT | OUTPOST 2031 |
| SOFTWARE USED | CINEMA4D, V-RAY FOR C4D, PHOTOSHOP |
| RENDERING TIME | 5 HOURS |
| ARTIST | MICHAEL TSCHERNJAJEW |
| COUNTRY | GERMANY |

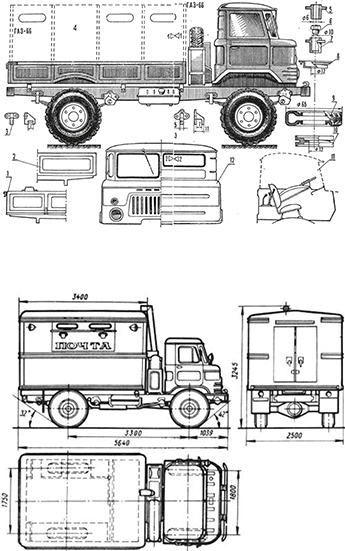
The actual truck itself. My version would change this by adding weaponry and remodelling it.
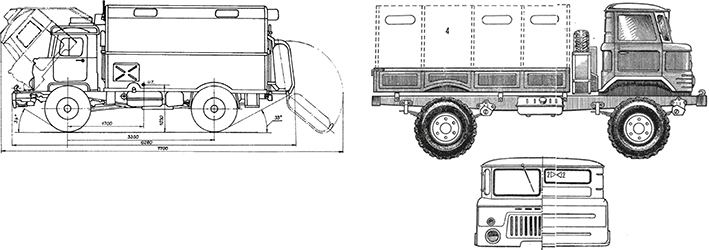
The blueprints for an old Soviet truck that was going to be the basis for the creation.
I used polygon modelling within CINEMA4D to create the truck. For some parts I used C4D's Nurbs tools to create windows, lights and features like that. It's faster and more accurate and for the image it is not important how you created it. I started with the hood and checked everything against the reference images and blueprints, which are very handy in such projects.
Next was the easiest part of the truck, the back cabin, as this was a really simple object being just made out of a box object. When modelling, I always render nearly every step just check how the model will look like under render circumstances with light and shadow.
After the basic shape of the cabin was done I added all the detail elements like rivets, bolts and windows. I decided to make the rivets out of real objects, rather than paint them, because it would look better in the end. I used a symmetry object to make it quicker though.
This was the first step in making the truck. I always start with the easiest part, so in this case it’s the cabin.

A quick render to check how the shape was progressing. After each modelling stage this was done.
After I made the wheels I positioned them for the first time to make sure the basic shape worked.
Next thing I had to do was to model an undercarriage which was done in a very simple and basic fashion because you can't see it, it's just there to support everything else.
After that was done I tackled the wheels. They were made out of cylinder objects which were subdivided and then formed out properly. I cut off some of the polygons and used them as extra geometry for dirt spots. Once the wheels were complete they were positioned to show what the basic shape of the truck would look like.
The next step was the front including the cabin where the driver sits. This piece was actually the most time consuming because it is the most important part of the vehicle. So I started with the driver's door which was also made out of a box object and then later was smoothed with a subdivision surface. From one reference image I found on Wikipedia I decided to add some interesting details on the roof. As work progressed on the front end I decided to model in some details at the same time, like lights for example.
Wireframe of the details being added to the hood to make it look more interesting.
Close up of the hood with the complex details, checking for any faults.

Almost done with the hood but still adding details like rivets, bolts, lights and features like that.
Next up were the bumpers and these varied from the blueprints because I wanted to create a custom look for them. They were formed out of a shape which I thought would look cool enough. That was it for the basic shape. For the post-apocalyptical version I needed to add some weaponry, grunge and to modify some parts.

The transmission underneath has been added along with some extra details on the doors.
The very basic shape of the bridge without any of the dangling debris.
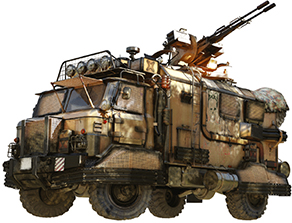
In the stage of adding and deleting stuff to the model, I went through several variations of the model.
This version has a large covering for the gun, but it does start to look like a carpet so it was ditched.
I went through the process of adding and deleting features. The first thing I made were some more bumpers. In this case they came out of an old project and were part of a metal fence, so just like in real I added that part to the truck. I covered the windows with plates and made cage-like objects to guard the wheels. A ladder to reach the top of the cabin was added and then up there I created the anti-aircraft gun. This was made very quickly and is a really simple model as I wanted to focus on the truck.
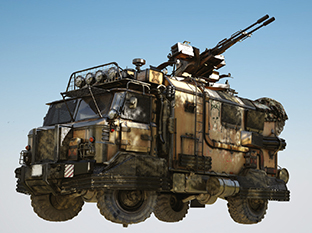
I kept on adding more and more features, and deleting others, to take the model from a Soviet era truck to that near-future, sci-fi post-apocalypse version. Again nearly every step involved a quick render to check the results, after I was pleased with modelling.
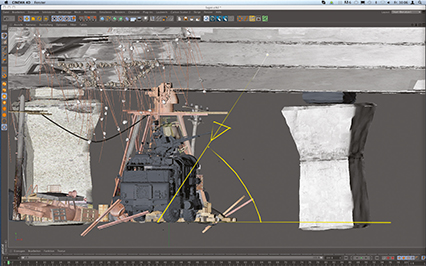
The background of the image consisted of parts from old projects I decided to recycle and arrange for this scene, except for the bridge, which I had to build especially.
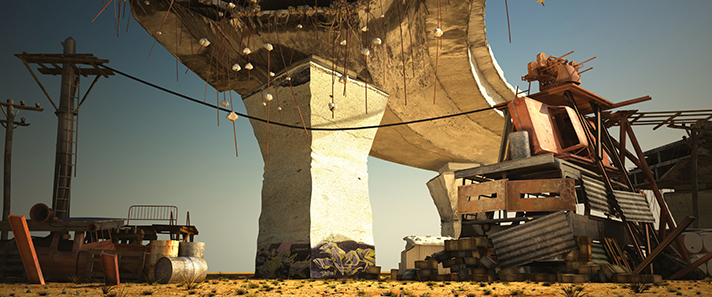
Basic arrangement of the scene with the bridge and the details in the background.
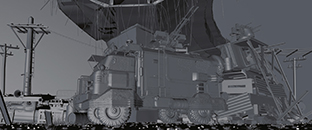
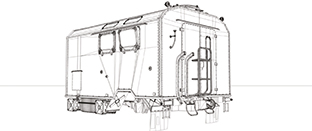
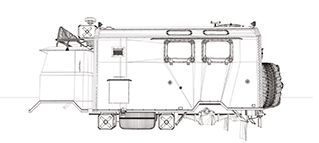
The entire scene with the armoured truck in it, in wireframe view.
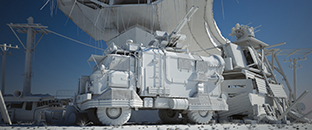
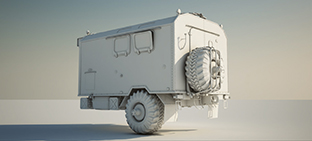
A clay render of the whole scene so that the lighting could be used.
As mentioned earlier, originally it wasn't the plan to create a scene like this with the GAZ66 model. So, I initially textured it like the real model. I wanted to make it look really dirty as though it had been driving down a muddy road. The wheels were tackled first which were unwrapped properly and then a wheel texture was applied to the skin wall. Some real dirt was added to the surface and this worked well in the final render.
I went over the basic colour of the truck and created a simple shader with a slight glossiness and almost no reflection. As I did not want to unwrap all of the parts I decided to add the dirt and used-look textures as separated, layered textures. This meant making a few dripping, rust, dust and dirt textures which were modified within CINEMA4D and stacked onto the specific parts. This was a very smart technique because I was able to move the stacked dirt on the model where I wanted without going back to Photoshop and change the whole UV map.
A lot of tests were run just to make sure the shaders would look cool enough. After I had a pleasing result the colour was changed from green to the rust-like colour seen on the model in the final image.
To make it more interesting I used Paul Everett's Grunge Shader plug-in but after testing it out, it was a little too grungy so I decided to make a mixture out of the Grunge Shader, the rendered version, and the one without.
Applying textures and shaders for the first time on the model.

Then rendering it to see how those textures looked when the lighting was applied.

The model applied with all textures and Paul Everett’s grunge shader. It worked fine, but in this case it was a bit too much.
The two versions of the textures mixed together produced a more pleasing result.
For the ground a simple dry desert photograph from ogtextures was used. That's where most of the other textures were from.
The ground plants, which were distributed with Surface Spread had the Surface Spread Grass Shader plus Clone Shader on them, so there was slight variation in the colour from one patch of grass to another. The trash in the background had some rust shaders on it which came out of my own database. Finally, a UV map was created for the bridge.
Adding some used old metal rust shaders to the pile of trash in the background.
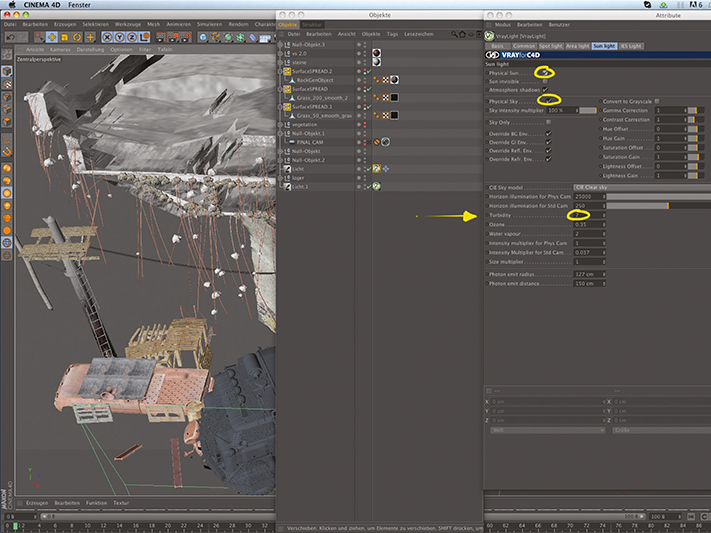
USING THE SUNLIGHT
The lighting of this scene is not really complex as it used a V-Ray sun with a V-Ray sky, as well as an area light with a HDRI in it. It was really simple but it produced great and natural lighting. The default attributes of the sun were mainly kept but the Turbidity number was changed from 3 to 7 and the colour of the sun/sky system was made a little more of a warmer colour.
The sun added great shadows to the scene and the HDRI made it better by lightening them out. In this way you don't have disturbingly dark places and also get some nice reflections on significant shiny parts. What's important when using a sunlight, is the angle of the sun entering the scene. It affects the shadows, colour, nearly everything in the scene. So, it's important that you figure out what is the best angle for your scene.
In this image a very directional angle, which was not too sharp, was used so there were short shadows that didn't cover too much. As I wanted to make the environment quite dusty I first tried out VRayFog, but this resulted in very long render times, so I decided to do that in the post work instead.
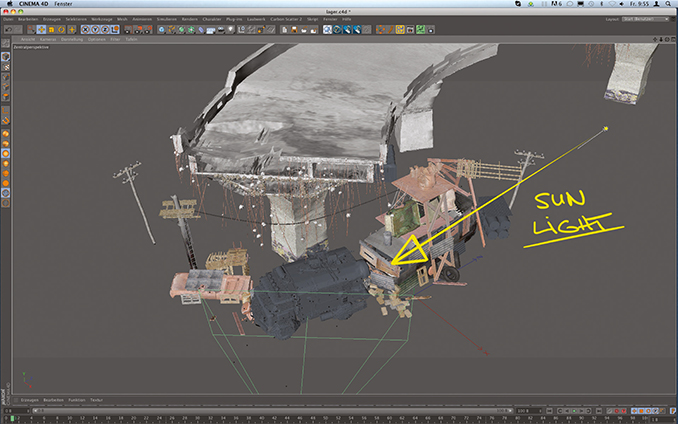
The basic scene with the lighting featuring sun light/directional light coming from the right.
Showing the angle of the sunlight, and the short shadows, compared to the rest of the scene.
For rendering I used VRayforC4D, which is my main render engine. For this image I used some of CINEMA's advanced render capabilities as well. To have better control over the final image the backgound and truck were rendered separately from each other. So, the background was rendered first with the truck invisible, but casting shadows, reflections and so on. Then the truck was rendered without the scene being visible.
For the render settings within VRayforC4D I used the most common Irradiance Map/Lightcache method. This produces great results.
Important for the scene was colour mapping and in this case I decided to use a “Reinhard” colour mapping with default attributes. Normally I use exponential colour mapping, but in this case Reinhard worked better.
For anti-aliasing an adaptive dmc without filtering and a dmc threshold were both used to get a nice clean result.
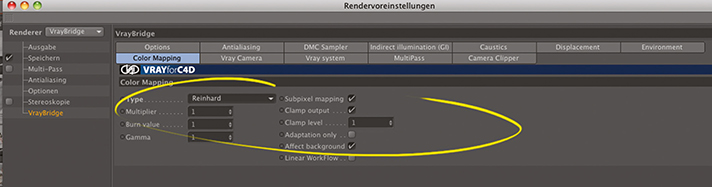
The colour mapping attributes where a Reinhard with default attributes was used.
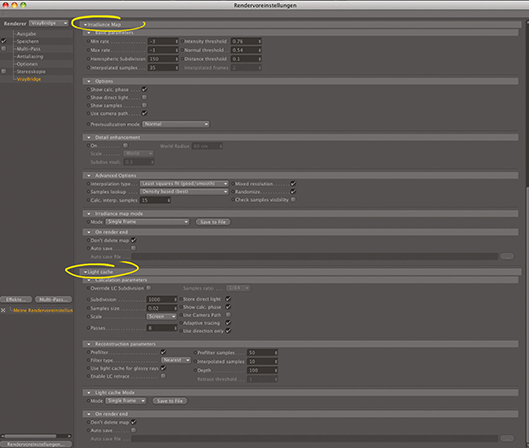
The GI attributes with Irradiance/Lightcache which was mostly using default settings too.
As I wanted to make a slight depth-of-field effect, I used CINEMA4D's Z-buffer render pass so that it would be possible to make the effect later in Photoshop. Also, an ambient occlusion pass was created to get a little more contrast in the end.
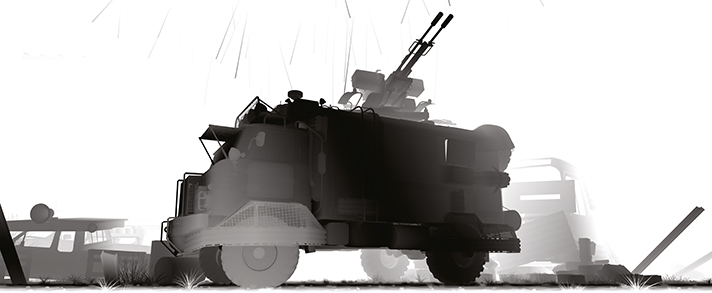
CINEMA4D’s Z-depth pass rendered out for compositing later in Photoshop.
FINAL COMPOSITION
Composing was done in Photoshop where there were layers for the background, the truck, as well as some fog layers and a sky, which was composed in the background sky.
Almost everything was done with just an alpha channel and a Z-pass, which was rendered out with CINEMA4D renderer. A few smoke plumes were drawn on with the Photoshop brush and the Z-pass was used to fit them in. A second smoke layer with an inverted colour for the back of the background was created. There were two renders of the truck, as mentioned before, that were then merged together. A soft brush eraser was used on some places of the grunge shader image so it looked like the truck was even more dirty and used, but more randomly.
For the gunfire, some images from web searches were cut out and placed on the scene. A colour ramp was added in Photoshop, over the entire image that made it look a bit faded out. In the end a scan of some dust particles was added on the final image.
The truck rendered with the grunge shader which was a bit too severe.
Then rendered again without grunge shader so the two could be combined.

The final background pass without any Photoshop work carried out on it.
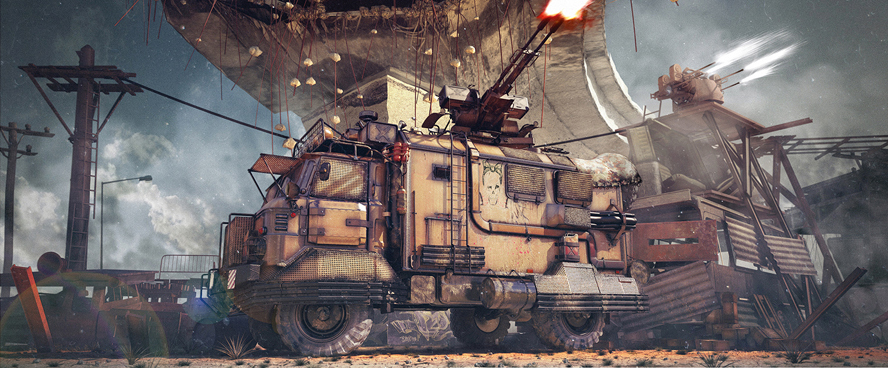
OUTPOST 2031 BY MICHAEL TSCHERNJAJEW
![]() CINEMA4D, VRAY FOR C4D, PHOTOSHOP
CINEMA4D, VRAY FOR C4D, PHOTOSHOP
![]() 5 HOURS
5 HOURS