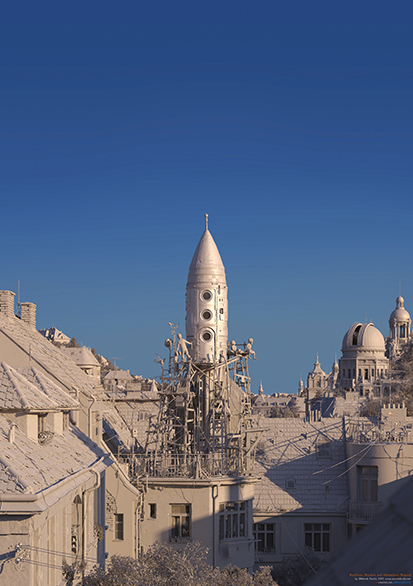
![]() For a long time I wanted to create a poster for my kids. To create something dreamy and fascinating, full of little things to discover. Something that could possibly push their pure minds to some direction in the future. To invent, build and explore.
For a long time I wanted to create a poster for my kids. To create something dreamy and fascinating, full of little things to discover. Something that could possibly push their pure minds to some direction in the future. To invent, build and explore.![]()
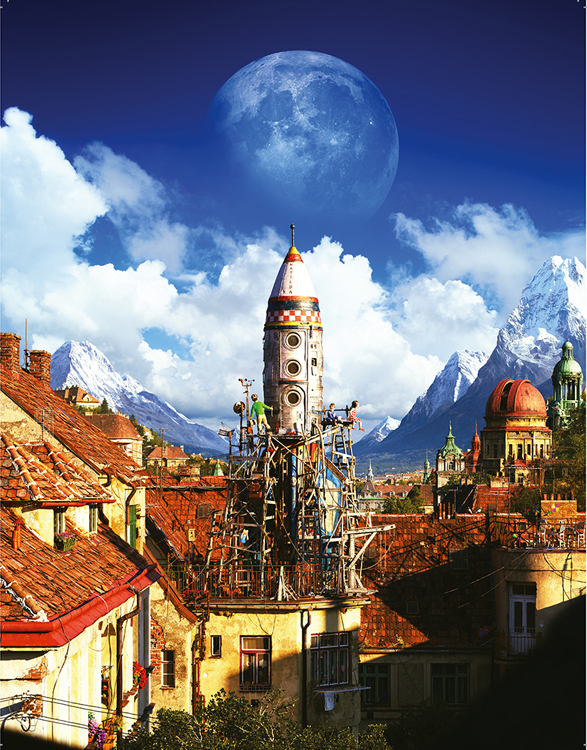
| PROJECT | ROOFTOPS, ROCKETS AND ADVENTURES BEYOND |
| SOFTWARE USED | 3DS MAX 2012, V-RAY 2.3, PHOTOSHOP |
| RENDERING TIME | RENDERED OVER NETWORK |
| ARTIST | MAREK DENKO |
| COUNTRY | SLOVAK REPUBLIC |
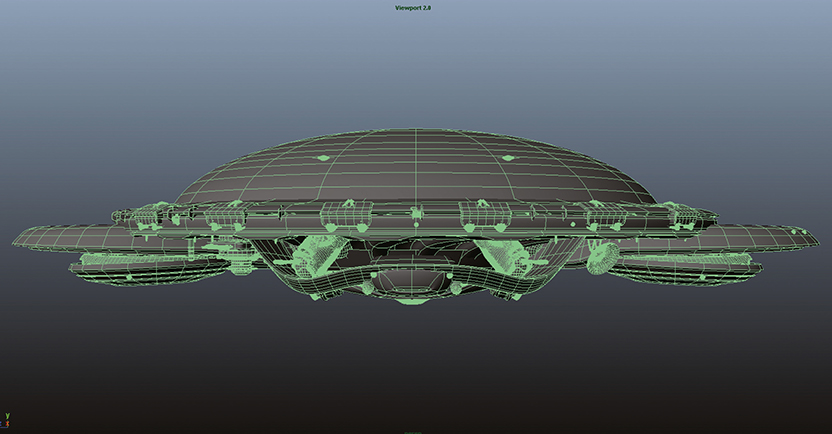
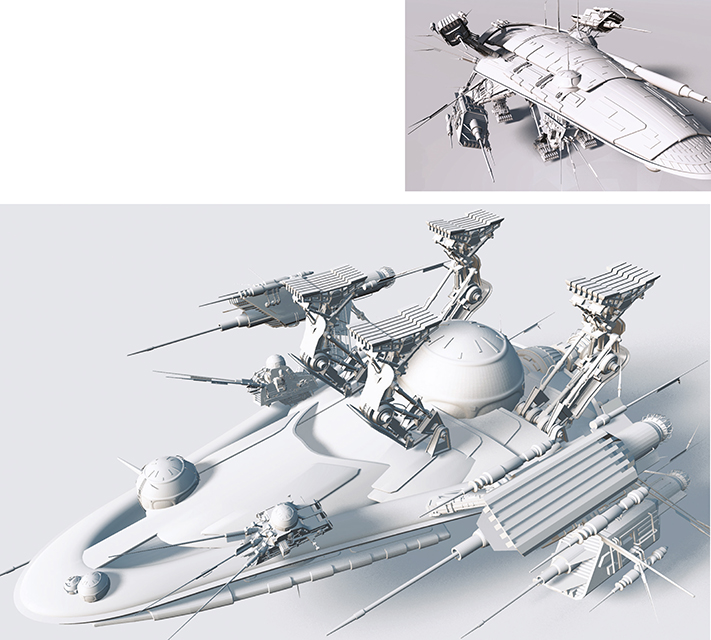
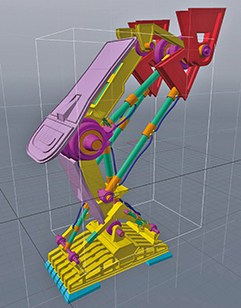
The shaded render without any textures to show the model in the foreground against the painted scenery.
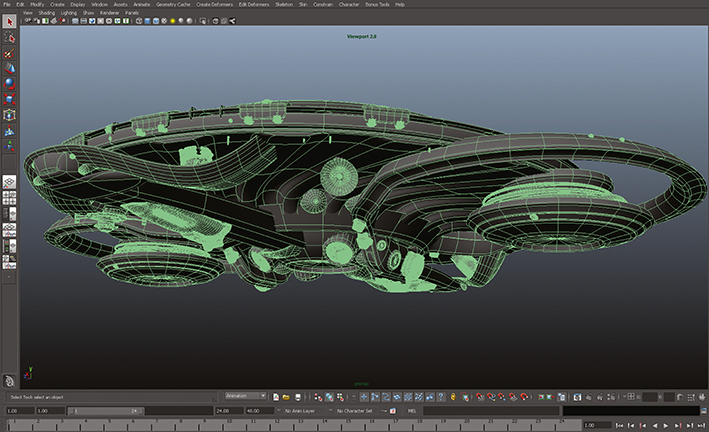
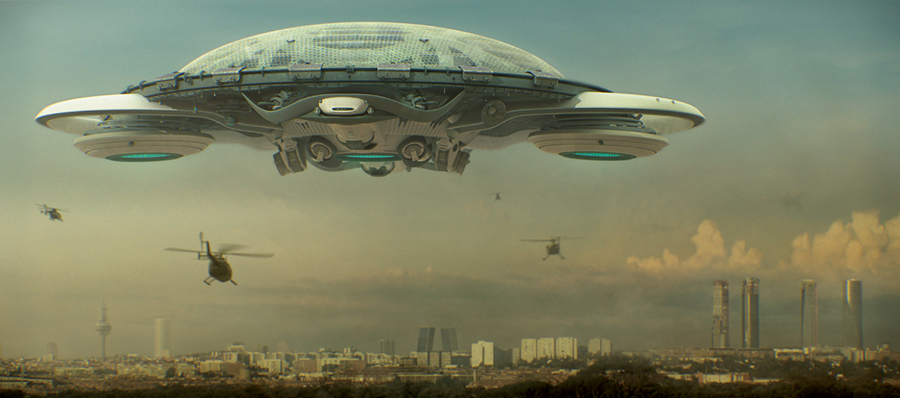
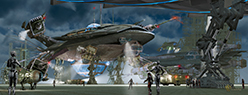
![]() This is a spaceship concept and layout design I did for the short film Audacia (http://www.imdb.com/title/tt2304493/). The director wanted a very big ship that sits over the city like in the movie District 9. For the ship design, I tried to mix up forms and volumes to depict a spacecraft that can go underwater as well as fly, hence the turtle-shaped final design.
This is a spaceship concept and layout design I did for the short film Audacia (http://www.imdb.com/title/tt2304493/). The director wanted a very big ship that sits over the city like in the movie District 9. For the ship design, I tried to mix up forms and volumes to depict a spacecraft that can go underwater as well as fly, hence the turtle-shaped final design.![]()
Maya viewport showing a frontal view of the ship’s wireframe. Work in progress.
| PROJECT | SPACESHIP OVER MADRID |
| SOFTWARE USED | AUTODESK MAYA, ADOBE PHOTOSHOP |
| RENDERING TIME | UNKNOWN |
| ARTIST | FRAN SAA |
| COUNTRY | SPAIN |
The wireframe of the ship, as seen from below, while it was still developing.
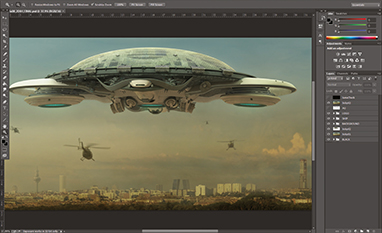
Post production tweaks in Photoshop with the image almost ready to be published.
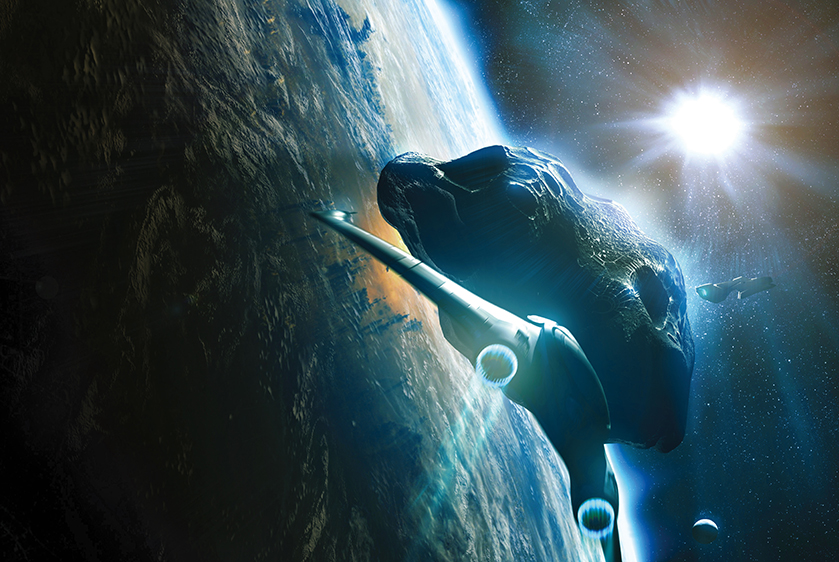
![]() The basic story is that of a control-vessel spaceship which is about to dock on a mining colony on an asteroid. I started with a short concept where I just put the general elements together. During the past year I had already created a huge library of 2D and 3D assets and some of them were used in this project.
The basic story is that of a control-vessel spaceship which is about to dock on a mining colony on an asteroid. I started with a short concept where I just put the general elements together. During the past year I had already created a huge library of 2D and 3D assets and some of them were used in this project.![]()
| PROJECT | MINING COLONY |
| SOFTWARE USED | 3DS MAX 2010, PHOTOSHOP CS3 |
| RENDERING TIME | ABOUT 10 HOURS |
| ARTIST | ALEXANDER PREUSS |
| COUNTRY | GERMANY |

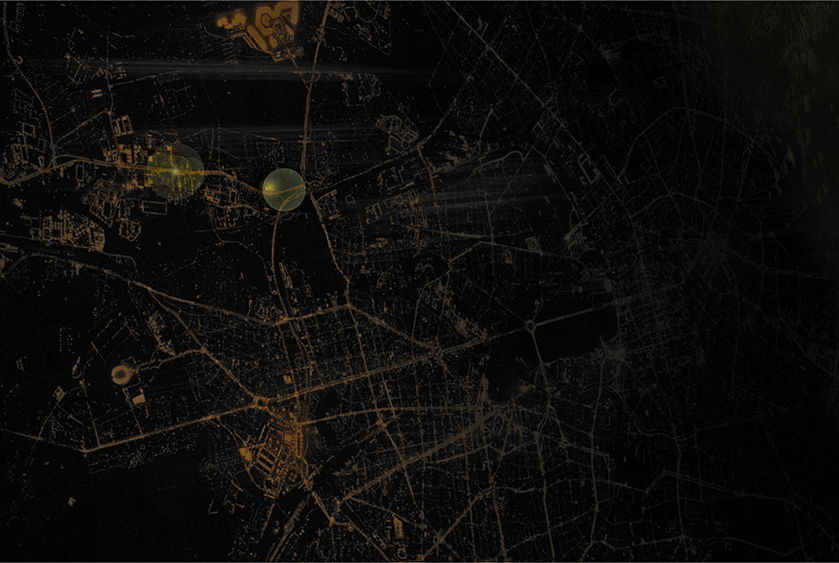
The background image without any of the models added.
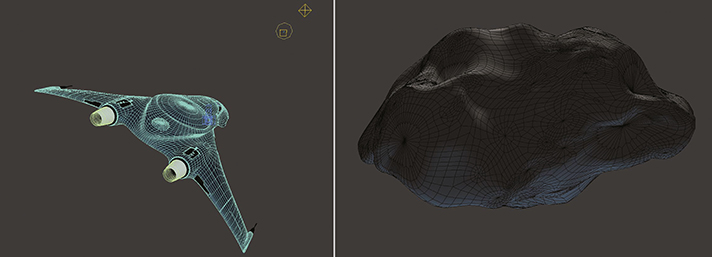
Some of the assets which had already been created during the year.
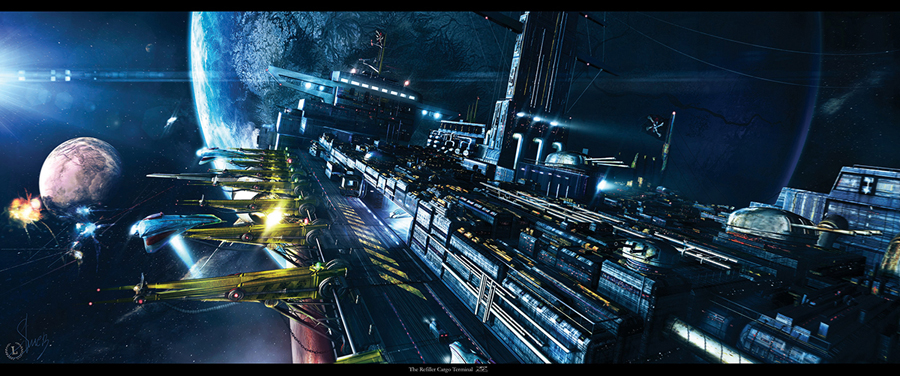
![]() The image was done to complete a series of two previous artworks themed on sci-fi terminals into space. I figured out that a massive terminal under the shape of an ULCC (Ultra Large Cargo Carrier) oil tanker would look pretty cool with a sci-fi spirit and background scene. While a space battle is taking place, the biggest cargo in space is there to refuel and refill the troops and spaceships at war. That’s the back story.
The image was done to complete a series of two previous artworks themed on sci-fi terminals into space. I figured out that a massive terminal under the shape of an ULCC (Ultra Large Cargo Carrier) oil tanker would look pretty cool with a sci-fi spirit and background scene. While a space battle is taking place, the biggest cargo in space is there to refuel and refill the troops and spaceships at war. That’s the back story.![]()
| PROJECT | THE REFILLER CARGO TERMINAL |
| SOFTWARE USED | 3DS MAX 10 AND PHOTOSHOP CS3 |
| RENDERING TIME | 10 MINUTES |
| ARTIST | SEBASTIEN HUE |
| COUNTRY | FRANCE |
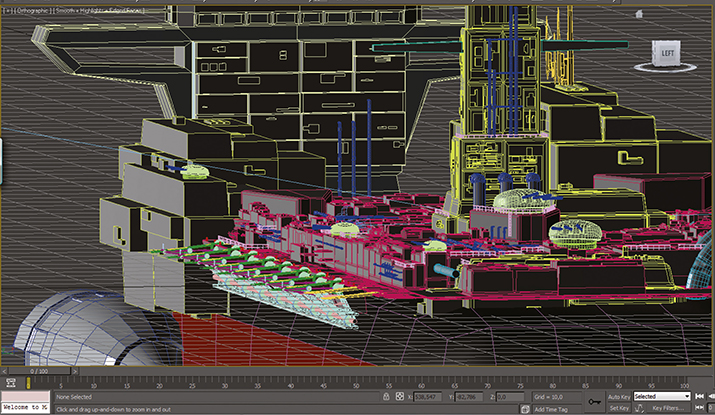
Modelling the various shapes for the surface detail of the cargo terminal.
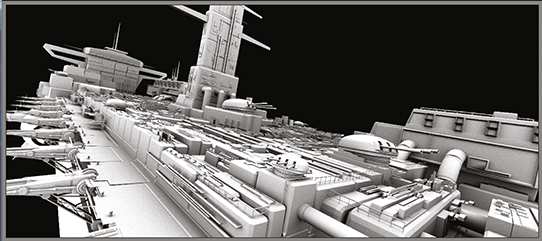
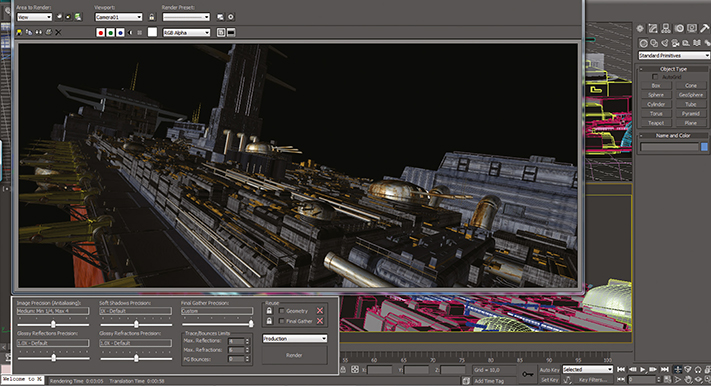
Adding textures now to give it an oily and used appearance, even on the gun turrets.
STEP-BY-STEP SCI-FI SPACESHIPS
CREATING A HEAVILY ARMOURED SPACESHIP
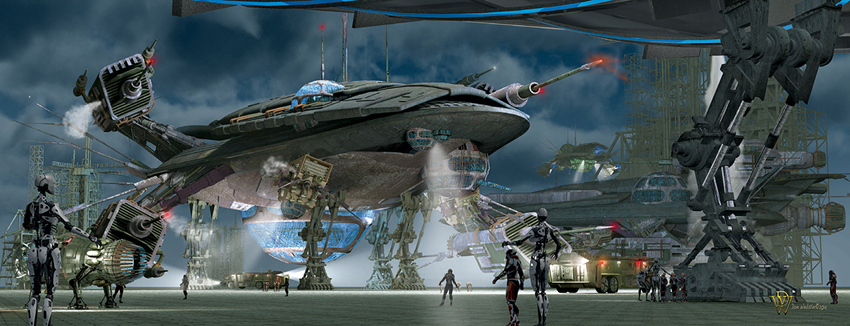
Don Webster explains how he modelled and posed a massive scene based around a spaceship hangar.
SCI-FI MOVIE INFLUENCES
Like most creative people, outside influences often redirect my modelling and composition efforts. Looking forward to the release of the movie Prometheus, I realized that I never do space art or models, even though I have been moved by films like Blade Runner and more recently Avatar. Such realization often pushes me into a new direction to take on a challenge to understand both the themes necessary as well as the technical aspects of doing it. Here I had a challenge, and a desire, to do something a bit different from the current look in both visual composition and in the mechanical look of the 3D hardware, vehicles, spacecraft, etc.
I started out knowing that I wanted a massive scale to everything, more grit than shine and, as far as the main spacecraft, something that looked more organic with probes and feelers rather than windows, and large domes which, in a way, were large eyes. The final requirement was to model something that was not at all symmetrical. While basic structure on anything like this needs to be symmetrical, there was no reason for much of the exterior elements to follow suit.
I have never been one to sketch out what I am thinking. I work out in my mind the basic items I want for a composition, which in this case would be a mother ship. From there I would see what developed. In this case a gantry landing system and some type of transport.
| PROJECT | NIGHT OPERATIONS |
| SOFTWARE USED | MODO 6.01, POSER PRO 12, VUE INFINITE 2014, PHOTOSHOP CS5 |
| RENDERING TIME | 6.7 HOURS |
| ARTIST | DON WEBSTER |
| COUNTRY | USA |
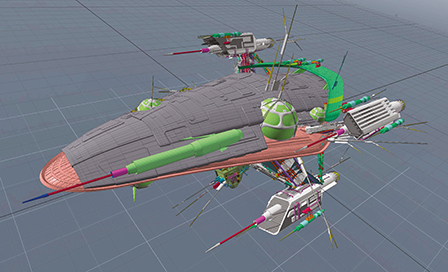
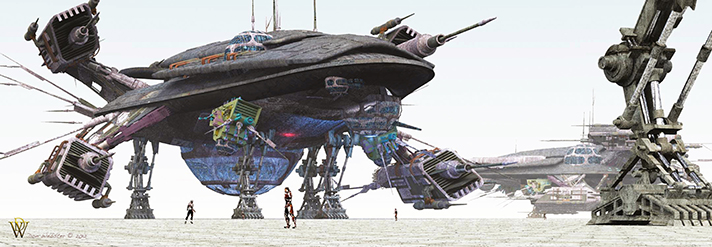
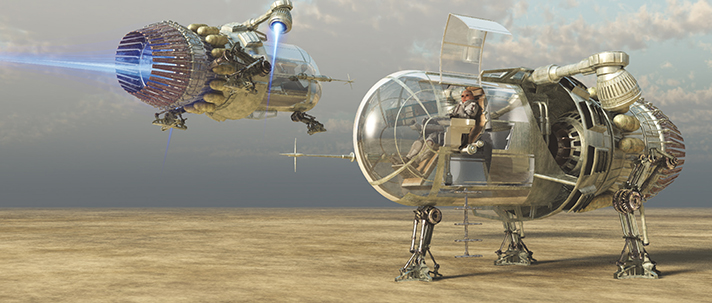
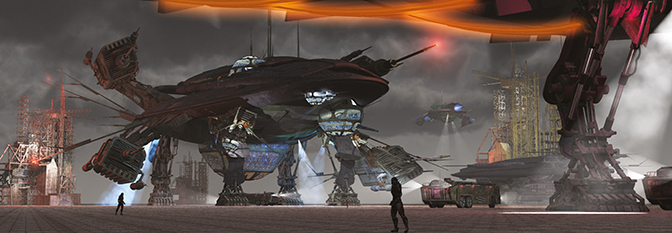
Night Operations – final image.
STEP 1
LARGE SHIP DESIGN THEME
My design was to be based on crustaceans, sea life that had flexible armour, arms and tentacles. I didn’t just want light probes like in Close Encounters, but projections that had secondary arms and feelers at angles to the main arm, looking as though they were reaching out.
STEP 2
COLOUR TAGGING FOR VUE PROCEDURAL TEXTURES
Since there would be some elements that were duplicates I colour tagged, or UV’d, them, then duplicated them to save time. Here the engine and support arms were mirror duplicated for the four positions. UV’d texture mapping in Modo provided many of the textures, but some of the smaller items and especially the domes benefitted from Vue’s procedural materials.
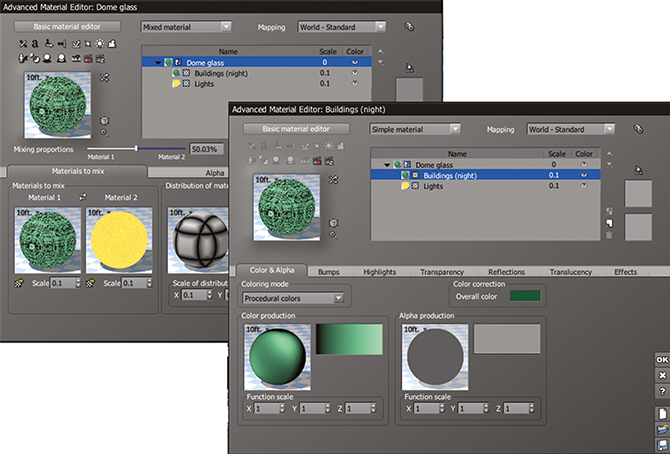
STEP 3
DOME MATERIAL
Rather than model the window viewports of all the different domes across the ship, I used a procedural material that had a distribution pattern and gave it the colour I wanted. Once applied, this provided a detailed framing structure reminiscent of the data structure visuals in the movie, The Matrix.

STEP 4
HULL UV
Modo has a very easy UV system and where possible I keep it in their Atlas projection. Here Modo has cut up the selected structure and laid out the main top and bottom surfaces for a horizontal alignment. The smaller elements are just too small to worry about, even for some of the close ups. Scaling is all that is necessary.
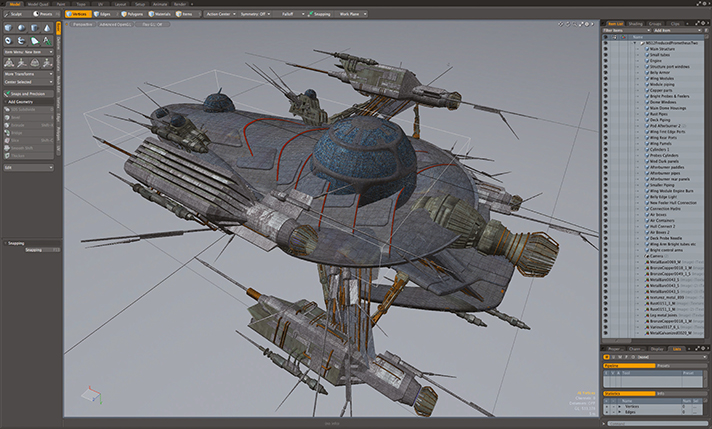
STEP 5
HULL TEXTURING
Main surfaces textures were run throughout the individual object meshes to check everything out before saving and exporting as obj format files, which I then used in Vue. It also allowed me to check structures that need to be further divided up for UV or colour tagging for even more material diversity.
STEP 6
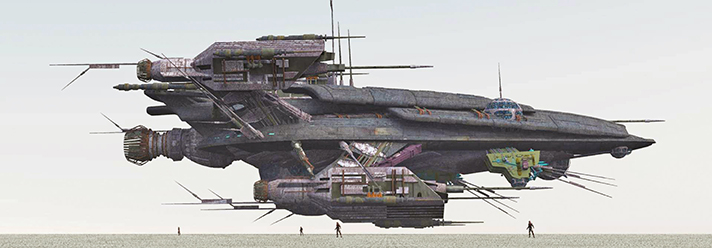
AN INFLUENCING VIEW
Importing the obj into Vue and taking a quick side view look, I imported a few Poser based obj figures and played with the scale. Intrigued with the size and look, I decided that I liked the potential of a composition that shows figures like this in a ground related view. The problem was that it wasn’t just going to float there.
STEP 7
TEXTURING LANDING LEGS
What was needed was a massive landing gear system to support such a structure. This became the fun part of the project with lots of hydraulics, pistons, cables and heavy feet. While the two shields were UV’d in Modo, the rest used Vue’s procedural materials.

STEP 8
BENEFITS OF VUE’S PROCEDURAL MATERIALS
I found that one of the main benefits of Vue with an object like this was the procedural materials and the ability to quickly and interactively mix to create just the metal look that I want. I could have a vertical piston start out at its highest points clean and then evolve to a greasier chrome at lower levels.
STEP 9
WORKING GEAR
Having achieved the results I wanted with the landing gear, I had to accept that I wasn’t able, nor really wanted, to go back and incorporate it into the main ship for any inflight operations. Cheating really, I just told myself that should I do a flight composition, I would simply leave them out.
STEP 10
FORMING AN IDEA
Positioning several duplicates of the ship and the landing gear, to include one gear in the foreground along with the figures, I sensed a possible final composition. The background could have been some troubled sky, a distant planet but I decided that this might be too distracting, yet I wanted some type of texture in the background.
STEP 11
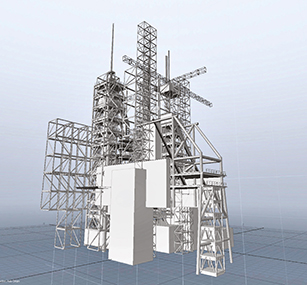
LAUNCHING TOWERS
My decision was to make a gantry or launch pad facility that would be appropriate and yet be nothing more than the texture pattern of horizontal, vertical and diagonal polygons. Looking at any of the gantries from our space programme, the structure was easy to make and build up by duplicating simple box structures.

STEP 12
TEXTURED ELEMENTS
A simple, one-texture UV in Modo Atlas projection and with all elements aligned in a horizontal, packing the gantry, was just what I wanted. Should I have needed to bring it out more in the composition I could easily have added lights to both the spires and the interior and let the shadows do the rest.
STEP 13
A TRANSPORTER
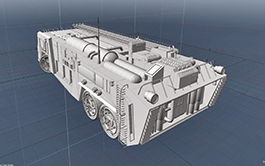
With these two models positioned, it seemed only natural that some type of transport would be necessary. I decided on something not unlike what we have today as emergency vehicles at our airports. Large enough to carry workers while still having flame-fighting hose systems and pumps on the roof plus emergency lighting floods and a wheel/ tire system to carry such a large vehicle.
STEP 14
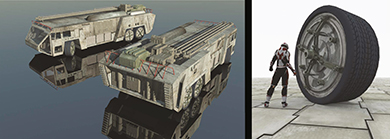
WHAT SIZE
From the rear the model was quite large compared to a human, and you can see this in the ladders. But from the front I decided to make it look more in scale with a figure and felt that if I needed to keep the large scale it would show a two-level cockpit cabin.

STEP 15
TEXTURING A TRANSPORT
I also decided that I liked the firefighting and emergency equipment of today and the vehicle would be in better shape, and looked after, in the atmosphere of far-away planets While weathered, it still remained a viable transporter and emergency vehicle with fire extension piping and tanks on the roof.
STEP 16
NEED A SMALLER RECON SPEEDSTER
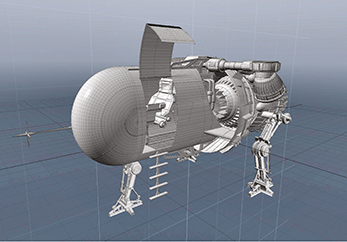
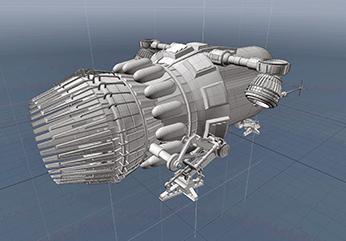
After considering ground transportation and distant travel spacecraft, what about those short trips and recon patrols? I decided to make a small, one-person craft that was basically a glass dome with a big engine. Happy with my landing gear, I took elements from it for the small craft tri-landing gear. The engine was made up of elements from the main ship.
STEP 17
INSECT-LIKE WITH A BIG MOTOR
Knowing that this would be something that I wanted to have in flight in future work, I developed the gear in a folded up position, modelled the hatch open and closed and provided a step up system. Happy with the look and the potential for close ups, I jumped into modelling a seating position with monitors for a pilot control system.
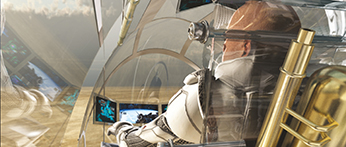
STEP 18
DID I GO OVERBOARD?
With a figure in the seat and taking advantage of the wonderful metal procedurals of Vue, I think I might have gotten carried away as I took a bit of a side-step in developing this one model. Playing around with POV from inside the cockpit I started to envision scenes from inside, looking out at the main ship. Then I decided to save that for another day.
STEP 19
JUST COULDN’T WALK AWAY
One thing that stopped that side journey was the fact that such a wide view to capture a small cockpit would also distance the main landing pad scene. Also, which one would be the main focus? Well, this was a problem to solve for another day, but intriguing anyway.
STEP 20
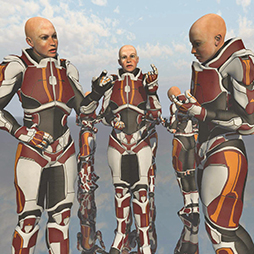
HUMAN FIGURES FOR SCALE
While I need figures and even a few cyborgs for the composition, I did not take a lot of time working this out in PoserPro. A single female figure was duplicated and repositioned to group together in a pairing of three and I had what I needed as they would be very small figures on the canvas.
STEP 21
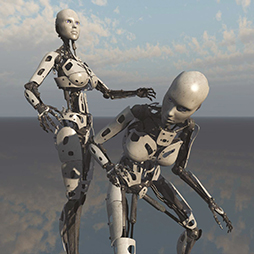
CYBORG MODELS
The cyborgs were another PoserPro asset that I did decide to make a bit more posed since I wanted to make them much taller than the humans. I’ve had some friends tell me that it wasn’t appropriate to have them larger, but I thought that with vehicles as large as this, mechanics would need to be larger and stronger to be useful. There was a cyborg leaning over as it listened to a group of humans in discussion.
STEP 22
INITIAL LAYOUT RENDER
While the composition was incomplete, a test render showed me that the basic framing was okay, but there was no, one focal point of interest. Also the glowing red underbelly lights of the main foreground ship were distracting. The gantries were too small and well defined with lights.
STEP 23
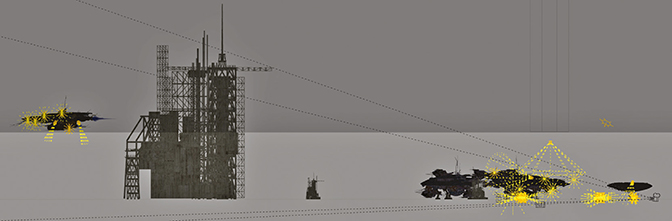
CHANGING COMPOSITION
In this side view you can see that I have moved both gantries, and also changed their sizes, disregarding world scale. In my camera view I simply moved, scaled and positioned the POV I wanted regardless. I changed some of the textures, like the glowing red strip lights, and added all the figures and the Recon Speedster.

STEP 24
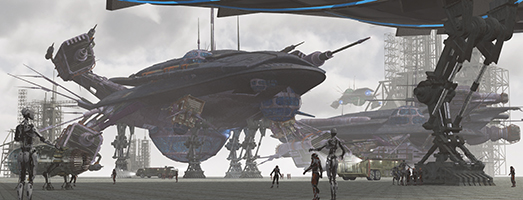
PREVIEW RENDERS
Even with the confusion of all the light sources, the composition was looking better and the focus was on the main ship. It was time for a full render. I already knew that this would take about 6–7 hours at 4800 px wide size. I print my own Giclee canvas prints, usually at 40 inches wide, and some have taken as long as 67 hours.
STEP 25
MASTER RENDER WITHOUT RELIGHTING
With 56 lights, this render might have been surprising, but my process was to just position lights and do all the lighting in Vue’s relighting Post panel. The render complete, I saved as a tiff and then saved the atmospherics mask as a separate tiff file. I then stacked the colour image into the Vue system for retrieval later if required.
STEP 26
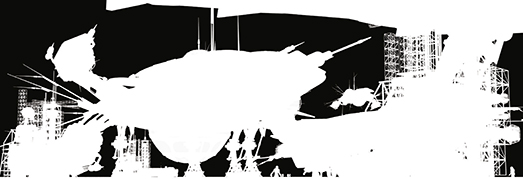
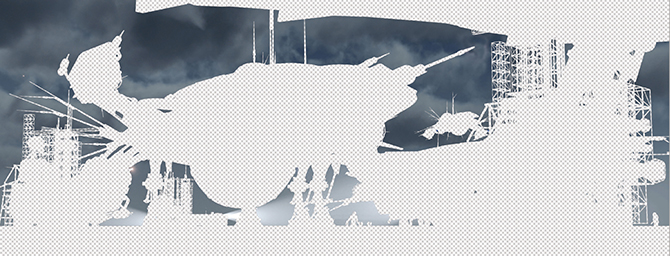
USING A SKY MASK
Saving the sky mask allowed me to make changes to it independently of the rest of the image. I often adjusted it, as well as added additional 2D elements to my background sky.

STEP 27
RELIGHTING THE SCENE
Relighting is one of the joys of Vue. It allowed me to place any number of potential light sources in the composition adding to the overall composition potential of any given work down the road. Once rendered, I could then go into a dark scene as it were and start turning on these lights as a lighting director would on a sound stage.
STEP 28
ADJUSTING THE SKY
With the relighting adjusted as desired and a full version saved in a Vue stack that I could come back to, I moved over to Photoshop where I imported the colour tiff and the mask, and then used the mask to cut out the sky into another layer. I made additional further contrast and selective colour changes.
STEP 29
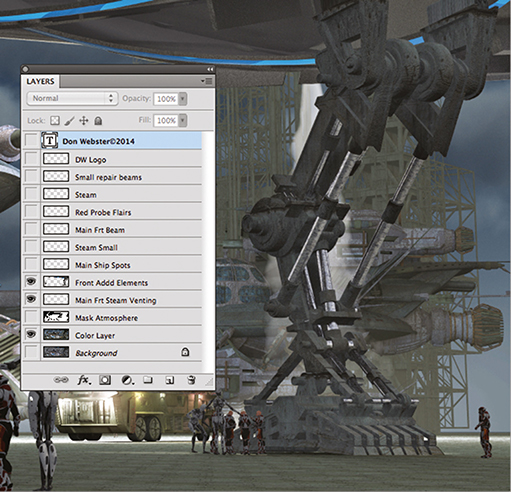
RE-RENDER SELECTED ELEMENTS
Wanting the landing gear and figures in the foreground to stand out a bit more, I went back to Vue and did a selective object render of those elements and saved it as a tiff, which was then added to the Photoshop layers. This also allowed me to do a few paint things to the image behind these elements.
STEP 29
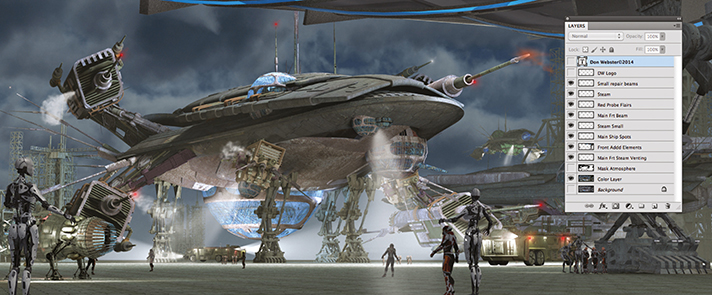
PHOTOSHOP ADJUSTMENTS
Using Photoshop steam and light-beam brushes, I was able to scale, add and adjust each in their own individual layer where necessary. The overall look was the one I wanted, with the main focus on the mother ship, framed and showing the large scale of the objects against the human-world scale.
THE ADVANTAGE
I cannot say enough about the advantages that Vue’s latest offering provides by having the ability to relight a scene after the render. Returning to a stacked render, the look of a scene can be changed beyond even just day or night to match whatever mood or highlight was required. A simple change of POV is all that is needed to develop a new look.
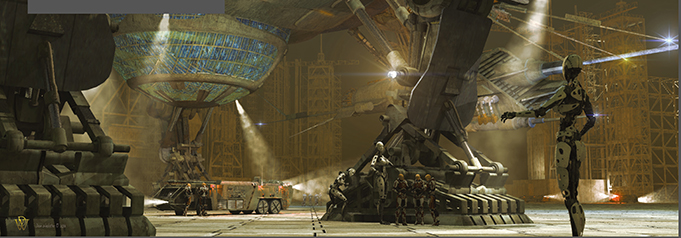
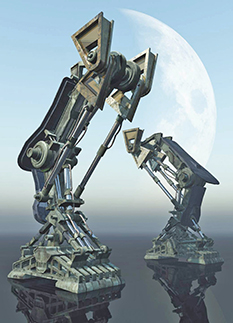
A night-time close up of the leg structure of the spaceship.