
SELECTING THE RIGHT SOFTWARE
There’s a handsome selection of packages you can use for creating 3D machines, each with their own strengths and weaknesses
When considering which software to buy for creating scenes featuring 3D machines there are numerous considerations If you’re going to work or train for a professional career in 3D then the Autodesk and Maxon packages are likely to be most suitable as they are most widely used in the industry. Then there’s the consideration of whether you actually want to create the machines that feature in your scenes, or whether you’re content to texture and light them only On the creation side you’re talking about hard surface modelling and some packages are better at this than others. For pure modelling needs, Modo from Luxology often comes up trumps, while Autodesk’s 3ds Max has a better toolset than sibling Maya, A different route is to take pre-designed models and use them in scenes. For this, e-on’s Vue has plenty to offer as it can not only create the landscape around the model, there are many options for texturing the surfaces and creating realistic lighting situations. Indeed, that brings us to the next question: how are the surroundings to be created? For anyone making models of cars the answer is usually that the background is a photographic plate and that means using After Effects, Photoshop or another 2D photo editing package to put the images together.
Autodesk 3ds Max
3ds Max is most often used in architectural visualisation, industrial design and advertising product markets as it has a robust modelling toolset and is easier to get on with than stablemate Maya, Max is a very complex, industry standard package and as such it’s well used, but not really in animation or game environments. As such it carries a commercial price tag and, while there are trial versions and educational discounts, it’s only worth learning if you are looking for a job in the core market areas.
Autodesk Maya
The role of Maya in TV and film is well documented – it’s the software of choice for big budget visual effect studios. As such its primary role is in animation rather than static imagery, though it can be used for one-off scenes equally as well. The modelling toolset isn’t as varied and the interface is harder to grasp than Max. As such, you wouldn’t want to try to learn Maya just for modelling yourself, but if you were intending working in the entertainment and TV industry it is the number one package in that area and consequently has a studio-orientated price tag.
Luxology Modo
A couple of years ago Modo was recognised as a great modelling package but not for much else. The last couple of releases have seen that functionality expand significantly so that Modo now offers an all-round package with those modelling tools being backed up by painting, animation, dynamics, pipeline integration and a new procedural particle engine. Modo is useful for creating machine models as well as working in design, arch viz, advertising and game development. It’s also much cheaper than the Autodesk products.
Maxon CINEMA 4D
With a decent modelling side and affordable price, this is a popular package in Europe, and popular with studios creating work for TV such as advertising logos as well as visual effects for programmes and animations. It uses an instancing system for landscape population and has scaled pricing according to the version – each is designed for the separate markets. It is also used extensively in architectural visualisation and is one of the easiest 3D packages to learn how to use.
New Tek Lightwave 3D
An all-in-one package that covers modelling, animation, rendering. It is most popular with studios creating work for American TV but is dated compared to rivals. It has contributed to plenty of big budget films, though it can’t compete with Autodesk’s Maya for film studios and CINEMA4D is more popular in Europe, Highlights are geometry instancing and fracturing animation. This isn’t a package you would choose to learn for yourself, but because the studio you were joining used it.
DAZ3D Carrara
If you’re looking for a package that offers integration with DAZ3D’s range of figures, modelling, landscape design and animation yet doesn’t break the bank then Carrara is probably your best bet. It isn’t as sophisticated as the packages designed for studios, but for the hobbyist it adds a level of control over the modelling process that you don’t get with DAZ3D’s other offering, Studio, The Pro version is more expensive but adds support for 64-bit multi-core rendering.

INFO
Website: www.autodesk.com
Price: from $3675/£3795 or $195/£235.75 monthly, $575 quarterly, $1840/£1897.50 annually
Best for: Architectural visualisation, industrial product design
Format: Windows 7 or 8 (64-bit only)

INFO
Website: www.autodesk.com
Price: from $3495/£3795, $195/£235.75
monthly, $1840/£1897.50 annually
Best for: Big budget TV/Film, animation
Format: Linux, Windows 7/8 Pro, Mac OS X 10.7, Red Hat Linux

INFO
Website: www.luxology.com
Price: $1495
Best for: Modelling, arch viz, product design, rich hobbyists
Format: Windows XP, Vista, 7 and 8 (64-bit only), Mac OS X 10.6.8, Red Hat Linux
INFO
Website: www.maxon.net
Price: $995–$3695/£720–£3120
Best for: TV/Film, advertising, architecture, animation, rich hobbyists
Format: Windows XP/Vista/7, Mac OS X 10.6.8

INFO
Website: www.newtek.com
Price: $1495
Best for: TV/Film
Format: Windows Vista/7/8 (32-bit or 64-bit), Mac OS X 10.6+
INFO
Website: www.daz3d.com
Price: Standard $149.95, Pro - $285
Best for: Hobbyists
Format: Windows Vista/7/8, Mac OS X 10.6+

INFO
Website: www.e-onsoftware.com
Price: Free then $9.95 for themed packs, main versions $199–$1495/Free then $9.95 for themed packs, main versions £166–£1250+VAT
Best for: TV/film, animation, hobbyist
Format: Windows XP/Vista/7, Intel Mac
e-on Vue
While Vue is generally regarded as the number one landscape creation package, it also offers an easier route to creating scenes with machines by being able to import and texture those models. It starts with some simple, content-driven packs for just $9,95, The features then scale up to the pro-level xStream plug-in and Infinite versions that have been used in big budget films like Avatar, The best features of Vue are the terrain sculpting and the Eco system. It also features an online content buying system that links directly from the app itself.
DAZ3D Studio
Although the focus of DAZ Studio is posing and rendering people, it’s easy to import models, and especially robotic human figures, tinker with the materials and poses and render those. The new Genesis models in particular are impressive. There’s a massive amount of pre-made content in an online store so if you wanted a gentle introduction to the genre without having to do any modelling yourself, this is a good option for hobbyists.
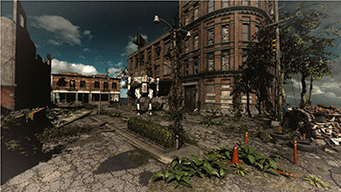
COMPOSING THE IMAGE
How the various elements are arranged will determine the ultimate success or failure of an image.
There’s no doubt that while great composition won’t make a 3D model any better from a modelling point of view, or improve the lighting and textures, it does make the difference between something looking right, dynamic and engaging, or simply looking wrong, awkward and crowded. When talking about 3D machines, it’s likely that the machine part is the focus of interest and that almost everything else is background, There are exceptions to this of course, where the view is so close and the machine so big, that it’s all about details, or that the entire scene has machinery from top to bottom so it all has equal weight. But, for the most part, the machine, whether that’s a car, truck, tank, plane or ship, will be centre stage. How you approach the composition differs slightly, depending on what environment the machine is set in. The most common is where it’s on the ground so here we’ll talk about cars and for that you can read anything else with wheels and tracks.
Mistakes to avoid
The worst composition of all is to put the vehicle dead centre, sideways on. It’s an absolute scene killer. It makes the car look two dimensional, it cuts the image in half, there’s no depth and no lead through for the eye. There are two ways to showcase a car and they are either from the front, or from the back. From the front, angle the car to show the bonnet and front grill and you immediately add depth to the subject. Put the back end close to the side of the image, leaving more space at the front end and you give the car room to breathe and move. It looks like it is moving into the scene, not leaving it. It’s also the best view for simply showcasing a car that isn’t moving. If you rotate the car all the way around so that it is facing the camera, you have many of the problems of the side shot, but you can mitigate these by angling the camera, adding blurred backgrounds, shining lights and so on, to make it seem like the car is hurtling towards the viewer. That way the image becomes dynamic and action-orientated.
When showing the car from the back, again, it should be angled so that you can see down the side as well. Also, the positioning needs to be carefully done so that there is enough scenery in the direction that the car is heading, so the viewer can see that the car is heading off in that direction at speed. You are sacrificing the detail and possible view of the driver that you get from a front view, for action and drama, A completely flat from the back shot doesn’t really work at all because it is so limited.
Lead through is another important concept in composition. By this I mean having items of interest that lead the eye through the image, from the foreground, which is usually at the bottom, to the background, which is usually at the top of the image. That’s why angled cars work so well, the shape of the car takes you through the image. It’s also important to avoid dead space areas where the eye doesn’t go and where nothing is happening. In detail shots, specifically close up ones, the idea isn’t lead through, but content, and here you need to fill all the areas with things to look at. It’s more of an exploration, a treasure hunt for details, so it’s important that there are no empty areas.
Using the rule of thirds
The rule of thirds is a classic landscape compositional aid which works by dividing the screen into thirds both horizontally and vertically. The basic concept is to place the horizon on either the bottom third which is the best option for cars, or the top third, which is the better choice if the camera is angled downwards. In landscapes the aim is to put key interest points on the lines of the thirds and, if possible, on where the lines intersect. Now that isn’t always possible, and in car shots especially so, but placing the horizon appropriately should always be a consideration.
IN THE AIR
Aeroplanes, spaceships or flying machines in general can either be on the ground or in the air. When on the ground, just treat them as you would a car in terms of positioning, though a front view is going to work much better than a rear view. Where you really want to make airborne machines work though is when they are flying. Fighter planes especially have sleek, sharp lines that work well on angles, whether that’s three dimensionally with the plane coming towards the camera at an angle, or from above. With this latter shot, you are reducing the plane to a two dimensional object, much like the frontal shot of a car, so you need to compensate by having the plane at a diagonal angle and showing the landscape screaming by underneath which gives the image depth. It’s usually a good idea to put some motion blur into the landscape to give that impression of speed. The alternative to showing the landscape is to picture the plane in the sky and here jaunty angles, with the plane heading upwards, are good as they infer a sense of speed, power and ripping through the sky into space.
RENDER CAMERA LENSES
Use different camera focal lengths to change the view in your render scene
Whether your machine is the centre of attention in the scene or simply part of an overall landscape, the choice of focal length for the render camera plays an important part in how it looks. The standard focal length used to be 35mm, in 35mm film camera terms, and some software still defaults to that, but a wider angle of 28mm is more common. As the focal length of the camera reduces, so the field of view increases, so that 18mm focal length produces a much wider field of view than even 28mm, When you get down to 12mm you’re talking about fish-eye lens effects because the lower the focal length, the more distortion is introduced. Whatever is in the centre becomes more highlighted and everything else bends away. It means for car renders, a wide angle lens is often very useful, because if the car is right at the front of the scene, at an angle, the point of focus can be the front corner, and you then get a great sweep of the bonnet towards the rear of the car and the rest of the scene becomes completely secondary.
At the other end of the spectrum, a telephoto lens uses higher focal lengths and brings everything in the scene closer. It also has the effect of narrowing the field of view. Now, telephoto lenses are used in reality to bring things closer because you can’t physically get any closer to the subject. In 3D that isn’t a problem, just move the camera to wherever you want. Unless the scene is specifically showing the viewpoint from a human point of view, you aren’t restricted.
So that brings us to the effects of using long lenses or high numbered focal lengths. One common misconception is that longer focal lengths compress the perspective of the scene, which is to say, that the distance between objects in the foreground and background appear closer together than when using a wide angle lens. In actuality, it doesn’t really happen at all, it’s simply that if you increase the focal length, the field of view narrows and all the objects come closer to the camera. So, the practical use for telephoto focal lengths is simply to narrow the viewpoint. This works well if the scene is presented in portrait orientation because it focuses everything in the middle. Or if your machine is say an aircraft or spaceship, flying down a canyon, then a narrow field of view will encapsulate the scene better. There’s also the issue of distortion as mentioned earlier. While a focal length of around 75mm produces very little distortion, there’s also an old trick in portrait photography which is to use a 200mm telephoto lens and stand further back. It narrows the field of view, has no distortion and produces a shallow depth-of-field. For your machine image, move the render camera back so that the subject appears as close as it was before, rather than right on top of it, but now you will find the scene much narrower.
However you use the render camera focal length is down to what you want to do with the subject, how it appears in the scene and how you want the background to be represented, Experiment with different settings and move the position accordingly to see the different effects it can create.
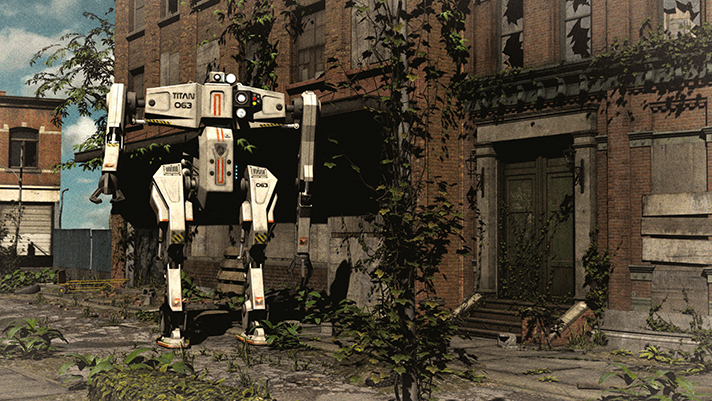
DIFFERENT FOCAL LENGTHS
The camera focal length changes from wide angle to telephoto with each image.
24MM The wide angle view encompasses the entire scene but pushes most elements Into the background.
35MM A standard viewpoint now bringing the background doser but immediately losing the ruined car in the foreground.

50MM A modest telephoto, often used for portraits. It excludes most of the foreground and shows the machine in the mid-ground.

80MM Telephoto lens view removes the foreground detail completely and focuses directly on the robot machina
USING DEPTH-OF-FIELD
Select lens types and apertures to create customised depth effects
One of the effects of using different focal lengths is that it changes the amount of depth-of-field generated in the scene, D-o-f is, of course, the amount of the scene that is in sharp focus, from front to back. With actual camera lenses, wide angle lenses produce lots of d-o-f at all aperture settings while telephoto lenses, or high focal lengths, say 200mm, produce very little. The aperture determines how much light comes into the camera, with a wide aperture letting in a lot but producing a very shallow d-o-f and a narrow aperture letting in very little, but producing a lot of d-o-f. Now, on some software, the amount of light let in by the aperture is irrelevant because this is tied to the shutter speed to produce an exposure. In 3D it tends not to matter because the exposure time is an artificial construct so that the image is produced with a set lighting level. On more sophisticated software, you can tie the two together, but equally, they can be separated and you just have to concern yourself with the aperture.
Where this all comes into play when creating a scene with a 3D machine in the mix is deciding how much you want the background to be visible. For cars or single objects in a pure CG scene, except for perhaps the sky, then including all the background means a narrower aperture setting, or using a wide angle lens, to ensure that there is plenty of d-o-f and you can see what’s going on all the way through the scene. With a photographic backplate, the d-o-f in the CG part needs to be consistent with how sharp the background is. The alternative to these is to use a medium d-o-f so that the immediate surroundings are all nice and sharp but the background is slightly blurred, or really just emphasise the subject by using a shallow d-o-f so the entire background is blurred. Obviously you need to be careful when setting the focal point so that the subject is in the sharp area of focus.
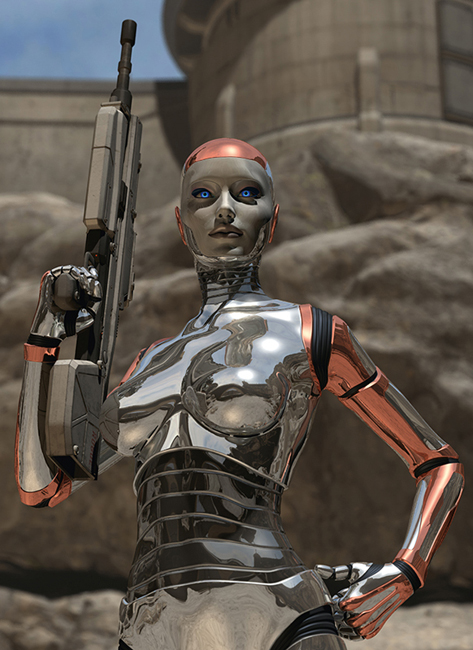
APERTURE EFFECTS IN PRACTICE
Here are two versions of the same scene using very different aperture settings for the render camera.
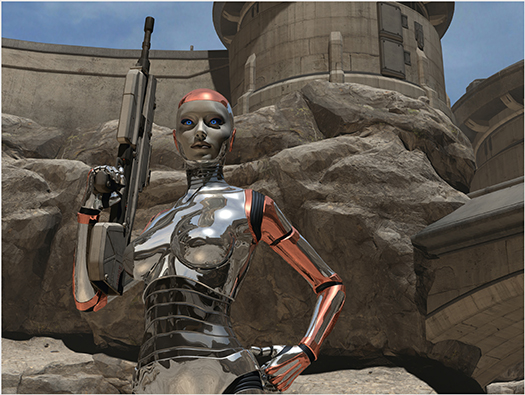
The figure competes with the background thanks to the copious depth-of-field.
SETTING THE COLOUR TEMPERATURE
How to use temperature to set the scene and enhance the environment for your machine subject
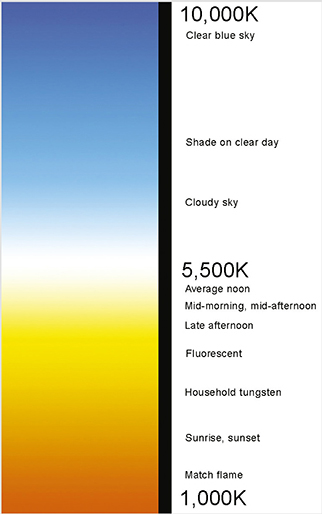
All light has a colour temperature, measured in degrees Kelvin, with lower numbers for very low levels of reddish light and high numbers for cold, blue light. The colour temperature of natural light changes throughout the day and is also modified by weather conditions. At mid-day it is said to have a temperature of around 5500K–5600K which gives white light. Shade in the morning produces blue light as does high cloud cover. At sunset and sunrise the light is much more red and is more like 2000–3000K, Artificial lights tend to be lower, with fluorescent lights at 3300K, giving a yellow/greenish light, tungsten at 2500K and candle light at 1800–1900K.
So where does this come into play for your 3D scene? Well the first thing is that since you have control of the scene, you don’t have to struggle with difficult colour lighting, it can be whatever you want it to be. The second is that sunset and sunrise are automatically associated with red and orange colours with the viewer, so giving a scene a blue tinge would look wrong. The other point to note is that metallic surfaces work well with blue tones, so setting the scene under cloud, in the shade, or with a high mid-afternoon sun with deep shadows, will look authentic. Of course, car images do like a sunset, which suits a dramatic or a passive image, but it’s something to consider.
For indoor lighting, you need to be more considerate of what is going on in the scene. If there are mixed lighting sources, you should consider mixing up the colour temperatures as well. For example, a scene lit by fire or tungsten lighting, that you create as white light would, in nature, make any natural light coming in from outside look blue. The opposite applies – if you balance the scene so that the natural light from outside looks white, then any artificial light inside should have a distinctive low colour temperature.
THE TEMPERATURE CHART
Here’s a simple guide to the colour and temperatures involved at different times of the day.


Osprey ship courtesy and © Terry Allitt
Here’s an edited version where the rest of the scene has had the colour temperature lowered to make more of the sunset effect, while retaining the white light from the ship.
STEREOSCOPIC IMAGERY
Take your CG images into the next dimension by creating a 3D version
With actual 3D, rather than referring to all CGI as 3D which everyone in the industry tends to do, there has been a resurgence of interest from the brief hey-day in the 1950s This has been driven by cinema, which has profited by being able to charge a premium for a 3D showing against a 2D one. One of the unfortunate side effects of this seeming bonanza is that studios have rapidly retro-converted ordinary films into 3D in order to cash in. Clash of the Titans was one of the earliest attempts at this, being rushed through in only around eight weeks once the actual feature had been finished. At the other end of the spectrum was Avatar, which was filmed with stereoscopic cameras to create a more natural 3D result. Many 3D visual effects were added in post production but even then they were in consistent because lead studio Weta didn’t have enough time, ILM, Framestore, Prime Focus, Giant Studios and Hydraulx all chipped in and this meant that some scenes featured things in 3D that stood out a lot more than others. All of which brings us to presenting your work with a 3D effect, rather than a flat 2D representation of a 3D scene. There’s no doubt about it, if you want to add the wow factor to a presentation, visualisation or effect, showing in 3D immediately engages the viewers a whole lot more. As you might have gathered from the introduction though, there’s a lot of different ways of going about it.
The simplest thing to do is to render your machines as you would normally, but then use a 3D monitor to turn the 2D display into 3D There are a number of monitors that can do this at very affordable prices these days. An LG D2343P, 23″, IPS LED monitor with 3D function is under $200/£150 for example. The depth effect created is graduated and goes backwards from the monitor front into the distance. The rest of the time it can simply be used to display 2D images.
For actual image creation there are two main types: anaglyph and stereogram. Both CINEMA4D and Maya use the anaglyph method which basically separates the channels of an image and spaces them slightly apart. Coloured glasses are then used to block out a channel for each eye, leaving the brain to recombine the two channels left into one, 3D image. Needless to say there’s a small problem with this, Monitors use an RGB process (CMYK is used for print) which is, of course, three channels. So, two of the channels have to be combined into one which is why the glasses used to view anaglyph images are either red and cyan – not blue, the cyan is actually green and blue, or green and magenta – not red, the magenta is blue and red. Of these, traditionally, red and cyan have been used, but in practice, green and magenta actually gives better results, particularly for landscape-based scenes. The point though is that the software has a 3D mode and can display the scene you model and create in 3D at the end. The advantages of anaglyph are that the images can be viewed easily on screen or in print with very cheap cardboard and plastic glasses.
The alternative to anaglyph is the stereogram. This is where the same scene is displayed twice, but the camera has been moved slightly to the left or right of the original image giving a slightly different perspective. The two images are then viewed through polarized glasses where each lens blocks out one of the two images. The eyes see one slightly different image each and the brain then combines these into a 3D result.
In the cinema and on TV, it isn’t practical to try to shove two letterbox sized images next to each on the same size screen, so instead one frame is displayed first, then the alternative frame is displayed next. As the format is a motion-based one at 25fps or 30fps the images can be displayed quickly for each individual frame to be seen. Again, the glasses filter out the other image, allowing the brain to recombine what it sees through each lens into one, 3D image. On paper, this was the original method of creating 3D and it is very effective. It doesn’t suffer from colour fringing effects that can plague the anaglyph method, but the disadvantage is that it takes up twice the space. On monitor screens, putting a static image twice across it essentially reduces the size by half as well which is why it generally isn’t used. For animation though, actual stereoscopic film delivers better results than anaglyph but requires more dedicated hardware and more expensive eyewear.
A post-script to creating 3D with your CGI images is to create some effects in post production with Photoshop. It’s easy to simply move one of the channels to one side to create an anaglyph image that, when viewed with the right glasses, then appears to sit behind the monitor screen. It won’t appear to have any actual depth though For that you can cut up parts of the image to increase the channel separation for a foreground, midground and background effect. This then starts to be more trouble than it is actually worth but it means you can retro-fit existing images into 3D long after the source files have gone. If you are starting out, while you could do separate render passes for each area then tweak the channels in Photoshop, it’s a whole lot easier to just use software that supports the 3D process in the first place.

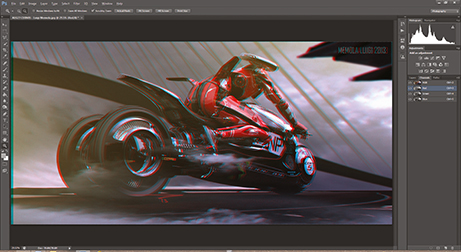
It’s easy in Photoshop to make an existing image into a basic anaglyph 3D version, but this will still look quite flat.
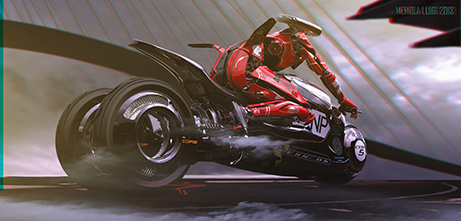
This is another view of Luigi Memola’s AEG27-CEEN05 image, turned into a two-part 3D image so the background appears further away from the rider. View it with red–cyan glasses for the effect. Go to page 232 to read more about the original image.