
Chapter Four
Lighting Your Shots – Not Just What You See, but How You See It
- Light as Energy
- Color Temperature
- The Color Balance of Your Camera
- Natural and Artificial Lighting
- Quantity of Light: Sensitivity and Exposure
- Quality of Light: Hard vs Soft
- Contrast
- Color
- Basic Character Lighting: Three-Point Method
- Motivated Lighting: Angle of Incidence
- Set and Location Lighting
- Controlling Light – Basic Tools and Techniques
Unless you are using specialty cameras such as night vision, thermal, or infrared, you will need to illuminate your subjects, sets, and locations. Light allows us and our cameras to “see” and it will allow you, the filmmaker, to show your story to an audience – not merely with basic exposure, but also with creative purpose and intent. The lighting you design for your films and animations can guide your audience where to look, stress what information to process first, and influence how they feel. Light is a necessary and powerful tool and a key element in the grammar of your shots.
Light as an Element of Composition
In the last chapter we mentioned how creatively placing an area of crisp focus in the frame could lead the eyes of your audience around your shot. This chapter briefly explores how light can be used to do the same thing. Values of light and dark can generate a sense of depth in the 2D frame; create feelings of sadness, happiness, fear and so on; underscore themes about characters; and highlight or obscure the more important subjects in a scene. All of this and more fall within the capabilities of film lighting. It will often be the most powerful creative tool in your filmmaker’s toolbox, but that does not mean it has to be the most complex or the most expensive. Learning about and using light effectively is a lifelong process, so let us move ahead and address some of the basics to help get us started on our way.
In daily life, our human visual system is programmed to respond to movement, light, and color. It stands to reason that while viewing a motion picture we would respond to these same visual stimuli, plus sharp focus. Knowing this physiological visual response of humans is a great creative tool for filmmakers to use in constructing engaging shot composition. It is very important for you to realize from the outset that well-planned and well-executed lighting can make or break the visual success of a motion picture project.
When you approach your lighting design for a particular project, you should be thinking about an overall look that fits the genre and works well with the messaging, purpose, and story. Can the lighting underscore or work against thematic tones? Does a character or the story require a particular color palette or quality of light? To what types of lighting equipment do you have access, and what techniques might achieve your lighting requirements? Any project can benefit from a solid lighting plan.
The art and craft of film and video lighting is a huge topic that is covered well by many qualified training manuals and film production text books [see internet and book references on film lighting in Appendix A]. We do not have the luxury of addressing all of the scientific, technical, and aesthetic aspects of light and film lighting here, but we will hit on some of the more important terms and practices involved with the discipline. The following list should set most of us on the right track:
- Light as energy
- Color temperature
- Natural or artificial light
- Quantity of light: sensitivity and exposure
- Quality of light: soft vs hard
- Contrast
- Colors
- Basic character lighting: three-point method
- Motivated lighting: angle of incidence
- Set and location lighting
- Controlling light
No matter what generates it, emits it, or reflects it, light is energy – energy waves of electromagnetic radiation that happen to live in a zone of frequencies known as the visible spectrum.
Light itself is invisible, but objects that reflect light can appear white, black, or combinations of colors or hues from violet, blue, green, yellow, orange, and red.
When white light (all color wavelengths combined equally) hits an object which then reflects all wavelengths equally, you see that object as white.
If an object absorbs all light energy wavelengths then the object is seen as black. It reflects no significant light energy for you to detect.
When an object absorbs all colors but reflects only one wavelength (like that of yellow) you see that object as yellow.
Not all light sources emit pure white light in a balanced spectrum, but luckily we have ways of measuring the color of light.
As with many forms of energy, light can dissipate across distances. A light fixture close to your scene or subject can deliver its light energy more efficiently and at an appropriate level for its intensity (wattage, lumens or lux). As you move that same fixture further from your scene or subject, the effective output remains the same, but the light energy that reaches your subject will be diminished. Be aware of this “drop off” when you place your lights and/or your subject in your shooting environment.
Color temperature, along the scale of degrees Kelvin, helps us understand what color the invisible light is. It is measured in thousands of degrees (roughly 1000 to 20,000 degrees Kelvin). Without going into all the science behind it, you should just understand that there are two main colors of concern along the Kelvin scale for film and video shooting: amber/orange and blue. The numbers associated most commonly with their color temperatures are 3200 and 5600 degrees Kelvin, respectively. Film lights (with lamps or light bulbs manufactured specifically for use in motion picture production that have tungsten filaments) generally emit light that is at 3200 degrees Kelvin. Noontime sunlight is roughly around 5600 degrees Kelvin. The lower the number of degrees Kelvin (0–4000-ish), the more red/amber/orange the light will be. It is often described as “warm” light. The higher the number of degrees Kelvin (4000–10,000 and above), the bluer, or “cooler,” the light will appear (Figure 4.1).

Figure 4.1 The Kelvin scale showing various examples of common color temperatures.
The terms “warm” and “cool,” used above, do not refer to the actual temperature of anything. They describe the perceived psychological and emotional value given to those color groups by humans who experience them. Reddish/amber can conjure “warm” or “stimulating” feelings associated with firelight, candles, sunlight, natural brown leathers, etc. The “cooler” blue values tend to be seen as “calming” and are associated with overcast skies, moonlight, ice fields, and even morgues, etc. Audiences have grown to accept (and to some degree even expect) these color values in film scenes involving such elements. We will discuss more creative uses of color in film production in the Color section of this chapter.
These values of degrees Kelvin are extremely important to motion picture production whether you are using digital video or emulsion film. Each, as a light sensitive medium, is balanced by the manufacturer to want to see either 3200 degree light as “white” or 5600 degree light as “white.” For emulsion films, the balance toward 3200 is referred to as tungsten balanced, and the film that seeks 5600 degree light as white light is called daylight balanced. The digital light sensors in most video cameras and mobile phones [either charge-coupled devices (CCD s) or complementary metal oxide semiconductor (CMOS)] are also calibrated to record tungsten (3200) or daylight (5600). Older video cameras often have a setting for both, but modern cameras can usually calibrate across the entire range of color temperatures.
Some video cameras require that you “white balance” or “neutral balance” the light entering the camera. This can be accomplished by placing a white card under the light sources you are using, zooming the lens in on this white card until it fills the frame, properly setting the exposure and then setting the “white balance” (usually a button found on the camera body or under the menu settings). Whatever the color temperature the light is that you are using, it will now be seen as “color neutral” by the camera – blues will be blue, reds will be red, and whites will look white, etc.
Natural and Artificial Light
Tungsten lighting is so called because tungsten is the chief element in the metallic filament inside the light bulb (or lamp) that glows “white” hot when electricity is run through it. Many people also refer to this kind of light as film or quartz lighting and it is used chiefly in film and video making. To clarify, however, any kind of light source generated by a man-made device can be called an artificial light even though it is not emitting 3200 degree Kelvin waves. Examples could include neon lights, a household incandescent or CFL, overhead fluorescent lighting, a computer or TV LCD screen, LED s, street lights, car headlamps, a flashlight, and so on. Because artificial lights produce a wide range of color temperature light, try to use the special film lights for your shooting or use all the same kind of lamp in multiple fixtures so you at least have consistent color output on your scene.
The daylight calibration derives its name from its chief supplier, daylight, and it may fall under the category of natural light. Natural light sources include the sun, the moon (reflected sunlight), and flames, and they too can all have different Kelvin temperatures.
However, there are man-made film lighting fixtures (HMI s and new LEDs) that also emit light waves around the 5600–6000 degree Kelvin ballpark. These lights can be used to augment or replace natural sunlight/daylight. When shooting outdoors, an easy way to add to your light levels is to bounce or reflect the free and available light (more on this technique later).
Correcting or Mixing Colors on Set
You must be careful, however, which light sources you use with which color temperature-balanced film or video. If you give tungsten-balanced media (film or video) daylight energy waves, it will record with a bluish tint. If you give a daylight-balanced medium tungsten light, it will record as reddish (Figure 4.2). Generally, you should match the color temperature of your light source with the color temperature sensitivity of your film or video medium. There is also a wide range of colored gelatin sheets that you can place on the lighting fixtures to alter or correct the color output of the raw lamp so that it matches your camera’s balance and other light sources.
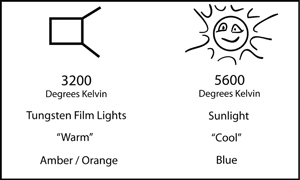
Figure 4.2 The two main color temperatures for video and film.
It is also possible to mix natural and artificial lighting for creative or dramatic purposes. Often you will see a nighttime interior scene with warm household lights juxtaposed with cooler “blue-ish moonlight” coming in the windows. There are many ways to play with the camera’s balance and the artificial or natural light color temperatures on your set. And you should not rely on them during production, but there are also some very capable software tools you can use to help your video color balance in postproduction – a process called color correction or grading.
Quantity of Light: Sensitivity
How well do you see during the daytime? How well do you see at night? Our vision is quite good in daylight, and, when given an adequate adjustment period, pretty good in darkness as well. The light receptors in our eyes (rods and cones on the retina) do have a wide range of “exposure” sensitivity. Of course, just detecting light is one thing but forming a good image is another. We have a particular minimum threshold for reacting to light energy – a bias towards needing more light to see properly in both luminance (brightness) and chrominance (color) values. The majority of emulsion films and video sensors are modeled after our own vision capabilities – they are also biased towards needing a fair amount of light to create a quality image.
Unlike our eyes, most light-sensitive material is manufactured to have one “recommended” or “best performance” light sensitivity rating or “speed.” We say “recommended” because although the technology is calibrated to this rating for best results, you are free to creatively deviate from this suggested value. It is most often represented by a number calculated by the International Organization for Standardization (ISO rating), or it is noted in the form of an exposure index (EI) or perhaps even an ASA or ANSI rating. These light sensitivity ratings are a scale of numbers. Lower values (50, 64, 100, etc.) indicate a large amount of light needed for proper imaging, while higher values (400, 800, 1600, etc.) require less light to react and form an image. Many digital video sensors are built to a moderate/fast sensitivity of 320. DSLRs and other more “processor-based” imagers can dial in a very wide variety of ratings that you get to choose in the settings.
With this sensitivity rating in mind, you can provide your camera’s light-sensitive medium (CCD, CMOS, film) with the manufacturer’s recommended quantity of light and yield a good image. This is known as achieving “proper” exposure. You have exposed the imager to the “right” amount of light. We’ve gone quotation happy in this section because so much of this practice is subjective – relative to the technology’s abilities and your story’s creative visual needs. Traditionally, a “proper” exposure represents an image with a wide-ranging gray scale (dark areas to bright areas, see Figure 4.9) and a faithful depiction of color values. However, what is appropriate for one project may be totally inappropriate for the visual mood or tone of another.
Keeping things simple, the basic exposure for your camera’s sensitivity settings is affected by several factors:
- Quantity of light on your scene – Are you using very bright, direct sunlight, many large film lights, or just a single candle flame? The amount of light you place on your actors, set and location helps determine how your image is created in the camera. Typically, more light is better than less light because it is easier to lessen the amount of light you have but it can be difficult to add to it.
- Camera aperture – How much light do you let through your camera lens? The iris (often related to the f/stop scale) controls the quantity of light entering the camera to expose the image sensor. “Opened up” (larger aperture) lets in more light, while “stopped down” (smaller aperture) lets in less light (see Figure 4.3).
- Shutter speed/Exposure time – Some cameras are set to 1/30th of a second for each frame, others are 1/60th, and still others have a variable electronic shutter speed to control the “length of time” the sensor is exposed to the light. Higher shutter speeds create more exact renderings of the image in motion, but require more light on the scene to do so. Lower shutter speeds require less light for exposure, but can cause motion blur between frames.
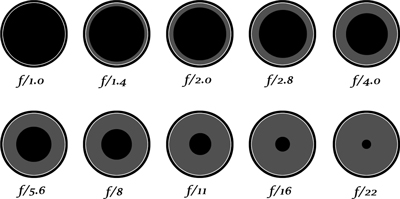
Figure 4.3 The iris scale, or aperture settings of a lens. Note that the larger openings seem to have lower numbers, but, in fact, all f/stop numbers are fractions under “1/” so 1/2 is indeed larger than 1/16.
Except for the amount of light on your scene, most video cameras have auto settings and take care of these choices for you. Certain models have manual settings where you get to control your iris, shutter, and so forth. Either way, you most likely have a light meter built into the video camera which, when calibrated to your medium’s light sensitivity rating, is used to help measure the quantity of light reflecting off your scene and recommends the appropriate iris setting given the shutter speed. With manual options you have greater creative control over how the lit scene gets recorded by the camera. If you recall, neutral density filters (some built-in to camera electronics) will help you lessen the amount of light hitting your sensor. Gain control is also present on many cameras, allowing you to increase the amount of electronic processing the video signal receives. Although it may appear to help make a darker scene brighter, it comes at the cost of image quality.
If you provide too much light to your camera, by flooding your filming environment with large quantities of light energy, by opening up to the largest iris setting, or cranking up your ISO setting, you can overexpose the image. You shift the gray scale up to show only middle gray and white and there will be no black values (deep shadows, etc.) in the frame. The resulting image will be too bright and have “blown out” highlights (Figure 4.4). Of course, your story may call for such a visual treatment of a scene. Filmmakers have used overexposure to indicate being in Heaven, a flashback or dream sequence, a POV from a character who has been drugged, and so forth. Overexposure is also used a great deal in music videos. Be aware that most video cameras do not react well to large amounts of light and will not record proper details in those bright areas of your frame. If your video image has serious overexposure (burn out in the highlights) then it will stay that way forever because there is no fix for this lack of image data in post-production color correction.
If you do not provide enough light to your image sensor, either by shooting in a very dark environment or by stopping down your iris, you will underexpose the image. It will be, overall, too dark. The gray scale shifts down to mostly dark and only up to midgray without having any bright or white areas in the image at all (Figure 4.4). Details in the dark areas of the frame cannot be recorded and color values suffer as well. You may decide that a certain scene for your story could benefit from being underexposed, but be aware that video cameras will often produce “video noise” (like film grain) when you do not provide enough energy to make the imager react properly. The image can look muddy with speckled, muted colors popping around the dark areas. It may be better to provide plenty of light to the subjects you do wish to see and stop down the iris. The brighter things you care about will be exposed well and the darker areas can reveal more detail but retain a truer representation of “black values.”

Figure 4.4 The range of exposures. A – Overexposure blows out highlight regions of the image. B – Averaged exposure should represent all portions of the gray scale. C – Underexposure loses details in the shadow regions. “Proper” exposure is whatever the story calls for. Creatively speaking, you may wish to severely under- or overexpose a few shots in your film due to story requirements, but most shots should be in a moderate range of exposure.
Achieving basic exposure of the visual elements within your frame is just the beginning. Achieving creative control over how much light you put on your film set, where you place it, and what quality of light you use is your real goal. As you have seen, light affects many other creative choices.
One easy lesson to remember about the quantity of light and exposure is that the more illumination you have available on set, the larger your depth of field (DOF) can be (think daytime exterior). You would have to “close down” your camera’s iris to block out more of the available bright light, which, in turn, increases your DOF. The less light you have, the more shallow your depth of field will be when you “open up” your iris. So purposefully limiting the light used for your scene’s exposure can not only illuminate certain areas as needed, but it can also creatively alter what is in or out of focus in your shot (Figure 4.5).

Figure 4.5 The amount of light on your scene can directly affect the depth of field focus range.
Quality of Light: Hard Versus Soft
Beyond the color temperature and the quantity of light, most filmmakers are also concerned with the quality of the light. Not how good or how bad the lighting looks, although that is extremely important, but how hard or how soft the beams of light are that illuminate the actors and the set.
Hard Light
If you have ever stood outside on a cloudless day you no doubt noticed how distinct your shadow was. A hard-edged shadow is the primary giveaway that you are using a hard light source. The sun, as a single point source light, sends its light waves to Earth and, for the most part, they are parallel to one another. They create a single, deep shadow with well-defined edges (Figure 4.6).

Figure 4.6 Examples of hard light
These parallel light waves are very directional. As they leave their source and encounter some physical object, they will illuminate that one near surface brightly, get blocked by that object, and cause a hard-edged shadow on the background. This does not mean that hard lights (with parallel rays) are brighter than softer lights; they are just more focused. Hard light can cause objects in your frame to “pop” off the screen or stand out from other objects. Because it is so directional and therefore more controllable you can pinpoint your light beam to strike very precise areas of your set. When placed at the side or back of your film set they can create rims, halos, or kicks of light around people or on surfaces. Hard light, depending on its application, can also create scary, dangerous, harsh, or mysterious environments (think film noir, horror, etc.). It is often less pleasing on the human face and can cause harsh eye socket shadows (top light), highlight skin imperfections (think the surface of the moon), and, from the front, flatten features, and so on.
The biggest and most readily available hard light source is our sun (on a cloudless day). It is free to use, so take advantage of it during your shooting as much as possible – just be aware of a few factors. Consider the sun’s direction (angle from up in the sky) and where it puts the shadows. What is the actual exposure/iris setting and your resulting depth of field? How long will it take to shoot your scene coverage versus how much time is left in usable sunlight? Did you look at the weather forecast? Is there impending cloud cover that can change your lighting look?
In addition to the sun, hard light sources include the open face, the enclosed Fresnel unit, HMIs and new LED spots.
Soft Light
Soft light is very diffused light. If you were to go outside on a very cloudy, overcast day (with no direct sunlight visible) you would not easily see your shadow at all or, if you did, it would be very faint and not hard-edged. The hard, parallel rays of sunlight hit the clouds in the atmosphere and then get all jumbled up and diverted into many different directions and bounce around our atmosphere. This diffused light of multidirectional energy waves comes at objects from many sides and therefore it illuminates more evenly all around – not hard and directional from one side but soft and diffused from several sides.
Almost any light source can be made into a soft light by diffusing it or bouncing it off bright or white walls or ceilings (Figure 4.7). Soft light sources tend to be more flattering to the human face because they cause little in the way of deep shadows. The light seems to wrap around the curves, bumps and contours of the facial structures (brows, nose, cheekbones, etc.), smoothing out the surfaces. For interior scenes, soft light may feel more natural because most light fixtures in reality (in homes, offices and stores, etc.) emit non-parallel rays. Because of this, soft lighting can imply a sense of warmth, friendliness, or romance when used in motion pictures (Figure 4.8).
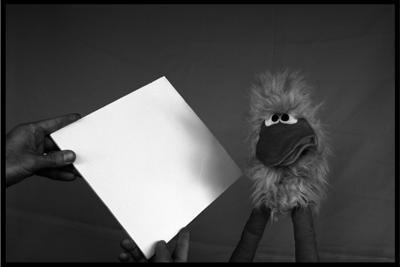
Figure 4.7 Reflecting or Bouncing light off of bright or white matte finish surfaces (like bounce cards or acoustic tiled ceilings) will diffuse the light rays and soften the light falling on your subject. An easy way to also get usable Fill light from your Key source.

Figure 4.8 Examples of soft light.
Soft film lighting fixtures include fluorescent lights, anything with a frosted lamp, and any light housing that diffuses the light energy either by passing it through a diffusing material or bouncing it off curved, internal surfaces. Actual hard light fixtures can be softened by bouncing their directional beams off a bright but marginally textured surface or by passing the beam through a diffusion gel sheet or white silk flag before it falls on the subject.
The relative differences between light areas and dark areas within your frame are referred to as the image’s contrast. Most often, the image creator’s goal is to have a well-balanced contrast within the frame where there are bright regions, dark regions, and a good representation of “gray scale” tones in between (Figure 4.9). An image with good contrast is said to have “snap.” A high contrast image is one that contains areas that are both very bright and very dark, but it lacks middle gray values in between the two extremes. High contrast images can be described as “moody.” A low contrast image contains more even lighting levels across the whole frame such that the delineation between light and dark regions is not well defined. Mostly shades of middle gray, the low contrast image can look flat and bland.
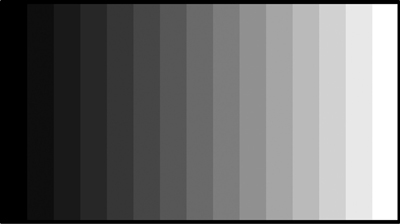
Figure 4.9 The gray scale from black, through mid-gray, up to white.
Low-key Lighting
High contrast, snappy or punchy, lighting schemes can make for more dramatic or suspenseful imagery, but they also yield more depth to your frame. The interplay of light and areas of deep shadow across the foreground, middle ground, and background of your shots helps create a layering effect within the set’s deep physical space. The irregularity of objects in the frame, including the human face and body, gains a relief or modeling from these pockets of light and dark, which helps them achieve a three-dimensional appearance on the two-dimensional film frame. This type of lighting design is often called low-key lighting. Hard, directional beams of light (from one or several directions) striking precise locations or objects in your scene can help create this visual style (see Figure 4.10).
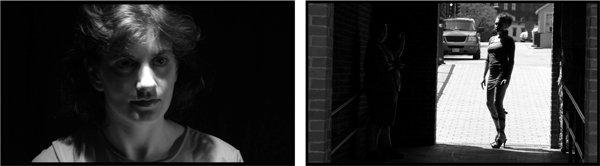
Figure 4.10 Examples of low-key lighting schemes. Strong areas of darkness and brightness.
Low contrast, flat or even, lighting schemes can make images seem more open, friendly, or “brighter,” but they also yield a flatter, less visually separated frame. Often, the point of low contrast, or high-key lighting, is to provide overall even illumination so that all elements of the frame are visible to the viewer. Talk show, news broadcast, and situation comedy sets are often lit in a low contrast fashion. This way, the multiple cameras that record the events can all receive proper exposure without the need to continually adjust lighting levels on the set. What you gain in even visibility you lose in dramatic flavor. Additionally, the 2D frame, including all objects in it, will appear flatter and, in the opinion of many, less visually interesting (Figure 4.11).
Figure 4.11 Examples of high-key lighting schemes. More evenly lit overall.
Color is another great creative tool for a filmmaker. Your visual plan for your motion picture project should include color considerations from the outset as there are many color choices to be made during production and post-production. This is especially true if you are creating an animation, and you have to be aware of every color of every character and background.
The quality or “look” of your recorded color imagery is related to many factors. The type of camera you are using (image sensor color sampling, compression processing, bit depth, etc.), the quality and quantity of light energy you use for exposure, and the actual colors of the wardrobe, set dressing, exterior environment and so forth all play a role. We will not dig into the numerous technologies and processing algorithms here, but instead we will touch on some of the basic characteristics of color and how you might use them in your films.
As we know from our talk about light energy and color temperature, the colors of light have particular wavelengths. These energy wavelengths are interpreted as electronic voltages in both video cameras and on computer editing systems and show as particular hues. Color saturation is directly related to how much light energy you have on your scene and the “color reflectance” values of the object being recorded. If you have very little energy on the scene you will generate low color voltages and the colors will render as muted or de-saturated. If you have a larger amount of light energy the voltages are higher and the colors will be more saturated.
Saturated colors (deeper, more vivid) in combination with a higher contrast level will make the image “snappy” and more vibrant. Children’s programming, cartoons, commercials, music videos, and musical theatrical films can all use highly saturated color palettes. They generally make an audience feel happy, bright, energized, and so forth. Low contrast, low energy images can appear more de-saturated, muted or grayish. Images with this look lack that visual “snap” and can seem somber, dull, or low energy to an audience.
Colors can be used as symbols or identifiers as well. Countries have colorful flags, sports teams have colorful jerseys, and film environments can have colors associated with them as well. The “soulless” financial executive sits in his modern, high-rise office depicted as steely-blue-gray, while our small town hero is shown around lush green lawns and warm/brown natural woods. The nuclear bunker is a jaundiced yellow-green.
The Princess’s rooms are deep reds and warm golden hues. The color palettes of these places not only help orient the viewer as to where, physically within the film world, they are, but also help them feel a certain way towards the people or events seen in those environments. Additional subtextual information is being conveyed to the audience through these color choices. [see color theory reference book in Appendix A].
Similar color treatments can be done for a character’s wardrobe. The angel on Earth, whom no one knows to be an angel, always wears a white suit. The possessed little girl in your horror film always has a red ribbon in her hair. Or it could be a very subtle choice and you withhold a particular color from a character throughout the story.
Beyond the basics of accepted color treatments (blue for moonlight and cooler temperature locations, such as a meat freezer or the Arctic Circle – or amber for warm, safe places, such as a family home or a candle-lit dinner for two) a filmmaker can use colors to underscore a story’s themes or represent a character. The important thing to remember is that you should always be conscious of the colors in your frame, whether you are using them creatively or not.
Basic Character Lighting: Three-Point Method
How one uses hard light and soft light to gain selective exposure on talent and on set is the fun part of creative lighting for composition. There are innumerable ways for you to place light on your actors, and hopefully, over your career as a filmmaker, you will have the opportunity to experiment with many of them. Starting off on solid ground is useful, however, so we are going to explore the most basic standard in subject illumination – the three-point lighting method.
The three points actually refer to three distinct jobs that lighting fixtures perform when put into particular placements around the film set. Rather than describing the light’s properties, these terms define their purposes.
KEY—Key light is the one light source around which you build your lighting scheme. It provides the main illumination to your film set or location. You “key” your other lights (quantity and quality) off this main source. The key light may live anywhere around your subject, but it traditionally is placed 45 degrees (horizontally and vertically) off the axis of the camera’s lens and above the height of the talent’s head.
FILL—Fill light is a light source used to help control contrast. The light energy that is used “fills in” the shadows often created by the brighter key light. The traditional physical placement of the fill light is on the opposite side of the subject from the key light, roughly 45 degrees (horizontally) off lens axis.
BACK—Back light is the light that defines an edge, or halo effect, around the backside of the subject. Because it lives behind the subject (opposite side of the film set from the camera’s lens) and provides a light “rim” to the outline of the subject, the back light serves to separate objects from the background and enhance the illusion of depth within the film frame.
The quantity of light from these three light sources must be enough to achieve exposure on the scene. Clearly, the key light will provide the most illumination. The fill light will contribute varying degrees of additional illumination, depending on how low or how high a contrast difference you would like to have (how much or how little shadow). The back light need only apply enough glow to the edge of the subject to “read” or be recorded by the medium (Figures 4.12 and 4.13).

Figure 4.12 The evolution of the three point lighting method in several combinations. A – Key only. B – Fill only. C – Back only. D – Key + Fill. E – Key + Back. F – Key + Fill + Back.
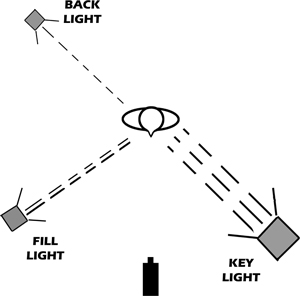
Figure 4.13 An overhead schematic of the three point lighting fixture placement in relation to subject and camera.
Contrast Ratio or Lighting Ratio
The lighting contrast specific to the human subject is a relationship known as the contrast ratio or the ratio of the key + fill side of the face to the fill side of the face only (often shown as Key+Fill:Fill). The quantity of light can be measured with a handheld light meter, but you really should develop your “eye” to gauge the relative amounts of light on each side of the face – is there more or less shadow present? Even light levels on each side would be a 1:1 lighting ratio and would create a high key scene of even and flat lighting. Differing quantities of light on each side may yield a higher contrast ratio, such as 4:1 or 8:1, and would be described as a low key scene with more deep shadow regions on one side of the face (Figure 4.14).

Figure 4.14 A – Image with 1:1 lighting ratio. B – Image with “average” lighting ratio. C – Image with high lighting ratio.
Motivated Lighting – Angle of Incidence
In fictional narrative cinematography, the lighting you see is generally motivated; meaning it is supposed to be generated by some source within the “reality” of the film world you are watching. A desk lamp, a computer screen, a lantern, even the sun itself are all examples of objects that can motivate light on a film set. This does not mean that these “sources” actually contribute to the illumination of your scene (although they can). It is the film lighting fixtures job to add light to your frame and make it look as though the motivating sources are actually providing the exposure.
Where you place your film lights around your set is partially dictated by the location of these motivating light sources within the film’s world. The point of origin for a beam of light determines its angle of incidence. If the light is supposed to be coming from a light fixture in the ceiling, then the film light must have an angle of incidence from higher than the subject’s head – from above, or top lighting. If someone stands next to a campfire, then the film firelight effect must have a lower angle of incidence and come from below the level of the subject’s head.
Front Lighting
Just as you know that the camera can be placed around the subject along imaginary horizontal or vertical circles, lighting fixtures can be placed in similar ways – in this case, think of them more as hemispheres above the subject’s waist and below it. When the lamp head is in the upper hemisphere and near the recording camera’s neutral angle on action (or lens axis), it is called front lighting. If the subject’s face is open towards camera, this lighting tends to flatten out the features by evenly illuminating all surfaces. This technique is used in fashion portraiture of women because it diminishes the presence of the nose while fully informing the details of the eyes and mouth. The loss of shadow across the face and body can also limit the perceived dramatic impression of the audience and reduce the illusion of 3D in your composition (see Figure 4.15).
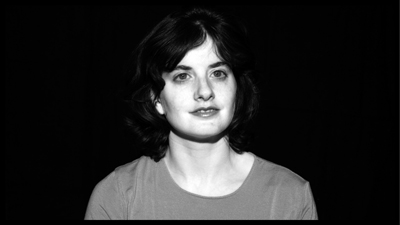
Figure 4.15 Example of even, flat front lighting. Notice how it smoothes out the bony features of the face.
Depending on the height of the lamp head in this scenario, you may also cause a shadow on any visible surface behind the subject being front lit. Upper hemisphere lamp heads with a higher angle of incidence force the shadows down along the floor. Any lights at or below the talent’s physical height will throw shadows across and up the set, which can be visible to the camera lens and are often not visually pleasing nor part of your visual plan. In general, shadows of actors are not welcome on film sets, unless you place them there on purpose because they fulfill a creative or thematic purpose in the story.
Side Lighting
If we continue our way around the imaginary circle and place a lamp head 90 degrees away from the camera, it is called side lighting. This holds especially true if the light source is at the same height as the talent’s head. Examples might be a bedside lamp, a window, light coming through a doorway from another room, sunrise and sunset. Hard sidelight can generate a half-bright half-dark face split along the bridge of the nose (Figure 4.16). Without any fill light, this lighting style makes a bold statement and can conjure feelings of mystery, half-truths or a split personality. The higher you raise the lighting fixture the more it will resemble traditional upper hemisphere lighting from above.
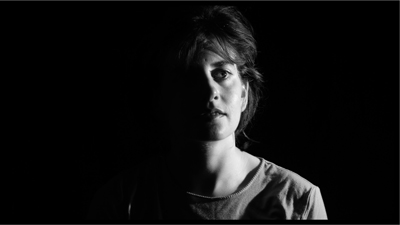
Figure 4.16 Example of hard side lighting.
Lights from Behind
When the light is behind the subject, opposite the circle from the camera lens, it is often called a backlight. As discussed earlier under three-point lighting, the backlight helps separate the subject from the background. Traditionally it has a higher angle of incidence. If the lamp head is placed between 90 degrees and 180 degrees it may be called a kicker or a rim light – highlighting the edges of the hair, shoulders, and sometimes the jaw bone (see Figure 4.17). A hard light source may work best for this “hot kick” lighting glint, as softer backlights tend to yield a more even halo effect with less punch. Backlighting is also used to illuminate water vapor from a “fog machine,” falling rain, and wet pavement or shiny polished floor coverings like marble, hardwood, and linoleum.
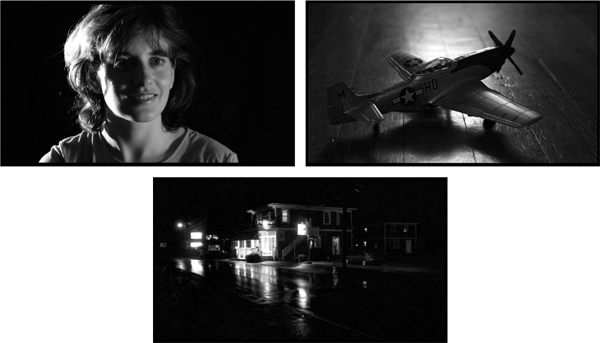
Figure 4.17 Backlighting can rim a subject and add highlights to the ground or set dressing.
Lights from Other Places
Most light sources in the real world, and subsequently in the film world, come from above and slightly away – somewhere in the upper hemisphere. Many lights in our public and private spaces come from above and sometimes from directly overhead. This light that comes from directly above (top lighting) is not always replicated exactly in film lighting. Either hard or soft, the top light causes the brow ridges on most faces to block the light from the eye sockets, putting the eyes into deep shadow. A small “moustache” shadow will also be cast on the upper lip by the nose. By keeping the eyes of the character in deep shadow you take away one very important visual means for the audience to relate to the character. If you can’t see the eyes, you probably cannot trust this person (see Figure 4.18).
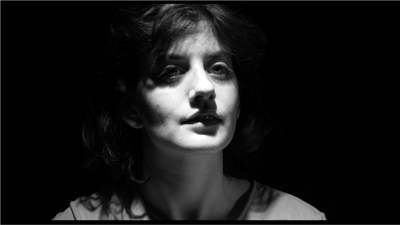
Figure 4.18 Top lighting can obscure the subject’s eyes.
Conversely, if you light from below, you are creating a rather unnatural lighting effect, as very few lights actually exist below the level of our heads in daily life. Under lighting, as this is called, causes the structure of the human face to take on a scary or ghoulish appearance and, therefore, is often used in horror films (see Figure 4.19).

Figure 4.19 Under lighting can turn good people into evil people.
Placing light on your set or location (on the walls, furnishings, floor, trees, cars, etc.) is often just as important as lighting the faces of your subjects. Certainly you need to add light to your set for general exposure, but placing light on specific areas of the set or location can add to the ambience of the scene, and change its tone or mood. When shooting dark environments or night scenes, placing lights in the deep background can also help create an illusion of 3D space by drawing your viewer’s eyes into the “depth” of the shot. They can also “rim” a subject and help further separate them from the darker background and so forth.
If you have a lighter background on your film set and only illuminate that background and not your subject in the middle ground, you will create what is called the silhouette effect (Figure 4.20). Exposing your camera for the well-lit background, and leaving your talent’s face in darkness (with no fill light), you force the silhouette. The camera is told to see the bright background as “normal” and that shifts the exposure on the dark face into the underexposure values of blackness. Use this for a sense of mystery, intrigue, or to protect the identity of an informant.
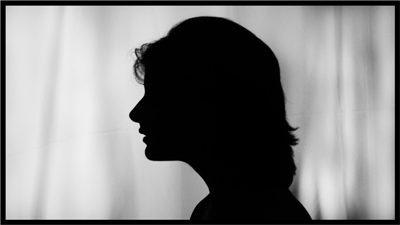
Figure 4.20 Whether you are protecting the innocent or creating an air of mystery, the silhouette keeps the subject in constant shadow while the background remains visible.
Any light fixture on your set that actually works and emits light that helps toward exposure and the overall creative lighting design is called a practical. Its job is to appear within the frame and provide light to the scene. Most often practical lamps are not bright enough to generate good exposure levels of light, so they are usually accent lights that provide points of visual interest around the set or act as motivators for other (off screen) larger film lights that raise exposure levels on the set. These augmenting film lights would need to be of matching light quality, color, and angle. Practical lights can also be a good source of motivation for creative color usage, as in “warm” amber firelight, “cool” blue refrigerator interior light, deep red neon light, and so forth.
If you are making a period piece from the days before electricity, or your story involves a power outage, then you may use light sources such as lanterns, candles, fire-light, flashlights, automobile headlamps, mobile phones, or any light that is battery or solar powered or run off a back-up generator. Most recent digital video cameras can get a decent exposure with lower light conditions. If you cannot or choose not to augment the practical source with film light illumination, then it helps if you shoot most of your shots in medium to close-up framing with minimal camera to subject distances. Light energy “falls off” in its intensity over distance, so a faint light source will just look more faint from further away. Keep it close to faces and to camera for best results in exposure (see Figure 4.21).

Figure 4.21 A practical. This functional lighting source on set actually helps give the image exposure.
Almost any other light-emitting or light-reflecting source can be used as a practical in almost any other film story situation. The important thing to remember is that effective output, intensity of light, may not actually be enough for exposure, so additional film lights will be needed to add levels but maintain the illusion that the light is coming from the practical fixtures. You should also be aware that color temperatures of these practical lights can vary widely and some color balancing may be necessary.
Controlling Light – Basic Tools and Techniques
A film lighting fixture is rather like a big bucket of light. Set it up, plug it in, point it to where you want the light to go and turn it on. If your goal were to just get exposure levels on your subject, then you’d be done with your lighting. Fortunately for all of us, there is more to it than that – or at least there should be.
Sculpting with your lights – applying their energy where and how you want – is often the best approach to creating great-looking images. There are many tools and techniques to help you do this (far more than we could list in this book). Grip equipment will be your best friend to help control your lights on set. You’ll become familiar with such things as C-stands, solid flags, nets, silks, and the ever-popular cucoloris. If you do not have access to grip equipment then there are things that you can do just with the film lights you might have.
Most hard light fixtures have “barn doors” (metal blades) that close over the output hole and knock down the amount of light coming out of the unit. These doors can also help sculpt the light. Hard lights also typically have a knob for Flood/Spot that spreads the beam out over a larger area or focuses it in to a small “hot” spot. Hard lights, in general, being more directional, are easier to control, cut, block off, and so on. As mentioned earlier, hard lights can also become soft light sources by using diffusion gels, bounce boards, bounce cards, or shiny reflectors.
Soft light, being less directional, is not as easy to control. You will need larger “blockers” to keep the diffuse soft light off certain areas of your film set [see internet and book Grip references in Appendix A].
Light … and the Light Years of Learning
This chapter has covered just some of the basic concepts in the art, science, and craft of film lighting. It is hoped that as you develop your overall skills with shot composition you will be expanding your abilities in the use of creative lighting as well. You cannot have one without the other. As you will grow to understand more and more, everything in filmmaking is related to everything else. Light relates to lens optics, aperture, CMOS/CCD/film sensitivity, exposure, ratios, color, emotional audience reaction, thematic/character interpretation, and so on and so on. Let us just say that you should always be conscious of how you are lighting your shots. Your lighting and compositional choices need to serve your “story” and not fight against it or leave it wanting or incomplete. What you choose to reveal to the audience or hide from them will yield more or less information, more or less understanding, and more or less enjoyment of your project.
- Lighting is one of the most powerful and creative tools available to the filmmaker.
- Light is energy – energy waves of electromagnetic radiation that happen to live in a zone of frequencies known as the visible spectrum.
- The color temperature of light is measured in degrees on the Kelvin scale. Film lighting is approximately 3200 degrees Kelvin and noontime sunlight is roughly 5600 degrees Kelvin.
- A camera set for tungsten light color balance will see daylight as bluish. A camera set for daylight balance will see tungsten film lights as amberish.
- Most manufacturers build their video cameras to have a particular exposure index or ISO rating for sensitivity to light levels (e.g. EI 320). Some cameras can have a wide range of ISO settings (e.g. 100–6400). Lower numbers mean more light is needed for the imager to react. Higher ISO/EI numbers mean less light is needed for an acceptable exposure on the image.
- Image exposure is affected by the amount of light on the subject, lens aperture, sensitivity rating of the recording medium, and the shutter speed or time of exposure.
- Neutral density filters lower the quantity of light hitting the camera’s imager, but they do not alter the quality of light (color, etc.).
- Hard light comes from sources with very directional, parallel beams of light waves, like the sun on a cloudless day.
- Soft light comes from sources with very diffused or scattered beams of light waves, like a cloudy day.
- Contrast is a reference to the amount of very dark, mid-gray and very bright areas in your image. High contrast is mostly black and white with very little gray. Low contrast is mostly gray tones with very little pure black or pure white in the image.
- Color refers to a particular hue or a palette of hues (ROYGBIV), and to the associated saturation or intensity of that color wavelength.
- Choosing a certain color palette for your film will help show your story on a thematic level.
- The traditional three-point lighting scheme for video is: Key, Fill, and Back. Each light does a job and can be placed in many regions around your subject.
- The placement of a lighting fixture (or light source) and the placement of the subject in relation to that light fixture dictate the light’s angle of incidence. High angle for top lighting and low angle for under lighting. The standard key light is 45 degrees above the subject’s head and about 45 degrees off axis from camera lens. In reality, you may place the key light wherever you wish provided it suits the “look” of your scene.
- Practical lights are light sources on the film set (like a desk lamp, computer monitor, etc.) that actually emit light and add to the overall exposure and “look” of the image.
- Grip equipment (C-stands, flags, nets, bounce boards, etc.) help you control the quantity and quality of light used on your film set.
Chapter Four – Exercises & Projects
1. Take two series of photographs with any digital still camera. Series 1 – Find any interior space that has a window to the outside. Photograph this interior space from an angle where you do NOT see out the window – in the morning, in the mid-afternoon, and at dusk. Series 2 – Record images of any exterior space in the morning, in the mid-afternoon, and at dusk. Compare the quantity of light and the quality of light from each location at the three different times of day. What do you notice?
2. Acquire at least three or four different subjects (a mix of male/female, young/old, etc. would be good). It would be best to perform all of the following during one session.
If you have access to film lights of some kind, set up a standard three-point lighting scheme and make it look as good as possible on the first subject. Record some video of that set-up. Then, without changing anything about the lights or camera, sit your next subject in the same place and record some video of that person. Do this process for all subjects. Watch your video and note what worked and what didn’t for each subject.
Return your camera to the same position if you moved it for image review, sit your second subject again and tweak the lights to improve the look. Do the same process for each remaining subject; sitting, tweaking, recording improved “look.” Take note of what was different about each subject and what you had to do to the lights in order to get the best look.
3. Set up an MCU on a subject in some room where you can control the lighting. With your camera in place and your subject seated, darken the room. Have an assistant hold a desk lamp or powerful flashlight and move it slowly around your subject from different heights (above/below) and angles (front/back/side). Review the recorded video results and take note of how the light from different angles of incidence interacted with your subject’s facial structures (nose, eyes, brow, chin), hair, and clothing.
Chapter Four – Quiz Yourself
- What is the color temperature (Kelvin scale) for most manufactured film lights?
- If you are shooting under direct sunlight, typically what color temperature would you need to set on your video camera?
- What do the terms “white balance” or “neutral balance” refer to?
- What factors can affect the exposure of your recorded image?
- How does light quantity affect your recorded image’s depth of field?
- What could you do with a hard light source in order to make it appear as soft light on your subject?
- What do you call a functional light fixture on a film set that is part of the set dressing or art direction but also contributes light to the set and subject, helping both the exposure and the “look” of the scene?