
APPENDIX B:
METERING AND EXPOSURE
In order to make successful photographs practitioners must first understand the basics of exposure. “Why,” you can ask, “when all of the newer cameras figure out exposure for me?” The answer is simple: these technical aspects of exposure have a tremendous effect on the way the final image will look, and to use your camera in its automatic settings relinquishes creative control to the computer tethered to the meter. The information in this appendix is straight forward and easy to learn, and learning it will make the images produced through your photographic practice much more successful and rewarding. This is the basic foundation for exposure and camera controls.
WHAT IS EXPOSURE?
Photography literally means “Light Writing.” With it we transcribe an image onto light-sensitive media through the action of light. Simply put, Exposure refers to both the amount of light projected onto the light-sensitive media, and the resulting Density (the overall lightness or darkness) of the image. There are four factors which work together to determine exposure. These technical factors seem a bit difficult to master at first, but after a little study and practice they become second nature, and they become your ally.
Four Determinants of Exposure
1.Amount of light in the scene (ambient light or flash/strobe light)
2.ISO (the sensitivity to light of the media)
3.Aperture (controls the intensity or quantity of light)
4.Shutter Speed (controls the time or duration of exposure to light)
THE AMOUNT OF LIGHT IN THE SCENE
The amount of light in the scene is the first and foremost determinant of exposure; unfortunately in many instances you have little to no control over it. By using flash, strobe, or other artificial lighting equipment you may completely control the light striking your photographic media (film or digital sensor), but outdoors under natural lighting conditions, you have to base exposure on the available or ambient light. The most straightforward way to learn to control exposure is to practice in various available light situations, and learn artificial lighting techniques later, as their principles build upon these.
Available light just is. Your camera's reflected-light meter, or a hand-held incident-light meter, will help you determine the amount of light in the scene.
ISO (AKA: FILM SPEED OR SENSOR SPEED)
This is the first and most basic determinant of exposure which you can control in-camera. As you already know, photographs are made by using materials that are sensitive to light. When dealing with most digital sensors and films, the ISO is the standard means of identifying its degree of sensitivity to light. When using digital photography you may change the ISO at will, depending on your light requirements; when using film you must choose the ISO that corresponds to the roll of film you are shooting (or your camera may read the DX code imprinted on the film cassette) and stick with that setting for the entire roll of film. It may be important to note that digital media sensitivity does not actually increase with the use of faster ISOs; the electrical signal produced by exposure to light is merely amplified so that the image may be recorded faster.
From the ISO chart you see that the slower the light-gathering abilities of the media (film or sensor), the more exposure to light it will require in order to adequately record the latent image. The primary advantage to slow ISOs such as 50 or 100 is greater image detail and clarity; however, it is difficult to impossible to render a moving subject with a slow ISO because it will blur due to the need for a longer shutter speed. Slow ISOs are good for still life, studio photography, and tripod work.
A medium ISO speed, such as 200 or 400 is a sort of middle of the road, best of both worlds' speed. It offers a rela-tively fine grain structure that, when enlarged, still retains good image clarity. The second advantage to using medium speed media is that it is fast enough that there is no need for a flash in most lighting situations, and that most movement can be frozen or the degree of blur controlled through the aperture/shutter combinations.
| 6 | 12 | 25 | 50 | 100 | 200 | 400 | 800 | 1600 | 3200 |
| 8 | 16 | 32 | 64 | 125 | 250 | 500 | 1000 | 2000 | 4000 |
| 10 | 20 | 40 | 80 | 160 | 320 | 640 | 1250 | 2500 | 5000 |
If you were going to memorize the ISO chart, I recommend memorizing the entire chart in 1/3rd of stops. At the least, know the following: 50, 100, 200, 400, 800, 1600, 3200
The common ISO speeds and their attributes are as follows:
| ISO | Exposure requirements | Visual qualities |
| 50 ISO | Very slow film or sensor;
Good for slow or still life subjects |
Digital: very little noise Excellent fine detail Film: very fine grain Excellent fine detail |
| 100 ISO | Slow film or sensor
2× faster than 50 ISO |
Fine grain/Low noise Very fine detail |
| 200 ISO | Medium-slow film or sensor
Requires half the light of 100 ISO |
Medium-fine grain/Low noise Good degree of fine detail |
| 400 ISO | Medium-fast film or sensor
Good for general purpose and moving subjects |
Medium grain/Acceptable noise Less fine detail |
| 800 ISO | Fast film or sensor
Good for stop motion and fast moving subjects |
Large grain/Some apparent noise Low fine detail |
| 1600 ISO | Very fast film or sensor
4× faster than 400 ISO |
Very large, coarse grain/ Clearly visible noise/ Poor degree of fine detail |
as these are the most common and they have the same 1-stop difference relationship as the aperture and shutter speed charts.
APERTURES, f-STOPS, LENS OPENINGS
The aperture, or f-stop, literally refers to the size of the opening through which light enters the camera. This mechanism, normally located within the camera lens, controls the amount or quantity of light that will strike the film or sensor for a given time, when you release the shutter mechanism. Without getting into the intricacies of how the aperture numbers operate, there is a simple way of remembering their interrelationship. Each whole aperture number lets in exactly 1/2 or 2 times the amount of light allowed by the number directly before or after it.
The whole aperture numbers are:
| f1 | 1.4 | 2 | 2.8 | 4 | 5.6 | 8 |
| 11 | 16 | 22 | 32 | 45 | 64 | 90 |
|
Opening the aperture |
Closing the aperture |
|
Provides more shallow |
Provides greater depth |
|
Requires a shorter/faster |
Requires a longer/slower |
Not all of the whole f-stops are available on all camera lenses (some lenses may offer f4–f22 only), and on most cam-eras you can set the aperture in-between full stops as well. For our purposes, we need to remember that the relationship between the whole f-stops is always the same. For example, f2.8 lets in half as much light as f2 and two times as much light as f4; f8 lets in only 1/4th the amount of light than f4 and four times more than f16; f16 lets in two times more light than f22 and half as much as f11. Knowing these relationships makes exposure calculation much simpler.
There is also a visual aspect to apertures that you should learn, that is, depth of field. Depth of field refers to how much of your image from foreground to background will be in focus.
We will cover depth of field more in depth in Chapter 2, but you should keep the basic visual effect of this exposure factor in mind as it applies to aperture. Avoiding the intricacies of technical explanations here, you should just know that three things determine depth of field:
1.The focal length lens. The longer (more telephoto) the focal length, the lesser the depth of field, and the shorter (wider) the focal length the greater the depth of field (assuming the remaining two factors stay the same).
2.The focusing distance size. The closer the focus distance, the lesser the depth of field; conversely, the further the focus distance, the greater the depth of field (assuming the other two factors stay the same).
3.The aperture. The larger the lens opening (i.e., a smaller number like f2), the lesser (or more shallow) the depth of field; the smaller the lens opening (i.e., a larger number like f16), the greater (or more broad) the depth of field.
SHUTTER SPEEDS
The third determinate of exposure which you control in the camera is the shutter speed, that is, the length of time or duration of the exposure the media receives to light. When you depress the shutter release mechanism, a curtain within the camera opens, leaving nothing between the open lens aperture and the media (sensor or film) but light. The shutter speed determines how long the media receives light of a given quantity (which is determined by the aperture). The relationship which exists between the whole shutter speeds is strikingly similar to the relationship between whole f-stops, and this comes in quite handy when trying to determine proper exposure.
The whole shutter speeds are:
| 4′ | 2′ | 1′ | 1/2 | 1/4 | 8 | 15 | 30 | 60 | 125 |
| 250 | 500 | 1000 | 2000 | 4000 | 8000 |
|
Slower shutter speeds let |
Faster shutter speeds let |
|
Slower shutter speeds = |
Faster shutter speeds = |
|
Slower shutter speeds |
Faster shutter speeds |
|
Begins to blur motion |
Begins to freeze motion |
On most shutter indicators, the number “2” refers to one-half of a second, the number “30,” one-thirtieth of a second, the number “1000,” one one-thousandth of a second, and so on. In photographic terms, 1/30th is considered a slow shutter speed (too slow to avoid a blurry photograph unless you're really steady or have a tripod). Average shutter speeds range from 1/60th to 1/500th, depending on the lighting situation, and anything above that, say 1/1000th, is considered a fast shutter speed. Because the shutter speed determines how much time that light is allowed to strike the media, slower shutter speeds add exposure while faster shutter speeds reduce exposure.
How to Hand-Hold Your Camera (No Tripod) Without Fear of Camera Shake
Camera shake is a blurry picture resulting from using too slow a shutter speed while hand-holding the camera. The basic rule to avoid camera shake is: Use a shutter speed that is the numerical equivalent or faster in relation to the focal length of the lens you are using, and never go slower than 1/60. Always err on the side of too fast if you don't want blurry pictures. For example, if you are using a 100-mm lens, you should use a shutter speed of at least 1/125th. When shooting with a 200-mm lens, you should use a shutter speed of at least 1/250th. When using a focal length of 50 mm or shorter (say, 16 mm) you still must use a shutter speed of at least 1/60th because this rule is for preventing blur due to the camera movement itself while hand-holding (not the movement of the subject—that's another calculation). If you use a tripod with a cable release or the on-board timer, you can use just about as slow a shutter speed as necessary (as long as the subject isn't moving).
An aside: There are two basic types of shutter mechanisms: a leaf shutter and a focal-plane (or curtain) shutter. The leaf shutter mechanism is located within the camera's lens (usually in medium and large format cameras) and the focal-plane (curtain) shutter is located just behind the lens in front of the film or sensor plane. Focal-plane shutters are most commonly seen in SLR cameras. The two kinds of shutters have several different attributes that are most significant when using flash or strobe; we won't get into those attributes here.
PUTTING IT ALL TOGETHER
Exposure determines the overall density of the image. There are essentially three ways to expose photographic media:
1.Normal exposure (N) contains all tones with proper density and detail.
2.Overexposure (+) will make the entire image lighter because the media received too much light.
3.Underexposure (−) will make the entire image darker because the media received too little light.
Because of the similar relationship between shutter speeds and apertures, any number of Equivalent exposures may exist for a single scene.
The Law of Reciprocity: Exposure = Intensity × Time
Exposure = aperture × shutter speed
What this means is, if an exposure of f/8 at 1/125 is correct, then an exposure of f/4 at 1/500 will also be correct, as will an exposure of f/32 at 1/8. There are reasons to choose one exposure combination over others, and experience will help. In the mean time, consider the following example: You are shooting digital media. You are shooting a waterfall scene, and your meter indicates an exposure of
| 400 ISO | F/5.6 | 1/125 | …but you want to blur the water, you could use: |
| 400 ISO | F/22 | 1/8 | …if you want to blur it more, you could use: |
| 100ISO | F/22 | 1/2 | …and then after all you decide to freeze the water: |
| 400ISO | F/2 | 1/1000 | …any of the above combinations will provide the same exposure but different visual effects |
UNDERSTANDING YOUR LIGHT METER
If you are working only with in-camera meters, you should understand how they work. In-camera TTL (through-the-lens) meters are a type of reflected-light meter; they read scene luminance, or how much light is reflected off the surface of the subject. Your camera's light meter is a tool, a guide to help you determine what the proper exposure will be for a particular scene under a particular quantity of light. In order for the light meter to perform its function properly it first needs one bit of vital information: the ISO or sensitivity setting. With this information, the light meter “reads” the amount of light reflected from within its field of view, and determines how much of that light it will take to sufficiently expose the media, based on the ISO.
When interpreting your light meter, know that it has one characteristic you can always count on:
Your light meter averages any light that it reads to middle (18%) gray. It does not matter if the subject you are metering is an average scene (a mix of tones from white to black), a high-key scene (a predominantly light-toned scene, for instance, a white dog in a snow drift), or a low-key scene (a predominantly dark-toned scene, say, a black cat on a dark stone path)—your meter will average the light reflected from within its field of view and give you an exposure indication which will render the scene a nice middle gray. When a scene contains tones that “fool” your reflective meter, the result is called subject failure; that is, the reflectance value of the subject fails to produce a middle-gray reading and the density of the resulting image is wrong. Of course, you do not always want the scenes you shoot to look gray (i.e., you want the white dog in the snow drift to look white, not gray; and the black cat on the stone path you want to be predominantly dark to black scene, also not gray). Think in terms of tones, not colors; colors are rendered as tones to your meter depending only on how much light they reflect (green grass is a very nice middle-gray tone). Since your meter does this averaging for you, there are only a couple general rules you need to follow in order to make your photographs render the tones you want.
ADVANCED EXPLANATION OF EXPOSURE
Your reflected-light meter is reading light reflected by objects in shades of gray; this combined with the relationship between how much light various tones reflect, and the way f-stops and shutter speeds interrelate, is very convenient. Not only does a 1-stop change in either direction with the aperture or shutter speed double or cut in half the exposure, but there are 5 whole stops between white and black tones based on the fact that each consecutive tone reflects double or half the amount of light of its tonal neighbor.
| Tone | Reflectance value (how much light a certain tone reflects) |
| White (with detail) | 90% |
| Dark white | 45% |
| Light gray | 22% |
| Middle gray | 18% |
| Dark gray | 11% |
| Light black | 6% |
| Black (with detail) | 3% |
This tonal relationship makes it very convenient to shoot an accurate exposure under high-key and low-key conditions, and to correct exposures that are wrong. Essentially, white tone with detail reflects about 21/2 stops more light than middle gray, and black tone with detail reflects about 21/2 stops less light than middle gray. This means, when you are shooting an average scene, you will usually go with what your meter indicates. When you are shooting a high-key scene you'll usually want to add exposure (about +2 stops) to what the meter indicated so that you will render bright tones as bright. When you are shooting a low-key scene you'll usually want to subtract exposure (about −2 stops) from what the meter indicated so that you will render dark tones as dark. Remember, your meter makes exposure recommendations that will render any scene as middle gray.
A Note About Advanced Metering Systems
Many contemporary metering systems contain thousands of digital tonal configurations; these systems compare (in about a millisecond) the scene you are currently metering with these digital files in order to provide a much more accurate meter reading than traditional analog meters. In order to guarantee proper exposure you will have to practice using your meter under various tonal and lighting conditions, and determine how your meter responds. For instance, I have a camera meter which is accurate to within 1 stop of the correct reading under most high-key and low-key conditions, so if I add or subtract the usual 2–21/2 stops I will have gone too far.
A Note About Judging Exposure with Digital Cameras
Never, never, never, ever … never ever … NEVER trust your LCD monitor. Always refer to your histogram to evaluate exposure!
Bracket to Insure Proper Exposure
To insure that you record an accurate exposure, bracketing should be in order. Bracketing is making several different exposures of the same scene. To bracket, you will usually make an exposure at the meter reading, then make a second exposure at 1/2 to 1 stop above the reflected meter reading (the image will be lighter), and a third exposure at 1/2 to 1 stop below the reflected-meter reading (the image will be darker). When in doubt, BRACKET your exposure!
THREE-SCENE TONAL-RANGE EXERCISES
You might practice metering and exposing using these exercises in order to help you to get a handle on your camera's technical operations and exposure.
Scene No. 1: Average Scene
As exposure decreases the image density becomes darker; as exposure increases the image density becomes lighter.
You are looking at an “average” scene, one in which there are tones varying from white to black and there is an average amount of light and shadow falling throughout. Your camera meter indicates that an exposure of f/5.6 at 1/60 is correct. You could shoot at this setting; however, you want more depth of field (i.e., you want more in focus from near to far within the scene). You simply move the aperture to a setting that will allow you to have more depth of field, say, f11. But now your meter indicates that if you shoot at this setting you will be underexposing the film by 2 stops. The remedy is to change your shutter speed to compensate for the change in aperture, so the shutter speed for f11 is 1/15. The exposure to the media is exactly the same; the only difference is the configuration: you are allowing 3 stops less light in through the aperture and balancing that with
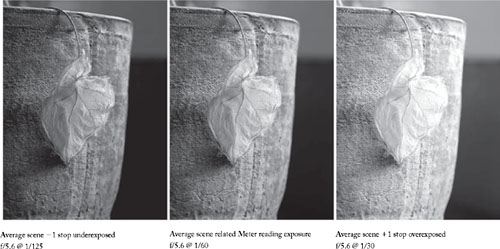
IMAGE © ANGELA FARIS BELT.
Average scene images with bracketed exposures — 1 stop underexposed, normal exposure, and +1 stop overexposed. As the exposure decreases the image density becomes darker; as the exposure increases the image density becomes lighter
3 stops more light via a longer shutter speed. The following are examples of over- and underexposure only.
Scene No. 2: High-Key Scene
A high-key scene is one which is predominantly light in tone. For scenes such as these, you might need to overexpose; that is, add more light than the meter reading indicates so the scene looks light.
You are looking at a beautiful tree emerging from a snow drift. It is a bright day and the whole scene is white. Your camera meter indicates that one possible exposure is f/11
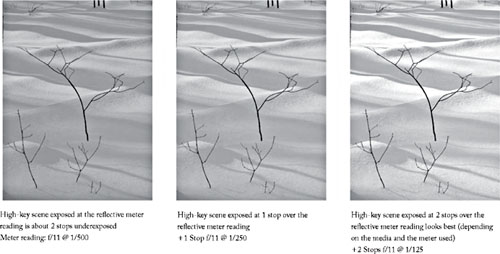
IMAGE © ANGELA FARIS BELT.
High-key scene with an initial exposure at the reflected-meter reading, then bracketed at +1 stop overexposed, and a second at +2 stops overexposed. A high-key scene is one which is predominantly light in tone. For scenes such as these. you might need to overexpose; that is, add more light than the meter reading indicates so that your image has blight white tones and doesn't look too gray.
at 1/500. If you made the photograph at this setting, how would the image appear? There would be a gray tree in a gray landscape that would resemble snow if only it would have been white. That's no good. In order to remedy the situation, you would need to overexpose; that is, allow more light to get to the media (sensor or film), thereby rendering the white scene as white (remember your meter thinks it's gray, so you have to interpret and override it). Depending
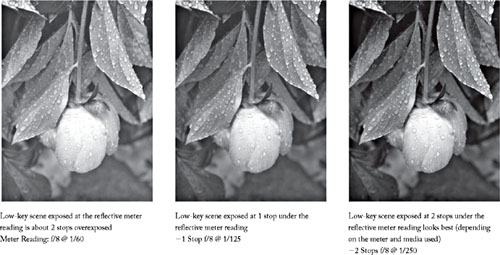
IMAGE © ANGELA FARIS BELT.
Low-key scene with an initial exposure made at the reflected-meter reading, then bracketed at −1 stop underexposed, and then −2 stops underexposed. A low-key scene is one which is predominantly dark in tone. For scenes such as these,you might need to underexpose; that is, provide less light than the meter reading indicates so that your image has rich black tones and doesn'l look washed out.
on the media, overexposing by 11/2–21/2 stops is sufficient. In order to do this you could either open to a larger aper-ture such as f/5.6 or f/41/2, or you could slow to a longer shutter speed such as 1/125 or 1/90. Either decision would be fine.
Scene No. 3: Low-Key Scene
A low-key scene is one which is predominantly dark in tone. For scenes such as these, you might need to underexpose; that is, provide less light than the meter reading indicates so that the scene looks dark.
You are looking at rain drops on a pink peonie flower in deep foliage. It is a dark scene, but you can make out all the details in the dark shadows. Your camera meter indicates that an exposure of f-8 at 1/60 would be fine. If you made the exposure at that setting how would the scene appear? The pink flower would be washed out and the dark foliage would be muddy-gray. In order to correct the situation, you would need to underexpose from what your meter indicates, that is, give the media less light so that it renders the dark scene as dark. Again, 11/2–21/2 stops should be sufficient. So, your correct exposure could be say, f/16 at 1/60 or in this case I would make a final exposure 11/2 stops under at f/8 at 1/200.
Understanding proper metering and exposure for your particular photographic materials is essential, prior to attempting to manipulate them for creative or communicative effect. The technical elements of the photographic process—in particular aperture and shutter speed combinations—are the foundation upon which photographic images are made. Practicing metering and exposing (even bracketing) average scenes, high-key and low-key scenes, backlighting, and a variety of other scenes will help you understand how your photographic materials respond to those situations, and will in turn enable you to create images as you conceive them to be.