PART 2:
USING
MULTIPLE
FRAMES
The frame is the most basic element of photographic image making since it is the first element you encounter—before apertures and shutter speeds, and more immediately than media choices—when you pick up a camera. The most straightforward way to use the frame is to simply make photographs—take single slices out of time and space—and print them. But many photographers choose to represent their subjects through the use of two, three, or multiple frames configured as diptychs, triptychs, panoramic, or montage images, and they do so for several reasons.
First, the use of multiple frames allows artists to create images that cohere through gestalt; that is, several images are combined to be interpreted as a unified whole. Images such as these force the photographer (and the viewer) to consider the multiple frame edges—their relationship and proximity to one another—and their relationship to the subject and content of the image. In this way the interrelationship of frames has a direct bearing on the meaning and interpretation of the image.
Second, using multiple frames allows photographers to create panoramic images and multi-panel pieces. In making these images, photographers can capture physical space outside the camera frame’s format; it allows photographers to create images that include a wider angle of view than the camera’s format could otherwise capture. Some of these types of images are seamlessly “stitched together” in the traditional or digital darkroom, but in the end those can be considered in the same way as a panoramic image made with a panoramic camera—as a single frame. What concerns us here is the creation of images that maintain the multiple-frame character of the image.
A third reason to use multiple frames is that it allows the artist to represent the passing of time without blurring, and as such is a conceptual means of breaking out of the single frame = single image mentality, as artists such as David Hockney so famously put to use. This is not the same as using a sequence of images, as, say artist-photographer Duane Michals does; it instead uses several images read as a single image to illustrate the passing of time.
Finally, using multiple frames in the form of collage or montage allows artists to incorporate historical and other images in order to make statements which expand on the subject of the image, as in the recent works by Mark Klett and Byron Wolfe (see the Portfolio Pages of this chapter for examples of their work).
This part of Chapter 1 is not about multiple exposures or multiple printing techniques (those are more closely related to the element of time which will be covered in Chapter 3);

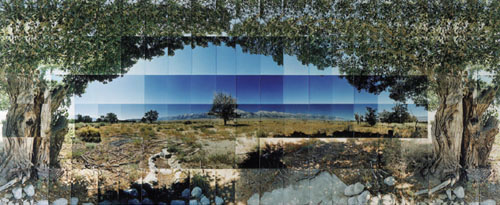
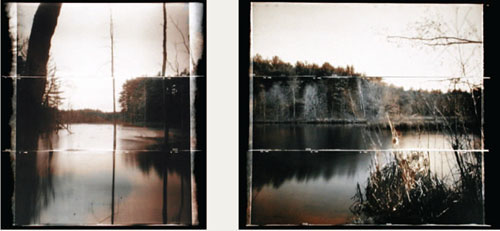
IMAGE © JOE LAVINE, 2007.
This dual-panel panoramic image allows photographer Joe Lavine to work with the relationship of the color in the landscapes individually; the effect makes the message of the scene more visceral.

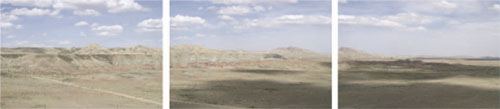
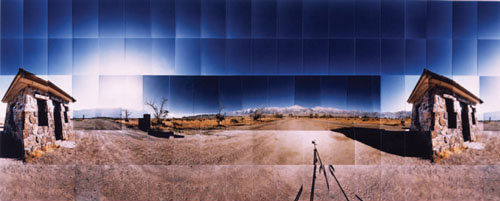
IMAGE © ANGELA PARIS BELT, WYOMING LANDSCAPE, JUNE, 2006.
This seven-panel panoramic image was made on my first expedition to Wyoming. The view was so wide and expansive, and so foreign to me, that I wanted to make a panoramic image of it. I placed my camera on a tripod, only generally leveled it for each frame using the circular bubble level on the tripod head. I paid attention to content in the far right edge of each frame, being careful to repeat that content slightly in the far left side of the next frame as I panned to the right. The slight repetition serves to elongate the image and contributes visual continuity from frame to frame so that the seven frames are more easily perceived as a single image.
it is about using multiple frames to create a single image, used to extend and add complexity to the way you would approach single frame images of the same subject. Think of using multiple frames as similar to individual stanzas in a poem: their proximity to one another within a single poem defines each as part of the larger whole; they may be interpreted individually, but in order to gain the complete meaning of the poem one must consider all of the stanzas together. In multi-frame images, each individual frame, like each stanza, has its own self-contained (framed) content, and as such is somehow divided from the larger whole, but only in relation to the other frames in the piece (other stanzas in the poem) is the image considered whole in its ability to fully communicate meaning. Like stanzas, multi-frame images tend to have components of equal or measured size for the purpose of structural unity, but this is by no means the rule.
Following is a discussion of some common types of multiple frame image techniques.
MULTI-PANEL PANORAMAS
You see them quite often: the scene that has too wide an angle of view to capture in a single frame. So you proceed to make several exposures in a row from left to right and
put them together later. The process can be either simple or complex, depending on whether it’s important for the images to align perfectly. To clarify, although the general process is similar, we are not talking about shooting several digital frames in order to make a seamlessly stitched panorama in Adobe Photoshop; that would defeat the point of bringing multiple fames into the discussion. We are talking about using several, clearly distinguishable frames placed together to make a single image.
The easiest way to make a multi-panel panorama is to simply make a sequence of images which, when printed together or placed next to one another in order, are read as a single image. You do not need a tripod to create these types of images; you only need to pay attention to the contents at the frame edges where the images will “adjoin.” You can make successful multi-panel panoramic images this way, but you should know that the results will be very different from those achieved though use of a tripod and a bubble level.
Making Multi-fram e Panoramas
If you are making panoramic exposures, whether to stitch seamlessly or not, there are several technical considerations to be aware of. The Technical Tutorials Section for Chapter 1 provides more information about how to successfully create images such as these.
Dividing the Single Frame
In order to use multiple frames or create an image which relies on gestalt, you don’t necessarily have to capture several frames; you can also divide a single capture into multiple ones. In the following image, I saw hundreds of birds flocking, preparing for their winter migration. The scene looked like utter chaos from the outside. I made some photographs, which I immediately cropped into a wide horizontal to follow the density of the trees surrounding the bright cornfield. After evaluating this image, I chose a different edit and decided to conscientiously crop it into four separate panels, aligning the content between frames. The multiple panel image is the one I chose to represent the scene, since it added to the feeling of rhythm and frantic energy of the scene.
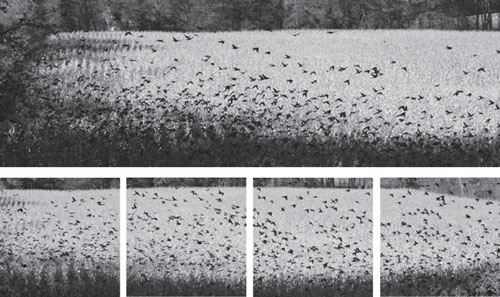
IMAGES © ANGELA FARIS BELT, 2006–2007.
MAKING CONTACT SHEET IMAGES
Images that use the structure of the contact sheet itself can be an interesting way to combine a direct reference to the medium with the subject to a viewer. Making successful contact sheet images can be extremely difficult, and it takes a good deal of planning prior to shooting. The following tips will help you along:
1 If you are using traditional film, be sure to understand the orientation of the film and the direction it advances inside the camera. Also, determine how the film fits into its designated sleeves, or plan to hand-place your negatives under glass in a pre-considered configuration for printing.
2 If using digital media, pre-determine how many rows and columns of frames you will want in the final piece, and match that configuration when you go to File > Automate > Contact Sheet II. You will have to be sure to name your files in such a way that they are placed in order when the automated function runs. You could also place the images by hand using layers.
3 Sketch out your ideas beforehand, using a template that has the correct number of frames you will use in the final piece in the order you will organize them. Also make sure that the template has individual frames that are to the proper size and orientation.
4 Decide beforehand if you want a fixed perspective; if you do, then you want to use a tripod.
5 Before you begin, determine proper exposure by metering an average (middle-gray) part of the scene or using an incident-light meter, and keep your exposure the same throughout the contact sheet regardless of your camera meter’s changes from frame to frame, otherwise your image will not have consistent density.
6 Keep your focus point where you want it. If you want to create a contact sheet that is visually similar to a single capture, zone focus and keep your focus point at the same distance by turning off any auto-focus capability that the camera has. If you want to use selective focus as part of the image, you can re-focus to different distances throughout the process, and you can mimic shallow depth-of-field to isolate your primary subject frames by capturing the surrounding frames intentionally out of focus.
7 Once you choose your subject and camera position, do a “dry run” by moving the camera from position to position in order using the focal length you intend to use, and considering your distance from your subject
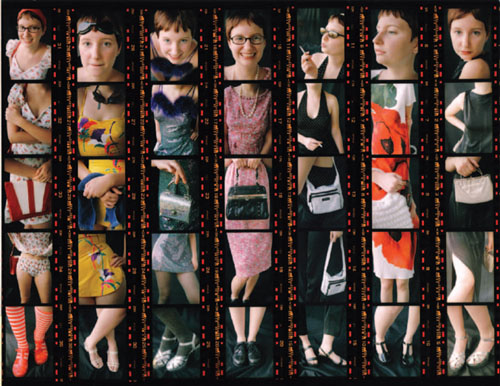
© JASON LAVERIS, STACEY PLOTT CONTACT SHEET IMAGE, 2000.
This contact sheet image was made by one of my students. His whimsical approach of dividing the image into seven scenes based on the structure of the contact sheet was inventive, and allowed his friend and collaborator Stacey to show off her extensive wardrobe. Jason is currently working as a freelance photographer in Los Angeles.
(the most common problem with failed contact sheet images is that the photographer was too far away from the subject matter).
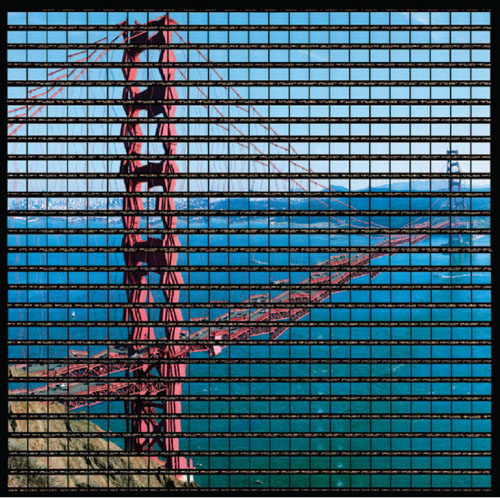
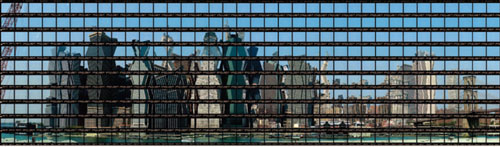
Thomas Kellner’s work provides an excellent example of what can be done using the contact sheet or any other grid-type configuration to make a multi-panel image. See examples of his work in the portfolio pages of this chapter.
There are innumerable ways to combine several images into a single piece; the idea is to think about how multiple images might communicate about your subject, and what using multiple frames will allow you to accomplish that using a single frame could not. Experiment, practice, be open to conceptual implications, and notice all of the multiple frames around you.
CHAPTER EXERCISES
In these exercises you will take framing one step further, and use multiple frames in order to help you communicate about your chosen subject or concept. Take a “no-holds-barred” approach to conceptualizing and creating your images, in particular when it comes to thinking of ways to place several frames together in order to make your images. Problem-solve to overcome any technical or equipment hurdles so that you can make your images exactly as you want them.
Exercise No. 1: Multi-Panel Panoramic Images
Make a series of photographs in a row with the intention of printing them as a multi-panel panorama. You may use a tripod or not for this exercise, but know that your results will be very different depending on which way you choose. Be sure to keep your exposure the same throughout each series of images that you intend to print together. If you intend to enlarge negatives in a traditional darkroom, remember to consider the size constraint of the enlarger you’re using; a 4 × 5 enlarger can print a panoramic image using three 35-mm frames across using a handmade or glass carrier. Alternatively, you could print each image separately and determine the best way to physically arrange them after printing, using window mat to separate them, or dry mount them flush with one another overlapping in the appropriate places.
Exercise No. 2: Contact Sheet as Image
In this exercise you will use the format of the contact sheet to create an image. Consider what the format—the space between frames and the use of so many frames—of a contact sheet has to add to a viewer’s perception of your subject.
Shoot each frame deliberately, so that when they are printed together as a contact sheet, the image revealed in the frames represents the unified whole that you had envisioned. The contact sheet will be your final piece, so there is not much post-shooting work to speak of; most of the work is up front. Making a successful contact sheet image can be easier said than done, because the image must be successfully planned and executed; one incorrect frame and the entire piece could be compromised. See the tips included earlier in this chapter for help. Remember that in the digital world a “contact sheet” can have a variable number of frames per column and row, and that the background color as well as the space between the images may be controlled by handplacing and aligning the images onto a single canvas.
Exercise No. 3: Incorporating Other Images
In this exercise, you will use images that you have previously made, found imagery, or old family photographs, and build on them to create a larger whole.
Concentrate on building imagery that incorporates already existing imagery, in order to expand the viewer’s understanding of your subject. You might decide to demonstrate the passing of time or a panoramic view (such as Mark Klett and Byron Wolfe do with the images in the Portfolio Pages of this chapter). Consider the dimension you can add to your statement about your chosen subject through thoughtful juxtaposition of multiple frames.
You may do this in the traditional darkroom by rephotographing old photographs, or digitally through scanning. You may choose to use collage, montage … anything goes, really. Push your ideas about your subject, continue conducting independent research about it, and expand the interpretive value of the images you use and create.
PORTFOLIO PAGES
The photographer-artists represented in the Multiple Frames portfolio pages all use more than one image to piece together a more faceted view of their subjects than the single image could provide, to defy the hold of time over the single capture, and to create significant visual and conceptual ties to their subjects. Their work is not about multiple frames; however, the meanings that these images communicate would not be possible without the use of multiple frames. Their meaning is intrinsic to the physical interrelationship and/or interconnectedness of the frames. Conceptually the images depend on this interrelationship; photography theorist Terry Barrett might refer to them as “theoretical” on that level in that the use of multiple frames is often used to comment on “modes of representation” (1990, p. 68), and included in these modes is the widespread and historic use of multiple frames. In creating their images these photographers use film, digital, and combined media to suit their specific needs. The following Artist Portfolio Pages should inspire ideas and discussion about these notions and more regarding the use of multiple frames.
ARTIST STATEMENT
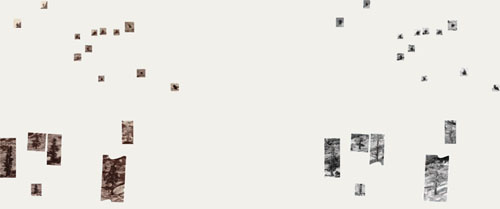
My work has been titled in very different ways in the past years. Usually I go back to its basic technical description: contact sheets.
Some have called my work deconstructive, others collage, de-collage, or montage, some say it is architectural photography—no and yes; only the subject is architecture. In a time where everyone turns to digital photography (some have not even used film in their life at all), “indexprints” might be the more contemporary description, I still use film and I use every image on the role. If I shoot on one frame the final size of the print is 20 × 24 cm, if I use 36 frames, the print is 100 × 120cm. And because the single frames are all shot in sequence I simply cut the strips, mount them together, and make a contact print.
It all started in pinhole photography using an 11 -pinhole camera and also one with 19 pinholes made for the whole length of a 35-mm roll of film. That was when I started to create multiple image reconstructions. I learned to collage on the negatives by shooting different objects or moving the camera in between each shot. This I do still today when I shoot architecture, each frame is a single shot and for each shot I tilt the camera differently.
But it all starts with choosing the object and finding the right time of day and weather (everything is shot with the same exposure time and aperture). Then I decide the final size of the image through the number of frames I am going to use. I already know how many frames there will be and I have to divide the images into this number of frames by finding the right focal length. I use a scale on my tripod to match all the vertical lines as they must line up precisely. Shooting can take anywhere between 30 minutes to 5 hours, depending on the size of the image.
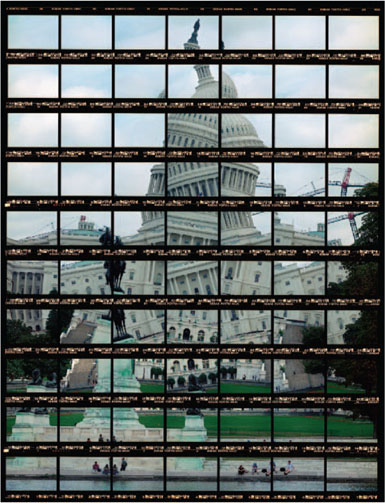
41#01 Washington, Capitol I, 2004.
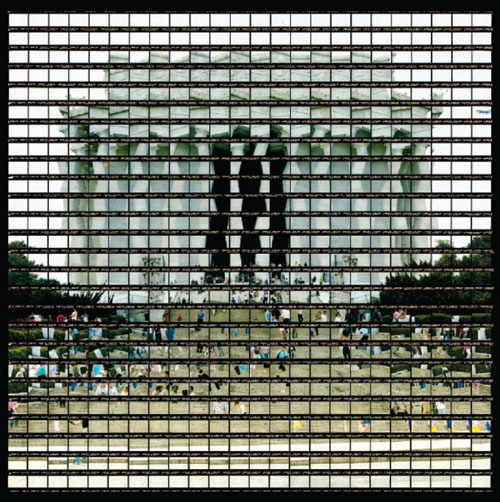
41#05 Washington, Lincoln Memorial, 2004.
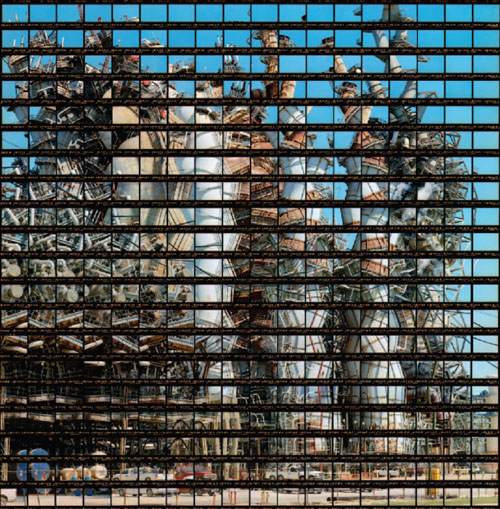
51#01 Houston, Texas Refi nery, 2006.
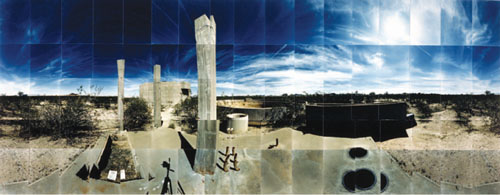
AMERICAN CONCENTRATION CAMPS
A note from the author: Masumi Hayashi is best known for her striking panoramic collages of Abandoned Prisons, E.P.A. Superfund Sites, Cityscapes, and Japanese Internment Camp Sites. The following artist statement was published alongside an exhibition of her series, American Concentration Camps, while it was on view at the Cleveland Center for Contemporary Art in 1997. These panoramic photo-collages document the remnants of World War II Japanese American Internment camp sites; in addition to the photo-collages, Hayashi interviewed camp survivors from the United States and Canada, and she collected personal photographs taken during their internment.
ARTIST STATEMENT
The Landscape of Place and Memory: American Concentration Camps
In February 1942, 3 months after the Pearl Harbor attack, the United States took unprecedented action directed at its own population. Executive Order 9066 and Civilian Exclusion Order 5 decreed that over 120,000 Japanese Americans be removed from their homes in the “western defense zone” of the United States and incarcerated in ten “internment” camps, which were located in isolated areas of Utah, Montana, Arkansas, Arizona, California, Colorado, and Idaho. These ten camps functioned as prison cities, with populations of 10,000 to 18,000 people in each camp.
With the bombing of Pearl Harbor, the Japanese Americans in America were no longer seen by other Americans as industrious, immigrant neighbors but were transformed into enemy aliens overnight. There were no trials, no hearings to prove innocence or guilt. They were assumed to be the enemy and made prisoners, indefinitely incarcerated because of their race. Successful Japanese Americans were informed that, according to Civilian Exclusion Order 5, they were required to liquidate all property, including homes, real estate, business holdings, and anything else that they could not carry themselves into the prison camps.
They lost their homes, property, and communities. Families were separated. After the war there was a long silence because of their shame and guilt, not unlike the victims of the holocaust.
The work American Concentration Camps is about a collective memory of the camps that “interned” 120,000 Japanese Americans during World War II without trial. Its memories are about the reconstruction of that time and space 50 years later. It is about the transition of the immigrant Japanese American people caught between two countries at war; people caught without a country that would claim them as their own. It is about the their collective voices and memories of that displacement, and it is about the quiet silence that surrounds the land, those prison cities, and that time.
Almost 50 years later, Presidents Clinton and Reagan issued letters of apology to the camp survivors that are still living. Collective voices now reach beneath the surface of the stereotypical Japanese American image of passive acceptance, “gamman” (“endurance”), “shikata ga nai” (“it cannot be helped”), and survival. Their voices call out beyond anger and memory.
THE PANOPTICAN
The French theorist Michel Foucault noted that nineteenth century prison architectural plans were often based on the panoptican, where one prison guard can see all of the prisoners in their separate cells. Such a space exudes hierarchy and control. These photographs of the concentration camps are about a mapping of space. The viewer can instantly see a 360° panoramic view which would otherwise circle around her, thus the viewer becomes both prisoner and guard within the photograph’s memory. The camera’s eye records a panoptic space, an impossible two-dimensional space composed of overlapping cubist images. From over 100 images, sequential fragments make up one panoramic photo-collage, extended and stretched like a warped shoji screen. They present the gestalt of looking at many fractured images and seeing a unified whole. These photographs confront the viewer with the beauty of the natural landscape and ironically with the history and memory of the land.
Gila River Relocation Camp, Foundations, Gila River, Arizona, 1990; 22″ × 56″.
Poston III Relocation Camp, Sewer, Yuma, Arizona, 1997; 26″ × 63″.
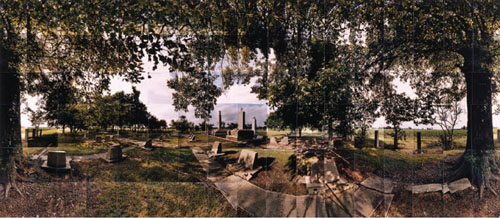
Rowher Relocation Camp, Cemetery, Desha, Arkansas, 1995; 33″ × 65″.
Manzanar Relocation Camp, Guard Gates, Inyo, California, 1995.
Manzanar Relocation Camp, Tree View, Inyo California, 1995; 22″ × 63″.

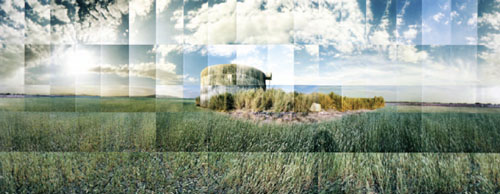
YOSEMITE IN TIME
ARTIST STATEMENT
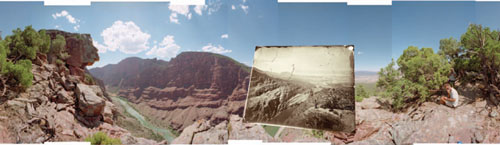
We began our collaboration as a way of sharing ideas about time and change, and to examine the ways we had developed personal relationships with places. Working together we began with 19th century landscape photographs of the American West and made re-photographs from the same locations as the initial starting point for what became an extended form of visual research that combined historical images with scenes from the same location. By relocating the vantage points of historic photographs and embedding them into contemporary panoramas made of the contemporary view, the composite images revealed aesthetic decisions of photographers in both centuries. The pictures also clarified how the basic physical reality of the world is often quite different from what is suggested within the borders of an original photograph. Such comparative techniques are especially complex in Yosemite National Park—a landscape filled with many iconic photographs that helped define photography as an art form. Assembled as single, all-encompassing views that contain multiple historic images by photographers such as Carleton Watkins, Eadweard Muybridge, Edward Weston, and Ansel Adams, these multi-dimensional composites led us to consider a form of stratigraphic layering of physical and cultural changes across time and space.
Process Statement
Much of our collaboration takes place electronically through e-mail and digital file exchanges (Mark lives in Arizona and Byron is in California). Initially we gather and collect electronic versions of source pictures through online research or by scanning reproductions in books. In the field, we work together with printed copies of the pictures to pinpoint the vantage point of the initial photograph. We use a large format camera with Polaroid film to make test pictures that we compare to the original view using visual cues and comparative measurements. We also sketch onto the Polaroid prints the projected frames of the original photographs. When making complicated panoramas, we trim and tape the Polaroids together to evaluate the visual continuity of the panels. As we establish the location for each panel, we record the image on large format color negative film. Back in our studios, we scan the film with a drum scanner and then begin the digital production, performing image correction, interpretation, and assembly in Adobe Photoshop. Once all the elements of a panorama have been assembled, we send the digital file back and forth for comments and revisions until we make a completed image that meets with our approval. The resulting images are printed using large format roll paper digital printers.
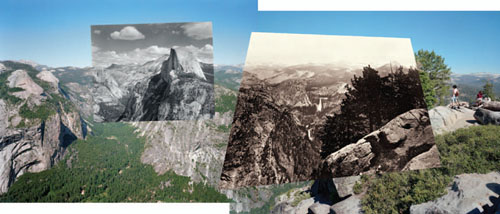
View from the handrail at Glacier Point overlook, connecting vie ws from Ansel Adams to Carleton Watkins, 2003 (Watkins’s photograph shows the distorting effects of his camera’s movements as he focused the scene); inkjet print, 24″ × 54″
Left Insert: Ansel Adams, c. 1935 (Courtesy: The Center for Creative Photography, University of Arizona)
Right Insert: Carleton E. Watkins, 1861 (Courtesy: The Center for Creative Photography, University of Arizona).
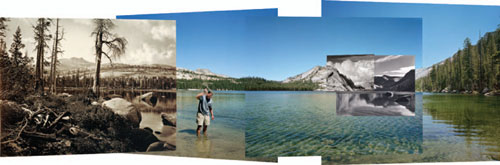
Four views from four times and one shoreline, Lake Tenaya, 2002; inkjet print, 24″ × 66″
Left to Right: Eadweard Muybridge, 1872 (Courtesy: The Bancroft Library, University/of California, Berkeley)
Ansel Adams, c. 1942 (Courtesy: The Center for Creative Photography, University of Arizona)
Edward Weston, 1937 (Courtesy: The Center for Creative Photography, University of Arizona)
Back panels: Swatting high-country mosquitoes, 2002.
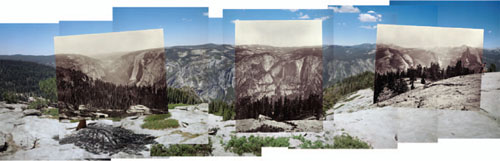
Panorama from Sentinel Dome connecting three views by Carleton Watkins, 2003; inkjet print, 24″ × 70″
Left Insert: From the Sentinel Dome, Down the Valley, Yosemite, 1865–1866 (Courtesy: Fraenkel Gallery)
Center Insert: Yosemite Falls from the Sentinel Dome, 1865–1866 (Courtesy: http;//www.artnet.com/magazine_pre2000/reviews/fineman/fineman7-10-96.asp; Fraenkel Gallery)
Right Insert: The Domes, from the Sentinel Dome, 1865–1866 (Courtesy: Fraenkel Gallery).
A: Eadweard Muybridge, Helmet Dome and Little Grizzly Fall. No. 42, 1872.
B: Mark Klett and Byron Wolfe, Sugar Loaf and Bunnell Cascade, Little Yosemite Valley, 2003.
DAY’S END
ARTIST STATEMENT
My continual experimentation with different cameras and different film formats has eventually led to the creation of my own unique camera that I use today. Through dedication to experimentation my images are works of art that incorporate the medium they’re composed in.
The fractured imagery reminds us of the limitations of the medium and the limitations of our own memories. We cannot capture a complete moment of time with a photograph, just as we can never remember a complete moment of time accurately. Humans can only remember bits and pieces of a moment, and as time moves on biases and changed perspectives cloud that vision. Each fractured pane exists in a paradox of harmony and conflict. One moment the pieces are working together to create a whole image; the next moment the pieces are fighting one another, trying to capture your full attention.
Process Statement
Using both modified and cameras of my own design and construction, all images are shot on multiple rolls of film simultaneously. While many of the images are lens-based, some photographs are pinhole images. All images are silver gelatin prints made from the unaffected negatives straight from the camera exposure. The edge markings are from tape used to hold the negatives in place in the enlarger framing each image within the print itself. The coloration is made through the multiple and selective use of archival toners that change the silver halides in the paper base. The chemical reactions result in a more stable compound, increasing the longevity of the print and creating the colors perceived. No color photographic materials are used. As a result of the extensive toning each print is unique in tonality.
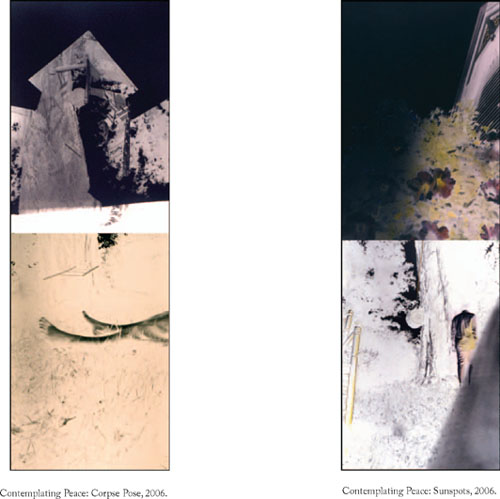
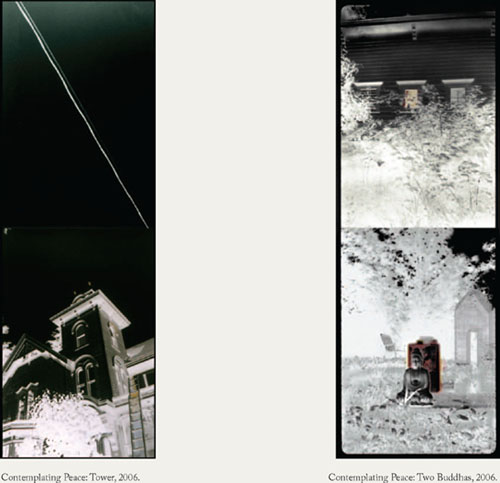
CONTEMPLATING PEACE
ARTIST STATEMENT
All my images begin with photography. Over several decades of art-making, I have altered photographs of myself and my personal environment by employing the distorting effects of handmade cameras, linking pictures through direct collage, painting on the surface of finished photographs, transforming them as photo-etchings, and eventually feeding them to the computer.
Current images about one’s unstable sense of self in an unpredictable world are driven by archetypal images derived from dreams. I begin with pinhole photographs, because they extend the serendipitous nature of the photographic medium, supplying me with pictures that seem to come directly from the unconscious, the source of dreams. The process is enhanced by the re-interpretation of everyday experience through meditation and disciplined yoga practice. For me, the images reflect our anxious experience of ongoing metamorphosis as elusive, fragile constructed identities shift throughout life. The contemplation of images emerging from the unconscious supports a search for peace, both an individual peace of mind and a shared universal peace.
Process Statement
The original pictures for the Contemplating Peace diptychs are made outdoors through very long exposures (more than half an hour) in a large corrugated cardboard pinhole camera that holds 11″ × 14″ fiber-base photographic paper. I participate in the extended exposure time by holding quiet yoga poses or meditating or simply watching leaf shadows shift on the lawn. The time becomes a slow and fruitful contemplation of peace. After development, I generously (or subtly) alter some of the paper negatives by drawing with Prismacolor pencils or painting with Marshal’s photo oils. Then I scan the painted pinhole photographs to my computer for further manipulation in Photoshop where the files are stacked in a tight diptych format creating tall extended frame digital prints. This vertical extension enhances meaning by referencing dualities and hierarchies, and by suggesting either progressions or simultaneous events. Between frames comparisons can be made, narratives invented, real and imagined worlds linked. In some images the device works to extend the observable visual space, while in others quite separate spaces (perhaps internal and external states of being) are implied.