
STEP FIVE
CONSTRUCTION
The primary advantage of constructing your own portfolio is that it allows you to build a presentation that is tailored to your needs from the standpoint of visual identity, your particular work, and even your budget. Beyond this, designing and building your own book reflects your ability to create and concept from start to finish, including the ability to craft your own book. While your goals may not necessarily be a print-oriented career, the fact that you can concept and design through a variety of forms, including a book, will reflect positively on your skills as a creative.
Finally, the portfolio book itself is a way for you to distinguish your portfolio from all of the other presentations. At minimum, it shows that you put thought, time, and energy into your work, and at best, it will be a unique presentation that will separate you from all of the others. The goal then in this chapter is to introduce some basic methods that can go a long way to making a portfolio that stands out and brings you attention.
Note: Considerations. From a practical standpoint, simplicity and flexibility are key here. Assume that you will be adding new materials and pieces to the portfolio over time and choose a design that allows for replacing or changing parts of the portfolio. One approach is to find a simple binding that can be easily recreated if necessary. This would allow you to:
- Update your portfolio easily and quickly.
- Make multiple versions of your portfolio.
- Make variations of your portfolio in relation to the particular client.
Your binding should, in all cases, reflect and serve the intentions of your visual identity as developed in your cover and page design.
Methods to Construct a Book and Book Terminology
Books Created by Sewing Folded Pages Together
- A signature is a gathering of pages folded together.
- A pamphlet is a one-signature book. The cover of the signature is folded around the gathering of pages. The signature and cover, or the signature itself, are sewn together through holes in the pierced fold.
- A multisignature book is a number of folded signatures that are sewn together with endpapers that attach the text block to the covers.
Books That Are Single Sheets Bound Together
- Side-sewn books: A group of individual pages (the book block) are bound together with stitching the block of pages to a set of board covers.
- Post and screw bindings: A group of individual pages (the book block) are bound together with binding posts to a set of board covers.
Books That Are Created by Folding
- One-page books.
- Accordion and concertina books.
- Back-to-back bindings.
GRETCHEN NASH, STUDENT BOOK, California Institute of the Arts.
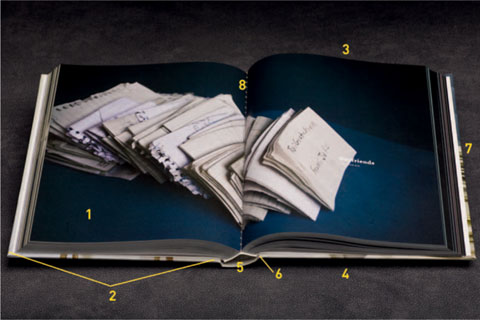
Parts of a Book
- Book block or text block: Contains all of the pages and content.
- Cover or case: A nonboard cover book is a soft cover.
- Head: The top of a book or page.
- Tail: The bottom of a book or page.
- Spine: Generally refers to the bound edge of the book.
- Hinge: The flexible gap between the board covers and the spine.
- Fore edge: The leading edge of the book, opposite of the spine.
- Gutter: The valley in the center of the book that forms at the binding and spine.
Other parts include:
- Signature or folio: A group on or more folded pages stacked together.
- Endpaper: Papers that are on the inside of the covers; these can be decorative.
Materials
- Davey board, or book binder's board, 0.070 thickness, or four-ply mat board.
- PVA glue (polyvinyl acetate); Sobo is a common brand. Other adhesives can be used, however, PVA forms strong bonds while retaining some flexibility.
- Methyl cellulose or wallpaper paste, which can be used as an adhesive, or added to PVA to extend it and slow down the drying time of the glue and make it more workable.
- Double-stick tape or ATG adhesive (see tip p.133).
- Book cloth is prepared with a paper lining to prevent glue from seeping through the fabric.
- Papers are used for accents on covers, endpapers, and cover stocks.
- Posts, screws, and bolts or fasteners.
Tools
- A snap-blade utility knife (Olfa or X-acto). The snap blade makes it easier to maintain a sharp edge.
- Self-healing cutting mat.
- Metal or plastic triangle.
- Metal straight edge for cutting board and paper.
- Bone folder.
- Flat bristle brush for application of glue.
- Two-inch paint roller, also for glue application.
Printing Your Books
Printers
The number of digital printers and inkjet devices that are capable of reasonable image reproduction is dizzying. In printing a portfolio, you want to use a printer that is going to give you industry-standard quality. Anything less, and you are undermining your success before you even begin. Beyond commercial printing, the best-quality printers available are those designed for photographic reproduction. They use pigment ink sets that provide the broadest color gamut, the highest black density, and image stability. This will ensure that your portfolio will be produced and appear in the manner you intended. Canon, HP, and Epson are the industry leaders in digital photographic imaging.
If you are going to employ a printer it is recommended that they support inks that offer longevity and ICC workflows, both of which we will address in the following sections.
Papers
With the development of digital imaging for photography, the digital printer is now a high-quality tool for printing, and as a result there are numerous papers that could be used for printing a portfolio. Bright-white matte papers intended for photographic printing are inexpensive, easy to work with, and very high quality. Papers such as these are standardized, come in a variety of weights and surfaces, and have paper surface settings that tailor the printer's ink distribution to that particular paper.
There are other kinds of media available such as high-quality inkjet printable vellum, canvas, and papers that have a higher tooth or texture. These could be incorporated in a variety of ways depending on your design. Coatings such as InkAid are also available to allow one to prepare a surface for inkjet printing. A large-format digital printer can even accommodate “poster boards” up to 1.5-mm thick.
Note: Working with papers intended for the type of printer you have or the specific printer you are using has a number of benefits. The papers have coatings that are designed to absorb the inks from the printers consistently for the best tone and color reproduction. High-quality digital printing papers rarely absorb the ink into the paper substrate, but rather, absorb it into the coating. An uncoated paper is not optimized for the inks and may not print well or consistently with every color. An additional and important fact is that the coatings are designed to work with the inks to ensure color stability, and in some cases, archival longevity. It is possible to end up with a distinct color shift in your printed portfolio six months after you completed it as a result of an unstable paper and ink interaction.
When choosing a paper there are some caveats you should consider:
- Coated glossy or luster papers have coatings which can crack when folded.
- The coatings of matte papers can wear and scuff with use and handling. It is a good idea to have another copy of your portfolio available if your active copy shows wear or gets damaged.
- One option is to laminate the cover, which will protect the coating, but result in a different surface from that of a matte paper.
- Another option is to use a protective spray that is designed to make the matte surface more durable and extend the archival longevity of the print. Premier, Lyson, and Hahnem ü hle all offer products that have been used with good results.
- Heavier stock over 150 g, while wonderful for individual prints, can be harder to work with and will build into a thicker book.
Color Management
A well-designed book that is poorly crafted will not present you effectively. You should assume that the standard of printing for your book must meet the expectations of your target market—anything less and you will undermine your intentions. Best practices, using ICC workflows, allow for high-quality image reproduction of vector-based graphics, type, and color. Even though color management can be difficult to understand, it is well integrated into high-quality inkjet printing systems by manufacturers such as HP, Canon, and Epson. When printing your book you could make adjustments and changes as you print, but color management offers a far more efficient method of working that wastes less materials, time, and energy.
Color management essentially enables you to go from screen to print with consistency and predictability. By employing color management one is able to take a file from one condition to another, maintaining accurate color even when the mechanism for reproducing it changes; the intention here is to go from A to B and not have significant shifts in color or tone.
Using an ICC workflow and profiles enables you to take your InDesign layout, in a CMYK (cyan, magenta, yellow, black) color space, and send it to a printer wherein the color information will be converted and reproduced accurately.
Profiles are characterizations of the color of a particular device with a particular material (paper). They allow you to orient the software to the kind of color gamut and conditions in which your file is going to be produced and to make adjustments to the color based on those conditions. High-quality desktop and large-format digital printers use destination or printer profiles to correctly reproduce the color and tone of the files that are being printed. Generally, when a printer driver is installed, the color profiles provided by the manufacturer are installed as well. Aftermarket paper manufacturers provide free profiles that need to be installed by you.
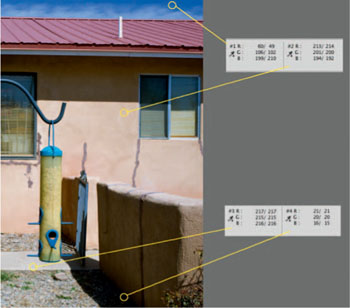
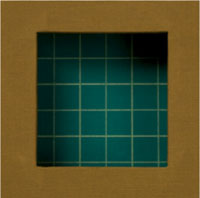
A color space defines the range of color based on a standard of measure known as the standard observer. Colors are mapped within this standard, and this allows color to be understood in relative terms. When you are working with software such as InDesign, Illustrator, or Photoshop, the color and tone of your content is represented by numerical values in RGB (red, green, blue) color or percentages in CMYK color. In the example above, the numbered color samples in the image are represented with their corresponding RGB values as indicated from the Photoshop Info palette.
Those color descriptions are only of value if they are placed within a framework, or some kind of constant as a point of reference. That point of reference is the color space of your file. Some of the standard working color spaces are: Adobe RGB (1998), ProPhoto RGB, and CMYK (U.S. Web-coated SWOP).
Therefore, color management allows one to take a file from one particular color space and, using a destination or printer profile, the color is reproduced with a degree of accuracy even though the device or system representing those colors has changed.
Software and Color-Managed Workflows
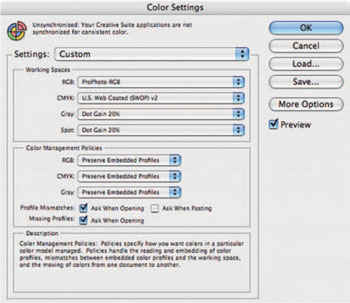
To employ color management with high-quality inkjet printers, you must have software that supports an ICC workflow. The Adobe Creative Suite, for example, supports the ICC workflow.
Below is a screen capture of the CS4 color settings dialog box, which determines color space preferences and color management policies within the CS4 suite.
As previously noted, most papers produced by the manufacturers intended for photographic reproduction have ICC profiles available online for free. If you choose to employ an off-brand paper, or material that is not manufactured for printing, it will not have ICC profiles available, and will require you to go through some trial and error. Unless you have a very specific need, the challenges of going this route can outweigh the benefits.
The color settings and color-managed workflow vary with each manufacturer. Most manufacturers have prescribed setups for their particular printer driver and for employing output profiles.
Note: Profile installation. Installation varies between Mac and PC, but is a relatively simple task. Mac-based installation is drag and drop. The profiles reside in the Library > ColorSynch > Profiles folder. For a PC the files are found in the Windows > system32 > spool > drivers > color folder. A profile can be installed by right-clicking on the profile and selecting “install profile.”
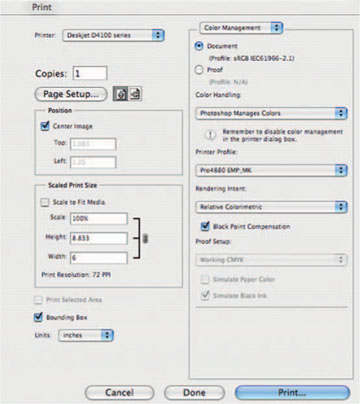
At left is the print dialog box for Adobe Photoshop where you would indicate a destination profile. In this example an Epson paper has been selected. You must have destination profiles that are generated for your particular paper and printer.
Tip: Get Help!
Most photographers should have experience with color management at this point if they are printing to inkjet devices. As designers frequently work with commercial printers, color management is often left to the printing professionals. Get help, if you are over your head. The workflows are easy to employ to those who are knowledgeable and can save you much hair-pulling and frustration. You may have color management tools available with your own printer and have not yet employed them. If in doubt, test, test, and retest.
Duplex Printing
Duplex or double-sided printing is necessary when making a sewn or stapled pamphlet. It can be incorporated in the post and screw binding as well. Printers that are designed for duplex printing will allow you to use pamphlet and imposition features of software such as InDesign. Most high-quality inkjet printers are not duplex enabled.
If you do not have a duplex-enabled printer, you will have to print single-sided pages, printing the backside spreads individually. Usually with a printer that is designed for single-sided printing, registering the backside to the front side can present some challenges. It is highly recommended that you test your printer to see if your sides are registering, and if not, figure out what adjustments need to be made. You may have to shift contents or page position to achieve good front to back alignment.
Alternatives to Duplex Printing
Lighter-weight papers can be adhered together in a similar fashion to a perfect binding, creating a single page that is printed on both sides. For our purposes we call this a back-to-back binding and instructions on how to produce a back-to-back binding are found later in this chapter.
In a similar manner, some books incorporate a back-folded page. The fore edge of the page would be the folded edge, with the open ends of the folded page bound into the spine. This is easy to apply to a post and screw binding. In both cases the result is a slightly heavier page, depending on the paper stock.
Tip: Finding grain direction and gluing. All papers have a “grain” in which the fibers that make up the papers are aligned in one direction. Generally the grain of all paper and board should run parallel to the direction of the spine. By aligning all papers, cloth, and board in relation to their grain, the book will be less prone to warping when gluing.
To determine the direction of the grain, bend the paper or board slightly in a vertical direction and then horizontally. Whichever bend offers the least resistance is the one that runs parallel to the grain.
Tip: Again, make a dummy! As mentioned previously, making working versions or dummies will always lead to better books. You can print and roughly bind a version, which allows you to practice your binding skills and test out methods of construction. More important, you can check for the overall reading and sequence of your book, and see a real version of your final design.
In this construction board covers are made separately with flexible hinged spines. The simplest design is to have two sets of boards, for back and front covers. The spine is open and the book, covers, and boards are joined with posts and screws. The same board covers can be used for a tied version of the binding, often called a stab binding or Japanese tie.
Materials: Chipboard, book cloth, endpapers, accent paper, glue/methyl cellulose, bone folder, brush, utility knife, and waste paper for gluing.
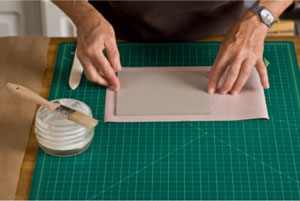
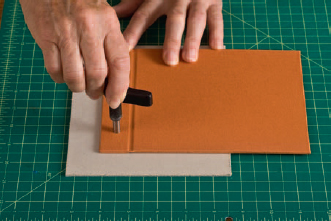
Note: When designing your pages for post and screw binding, add 1½ inches additional width to the left edge of your page to account for the spine and area of the gutter. This total length then reflects the size of the cover, which includes the flexible spine [see example, right].
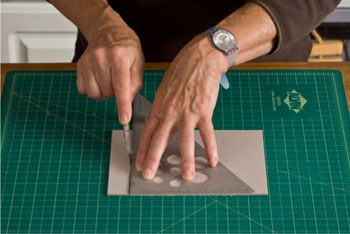
Cutting Your Boards
When cutting your boards, a metal triangle or t-square is essential to make sure your cuts are square and consistent. Cut the height of the boards first. Then cut the overall length of the board, and then cut the 1½-inch spine out, marking both pieces so they are easily identified with the other set of boards.
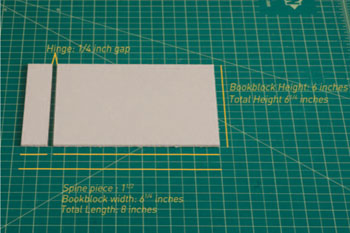
Measurements: The cover boards should overhang by ⅛-inch from the edge book block.
- Height: Add ¼ inch to the height of the boards to create the overhang for the top and bottom edges.
- Width: Measure the cover to the same width as the book block plus ½-inches for the spine. When the spine is cut from the width, the spine will have an additional ¼-inch gap (this is for the hinge) when glued together and this will produce the ⅛-inch overhang on the width.
For example, If the printed area of your book is 6¼ inches wide, your book should have an additional 1½ inches for the spine, plus ¼ for the gap making it 8 inches wide in total. If the height of the book is 6 inches, ¼ inch would be added to the height, making the dimension 6¼ inches.
Tip: Any fabric can be used for book covers by sizing it prior to gluing. Sizing is available in most fabric stores, the simplest of which can be ironed on allowing for alternative fabrics to be used in lieu of book cloth. One can also make custom-printed fabrics and materials by purchasing coatings that will allow inkjet printing inks to adhere to any surface. There are also fabrics that are designed to be printable, and can be used to create a printed cloth cover. Inkjet printable book cloth is now available as well. (See Appendix A for suppliers.)
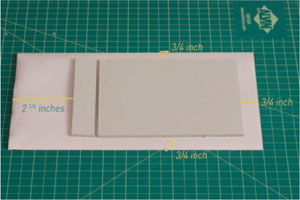
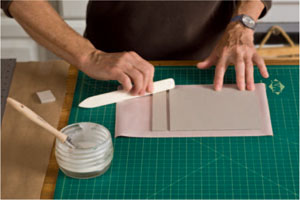
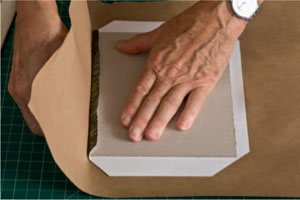
Measure and Cut the Book Cloth
Lay the book cloth face down on your table or work surface. Lay the cover boards and spine on the cloth. Make a ¼-inch gap between the spine and the larger cover board to form the hinge.
- Height: Add 1½ inches to the height of the cloth. This will create a ¾-inch edge that can be folded over the edge of the board and glued down. This is called a turn-in.
- Width: Add 3 inches to the width. This will allow ¾ inches for the turn-in on the fore edge and 2¼ inches for the turn-in on the spine edge. This longer piece will be folded over the end of the spine, onto the inside of the book, across the gap of the spine, to create a complete hinge.
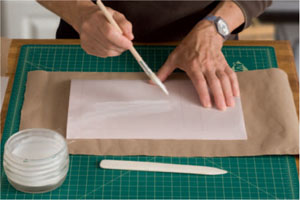
Gluing
When you glue be sure to have plenty of scrap paper, or kraft paper, covering your work surface. You can use small pieces that equal the dimension of your book as waste sheets to sit under your materials catching excess glue. Be sure to remove the waste sheets from your work surface as you work to avoid getting stray glue on the book cloth or paper. Use an even, thorough coat of glue to the area of the cloth that you are gluing up. There should be complete coverage to all surfaces to prevent any puckering or bubbling where the paper and book cloth might not stick. Spread the glue from the center of the cloth out to the edge. Think of the pattern of the British flag, the Union Jack. If the cloth or paper curls, keep brushing and it will eventually lie flat and relax. Wait, as it will be easier to handle.
1. Take a new waste sheet.
2. Set down the book cloth.
3. Smooth the boards down with the bone folder.
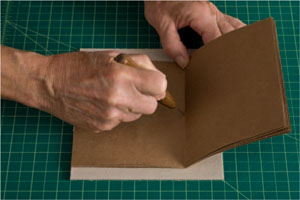
Tip: If you draw pencil marks outlining the position of the boards prior to gluing, it makes it easier to place them down on the cloth once it has been glued.
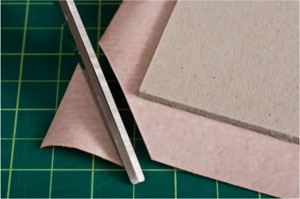
Use two small scraps of book board adhered together, to check the gap for the hinge between the spine board and the cover board.
The bone folder is an essential tool in this part of the process for working the cloth or paper, as it should be smoothed out with no air bubbles, assuring complete adhesion. The edge of the cloth needs to be pushed and somewhat stretched over the ends of the board to create tight, clean edges.
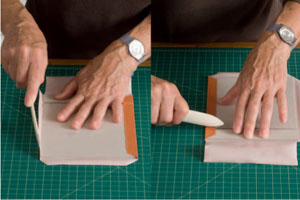
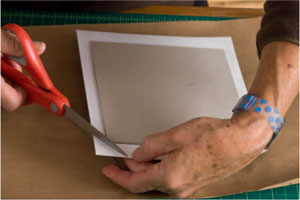
Trim the corners of the fore edge with scissors as above. You will cut a triangle off the corner, leaving an ⅛ inch.
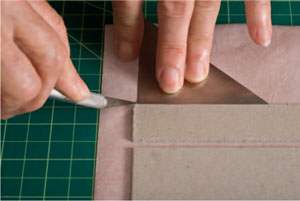
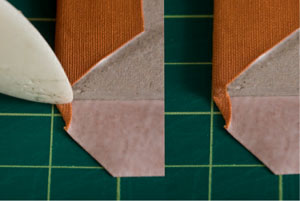
Trim the cloth at the spine edge. Use a small triangle to align your knife. Place the triangle ⅛ inch to the inside of the end of the spine board. Cut a straight cut back, and then cut outward at an angle away from the bottom edge of the board, as shown in the example above.
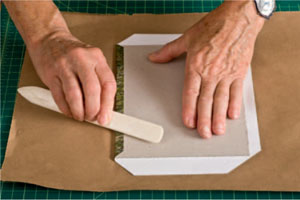
Now reapply glue if needed to the turn-ins on the top and bottom edges of the board. Use a bone folder to work the cloth over the top and bottom edges of the board.
At the fore edge, pinch the cloth in at the corners with a bone folder. Then turn the cloth over the board as you have done with the top and bottom turn-ins to finish the fore edge.

At the spine end, pinch the cloth at the corners as you have with the fore edge. Reapply glue if necessary (use your finger to see if it has started to dry). Fold the cloth over the edges of the spine and the hinge.
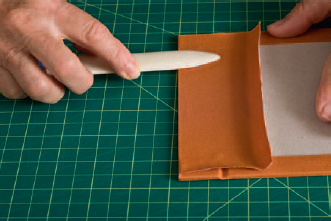
Use a bone folder to work the cloth over the spine board and across the gap of the hinge. Then work the cloth into the gap or valley of the hinge.
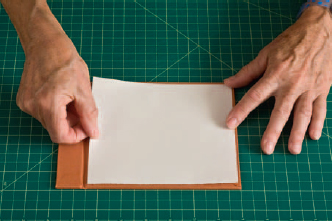
Measure your endpaper, or lining paper, to ¼-inch less than the height of the cover and ¼-inch less than the width of the board from the fore edge up to the hinge or gap in the spine. You will not cover the spine with paper.
Coat the paper with glue as you did the book cloth and apply it carefully to the inside of your cover, making sure you have 18-inch inset on all sides.
Once the boards are covered and endpapers applied, place them between paper or board and let them dry overnight under heavy weight.
Punching Holes in Your Covers and Book Block
There are a variety of ways to punch through the book block and covers. Frequently, the whole book, covers, and book block are clamped together, having been marked for drilling. A sharp drill bit is used with a drill to cut a hole through the covers and book block.
Other alternatives are a paper drill and a punch with a hammer. In the case of these options, it is good practice to mark one cover, drill the holes, and then align and mark the other cover via the holes you just punched. This assures that the holes on the front and back covers are aligned. The covers can be used to mark individual pages for punching, which insures that they will fi t correctly.
Good-quality inkjet papers can be used to make a book cover and can be applied in the same manner as book cloth. Lighter-weight paper, 160–190 grams, is recommended, as it is easier to turn over the edges of the binder's board. Matte paper is also recommended, as glossy coatings will more than likely crack when folded.
The measurements and proportions for using paper to cover boards are the same as using cloth. It is recommended, in the case of any book with a flexible hinge and spine, that you use book cloth in this area. The paper would not be strong or durable enough to tolerate the movement of the hinge. You cut the corners and pinch the edges just as you would a book cloth cover.
The trick to creating turn-ins on the top and bottom edges of the cover is to use the scratch paper as a support to bring the paper over the edge. This avoids possible abrasion from the bone folder. The bone folder can then be used to do the final smoothing out of the turn-ins.
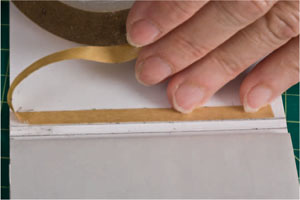
Tip: The use of double-stick tape or ATG adhesive makes for much easier construction when adhering pages together. It eliminates the problem of moisture, which can cause warping and pulling of the pages. Spray adhesive can be used but presents far too many problems, not the least of which is the need for ventilation.
Heavy-duty double-stick tape is available in a variety of widths and is easily applied to pages. The advantage of these tapes is that only one side of the adhesive is exposed when applied. The second side is exposed when the covering is peeled away (see Appendix A).
ATG is a 3M product and must be applied with an ATG dispenser or gun. It is available in ¼-, ½-, and ¾-inch widths, and is a product often used in the picture framing industry. (See Appendix A for suppliers.) While it can be used to adhere cloth, glue is still the preferred method for applying book cloth to board.


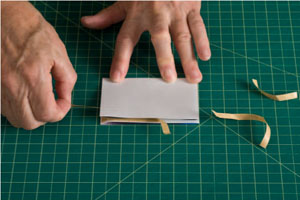
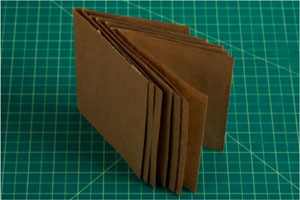
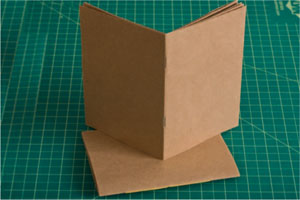
This binding with soft or hard covers is a simple construction that is easily reproduced and assembled. This allows for simple single-sided printing, without the registration problems of two-sided or duplex printing. Standard papers result in a glued page of a reasonable thickness. Each pair of pages is scored down the center to allow for better turning and folding. The cover can be made of slightly heavier stock.
The result is a simple, clean soft-cover book. This is well suited to books up to 8.5 × 11 inches. As the books get larger, the covers must be more durable to handle the weight and size of larger glued pages.
Each set of pages is printed one sided in pairs. It is helpful that you print in light score marks at the center of each page, which makes it easier to trim and fold the pages.
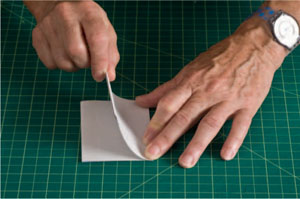
Once you have printed your page sets, you can trim and fold them. When printing, leave some margin of extra space at the edges of the page to allow for some trimming of the entire book once assembled.
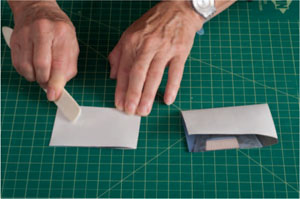
Use the bone folder to smooth the fold. Sometimes scoring the page will aid in folding, but you can only score the backside of the printed page, as the coating on the printed side can be broken by the bone folder.
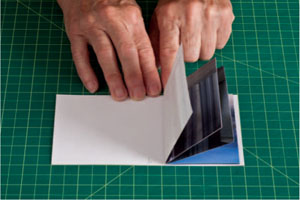
The backs of the page pairs are then glued to each other to form a set of joined pages. Here is where double-stick tape or ATG adhesive is the best choice. For example, pages 3 and 4, left and right respectively, are joined to pages 5 and 6 by adhering the back of page 4 to the back of page 5.
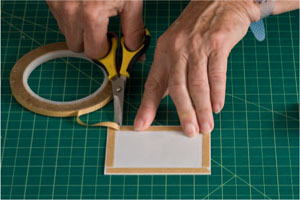
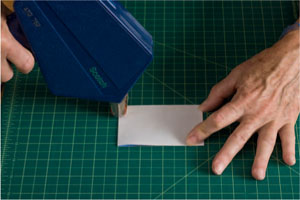
Tape all of the outside edges, spine edge, and fore edge, top and bottom, with the double-stick tape. At this point do not peel the covering off the tape to expose the adhesive.
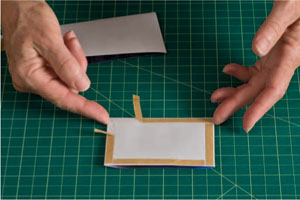
Peel back the covering tape to expose the adhesive at 2 opposite corners. [see next example.]
Align the edges of two folded sections. Align the two corners and place them down to adhere them.
At this point you can gently peel away the remaining tape covering by pulling it away from the edges of the pages and then smooth the edges together.
Continue adding folded page pairs to the back of the glued set to build the book block.
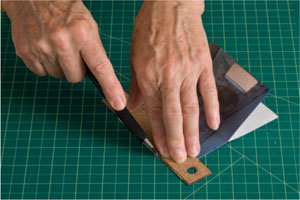
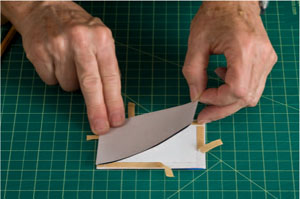
Once the page sets are glued a large cutting ruler and a heavy mat knife are needed. You must carefully cut through the pages to square up and trim your book. A book bindery, or a school that teaches book binding, may have a large guillotine cutter that is very handy for this particular purpose. A matte knife with a ruler can work just as well with a little patience.
The ATG gun is as effective as double-stick tape, with the one difference being that the adhesive is exposed once applied. As such, you have to be careful to align your page sets. The procedure is similar, but rather than taping all sides, you progressively glue edges starting with the fore edge.
Combine the pages at the glued fore edge. Then apply adhesive to the remaining three edges and carefully adhere the two page sides together.
Measure and Cut the Cover
For a smaller book of 10- to 15-page spreads, the same papers used to create the pages should provide an adequate cover. This material can be doubled up as well to create a stiffer cover, which will be stronger and provides better support for the book block.
The pages of the cover generally are sized to sit flush to the edges of the book's pages, however, if you use a heavier stock for the cover you could have an overrun of about ⅛ inch. The risk here is that edge is exposed and vulnerable to being bent or damaged.
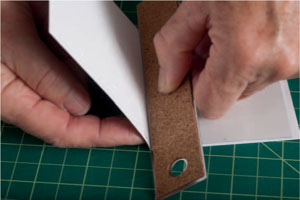
The cover page is glued on to the endpapers in the same manner as the page sets in the book block. Start with the front side of the cover. Use double-stick tape or ATG adhesive along the fore edge and spine edge. Do not tape beyond the dimension of the page. You don't necessarily need to apply adhesive to the top and bottom edges of the cover. Make sure you have the book block in the correct orientation. Align the first page of the book and adhere it to the inside of the cover.
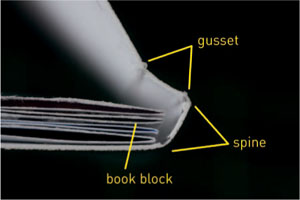
Now measure the width of the spine, using the book block. The width of the spine should be the thickness of the book block. You will need to score the paper of the cover along the edge of the spine at either side of the book block. A ruler can help get the folded edge of the paper.
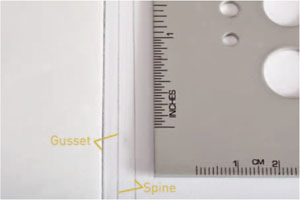
Make an additional score an ⅛ inch from the edge of the spine on the back cover. This third score creates a gusset. The gusset will move freely with the spine, creating flexibility when the book is opened.
Apply double-sick tape or ATG along the gusset, but not in it, nor should you glue the spine.
With the spine of the book block unglued, it will move and bend freely as the book is turned.
You can make the cover slightly larger to allow for some misalignment, then carefully trim it flush to the page edges.
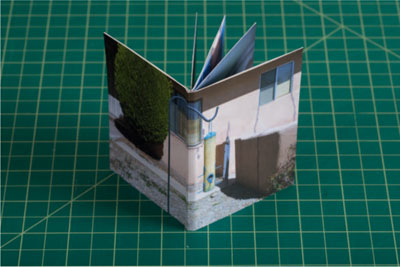
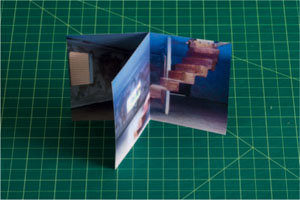
A finished back-to-back binding
ANN PELIKAN, ARTIST'S BOOK, Ipswich, MA.
A variation in the same configuration is a book block with board covers, rather than a paper cover. A printed page can be adhered to the board and trimmed. One can use mat board or book binder's board (though this might be rather heavy). Cut the boards to the trim size of the book block. The spine is left open allowing for movment and laying the book flat. Apply double-stick tape or ATG adhesive to all four edges of the front page of the book block and the back page. Align the edges and adhere.
This is a simple way to make a bound book, or more accurately a booklet/pamphlet. The binding itself is easy and relatively innocuous. The printing of the book requires that you duplex the pages, and this can be a little more involved depending on your type of printer. You must be sure you paginate correctly.
Score each page (using a bone folder) and fold the page along its center. Then each folded page, or folio, is stacked with another folio, forming a set of stacked folded pages, or a signature.
The number of pages you combine could be 10–12 depending on the thickness of your paper. This would allow for 20–24 page sides. The page sides will always be an even number.
Just as in the perfect bind, once joined, the page edges can be trimmed, allowing for some irregularity when sewing or stapling. You can also trim the fore edges of the stacked signature to make t he edges flush. Remember to print to an oversize paper, which allows for printing crop marks that can be used later to guide trimming.
You must align the pages carefully before piercing the center fold of each folio. An awl or needle can be used to pierce the paper.
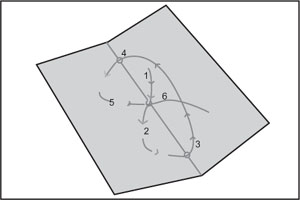
A three-hole sewing pattern. The thread or twine is tied in the center of the book.
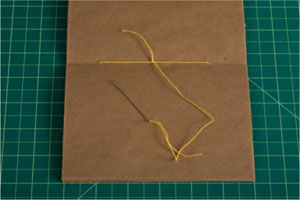
To have the knot reside on the inside of the signature, you must start it on the inside. Once thread is worked through, finish the sewing by securing the thread with a knot and trimming it.
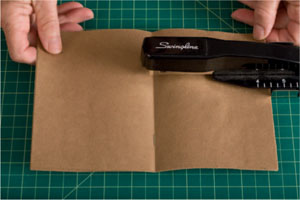
The stapled signature is created the same way as the sewn signature, but it is finished with staples. This stapler is designed to accommodate the depth of the page. These are available at office supply stores and are reasonably priced. The number of staples used can vary depending on the size of the signature. Stapling from the outside creates a smooth appearance to the finished staple. Be sure to align the stapler along the fold carefully.
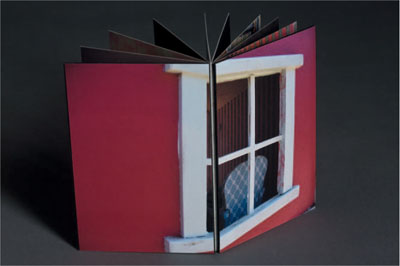
Note: Methyl cellulose added to your PVA glue extends the drying time of the glue and is particularly helpful when having to smooth a complex edge such as a window.
An inset creates a depression in which an image, or even a brandmark, could be placed after the cover is glued up.
Window and insets need to be cut prior to covering your boards. Measure and mark the position of the inset on the cover. As most book binder's board is laminated, one can score into the board and carefully peel up the layers of material, making the inset's depth about one-half the thickness of the board.
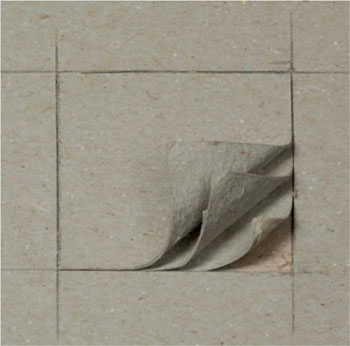
When gluing, the cloth or paper needs to be carefully set into the depression and worked with a bone folder to smooth out the inset. Use the bone folder carefully to smooth the cloth into the corners and over the edges of the inset. Then work the cloth outward from that point to smooth and finish the remainder of the cover.
The image is then placed and adhered into the depression created in the cover.
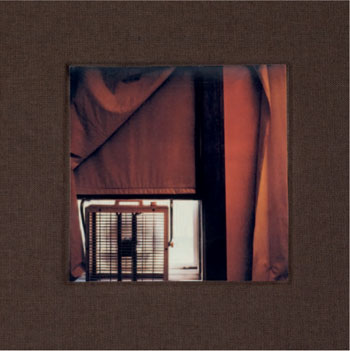
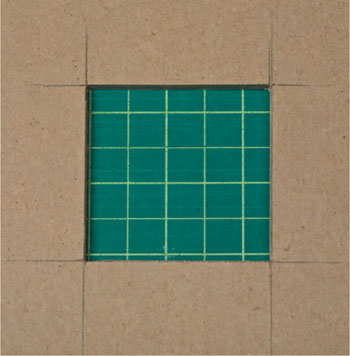
Windows need to be marked and measured in relation to elements on the interior page, which sit directly below the cover. This requires that the inner page be laid out and considered prior to cutting the window. The binder's board then needs to be marked and measured, creating a clean opening in the cover board prior to covering it with book cloth. Careful measurement is necessary here in addition to clean cutting.
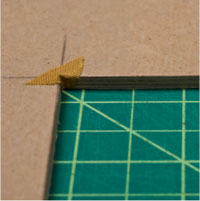
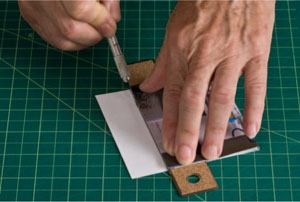
The next step is to adhere small triangular pieces of cloth over the corners of the window. This will ensure that no raw board will be visible once the entire board is finished.
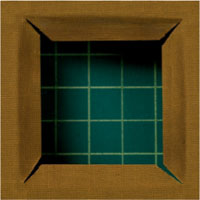
As is the case with the inset, you will cover the entire board, including the window. Once covered, the cloth is cut out of the window, leaving pieces as turn-ins for each side of the window. A diagonal cut is made from the corner pulling toward the center.
The turn-ins are then glued and smoothed over the edge of the window.