Chapter 10. Other Useful Layers
In This Chapter
Core Animation provides a plethora of layers to help you accomplish many and various tasks. This chapter covers several notable layers, including
• CAShapeLayer, a layer that provides a simple way to composite a shape in the layer tree using a Core Graphics path.
• CAGradientLayer, a layer that enables you to simply draw a gradient in your layer tree by specifying the colors, a start point, end point, and gradient type.
• CAReplicatorLayer, which replicates any sublayers that have been added to it. These replicated layers can be transformed (as discussed in Chapter 5, “Layer Transforms”) to produce dazzling effects.
The layers discussed in this chapter are not ones normally used on a daily basis but are more of a specialty nature. When a special effect is needed or an unusual shape needs to be worked with, these are the layers that can accomplish that goal.
CAShapeLayer
So far through our discussion of CALayer objects, they have always been rectangles. This generally makes sense because views and windows are also rectangles. However, there are situations where we want a layer to be another shape; perhaps a circle or a triangle. In the first release of Core Animation (on iPhone 2.x and Mac OS X 10.5 Leopard), we had to create a transparent layer and draw the desired shape onto the rectangle. Further, if we needed to click on that layer, we then needed to do a complicated hit test to determine if the click was within the desired shape or outside of it.
Fortunately, with the update to Core Animation that was included in iPhone OS 3.0 and Mac OS X 10.6 Snow Leopard, there is another option: the CAShapeLayer, which is specifically designed to solve this issue. With CAShapeLayer, you can specify the path for any shape by creating a Core Graphics path and assign it to the CAShapeLayer’s path property. You can then specify a fill color for the shape using –setFillColor on the layer.
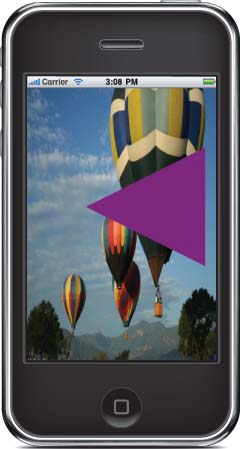
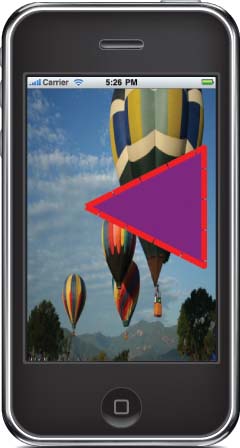
Listing 10-1 demonstrates how to create a CAShapeLayer and add it to the layer tree. In this example, a new CAShapeLayer is created, and it is instructed to take on the shape of a simple triangle.
Listing 10-1 Initializing a CAShapeLayer and Adding It to the Layer Tree
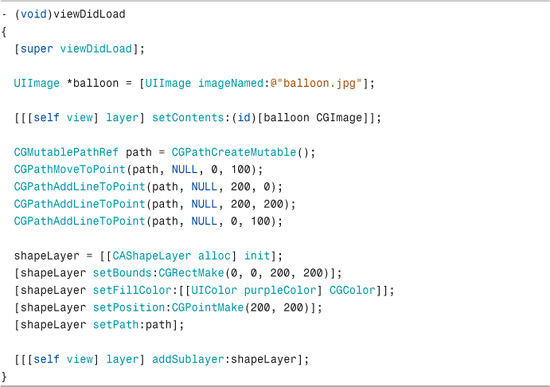
The first thing you notice in Listing 10-1 is that it starts out with the –viewDidLoad method, which tells us that this code is for an iPhone project. We grab an image from the main bundle by calling [UIImage imageNamed:] and then set the view’s layer contents to display the image. Next, create a Core Graphics path with a call to CGPathCreateMutable. We add lines to the path to draw a rectangle. Next we create our shape layer giving it a size of 200 x 200 pixels. We set the fill color to purple and then set its path to the path we just created. Now, when we add the layer to the layer tree with a call to –addSublayer, you can see something like the image in Figure 10-1.
FIGURE 10-1 CAShapeLayer Displaying a Triangle
Although this example is shown to be running on iPhone OS, the CAShapeLayer is also available as of Mac OS X 10.5 Snow Leopard and can be used in any application targeted at that version of the desktop OS.
Manipulating the Path Stroke
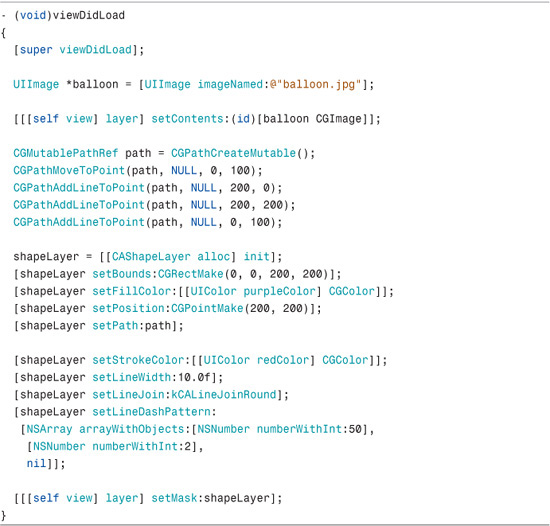
CAShapeLayer enables you to manipulate the appearance of the stroke around the perimeter of the shape you have drawn. For example, you can set the stroke width with the lineWidth property, or you could set the stroke color by calling –setStrokeColor passing it a CGColorRef. Listing 10-2 demonstrates several of the fields that you can change to manipulate the stroke of the shape.
Listing 10-2 Path Stroke Manipulations
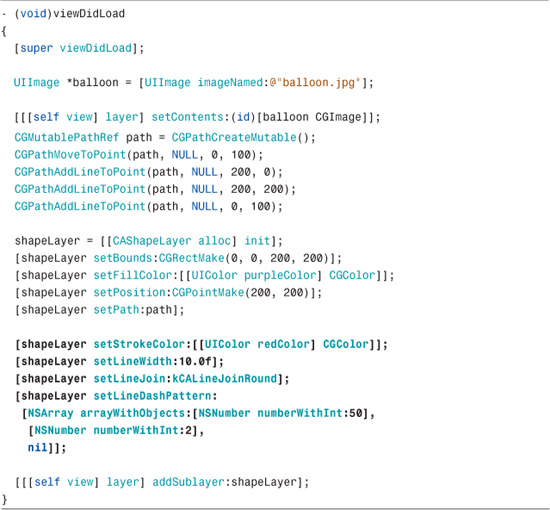
The first thing we do is set the stroke color to red and set its width to 10 pixels. To round the corners of the path, kCALineJoinRound is used to join the lines and round corners. The radius of the corners is based on the thickness of the lines being joined and the angle of the intersection of the lines and, therefore, cannot be adjusted directly. The last thing we give the line is a dashed pattern. In Listing 10-2, the layer is stroked with 50 units of red-colored line to create the dash, followed by 2 units of unpainted space, which gives you the gap between the dashes.
This pattern could get very complex if we wanted it to. When you specify the pattern you want to use, odd number values are painted and even numbered values are unpainted. For example, if you specify the values 5, 10, 15, 20, the stroke will show 5 units painted, followed by 10 units unpainted, followed by 15 units painted, followed by 20 units unpainted. This pattern can be specified with any interval you like. Just remember: Odd equals painted and even equals un-painted. The units defined within the NSArray are expected to be NSNumber objects and placing anything else in that array can have unexpected results.
FIGURE 10-2 shows the shape layer with the stroke, as specified in Listing 10-2. Note that one of the corners appears to be missing because the gap in the line pattern falls directly on that corner.
FIGURE 10-2 The Shape Layer with a Red-Dashed Stroke
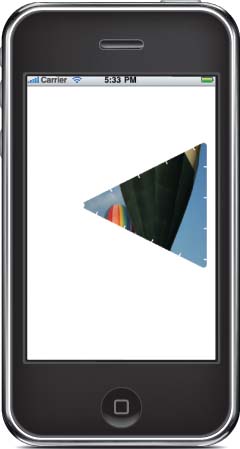
Using CAShapeLayer as a Layer Mask
All CALayer-derived Core Animation layers have a property called mask. This property enables you to mask everything in the layer except the portion where the layer mask has content. For example, if you set the image layer’s mask to a shape layer instead of adding it to the layer tree, it allows only part of the image to show through where the shape layer has been drawn. Listing 10-3 demonstrates the difference if we wanted to use a shape layer as a mask instead of as a sublayer.
Listing 10-3 Using CAShapeLayer as a Layer Mask

The initialization code for the layer is identical to the code in Listing 10-1. The difference in Listing 10-3 is that we have changed the method call from –addSublayer to –setMask, passing it the CAShapeLayer. Figure 10-3 shows what the view looks like after applying this change.
FIGURE 10-3 Using a Layer Mask to Create a Triangle Filled with the Image
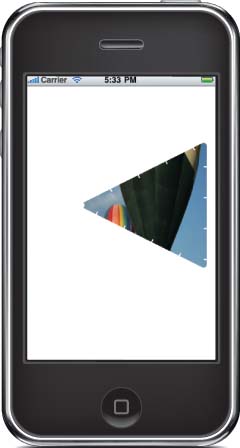
The stroke manipulations can also be applied when using the shape layer as a mask. In fact, if you change the code from Listing 10-2 to set the layer mask instead of adding the layer as we did in Listing 10-3, the view will now look like what you see in Figure 10-4. See Listing 10-4 for the specific code changes.
Listing 10-4 Using a CAShapeLayer with Stoke Manipulations as a Mask
As can be seen in Figure 10-4, the stroke manipulation is reflected in the masking of the image and changes the clean edges into a jagged pattern that follows the shape of the CAShapeLayer.
FIGURE 10-4 Using a Stroked Layer as a Layer Mask
CAGradientLayer
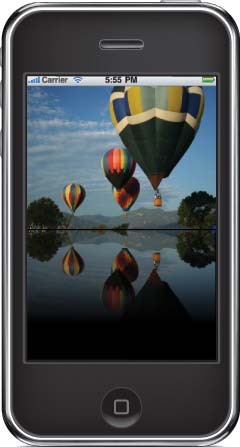
One of the more common effects you have likely seen on Mac OS X and the iPhone is composited images that look like they have a reflective surface underneath them. This effect can be somewhat difficult to produce, but with the CAGradientLayer, it becomes fairly trivial.
The basic concept behind creating a reflective surface (as seen in iChat or in image displays in iWeb) is to use a copy of the main image flipped and placed beneath the main image. Then you apply a gradient to the flipped image to make it look like it is fading into the foreground, as shown in Figure 10-5.
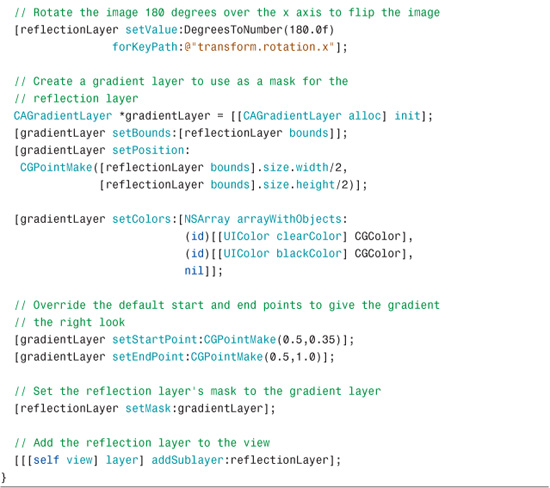
The sample code in Listing 10-5 creates three layers—one for the main image and one for the image reflection—and then applies a gradient layer to use as the mask for the reflection layer on the bottom.
NOTE
At the time of this writing, CAGradientLayer supports only linear gradients. This section provides a quick and simple way to add gradients to your application without relying on Core Graphics for the heavy lifting.
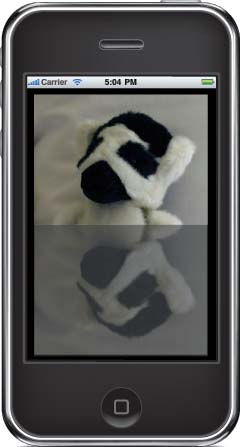
FIGURE 10-5 Image Reflection with Gradient Layer
Listing 10-5 Applying Reflection Using a Gradient Layer
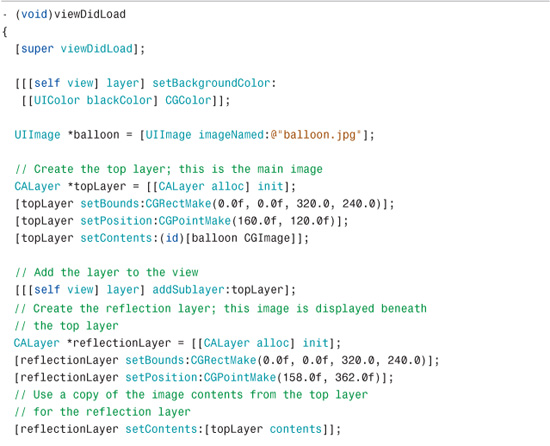
This application uses three layers to achieve the desired effect. The top layer takes up the upper half of the screen and displays the original image. The bottom, or reflection, layer takes up the bottom half of the screen and shows a copy of the top layer’s contents flipped on the x-axis. The image is flipped using key-value coding with the following call:
This sets the layer’s transform to 180 degrees from its original to give you the flipped image effect.
Finally, a gradient layer is applied to the reflection layer. Because we want to use the gradient layer as a mask, the gradient layer uses the same bounds and position as the reflection layer and is added to the layer tree of the reflection layer. You can adjust the way the gradient layer displays by altering its startPoint and endPoint properties as we have done in Listing 10-5.
CAReplicatorLayer
CAReplicatorLayer is an unusual and powerful subclass of CALayer. Its main job is to replicate any sublayers that have been added to it. These sublayers can be replicated a number of times based on the value of the -instanceCount property. In addition to replicating its sublayers, CAReplicatorLayer will shift their colors and transform the layers based on values stored in the following instance properties:
• instanceTransform
• instanceColor
• instanceRedOffset
• instanceGreenOffset
• instanceBlueOffset
• instanceAlphaOffset
One use for CAReplicatorLayer is to mimic the image reflections similar to what you see in CoverFlow. You can create a UIView that automatically creates a reflection of its subviews (and sublayers). The example we build is shown in Figure 10-6.
FIGURE 10-6 A Reflection Layer Generated with the CAReplicator Layer
Building the UIView
You can begin this project by selecting the basic Window iPhone template in Xcode. Add a UIView subclass to this template, called ReplicatorView. The entire purpose for subclassing UIView is so we can override the +layerClass method and dictate what kind of layer this UIView will be backed with, as shown in Listing 10-6.
Listing 10-6 Overriding the +layerClass Method

This class method is called whenever an instance of the ReplicatorView is initialized. Instead of having a CALayer backing the view, we will automatically have CAReplicatorLayer as the backing layer.
Because we are subclassing the UIView, add the setup code shown in Listing 10-7 to the -initWithFrame: method of the ReplicatorView class. This setup code tells CAReplicatorLayer what to do with the sublayers (and subviews) it is about to receive.
Listing 10-7 Overriding the +layerClass Method
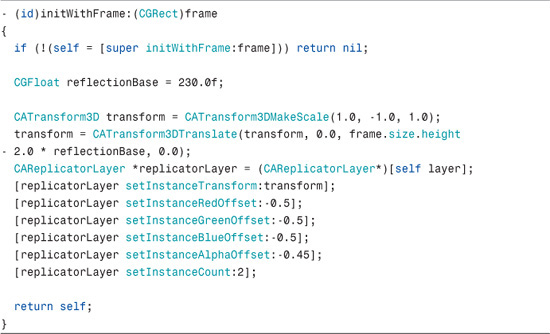
After calling super, a transform is used to both flip the layer it is associated with and to shift that layer down 230 pixels. The reason for shifting the layer down 230 pixels is because we know the ReplicatorView will be 220 pixels high, so we want to position the layer 10 pixels below the top of its parent view.
After applying the transform, shift the colors (red, green, blue, and the alpha value) of the duplicated layers closer to black. The reason for this color shift is because the background of the window to which the view is added is black. This gives the layer a nice glossy reflection.
NOTE
In a production application this transform would probably need to be calculated at a later point in the application’s execution.
All of these “instance” properties are used to instruct CAReplicatorLayer what to do with the layers it is generating. The initial layer remains untouched, but each subsequent layer from the first (based on the instanceCount property) will have transform and offset values applied. In addition, if the layer is duplicated more than once, each subsequent layer will receive the transform of the previous copy and an increase of its own. In this project, if we had more than one copy, we would see them fading closer and closer to black, and they would alternate vertically while being moved further and further down the screen.
Utilizing the ReplicatorView
Finally, we need to initialize an instance of the ReplicatorView, add it to the window, and then give it a subview to replicate. This is all accomplished in the AppDelegate, as shown in Listing 10-8.
Listing 10-8 Adding the ReplicatorView to the Window
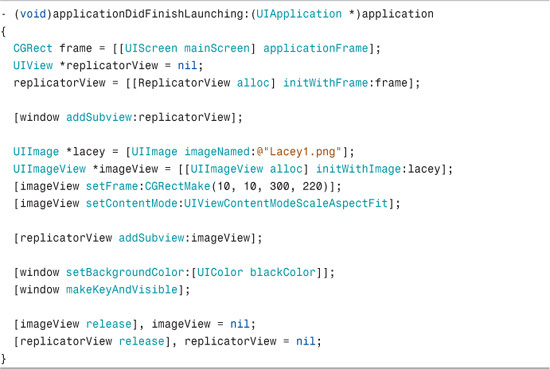
In this final piece, we initialize a new ReplicatorView with a frame the same size as the application itself and add it to the window. The image to be displayed is loaded into a UIImageView, and the -contentMode of that UIImageView is set so that it scales the image to fit the frame. Finally, the UIImageView is added to the instance of the ReplicatorView.
If you wanted to add more than one component to the ReplicatorView, you would need to adjust the instanceCount appropriately so that each sublayer added has one replicated layer.
Summary
Each of CALayer’s subclasses are very useful on their own. However, they can be applied together and along with other CALayer subclasses to provide some startling effects. For example, a combination of CAReplicatorLayer and CAShapeLayer can produce a perfectly aligned pie chart with identically sized wedges.
In the next chapter, we discuss how to add user interaction to Core Animation layers. The combination of CAShapeLayers with User Interaction can create dazzling user interfaces that go beyond the standard widgets that both the Desktop and iPhone offer.