
Chapter 10. Tabs, Tables, and Lists
TABLES ARE EVERYWHERE: train and bus schedules, product comparisons, stock charts, sports league tables, and TV and radio listings to name but a few. Unlike narrative text, tables need to be read in two directions simultaneously, so it’s important to keep the design simple. When creating tables, start out with a design that is homogenous, bland even, introducing rules, tints, and changes in emphasis only as necessary—and only if you can articulate why they are necessary. Lists are also ubiquitous: the top ten this, the 100 greatest that, 12-step programs, 50 ways to leave your lover, and so on. In this chapter I’ll look at InDesign’s robust and versatile table formatting features, then move on to the options for creating bullet and number lists, as well as a few useful things we can achieve with tabs.
Working with Tables
There’s no denying it, tables are a drag. Faced with having to typeset lots of tabular information, filing a tax return starts to seem like an attractive prospect. Thankfully, InDesign’s table options help ease the pain—but as well as using the tools at our disposal, it helps to arm ourselves with a commonsense, no-nonsense approach to the aesthetics of tables.
Unfortunately, clients sometimes treat tables the way we might treat a junk room: just cram as much stuff in there as possible, then force the door shut. Remember: Even though it’s a table, it still needs to be read. Normal rules of legibility still apply.
In terms of typeface choice, table text is typically one or two points smaller than body text. My point about legibility notwithstanding, condensed faces may be preferable because they are more economical with space. Sans serif faces with relatively high x-heights and open counters (Helvetica, Univers, Myriad) are more readable at small sizes than serif faces. Make sure your typeface has lining numerals (that is, numerals without ascenders and descenders) rather than proportional old style numerals. If it’s an OpenType font with a choice of numeral style, select Lining Numerals as the default figure style. Unlike in body text, in tables you want all the figures to have the same set width so that they line up with each other.
The mantra “Keep it simple” is perhaps never more important than when working with tables. The way the table is constructed should establish the hierarchy of information, rather than different fonts, weights, and point sizes. InDesign provides borders, column and row strokes, and tinted cells. These should all be used sparingly. Too many rules and tinted blocks and you’ll overemphasize the cellular structure of the table, causing your data to look trapped within the cells. Rather than a full border around the table, consider using top and bottom rules only to create a more “open” table with room to breathe.
In terms of alignment within tables, it pays to be flexible. Centering column heads over numbers is preferable if the number of numerals in each column varies. If there are the same, or close to the same, number of numerals in each column, left alignment may be preferable. Be prepared to adjust for optical alignment where necessary.
Vertical alignment can be important for column heads. Where these run to more than one line, bottom alignment is cleaner and makes it easier for the eye to scan along the column. Justified alignment and first-line indents have no place in tables; the table cells are too narrow. If table cell entries run to more than one paragraph, break them into separate cells. When working with currency columns, the currency symbol should be positioned according to the widest numerical entry in the column. For all other entries in that column, the currency symbol should be horizontally aligned to this point using figure spaces.
For long tables that run across several pages, repeat the header row on each page; a footer row is only necessary at the end of the complete table.
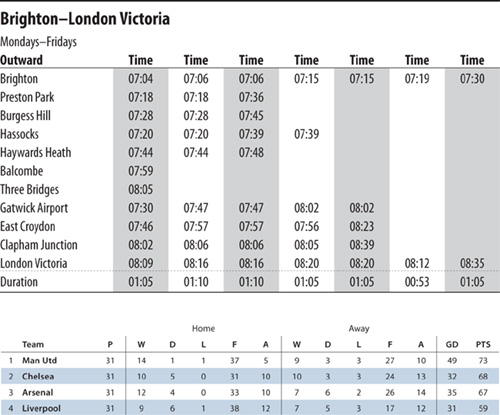
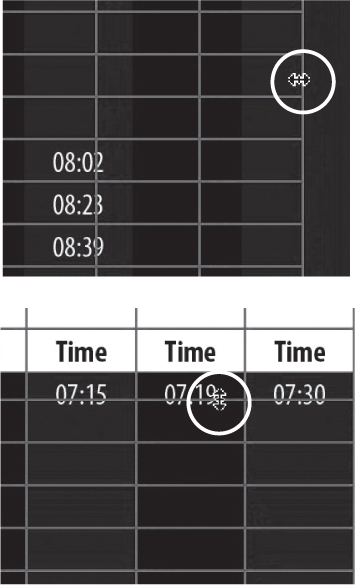
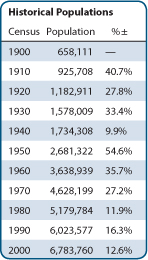
Figure 10.1 Two examples of tables where the cell shading reinforces the primary reading direction: vertical in the case of the train timetable, horizontal in the case of the league table.
Creating a Table
Tables are contained in a text frame. If you insert a table into an existing story, it will move with the flow of the text. Treat the table as a discrete paragraph. Then, should you choose to reduce the table width, you can horizontally align the table within the frame using the Text Alignment option in the Paragraph formats of the Control Panel. You use the Type Tool to edit tables, and formatting table text is the same as formatting any other. You can also drag and drop or place graphics (Cmd+D/Ctrl+D) into table cells. It helps to think of each table cell as being its own text frame.
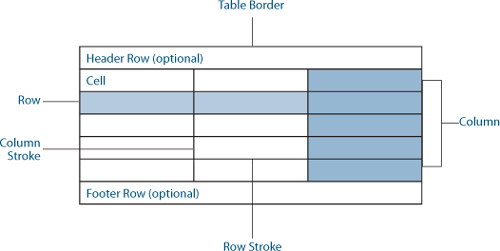
Figure 10.2 The anatomy of a table.
There are three approaches to creating a table: from scratch, converting existing text to a table, and importing a table from Microsoft Word or Microsoft Excel.
From Scratch
- Draw a text frame with the Type Tool, or insert your type pointer into an existing text frame.
- Choose Table > Insert Table.
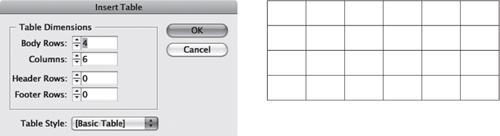
- Specify the numbers of rows and columns.
- Click OK.
Optional: If the table will span more than one column or frame, specify the number of (repeating) header or footer rows. If you create a table without a header or footer, you can convert the first row to a header or the last to a footer by choosing Table > Convert Rows. If you have a Table Style prepared, you can apply it here. For more on Table and Cell Styles see Chapter 12, “Global Formatting with Styles.”
Figure 10.3 Creating a table from scratch.
Converting Text to a Table
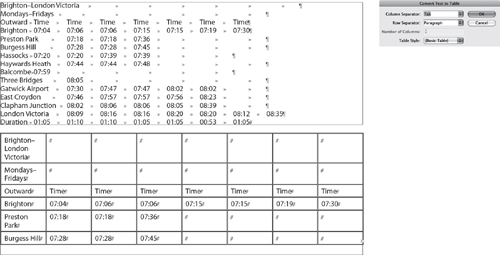
If you plan to convert text to a table, it pays to set up the text with tabs separating the columns and paragraph returns separating the rows. Select your text and choose Table > Convert Text To Table. It may not look pretty at first, but by adjusting the column widths, merging cells where necessary, and applying appropriate paragraph styles to the text, you’ll be well on your way. You can also make this conversion in reverse by inserting your Type Tool in a table and choosing Table > Convert Table To Text.
Figure 10.4 Converting tab-delimited text to a table.
Importing a Table
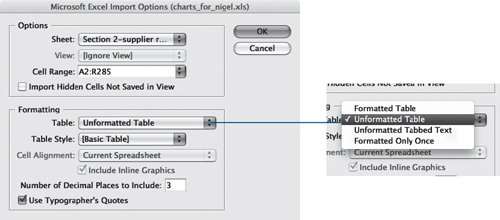
There’s no point in reinventing the wheel: You can place an Excel spreadsheet or a Word table in InDesign. Choose File > Place (Cmd+D/Ctrl+D) and select Show Import Options. If you’re placing a Word or RTF document, you can choose to remove the style and formatting from text and tables, either converting the tables to unformatted tables or to unformatted tabbed text. If the table you’re importing exists in the context of a longer document, it’s better to choose Preserve Styles And Formatting and then strip out the formatting from the table once the story is placed. To remove the formatting from an imported table, do the following:
- Select the Table by inserting the Type cursor in any of the table cells, and choose all cells with Cmd+Option+A (Ctrl+Alt+A).
- Go to the Paragraph Styles panel and click the Clear Overrides button at the bottom of the panel to remove any local character and paragraph formatting.

- Go to the Cell Styles panel (Window > Type & Tables > Table) and do the same. This will zap any cell formatting (row or column stroke weight, cell colors), so that you can proceed with a completely unformatted table.

When placing an Excel file, you can specify a cell range and apply a table style to the incoming table.
Figure 10.5 Importing an Excel table (saved with the .xls file extension).
Note:
If you aren’t using the Type cursor when you place a table, the table will be independent of the text flow. To insert the table into the text flow, cut the table, select the Type Tool, click inside the story, and paste.
Table Selection Methods
Selecting a whole table allows you to change the formatting of all the table’s cells. To do so, move your pointer to the upper-left corner of the table—it becomes a southeast-pointing arrow—and click. Alternatively, with your Type cursor inside the table, choose Table > Select > Table (Cmd+Option+A/Ctrl+Alt+A).
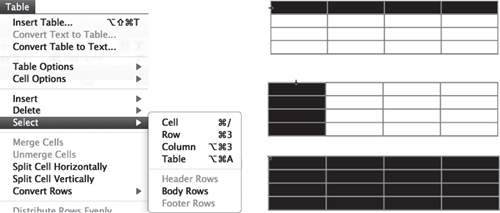
To select a column, move the pointer to the top edge of the table; your pointer becomes an arrow shape. Click to select the entire column. Alternatively, press Cmd+Option+3 (Ctrl+Alt+3). To select a row, move your pointer to the left edge of the table and click to select the row. Alternatively, press Cmd+3 (Ctrl+3). You can also click inside a table and choose Table > Select > Column or Row. To specifically select Header, Body, or Footer rows, click inside the table and choose Table > Select > Header Rows, Body Rows, or Footer Rows.
To select a cell, insert the Type cursor in the cell and press Esc or Cmd+/ (Ctrl+/).
To select the text within a cell, use the normal text selection methods.
Note:
Selecting a cell and the text within a cell are two distinct things. To select a cell, drag from the top left of the cell. Alternatively, because it’s all too easy to inadvertently resize rows and columns when trying to select individual table cells, put your Type cursor in the cell and choose Table > Select > Cell or press Cmd+/ (Ctrl+/).
Figure 10.6 Selecting a row, a column, and a whole table.
Adding Borders, Strokes, and Fills to a Table
When you insert a table based upon the Basic table style, by default it will have a border and a row, and column strokes will be turned on. Your first job is to turn off these options and add back only those that you need. Here’s how:
- Select the table by clicking in its upper-left corner. This will change the top control panel into Table mode—a one-stop styling center.
- Select the Preview check box to the right of Strokes in the Control Panel. Selected lines appear in blue; deselected lines in gray. Click the gray horizontal and vertical lines within the preview to add rules not already selected. Enter o in the Stroke value box to the left. To deselect all lines, triple-click the proxy preview.
- Return your cursor to the table, and open the Table Setup dialog box (Cmd+Option+Shift+B/Ctrl+Alt+Shift+B). Set up your own stroke and fill properties for the whole table. You can always go back and change individual rows or columns through the Control Panel using the proxy preview or through Table > Table Options or Cell Options.
Figure 10.7 Use the proxy preview in the Control Panel to determine which sides of the cell border are being affected. Selected rules appear in blue; deselected lines in gray.
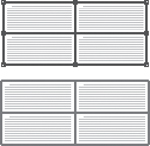
Row strokes or fills can enhance the readability of complicated tables with wide measures by helping the eye to track along the table rows. Depending on the nature of the data, you may want to experiment with Alternating Patterns. You can apply your fills or strokes to every other row, every second row, every third row, or, using the First and Next menus, come up with a Custom Row pattern. The same is true with columns.
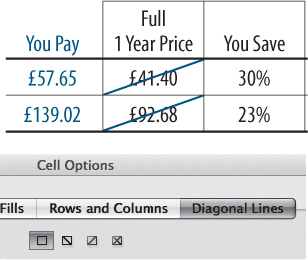
Row or column shading should reinforce the primary reading direction. According to the data in the table, is the reader more likely to read down the column or across the row?
Figure 10.8 Applying alternating fill colors to a table makes it easier to compare statistics.

Inserting and Deleting Rows and Columns
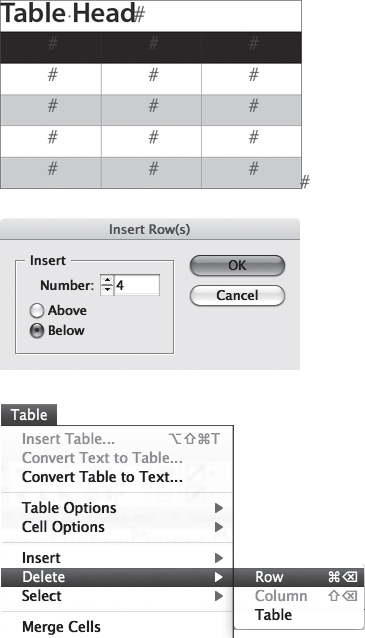
You can insert rows and columns using the menu options, or on the fly by holding down Option (Alt) as you drag a row or column border. You can also create a new row by pressing Tab when the insertion point is in the last cell of the table. Make sure frame edges are shown (select View > Extras) so you can see the individual table cells.
To delete all or specific parts of your table, choose Table > Delete > Row, Column, or Table.
To delete cell contents without deleting the cells themselves, choose the Type cursor, drag over the cells containing the text you want to delete, and press Delete or Backspace.
Tip:
When adding columns, if you hold down the Option/Alt key and drag the column divider more than one and one-half times the width of the column being dragged, new columns with the same width as the original column are added.
Resizing Rows and Columns
To resize individual rows and columns, drag the row or column border to change the row height or column width. To keep the table at the same size, hold Shift while you drag. This method affects only two rows (or two columns) at once—as one field grows larger, the adjacent field grows smaller. To resize all the rows and columns proportionally, hold down Shift while dragging the bottom table edge or the right table edge respectively.
To resize the whole table, position the pointer over the lower-right corner of the table so that the pointer becomes a diagonal arrow, and then drag to increase or decrease the table size. To maintain the table’s height and width proportions, hold down Shift. Note, however, that this doesn’t work if the table spans more than one frame.
If you want the selected rows or columns to have a uniform height or width, choose Table > Distribute Rows Evenly or Distribute Columns Evenly.
In certain cases, a design may require a single cell be split into two distinct cells. For example, if you want to make one cell wider without making all the cells in that column wider, you first need to split the cell horizontally. Place your cursor in the cell to be split, and choose Table > Split Cell Horizontally.
One resizing caveat: InDesign doesn’t show rows that fall outside the text frame (although it does show columns that do). Turn on Show Frame Edges (Alt+Cmd+H/Ctrl+H) when resizing tables. Then resize the text frame once you have resized the table to ensure that the whole table is visible.
Tip:
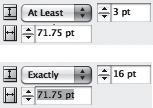
Choosing Exactly from the Control Panel or Table panel sets a fixed row height. Fixed row heights don’t grow when you add text, and a small red dot will appear in the lower-right corner of the cell if it is overset. With an overset cell you have two options: Make the content smaller or the table cell bigger.
Figure 10.9 Inserting and deleting rows.
Specifying Row Height
Row heights can grow with the content of the cell or be an absolute value. The default height of a row is determined by the leading of your text. The At Least option found under Table > Cell Options > Rows And Columns specifies a minimum row height that will grow as you add text or increase the point size of the text within the cells. “Exactly” sets the row height to a fixed value even if the row is empty. If your text or graphic exceeds this height, a red dot in the lower-right corner indicates that the content is overset. To avoid having to hunt for the overset, set the individual cell insets to o and choose the Clip Contents To Cell option before placing the graphic.
Figure 10.10 Resizing columns (top) and rows (bottom).
Breaking Tables Across Frames
If the table is taller than the text frame in which it resides, to continue the table you can thread the frame with another frame in the same way you would thread a regular text frame.
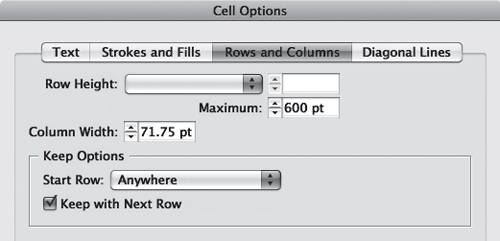
Specifying Keep Options (Cell Options > Rows And Columns) determines where a row should start. The default is “Anywhere” (that is, after the previous row), but this can be changed to In Next Text Column, In Next Frame, On Next Page, On Next Odd Page, or On Next Even Page. You can also request that a selected range of rows be kept together in the same text frame by selecting Keep With Next.
Figure 10.11 Specifying row height and column width using the Control Panel.
If you want a header or footer row to repeat information in the new frame, choose Table > Headers And Footers.
If you didn’t set up a header or footer row initially, you can easily convert an existing row to a header or footer row by selecting the row and choosing Table > Convert Rows > To Header or To Footer.
Figure 10.12 The Keep Options hold specified rows together and set the location where the keep will start.
Working with Table Cells
Cells are the building blocks of a table, and each cell in your table has the same properties as an individual text frame.
Using Cell Options, you can determine the Cell Inset Spacing and the Vertical Alignment. On a cell-by-cell basis, you can also change Row Strokes, Column Strokes, First Baseline Options, and Diagonal Lines. Table text can be formatted in exactly the same way as text in a text frame, and paragraph and character styles are equally beneficial (see Chapter 13). The only restriction on table formatting is that text can be rotated in increments of 90°, 180°, or 270° only. (If you really must have text rotated at any other angle, format the text in its own frame and then cut and paste the text frame into a cell as an inline frame.)
Figure 10.13 The Cell Options dialog box.
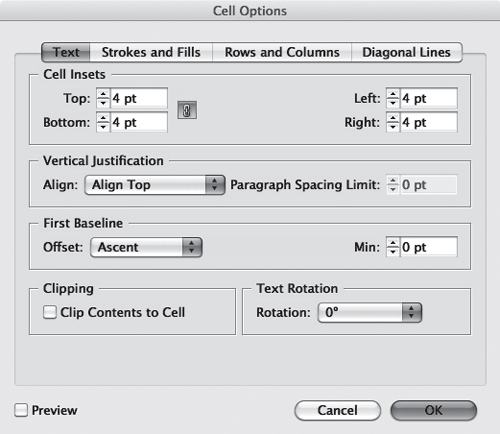
Figure 10.14 Applying diagonal lines to cells.
Note:
Table cells do not have a gutter setting to specify the distance between them. To calculate the space between columns, add the right inset of column one to the left inset of column two.
Cutting/Copying and Pasting Data
Should you wish to cut or copy and paste data from one table to another with the same number of rows and columns, select the first table (Cmd+Option+A/ Ctrl+Alt+A) and choose Copy or Cut, then go to the destination table, insert your cursor in the first cell, and press Esc. It’s important here that you select the cell by pressing Esc rather than selecting the data within the cell (which would place a table within a table). When you choose Paste (Cmd+V/Ctrl+V), the incoming data will replace the existing data in the table. This saves time if you’re working with tabular information that needs frequent updating. It also works if you are copying and pasting data from an Excel spreadsheet into an InDesign table.
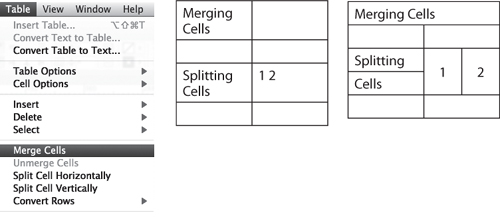
Merging and Splitting Cells
You can click the icons on the Control Panel to merge (![]() ) and unmerge (
) and unmerge (![]() ) cells, or you can choose these options from the Table menu, where you can also split cells horizontally or vertically.
) cells, or you can choose these options from the Table menu, where you can also split cells horizontally or vertically.
Figure 10.15 In addition to merging (and unmerging) cells, you can also split cells horizontally (right) and vertically (left).
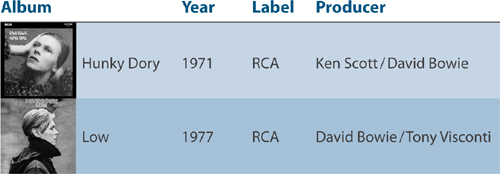
Graphics in Table Cells
Placing graphics in tables is useful for creating specification sheets or product comparison tables, or just for jazzing up what might otherwise be a deathly boring chunk of data. Because table cells are essentially text frames, pictures in those table cells are effectively inline or anchored objects and thus move with the table. To get a graphic into a table cell, it may sometimes be easier to start out with an independent graphic. Rather than place the graphic directly into a table cell, which is apt to cause confusion if the graphic is substantially larger than the cell and only a small portion of it is visible, first place the graphic close to the table, but not in it. Size the graphic to the dimensions of the table cell you wish to place it in, then cut the resized graphic and paste it into the target cell, which makes it into an anchored object. If the graphic is bigger than the cell, choose Table > Cell Options > Text and select the Clip Contents To Cell check box. Choose Table > Cell Options > Text (Cmd+Opt+B/Ctrl+Alt+B) and set the Cell Insets value to 0. The graphic will fill the cell vertically, but not horizontally; you will need to adjust the column width accordingly. To crop, triple-click with the Selection tool and drag the image around within its frame.
Figure 10.16 In this example, the graphics have an inset of 0, making them flush with the edges of the table cell.
Tables and Text Wrap
You can wrap text around an image in a table by making the image into an anchored object. However, it can be difficult to adjust the text wrap exactly as you’d like, especially when trying to wrap the first line of the type around the anchored object. For this reason, it’s easier to create the text wrap in a text frame outside the table, making sure that the frame is the same width as the table cell you want it to occupy. Group the image and text together, and then cut and paste the grouped object in place.
Figure 10.17 This text wrap was constructed outside of the table and then pasted into the table as a grouped object.
Rounded-Corner Tables
Personally, I have a phobia of rounded rectangles, but rounded-corner tables are often requested. Here’s how to make one:
- Create your table without a table border.
- Cut the table (Cmd+X/Ctrl+X).
- Create a rounded-corner rectangle (Object > Corner Options), then insert the Type cursor into this and choose Paste Into (Cmd+Option+V/ Ctrl+Alt+V). The table becomes an inline object and can be repositioned using the Selection tool.
Figure 10.18 To create a rounded-corner table, cut or copy and paste a table into a rounded-corner rectangle.
Joining and Splitting Tables
Although there is no command for joining tables, you can do this manually. First, make sure the table you’re copying to has enough empty rows and columns to accommodate the data. Then copy or cut the contents to be carried over. Select the first empty row in the destination table and paste the contents in. Be sure to select the row(s) and not the single cell, as this would cause the new content to be placed as an inline graphic.
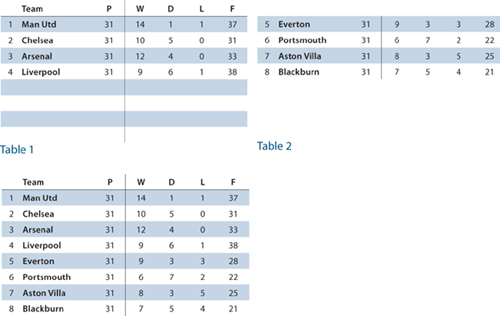
Figure 10.19 To join tables, copy and paste Table 2 into the empty rows of Table 1.
To split a table, select the rows you want to split off and cut them to the Clipboard (Cmd+X/Ctrl+X). Insert the Type cursor wherever you want the new table to be and paste (Cmd+V/Ctrl+V).
Tables and the Story Editor
You can view any overset table text in the Story Editor. Right-click the overset marker at the frame edge and choose Edit In Story Editor to see the contents of the table. Clicking the triangle to the left of the Table icon in the Story Editor will alternately hide and disclose the contents of a table. The Story Editor can also be useful for selecting copy before or after a table, particularly if you want two tables in a row with no paragraph return between them.
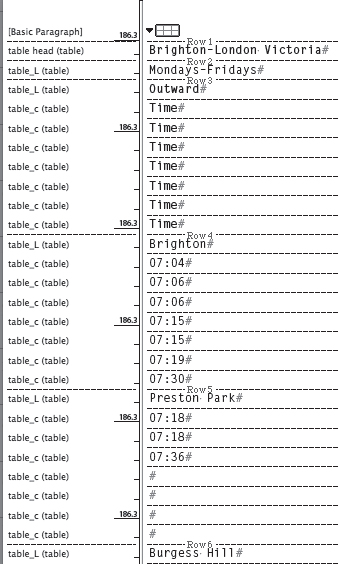
Figure 10.20 Sometimes it can be easier to edit tables in the Story Editor. You click the triangle to the left of the table symbol to hide or disclose the table’s contents.
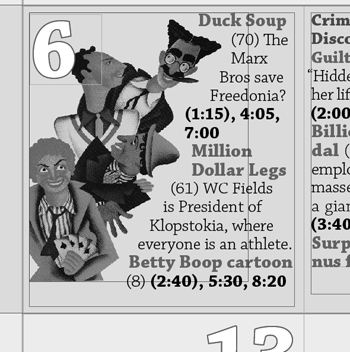
Unexpected Uses for a Table
Beyond their obvious utility, tables can also be helpful in the following situations.
If you want to put a screened background behind a specific paragraph, a table is an elegant solution. Select the text in the paragraph—but not the final hidden carriage-return character—and choose Table > Convert Text To Table to make a one-cell table. You can then stroke and fill the table as you wish and—because it’s a table—it will grow as you add type and move as part of the text flow. You control the paragraph spacing between the table and the paragraphs above and below using Table Options > Table Setup.
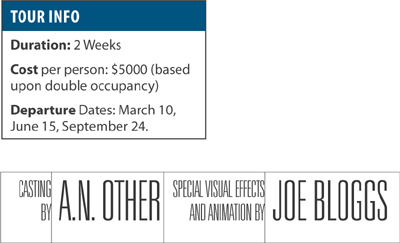
Figure 10.21 Tables used to create shaded paragraphs, info boxes (a one-column, two-row table), and movie credits where a double baseline is arranged against a single baseline.
Et assintur re experere evelis res natinci minisciis magnimus ut volo es moditi asperit, nossequi sundae ducius ea dellendes dolum que sequam, ut es audi con rest.
Convert the paragraph into a single cell table and then apply a fill color to that cell. Use Cell Options to control the inset spacing of the text.
Dus maio mi, ne et voloris nones etur aceaqui aturia volore si nullace pudipsum fuga. Cum rem conecta pero offictempos ut aspit dolut aut maionse catur?
Bulleted and Numbered lists
Bulleted and numbered lists are formatted with automated hanging indents with either a bullet character or a number as the first (hanging) character. A character style can be applied automatically to the bullet or number to change its color, size, or baseline position. This formatting can be included in a paragraph style definition.
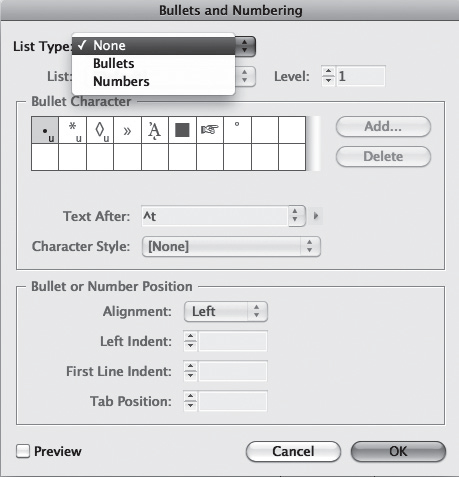
To apply either a bulleted or a numbered list to selected text, Option-click (Alt-click) the Bullets And Numbering icon (![]() ) on the Paragraph Formats level of the Control Panel, and then choose the list type, the bullet or numbering style, and the alignment. As always, select Preview to see how your changes affect the selection. Select a character style to be automatically applied to the bullet or number; if you don’t have one already made, choose New Character Style and make one on the fly. Once you’re satisfied with the bulleted or numbered list, click OK, then capture the formatting in a paragraph style by choosing New Paragraph Style from the Paragraph Styles panel menu. (For more on paragraph and character styles see Chapter 12.)
) on the Paragraph Formats level of the Control Panel, and then choose the list type, the bullet or numbering style, and the alignment. As always, select Preview to see how your changes affect the selection. Select a character style to be automatically applied to the bullet or number; if you don’t have one already made, choose New Character Style and make one on the fly. Once you’re satisfied with the bulleted or numbered list, click OK, then capture the formatting in a paragraph style by choosing New Paragraph Style from the Paragraph Styles panel menu. (For more on paragraph and character styles see Chapter 12.)
Figure 10.22 The Bullets And Numbering dialog box, where you specify the numbering or bullet style as well as the list’s alignment and amount of indent.
Bulleted Lists
Here are some things to consider when making bulleted lists:
• Sometimes, especially if your bullet character is a different font, the bullet may not vertically align perfectly. If necessary, adjust the baseline shift for the character style that is applied to the bullet. If the items begin with a cap, center the bullet vertically within the cap height. If the items begin with lowercase characters, center the bullets within the x-height.
• An em space is usually a sufficient amount of indent.
• Keep the punctuation to a minimum while adhering to the house style. Unless the bullet point is a full sentence, don’t end it with a period.
• Add space before the first and after the last item in the list. A full line space is too much, so use a half-line space before and after. Once you have made a bullet paragraph style, make two variants based on it: bullet_first that has a half-line space before, and bullet_last that has a half-line space after. A caveat here is that if you’re working with a baseline grid that is a full leading increment, the grid will override the paragraph spacing, effectively giving a whole line space before or after. For this reason, make sure that the bullet_first and bullet_last paragraphs are not aligned to the grid.
• Even if your body text is justified, bulleted lists work better left aligned.
Figure 10.23 A bulleted list with a half-line space before the first and after the last bullet item.
Solomon Grundy. . .
- Born on a Monday
- Christened on Tuesday
- Married on Wednesday
- Took ill on Thursday
- Grew worse on Friday
- Died on Saturday
- Buried on Sunday
That was the end of Solomon Grundy.
•Indenting the text after the bullet means you lose the strong flush-left alignment of your text. For this reason, some people prefer outdenting the bullet to strengthen the left axis of the text. This requires indenting the body text by the same amount that you indent the bullet.
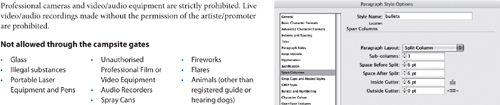
When working with long item lists, it can be a much more efficient and aesthetic use of space to split the list within a single column of text. To do this, select the text and choose the Split widget from the Control panel; alternatively, you can incorporate the instruction to split across a specified number of columns as part of the paragraph style definition. Note that split columns cause havoc with your Keep Options, especially if some of the paragraphs run to multiple lines.
Figure 10.24 Outdenting the bullet character maintains the flush-left alignment of the text.
Lorem ipsum dolor sit amet, consectetur adipiscing elit.
- maecenas lacus libero, sagittis ac sollicitudin id, tempor nec arcu
- aliquam convallis feugiat quam vel sodales
- vestibulum hendrerit pulvinar leo id sollicitudin
Integer adipiscing, risus vitae vehicula dapibus.
Numbered Lists
The same considerations apply to numbered lists. Applying autonumbering is pretty self-explanatory: Instead of a bulleted list, choose a numbered list and then select the style of numbering, the character style you want applied to the number, and the alignment, and you’re done. There are, however, a couple of aspects of working with numbered lists that can cause frustration: right- or decimal-aligning numbers in lists that have single- and double-digit numbers, and managing the numbering of lists across unthreaded text frames.
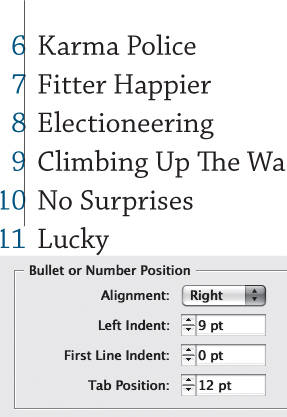
Right-aligning numbers: Set the Alignment drop-down menu to Right to align the numbers to the rightmost character or decimal point. Because InDesign doesn’t allow text to hang outside the frame, this won’t work unless you also increase the left indent, decrease the first-line indent, or both, to move the text to the left and create enough space for the numbers to fit to the left of the text.
If you plan to export the InDesign story to an RTF file, you’ll need to convert the automatic numbers (or bullets) to text, otherwise they’ll be stripped out of the converted document. Select the list and choose Type > Bulleted And Numbered Lists > Convert Numbering To Text. You will now be able to select the numbers or bullets, and they will survive intact when you export the story; the numbers will no longer be “live,” however.
Figure 10.25 Splitting bulleted list items into three columns using Split columns.
Numbering across frames: You can have numbered lists continue across unthreaded frames from frame to frame, from page to page, or even across documents if those documents are collected as a Book. The most obvious use of this is a figure caption.
In order to do this, you’ll need to make a list style. Numbered lists have the [Default] list style applied to them, which doesn’t allow numbering across unthreaded text frames.
Figure 10.26 Right-aligning the numbers in a list that combines one- and two-digit numbers.
Create a new list style and apply that style to the paragraphs you want to sequentially number. In the Bullets And Numbering dialog box, choose New from the List drop-down menu, name the style, and select Continue Numbers Across Stories.
Apply this list style to paragraphs you want to autonumber across frames. Even better, incorporate the list style into a paragraph style. Set it up correctly once, use it an infinite number of times thereafter. See Chapter 12 for more on using paragraph styles.
Figure 10.27 Choosing a list style to ensure numbering across unthreaded stories.

Tabs
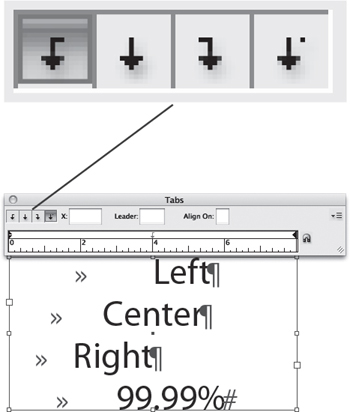
Tabs are used for positioning text at specified positions on a line. Tabs are automatically incorporated into bulleted or numbered lists, but they can also be added manually to create reply forms, to align numbers on a decimal point, or to separate columns of information into a table-like layout. Tabs come in four flavors: left, center, right, and decimal.
Figure 10.28 The different types of tab character.
Setting Tabs
- Insert your Type cursor where you want to add horizontal space, and press the Tab key.
- Choose Type > Tabs or press Cmd+Shift+T (Ctrl+Shift+T). With your Type cursor in the text frame, click the magnet symbol at the lower right of the Tab Ruler to snap the Tab Ruler above the text frame.
- On the Tab Ruler, choose the type of tab you want and click a location on the ruler to position the tab.
Figure 10.29 Typically, decimal tabs align on a decimal point, but they can align on any character.
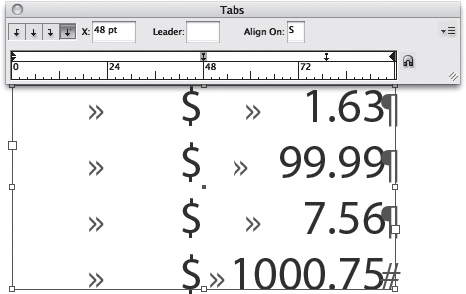
Creating Decimal Tabs
A decimal tab aligns characters on a decimal or another character you specify. Place the tabs in your text. Select a decimal tab on the Tab Ruler, then, in the Align On box, type the character you want to align on—typically a decimal point, but you can use anything, such as a dollar sign or pound sign when working with price lists.
Using Tab Leaders
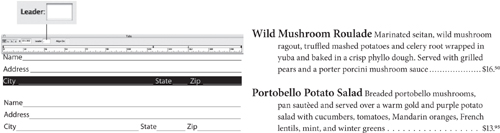
Tab leaders are used on menus, price lists, and tables of contents. Their purpose is to guide the eye from one piece of text to the next. There are other solutions, arguably preferable, but so long as the distance between the text and the number isn’t too wide, leaders can be effective.
For open leaders, add a space after the period in the Leader Character field. For more control over the appearance of the leader characters, apply a character style to the leader dots.
Leader characters don’t necessarily need to be dots. Using the underscore as the leader character is a way to create a simple line that’s useful in reply forms.
Figure 10.30 Four instances of using a tab leader: On the left, the underscore character is used; on the right, a full stop (period). In the lower example of the address form, a character style with an underline is used instead of a leader character, allowing more control over the weight of the rule. In the lower example of the menu, the leader character is a full stop followed by a space.
Tabs in Tables
When you’re working in a table, pressing Tab moves your cursor to the next cell. If you want to insert a tab in a cell, choose Type > Insert Special Character > Other > Tab. (On the Mac, you can also press Option+Tab.) That’s a long way to go every time you want a tab in a table; if this is something you find yourself doing a lot, then it’s worth making your own keyboard shortcut (Edit > Keyboard Shortcuts), or, once you’ve inserted one tab, copy and paste it for the subsequent instances.
Note:
You can set repeating tabs based on the distance between the tab and the left indent or the previous tab stop by choosing Repeat Tab in the Tabs panel menu. You can also delete any existing tabs by choosing Clear All.
Right-Indent Tab
A right-aligned tab (Shift-Tab) allows you to align all subsequent text to the right edge of the text frame. You can also use a Right-Indent Tab with a tab leader: Set a tab stop anywhere in the paragraph and apply a leader character to it. Place your cursor at the end of the paragraph and press Shift-Tab, and the leader character will appear.
Figure 10.31 The Right-Indent Tab (Shift-Tab) flushes the text to the right edge of the frame.
