Chapter 13. Working with Text Wraps
TEXT WRAPS OFFER a great design opportunity by giving you an effective way of adding visual interest to a page. With text wraps, a boring picture can become an intriguing shape or a boxy layout can be made unique and exciting. However, like most tricks, text wraps should be used sparingly and with care. Done well, a text wrap improves both the text and the image; done poorly, your layout will look gimmicky and amateurish. Once you start looking out for bad text wraps, you realize they’re everywhere. It’s shockingly easy to make a bad text wrap. What frequently gets overlooked is that when you place a graphic inside a block (or blocks) of type, the column measure is narrowed. All the careful planning of type size to column width ratio goes out the window. This chapter looks at how to make a good text wrap—and how to avoid the common pitfalls that cause bad ones.
Applying Text Wraps
While it doesn’t require rocket science to make a good text wrap, it does require common sense—and often some tweaking. Here are a few simple precautions:
• Avoid text wraps in a single column where the text wraps around all four corners (or the entire shape) of the bounding box or graphic. Such text wraps disrupt the horizontal flow of the text, and readers may be confused about whether to jump over the graphic or continue reading back and forth in the column.
• Use text wraps with justified type. Because left-aligned type has an uneven or ragged edge, it doesn’t emphasize the shape of the graphic the way justified type does. That said, it’s harder to achieve good type color with justified type, so make sure the columns are not too narrow.
• Avoid having the left edge of lines in a paragraph start at different horizontal locations (apart from a first-line indent). When you do this, the reader’s eye has to search for the start of the line and may lose the rhythm of the text, ending up on the wrong line.
• It’s essential to visually balance the space around the graphic. This is about more than just selecting equal values for all the text offsets. The vertical space around the wrapped object depends on where it sits relative to the baselines of the type around it.
• When working with text wraps on rectangular images, align the top of the picture frame to the cap height or x-height of the text in parallel columns. Whichever you choose, be consistent. Align the bottom of the picture frame with a text baseline.
• Check all lines affected by the wrap. If you have composition problems you can try slightly adjusting the position or scale of the graphic. If this doesn’t work, use a combination of tracking, hyphenation, and (if appropriate) rewriting.
• When using more than one text wrap in your document, keep the offset amount consistent.
• Don’t attempt the impossible. If the shape of your wrap object is too irregular, the result will be too many different line lengths, too much hyphenation, and great gaping holes in the text. If you’re working with multiple columns, consider placing the image on the edge of one of those columns, rather than between columns.
Tip:
When adding a text wrap to a picture, make sure you add the text wrap to the picture frame (selected with the Selection Tool) and not the picture itself (selected by clicking on the picture “donut” or with the Direct Selection Tool). If you do the latter, the text will wrap according to the picture’s full dimensions rather than its cropped dimensions.
Figure 13.1 The Text Wrap Panel.
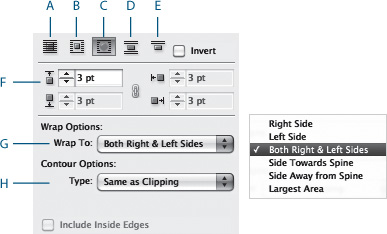
Figure 13.2 Avoid wrapping text around a graphic in a single text column. It’s unclear to the reader whether to “jump” the picture or continue reading down the column, and it creates ugly word spacing.
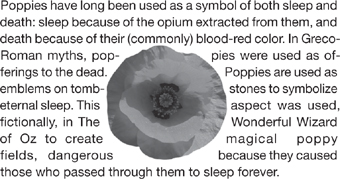
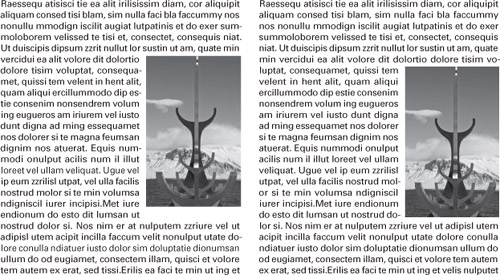
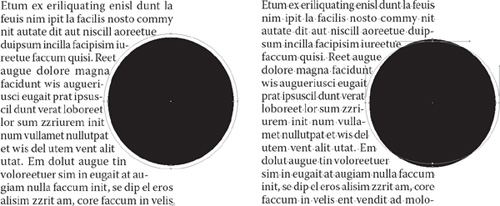
Figure 13.3 Justified type (right) better describes the contour of the object that the text is wrapping around than does left-aligned type (left). This can be seen more clearly when the wrapping object is made invisible (below).
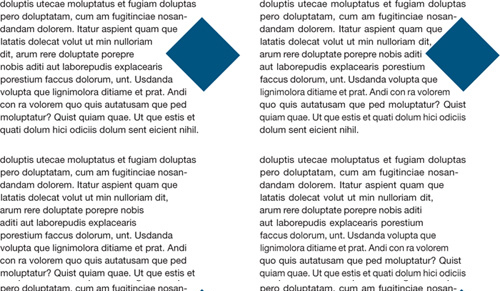
Figure 13.4 The vertical positioning of the object affects the size of the offset above and below the graphic. On the left, the image is carelessly placed, creating unequal spacing. A size adjustment would easily fix this problem. On the right, the top of the image is aligned with the cap height of the line of type and the bottom of the image is aligned with the baseline of the corresponding line.
Wrapping Type Around Irregularly Shaped Graphics
Prepare your image in Photoshop with a layer mask and save it as a PSD file, or with a Photoshop path and save it as a JPEG file (a PSD or TIFF file also works in this context, but a JPEG yields a smaller file size). Place the image in your InDesign document. From Contour Options, choose Alpha Channel or Photoshop Path. You can adjust the Top Offset field (you’ll have only the one) to determine how close the text comes to the edge of the image.
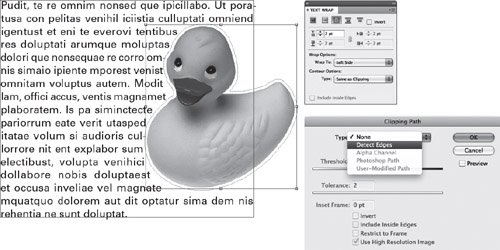
Don’t have Photoshop? You may be able to create a clipping path for the graphic within InDesign. This works best if the image has a flat background that contrasts with the foreground. With the picture frame selected, choose Object > Clipping Path > Options (Cmd+Shift+Option+K/Ctrl+Alt+Shift+K) and from the Type menu choose Detect Edges. If the image isn’t already positioned behind the text, you’ll then want to send it there: Object > Arrange > Send To Back (Cmd+Shift+[/Ctrl+Shift+[).
Figure 13.5 The opaque white of the image background is “knocked out” using Detect Edges. The text wrap is set to Wrap Around Object Shape, causing the text to wrap around the clipping path. Use the Direct Selection Tool and click the image to see the new path and the text-wrap offset, both of which can be adjusted.
When you’re working with an irregularly shaped object, select the object and choose Wrap Around Object Shape from the Text Wrap panel. Using the Direct Selection Tool and the Pen Tool, you can manipulate the path to exactly the shape you want the text to wrap around. Select the image with the Direct Selection Tool to show the text wrap path. Now drag any of the anchor points to adjust the text-wrap shape. To add or delete anchor points, switch to the Pen Tool. Click on the path wherever there is no anchor point to add one, or click on an existing anchor point to delete it. You can also use the Pen Tool to convert smooth points to corner points and vice versa. Optionally, once you have finessed the clipping path you can convert it to a picture frame as a way of identifying a spot varnish for the object.
It’s best to evaluate text wraps by eye rather than rely on the numbers in the Text Wrap panel. For example, a text wrap around a curved shape may appear to have a bigger offset at the top and bottom of the shape than at its center, even though the wrap offset is set to a uniform distance from the graphic.
Figure 13.6 Converting the clipping path to a frame for the purpose of applying a spot varnish to an irregularly shaped image. Apply this to a copy of the image and put the copy on a separate layer, identified as a spot varnish layer.
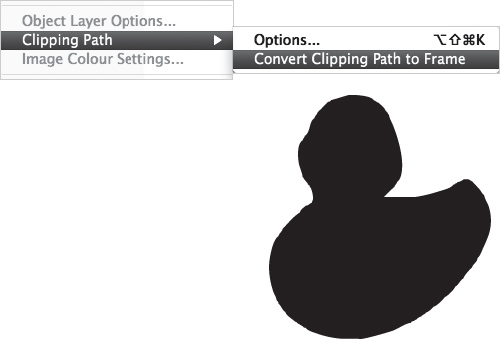
Figure 13.7 Wrapping around a circular shape. On the left, the text wrap at the poles of the circle is larger than that at its center. On the right, the Direct Selection Tool is used to pull the text-wrap offset at both poles toward the center of the circle, letting the text hug the circle shape.

Wrap Options
By default, the wrap options are set to both the Right and Left sides. You can avoid certain spacing problems by switching to either the Left or Right side option.
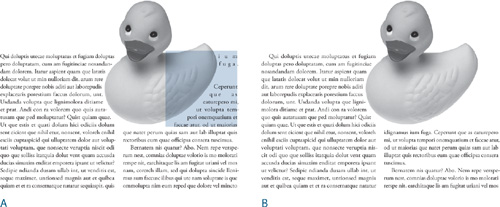
Figure 13.9 Wrapping around both sides of the object causes type to flow awkwardly down the right side of the object (A). Choosing the Left as the Wrap To option solves the problem (B).
Text Wrap Preferences
The following composition preferences (choose Preferences > Composition) determine how a text wrap behaves. In all cases, they are document-wide preferences and so are all-or-nothing propositions:
• Justify Text Next to an Object justifies text next to text wraps in a single column. This preference will not justify ragged type when the wrap object straddles more than one column. This preference is of little practical value because you shouldn’t use ragged type with text wraps, and you certainly shouldn’t wrap text around all sides of an object in a single column.
• Skip By Leading. When working with multiple columns of text, if a text wrap affects some but not all of those columns, this preference ensures that the text below the text wrap is knocked down to the next available leading increment, making sure that your baselines align across columns. However, rather than turn this preference on, you’re better off using a baseline grid to get the same effect (see Chapter 4, “Leading,” and Chapter 14, “Pages, Margins, Columns, and Grids”).
• Text Wrap Only Affects Text Beneath makes InDesign behave like QuarkXPress, where text wraps—or runarounds as they are called in Quark—affect only the text beneath them in the stacking order.
Note:
If you are converting a Quark document to an InDesign document, be sure to carefully check any text wraps. Because InDesign and Quark handle text wraps/runarounds differently, you may see differences between the original and the converted document.
Documents that have been converted from Quark using Markzware’s Q2ID will have this preference turned on. For all other documents, you’re better off leaving this preference off. Putting pictures above text in the stacking order can result in printing problems when transparent objects overlap type. Text that wraps around a drop shadow or any other transparency effect can end up being rasterized if that text is below the image in the stacking order. Solution: Make sure that text is always on a layer above the pictures, especially those that are transparent (a checkerboard icon next to the page icon on the Pages panel alerts you to the use of transparency on the page or spread). If you want a text frame to be unaffected by a text wrap, choose Object > Text Frame Options and select Ignore Text Wrap (see the next section, “Ignoring a Text Wrap”).
Another option that you need to know about is not a composition preference, but rather is a layer option: Suppress Text Wrap When Layer Is Hidden. (Double-click any layer name to bring up its Layer Options.) When you hide a layer that contains a text-wrap object, the text on other layers continues to wrap around the object. This is so your text won’t recompose if you turn off the layer. You can also use it to get interesting text-wrap shapes without seeing the text-wrap object. Turning on Suppress Text Wrap When Layer Is Hidden causes the text to reflow when the layer containing the wrapping object is hidden. This may be useful if you wish to print a version of the document without the images.
Figure 13.10 Text wrap options found under Preferences (left) and under Layer Options (right), including the option to turn off the text wrap when the layer containing the wrapping object is hidden—a seldom necessary choice.

Inverted and Invisible Text Wraps
Every once in a while you might want to make the text wrap within the graphic shape, rather than around it. To do so, simply select the Invert option on the Text Wrap panel. This works best with simple shapes and when the type is a solid block—without paragraph breaks and indents—tightly leaded and justified so that it better defines the object shape.
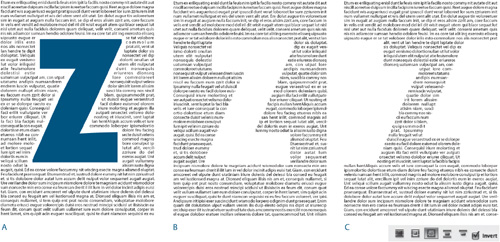
Figure 13.11 A text wrap around a Z that has been converted to outlines (Type > Create Outlines or Cmd+Shift+O/Ctrl+Shift+O) (A). The wrap object is put on a separate layer and the layer visibility disabled (B). The text wrap is inverted and the layer visibility disabled (C).
Ignoring a Text Wrap
There are certain elements that you don’t want affected by a text wrap. A common scenario is a caption directly below a photo: If the caption doesn’t ignore the text wrap, it may not be possible to position the text close enough to the picture. The same applies whenever you have text overlapping a wrap object or a text-wrap offset. In such cases, the text disappears—it gets pushed out of the box by the text wrap, even though the text is on top of the image.
The solution? Select the caption frame, choose Object > Text Frame Options, and select Ignore Text Wrap.
If this is something you find yourself doing repeatedly when creating captions, then make an object style that incorporates the Ignore Text Wrap attribute as well as applies the caption’s paragraph style to the content of the frame.
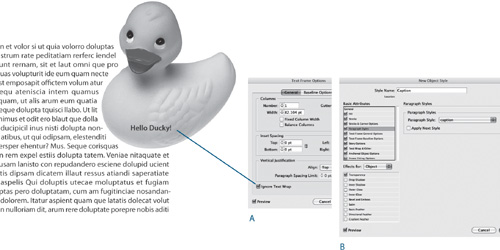
Figure 13.12 The caption text frame is set to ignore text wrap (A). These attributes (the paragraph style and the text frame options) are then captured as an object style (B).
This can get tricky if you have a text frame that you want to conform to the text wrap of one object, but ignore the text wrap of another. You will need to use the Pen Tool and the Direct Selection Tool to sculpt the text frame into the wrap shape. Here’s how:
- Set the Text Wrap panel to No Text Wrap.
- Use the Add Anchor Point Tool to add two anchor points approximately where the wrapping object (the circle) overlaps the text frame.
- Use the Direct Selection Tool to select the top left anchor point and reshape the text frame, causing the text to “wrap” around the circle shape. To convert the corner point into a curve point, hold Option (Alt) as you drag the point.
Tip:
When adjusting text wraps, make the cursor key increment (Preferences > Units & Increments) smaller for more flexibility.
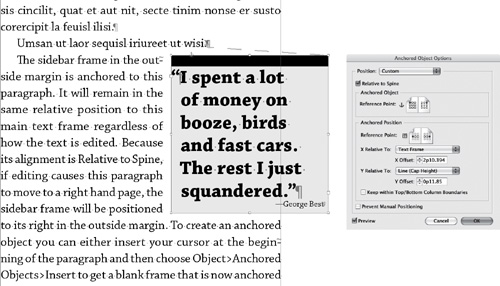
Text Wraps in Anchored Objects
Anchored objects are useful for creating side-by-side paragraphs or when you need a caption or pull quote to move with the flow of the text. Getting the anchored objects to position exactly right can be tricky. While it’s possible to add a text wrap to an anchored object, unfortunately the first line of text in a paragraph will not wrap around the anchored object. The not-very-elegant workaround is to place the anchored object in the previous paragraph and use the Custom anchored options to adjust its position. The easiest way to do this is to get the position close, then (making sure that Prevent Manual Positioning is not selected in Anchored Object Options), click OK and move the now-anchored frame to exactly where you want it. Make sure the guides and the baseline grid are turned on to make it easier to position the anchored object relative to the baselines and cap heights of the type. Once you’ve nailed the Anchored Object Options, save them as an object style, which you can then apply with a single click thereafter.
Figure 13.13 Text wraps are maintained when you make an item into an anchored object. However, if you want the first line of a paragraph to respond to the text wrap, you will need to anchor the object in the preceding paragraph.
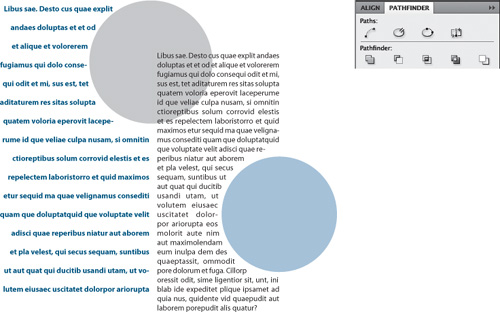
Tricky Text Wraps
There may be times when you’re working with a complex layout and you need a block of text to wrap around one text-wrap object, but ignore another that is affecting a separate text frame. Such times are rare, but when they arise they can present something of a conundrum. You should not resort to changing the text wrap preferences to have the wrap object affect only elements below it in the stacking order, for reasons discussed earlier in “Text Wrap Preferences.”
One solution is to change the text wrap of the wrap object (indicated by the gray circle in Figure 13.14) so that it covers only half of the object shape. Or make a copy of the object. Then select the text frame and the original object. Use the Pathfinder Subtract Tool (Object > Pathfinder > Subtract) to take a bite out of the text frame with the second wrap object (the blue circle). Then paste the object copy back into the hole that is left by using Cmd+Shift+Option+V (Ctrl+Shift+Alt+V).
Figure 13.14 To make the column on the right wrap around the blue circle but not the gray one, the frame is set to Ignore Text Wrap. The blue circle is copied to the clipboard, then its shape is subtracted from the text frame using the Pathfinder Subtract options. A copy of the blue circle is pasted into the hole that remains.