This may be my all-time favorite chapter title, because this is the type of title that publishers of computer books go wild over, because when people search for the word “passion” (which they sometimes do), this chapter will come up. Now, what they’re hoping for is that someone who was looking for scenes of passion, but came across this chapter instead, might think to themselves, “Ya know, this isn’t as intriguing as the passion I was looking for, but the reflection effects used in this chapter are so compelling that I’m going to rush out to the bookstore and buy this right now!” Laugh if you will, but this has actually been documented to happen at least 2.1 times in the history of book publishing. Anyway, if it’s a saucy title, it helps sell books, so they’re happy. Anyway, the title (which is just too perfect for a chapter on reflection effects) actually comes from a Yanni song. Now, you’re probably thinking one of three things: (1) whatever happened to Yanni, or (2) who is Yanni, or (3) I am Yanni. In answer to (1), I’ll tell you where he is: he’s sitting around making up names for songs that are packed with smoldering passion. For example, other songs on his album included (I’m not making this up) “Secret Vows,” “A Word in Private,” “First Touch,” and “Breakaway Underwear.” (Okay, I made that last one up, but I had you there for minute, didn’t I?)


Although you’re going to see versions of this technique throughout this chapter (and even in other chapters), I thought we’d better get it out of the way right up front. Now, because I wanted this to be learned (and used) in a real world fashion, I went ahead and took the technique a little further, adding some other effects to it to finish it off (plus I didn’t think you’d mind learning a few extra techniques).
Press Command-N (PC: Ctrl-N) to create a new document that is 800×600 pixels at a resolution of 72 ppi. Click on the Foreground color swatch and choose a color in the Color Picker (I chose R: 163, G: 138, B: 90), then fill your Background layer with that color by pressing Option-Delete (PC: Alt-Backspace). Now, you’ll need to drag the object you want to create the reflection for onto this background. Here, we’re using a screen capture of my blog (which you can download from the book’s downloads page), or you can take a screen capture yourself of any webpage you’d like to practice with. To do this, press Command-Shift-4 on a Mac, and click-and-drag a selection around the webpage. This creates a file called “Picture 1” on your desktop. On a PC, press Alt-Print Screen, then go into Photoshop and create a new document that is the size of the clipboard, and press Command-V (PC: Ctrl-V) to Paste the screen capture into the new document.
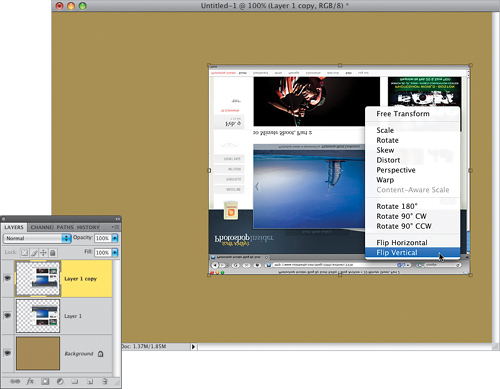
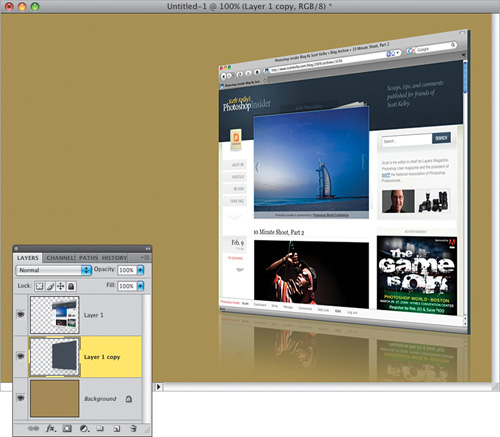
Press Command-J (PC: Ctrl-J) to duplicate your webpage layer, then press Command-T (PC: Ctrl-T) to bring up Free Transform. Next, Control-click (PC: Right-click) inside your webpage and a contextual menu will appear. From that menu, choose Flip Vertical (as shown here) to flip this duplicate layer upside down. Press Return (PC: Enter) to lock in your change.
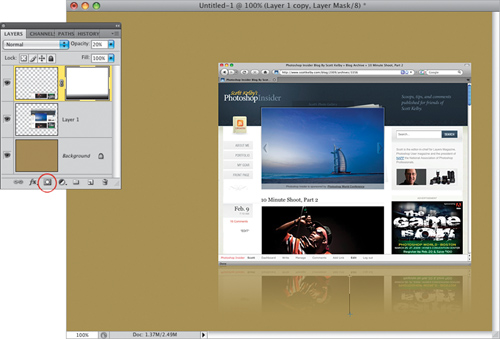
Get the Move tool (V), press-and-hold the Shift key (to keep things lined up), and click-and-drag straight downward until the top of the flipped webpage meets the bottom of the original (as shown here). Then, to create the reflection look, lower the layer’s Opacity (in the Layers panel) to 20%.

The most popular look for reflections now is to have them “fade away” at the bottom. So, click on the Add Layer Mask icon at the bottom of the Layers panel (it’s circled here in red), then get the Gradient tool (G), click on the down-facing arrow next to the gradient thumbnail in the Options Bar, and choose the Foreground to Background gradient (in the top left). Now, click-and-drag from the top of the reflection downward, and stop just short of the bottom of the image window (as shown here) to fade away the bottom of the reflection. Press Command-E (PC: Ctrl-E) to merge these two layers into one single layer. (Note: That’s the shortcut for Merge Down, which merges the layer you’re on into the layer directly below it.)
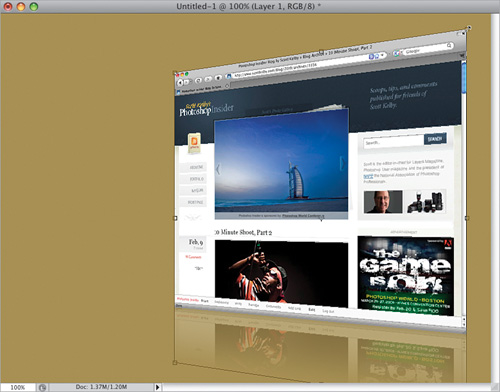
Let’s add another popular effect to our webpage—the perspective effect. Bring up Free Transform again. Although you could choose Perspective from the contextual menu you saw in Step Two, you’ll save yourself some work by using the keyboard shortcut instead, because you’re going to do two different transformations: (1) adding the perspective effect, and then (2) thinning up the image to remove the stretched look you get from adding perspective. The keyboard shortcut is to press-and-hold Command-Option-Shift (PC: Ctrl-Alt-Shift), then grab the top-right corner point and drag upward (as shown here). As you do, it creates a perspective effect, expanding the right side (top and bottom). Don’t lock in your changes yet.
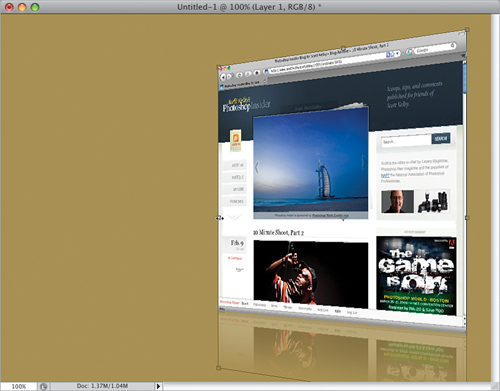
While Free Transform is still active, release those keys, then grab the left-center point and drag inward (to the right, as shown here) to remove the stretched look perspective gives to your object. Now you can lock in your two transformations.
A popular little trick to give your object a slight 3D depth effect is to duplicate the layer, fill it with black (or a dark gray, or a color sampled from the page) and offset it a bit behind the page (like you see here). You do that by duplicating the layer, then pressing D to set your Foreground color to black (or choose a color from your webpage using the Eyedropper tool [I]—just click it on a color on your page, and that color becomes your Foreground color). Now, to fill that duplicate page with this color, press Option-Shift-Delete (PC: Alt-Shift-Backspace). In the Layers panel, drag that layer behind your webpage layer, get the Move tool, and press the Right Arrow key on your keyboard a few times to offset this copy from the original, which gives you the slight 3D effect you see here. Don’t offset it too far, or it will be obvious it’s just a copy of the page.
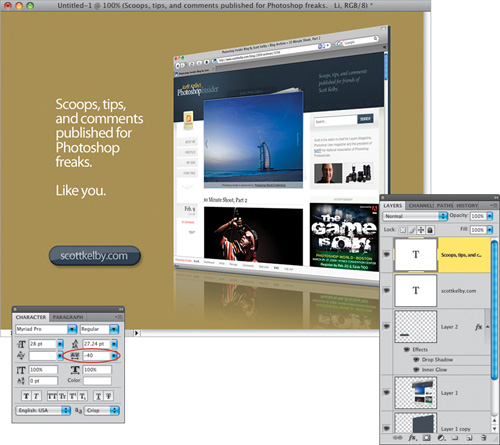
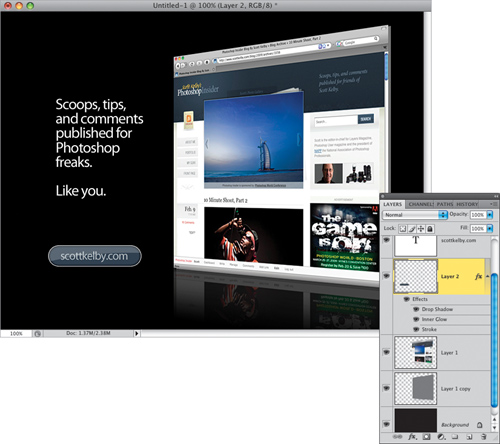
At this point, you can add some text—I used the font Myriad Pro, which comes installed with Photoshop CS4. I set the font size at 28 points. I also went to the Character panel and tightened the space between the letters by entering –40 in the Tracking field (it’s shown circled here in red) and set the Leading field (above the Tracking field) to a little less than the font size. Next, create a pill-shaped button on a new layer using the Rounded Rectangle tool (press Shift-U until you have it) set to Fill Pixels, with the Radius (roundness) setting set at 40 up in the Options Bar. Then, choose Inner Glow from the Add a Layer Style icon’s pop-up menu. When the dialog appears, choose black as your glow color, and set the Blend Mode pop-up menu to Normal to add a slight shadow inside the pill shape. While you’re there, click on Drop Shadow in the Styles section on the left side, and in the Drop Shadow options, lower the Opacity slider to 30% to create a soft shadow behind the pill shape. Lastly, I added the glassy reflection technique you’ll learn on page 148. The final image here shows how the page looks if you simply change the background color to black (and your 3D thick layer to medium gray). I also added a white stroke around the pill-shaped button by choosing Stroke from the Add a Layer Style icon’s pop-up menu, and changing the Color to white.
Apple has become such a part of popular culture that their design elements have become a part of popular design (luckily, their stuff looks really cool). A few years back, everybody was designing everything with a “gel” look, so gel buttons and bars were found on nearly every website and ad (and you still see them here and there), but Apple’s reflected look has taken the place of the gel look, and in this particular project, we’re going to use two different gradients on two different layers to recreate the reflected look Apple used on their Mac OS X Leopard product box (but of course, we’re applying it to different letters).
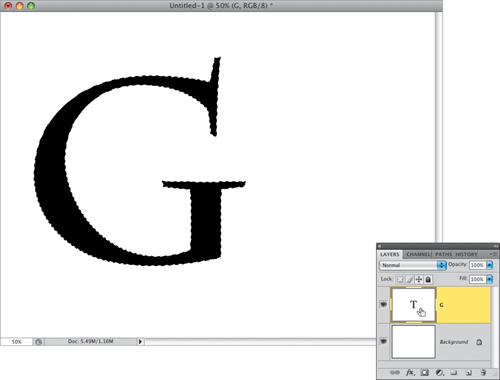
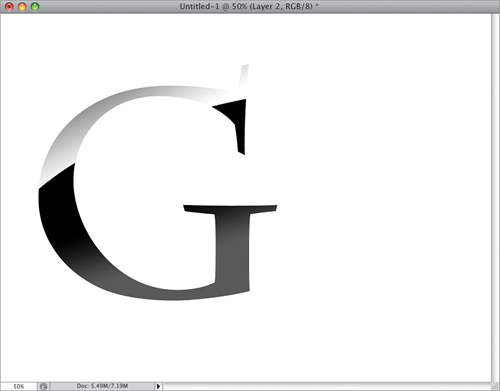
Start by creating a new document that is 8×6″ at a resolution of 200 ppi. (This technique works best if you start with a higher resolution, and then scale the image or shape down if you want to use it onscreen or on the Web.) Press D to set your Foreground color to black, then get the Horizontal Type tool (T) and type in the letter “G” using the font Charlemagne Std Bold (it comes installed with Photoshop CS4). We need to put a selection around your letter, so go to the Layers panel and Command-click (PC: Ctrl-click) directly on the thumbnail of your Type layer, and it puts a selection around your letter (as seen here). Now that your selection is in place, you don’t need the Type layer any longer, so drag it onto the Trash icon at the bottom of the Layers panel.
Create a new blank layer by clicking on the Create a New Layer icon at the bottom of the Layers panel. Make sure your Foreground and Background colors are the default black and white. Now, click on the Foreground color swatch and choose a medium gray color in the Color Picker. Get the Gradient tool (G), click on the down-facing arrow to the right of the gradient thumbnail in the Options Bar, and choose the Foreground to Background gradient. Then, click-and-drag through your selection starting above and to the left of your selected letter, and dragging down through it at the angle you see here. This fills the top quarter with gray, and the rest of the letter with white (as seen in the Layers panel). Don’t deselect yet.
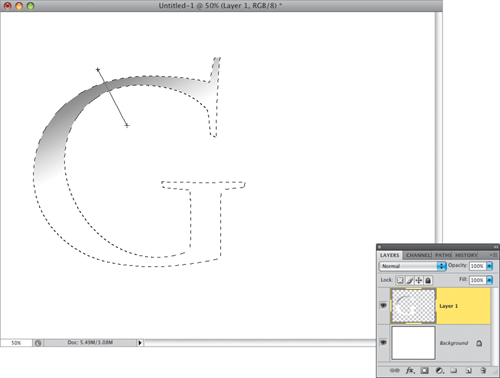
Add another blank layer. Now you’re going to create a new gradient—one that goes from black to dark gray. Start by setting your Foreground color to black, then click on the Background color swatch and choose a dark gray in the Color Picker. Take the Gradient tool and click-and-drag from around the center of the letter downward about an inch and a half (as shown here). This puts black in the top three-quarters of the letter and dark gray in the bottom quarter. Now, press Command-D (PC: Ctrl-D) to Deselect.
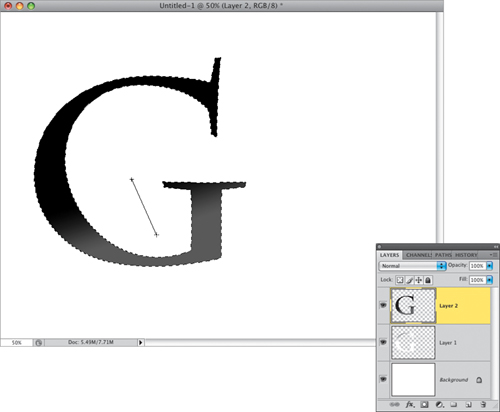
Get the Elliptical Marquee tool (press Shift-M until you have it) and click-and-drag out a huge oval-shaped selection, like the one you see here. What we’re going to do with this is use it to cut a hole out of the top gradient, revealing the bottom gradient, which creates the reflected look (by the way, we’re doing this on a letter, but it works the same way on an object or shape).
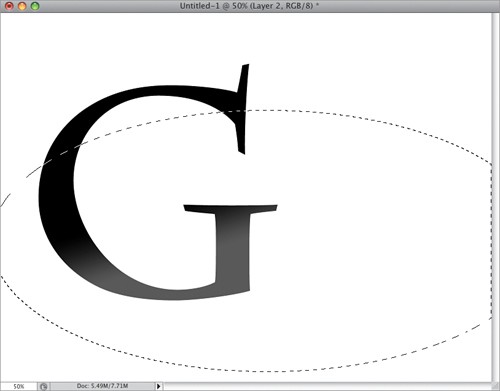
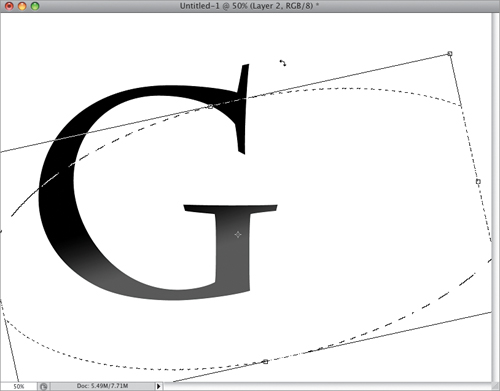
To get just the right angle, you’re going to have to rotate this oval-shaped selection. To do that, go under the Select menu and choose Transform Selection. This puts Free Transform handles around your oval selection, and it works just like Free Transform, so move your cursor outside the bounding box and your cursor changes into a two-headed arrow (as seen here). To rotate the oval, just click-and-drag in a counterclockwise direction until your oval looks like the one you see here. If you need to reposition your oval, just move your cursor inside the bounding box and you can click-and-drag it where you want it. When it looks good to you, press Return (PC: Enter) to lock in your rotation.
Press Command-Shift-I (PC: Ctrl-Shift-I) to Inverse the selection, so rather than having the bottom of the letter selected, now you have the top. Just press Delete (PC: Backspace), and it deletes the top of the top layer, to reveal the gradient on the layer below it (as seen here). Now you can deselect.
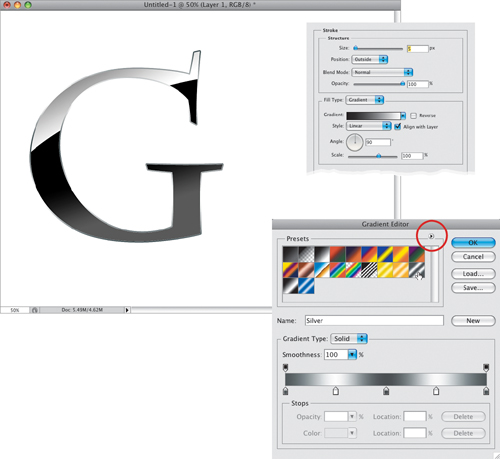
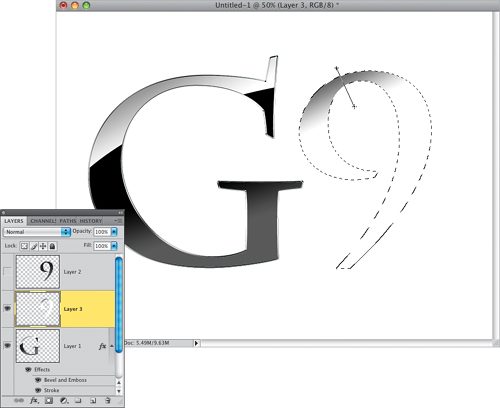
We need both layers merged into one, so press Command-E (PC: Ctrl-E) to merge these two layers (well, it actually merges the top layer with the one directly beneath it, but the result is the same). You’re now going to add a metallic stroke around the outside of your letter, so click on the Add a Layer Style icon at the bottom of the Layers panel and choose Stroke from the pop-up menu. When the Layer Style dialog appears, increase the Size to 5, then for Fill Type, choose Gradient. We want to use a special metallic gradient, so click on the gradient thumbnail to bring up the Gradient Editor, then click on the little right-facing arrow at the top right of the Presets section (it’s shown circled here in red), and from the list of gradient presets that appears, choose Metals. When the warning dialog appears, choose Append, and then the metallic gradients will appear at the bottom of the presets. Click on the gradient that goes from gray to white to gray to white to gray (the Silver gradient, as shown here).
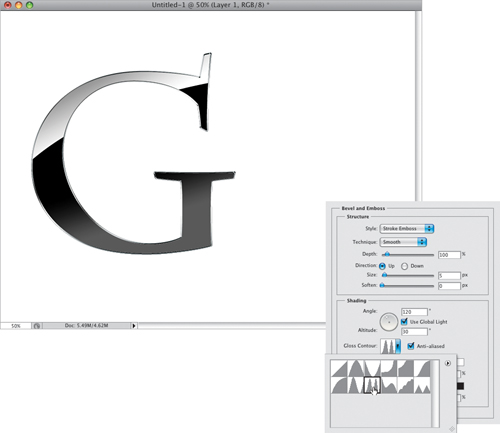
In the Styles section on the left side of the Layer Style dialog, click on Bevel and Emboss. When those options appear, from the Style pop-up menu, choose Stroke Emboss. Go down to Gloss Contour, turn on the checkbox for Anti-Aliased, then click on the down-facing arrow to the right of the graph thumbnail to bring up the Gloss Contour Picker (seen here), and choose the Ring-Double contour (the third contour in the second row, as shown here). This adds a metallic effect to the metallic gradient you added as a stroke. Now, click OK to apply these effects to your letter. At this point, you’re done with this letter, but if you wanted to do an additional letter, you’d pretty much follow the same steps (which we’ll do on the next page, with one small exception).
Get the Horizontal Type tool again, and type in “9.” Press-and-hold the Command (PC: Ctrl) key and click on the layer’s thumbnail to put a selection around the number. Now you can delete that Type layer, then add a new blank layer (sound familiar?). You’ve already got black and gray set up as your Foreground and Background colors, so you can save yourself a step by creating the second gradient first. However, since you used that metallic gradient in the Stroke layer style, once you get the Gradient tool, you’ll have to go up to the Options Bar, click on the down-facing arrow to the right of the gradient thumbnail to get the Gradient Picker, and choose the first gradient (which is the Foreground to Background gradient). Then take the Gradient tool and click-and-drag it through the number starting above the middle of the number and dragging downward diagonally (like you see here). Don’t deselect yet.
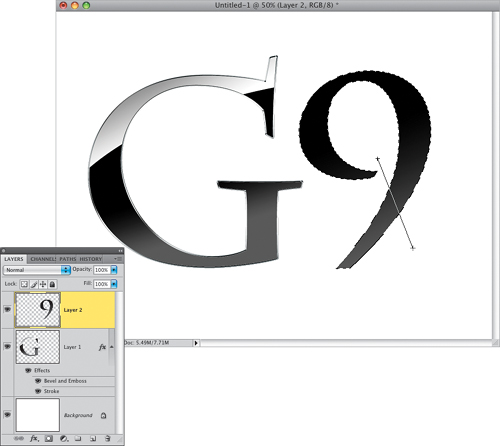
Now, hide that layer you just filled with a gradient from view by clicking on the Eye icon to the left of the layer. Press-and-hold the Command (PC: Ctrl) key while clicking on the Create a New Layer icon at the bottom of the Layers panel. This creates a new layer directly below your current layer (the hidden layer). Your selection should still be in place, so now you can create your other gradient, which was medium gray to white. Click-and-drag your gradient through the number (as shown here) to put gray at the top of the number, and white filling the rest. Now you can deselect, and you can make your top layer visible again (by clicking where the Eye icon used to be).
You’re going to make the large oval again, then use Transform Selection to rotate the oval a bit, inverse the selection (as seen here), then click back on the top layer to make it active. Press the Delete (PC: Backspace) key to cut out the top of the number, revealing the gradient on the layer below it, and deselect. Merge these two layers together and we’ll now add the same Stroke and Bevel and Emboss layer styles to the number that we added to the letter. Press-and-hold the Option (PC: Alt) key, click on the word “Effects” beneath the “G” layer, then just drag-and-drop it onto the “9” layer, and merge the “9” layer with the “G” layer.

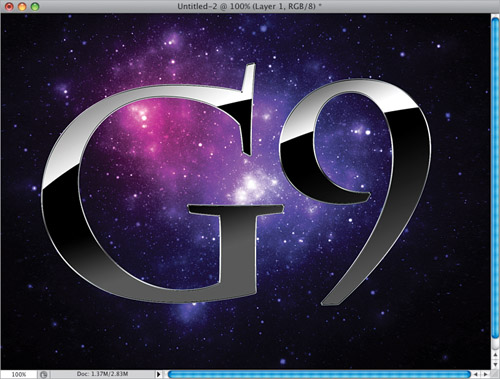
Now that everything’s on one layer, you can drag-and-drop this layer onto a different background (you can download the background you see here from the book’s downloads page, listed in the intro of the book). The background is only 72 ppi and your letter and number are 200 ppi, so when they appear in your document, they’ll be pretty huge, so press Command-T (PC: Ctrl-T) to bring up Free Transform. Press-and-hold the Shift key, grab a corner point, and drag inward to scale the text down to size. If you can’t see the corner points, press Command-0 (zero; PC: Ctrl-0) to expand your image. (Note: One advantage to merging those layers before we moved them over to this other document is that it locks in the size of the stroke and bevel layer style effects we applied to them. If we left those “live,” when you shrank them down, the effects would stay at their same size and strength, so they’d look kind of weird. The way around it is to go under the Layer menu, under Layer Style, and choose Scale Effects. This brings up a dialog with a slider, so you can scale the effects themselves down in size, until they look right, but of course, we didn’t have to do that here because we merged down.)
Last year, apparently, an international law was passed which stipulated that any and all buttons, banners, and bars on the Web, on TV, and basically on anything with a screen, must look glassy. Luckily, getting this look is one of the easiest techniques in the whole book. Here’s how it’s done:
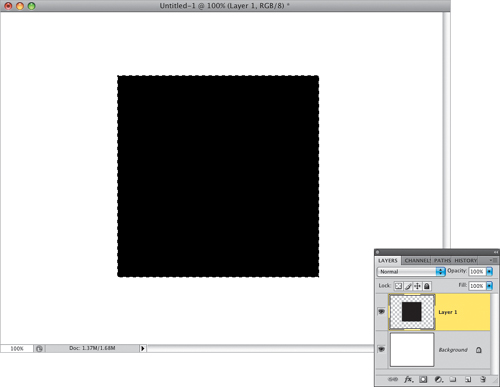
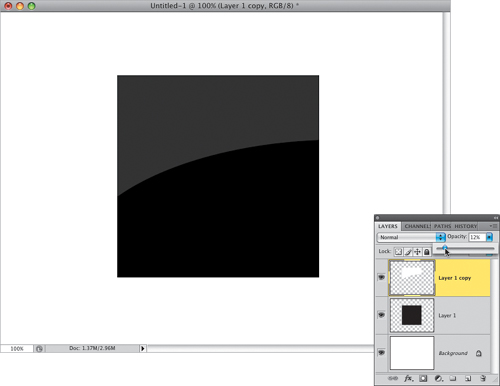
Create a new document (the one here is 800×600 pixels at a resolution of 72 ppi). Click on the Create a New Layer icon at the bottom of the Layers panel to add a new layer, and then get the Rectangular Marquee tool (M). Press-and-hold the Shift key, then click-and-drag out a square selection in the center of the document (like you see here). Press D to set your Foreground color to black, then fill this selection with black (your Foreground color) by pressing Option-Delete (PC: Alt-Backspace). Press Command-D (PC: Ctrl-D) to Deselect.
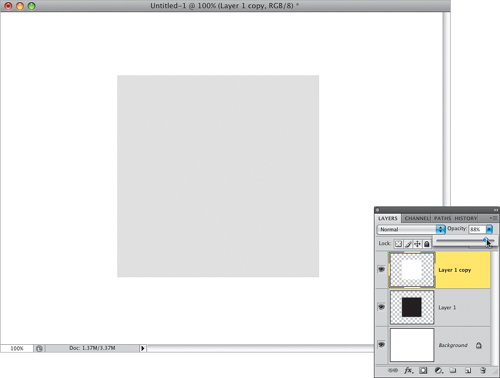
Press Command-J (PC: Ctrl-J) to duplicate the layer, then press Command-I (PC: Ctrl-I) to Invert the layer (which switches your black square to a white square). The problem is you can’t see a white square on a white background, so lower the Opacity of this layer to around 90%, just so you can at least see the outline of the shape (which you’ll need for the next step).
Get the Elliptical Marquee tool (press Shift-M) and click-and-drag out a huge oval-shaped selection—so big that it extends off the image area (as shown here)—and position it so that it overlaps the center of the square (just press-and-hold the Spacebar while you’re creating it to positon it).
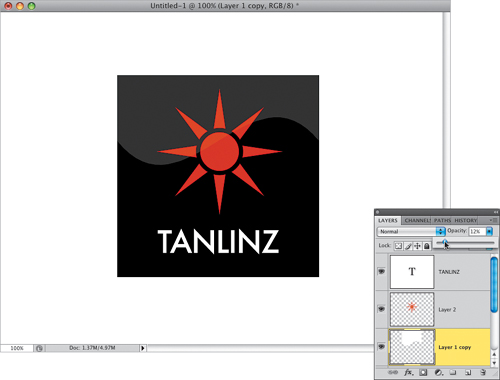
Press the Delete (PC: Backspace) key to knock out the selected area from your white square, and deselect. Now, simply lower the Opacity setting of this white layer down to around 11% or 12% to give it that glassy look. In the next few steps, we’ll add some text, a shape, and a variation.
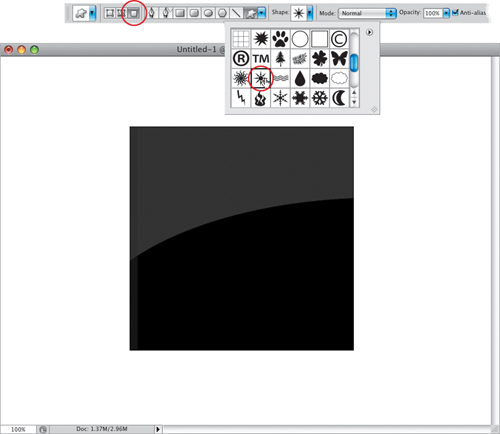
Just for looks, we’ll finish off our logo with a shape and some text. First, create a new layer, then get the Custom Shape tool from the Toolbox (it’s two tools down from the Type tool—click-and-hold on it and all the shape tools will appear, then choose the bottom one). Now, go up to the Options Bar and click on the currently selected shape’s thumbnail to bring up the Shape Picker (shown here). Click on the little right-facing arrow at the top-right corner of the Shape Picker, and from the flyout menu that appears, choose Nature, then click the Append button to add these shapes. Click on the stylized sun shape (as shown here), and then in the Options Bar, click on the third icon from the left (so your shape is made up of just pixels, and not a path).
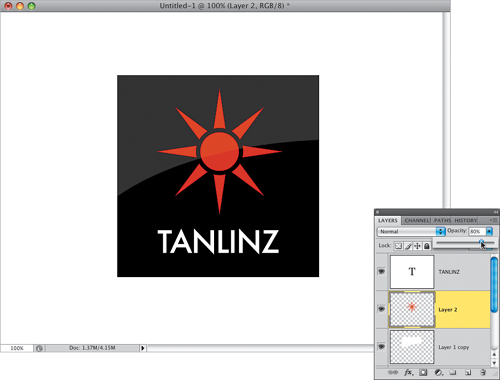
Click on your Foreground color swatch and set your Foreground color to orange (I used R: 228, G: 66, B: 36), then click-and-drag out your shape and position it just above the center (as shown here). If you want the reflection to appear to pass over your shape, then just lower the Opacity of your Shape layer to 80% (as shown here). Now press D, then X to set white as your Foreground color, grab the Horizontal Type tool (T) and create your text (as shown here). I used the font Futura Medium at a point size of 55.
Another popular variation for creating this look is to have more of a wave to your reflection. To do this, first hide your Type and Shape layers from view by clicking on the Eye icons to the left of each layer’s thumbnail in the Layers panel. Then, go to your reflection layer and delete it by dragging it onto the Trash icon at the bottom of the Layers panel. Now, click on your black square layer and duplicate it again, then Invert it to white again. Lower the Opacity of this layer to 80%, then press Command-T (PC: Ctrl-T) to bring up Free Transform. Next, Control-click (PC: Right-click) inside your bounding box and, from the contextual menu that appears, choose Warp (as shown here). Go up to the Options Bar and, from the Warp pop-up menu, choose Flag, then lower the Bend amount to 30% to give you the shape you see here.
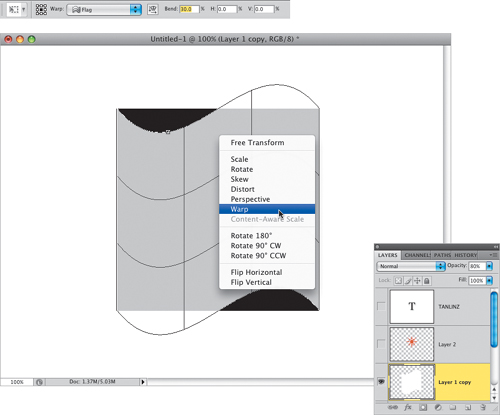
Press Return (PC: Enter) to lock in your transformation, then get the Move tool (V), press-and-hold the Shift key to keep the layer aligned, and click-and-drag straight upward until only the bottom third of your flag shape is showing. Lower the Opacity of this layer to around 10% or 12%, then make your Type and Shape layers visible again by clicking where the Eye icons used to be. Also, to crop off the extra area of white above the top of your logo, go to the Layers panel, press-and-hold the Command (PC: Ctrl) key, and click directly on the black square layer’s thumbnail (don’t change layers, just load that black layer as a selection—your active layer should still be the white flag shape layer). Now, press Command-Shift-I (PC: Ctrl-Shift-I) to Inverse your selection, then press Delete (PC: Backspace) to delete any leftover areas above your logo, and go ahead and deselect.
Here’s another twist on the reflection effect, and Sony has used this one for a while now for their electronics products. The first place I noticed it was in the backlit ads you see in airports, but it’s been used in everything from their print ads to their website (www.sonystyle.com). The product reflection is only a small part of this project, but I think this one is cool because you get to use a lot of different parts of Photoshop, and the final effect looks great, but is deceivingly simple (which is a good thing).
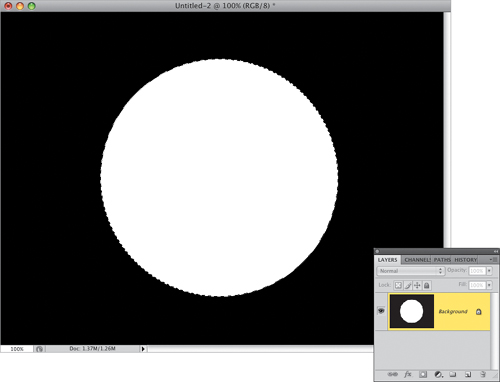
Press Command-N (PC: Ctrl-N) to create a new blank document (I made mine 800×600 pixels at a resolution of 72 ppi). Press D to set your Foreground color to black, then press Option-Delete (PC: Alt-Backspace) to fill your Background layer with black. Next, get the Elliptical Marquee tool from the Toolbox (or press Shift-M until you have it), press-and-hold the Shift key (to constrain your selection to a perfect circle), and click-and-drag out a large circular selection like the one you see here. Now, press X to make white your Foreground color, then fill this circle selection with white using the same keyboard shortcut you used to fill your layer with black.
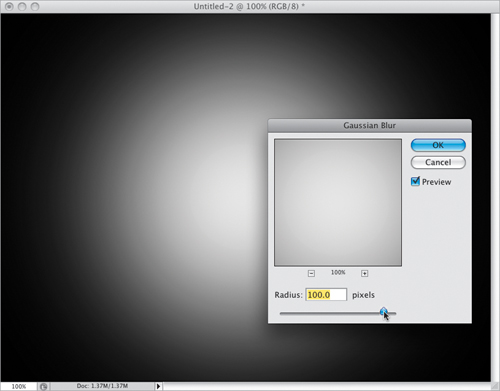
You can Deselect by pressing Command-D (PC: Ctrl-D). Next, go under the Filter menu, under Blur, and choose Gaussian Blur. For your Radius, enter 100 pixels (as shown here), then click OK to greatly soften the circle on the Background layer.
Get the Rectangular Marquee tool from the Toolbox (or press Shift-M until you have it) and put a selection around the bottom three-quarters of your Background layer (as shown here). Press Command-J (PC: Ctrl-J) to put your selected area up on its own separate layer (if you look in the Layers panel here, you’ll see that layer).
Get the Move tool (V), press-and-hold the Shift key and click-and-drag straight downward (as shown here), so the top of this dragged layer is about an inch below the center of the image. This creates the “table” for your product to sit on.
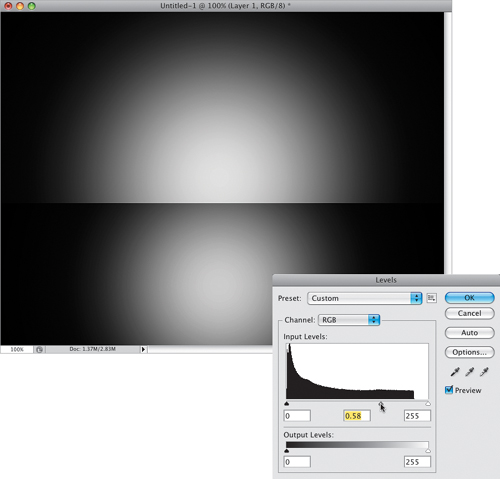
Let’s darken the table a bit, so it looks more separate from the background, by pressing Command-L (PC: Ctrl-L) to bring up Levels. Drag the center (midtones) Input Levels slider to the right (as shown here) to darken the midtones, which in turn darkens the fake table. Click OK. Then, press Command-E (PC: Ctrl E) to merge your table layer down into your Background layer.
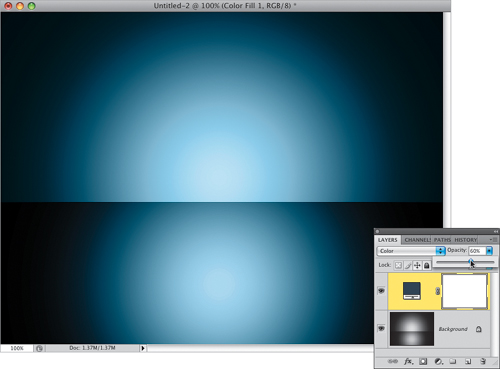
Now, let’s add some color. Choose Solid Color from the Create New Adjustment Layer icon’s pop-up menu at the bottom of the Layers panel. When the Color Picker appears, choose a blue color (I chose R: 18, G: 73, B: 112), and then click OK. This puts a solid color over your entire image, so you’ll need to change the layer’s blend mode from Normal to Color, which brings the color into your background (as seen here). The blue may be pretty punchy, so lower the layer’s Opacity a bit to around 60% (as shown here).
Open the photo of the product you want on this background. I took a quick photo of some Sony noisecanceling headphones I sometimes travel with, and made it available for you on this book’s downloads page. The headphones are on their own layer, so once you open the document, you can just take the Move tool and drag-and-drop those headphones right onto your layout.
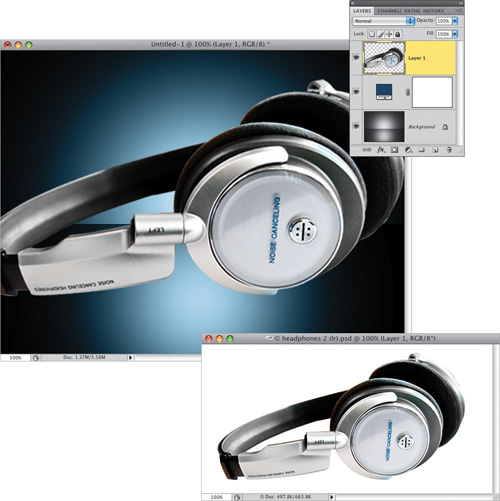
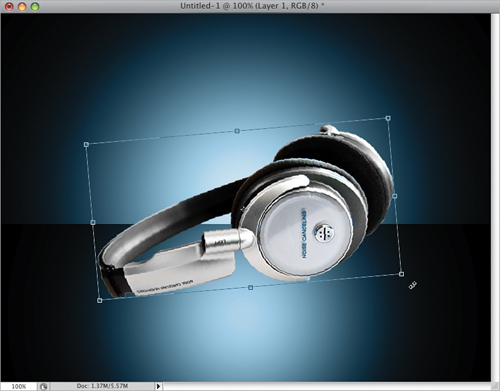
If you need to make them smaller, just press Command-T (PC: Ctrl-T) to bring up Free Transform, press-and-hold the Shift key, grab a corner handle, and drag inward (if you can’t see the corner handles when you enter Free Transform, just press Command-0 (zero; PC: Ctrl-0). Position them so a little bit of the edge of the fake table is visible through the opening in the headphones (as seen here). To angle them, move your cursor outside the bounding box until you see the curved two-headed cursor, then click-and-drag up or down to rotate (as shown here). Press Return (PC: Enter) to lock in your changes.
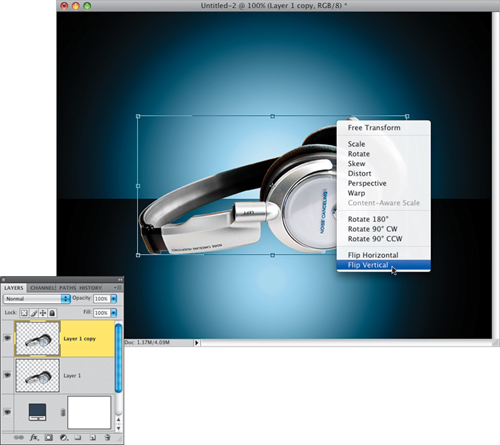
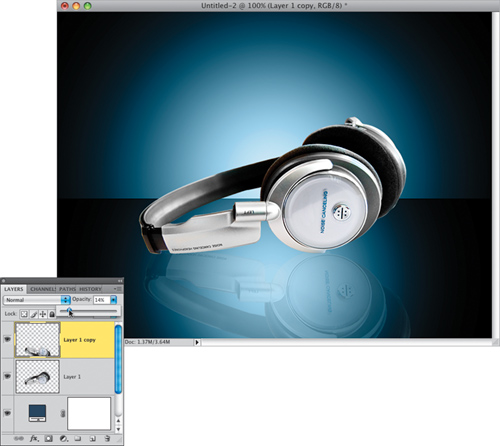
Now, let’s make the reflection. Duplicate the headphone layer, then bring up Free Transform again. Now, Control-click (PC: Right-click) inside the Free Transform bounding box and a contextual menu will appear. Choose Flip Vertical (as shown here) to flip this duplicate layer upside down.
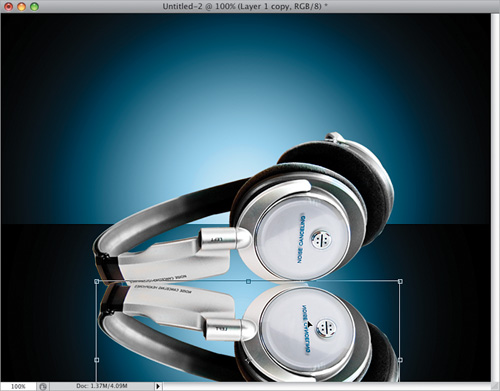
Click inside the bounding box and drag your flipped image straight down until the two sets of headphones are just barely touching, creating the mirror reflection you see here. When it’s positioned where you want, lock in your transformation.
To enhance the reflected effect, lower the Opacity of this layer to around 14% (this will vary from image to image, but anywhere between 10% and 20% will usually work—you have to make the call as to what exactly that percentage will be. I know. The pressure!). The reflection here isn’t dead-on with what the real reflection would be if these headphones were really sitting on a reflective surface, but you’d have to tweak the type on them so much (bending and distorting it), that we’re getting close enough that folks won’t ever even notice. Of course, the whole thing is faked from top to bottom, so that should be the least of our worries, eh?
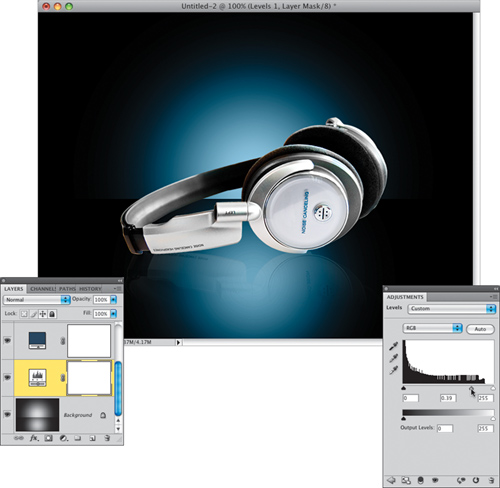
To make sure the reflection isn’t on top of the headphones, click on the reflection layer and drag it below the headphone layer in the Layers panel. Now, we need to apply a “fade away” effect to our reflection, so click on the Add Layer Mask icon at the bottom of the Layers panel (it’s shown circled here in red), then get the Gradient tool (G), click on the down-facing arrow to the right of the gradient thumbnail in the Options Bar, and choose the Foreground to Background gradient (the top-left one). Click at the top of your reflected image, and then drag downward to the point where you want your image to fade away (as shown here), and son of a gun, it just fades away.

Lastly, you actually have control over the brightness and spread of the background, and in the Sony ads, it’s usually a little darker and more dramatic, and the glow isn’t quite as big, but luckily we can adjust that easily. Click on the Background layer, then in the Adjustments panel, click on the Levels icon (the second icon from the left in the top row), and when the options appear, drag the center midtones slider to the right. As you do, it crunches down the spotlight effect quite a bit (as seen here).
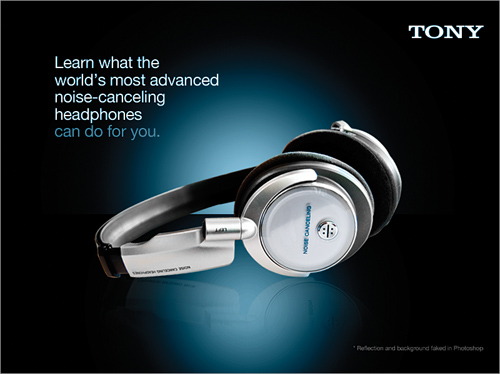
Now you can add some text to finish the project off (as I did here in the final image). The headline (and tiny disclaimer at the bottom) are both done in Helvetica Regular.
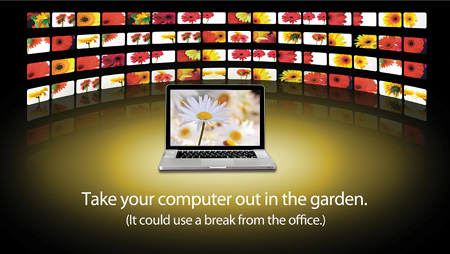
Here, we’re going to recreate the very slick 3D wraparound video wall that Apple used for the introduction of AppleTV. This is the longest project in the entire book, but that doesn’t mean it’s hard. In fact, it’s not hard at all—you’ll be able to recreate this project, which starts in Bridge CS4, without any problem at all, so don’t let the number of steps make you think it’s too hard. The thing I like best about this project is the cool way Smart Objects are used to make the whole thing into a template that lets you change the look (once you’re done with the initial project) in less than one minute (I have to thank Corey Barker for his suggestion to add Smart Objects to this project, because as you’ll see, it takes the technique over the top).
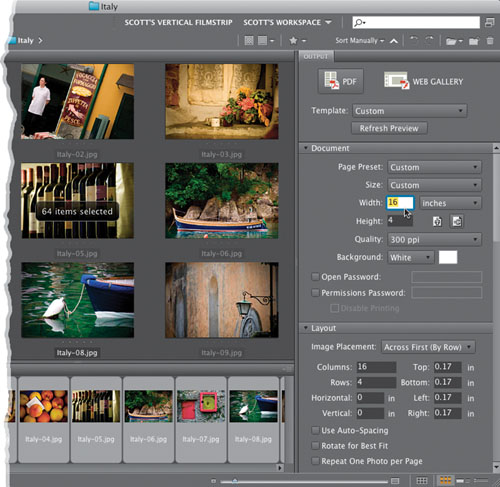
Put together a folder of 64 low-resolution photos you’d like to have appear in your curved 3D video wall. Your wall will look best if you use all wide photos (rather than a mix of tall and wide photos), and this will work best if you make them all the same width. Open that folder of images in Bridge CS4 (as shown here). Press Command-A (PC: Ctrl-A) to select all your photos in Bridge, then click on the Output icon at the top of the Bridge window, and choose Output to Web or PDF from the pop-up menu (as shown here) to bring up the contact sheet feature.
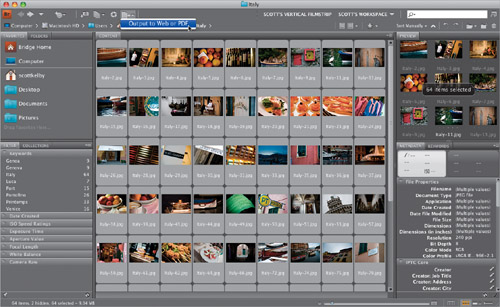
When the Output workspace appears (shown here), at the top of the Output panel (on the right side), click on the PDF button. Then in the Document section, enter a Width of 16 inches, a Height of 4, and choose a Quality of 300 ppi (as shown here). In the Layout section, choose 16 columns by 4 rows, then set your Horizontal and Vertical spacing to 0.00. One last thing: scroll down to the Overlays section, and make sure the Filename checkbox is turned off. Now, scroll to the bottom of the right-side panels and click on the Save button.
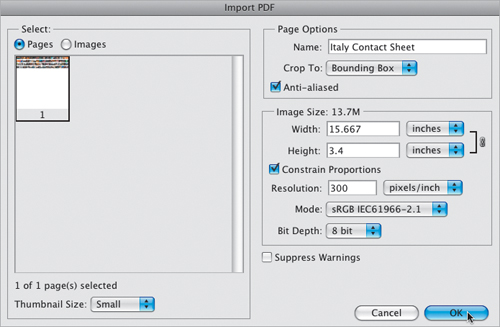
Give your PDF a name, and save it on your computer. Now go to Photoshop CS4, under the File menu, and choose Open. Navigate to your PDF and click Open. When you do this, it will bring up the PDF Import dialog you see here. Luckily, you don’t have to do anything in this dialog except click OK.
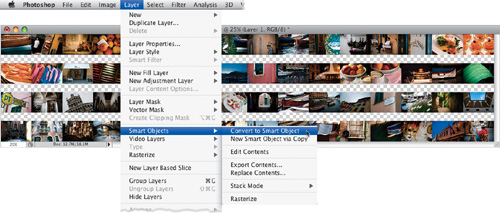
When your contact sheet appears, go under the Layer menu, under Smart Objects, and choose Convert to Smart Object (as shown here). When you do this, you’ll see a little page icon in the bottom-right corner of your layer’s thumbnail, letting you know it is now a Smart Object (as shown in the next step).
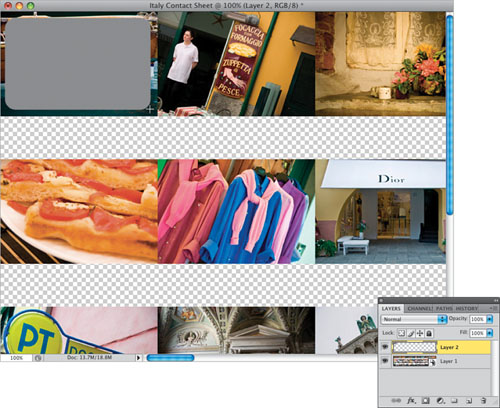
Create a new blank layer above your contact sheet layer by clicking on the Create a New Layer icon at the bottom of the Layers panel. Click on the Foreground color swatch at the bottom of the Toolbox to bring up the Color Picker, and choose a gray color. Then, get the Rounded Rectangle tool (press Shift-U until you have it), and set your Radius (corner roundness) up in the Options Bar to 20. Click on the third icon from the left in the Options Bar, so when you draw rectangles, they’re made of pixels, rather than becoming a Shape layer or path. Now, draw a rounded rectangle over the first thumbnail in your contact sheet, and make it a little smaller than your thumbnail (as shown here).
Load that layer as a selection by Command-clicking (PC: Ctrl-clicking) on the layer’s thumbnail. Press Command-Option-T (PC: Ctrl-Alt-T) to bring up Free Transform and make a copy of your selection. Press-and-hold the Shift key and click-and-drag this shape copy over until it covers the next thumbnail to the right, then press Return (PC: Enter) to lock in your change. Because you used that keyboard shortcut, it actually makes a duplicate of your shape on the same layer.
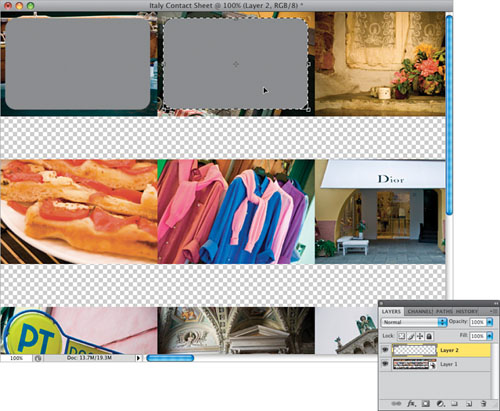
Press Command-Option-Shift-T (PC: Ctrl-Alt-Shift-T) again and again until you have 16 thumbnails in one long horizontal row. They should perfectly align themselves over each thumbnail on the top row of your contact sheet (well, they will if, when you dragged the second thumbnail over, you carefully positioned it so it covers the second thumbnail). Then, Command-click (PC: Ctrl-click) on the thumbnail for your gray shapes layer to select the entire row. Get the Move tool (V), press-and-hold the Option (PC: Alt) and Shift keys, then click-and-drag one of those gray shapes straight downward, and position this row of gray rectangles so it covers the thumbnails on the second row. Pause a moment, then do this two more times (dragging a copy of your gray shapes), until all your thumbnails are covered. Because of the way you did this, all your rows of shapes will be on one single layer.
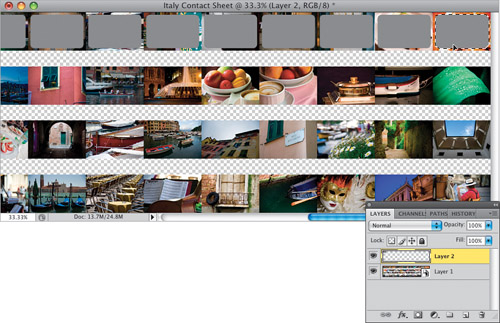
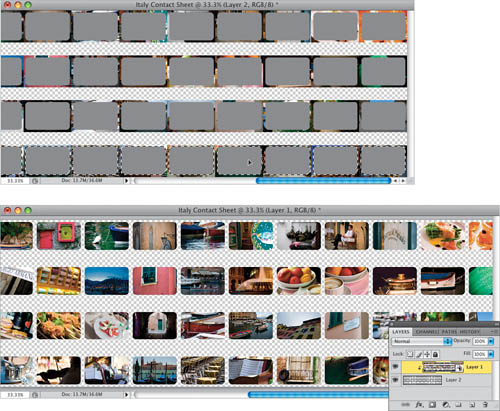
Here’s how it should look at this point, with gray shapes covering all your photos, and these shapes all on one layer. Press Command-D (PC: Ctrl-D) to Deselect, go to the Layers panel, and drag your gray shapes layer below your photo contact sheet layer. Then, click back on the photo contact sheet layer to make it active. Go up top to the menu bar, under the Layer menu, and choose Create Clipping Mask (or just press Command-Option-G [PC: Ctrl-Alt-G]). This puts your photo thumbnails inside the gray rounded rectangles on the layer below it, so now all your thumbnails have rounded corners like a TV (as seen at the bottom here).
Press Command-N (PC: Ctrl-N) to bring up the New dialog, and create a new document that is 16 inches wide, but rather than using 4 inches again, make the height 9 inches, so we can add a product and some text below the video wall. Set the Resolution to 300 ppi, just like your previous document. Press D to set your Foreground color to black, then press Option-Delete (PC: Alt-Backspace) to fill this new document’s Background layer with black (as shown here).
Go back to your contact sheet document. Go to the Layers panel, Command-click (PC: Ctrl-click) on both layers to select them, then get the Move tool, click-and-drag both of these layers onto your new document, and position them up near the top of the window (as shown here). Go to the Layers panel and drag either of the two selected layers down to the Create a New Layer icon to duplicate both layers.
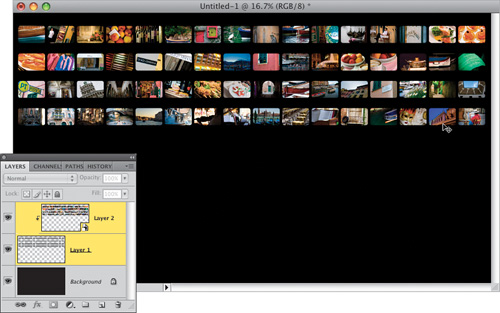
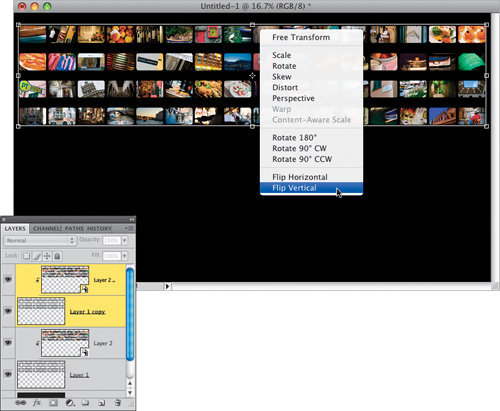
Now, press Command-T (PC: Ctrl-T) to bring up Free Transform. Then, Control-click (PC: Right-click) inside the Free Transform bounding box, and when the contextual menu appears, choose Flip Vertical (as shown here), to flip these two selected layers upside down.
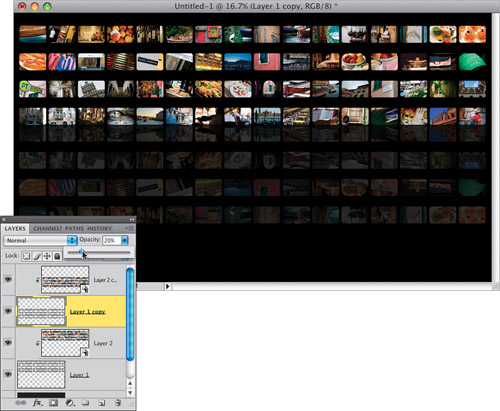
Press-and-hold the Shift key, and click-and-drag these two layers straight downward until the top edge of the flipped layers touches the bottom edge of your original layers (as shown here). This creates a mirror reflection of your contact sheet. When you’re happy with the placement, press Return (PC: Enter) to lock in your transformation.

In the Layers panel, click on the second layer from the top (the flipped gray rectangles layer), then lower the Opacity of this layer to 20%, so it looks more like a reflection.
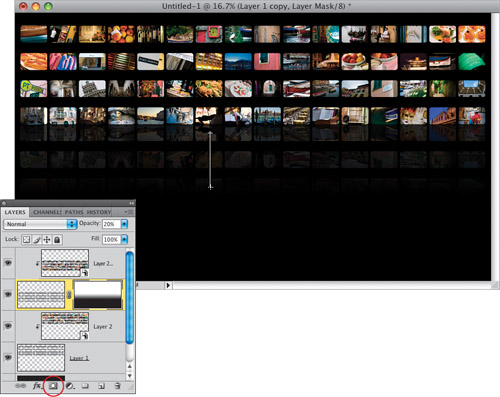
Now we need to have this reflection fade away, so click on the Add Layer Mask icon at the bottom of the Layers panel (it’s shown circled here in red). Get the Gradient tool (G), click on the down-facing arrow to the right of the gradient thumbnail in the Options Bar to open the Gradient Picker, and click on the top-left gradient (Foreground to Background). Click-and-drag it from the bottom of your upright layer (where the two meet) to the bottom of the flipped layer, so it fades away (as seen here).
Press-and-hold the Command (PC: Ctrl) key, go to the Layers panel, and click on all the layers (except the Background layer) to select them. Then, Control-click (PC: Right-click) on one of those selected layers, and from the contextual menu that appears, choose Convert to Smart Object (as shown here), to convert all four layers into one Smart Object layer (you’ll understand why we did this in just a moment).

Bring up Free Transform again, for this layer you just created. Control-click (PC: Right-click) inside the Free Transform bounding box and, from the contextual menu that appears, choose Warp (as shown here).
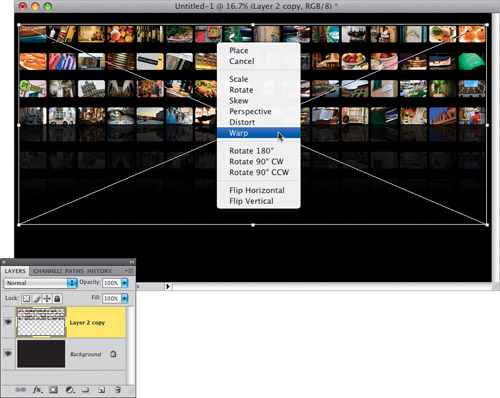
Go up to the Options Bar and, from the Warp pop-up menu, choose Arc Lower (as shown up top here), then set the Bend amount to –30. This bends the thumbnails into a curve.
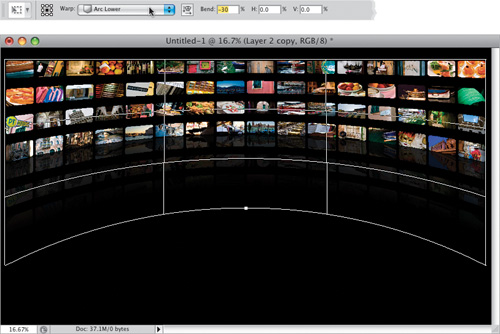
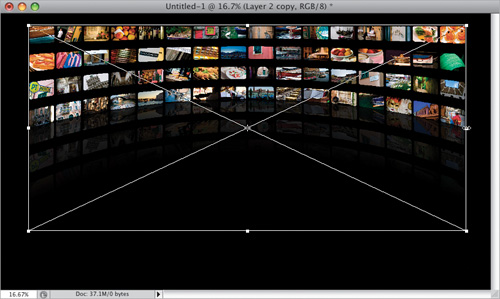
Adding this warping to your photos tends to make them look a bit stretched, so go back into Free Transform again. Grab the center point on the right side and drag inward (as shown here) to remove some of the stretching. Now do the same thing to the left side, then lock in your side shrinking.
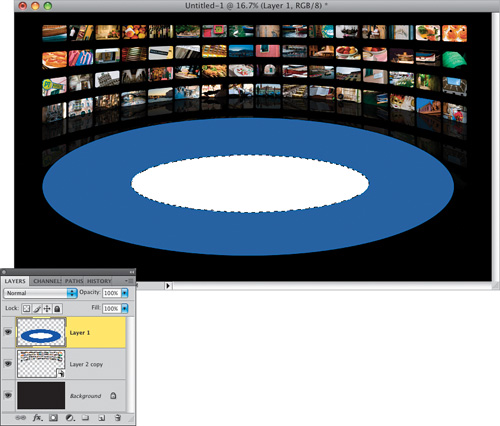
Create a new blank layer. Get the Elliptical Marquee tool (press Shift-M until you have it), click-and-drag a huge oval-shaped selection that roughly matches the roundness of your curved video wall, and position it so it overlaps your reflection a little bit (as shown here). Click on your Foreground color swatch and choose a blue color in the Color Picker, then fill your oval-shaped selection with this color by pressing Option-Delete (PC: Alt-Backspace). Deselect by pressing Command-D (PC: Ctrl-D).
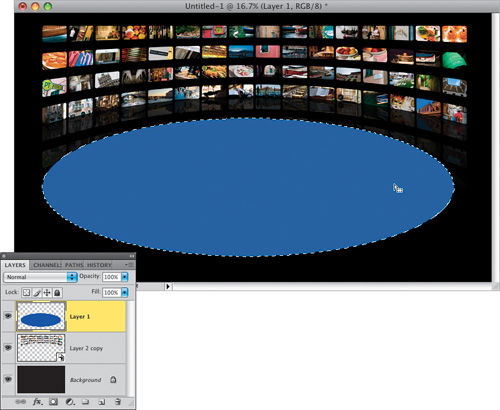
Now, use the Elliptical Marquee tool to draw a smaller oval selection inside your blue oval. Press D, then X to set your Foreground color to white, and fill that oval with white (as shown here), then deselect.
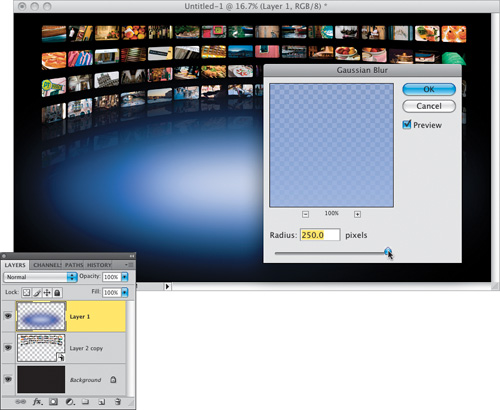
Go under the Filter menu, under Blur, and choose Gaussian Blur. When the dialog appears, enter 250 pixels to greatly soften the edge of your blue-and-white oval, and make it look like a soft spotlight (as seen here).
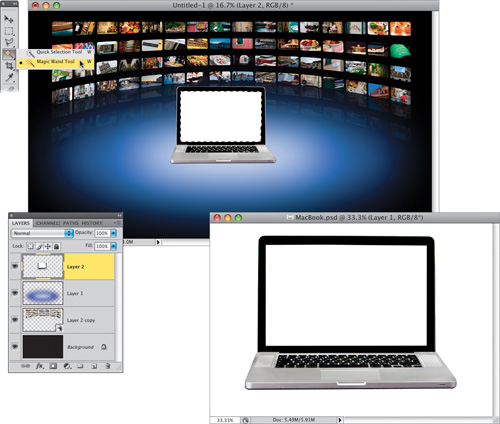
Now, open the photo of the product you want to showcase (in our case, it’s an Apple MacBook Pro laptop. You can download this photo from the book’s downloads page). If you choose to use this one, I put the laptop on its own layer, so all you have to do is get the Move tool, click-and-drag it onto the blurred soft spotlight in your main document, and position it like you see here. Then, get the Magic Wand tool (press Shift-W until you have it), and click once inside the blank white screen on the laptop to put a selection around it.
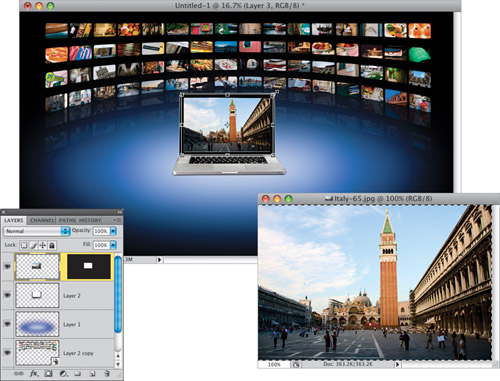
Open the photo you want to appear inside your computer screen (after all, you can’t leave that blank white screen there, right?). Press Command-A (PC: Ctrl-A) to select the entire photo, then press Command-C (PC: Ctrl-C) to Copy this photo into memory. Now, switch to your video wall document, go under the Edit menu, and choose Paste Into to paste the photo in your computer’s memory into your selected area inside the computer screen (as seen here). If your image is too large to fit in the screen, bring up Free Transform, then press-and-hold the Shift key, grab a corner point, and drag inward (as shown here) to shrink it down to size (while still staying masked inside the laptop’s screen).
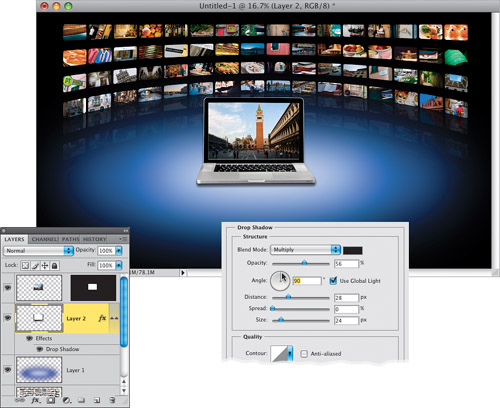
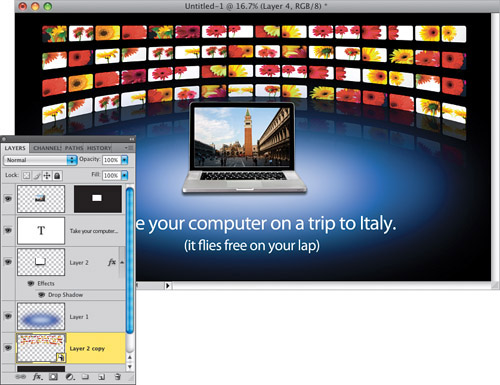
Now, let’s add a drop shadow directly under the laptop. In the Layers panel, click on the layer with your laptop image on it (it should be the second layer from the top). Choose Drop Shadow from the Add a Layer Style icon’s pop-up menu at the bottom of the Layers panel. When the Layer Style dialog comes up, set the Angle to 90°, so the shadow appears directly below the laptop (as seen here). The shadow looks a little too dark, so lower the Opacity to around 55%. Then set the Distance to 28, and to soften it, increase the Size amount to 24. Click OK to apply the drop shadow to the laptop.
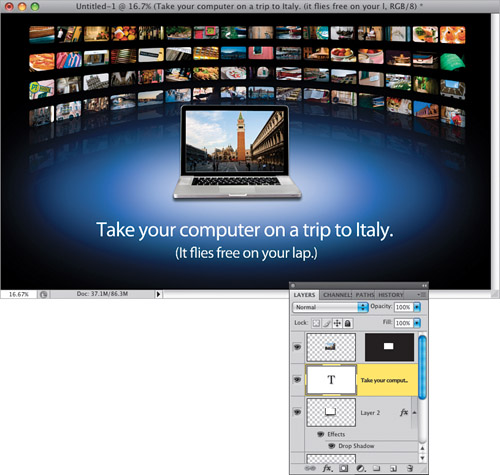
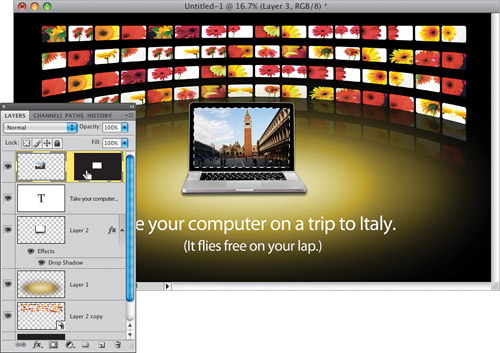
Next, let’s add some text below the product (I used the same font that Apple uses, Myriad Pro, which comes installed with Photoshop CS4), so grab the Horizontal Type tool (T), click below the laptop, and type away. Okay, now the look is complete, but we haven’t put those Smart Object layers to use yet, and that’s where it gets really fun. Here’s how: since you used Smart Objects, you can just build another contact sheet (use a different set of 64 photos), and then in just a few clicks, you can not only replace the photos in the video wall (while retaining it’s curved video wall look), but it will also automatically create the reflected images, as well. Here’s how that’s done:
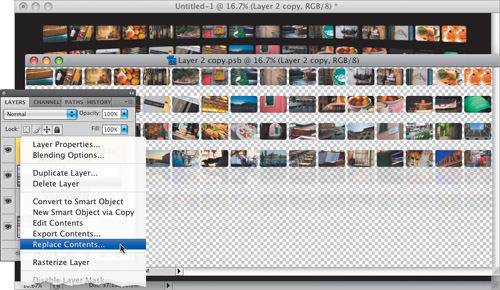
Go to the Layers panel and double-click on the Smart Object layer’s thumbnail, click OK in the warning dialog that appears, and a new image window will open with the four separate video wall layers intact (as seen here). Now, Control-click (PC: Right-click) on the top layer, and from the contextual menu that appears, choose Replace Contents (as shown here).
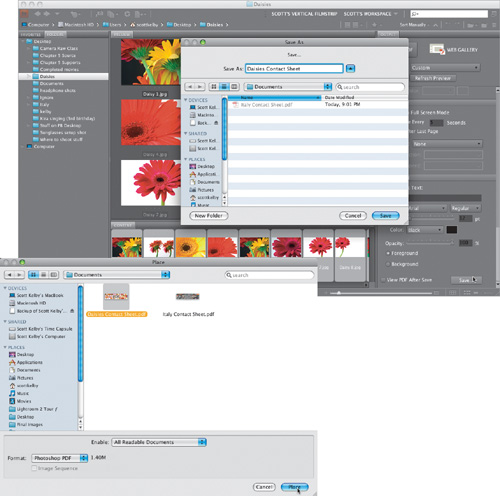
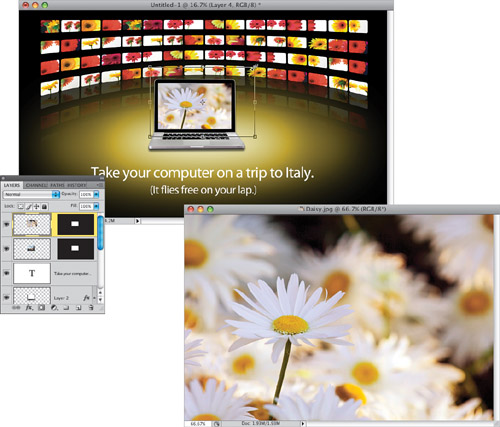
A standard Open dialog will pop up, and now all you have to do is locate your other photo contact sheet (I created a second contact sheet using photos of daisies), and then click the Place button (as shown here). When your new photos have replaced the old ones, press Command-S (PC: Ctrl-S) to save the Smart Objects document, then close it and return to your laptop and video wall document. Note: Make sure you don’t do a Save As and change the location of the Smart Objects document or your other document won’t update.
Now, the photos from the daisy contact sheet have replaced the Italy photos, and the faded off reflection is automatically updated with these new photos (how slick is that!). Of course, we still have a photo of Venice in the laptop, so we’ll have to deal with that, too.
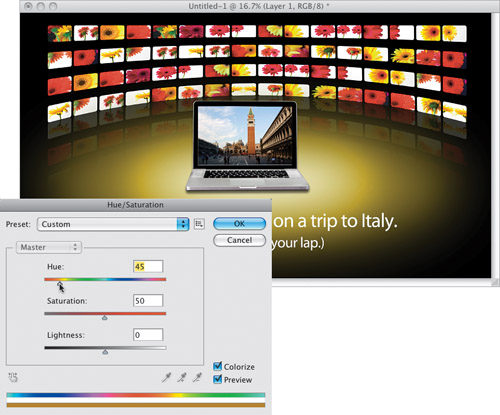
First, let’s change the color of the glow (because that blue color just doesn’t cut it anymore). In the Layers panel, click on the blue circle layer, then press Command-U (PC: Ctrl-U) to bring up the Hue/Saturation dialog. Turn on the Colorize checkbox at the bottom right, then drag the Hue slider to the left, over to the yellow side of the hue gradient, raise the Saturation up to 50, and click OK to change the color of the blue spotlight to more of a yellowish look (as seen here).
Now, let’s replace that graphic in the laptop’s screen. In the Layers panel, find the layer that has the photo you placed into the screen earlier. Press-and-hold the Command (PC: Ctrl) key and click on that layer’s layer mask thumbnail to put a selection around the screen (as shown here).
Open the photo you want to put inside this laptop (in this case, it’s another daisy photo), then select the entire photo, and copy it into memory. Switch back to your video wall document, go under the Edit menu, and choose Paste Into to paste that photo into your selected computer screen (as seen here). If you need to resize the image, use Free Transform to scale it down.
Here’s the final image, with the daisies in the video wall and the computer monitor, the spotlight color updated, and new text. Just remember to save a copy of this document with all the layers intact, so any time you want to update it with a new look, it’s just a matter of having Bridge make a new contact sheet, then using the Smart Object Replace Contents command to swap out the images for you.
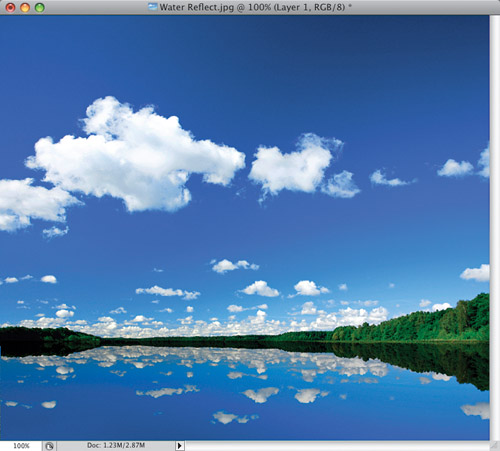
Here’s a project that takes a little twist on the basic reflection technique we learned at the beginning of this chapter, and adds a little tweak at the end that helps make the effect more realistic.
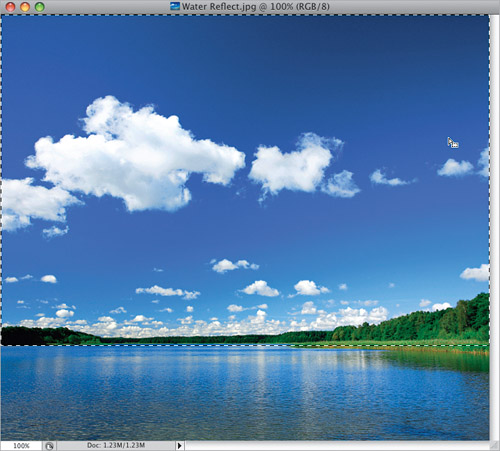
Open the photo you want to apply the effect to (you can download this photo from the book’s downloads page, listed in the book’s introduction). Take the Rectangular Marquee tool (M) and make a selection from the horizon line on up to the top of the image (as shown here).
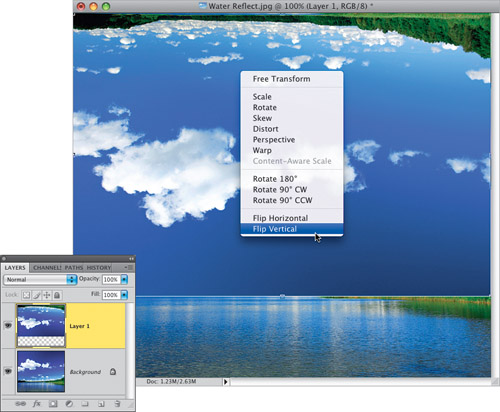
Press Command-J (PC: Ctrl-J) to put this selected area up on its own separate layer. Now, press Command-T (PC: Ctrl-T) to bring up Free Transform, then Control-click (PC: Right-click) anywhere inside the bounding box and, from the contextual menu that appears, choose Flip Vertical to flip this layer upside down (as seen here). Press Return (PC: Enter) to lock in your transformation.
Get the Move tool (V), press-and-hold the Shift key (which keeps things aligned as you drag), and click-and-drag straight downward until the top of your flipped layer touches the horizon of the top layer (to create the mirror reflection you see here). To help the reflection not look so obvious, press Command-L (PC: Ctrl-L) to bring up Levels, then drag the Input Levels midtones slider (the gray one in the center) to the right a bit to darken the midtones, and drag the highlights Output Levels slider (on the right) to the left to darken the flipped layer a bit overall.
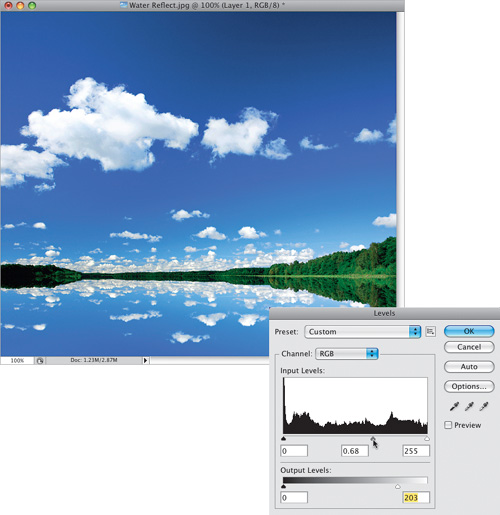
Now, click OK to apply your Levels adjustment, which completes the water reflection (as seen here). Press Command-E (PC: Ctrl-E) to merge this layer with your Background layer, which flattens the image. Compare this final image with the image in Step One to see what a dramatic difference this 60-second technique can have on the impact of a photo.