
This chapter is about commercial effects you see used every day (I’m not talking about effects used in commercials, I’m talking more about effects you see used in commercial work, so they could be in anything from website design, to annual reports, to brochures, to magazine layouts). The name “Commercial Break” is actually from a song by the same name from a rapper named D12, from his album D12 World. I found the song by searching in Apple’s iTunes Store, and I actually found two versions of the song: one marked Explicit and one marked Clean. I listened to the free 30-second preview of the explicit version, and sure enough—they were right. Now, I did notice a phrase in that version that I thought would be hard to make “clean,” so then, just for fun, I played the clean version, and they muted a small part of that naughty phrase. About a syllable. However, I’m not sure how much that helped, because I can’t imagine there’s a single person alive today that would not immediately know what that phrase was. I would imagine that even Tibetan monks, who would listen to the clean version, would look at each other and say, “Dude, did he just say what I think he said?” And then the other Tibetan monk would look at him and say, “Don’t call me dude!”


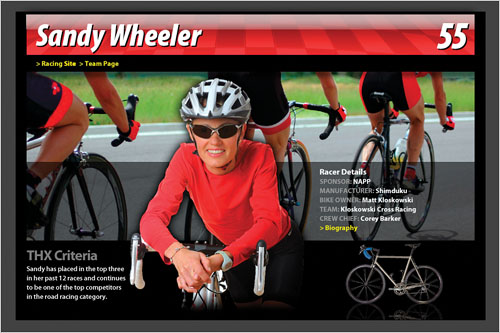
I originally saw this layout on the NASCAR website and liked it right away. There’s a lot more going on here than it appears at first, and although it takes a few minutes to go through this entire project, you’ll learn a lot by doing it because it’s got a little bit of everything in it. Plus, this is a very flexible layout that can be tweaked and used in lots of different ways—from websites to slide presentations. So, don’t let all the steps fool you. There’s nothing really hard here (in fact, it’s all pretty easy), it just takes a few steps to build this puppy from the ground up.
Press Command-N (PC: Ctrl-N) to open the New dialog and create a new document that’s 12″ wide by 8″ high at a resolution of 72 ppi. Click on the Foreground color swatch, choose a dark gray from the Color Picker, and fill your Background layer with this gray by pressing Option-Delete (PC: Alt-Backspace). Click on the Create a New Layer icon at the bottom of the Layers panel, and then take the Rectangular Marquee tool (M) and click-and-drag a rectangular selection that’s almost as big as the entire image (leave a little bit of gray showing all around, like you see here). Now press the letter D to set your Foreground color to black, and fill this selection with black by again pressing Option-Delete (PC: Alt-Backspace), then Deselect by pressing Command-D (PC: Ctrl-D).

Press Command-R (PC: Ctrl-R) to make Photoshop’s rulers visible, press V to get the Move tool, then create a horizontal guide by clicking directly on the ruler at the top of the image window and dragging straight down near the bottom of the window. Then click-and-drag another guide down near the top of the window. Drag a vertical guide out from the left-side ruler and place it just to the inside right of the black rectangle, leaving a little gap. Do the same thing for the left side, so your guides look like the ones here (later, we’ll put a photo in that space). Note: These guides are always available to help you line up things, so anytime you need one, just go to the rulers and click-and-drag one out. To remove a guide, click on it and drag it back to the ruler it came from.

Get the Rectangular Marquee tool again, and click-and-drag out a rectangle within your two horizontal and two vertical guides (like the one I’ve drawn here). Now open the photo of the race car. (Note: You can press Command-R [PC: Ctrl-R] to turn off the rulers.) Once it’s open, press Command-A (PC: Ctrl-A) to put a selection around the entire image, and then press Command-C (PC: Ctrl-C) to copy that image into Photoshop’s memory (you can close the race car photo). Now return to your main document and your selection will still be in place.

Go under the Edit menu and choose Paste Into, and the photo you copied into memory in the previous step will appear inside that selected area (and the selection will automatically deselect). If you don’t like the position where the photo appears inside that rectangle, you can just take the Move tool and click-and-drag it up, down, left, right, etc., or use Free Transform (Command-T [PC: Ctrl-T]) to change the size. Don’t worry, it will stay within that rectangular area while you reposition or resize it. Once it’s positioned the way you like it, open this photo of a driver, as shown here. Get the Magic Wand tool (press Shift-W until you have it) and click it once on the white background area behind the driver to select it. Now press-and-hold the Shift key, and click in the white area inside his arm—this adds that area to the selection. Keep holding the Shift key, and click any other unselected white areas (next to his other arm, for example). Once it’s all selected, press Command-Shift-I (PC: Ctrl-Shift-I) to Inverse your selection, so now the driver will be selected (rather than the background).

With the Move tool, click-and-hold on the driver, then drag-and-drop him right onto your main image. If he’s too big (and he probably will be), bring up Free Transform, press-and-hold the Shift key, then click on a corner point, and drag inward to scale him down to size (press Command-0 [zero; PC: Ctrl-0] if you can’t see the Free Transform handles). When the size looks about right, press Return (PC: Enter) to lock in your resizing. Now, since he was selected with the Magic Wand tool, you’ll probably see a little bit of white “fringe” around his entire body, which looks pretty lame, so in the next step we’ll have to deal with that.

The quickest way to get rid of edge fringe like this is to go under the Layer menu, under Matting, and then choose Defringe (as shown here). This brings up the Defringe dialog, and by default it’s going to remove 1 pixel of edge fringe. Just leave everything as it is, click OK, and that should do the trick in getting rid of that white fringe.

Now we’re going to add something like a drop shadow, but since we want the shadow to appear on all sides of him, we’re going to add a black outer glow instead. Click on the Add a Layer Style icon at the bottom of the Layers panel and choose Outer Glow. When the Layer Style dialog appears, change the Blend Mode to Normal, then click on the yellow color swatch, change the glow color to black, and increase the Size to around 18 px (the size is really the softness of the glow, so the higher the amount, the softer and wider the glow). Now click OK, and you’ll see the black drop-shadow-like glow behind your driver (as seen here).

Later we’re going to add some text up at the top, so let’s create a gradient bar up there now. Create a new layer, then get the Rectangular Marquee tool and make a long, thin rectangular selection across the top, between the two side guides (as shown here). Get the Eyedropper tool (I) and click once on a bright red area of his clothes to set this as your Foreground color. Then press X to swap the Background and Foreground color swatches, and click the Eyedropper on a darker red area of his clothes (so now your Foreground color is set to dark red and your Background color is set to bright red). Get the Gradient tool (G), click on the down-facing arrow next to the gradient thumbnail up in the Options Bar and choose the Foreground to Back ground gradient in the Gradient Picker, then click-and-drag your gradient from the top to the bottom of your selected area, so the dark red is at the top and bright red is at the bottom (like you see here). Don’t deselect quite yet.

You’re going to create a checkered flag graphic that’s going to go inside that selected gradient rectangle. Start by creating a new document that is 12″ wide by 2″ deep at 72 ppi. Get the Custom Shape tool from the Toolbox (or press Shift-U until you have it), and then go up to the Options Bar and click on the third icon from the left, shown circled here in red. This makes it so your shape will just be regular old pixels, rather than making it a path or a Shape layer. Then, click on the Shape thumbnail in the Options Bar to open the Shape Picker, and choose the Grid shape from the default shapes (as shown here).

Now create a new blank layer, press D to set your Foreground and Background colors to the default black and white, and then take the Custom Shape tool and click-and-drag out a nine-square grid over on the far-right side of the document (as seen here). Once it’s in place, switch to the Magic Wand tool and click in the top-right square to select it. Then make more selections by pressing-and-holding the Shift key and clicking in the bottom-right square, the center square, the bottom-left square, and finally the top-left square to select those five squares (as seen here, where they’re all selected).

Fill those five squares with black (your Foreground color), which makes a checkerboard pattern. Now, don’t deselect yet. Instead, Shift-click on the black strokes on each side of the checkerboard to add them to the selection. Get the Move tool, press-and-hold Option-Shift (PC: Alt-Shift), click on the selected checkerboard, and then drag straight over to the left, and it makes a copy. Holding the Shift key will have this copy line up its squares with your original set (each checkerboard is three squares wide, right? But you’ll have to line it up by moving over just two squares. You’ll see why when you start to try this yourself). Keep dragging yourself copies (while pressing-and-holding Option-Shift), until they fill the document from side to side with a checkerboard pattern like you see here (yours may look a little different, depending on how you drew your original grid). When you get to the end, you can deselect.

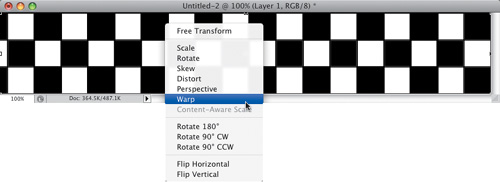
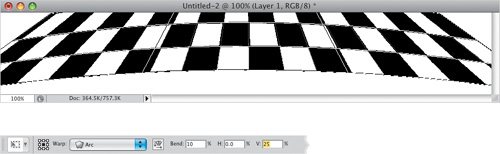
Now you’re going to bend this checkerboard, so it’s tipping away from you and tilting a bit. Bring up Free Transform, and Control-click (PC: Right-click) anywhere inside your checkerboard. From the contextual menu that appears, choose Warp (as shown here).
Go up to the Options Bar and, from the Warp pop-up menu, choose Arc. In the Bend field, type in 10, then press the Tab key twice to jump over to the V (vertical) field, and enter 25 to give you the shape you see here. Now, lock in your warp.
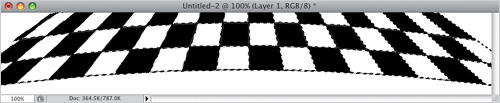
You’ll need a selection around just your checkerboard, so go to the Layers panel, press-and-hold the Command (PC: Ctrl) key, and click once directly on the layer’s thumbnail to put a selection around your checkerboard layer (as shown here). Copy this checkerboard into memory.
Switch back to your main document (your selection should still be in place), go under the Edit menu, and choose Paste Into to paste your checkerboard pattern into your selection (as shown here). Use the Move tool to reposition the checkerboard, if needed.

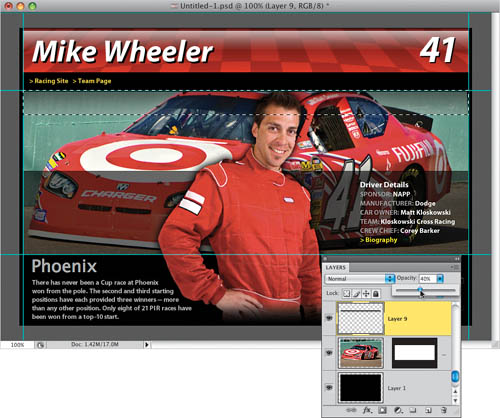
So that the checkerboard blends a little better with the red gradient background behind it, lower the Opacity of this layer to around 20% at the top of the Layers panel. Now we’re going to add a reflection to the top of this red bar, so get the Rectangular Marquee tool and draw a long, thin rectangular selection across the top of the red gradient bar (as seen here).

Create a new blank layer, and then press the letter X to make white your Foreground color. Now get the Gradient tool, open the Gradient Picker, and click on the second gradient in the top row, which is the Foreground to Transparent gradient (and since your Foreground color is currently white, your gradient will go from white to transparent, as shown here). Take this tool, click just above the rectangular selection, and drag down to the bottom of it to add a gradient that is white at the top and quickly fades down to almost clear (if you wanted it to be completely white, then you’d start dragging downward near the bottom of the selection. By starting to drag outside the selection, it means that a little bit of white will appear at the top of the gradient, which in this case, we wanted). Now lower the Opacity of this layer to around 60%, so it’s a bit more see-through.

You’re going to be adding some text over the bottom half of the photo, behind your driver, so we’re going to add a backscreen effect to do that. Start by going to the Layers panel and clicking on the background photo layer (Layer 2) to make it the active layer. Now create a new blank layer, then get the Rectangular Marquee tool, and click-and-drag a rectangle around the bottom half of the photo (as seen here). Set your Foreground color to black, then fill your rectangle with black (your Foreground color, as shown here), and deselect.

In the Layers panel, lower the Opacity of this solid black layer to around 60%, so that area is darker, but you can still see through to the race car on the background. Here, you can adjust one other thing: the position of the background photo. If it seems too distracting, go the Layers panel and click on the background photo layer again, then get the Move tool, and just click-and-drag it around a bit, so it looks better. It’s a little thing, but they’re all little things.

Now, open the photo of the other race car. Get the Magic Wand tool again and click it once on the white background. That selects most of the background, but not all the white background seen through the windows. It would take a long time to do this manually, which is why we’re going to get Photoshop to help us out. Go under the Select menu and choose Similar (as shown here). What this does is puts a selection around all the other areas in your photo that are the same color as what you’ve already got selected. In this case, we had white selected, so it selects all the other white areas in the photo for us. (Pretty sweet—I know.) Now press Command-Shift-I (PC: Ctrl-Shift-I) to Inverse the selection, so you have the car selected instead of the background. Note: The race car has white highlights on its back window and numbers, so some of those small areas will probably get selected, too. If you are worried about them, just get the Lasso tool (L), press-and-hold the Option (PC: Alt) key, draw a selection around those areas, and they’ll be removed from your selection.

Get the Move tool and drag the selected race car over onto your main document, where it will probably be way too big. Bring up Free Transform, then press-and-hold the Shift key, grab a corner point, and drag inward to scale the car down in size. When it looks like the size shown here, lock in your transformation. Position the car to the right of the driver (as shown here).

Now you’re going to make a copy of the race car layer, and turn that into a reflection, so press Command-J (PC: Ctrl-J) to duplicate the layer. Bring up Free Transform again, and then go under the Edit menu, under Transform, and choose Flip Vertical to flip this duplicate layer upside down (you’ll see it upside down in the next step).

Press Return (PC: Enter) to lock in your Vertical Flip, then press-and-hold the Shift key, and with the Move tool, click-and-drag this flipped car straight down until the bottom of the wheels are touching (creating the mirror reflection you see here). Lower the Opacity of this layer to 30%. Now, the bottom of the upside-down car will be hanging off the bottom of your black square, so get the Rectangular Marquee tool and draw a rectangular selection around it (as shown here), and then press the Delete (PC: Backspace) key to remove that excess area, and deselect.

You’re going to fade away the bottom of the driver in front (so he “fades to black”). In the Layers panel, click on the driver’s layer (Layer 3) to make his layer active. Then click on the Add Layer Mask icon at the bottom of the panel (it’s shown circled here in red). Make sure your Foreground color is set to black, then get the Gradient tool, click near the bottom of his leg, and then drag upward, and the bottom of the photo fades out (as shown in the next step).

Now we can start adding some text. To the right of the driver, using the Horizontal Type tool (T), I added a block of text using the font Myriad Pro Bold (which comes with the Creative Suite and a bunch of other Adobe applications, so you probably already have it installed. If not, use Verdana or Helvetica). The font size is 12 points (but the Driver Details headline is 14 points). There’s nothing fancy here—the categories are in all caps, and in gray, and the answers are in white. I used the same fonts to the left of the driver, just in different sizes and weight (the Phoenix type is 33 points Semibold, and the body copy is 12 points Semibold).

You’ll add the driver’s name in the top red gradient bar, and his race car number to the far right of it, so click on the top-most layer in the layer stack. The font I used is Myriad Pro Bold Italic at 54 points, but it didn’t look to me like the white text stood out enough, so I created a hard black drop shadow behind it by: (a) duplicating the Type layer, (b) filling this duplicate text with black, and then (c) switching to the Move tool and pressing the Right Arrow key twice (to nudge the black text to the right), and then pressing the Down Arrow key twice (to nudge it two pixels down). Then I pressed Command-[ (Left Bracket key; PC: Ctrl-[), which moves this black duplicate layer behind the white layer, and since you offset it with the Arrow keys, it appears as a slight black drop shadow (as seen here). Just so you can see this better, I also did it for the number 41, but didn’t move it behind the white type yet.

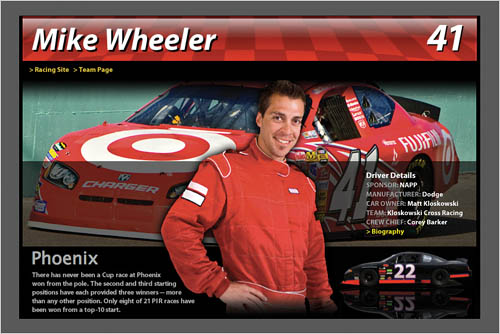
Here’s how it looks once you use the keyboard shortcut to move that offset 41 behind the white type. Now, one last thing: To create a little depth, go to the Layers panel and click on the background photo layer (Layer 2), then create a new layer above it. We’re going to add a thin inner shadow just above the photo to make it have more depth. To do that, get the Rectangular Marquee tool and draw a thin horizontal rectangle at the top of the background photo, from side to side (as seen here). With your Foreground color set to black, get the Brush tool (B), and choose a small soft-edged brush from the Brush Picker (up in the Options Bar). Press-and-hold the Shift key, and click the Brush tool once on the top-left side of your rectangular selection. Then release the mouse button and, while still holding the Shift key down, move to the right side and click once on the top-right, and a straight line (a thin soft shadow) will appear between those two points. Lighten the effect by lowering the Opacity to 40% in the Layers panel (as seen here).
Go ahead and deselect. We’re done at this point, so let’s finally get rid of those guides we created earlier by going under the View menu and choosing Clear Guides (if you think you might need to make some adjustments, instead of choosing Clear Guides, press Command-H [PC: Ctrl-H], which just hides the guides from view—it doesn’t actually delete them. If you turn them back on, just don’t forget to press Command-H again to hide them again when you’re done). Here’s the final image.
Here’s a variation of the NASCAR page, but highlighting a cyclist instead of a driver. I changed the background photo to one of cyclists in a race, and added a bicycle in place of the small race car in the bottom right. Then, using the same fonts, I changed the text to match the cyclist.
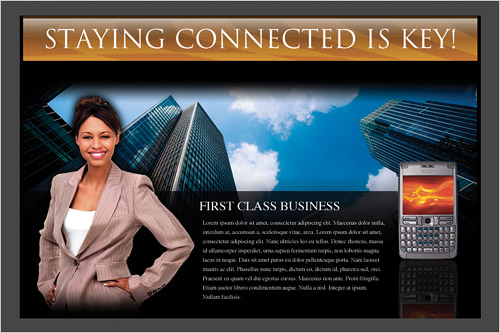
Just to show you how flexible this can be as a template, I also did a page changing it to a business layout. I substituted a businesswoman for the driver, a mobile phone for the small car in the bottom right, and a shot of some tall buildings for the background photo.
Since circular line bursts are so popular as backgrounds these days, I knew I had to include it in the book. The example we’re doing here I saw on a poster inside a Walt Disney World park bus when I was on vacation there with my family. It was for the ABC show Good Morning America, and it makes for a perfect project for learning about these line bursts (by the way, I have no idea what the official name of these things are, so I came up with “line burst.” But believe me, I’m open to any better names, since “line burst” just doesn’t have much oomph!).
Create a new document that’s 9×9″ at a resolution of 72 ppi (we’re using this low resolution for practice purposes only). Click on the Foreground color swatch in the Toolbox and set your Foreground color to blue (I used R: 29, G: 62, B: 174) and then fill your Background layer with that color by pressing Option-Delete (PC: Alt-Backspace).

Go to the Layers panel and create a new blank layer by clicking on the Create a New Layer icon at the bottom of the panel. Now, get the Rectangular Marquee tool (M) and create a tall, thin rectangular selection on the far-left side of the document (like the one you see here). You’re going to fill this rectangular selection with a darker shade of blue, so set your Foreground color to R: 1, G: 21, B: 125, then fill the selected area with this new color by again pressing Option-Delete (PC: Alt-Backspace). Don’t deselect yet.

Instead, press Command-Option-T (PC: Ctrl-Alt-T) to go into Free Transform and make a copy of your selected dark rectangle, then press-and-hold the Shift key (to keep things in a straight line), and drag the copy to the right. Leave approximately the width of one bar as the space between the two bars (as seen here). Press Return (PC: Enter) to lock in this duplication and move, but still don’t deselect quite yet.

Now, press Command-Option-Shift-T (PC: Ctrl-Alt-Shift-T), which is the keyboard shortcut that will create another bar that is spaced to the right exactly as you had spaced the second bar (think of it as “step-and-repeat”). Keep pressing that keyboard shortcut again and again until you have a row of perfectly spaced dark blue bars, like you see here. When you get to the last bar, you can finally deselect by pressing Command-D (PC: Ctrl-D).

Now you’re going to take the vertical bars and turn them into a circle of bars. So, go under the Filter menu, under Distort, and choose Polar Coordinates. The default setting for this filter is Rectangular to Polar, so all you have to do is make sure that’s what’s selected as your option, and then click OK.

Here’s how the rectangular bars look once you apply the Polar Coordinates filter to them. Now, for this particular layout we need the center of our circular bars to be a little lower than the center of our image area. So, switch to the Move tool (V), click where the bars meet in the center of the image, and drag it downward, so the center is around 25% from the bottom of your document (as seen here). Of course, this leaves a huge gap at the top of your image, so we’re just going to stretch it. Press Command-T (PC: Ctrl-T) to bring up Free Transform, click on the top-center handle point, and drag upward until your bars fill the entire image area, covering up that gap and aligning nicely with the edges of your document, as you see in the next step.

Press the Return (PC: Enter) key to lock in your transformation, and you can see that now the center of your circular bars is in the lower part of the image (as shown here).

Now, let’s add some text. First, set your Foreground color to a dark yellow (I used R: 240, G: 170, B: 75). Get the Horizontal Type tool (T) and create your text (I used the font Futura Extra Bold, but you can use Helvetica Bold, or any really bold sans serif font). In Photoshop’s Character panel (found under the Window menu), I set the font size to 72 and the tracking (the space between the letters) to –50, so the letters would be nice and close to each other. I also made the leading (the vertical space between the lines of text) nice and tight at a setting of 60 points. Lastly, I made the bottom word “ALBANIA” quite a bit larger than the other words (I set the font size to 115 points, which also caused me to increase the leading amount of “ALBANIA” to 94, because the tops and bottoms of the letters were touching).

We’re going to add a little “swash” graphic under the text, so start by creating a new blank layer. Then get the Elliptical Marquee tool (press Shift-M until you have this round selection tool), and click-and-drag out a huge oval-shaped selection that extends right off the image area (you’ll have to click on the bottom-right corner of your image window and drag it out, so you can see the gray area around your image). Make the oval similar to the one you see here (really, really big), and then fill your oval with your Foreground color (if you need to, press-and-hold the Spacebar to move your selection around while you’re creating it). Note: On a Mac, while you’re dragging out your oval, you’ll see it extend off the sides like this, but in CS4, once you release the mouse button, your selection automatically becomes contained inside your document border (on a PC, your selection will not extend off the sides). That’s okay, because you can’t do anything out in that gray area anyway. I just wanted you to know, so you don’t freak out. Hey, it could happen.

Go ahead and deselect the oval. Now you’re going to create another huge oval-shaped selection just a little bit below the big oval that’s already in place (like the one seen here). Leave just a little of the top of the original oval still visible, because once your new oval is in place, you’re going to press the Delete (PC: Backspace) key to delete the rest of your big yellow oval, leaving just that curved sliver up at the top (as seen here). Now you can deselect again.

Next, you’re going to cut a little chunk out of the far-right side of your yellow graphic sliver. This time, make a small, thin oval (like the one you see here) that cuts off the end of your sliver at an angle, then press the Delete (PC: Backspace) key to cut that area out (as seen here), and deselect.

Just one more little area to cut out, and then our little graphic sliver becomes a graphic swash (because a “swash” just sounds much better!). Draw another oval on the far-left side, just like the one you see here, so it cuts off the left side of the swash (see? Swash sounds better), then hit the Delete (PC: Backspace) key. Go ahead and deselect and you can see the final swash. There’s still a couple more things to do, but at least you’re done making ovals.

Now, you’re going to add a gradient through your text that goes from your regular yellow on the left to an orange on the right. First, click on your Type layer in the Layers panel to make it active. Press the letter X to swap your Background and Foreground color swatches (at the bottom of the Toolbox), and then click on the Foreground color swatch to bring up the Color Picker. Choose a dark orange color (I chose R: 220, G: 110, B: 30), then click OK. Now, click on the Add a Layer Style icon at the bottom of the Layers panel, and choose Gradient Overlay. When the Layer Style dialog appears, click on the down-facing arrow to the right of the gradient to bring up the Gradient Picker. Click on the very first gradient (the Foreground to Background gradient) to use your Foreground (orange) and Background (yellow) colors as your gradient. Now, in the Gradient Overlay options in the Layer Style dialog (shown here), set the Angle to 180°, and drag the Scale slider down to 60%, so the gradient graduates from yellow on the left to orange on the right (as seen here), then click OK.

Let’s apply that exact same gradient to our swash graphic. Press-and-hold the Option (PC: Alt) key, go to the Layers panel, click directly on the phrase “Gradient Overlay” beneath your Type layer, drag it up to your swash graphic layer, and release your mouse button (pressing-and-holding the Option key copies the layer style from one layer to another—you’re basically dragging-and-dropping effects). Now, create a new layer. Near the bottom of your image area, with the Rectangular Marquee tool, make a large horizontal rectangular selection (like the one shown here), then fill it with your Foreground color and deselect (it actually doesn’t really matter which color you fill it with, because in the next step, you’re going to “drag-and-drop” that same gradient effect onto this bar.

Drag-and-drop a copy of the Gradient Overlay layer style from the swash layer to this rectangular bar layer to add the gradient (as seen here). Now you can press D to set your Foreground color to black, and use the Horizontal Type tool to add text for the website of the company (although I put my daily blog address as a subtle reminder to visit me there). Now let’s add a logo below the swash, so create a new layer. Get the Elliptical Marquee tool again, press-and-hold the Shift key, so it creates a perfect circle, then click-and-drag out a circular selection below the center of the swash (press-and-hold the Spacebar to reposition it). Fill the circle with black (your Foreground color), and then add a white stroke around your black circle by clicking on the Add a Layer Style icon at the bottom of the Layers panel, and choosing Stroke from the pop-up menu. In the Stroke Fill Type section of the Layer Style dialog, just click on the Color swatch, change the color to white, click OK in the Color Picker, and then also in the Layer Style dialog. Now press X to make white your Foreground color, then add the CS4 text in the center of the black circle. (Note: I made the “4” a smaller font size, so it looked even.)

The final step is to darken the area behind the text and black circular logo, so it’s not so hard to read over the center of the circular bars. Start by clicking on the circular bars layer (Layer 1) in the Layers panel, then create a new layer directly above it. Get the Eyedropper tool (I), click on one of the darker blue bars to make it your Foreground color, then fill this new layer with this darker blue color. With the Elliptical Marquee tool, press-and-hold the Shift key and make a large circular selection where most of your text appears (as seen here). To soften the edges of your selection, go under the Select menu, choose Modify, and then choose Feather. When the dialog appears, enter 50 pixels and click OK. Now, press Command-Shift-I (PC: Ctrl-Shift-I) to Inverse your selection, then press Delete (PC: Backspace) to erase everything but that soft circle in the center, which completes the effect (seen here).

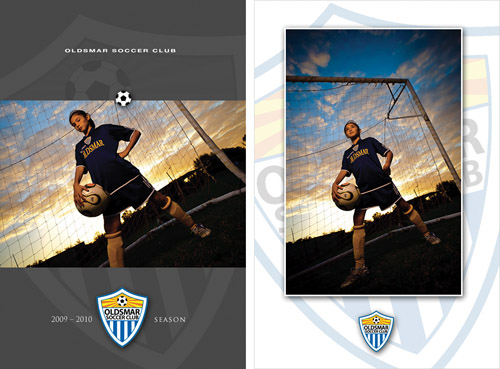
Backscreening has always been popular (even before there was Photoshop), but in this case, we’re taking things way beyond backscreening and recreating a poster I did for a local soccer league (the league president is one of my longtime friends). I did a photo shoot out at the field with some wonderful kids, and then took the images and created the poster you’re about to create. Also, at the end of the project, I gave you an alternate layout, just so you can see how easy it is to customize a layout like this.
Start by pressing Command-N (PC: Ctrl-N) to create a new document. Since we’re just practicing, we can create a small, low-resolution document. The one we’re creating here is 8″ wide by 12″ high at a resolution of 72 ppi. Now, click on the Foreground color swatch at the bottom of the Toolbox, and in the Color Picker, set it to a dark gray (I used R: 71, G: 71, B: 71), then fill your Background layer with this color by pressing Option-Delete (PC: Alt-Backspace).
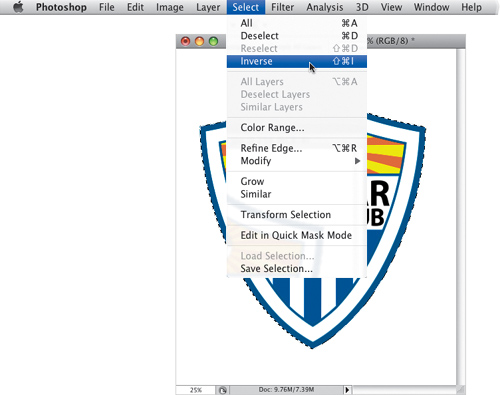
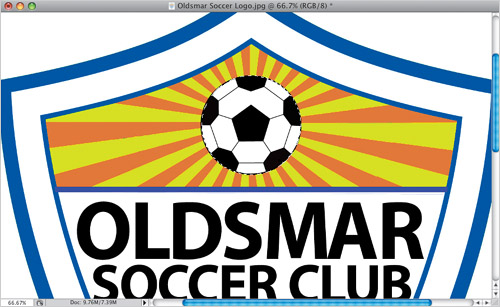
Open the logo you want to add to your poster (you can download the sports logo you see here, if you’d like. Just go to www.kelbytraining.com/books/CS4DD). We need just the logo by itself, and not the white background it sits on, so get the Magic Wand tool (press Shift-W until you have it) and click it once on the white background to select it.
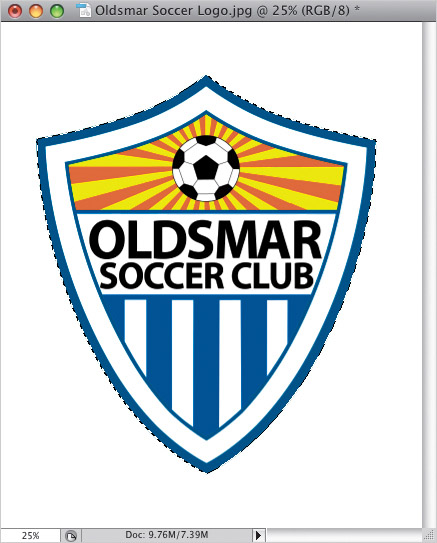
At this point, the white background is selected, but that’s exactly the opposite of what we need selected (which is the logo). So, go under the Select menu and choose Inverse (as shown here), and it inverses your selection, so now instead of the background being selected, the logo is selected (this is a pretty popular way to select any object on a solid background—you start by selecting the background, which is usually pretty easy, and then you inverse to select the object).
Now switch to the Move tool (V), and click-and-drag the logo onto your gray background document (don’t close this logo document quite yet, though, and keep your selection in place, too—you’ll need this logo again in a few moments). When the logo appears in your new document, it’s going to be pretty huge (as you can see here), but it’s easy to resize. Press Command-T (PC: Ctrl-T) to bring up Free Transform. Because the logo is so much larger than the image area, you won’t be able to reach the Free Transform handles until you press Command-0 (zero; PC: Ctrl-0), which automatically resizes the window, so you can reach all four corner handles (as seen here). Just click on a corner handle and drag in to the size you want (press-and-hold the Shift key to keep it proportional).
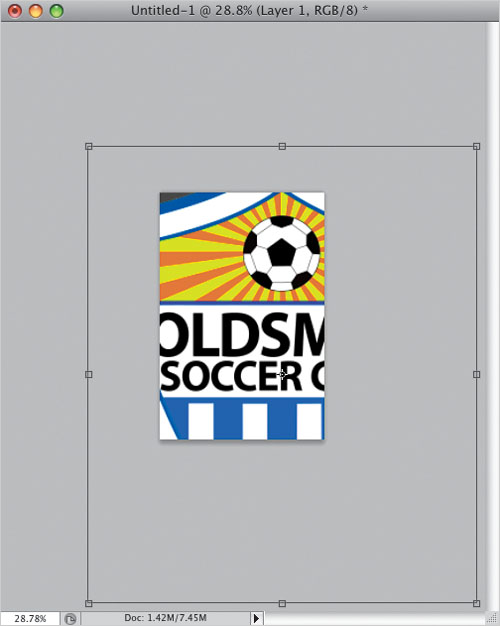
Once you’ve got the size about where you want it, move your cursor outside the Free Transform bounding box, and click-and-drag in a circular motion to rotate your image (as seen here). When you’re done, press Return (PC: Enter) to lock in your resizing and rotation.
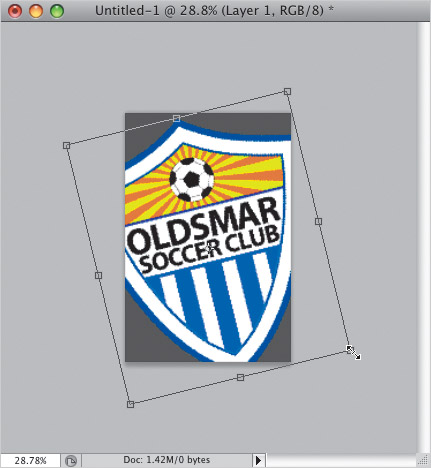
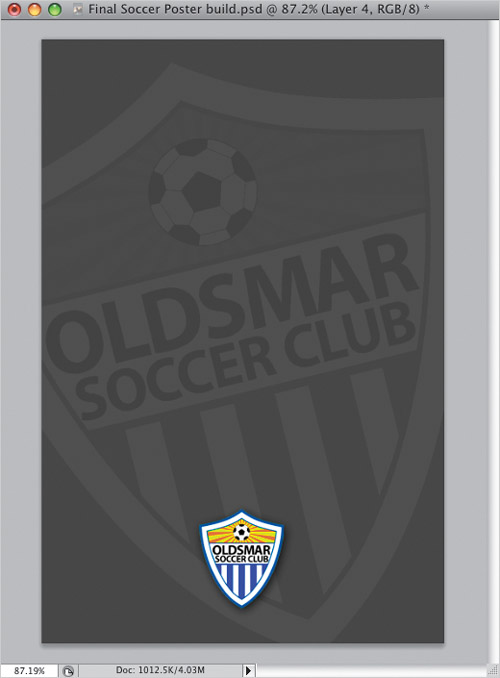
To backscreen your logo, so it’s just a subtle image in the background, go to the Layers panel and lower the Opacity to around 5% (as seen here). You can see that the logo is still very visible, but now it’s backscreened enough to where you can put text and photos above it without it distracting from them.
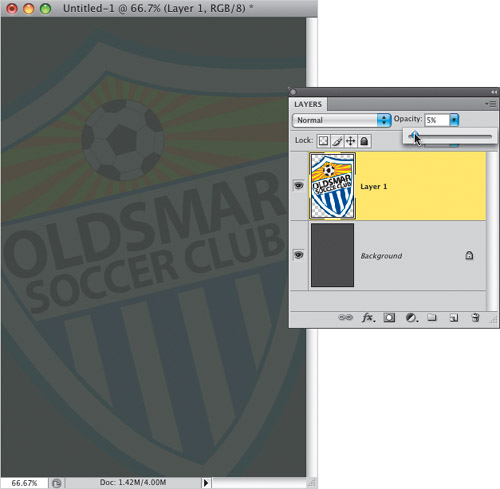
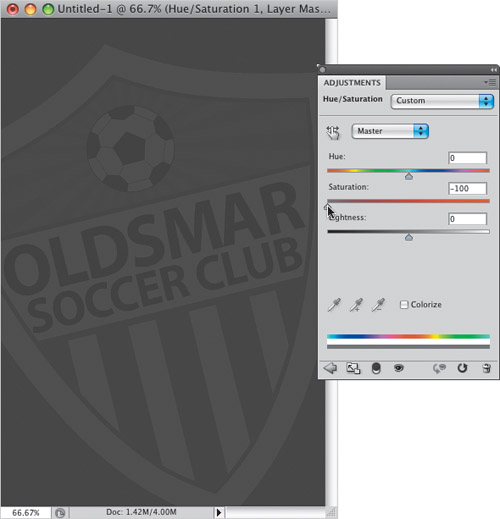
To make the logo appear even subtler, we’re going to remove the color. You can try the Desaturate command (press Command-Shift-U [PC: Ctrl-Shift-U]), but I decided to manually desaturate the color using a Hue/Saturation adjustment layer, because when I used Desaturate, the stripes at the top of the logo disappeared. To use an adjustment layer, go to the Adjustments panel (found under the Window menu), click on the Hue/Saturation icon (the second icon from the left, in the second row), and then drag the Saturation slider all the way to the left (to –100, as shown here). This removes the color, but retains the stripes in the top of the logo. Why do two seemingly similar commands have such different results? I have no idea. However, there is another advantage to removing the color with an adjustment layer like this—we can delete the adjustment layer later if we change our minds (and we just might).
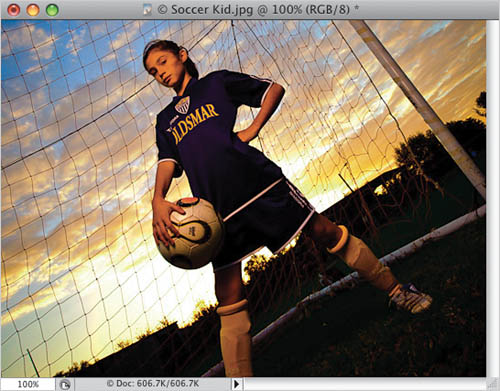
Now open the color photo you want to appear above your gray backscreened background.
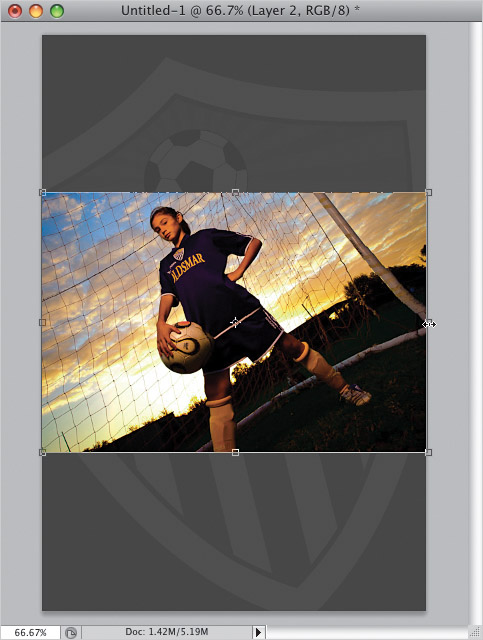
Get the Move tool, and drag-and-drop this photo onto your poster document. When you do this, you’ll find that the photo isn’t quite wide enough to fill from side to side (there’s a small gap on both sides). This is where CS4’s Content-Aware Scale feature is worth its weight in gold, because it will let us stretch the edges of the photo, without distorting or stretching our soccer player. Go under the Edit menu and choose Content-Aware Scale. This puts Free Transform-like handle points around your image. Just drag the right-side point to the right until the gap is filled, then do the same to the left side, until the image fills the poster side to side (as shown here). Press Return (PC: Enter) to lock in your changes.
Remember earlier when I said not to deselect or close that logo document? That’s because you need that logo again now. With the Move tool, click-and-drag that logo onto your document again, then use Free Transform to scale your logo down to the size you see here. Lock in your resizing, and then position the logo so it’s centered under the photo (as seen here).
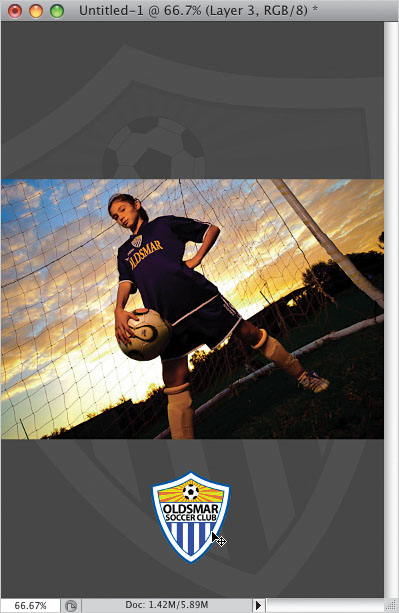
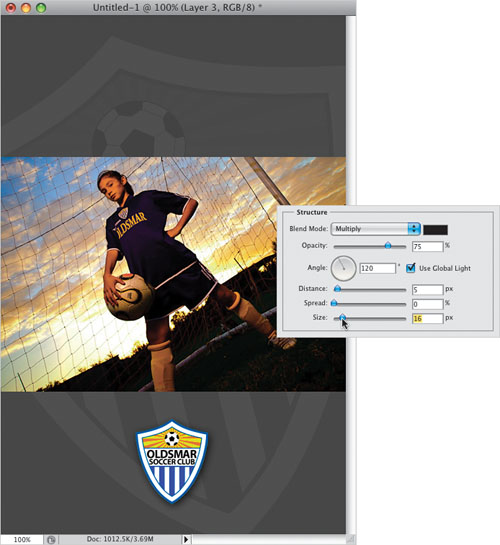
To create some separation between the logo and the background, we’ll add a drop shadow. So, click on the Add a Layer Style icon at the bottom of the Layers panel, and choose Drop Shadow from the pop-up menu. When the Layer Style dialog appears, increase the Size amount to 16 (as shown here) to make the shadow softer, then click OK. This adds a soft drop shadow below and to the right of your logo (as seen here).
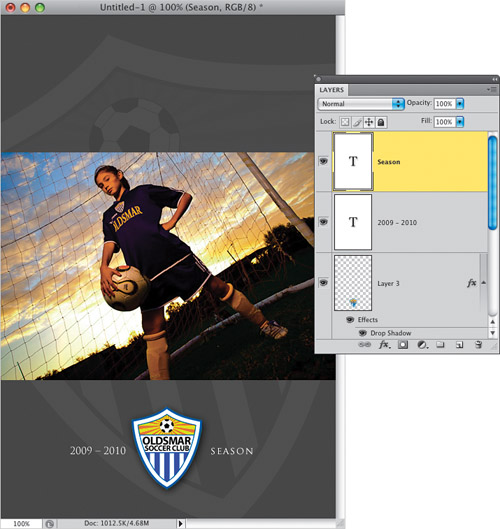
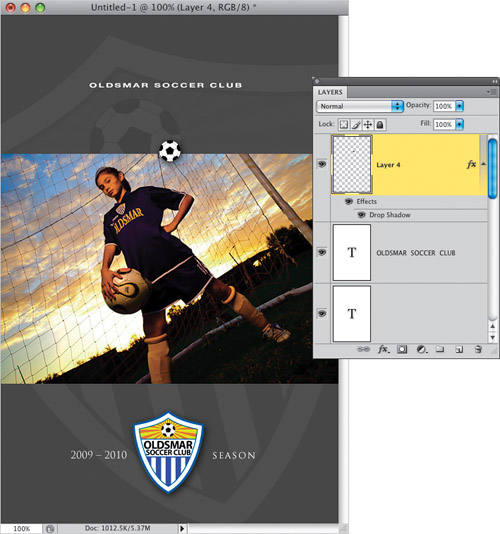
We’re going to add some text on either side of the logo. I used the font Trajan Pro, which comes with the Creative Suite (so if you have the Creative Suite, it should already be installed in your Font pop-up menu). Press D, then X to set your Foreground color to white, get the Horizontal Type tool (T), click it once in your document, and choose Trajan Pro from the Font pop-up menu up in the Options Bar. Set your font size to 16 points, type in “2009 – 2010” as your text, then click on the Move tool in the Toolbox and position the text on the left at about the center of the logo (as seen here). Press Command-J (PC: Ctrl-J) to duplicate this text layer, then press-and-hold the Shift key, and with the Move tool, drag this copy straight over to the right. Return to the Horizontal Type tool, highlight the duplicated text, and then type in “SEASON” (as seen here).
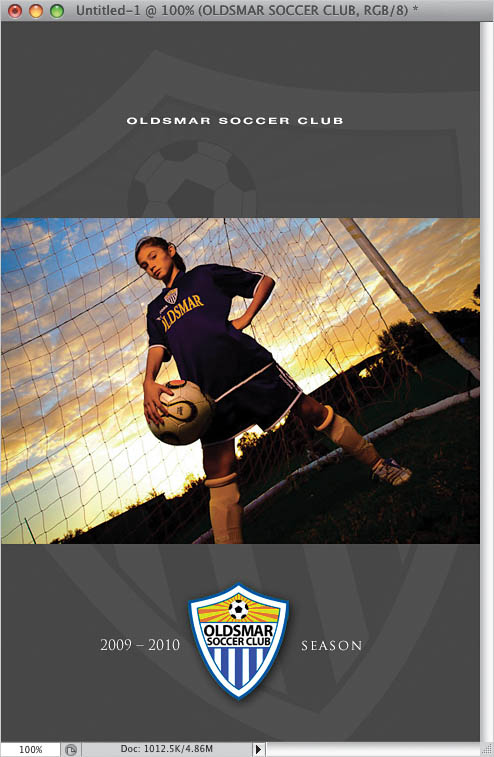
Let’s add another line of type up top. With the Horizontal Type tool, type in “OLDSMAR SOCCER CLUB” in the font Helvetica Bold (or another font of your choice) at 13 points, and position it at the top center of the poster (as seen here). To make the type appear wider, I used Free Transform—bring up Free Transform, grab either the left or right center handle point, drag outward, and it stretches your type, which makes it wider and thicker, like the type you see here. When it looks good to you, lock in your stretching.
Now you’re going to take an element from the logo (the soccer ball) and separate it, so you can use it in your poster. Switch back to the logo document (press Command-D [PC: Ctrl-D] to Deselect, if your selection is still in place around the logo). Get the Elliptical Marquee tool (press Shift-M until you have it), press-and-hold the Shift key, and click-and-drag out a circular selection around the soccer ball. This isn’t as easy as it sounds, but you can use the trick I mentioned earlier to help you out: as you’re dragging out your selection, press-and-hold the Spacebar—this will let you reposition the circle as you’re dragging it out, and now it’s simple to create a circular selection around the soccer ball (as seen here).
Get the Move tool, and click-and-drag your selected soccer ball over to your main document. Use Free Transform to shrink the size of your soccer ball down to the size you see here (be sure to press-and-hold the Shift key while resizing to keep it proportional), and position it so it’s at the top center of your photo, with half the ball on the photo, and half on the poster background. This is a design trick that helps to unify the background and the photo (the overlapping soccer ball acts to visually tie them together). When it looks good, lock in your resizing.

Now let’s put the same exact drop shadow on the soccer ball that we put on the logo. In the Layers panel, scroll down to the Logo layer (Layer 3), Control-click (PC: Right-click) on it, and from the contextual menu, choose Copy Layer Style. Then scroll back up to the small soccer ball layer, Control-click on that layer, and from the contextual menu, choose Paste Layer Style. This pastes the exact same drop shadow, with the same exact specs, onto this soccer ball (as seen here—notice the soccer ball now has a drop shadow, creating some depth above the photo). This completes our poster, but on the next page, I’m going to show you how easy it is to create a different look once you have these things already in place.
For our new look, click on the Eye icons next to each Type layer, along with the small soccer ball layer, then delete or hide the photo layer (by dragging the layer onto the Trash icon at the bottom of the Layers panel or by clicking on the Eye icon to the left of its layer), so all you have visible is the background, the backscreened large logo, and the small logo at the bottom. Now press D to set your Foreground and Background colors to their defaults of black and white.
In the Layers panel, click on the Background layer, press Command-A (PC: Ctrl-A) to select the entire background, then press the Delete (PC: Backspace) key to erase the gray background. Next, drag the Hue/Saturation layer that’s directly above your backscreened layer onto the Trash icon to delete it. This brings back the color in your backscreened logo. Click on its layer and raise the Opacity to 15% to make the logo stand out a bit more. Now open a tall photo, and with the Move tool, drag it into your poster layout and position it like the one you see here. Click on the regular full-color logo layer, and use Free Transform to shrink the size of this smaller logo and position it below the center of the photo (as seen here).
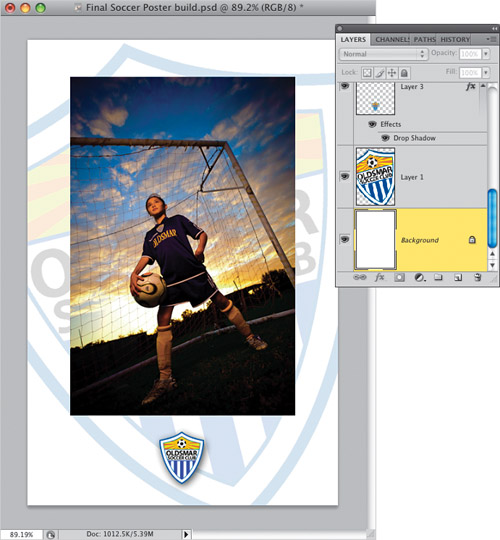
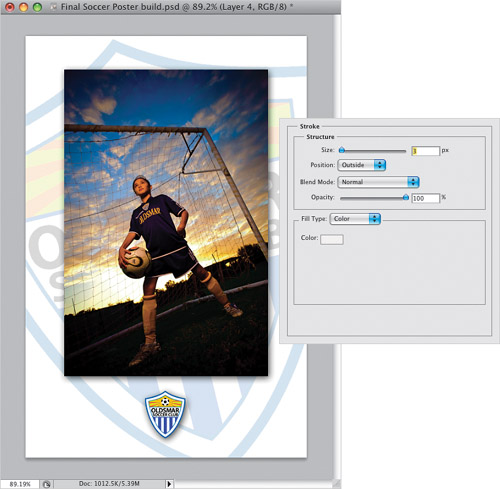
Now, copy-and-paste the Drop Shadow layer style from the small logo layer to the new photo layer, using the technique you learned back in Step 16, to give you the look you see here. The last step is to add a white stroke around the photo, so click on the photo layer, then click on the Add a Layer Style icon at the bottom of the Layers panel and choose Stroke from the pop-up menu. When the dialog appears, change the stroke color to white (click on the black Color swatch and a Color Picker will appear), then click OK to apply a white stroke around your photo (you’ll see the white stroke in the final image on the right below). Both of the final posters are shown below.