Chapter Sixteen: SVG and the Canvas: Rich Graphics in the Browser
For over a decade, browsers have supported a range of bitmap image formats (such as GIF, PNG, and JPG) natively, but the search for a standard, widely supported, native vector image format for the web continues to this day. Though not widely used for this purpose, Flash has provided vector web graphics since the mid 1990s in every browser that supports the Flash plug-in.
In 1998, Microsoft and Macromedia proposed VML (Vector Markup Language) as a W3C standard for vector graphics. Around the same time, Adobe, Sun Microsystems, and others proposed the competing PGML (Precision Graphics Markup Language) format. In the end, neither PGML nor VML were adopted. Instead, in 1999, the W3 began working on the Scalable Vector Graphics (SVG) format, and in 2001, they finalized SVG 1.0.
SVG has been widely adopted: the format is now supported natively by all modern browsers except for Internet Explorer, which continues to support VML natively and SVG via plug-ins. Despite this, in 2004 Apple introduced another vector solution—the HTML canvas element. Unlike SVG, the canvas element is not actually a format: it’s an HTML element with a programmatic interface that allows images to be generated “on the fly” using JavaScript. The canvas element, initially controversial among standards-focused developers, has become part of the HTML5 standard and is now supported in all modern browsers other than Internet Explorer. There are also workarounds that enable the use of canvas with Internet Explorer, and we’ll look them later on in this chapter.
In this chapter, I’ll focus on SVG and the canvas: how they work, what they are designed for, the challenges of using them in the real world today, and some of their core concepts and syntax. Each of them is worthy of a book themselves, so I won’t be able to do much more than touch on their many uses and features. Still, I hope you’ll get a sense of their uses and get interested in exploring them more. As always, you’ll find resources for learning more at the end of this book.
SVG
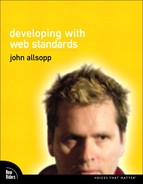
SVG is a vector graphics format; it’s also an application of XML. This means that every line, curve, path, and other component of an image in SVG format is marked up in XML—and that, in theory, you can author SVG with nothing more than a text editor. In practice, complex images quickly become very complex XML documents, so text-based editing of SVG files is not usually practical. Here’s some simple SVG code for drawing a red rectangle 100px tall and 200px wide:
SVG is capable of all sorts of effects you might be familiar with from vector drawing applications like Illustrator or Freehand, including support for:
• Basic shapes like circles and polygons
• Including other graphics formats like PNGs
• Bézier paths and curves
• Text, including text on complex paths
• Opacity
• Transformations, like rotate, skew, and scale (we saw in Chapter 13 how CSS3 has proposed support for transformations, which closely mirrors SVG transformations)
• Gradients
• Animations
and much more.
Core SVG Concepts and Syntax
As an application of XML, the basic SVG syntax should be reasonably familiar to web developers who are comfortable hand-coding their HTML. Mostly, SVG documents are composed of SVG elements (like circle and rect), attributes (like height and width), and CSS.
Whether your SVG is inline (that is, part of your XHTML document itself), or embedded (that is, in a stand-alone SVG file, linked to from an HTML or XHTML document using the object or img element), the root of all SVG is an svg element:
![]()
Within the svg element, there can be one or more elements, such as lines, shapes, and text. We can group these elements using the g element, and once elements are grouped, transformations and other effects applied to the group apply to all its descendants.
Some of the most common SVG elements are:
Rectangles—the rect element. These have a top-left position, specified by the attributes x and y, respectively, a width and height, and optional horizontal and vertical corner radii. Here’s an example:
![]()
This is an empty element—it has no content, and so closes with />, like empty elements such as br in XHTML. You might also notice that the numeric attributes (like height) have no units of measurement—in SVG, length values with no units are assumed to be in pixels.
Circles—specified using the circle element. Circles have a horizontal and vertical center, and a radius.
![]()
The default fill color of an object like rect or circle is black.
Ellipses—specified with the ellipse element. Ellipses have a horizontal and vertical center, and horizontal and vertical radii.
![]()
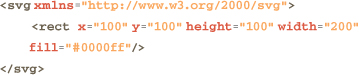
Figure 16.1 shows each of these shapes as rendered in Safari, which has native SVG support.
16.1 The rectangle, circle, and ellipse rendered by Safari
The SVG Coordinate System
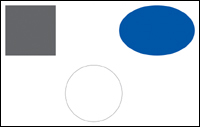
Unlike the Cartesian coordinate system we are all familiar with from high school mathematics, in which y values increase on the plane from 0, in the SVG coordinate system, a y value of 0 is at the top of the page or containing element. The higher the value for y, the further down the page or containing element we are. Figure 16.2 shows this in action. This shouldn’t cause web developers familiar with CSS any trouble, as this is how CSS also uses vertical values.
16.2 Cartesian (left) and (right) coordinate ems
There’s obviously a great deal more to SVG than these basic shapes and attributes, but this should provide a taste of how SVG works. As mentioned earlier, most SVG is likely to be generated using tools, or by software, and most web developers are unlikely to need a detailed knowledge of the features of SVG in their day-to-day work.
Benefits of SVG
As you’ll see in the sections that follow, the process of using SVG in our work can be a little bit complicated. So before we go any further, you may be wondering, “Is there really any point in going to all this trouble to use SVG?”
Well...yes.
SVG has several benefits that make it well worth considering when choosing an image format for your web content. Before examining those benefits in more detail, though, I should note that there are uses for which SVG is an inappropriate format: photographs and other images that are fundamentally bitmaps are better formatted as JPG (photographs) and PNG (non-photo bitmaps) images. For almost everything else, though, SVG is at the very least a strong candidate.
Now let’s take a look at what makes SVG so special.
Accessibility
SVG is designed to make images accessible as a matter of course.
When a user magnifies an SVG image, as people with visual disabilities often need to do, the image remains essentially unaltered. Bitmap images, on the other hand, often become less comprehensible as they are scaled up. Figure 16.3 shows what happens when the image shown in figure 16.1 is zoomed as a bitmap image.
16.3 Bitmap images scale poorly compared with SVG images.

Additionally, in SVG, text is rendered as text, and developers can easily build in textual equivalents for objects. A bar graph, for example, could have built-in textual equivalents for each bar, while an illustration of an engine could have a built-in text equivalent for each component.
File sizes
In most circumstances, the file size of an SVG image will be much smaller than the same image rendered as a bitmap image. Bandwidth savings alone can make SVG worth serious consideration.
Scalability
Increasingly, web browsers are offering users full-page zoom capabilities that scale images along with text. SVG images scale much more smoothly than bitmap images, and this feature will only become more important as small, higher-resolution devices like the Palm Pre and the iPhone make zooming a common aspect of web use. The same features that make SVG images more accessible for people with visual disabilities also make them a better fit for a broad range of screen sizes and resolutions.
Scriptability
Every aspect of an SVG image can be manipulated via JavaScript and the DOM. This means you can change SVG image elements’ size, fill color, opacity, and so on, just as you can alter these properties of (X)HTML elements.
Animation
While we haven’t had the chance to look at this aspect of SVG, it supports animation as a core part of the language. Any SVG element, or group of elements, can be animated in SVG, with no need for scripting.
For example, we might fade the rectangle mentioned earlier using the animate element as a child of the rect element (in this case, rect is now a non-empty element; this is one way in which SVG differs from XHTML: elements can be both empty and non-empty):

We don’t have the space to go into SVG animations in detail, but there are links for more information at the end of the book.
SVG Use Cases
Here are just a few of the situations in which SVG is much more appropriate than non-vector formats.
Geographical Information Systems
SVG is being widely used in GIS (for example, in Google Maps—for all browsers other than Internet Explorer, in which VML is used).
Graphs and Data Visualization
Graphs and other data visualizations are ideal candidates for SVG. Data visualization projects typically have a direct relationship between each aspect of an image (the objects, their size, their color, and so on) and the underlying data. With SVG, each of those data points and relationships can be made explicit, by adding textual equivalents for each of the visual representations of data.
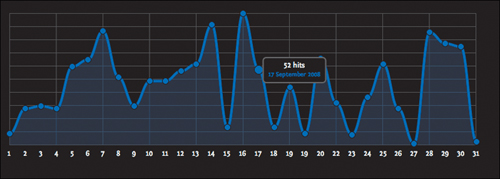
SVG graphs and visualizations are also much more accessible than those made with bitmap images, and they can be scaled by both browsers and users. SVG also makes it much easier to create interactive graphs in which users can, for example, click a bar in the graph to see more information. With image formats like PNG, this would be far more difficult to implement. Figure 16.4 shows an interactive SVG traffic graph.
16.4 An interactive SVG traffic graph, developed using Raphaël
Logos
Logos are usually created as vector images, and are often displayed at many different sizes on a site. Rather than creating numerous bitmap versions of a logo, you can simply use a single SVG image.
Including SVG in Web Pages
There are two ways to include SVG in a page: by embedding the SVG file (that is, by linking to it through an img or object element), or by including the actual SVG within the web page itself. This is referred to as inline SVG.
Embedded SVG
Embedding your SVG is by far the less complicated of the two methods—though “embedding” is a bit of a confusing term, because like all “embedded” HTML content, the SVG file is linked to from the page, rather than being more literally “embedded” in the page. There are two standards-based ways to include an external SVG image in a web page.
The first way to include an SVG image is the most obvious: via the HTML img element that we’d use for other image formats such as PNG. But although it’s an obvious approach, this has only recently come to be supported by browsers that support SVG natively. Safari 3.1, Opera 9.5, and Firefox 3.5 and higher all support native rendering of SVG files linked from an img element:
For older versions of these browsers—and browsers such as Internet Explorer that don’t support SVG embedding via the img element—the object element, which we saw in Chapter 3, is designed for embedding just about any kind of content. Here’s how we’d link to the SVG image using an object element:
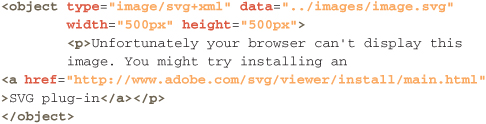
So is there a difference between these two approaches, except that the latter is more widely supported in browsers? Well, yes. SVG included via the object element is included in the HTML document’s DOM, allowing it to be scripted. SVG included via an img element is not included in the DOM—well, the img element is, but the SVG itself isn’t.
Inline SVG
The second, more challenging way of including SVG in a page is putting the actual SVG into the code of the page itself. The challenge is that this is only possible with XHTML, not with HTML. This is one of the few cases in which the distinction between HTML and XHTML has real impact. For the most part, developers consider HTML and XHTML to be identical except for some very minor syntactic differences, and this distinction is usually accurate enough. Indeed, as we saw in Chapter 3, almost all XHTML is served as text/html for reasons of compatibility and practicality, which means that even browsers that have an XML parser treat documents served as text/html with XHTML syntax and DOCTYPE as HTML.
But, inline SVG can’t be contained within an HTML 4 document, only in an XHTML document. Real XML parsers, like those found in Safari and Firefox, take into account the MIME type of a document (as sent by the sever), not just its DOCTYPE and syntax, when determining its real nature. So, unless the document containing our inline SVG is being served as application/xml or application/xml+xhtml and has an XHTML DOCTYPE—and is syntactically correct—the SVG won’t be displayed.
But, there’s yet another complicating factor. Remember, if we serve XHTML as application/xml, Internet Explorer will simply display the markup, rather than rendering the document. So if we serve the XHTML correctly for browsers that have real XML support, we’ll not only stop Internet Explorer from displaying the SVG, but from displaying the document at all.
There are ways to specify a MIME type of text/html for Internet Explorer and application/xml for other browsers, but these methods depend on the server being used to serve your documents, and are beyond the scope of the book, but we do have links to resources for this at the end of the book. It is possible, but it’s much more complicated than embedding SVG, and so linking to SVG files is typically the preferable option.
Inline vs. Embedded SVG
Given all these complications, is there an advantage in using inline over embedded SVG? If you want to expose the SVG elements via the DOM for scripting purposes, as long as you use the object element, embedding is little different from using inline SVG. There are one or two complications: when you use embedding, the SVG element is the child of an object element, whereas when the SVG is inline, it is the child of the element in the HTML it’s contained by.
There’s also some suggestion that embedding uses more memory, because with an embedded SVG document via the object element, browsers create a whole SVG document in the DOM, and this produces much more memory overhead than if the SVG element is simply part of the HTML document. This would be something to consider carefully if you are embedding several SVG documents in a single page—or in the context of mobile browsers, which even at the best of times tend to run on devices with relatively little memory.
SVG Browser Support
There are many factors to consider when it comes to SVG support in browsers. First, does a browser support SVG natively or require a plug-in? Firefox 3.5, Safari 3.1, and Opera 9.5 all natively render SVG, and do not require a plug-in. Older versions of these browsers, and all versions of Internet Explorer up to at least version 8, require a plug-in to render SVG.
The second factor to consider is how the SVG is included—is it embedded or inline? Browsers that support native rendering also support embedding SVG via the img element. All browsers support embedding via the object element, though those without native support require a plug-in to do so. Inline SVG is only supported by browsers with native SVG rendering and when a document is true XHTML—valid markup, with an XHTML DOCTYPE, and served as XML.
With a bit of effort, it’s possible to use SVG content in all common browsers. Let’s summarize all these different aspects of SVG support.
Browser Support for SVG

SVG and Internet Explorer
While SVG is not, as we’ve seen, supported natively in Internet Explorer (even version 8), it will be rendered by that browser when a plug-in is available for rendering SVG content. There is however, another way of using SVG while working around this limitation of Internet Explorer. Internet Explorer supports its own vector graphics format, VML, and the two languages are sufficiently similar that it’s possible to deliver VML-formatted content for Internet Explorer and SVG content for browsers that support SVG. (There are also tools that can convert from one format to another or save as either format.)
A second option is to use one of several JavaScript vector graphics libraries that use SVG when it is supported in a browser and VML when a page is viewed in Internet Explorer, or use Flash, or Silverlight in Internet Explorer when these are available.
SVG Support Libraries
Raphaël by Dmitry Baranovskiy (raphaeljs.com) provides a JavaScript API for rendering objects and other features of SVG.
Drawbacks of this approach are that it requires JavaScript to be enabled, and that it uses a programmatic interface via JavaScript, rather than SVG markup. So instead of markup like this:
![]()
we’d have JavaScript that looked like this:
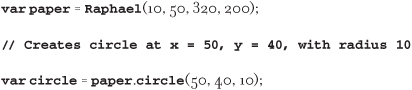
Despite being written with JavaScript, Raphaël in fact creates SVG—or VML, for IE, even when a plug-in for SVG is available—so the objects it creates are in the DOM and can be accessed via JavaScript. You can think of it as an alternate, JavaScript-based syntax for creating SVG.
Serving SVG
Most browsers that support SVG will not render SVG files served as anything other than with a MIME type of “image/svg+xml.” The most common cause of embedded SVG files failing to render is that they’re being served with incorrect types, usually as text.
Beyond SVG
As we’ve seen, we now have several optimized bitmap formats to choose from, along with SVG for vector illustrations. So are there any needs that these existing formats can’t meet? Once again, the answer is “yes”—or at least, “maybe.”
Websites and web applications sometimes need to generate images “on the fly.” None of the commonly supported bitmap formats are suitable for this—the best we can do with bitmap images is to generate new images on the back-end and update the images in the browser using JavaScript. SVG does allow us to manipulate the SVG DOM, changing properties of SVG elements or even adding and removing SVG elements with JavaScript, but DOM manipulation is memory intensive and can result in performance problems.
Although we can use SVG for dynamically generated images, HTML5’s canvas element was developed specifically to allow for dynamically created images via JavaScript.
The HTML5 canvas Element
Originally developed by Apple as part of their Dashboard widget platform for Mac OS X, the canvas element is now supported in WebKit-based browsers, Firefox 1.5 and higher, and Opera 9 and higher, as well as being part of the HTML5 draft specification. Although the element is not supported in Internet Explorer 8, there are JavaScript libraries that allow you to write the same JavaScript for all these browsers to generate images dynamically. These libraries serve canvas to browsers that support it, and VML or Flash to Internet Explorer. We cover these libraries later in the chapter.
Using canvas
The key to the canvas element is a unique DOM interface that lets developers use JavaScript to draw shapes, fill regions, and perform other graphics operations on a resolution-dependent bitmap canvas. We’ll look at some of this API in detail in a moment.
There are two distinct aspects to using the canvas elements:
• Add a canvas element to an HTML document.
• Use JavaScript with the canvas DOM interface to draw the graphics we want.
Let’s tackle these in order.
Adding the canvas Element
We can add a canvas element to a document by including the element as part of the HTML markup, or by programmatically adding it when required using JavaScript.
If we insert it directly in the markup, the canvas element looks like this:

We’ve used a fallback image for browsers that don’t support canvas (much like the fallback for object, video, and audio), but there is a complicating factor to consider. In versions of Safari prior to 4, canvas was an empty element (like img). So in older versions of Safari, the fallback content will be rendered in addition to, rather than instead of the canvas element. Safari users tend to upgrade quickly, so this may not be a problem for very long, but it’s worth considering how many of your visitors use Safari 3 or older. If lots of your users are still rocking old versions of Safari, you should probably add the canvas element using JavaScript, rather than putting it in the document markup. (Since JavaScript is already required for using canvas, the usual downside of JavaScript—excluding users—doesn’t apply, since non-JavaScript users are excluded to begin with.)
In the preceding example, we’ve set a width and height for the canvas element. If we don’t explicitly set these, the default height of a canvas element is 150px and the default width 300px. These properties can be changed using CSS, but if you do so, the graphics drawn into the canvas will be scaled accordingly. For example, if the original height and width are 150px, and we use CSS to set these to 300px, if we draw a line from 0,0 to 150,150, our line will be a diagonal not from the top-left corner to the midpoint of the canvas, but from the top left to the bottom right. In essence, coordinates of a canvas element scaled with CSS are also scaled by the same amount as the element. The easiest way to manage this complex situation is to use JavaScript, rather than CSS, to set the height and width of a canvas explicitly. If we use JavaScript instead of CSS to set the height and width of a canvas whose original height and width are 150px to 300px, drawing a line from 0,0 to 150,150 will now draw a diagonal from the top-left corner to the midpoint of the canvas.
If we were to view our page so far in a browser that supports canvas, we’d see...well, nothing. By default, the canvas is completely transparent. Now we need to use JavaScript and the canvas DOM interface to draw our graphics.
Getting a Drawing Context
To draw graphics with the canvas, we need to get a drawing context from the canvas element. At present, there is only one type of context, 2D rendering, though there are experimental 3D rendering contexts in some browsers, and the HTML5 specification suggests that an Open 3GL–based 3D context will be part of the specification at some stage.
We get a drawing context like this:
![]()
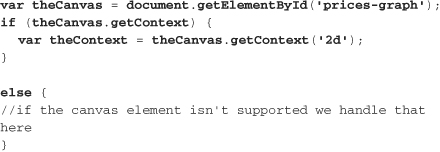
The preceding code creates a variable called theCanvas by calling the DOM method getElementById on the document object of the DOM, which should be familiar from Chapter 5. We then simply ask theCanvas for its drawing context called 2d. (The method getContext on the canvas element is part of the HTML5 DOM specification for canvas.)
In Chapter 5, we also introduced the concept of unobtrusive JavaScript. One aspect of this practice is testing for the availability of a feature of the DOM before trying to use it. (Using an unsupported feature will cause an error that different browsers handle in different ways, some of which can be confusing to users. We want to avoid this.) In this case, we can detect support for the canvas element by testing to see whether the getContext method is supported:
Drawing with the Context
Now we get to the fun part—doing the actual drawing. We don’t have the luxury of being able to go into great detail about all of the functionality provided by the canvas when it comes to drawing, but we’ll look at the core concepts and then take an overview of what can be done.
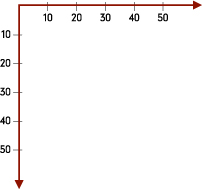
The Canvas Coordinate Space
The canvas has a coordinate space or grid, that starts in the top-left corner of the element and extends right and down [16.5]. In the top left, the coordinates are x=0 (horizontal coordinates) and y=0 (vertical coordinates). As you go to the right, the x coordinate values increase in value; as you go left, they decrease. Similarly, as you go down the element, the y coordinate values increase, and as you go up the element, the values decrease.
Shapes and Paths
It’s trickier to draw shapes in the canvas than in SVG, because unlike SVG, which offers a number of primitive shapes such as circles and ellipses, the canvas offers only the rectangle. But we can draw other shapes in the canvas by combining paths.
Rectangles
With rectangles, we can:
• Clear a rectangle, which erases a rectangular part of the canvas, and anything already drawn there, but not anything “behind” the canvas, such as text in a paragraph that the canvas overlays
• Fill a rectangle with a color, pattern, or gradient
• Stroke the rectangle (draw the edges of a rectangle)
We’ll do this with three functions of the 2D context—clearRect, fillRect, and strokeRect.
For example, to outline a rectangle that is 50px on each edge, and centered at 75px, 75px, we’d use:
![]()
A context has a fill and a stroke style, each of which specifies a color, gradient, or pattern to be used for stroking or filling a path or rectangle. Although gradients and patterns are too involved to examine in detail here, we would set the color of the current strokeStyle for the context like this:
![]()
We can use any color we would use with CSS as a string value for the strokeStyle (and fillStyle). If we want to draw a red outlined rectangle and then a blue outlined rectangle, we’d set the context’s stroke color to red, draw the first rectangle, then set the color to blue, then draw the second rectangle.
Paths
As noted earlier, any shape other than a rectangle has to be drawn using paths. Here’s how to draw a path:
1. Begin the path with the context.beginPath method.
2. Draw one or more subpaths using one of a number of possible methods, including lineTo, arc, quadraticCurveTo, and bezierCurveTo.
3. Fill or stroke the area bounded by the path with context.fill or context.stroke.
4. Close the path with context.closePath. A path must be closed before a new one can be started.
Once again, we won’t go into these various methods in detail, but here’s a quick overview of the various path-drawing methods you can use in the canvas. Imagine that there’s an imaginary “pen” that draws on the canvas. We can use the following canvas methods to draw with the pen:
• moveTo—Moves the pen to a given x and y position on the canvas
• lineTo—Draws a line from the current pen location to a specified x and y position on the canvas, which becomes the pen’s new location
• arc and arcTo—Allow us to draw paths along the arc of a circle
• quadraticCurveTo—Draws a path from the current pen location to a specified location along a quadratic curve
• bezierCurveTo—Draws a path from the current pen location to a specified location along a Bézier curve
Lines
We draw lines using the moveTo, lineTo, and other methods we’ve just seen, but there are a number of context properties we can use to change how our lines are drawn. Among others, we can set:
• lineWidth—Specifies how wide the lines will be
• lineCap—Specifies how the end of a line should be drawn; has a value of butt, square, or round
• lineJoin—Specifies how two joining lines should be joined; has a value of round, bevel, or miter
Text
The original implementation of the canvas in Safari did not allow for the drawing of text, but this feature is part of the HTML5 specification and is supported by Safari from version 4 and in Firefox 3.5 and higher. This means that for some time, visitors to a site may be using a browser with the canvas enabled but without support for text rendering by the canvas element. The intelligent use of images—as we’ll see in a moment, you can in addition to shapes and paths draw images into a canvas—with unobtrusive JavaScript techniques may allow for a simple approach that uses the canvas element, with images in place of the strings where text in the canvas is not supported.
Where text is supported, in the same way we can draw paths and shapes we can draw (or render) a string of text on the canvas using the fillText and strokeText methods of the context. For example:
![]()
draws the string “this is the text to fill” starting from the point 50px, 50px. You can also set the font, text alignment, color, and other text styles using properties of the context.
Text rendered by a canvas element is far less accessible than text marked up in an HTML document. canvas-rendered text is not part of the DOM, and it is mostly or entirely invisible to search engines. One way of exposing the text to the DOM, assistive devices, and search engines is to include structured text inside the canvas element. This text would be accessible to search engines and via the DOM, but not displayed by browsers that support the canvas. Well, almost. There’s a complicating factor with Safari 3, which, as we saw treats canvas as an empty element, and so it will display this additional text. The best solution to this is to use JavaScript to add the canvas element to the DOM, and in Safari 3 (yes, here we are browser sniffing, on rare occasions it may be unavoidable!), don’t add the additional content.
Transparency
You can use transparency with the canvas in two ways. You can either:
• Use RGBa colors for fill and stroke colors and set the globalAlpha property of the context to a value from 0 to 1 (this alpha channel value will apply to any operations you perform while the value is set).
• Change the globalAlpha value between operations to have different alpha values for different fills, strokes, and so on.
Transformations
We saw briefly in Chapter 13 that CSS3 now features “transform” properties that can scale, rotate, skew, and otherwise transform HTML elements. The canvas contexts can also be transformed in similar ways—for example, to rotate or move horizontally and vertically the drawn contents of the canvas.
Images
We can use images directly in the canvas—that is, we can draw an image into the canvas. To do so, we’ll need to use an img from the DOM, rather than just a URL. So we’ll first need to use a DOM method like document.getElementById to get the image element. Then we can draw the image like this:
![]()
This draws the image of the element with an id of logo at 50px, 50px. There are more sophisticated ways to use drawImage, including scaling the image up or down and putting only part of the source image onto the canvas. You’ll find resources for these methods at the end of this book.
Shadows
Anything we can draw (paths, rectangles, text, and so on) with the canvas, we can draw with a shadow property. This looks similar to the method for setting fill and stroke colors. We give the context one or more of the following values:
• shadowOffsetX—A pixel value for how far to the right (positive values) or left (negative values) of the object the shadow should be drawn
• shadowOffsetY—A pixel value for how far below (positive values) or above (negative values) the object the shadow should be drawn
• shadowBlur—A pixel value that specifies, like with CSS, how blurred the shadow should be—the higher the value, the more blurred the shadow
• shadowColor—A color for the shadow
When these properties are set for a context, everything drawn on the canvas will have these shadow values. (You’ll recognize this shadow model from CSS text and box shadows.)
And More...
There’s even more to the canvas than we’ve discussed. Here are just a few of the additional possibilities:
• We can directly manipulate the image data of a canvas element, pixel-by-pixel.
• We can create linear and radial gradients and use them as the fill and stroke styles in place of colors.
• We can create patterns based on images to be used as fill and stroke style.
• We can use the canvas element’s many compositing styles to specify how new content is drawn onto existing content in the canvas.
• We can use clipping paths, which determine where new content is drawn; for example, you can create a circular clipping path, thus mandating that content be drawn only into this circle.
The canvas provides very powerful drawing primitives, though it’s likely that most developers will prefer to use a JavaScript library that provides features such as more complex shapes, or specialized functions for tasks like graphing. Libraries also help target Internet Explorer, which as of version 8 does not support canvas. These libraries include:
• Processing.js (www.processingjs.org)—An implementation of the processing language designed for data visualization. Processing.js is also supported in Internet Explorer, using VML rather than the canvas element.
• LiquidCanvas (www.ruzee.com/content/liquid-canvas) is a plug-in for JQuery, which provides a higher-level (and so easier to use) programming interface to the canvas API.
• ExplorerCanvas (ExCanvas) (code.google.com/p/explorercanvas)—A simple way to get canvas support in Internet Explorer, developed by Google, and used widely by them.
• RGraph (www.rgraph.net)—A library that uses the canvas to create sophisticated charts and graphs.
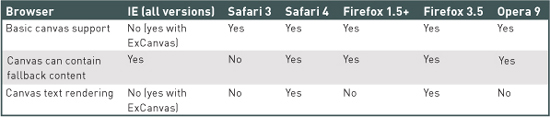
Browser Support for canvas
canvas Use Cases
Anytime we need to use dynamically generated images, we should consider using canvas. Common examples include:
• Graphs and charts—With canvas, these can easily be generated from content found, for example, in a data table.
• Games—Game graphics in the canvas can be animated using JavaScript, making canvas useful for the kind of games usually developed using Flash.
• Applications—Mozilla Labs’ browser-based coding tool Bespin uses canvas to render its UI and the text you edit. (Mozilla chose canvas over HTML/CSS for text rendering due to performance issues with large text files.) Some developers are concerned by the accessibility problems associated with this approach—as we saw, text in the canvas is not accessible via the DOM. There are potential workarounds for this challenge being explored, and there is work by the developers of HTML5 to address this accessibility difficulty. Ben Galbraith, one of the lead developers of Bespin, discusses some of these issues here: benzilla.galbraiths.org/2009/02/18/bespin-and-canvas-part-2.
We’ve made reference to various aspects of browser support for canvas throughout this section. The preceding table brings together the information we’ve discussed and covers browser support in all major browsers and versions that are currently in widespread use.
Workarounds for IE
Several JavaScript libraries provide support for canvas in Internet Explorer. The best-known is ExplorerCanvas (commonly known as ExCanvas). Developed at Google, it’s widely used, well maintained, and used extensively in Google web applications.
Using ExCanvas is straightforward: just include a link to an excanvas.js file when the browser is IE, like this:
![]()
Your canvas code should now work in Internet Explorer as well as browsers that support canvas, though you shouldn’t expect full compatibility with all the features of canvas in Internet Explorer. Dynamically generated canvas elements (canvas elements created with JavaScript) need some extra steps to be usable, and as of the time of writing, ExCanvas didn’t allow for text rendering, though this feature is slated for inclusion in the future. You’ll also notice subtle and not-so-subtle differences in IE, because ExCanvas uses VML to emulate the canvas element.
All these differences and more are documented at the ExplorerCanvas Google Code site: code.google.com/p/explorercanvas/wiki/Instructions.
The Canvas vs. SVG
Though they produce similar effects, the Canvas and SVG are designed for quite different tasks. Some of the key differences:
• As mentioned earlier, SVG uses retained mode rendering, meaning that the browser takes care of rendering SVG objects, while the canvas uses immediate mode, meaning that your code needs to do all the drawing. If, for example, you need to rotate a rectangle in front of other graphics on the canvas, each step of this animation must be redrawn, not just for the rectangle, but for the graphics that the rectangle overlays as well.
• SVG elements are part of the DOM unless the SVG is embedded in an img element. The canvas itself is part of the DOM, but none of the graphics drawn on the canvas are.
• It is much easier to create accessible content with SVG than with canvas.
• SVG provides more primitives, shapes, and built-in animation, whereas canvas is a low-level toolset in which complex shapes and animation must be implemented with JavaScript.
• The canvas element is part of the HTML5 specification, whereas SVG is a stand-alone markup language derived from XML. SVG can, however, be used inline with XHTML, and HTML5.
The Wrap
Web developers have long been restricted to using HTML, CSS, and a handful of bitmap image formats, along with plug-in technologies like Flash, to develop sites. Rapidly maturing support for SVG and the canvas, as well as the development of libraries that enable their use in Internet Explorer, gives us access to much more sophisticated standards-based tools for both graphic design and the visual representation of data. And unlike in the “bad old days” of the browser wars, these innovations—like those we are seeing in HTML5 and CSS3—are taking place within the framework of web standards, ensuring greater interoperability between browsers and less uncertainty for developers. We don’t have to “pick winners” like we did during the browser wars—standards are the winner.
This is an enormous change in just a few short years, and it’s due to several factors: the diligence of browser developers, the advocacy of the many web designers and developers who’ve worked to make this standards-based approach the cornerstone of professional web design and development, and the ongoing custodianship of the web by the W3C.
In the 16 or so years I’ve been developing websites, I genuinely believe that this is the most positive period yet for the web’s underlying technologies. We learned a lot from the browser wars, and this time around, there’s considerable goodwill on all sides to ensure we don’t repeat our old mistakes. As a result, we’re finally seeing the maturity and widespread adoption of technologies that have been in development for many years.
We are also seeing the rise of the web beyond the desktop—on mobile devices, televisions, game consoles, and elsewhere—the promise of which I believe will far outstrip the value of the web we’ve seen to date. I also believe that the technologies we’ve covered in this book—HTML, CSS, JavaScript, SVG, and more—will be the way we develop not just for the web, but almost all user interfaces in the coming years, whether they’re for ATMs, inflight entertainment devices, microwave ovens, or even devices that may never even be connected to the Internet.
Having come to grips with these technologies in this book, I hope you feel equipped for this coming revolution. I’m sure we’ll look back on the end of the first decade of the 21st century as the end of the infancy of the web. We’ll doubtless smile at the naivety of what we then called Web 2.0, but I think we’ll also realize that this is where the seeds for our future web were sown: powerful standards with widespread cross-browser, cross-device support, and all the developments they will enable.