Now that you're thoroughly grounded in the functions and controls used to manipulate shutter speed, you're ready for the techniques that will let you exploit them. In this chapter, you'll learn a variety of action-stopping shooting techniques that will enable you to stop action in a variety of situations.
What you've learned about the many camera controls that affect exposure, ISO settings, exposure compensation and exposure modes, focus controls, and file formats will belp you choose the shutter speed you need to freeze even the fastest of subjects.
In this chapter you will discover not only how to maximize the action-stopping power of fast shutter speeds, but also how to effectively stop action with a shutter speed commonly deemed too slow to freeze a fast moving subject.
You may think that stopping action can be boiled down to simply choosing a fast shutter speed. Just set 1/4000 second on your camera and fire away. And while that may often work, you'll find that a variety of other factors can force you to use a slower shutter speed.
But before we explore the glory of fast shutter shutter speeds, let's take a look at shutter speeds appropriate for stopping the action in your everyday life.
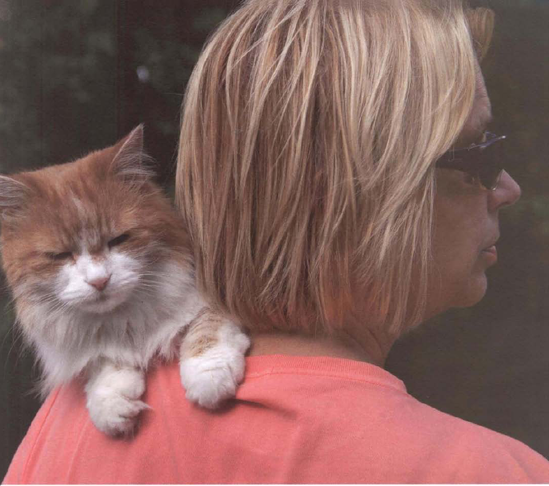
Figure 5.1. For documenting family life, shutter speeds in the range of 1/60 to 1/250 second nicely balance the needs of slopping action and achieving overall sharpness. Exposure at 1/60 second, f/8
Shutter speeds ranging from 1/60 second to 1/250 second are like your everyday work clothes. They're serviceable but nothing fancy. Quite simply, they get the job done. And, because you'll use these shutter speeds frequently for everyday photography, you'll likely become as comfortable with this range as you are with your favorite T-shirt and jeans.
Of course, just as your everyday clothes aren't appropriate for every occasion, these everyday shutter speeds won't be suitable for every photograph you take. You dress up for special times, and you'll also occasionally want to stretch your shutter speed range up, too, so it includes a setting of 1/500 second. That little bump in speed might be just enough to stop most of the everyday events that are just a bit too fast for the relaxed attitude of 1/60 to 1/250.
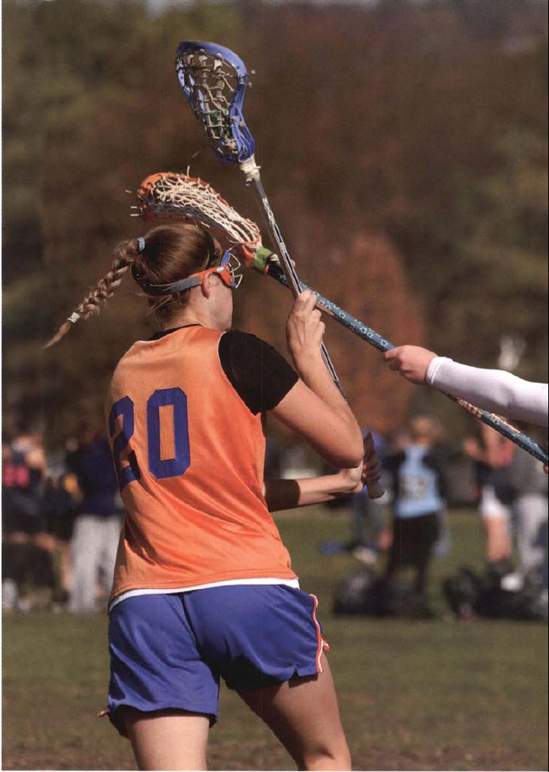
These shutter speeds seem custom-made for everyday events and activities. They are the shutter speeds to use for snapshots at summer camp, on vacations, and for impromptu portraits. They're the speeds to choose for backyard soccer games and swingsets in the park. And these are the shutter speeds that fit right in when families and friends gather for holidays, reunions, graduations, and birthday parties.
This is not to say you can't take exciting and superb photos with these mid-range shutter speeds. You can. Especially when you visit racetracks and outdoor athletic events, these speeds stand out for their ability to pan fast subjects and give you some great results. But the majority of the time you'll use 1/60 second through 1/250 for family gatherings and informal activities.
As the shutter speeds most closely associated with casual, everyday photography, you'll use this range often— but you won't often select them. At least not consciously. More likely they'll be chosen for you by the camera, because you've set it to Program mode. I think of this mode as the snapshot or the "set it and forget it" choice: it lets you take pictures without thinking anymore about it. And it's the "compromise" mode, as well. It works to give you a middling combination of shutter speed and aperture that will cover the variety of features often present in everyday photo subjects.
The versatility of these everyday shutter speeds breaks down under more challenging picture situations. Whenever you find yourself wading through a field of pumpkins that stretches to the horizon or dodging a Flamenco dancer as she fires up ber feet, everyday shutter speeds won't cut it. For extraordinary subjects like these, you need to wrest control from the Program mode. To show that field of pumpkins sharply from your feet to the horizon, switch to the Aperture-Priority exposure mode and choose a small aperture (a large f-stop number like f/16 or f/22). To freeze the flashing feet of the Flamenco dancer, switch to Shutter-Priority mode and select a hyper shutter speed, a very fast setting such as 1/2000 second.
With fast shutter speeds like 1/1000, 1/2000, 1/4000, and 1/8000 second, you can freeze almost any action, be it a water skier slaloming behind your boat or a speed skater hugging the inside curve as be comes into the bell lap.
Don't casually choose a super-fast shutter speed just because it's as simple as turning a dial until 8000 shows up on your camera-top LCD. There are risks involved. As we've mentioned before when shutter speeds rise so do the complications. Those super-fast shutter speeds require near ideal scene conditions and equipment: bright light, a high ISO (800 or 1200), a lens with a large maximum aperture, and a camera-lens combination capable of focusing quickly and accurately on a subject that moves so fast it can only be stopped by a super shutter speed.
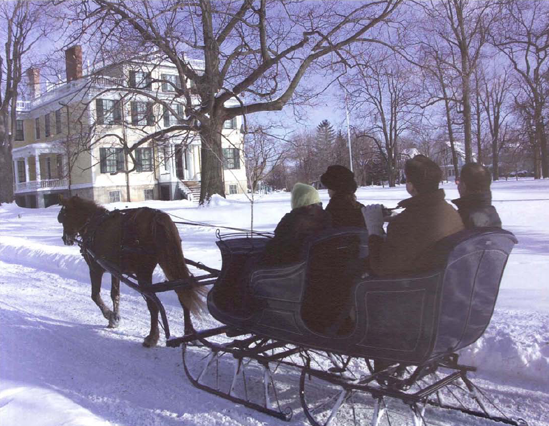
Figure 5.2. When the action picks up, so should the shutter speed. A shutter speed of If500 second was fast enough to stop this slow-moving sleigh. Exposure at 1/500 second, f/8.
And perhaps most importantly, a fast shutter speed tends to mean a large aperture that yields shallow depth of field. With a 300mm telephoto lens set to f/4 and focused on a subject twenty feet away, the depth of field is a mere four inches —about the width of your palm. That's not much room for error. Not only must the camera focus accurately, you must choose the most important subject area to focus on because there's a good chance other parts of the subject will be slightly soft because they're out of the depth-of-field area.
So go ahead and use that super-fast shutter speed. Bur first consult the action-stopping table that appears in a few pages to determine if maybe you can use a slightly slower shutter speed and possibly a smaller aperture to gain a bit more depth of field.
If you're a stock market player, then you know that timing (trying to buy low and sell high) is considered amateurish because it's highly unlikely to succeed. (Trust me, the experts are tight for once.) But let's face it, timing is important. Who wouldn't like to have put $5,000 down on Dell in 1990 and have sold it ten years later for a 4000% gain?
Much like when playing the stock market, timing is critical when you want to photograph moving subjects. So let's find the techniques that put you on the path of success. You may not be able to predict if Peyton Manning is going to throw a deep post rout or when Sidney Crosby is going to steal the puck and make a breakaway goal, but many sports and action activities do offer you some predictability.
If you want to photograph a bowl of peaches, before they go bad you have at least a week to arrange them, monkey with various lighting schemes, and try out several angles, exposures, and backgrounds. When your subject is a still life like a bowl of peaches or perhaps a posed portrait of Uncle Ned sitting by the fireplace, you have the twin luxuries of predictability and plenty of time. These are not high-pressure situations.
But, if your goal is to get a picture of Uncle Ned as be juggles those peaches, both your preparation and execution need to be ramped up. The right timing is critical when you are photographing subjects in motion.
Some subjects are easier to time than others. You don't know how long a bronco buster can stay atop an angry bull or when a cat will stop teasing and finally pounce on its prey, but many actions and activities do offer predictability. Knowing where and when a high jumper will make his next leap or a golfer his next swing is, of course, a bit more predictable than deciding which direction a midfielder will try to bead the soccer ball.
Choose a shooting location based on high odds of climactic action and closeness to the action.
Prefocus the lens where you expect the action to occur.
Use your camera's rapid fire and continuous focusing (auto servo) modes so you can take several shots in rapid succession.
How well you can predict and prepare for climactic action depends on the nature of the activity. Before an event, can you walk a steeplechase or motocross course to find the locations for the best action shots? Yes, you can. You should arrive an hour ahead of the scheduled start to do just that.
Especially for the most active subjects and more unpredictable sports, the best technique to use to achieve superbly-timed photographs is to build an in-depth knowledge of the activity. Having a background for an event allows you to better anticipate what's going to happen. You should, of course, check up on a schedule of events—this insures that you won't do stupid things like arrive in Pamplona three days after the bulls ran the streets.
Before photographing a major race like a Boston Marathon or Daytona 500, first take your camera and scout out a local, scaled-down version of a similar event. And why not just wait for the big one? Well, under the low-pressure conditions of a smaller event, you can become familiar with timing strategies that will get you better results at the "real thing." A great advantage of small events and venues is that you can get close to the action—no press credentials required.
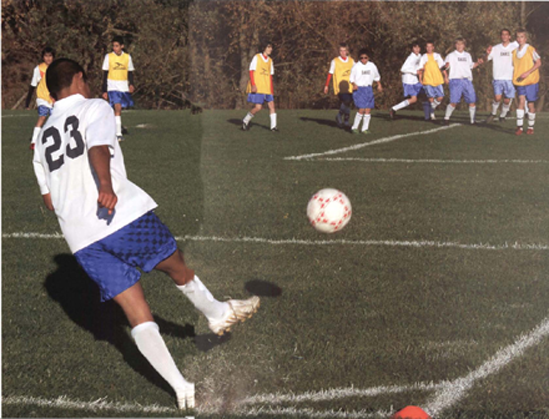
Figure 5.5. With good timing, you can instill story-telling tension into your picture. Exposure at 1/800 second, f/5.6.
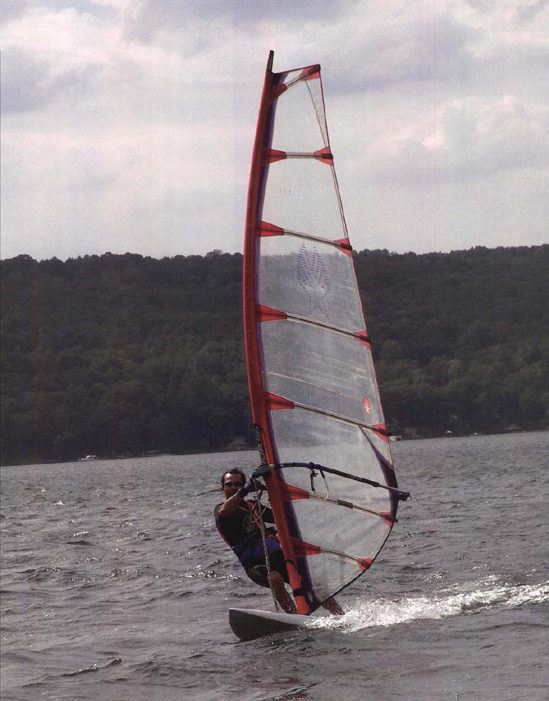
Figure 5.6. With subjects like windsurfers you can easily anticipate their course and be ready to take good jJicwres. EXjJosure at 1/640 second, f/5 .6.
From the perspective of a former "silent spectator," 1 can tell you that one of the best tactics for acquiring substantial background knowledge at an event is to overcome your reserve and make an effort to engage staff, participants, enthusiastic fans, and fellow photographers in conversation. Most people I talk to are happy to answer questions. When I ask for more details (which I often do), it's not unusual to have some great photo opportunities, highly entertaining anecdotes—even invitations to go behind the ropes—come my way.
What shutter speed is fast enough to freeze your six-year-old as she wobbles away on ber roller blades? Your skateboarding teen perfecting a One-footed Ollie? A horse leaping over a timber jump or a waverunner, throttle open full, slashing toward the finish line?
Several motion and photographic variables—not just subject speed—impact this decision. We'll cover them. But to belp you stop most action most of the time, let's use a chart based on miles per hour to guide you. We're going to assume you're using a focal length of about 200mm and that the subject fills about one-third or less of the viewfinder or the picture area of your LCD. With those assumptions, the shutter speeds given in Table 5-1 will prevent blur from both subject movement and camera shake inherent in using a medium telephoto lens.
Table 5.1. Action-stopping shutter speeds
Subject speed | Minimum shutter speed based on direction of motion | ||
|---|---|---|---|
<10 mph | 1/250 | 1/90* | 1/160* |
10-20mph | 1/500 | 1/125[a] | 1/250 |
20-30 mph | 1/1000 | 1/250 | 1/500 |
30-50 mph | 1/2000 | 1/500 | 1/1000 |
50-75 mph | 1/4000 | 1/1000 | 1/2000 |
>75 mph | 1/8000 | 1/2000 | 1/4000 |
[a] With these shutter speeds, avoid blur from camera shake by using image stabilization or a tripod. | |||
If one train leaves Chicago at midnight beading toward New York City at 55 mph and another leaves New York City beading toward Chicago at 77 mph, where will they meet? If you can solve this kind of math problem, choosing a shutter speed will never stymie you.
I think it's obvious speed is a major factor in choosing an action-stopping shutter speed but two other factors include the direction of the motion and image size.
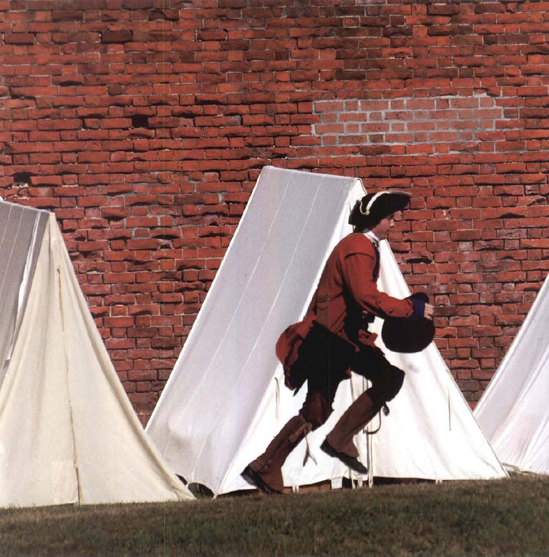
Figure 5.7. When the action beads right for you, you can use a slower shutter speed to stop it and also give yourself the choice of using a smaller aperture to increase depth of field for greater overall picture sharpness. Exposure at 1/350 second, f/11.

Figure 5.8. Action cutting directly across the scene requires faster shutter speeds to freeze it. Exposure at 1/1500 second, f/8.
Objects moving directly across your field of vision cover a lot more retinal—and camera sensor—territory than those moving at the same speed directly towards you. As the shutter speed table shown earlier demonstrates, you may need a shutter speed four rimes as fast to stop motion moving across the scene than to stop motion moving towards you.
Another important factor is image size. Consider that sometimes you can visually track an airliner going 600 mph easier than a bicycle going 15 mph. How is that possible? When the airliner is passing overhead at 30,000 feet—or even 3,000 feet—you have no trouble following it because it's so far away that it seems quite small and moves slowly across your visual field. Compare that to a bicycle ten feet in front of you. Because it's so close, the bike fills much more of your visual field, and moves rapidly across it. So image size is a critical factor in determining which shutter speed you need to stop action. A shutter speed of 1/60 second that would quite easily stop the motion of that distant 600 mph airliner, would reveal the nearby 15 mph bike as blurred.
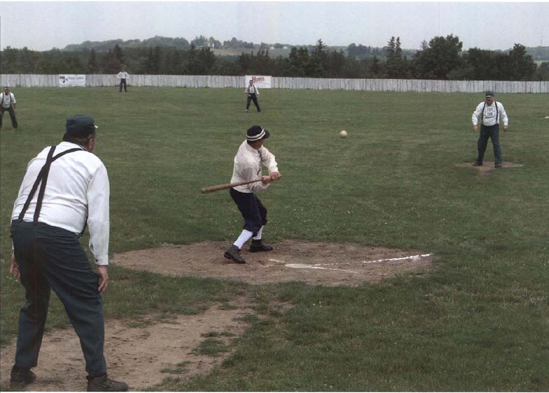
Figure 5.9. When the subjects are moving a bit slower and not filling the frame, you can often stop the action with a moderate shutter speed. Exposure at 1/500 second, f/8.
In summary then, when choosing a shutter speed to stop action, consider the direction the subject is moving, its speed, and how large it appears in the viewfinder. A fast subject filling the viewfinder and moving directly across the field of view is the most challenging of all subjects for the stop-action photographer. For our purposes, those three things—subject speed, subject image size (how much of the picture area it fills), and subject direction—determine the shutter speed you need to freeze the action of your subject.
There ace times when speed is everything. Whether you're at the NASCAR track or the local motocross (where you can often get within a few steps of the action), when you're able to fill the viewfinder with a subject roaring close by, you'll need as fast a shutter speed as you can get.
For a few dSLRs, the fastest shutter speed is 1/2000 second, for most it's 1/4000 second, but for the high-end cameras, it's 1/8000 second. Shutter speeds of 1/4000 and 1/8000 second can stop some pretty fast action, but achieving a shutter speed that fast requires optimal conditions.
So how do you achieve the fastest shutter speed on your camera? As always, exposure is a set formula for delivering the amount of light required by the sensor based on the ISO you set. The higher the ISO you set, the less light the sensor requires, and the faster the shutter speed you can set. The tradeoff from high ISOs is an increase in sensor noise that reduces image quality, so you may want to take a series of test pictures of the same detailed subject at different ISOs to see at what ISO noise becomes a problem with your particular camera.
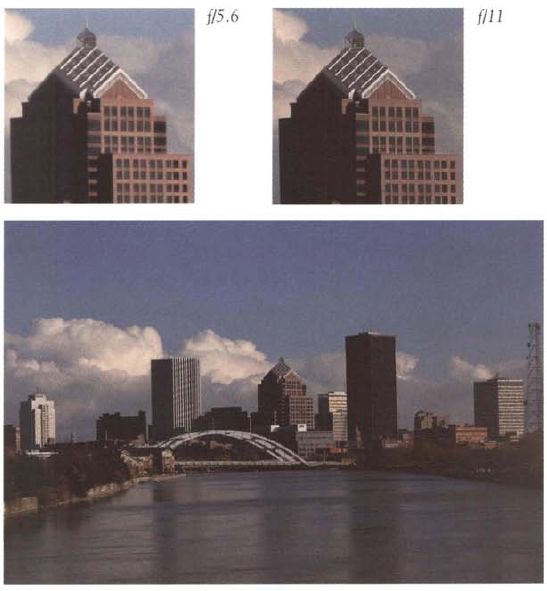
Next up is a large lens aperture, let's say f/2.8 or f/4. A large lens aperture lets in a lot more light. Going from f/5.6 to f/4, in fact, lets in twice as much light, allowing you to double the shutter speed. To get a lens with a very large aperture, you may need to spend a bit more money or buy a fixed-focal-length lens instead of a zoom. Moderately-priced telephoto zoom lenses typically have a largest aperture of f/5.6 or f/4 which is not ideal for high-speed action photography. To get a f/2.8 telephoto lens, 00you may have to spend a thousand dollars or more.
Finally, if you can, hold out for a sunny day. Then position the camera to use front lighting (sidelighting and backlighting typically require a 1/2- to 1-stop exposure increase). That extra light will let you max out your shutter speed. On a sunny day with the ISO set to 500, you can shoot at 1/4000 second at f/5.6 or 1/8000 second at f/4.
If you're shooting in RAW format, you can try this trick to boost your shutter speed. When your meter indicates you've reached the fastest shutter speed that will give a good exposure, double or quadruple that shutter speed (1/1000 second to 1/2000 or 1/4000 second) to underexpose the photo on purpose. When you return home, open the image in Adobe Camera RAW (or whatever imaging software you're using) and boost the exposure back to normal by moving the Exposure slider until the histogram indicates a good exposure. There may be a slight quality loss, but you'll have achieved the faster shutter speed you needed.
In summary, to maximize shutter speed:
Set the camera to ISO 400 or 800 or even 1200 if the illumination is low and your camera performs well bere.
Set the exposure mode to Shutter Priority (sometimes designated Tv).
Set the lens to its largest maximum aperture.
If you still aren't at the fast shutter speed you need, use the RAW file format, and set the shutter speed two to four times faster than the fastest speed that gives a good exposure. Later, correct the exposure in Adobe Camera RAW software.
I've waited almost the entire book to work in a phrase like "static action." Action sequences show motion using a series of still pictures. But more importantly static action is an oxymoron, a class of words I love and hardly ever get to use. You probably know it means a self-contradictory phrase—two words that seem to oppose each other, such as "cold toast," "government intelligence," or "serious fun."
Action sequences fall into two categories. The conventional approach is movie frame style. Here, each subsequent picture is a continuation of the one before it and the result is a series of pictures from that sequence that are intended to be displayed together. The more artistic approach embraces psychological surprise and uses fancy-names: the diptych (two pictures) or triptych (three pictures).
Let's first focus on the continuous action sequence in which you use several pictures in chronological order to convey a subject's motion. How many pictures should your sequence hold? That's a creative decision. Typically three to five pictures can convey the motion. The ultimate criterion for deciding on how many pictures to use is the entertainment factor. A picture sequence of your wife taking a Sunday bike ride with no apparent change from picture to picture will bore viewers whether it's two photos or twenty. However, the liquid, undulating form and flapping ears of Bob the basset bounding after a Frisbee could easily run up to ten pictures. (Sorry, but Bob refused to sign a model release so you can't see him in action.)

Figure 5.10. It's fairly easy to create action sequences of subjects moving in straight lines or other predictable paths. Exposures at 1/1250 second, f/5.6.
The first set of sequence action photos is usually credited to the Englishman Eadweard Muybridge, whose early photographs of Yosemite Valley had been published in 1867. Using tripwires and an electrically-controlled shutter release apparatus, in 1878 be set up a series of twenty cameras and photographed a galloping horse. As legend has it, former California governor Leland Stanford hired Muybridge's services to prove a bet: that when a horse gallops, at some point all four feet are simultaneously off the ground. His series of twenty pictures of a single gallop showed that they are; this doesn't happen, however, at the moment when the legs of the horse are fully extended. It happens when the horse's legs are tucked underneath. Muyhridge's achievement unleashed an unending fascination with freezing movement and photographing action at ever shorter exposures.
Muybridge became obsessed with his success and for years created action series of everything and anything in motion. By today's standards some seem quite quaint and amusing, especially the series of naked people doing things like pole vaulting, wrestling, carrying and pouring a pitcher of water, walking up stairs, and all sorts of mundane human activities. Muybridge and others photographed not only humans but hundreds of animate and inanimate objects in motion, and turned their efforts into the successful publication of reference books for artists on the human form in motion.
If you find straightforward action sequences artistically tame, the triprych may-intrigue you. It's a series of three pictures, not necessarily of action subjects, but since that's our topic bere, we'll hold true to it. The success of the form comes from entertaining the viewer. Somehow, your three pictures need to engage and hopefully surprise your viewer. Many triptych artists throw into the middle of the sequence a picture that visually seems out of place hut perhaps is logically, artistically, or psychologically appropriate. (All 1 can say is that when it comes to art, be hold, be baffling, be mysterious, and be original.)
Here are a few tips to belp you take action pictures in a rapid sequence.
Review your camera manual on this topic to understand how to set your camera to maximize the number of rapid fire pictures you can take.
Set the camera to JPEG file format. RAW files are large and slow down the camera, reducing the number of pictures you can take in a sequence.
Choose the second highest JPEG quality to speed up transfer rate.
Use a memory card with a high-speed transfer rate.
Choose your camera's rapid fire or sequence settings for focus and shutter release. Your camera may have a specific setting for taking a large number of rapid sequence pictures that makes most of the settings mentioned above.
Planes do it. Cars do it. Even kayaks and canoes do it. What they all do is carry us past some fascinating sights that we'd like to photograph. Fortunately we can photograph while we're on the go. Planes in particular offer sights unusual for their aerial perspective. I'm especially intrigued by the unusual geometric patterns formed by farmlands and highway cloverleafs mixed in with housing developments, not to mention the textures raised by the sidelighting of a low sun.
Here's how to make sharp pictures of the sights passing by you. Planes, buses, cars, and trains all share two things: windows and high speed. (Lots of luck, but try to sit next to a clean window.) When taking a picture, hold the camera near—but not touching—the window glass and place your hand above the lens to block window reflections. (If you're photographing from a car, you can open the window.) Use Manual focus and set the lens to infinity (far distance). Don't touch the window with the camera because vehicle and plane vibrations can add blur. For fast-moving ground transportation, use a shutter speed of 1/1000 to 1/4000 second and try to avoid foreground objects (especially telephone poles) as their nearness may render them strongly blurred. For airplanes, a shutter speed of 1/500 second will usually work.
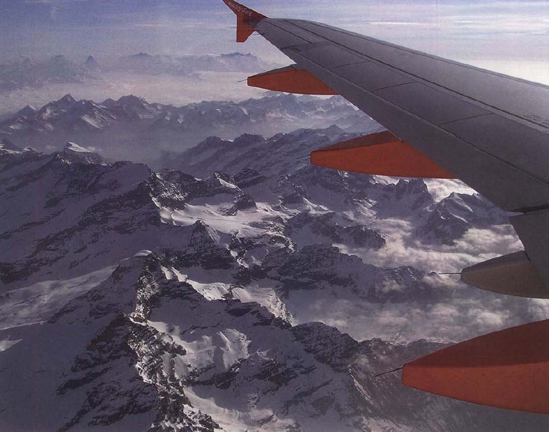
Figure 5.13. Air travel affords you many wondrous sights — if you have a window seat and a clean window. Exposure at 1/1000 second, f/5.6.
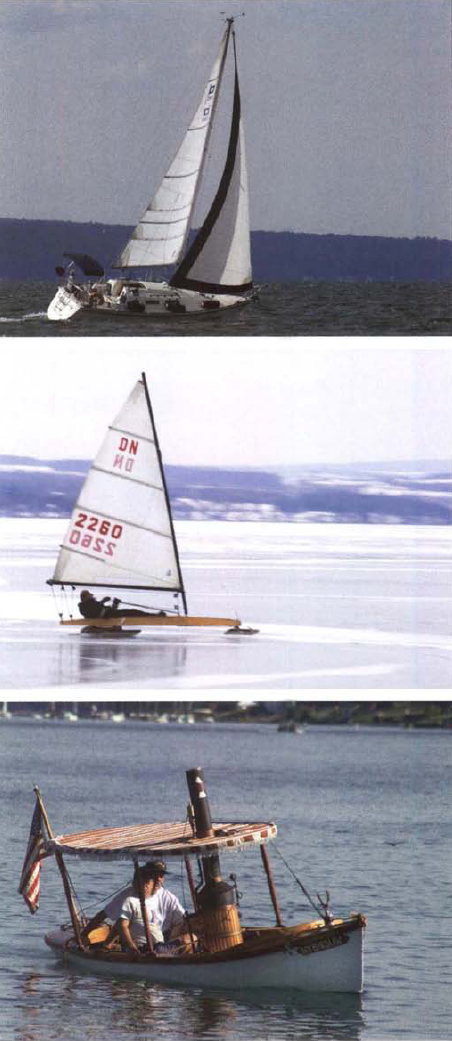
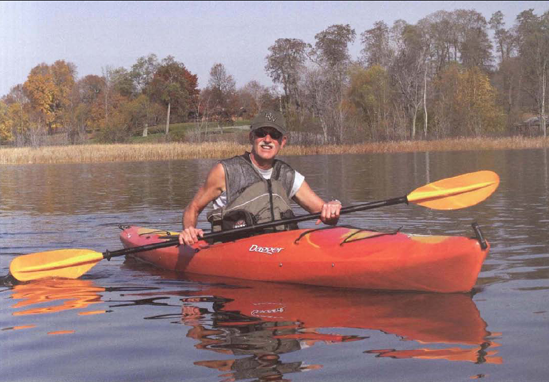
You can also take pictures while on the water. Different water craft—kayaks, canoes, motor boats, cruise ships and ferries—present different challenges. Personal craft are close to the water but bob quite a bit. Large boats are high up and more stable.
When in a small boat, keep your camera in a waterproof bag until you're ready to take a picture. When you remove it for picture taking, be careful not to dunk the camera (which I have done—bye-bye camera) or splash it (which I have also done, but saved it with a quick drying). If you're in a kayak or canoe, use a shutter speed of 1/1000 to 1/2000 second and try to steady the craft as you take pictures. For motor boats flying across the water, use the fastest shutter speed you can—but don't besitate to go creative with slower shutter speeds. The stability usually common to cruise ships and ferries lets you slow down to shutter speeds like 1/250 and 1/500 second.
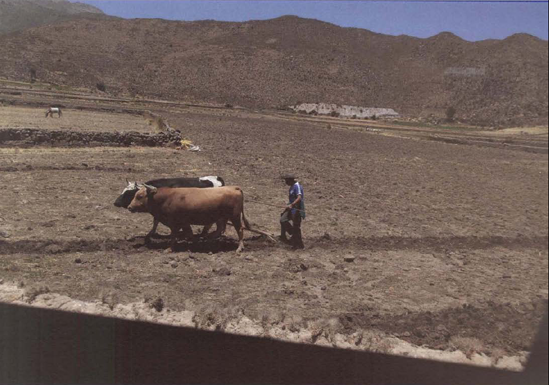
Figure 5.14. The tinted windows of buses may block light and lower your shutter speed. Far this scene in rural Peru, the bus slowed down. Exposure at 1/1O00 second. f/8.
Figure 5.15. When you use a marginal shutter speed while handholding the camera, you risk incurring the subtle blur from camera shake that can ruin an otherwise good picture. Here a shutter speed of 1/125 second used with a 200mm telephoto lens wasn't fast enough to eliminate the blur caused by camera shake from handholding the camera. Exposure at 1/125 second, f/11.
One of the greatest quality issues in taking pictures is the blur that can occur from the subtle shake of a person handholding the camera. That slight blur is magnified when you use a longer focal length that magnifies the image size. For instance, if you zoom from a 50mm focal length to a 200mm focal Length, you've magnified not only the image 4X but also the movement that results from handholding the camera.
You can counteract the blur from camera shake by using a fast shutter speed. How fast? That depends on your steadiness, your quality stringency, and the type of lens you're using. A longstanding rule of thumb guides you to use a shutter speed equal to the inverse of the focal length of the lens. For example, with a 50mm lens, you would use a shutter speed of 1/50 second (or faster).
But thanks to the recent innovation of image stabilization technology, that old rule of thumb needs to be updated for image-stabilized lenses.
Give these three rules a try:
For traditional, non-stabilized lenses, use a shutter speed approximating the focal length of the lens: 1/50 second for a 50mm lens, 1/200 second for a 200mm lens.
For a lens with image-stabilization technology, use a shutter speed of 1/4 the focal length of the lens: 1/15 second for a 50mm lens, 1/50 second for a 200mm lens, and so forth.
To truly prevent blur from camera shake, use a shutter speed twice as fast as recommended in the first two rules.
Number 3, my own rule of thumb, doesn't take chances—that's because I want you to be able to make sharp enlargements. And given the exceptional quality of images shot at ISOs 400 to 1200 in dSLRs made since 2007, you should be able to use fast shutter speeds in most circumstances.
Finally, test your personal steadiness quotient by taking a series of pictures at increasingly faster shutter speeds and then review them to see what shutter speed you require to get sharp pictures.
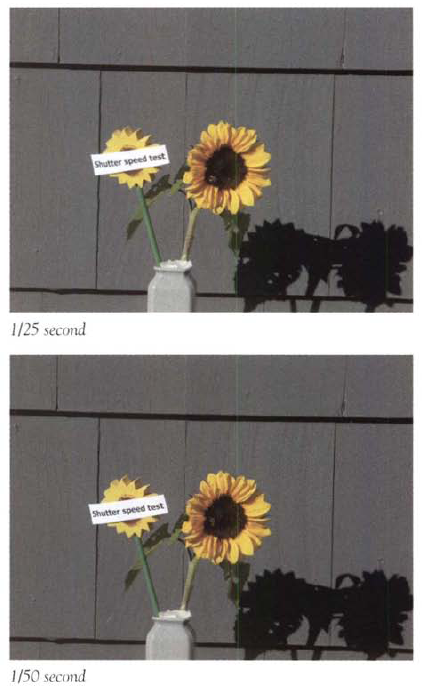
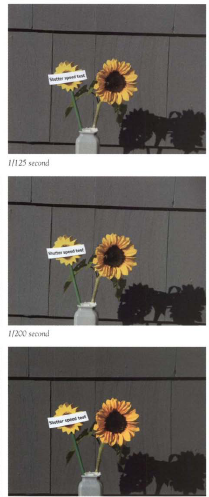
Here's how. Do your test on a sunny day. Find a fairly flat, detailed subject that's at least twenty feet away. A brick wall or a large sign with sharp lettering would work well. You want a flat subject so the changes in depth of field from varying the aperture don't influence your perception of blur. Set the ISO to 200. Set your camera to Shutter-Priority. If you're using a zoom lens, set it to 100mm as a nice mid-range setting. Focus carefully. Because you're doing the test on a sunny day, you may have trouble achieving the slowest shutter speed needed for the test. If that's the case, attach a polarizing filter when you need to use a slower shutter speed.
For convenience, either take notes or put a small sign in the picture denoting the shutter speed you are using. Alternatively, you probably know that picture- taking settings are contained in the file metadata that you can find by right clicking (PC users) on the file when in Explorer, choosing Properties and looking in the EXIF area. On a Mac, click on a photo, hold Cmd, and press 1. Inside the new window, click on the "More Info" section that opens. In Photoshop, go to File Info and a window will open up with the shutter speed setting.
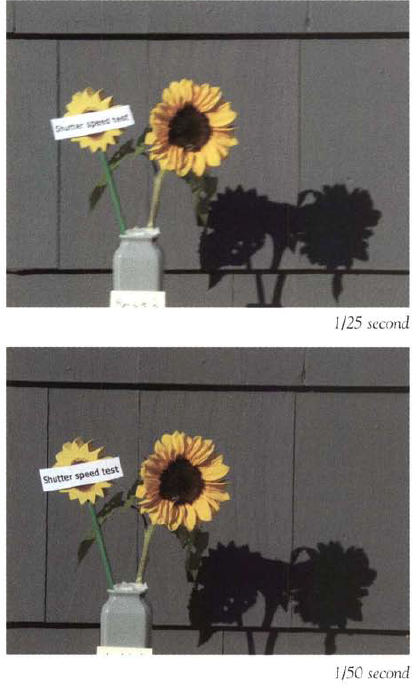
Figure 5.16. Personal shutter speed test while handholding a non-image- stabilized lens. Take a series of pictures at different shutter speeds as described in the text to determine the slowest shutter speed you can use to get a sharp picture.
Before you start the test series, put the camera on a tripod and take the first picture at 1/500 second. This tripod shot will be your reference for your ultimate standard of sharpness.
With the lens set at 200mm, handhold the camera and take a series of pictures at the following shutter speeds: 1/50, 1/100, 1/200, and 1/400 second. I want you to use a slow shutter speed so you can clearly see the blur effect from camera shake.
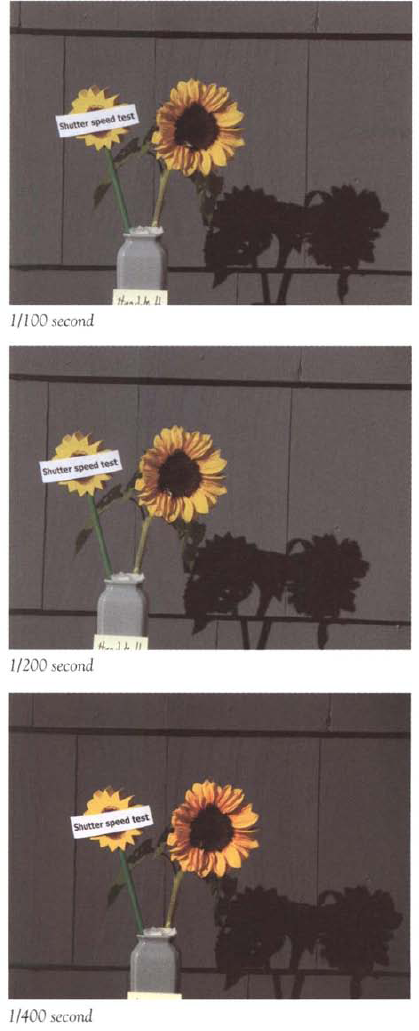
If you're testing a stabilized 200mm lens, turn on the stabilization and give it a moment to kick in before you take the first picture. Then take a series of pictures at these shutter speeds: 1/25, 1/50, 1/100, 1/200, and 1/400 second.
Now transfer the images to your computer and using your notes add the shutter speed to the file name. For example, "Handheld200mmLens-125sec" is a typical file name. Open the images in Photoshop and look at them at 100% magnification by double-clicking on the magnifying glass icon. Be sure to also open the photo taken on a tripod and compare your other test images to it. Decide what level of blur from camera shake is acceptable to you and use that to create your own personal rule of thumb. For instance, if you find the image shot at 1/100 second is fine, then your rule of thumb becomes: Shutter speed = 1/2 times the focal length of lens.
Finally, to be extra sure, you may want to make three 8x10 prints: one each of the shutter speed photo you prefer, the one on the tripod, and maybe one at double the shutter speed you prefer. Look at the prints and see if you're still happy.
Eventually it happens to all of us. Daylight falls as the action rises. Or we find ourselves inside a dark cave of a wedding chapel and (because of our designation as the family photographer) we're expected CO deliver some exciting photos—without using obtrusive flash. Or the invasion of very photogenic migrating butterflies is accompanied by thick clouds sliding a lid across the sky and forcing us to struggle to get a shutter speed fast enough for sharp close-up photography. Or speedy subjects ate escaping the grasp of shutter speeds a step too slow. Of course, you could use flash for nearby subjects, but what about subjects beyond the reach of flash?
When photo opportunities soar as photo conditions sink, the temptation is to despair Don't. You're about to discover that your resourcefulness will save the day. You can turn to one or several of the techniques below.
Over the years, several articles have shown that if you take a rapid series of pictures while handholding the camera at a slow shutter speed, one or two (out of say, eight pictures taken) will be acceptably sharp. The theory is that even when you're handholding the camera, you are not constantly moving it so if you take several pictures quickly, you may get one where you barely moved the camera.
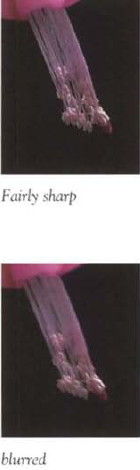
Figure 5.20. These close-up pictures were taken while handholding the camera at 1/15 second using a 100mm lens. That's too slow a shutter speed for sharp results, even with a stabilized lens—which this wasn't. As a last resort you can often get a fairly sharp picture by taking a rapid burst of pictures. From such a series of photos, at least one will often be fairly sharp, because your movements while handholding a camera usually are not constant and continuous. Exposure at 1/15 second, f/13.

Before you shoot, boost the ISO to 1200. Still not getting a fast enough shutter speed? Then underexpose by two stops so you can use a shutter speed twice as fast. By using the RAW file format, you can better address any noise issues that may arise with a high ISO. And when you underexpose, the RAW file format allows you to restore good exposure with minimal loss of quality. Of course, all these corrections happen when you're later using imaging editing software to adjust the RAW file format image. And a word of caution; underexposing, even with the RAW file format, does pose a risk of reducing image quality.
Conversely, you can also overexpose a stop or two to get a slower shutter speed for panning or other slow motion techniques, Again, open the RAW file and in combination use the controls to reduce the exposure and recover the highlights until you get the results you want.
What could be more obvious? If you have an image-stabilized system, now is the time to use it and to try and stretch it beyond its limitations. Most stabilization systems let you get pretty good results at shutter speeds two or three times slower than what you would normally try. So what the beck, try an even slower shutter speed—you might get lucky.
My perch for that wedding was the balcony railing. Railings are often round and most cameras have squared flat bottoms, so it can be hard to get a steady, firm support on a railing. 1 bunched my coat on the railing and then nested my camera in it. Now I had a good support. When using an impromptu support, the key is to very carefully press the shutter button—no jabbing—to avoid moving the camera as you press downward.
Okay, so the subject you are photographing is moving. Then position yourself so it is moving toward you. With the subject moving toward you, you can choose a shutter speed at least one-third slower than you'd use when the subject is crossing in front of you. The picture may not be as dramatic, but your chances of getting a sharp shot rise dramatically.
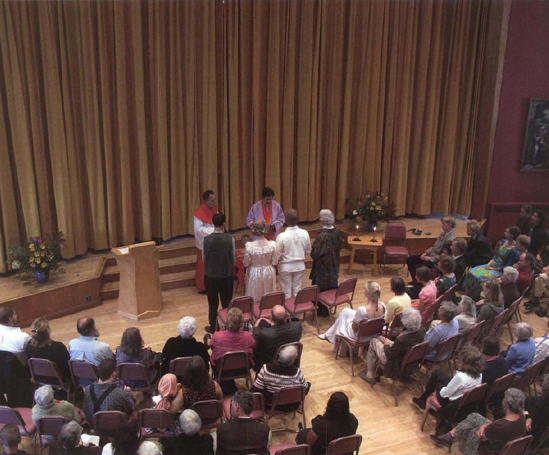
This seems obvious. But when I was in the balcony at a wedding and focused on the couple and the preacher below I couldn't believe how much everybody fidgeted. With a shutter speed of 1/6 second, each fidget caused a frustrating blur—and time was running out. But patience and taking extra pictures paid off as I got several good photos of the couple exchanging vows.
Many moving subjects include a motion in which there is a short-lived momentary pause before they reverse direction. This usually includes a leaping motion that slows and then stops before gravity takes effect and they accelerate back to earth. Gymnastics, basketball, springboard diving, and figure skating all bring obvious examples to mind. But peak motion can also include a reversal of direction, such as a water skier swinging out to the far side before coming back, or a halfback, faced with a wall of tacklers, deciding to turn and go the other way. Just time your picture for when the action is slowest and you may get that sharp shot even with a fairly slow shutter speed.