In This Chapter
Getting the most from your campaigns
Showing ads around the corner and around the world
Selecting content Web sites to show your ads
Choosing the best ad positions
When I install a piece of software on my computer, I often get a screen that asks me whether I want to go ahead with the Typical Installation (always recommended) or the Custom Installation (for advanced users only). To my recollection, I've never chosen Custom. I always worried that I would install a version of Microsoft Word that wouldn't let me type the letter M, didn't have a built-in English-to-Esperanto translator, or would omit some other crucial feature.
Google gives you an overwhelming number of choices for configuring AdWords campaigns — but it doesn't really bring them to your attention. Google isn't trying to bamboozle you; instead, the default settings are designed to protect clueless advertisers from themselves. But you, my friend, are no longer a clueless advertiser. By virtue of buying this book (or at least spilling coffee on it at Barnes & Noble), you are hereby officially dubbed clueful advertiser.
In this chapter, you see how to tweak the AdWords default settings that aren't appropriate for power users. You discover how to bid intelligently on your own and when to let Google set your bids for you. (I know Google's motto is "Don't Be Evil," but I still wouldn't give it complete control over my advertising spending.) And you figure out how to show your ads to different geographic areas with laser precision and how to separate your search and content traffic for maximum clarity and ROI.
If you want to set up one AdWords campaign, put it on autopilot, and never look at it again, feel free to skip this section. The changes I suggest will usually mean more, not less, work for you — more decisions, more overseeing, more risk, even, if you drop the ball. Google gives you a vehicle with an automatic transmission that does your thinking for you. On highways, it works fine, although it will never be as efficient as a well-handled manual transmission. When you take it out for a race, though, you're going to need precision control based on experience — something no computer can do for you. Ready to strap on your AdWords seatbelt and hit the track?
From within the Campaigns tab of your AdWords account, click the Settings Rollup tab. You'll see a list of all your campaigns along with a summary of settings for each, as shown in Figure 7-1. Click the campaign name to access a page on which you can change any or all of the settings. Some of the settings are shown to you when the campaign is born, whereas others hide on this page, waiting for you to find them. I explore some options that you haven't yet seen.

Figure 7-1. You can edit the default campaign settings to gain more control over where and when your ads show.
You can change three parameters under the Audience settings: locations, languages, and visitor demographics (if you are showing your ads on the content network).
Google allows you as much geographical precision as you could possibly need. The default setting is by country: Google gives you a list of countries and then you choose the ones whose inhabitants will see your ads. Straightforward and uncomplicated, this setting is common for online businesses that can serve customers pretty much anywhere. If you sell downloadable software or telephone consulting, for example, you don't have any reason to exclude customers from Belgium, Israel, or New Zealand, assuming language compatibility. In my experience, certain African and Asian countries tend to be hotbeds of credit-card fraud, however — and if you don't think a particular country will add a great deal to your bottom line, you may want to leave it off your list.
Click the Edit link next to Locations to take you to a recently updated interface that enables you to target your campaigns as widely or as precisely as you desire. Under the Browse tab, Google lists the most commonly selected 24 countries at the top, beginning with the United States and continuing alphabetically from Australia to United Kingdom. If you click the Show All Countries link at the end of the list, you'll see a complete list of dozens of countries from Afghanistan to Zimbabwe. Select countries by clicking their check boxes. When your list is complete, click the Save button to return to the Edit Settings page.
The Bundles tab, as shown in Figure 7-2, enables you to choose with an even broader brush among 14 country bundles. Notice that these bundles overlap with the United States and Canada bundle contained within the North America bundle, and the last bundle, All Countries and Territories contains, you guessed it, all countries and territories.
If you want to target prospects more precisely, you can drill down into each country listed under the Browse tab. Click a country's expand button (the plus sign next to a country's name) to select or deselect regions/states within that country. Similarly, you can expand regions/states into cities/metro areas and metro areas into smaller cities. To select a single small city, deselect the country, region/state, and metro area that contain it and then select the specific city, as shown in Figure 7-3.


If you run a local business, the regional and city targeting may not be precise enough for you. After all, no matter how good a dry cleaner you may be, few customers will drive 45 minutes across town to drop off their dress shirts. Enter customized targeting to the rescue. You get to that page by clicking the Custom tab. You're given three options:
Map point: This option designates a circular area. After entering a physical address or centering the map at your desired location (zoom way in by clicking the + button at the top left of the map), you can enter a radius around that spot in miles or kilometers. Figure 7-4 shows a radius of 2 miles around Ewing, New Jersey.
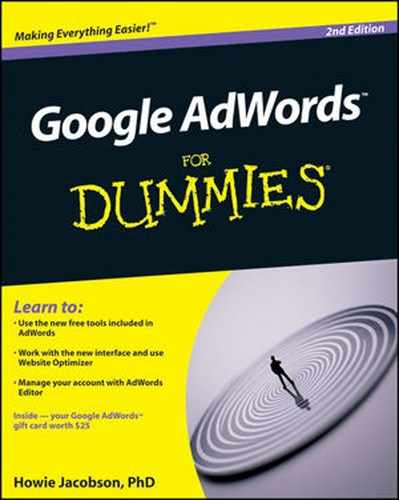
Custom shape: Occasionally, a circle isn't precise enough. What if, in Figure 7-4, I want to expand the area where my ads show to include the entire triangle between I-95, US 1, and the Delaware River? Google sends a multi-point option to the rescue. Click the Custom Shape link. You can either enter coordinates as if you're a World War I ace, or zoom in to your map location and draw a polygon that defines your target area, as shown in Figure 7-5.
Bulk: This option adds a bulk list of locations. Click the Bulk link. You can paste or type up to 100 different locations (cities, states, countries) to create a global patchwork of ad serving.

Figure 7-4. Centering the map on zip code 08618 and selecting a 2-mile radius produces a circular area that will see your ads.
When you finish specifying the ad serving locations for this campaign, click the Save button to save your changes and return to the Campaign Settings page.
You can specify the language(s) of the users you want to see your ads. Click the Edit link to bring up a list of languages from Arabic to Vietnamese.
If your campaign is set up to show ads on the content network, you may be able to see a breakdown of your data by age and sex. (Because I turn 44 this year, I will not be making any middle-age jokes about that last bit.) When you set up conversion tracking (see Chapter 14), you receive data that shows which sex and age groups convert at the highest rates. This data allows you to modulate your bid prices, so you pay less for clicks from some groups than others.
As you may have read in Chapter 1, you can show your text ad in any of three places: Google pages, search partner pages, and the content network. The default setting for each campaign includes all three networks. The trouble with this setting is that the three sources of traffic generally behave very differently, respond to different language and different offers, and don't command the same bid prices. You can set different bids for the content network, but a cleaner way to separate the networks is to put each one in its own campaign. See the section, "Separating your account into three types of campaigns," later in this chapter, for details.
Click the Edit link next to the list of current networks and devices to choose where and on what machines to show your ads. Click the radio button next to Let Me Choose to change any of these options.
In this section, you can set the most you're willing to pay for a click across various networks, and even change the way Google sets your bid prices. You can change the daily budget for your campaign so that you don't end up with nasty surprises.
Keep the default here (Focus on clicks, Manual bidding – maximum CPC bids) for now. Don't let Google optimize your budget. See the section, "Bidding Smart," later in this chapter, for a discussion of bidding strategies.
Click the plus sign next to the Position Preference, Delivery Method link to show these advanced settings. Click the Edit link next to each item to make any changes.
If you enable Position Preferences by clicking the radio button next to On: Automatically Manage Maximum CPC Bids to Target a Preferred Position Range and saving your changes, you can then designate a position range for each keyword. Now your ad will show for a given keyword when it falls within that position range, and Google will try to keep your ad within that range, given your budget limitations.
Essentially, position preference is like setting your maximum cost per click (CPC), except you focus on the outcome (position) instead of the input (how much you're willing to pay for that position). If you discover that your ad is most profitable at position 7, for example, you can tell Google to keep it there, instead of allowing it to fluctuate.
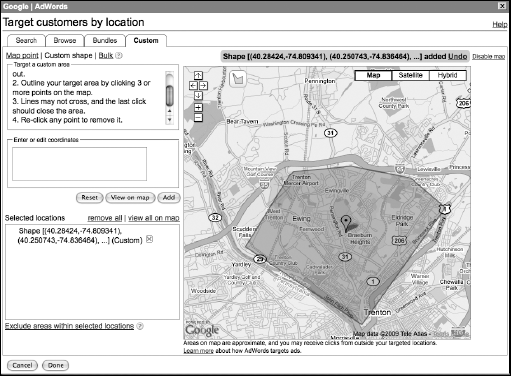
To play with position preference, go to the Keywords tab (from within a campaign or from within an individual ad group). In the column named Position Preference, click the word Any to input the highest and lowest position your ad will appear for that keyword (see Figure 7-6).
In Figure 7-7, I've configured the keyword [cold calls] to trigger ads that appear in position 7 only. You can edit position preferences for multiple keywords by checking the box to the left of the keywords you wish to edit, and then clicking the Edit button just above the keyword list.
![The [cold calls] keyword will now show its ad in position 7 only.](http://imgdetail.ebookreading.net/business/42/9780470455777/9780470455777__google-adwordstm-for__9780470455777__figs__0707.png)
If you exceed your daily budget on a regular basis, you have two choices: tell Google to pace your ads evenly through the day (Standard), or show the ads as often as possible until you run out of money (Accelerated).
Tip
Both methods can make sense, depending on the viewing patterns of your market. If your market is global, you probably want to show your ads evenly so you can get your message to your prospect in Singapore as well as the one in Saskatoon. If you run a local campaign for office workers, you may want to accelerate the ad showing if more people buy in the morning than the afternoon.
However, the choice begs an important question: Why are you limiting your advertising spend? The concept of an advertising budget doesn't make sense if each ad is making money. If I offered you a dollar bill in exchange for your half-dollar, how many times would you want to complete that transaction? Does infinity sound about right to you? It wouldn't make sense for you to say, "I only trade my 50 cents for your dollar 24 times because my daily budget is 12 dollars."
Note
Limit your daily budget for testing purposes, when you're not yet profitable and you're adjusting your keywords, ads, and Web-site sales process to become profitable. Another case where limiting your budget makes sense is if demand exceeds supply and you can only service so many paying customers. Or if you work for a big company used to advertising that's not directly tied to results, and you're given an ad budget. Or if you haven't read this book and don't yet know what you're doing.
In fact, as you're assessing the competition, if you find that their ads disappear and reappear on the Google search results page as you refresh the page, you can be fairly confident that they aren't profitable yet or they don't understand results-accountable marketing and won't be much of a threat to you.
Actually, these settings are no more or less advanced than any of the others. But if you want to feel special about messing with them, you have my permission. Click the Schedule: Start Date, End Date, Ad Scheduling link to see the options available for scheduling your ads.
You can set up campaigns to run for a predetermined time period. This is useful if you have a seasonal campaign (pool toys, Valentine's Day candy, or Happy January 25th cards) or an event-based campaign (tickets to the World Cup or presidential candidate hats and t-shirts in the months leading up to an election). You can specify start and stop dates in advance, thus saving you one more thing to remember to do later. Click the Edit link to set the campaign dates.
Click the Edit link next to Ad scheduling and gasp to discover that Google gives you the option to schedule your ads by 15-minute increments, any day of the week, as shown in Figure 7-8. You can run your ads from midnight to 2:45 a.m. Monday, 3:00–3:15 a.m. Tuesday, and so on. Click the Time Period setting for the desired day to specify the time periods for your ads to show on that day. By clicking the Bid Adjustment link near the top of the page, you can even adjust your maximum bids by time period. You may want to be in a higher position on weekends, or just after The Daily Show, or during Monday Night Football, and so on.

Click the Ad Delivery: Ad Rotation, Frequency Capping link to view the options here and then click the appropriate Edit link to make any changes.
Hold on for a short fire and brimstone sermon about the Ad Rotation setting: Until you start using the Conversion Optimizer, a very advanced tool that I talk about at the end of this chapter, please do not optimize your ads. I don't care where you are. Run, don't walk to a Web browser, log in to your account, choose a campaign, click the Settings tab, click the Ad Delivery: Ad Rotation, Frequency Capping link, click the Edit link (next to Ad rotation), and move the radio button from Optimize to Rotate. Then click the Save button.
Done? Okay, now I can get rational and calm again. Let me explain why you made this change, and why it's so important. When you run two ads in the same ad group, Google shows them to different people and gives you statistics on how each ad performed (see Chapter 13 for the gory — er, glorious — details of split-testing). If Google optimizes your ad rotation, the ads with lower click through rate (CTR) are shown less and the ads with higher CTR are shown more. Eventually, the poor performer stops showing, and Google declares a winner by default. You set up the test once, and it runs without you from then on. What could be bad?
First, your tests take much longer when you don't give each ad an equal chance to be "voted on" by searchers. You need a threshold number of impressions and clicks for each ad to determine a statistical winner. If one ad gets fewer and fewer impressions and clicks, it takes longer to declare that winner.
When you can't declare winners as they happen, you learn slower. Think of how fast bacteria adapt to antibiotics — because they go through so many generations in a short time frame. The more iteration per time frame, the more your ads can evolve and improve. AdWords is a playground where both evolution and intelligent design rule.
You also lose money because your campaigns are improving more slowly than they might. Ad groups that could achieve profitability in a few days, based on traffic, will take weeks or even months to start making money.
In the second-to-worst-case scenario, you don't figure out anything about your market because you don't even pay attention to the differences between the winning and losing ads. You don't figure out which headlines work best, so you can't improve your Web site, your e-mails, your expensive offline advertisements, and so on.
Warning
If you allow Google to optimize your ads, the absolute worst-case scenario involves Google killing off the more effective ads by mistake. Until you activate Conversion Optimizer (see later in this chapter), Google decides ad effectiveness based on CTR, not whether the visitors who click an ad end up buying. Often the highest CTR ads lose money because they attract too many nonbuyers.
If you show ads on the content network, you can control how many times a unique user (the online marketing geek term for "person") sees your ad. Click the Edit link to set a number of views, specify the time frame (day, week, or month), and tell Google whether this limit should be applied to the entire ad group (that is, all the ads you may be rotating), or to each individual ad (called a "creative" here). Because the content network is more of a "branding" medium than search, and since you don't pay for impressions that don't lead to clicks (as long as you don't change the content network-bidding format), I would leave the default No Caps on Impressions. If you discover a very low CTR and you suspect the same uninterested people (oops, I mean "unique users") are viewing your ads over and over again, you can try to limit impressions and see whether your numbers improve.
By default, Google wants to show each of your ads to as many people as possible. It's good business for them and possibly for you as well. But until you separate out the traffic streams and evaluate each one individually, you'll never know. For most keywords, Google search converts best; search partners second best; and content network worst. So it makes sense to test your ads and keywords where they have the greatest chance of success before rolling them out globally. Google is a little bit like Frank Sinatra's "New York, New York:" If you can make it there, you might be able to make it anywhere.
Separating your traffic by network is a little more complicated than it ought to be, but that turns out to be a good thing. If it were easy, everyone would be doing it and you couldn't gain a competitive advantage.
Your first campaign should probably be Google search only. Creating a Google only campaign is simple. On the Campaign Settings page, under Networks, Devices, and Extensions, click the Edit link, and then uncheck the Search Partners and Content Network check boxes. Google has a little snit when you uncheck those boxes — and warns you that your ads won't show in those networks. Click the Save button and ignore the entreaty.
This campaign will now show your ads only on Google pages — not AOL search, not EarthLink, not Aunt Tillie's blog. To confirm this setting, visit the Networks tab for this campaign and make sure Search Partners and Content Network are both off.
As you've seen, Google happily shares its search results with AOL, EarthLink, and other search partners. Google and AOL users are different from each other in meaningful ways, and those differences can affect how they respond to your ads. You probably can't predict how those differences will affect response, so the safest route is to separate the two streams and market to them separately.
On the Campaign Settings page, uncheck the Google Search box but leave the Search Partners box checked ...just kidding! You can't do it; Google won't let you. You can't target AOL without also targeting Google. You can separate the streams by following this process:
Create two identical campaigns (see Chapter 9 for some timesaving Campaign Modification tools).
The two campaigns should have the same settings, same ad groups, and same keywords. Add the letter G (for Google) to the end of one of the campaign names, and add S (for Search) to the other.
Change their Networks settings as follows:
Campaign G: Check Google Search, uncheck Search Partners, uncheck Content Network.
Campaign S: Check Google Search, check Search Partners, uncheck Content Network.
For the Campaign S, reduce all your bids to about five cents below the Campaign G bids.
You've created two campaigns that compete with one another for exposure. When they compete head to head on Google, the Campaign G will win because it has the higher bids. Only Campaign S will show for the search partners because Campaign G isn't configured to show for that network. Voilà!
You can add the content network by creating a third identical campaign, this one with C after the name. For Campaign C, go to the Settings tab, click the Edit link next to Networks and Devices, and then click the radio button next to Let Me Choose. Then remove the check from Google Search and select the radio button next to Relevant Pages across the Entire Network. Click the Save button, and you've just created a keyword-based, content-only campaign.
Next, you're prompted to create an ad group. Name the ad group, write your first ad, and choose some keywords so that Google knows what content to pair with your ad. Set your default bids, and click the Save Ad Group button. You have just told Google to show your ad on sites with content related to the keywords your entered.
Figure 7-9 shows a neat AdWords account with three campaigns each receiving different streams of traffic. The Google search–only campaign has the highest CTR, 0.87 percent, the search partner campaign is second with 0.44 percent, and the content campaign comes in lowest with 0.07 percent. Notice also the difference in average CPC: The search and Google networks cost 10 to 12 cents more per click, respectively, than the content network. These differences suggest that each network requires its own strategy, from ad copy to ad position to keywords. Unless you separate them, you'll never discover what works best for each network.
Tip
Although people searching on Google expect organic listings and ads (after all, that's why they're searching), ads on the content network are interruptions. If you're reading an article in the New York Times or managing your Gmail, you haven't asked a bunch of advertisers to vie for your attention. Your content ads must be extremely relevant, urgent, or curiosity-provoking to compete against the editorial content of a Web page. Your search ads may only need to highlight a problem and offer a solution.
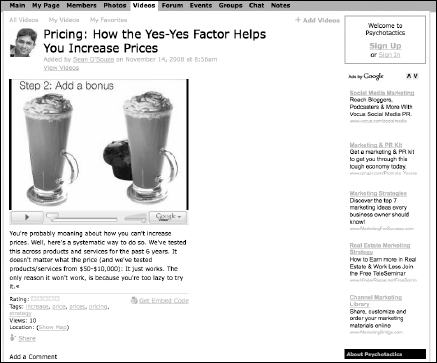
Your bidding strategy for the content network must achieve the goal of getting your ad at or near the top position. Unlike a search-results page, AdSense pages typically show from one to five text ads. Figure 7-10 shows the online community, at http://psychotactics.ning.com with five AdSense ads on the right, next to the video. Your marketing-related ad needs to be in positions 1–5 to get any play on this social network.

If you show your ads on the content network, Google decides by default where to show your ads (automatic placements, based on the keywords you select). But you can regain control here, by telling Google to show your ads on specific sites (managed placements). You can set up a managed placement campaign by following the steps in the previous section and selecting the radio button next to Relevant Pages Only the Placements I Manage. You can later combine the two methods by specifying keyword-optimized pages on specific sites (see the following section, "Combining keyword and placement targeting").
To add managed placements to an automatic placement campaign, click the Ad Groups tab within a campaign, click an ad group name to view the details of that group, and then click the Networks tab. Click the Show details link next to Managed Placements. You'll see a list of all your managed placements (none, to start), along with an Add Placements button. Click that button to bring up another screen with an Add Placements button. Click that button to access a text box where you can type the URLs of Web sites that you want to carry your ads. If you have no idea, click the Try the Placement Tool button next to the magnifying glass.
When you advertise on the content network, in addition to locations and languages you can also specify user demographics. Basically, you're selecting a group of people in some geographic area, from a small town to the entire world, who visit certain Web sites. You can choose Rap/Hip-Hop fans in the Midwest, Progressives in South Carolina, Evangelicals in Chicago, and so on. Interest groups merged with geography can provide very tight, responsive markets for your ads.
The Placement Tool prompts you to select from categories, such as games or health, enter topic words, name specific Web sites, or describe your audience and let Google suggest Web sites matching that demographic, as shown in Figure 7-11.

If you type the topic Gout (as shown in Figure 7-12), Google returns a list of Web sites, with locations or categories on those sites, along with information like impressions per day and supported ad formats (text, image, and video). You can filter the results by clicking Choose Ad Format, so if you have a square 300 × 250 pixel image ad, you can choose only those Web sites that have elected to serve ads of that size and shape.
If your desired audience is in the United States and you choose to target the entire country, you can choose Web sites based on demographics. In Figure 7-13, Google will show Web sites visited by 25–44-year-old women making more than $60,000 a year who have children in their household. Figure 7-14 shows the top Web sites returned for those criteria. You can select any or all of them to show your ad. The first one, Aintitcool.com, shares news and reviews of movies, DVDs, and comic books. Ask yourself, "Can I create an ad that will interrupt someone reading an interview with Tom Cruise about the next Mission Impossible movie and make him or her act on my offer? If so, will that person be a good prospect?" If both questions can be answered, "Yes," you may have found a successful content site.


Figure 7-13. Demographic targeting allows you to show your ad to men or women of different ages, income brackets, and ethnicity, whose households include children.

Figure 7-14. Web sites whose visitors are deemed to meet the demographic criteria shown in Figure 7-13.
You can combine the two targeting methods — keywords and placements — within a single ad group. For example, if you want to show your ads on Webmd.com pages that are about gout, you can choose the URL webmd.com from the placement list, and then refine the targeting by adding gout-related keywords and negative keywords (say, for other kinds of arthritis) in the Keywords tab. This gives you much more control than using either placement or keyword targeting separately.
Earlier in this chapter, I urged you not to let Google automatically determine your bids. Eventually, when you have conversion tracking and analytics set up (see Chapters 14 and 15), you can adjust your bids intelligently in response to back-end conversion. When you first bid on a keyword, you want to balance three objectives: getting valid data quickly, generating high CTRs for your best keywords, and not losing the shirt off your back by paying too much for too many unprofitable clicks.
Richard Stokes, founder and president of AdGooroo, discusses his research-backed bidding strategy in his book Mastering Search Advertising — How the Top 3% of Search Advertisers Dominate Google AdWords. He divides keywords into two groups:
Niche keywords: Keywords with that are at least three words long, that you expect will generate high CTRs.
Examples:
gout foods to avoid, left-handed titanium driver, iPod shuffle blue caseBid to get those keywords in positions 2–3. Typically, the costs for positions 2 and 3 are not significantly higher than that for lower positions, while obtaining both a good CTR and conversion rate. Position 1 often has a significant jump in cost and tends to attract unqualified clicks.
Broad keywords: Category terms that lots of people use at the beginning of their search process; these are usually one- to two-word, short-tail keywords.
Examples:
gout, golf club, iPodBid for position 7 for broad keywords. Rarely will you convert enough of these searches to sales to justify the extra expense of positions 1–3, and the traffic for these words can bankrupt you if you generate too many clicks before optimizing your sales process.
Tip
If your campaign is showing on the content network, bid to appear in positions 1–3 for text ads, and position 1 for image and video ads. Otherwise, your ads won't appear enough to for you to learn (or profit) from.
The initial bidding strategies should give way to data-informed bids as soon as possible. After you set up conversion tracking and analytics (described in Chapters 14 and 15, respectively), run keyword reports and adjust each keyword to be profitable. One position will give you the highest ROI for each keyword, and you can usually find it through trial and error within a few hundred clicks.
Just as this edition was going to press, I received reports from a bunch of AdWords power users that the Conversion Optimizer tool was improving their campaign performance significantly. This tool asks you how much you're willing to pay for a conversion — for example, a lead or a sale. Google then scans the history of all your conversions in a search for the perfect bid price for every occasion to provide you with the most conversions at or below your bid. The amount of data Google considers is awesome (I mean that in the literal sense, not the teenager sense). The Conversion Optimizer fluctuates your bid based on time of day, geographic region, keyword, placement site, and other variables — all in combination with each other.
To enable Conversion Optimizer, make sure your Ad Rotation setting is set to Optimize, not Rotate. You must run your campaign for at least a month with conversion tracking on, so Google can start collecting the data to optimize. If your campaign generates at least 30 conversions during the past 30 days, your campaign is eligible for Conversion Optimizer. Determine the most you're willing to pay for a conversion, and then edit the Bidding Option setting for the campaign. Select Focus on Conversions, enter a maximum CPA (cost per action), and then click the Save button.
Warning
When you move a campaign to Conversion Optimizer, you lose all your existing bids. In case things don't work out, make sure you back up your campaign with the desktop AdWords Editor (see Chapter 9 for details). Also, be aware that the tool can take several weeks to discover improvements. The more conversions you generate, the faster it learns. This is one of the most powerful tools in the AdWords arsenal — please read the documentation carefully. You can get to it by clicking the question mark next to Bidding Option on the campaign settings page and then clicking the Learn More link at the bottom of the pop-up.