
Your Flash applications have the capability to make requests back to a script running on a Web server. These requests can send user-generated data that can be processed by the script, which in turn can send responses specific to the data. For example, you can have a user enter his or her personal information into a form in your Flash application, have the server-side script insert that data into a database, and then return a response that can be displayed in Flash Player.
In order to test that your applications are working properly, you should set up a testing server on your personal computer. To do this, you will need to install a Web server and a server-side application server. If you use Windows, you can choose between the free Apache Web server or Microsoft's own Internet Information Services (IIS). For the purposes of these examples, Apache will be used. If you run a Mac with at least OS X, Apache is already on your computer. See the Extra at the end of this section for details on enabling it.
To use Apache, you first need to download it from the Apache Web site. As an open source project, the Web server is free to download and use for any purpose. In fact, you can even download the raw source code for the server, but you probably will not need to because Apache provides a precompiled installer similar to what you are used to from other programs.
When you visit the Web site to download the server, you see links to the latest "stable" release, as well as past versions and new, still-in-development versions. You want to get whatever version is being offered as the latest "stable" release.

The main Apache Web site opens.

The Apache HTTP Server Project page appears.


Note
The text of the heading and link may be slightly different if a newer version is available.
The download page appears.

The File Download dialog box appears.

The Save As dialog box appears.
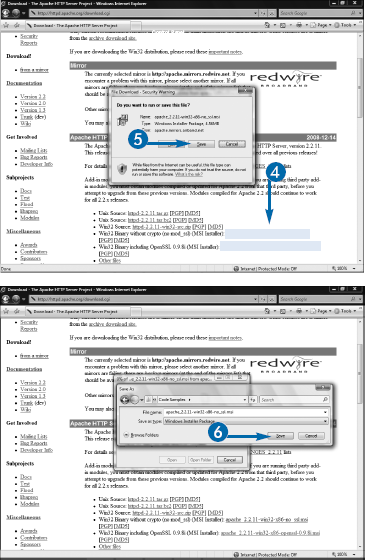

The software downloads.
If you use a Macintosh running at least OS X, you will have Apache preinstalled, but not configured, for your computer. To enable it, you need to go into the Sharing panel in System Preferences and check the Web Sharing box.
You can also open a Terminal window and type
sudo apachect1 start
You will be prompted to enter the computer's root password. If you need to restart the server at some later point, for example after making changes to its configuration settings, you can return to a Terminal window and type
sudo apachect1 restart
Although the actual process of installing Apache in Windows is very straightforward — it uses an installer wizard that guides you through the steps — there are several important configuration issues that you should address. You need to provide administrative information such as the domain name of the Web site and a contact email address, both of which are displayed in default error messages. If you are creating a testing computer for your own use, you can enter anything you want into either of these fields. The same applies to the email address: For testing purposes, it is not necessary to be accurate.
You can also choose to install Apache completely or perform a custom installation to choose which components you want to have available. In most cases, the default installation will be fine for testing purposes.
You can also decide whether you want to run Apache as a service and control how it starts. If you run it as a service, it is configured to run "silently" in the background, which simply means that you do not have a visual indicator that it is running while working. You can have the server start automatically when you start Windows, or you can set it so that you have to manually start the server when you want to use it. Most of the time, it makes the most sense to have it run as a service and start automatically, although you can choose either of the other options if you prefer more control.
The Installation Wizard launches, and the Welcome screen appears.
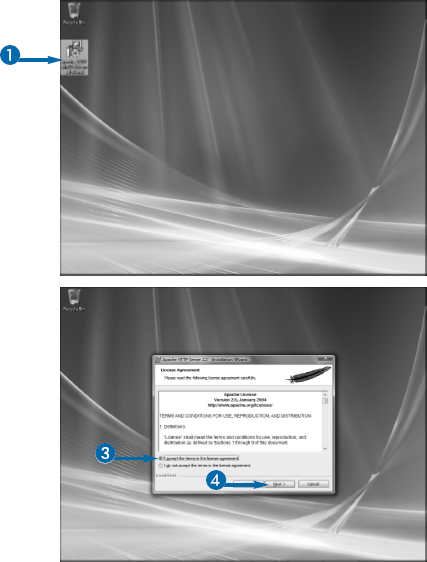
The License Agreement screen appears.
The Read This First screen appears.
The Server Information screen appears.


The Setup Type screen appears.


The Destination Folder screen appears.

The Ready to Install the Program screen appears.

The installation begins.
When the installation is completed, the Installation Wizard Completed screen appears.

Apache is installed.

Before you begin attempting to test Flash applications against a server, you need to be sure that it is running. The easiest way to tell if the server is running is to open your Web browser and go to http://localhost. If a page appears with information about Apache, the server is running. If you get a Page Not Found error, you need to be sure that the server installed correctly and that it has been started.
With the default installation, the server should start automatically when you launch Windows. If you want to control it manually, you can start and stop the server by clicking Start
In addition to a Web server, you need an application server to actually process the data. Flash Player cannot communicate with services such as databases directly; instead, it simply makes a request to the server, which in turn must pass the request to an application server for processing. Several solutions exist for this purpose. A few of the most popular are Adobe ColdFusion, Microsoft ASP.NET, and open source PHP. The one you choose depends mostly on personal preference; Flash applications can work with any of them.
Adobe ColdFusion is a commercial product, with a Standard Edition that retails for about $1,300 and an Enterprise Edition for around $7,500. However, you can develop and test applications in ColdFusion using the Developer Edition, which can be downloaded for free from the Adobe Web site.
The Developer Edition of ColdFusion includes all the features of the Enterprise Edition but is limited to access from only two other computers. It is designed so that developers can create ColdFusion applications without needing to purchase a license. You need to deploy your application to a server that is running one of the two commercial editions of ColdFusion, but you can find third-party hosting companies that offer ColdFusion hosting. With some comparison shopping, you can find ColdFusion hosting plans for the same cost as, and in some cases less than, that for other technologies such as PHP.
ColdFusion runs with almost any operating system, as it is available for Windows, Macintosh, and several varieties of UNIX. The installation package is a very large file, so it may take some time to download over slower Internet connections.
A login page appears.
If you do not have an account, you can click Create an Adobe Account on this page, which takes you to a form to create a free Adobe membership.

The File Download dialog box appears.
The Save As dialog box appears.

The download begins. A message appears when the download is complete.
If you would prefer to run PHP for your applications, see the sections "Download PHP" and "Install PHP" later in this chapter for details on downloading and configuring it.
ASP.NET, Microsoft's solution in this market, is also available for free to download and run, but it works only on Windows machines and runs with ease only on Microsoft's Web server, Internet Information Services. You can learn the basics of installing and configuring ASP.NET and writing .NET applications in ASP.NET 2.0: Your visual blueprint for developing Web applications, by Chris Love, published by Wiley.
Several other application server technologies exist. Ruby on Rails is an increasingly popular open source solution. If you are a Java developer, you may already be familiar with Java Server Pages, or JSP. Older solutions such as Python or Perl will provide the necessary capabilities for use with your Flash applications.
Keep in mind that Flash does not directly connect to or work with the application server. Rather, it merely makes a request to the Web server, which is responsible for then passing the request to the application. Therefore, any server-side technology can work with Flash.
Once downloaded, ColdFusion can be installed by using the install wizard. It takes you through a series of steps to install the program and get it set up. Once completed, you can begin using ColdFusion immediately.
ColdFusion can be run with a Web server such as Apache or IIS, but the Developer Edition can also be run with its own standalone server. If you are going to use Apache or IIS, you need to be sure that the server is installed and running before you install ColdFusion. You can also install the database connectors, search services, and documentation for ColdFusion.
Your ColdFusion server is configured through an administrator, which requires a password that you set during installation. You will be prompted for this password when you need to access the administrator. ColdFusion will also ask if you want to enable Remote Development Services, or RDS. RDS is used by programs such as Dreamweaver to communicate with ColdFusion. You can choose to install it if you use Dreamweaver, but it is not necessary for testing with Flash.
Once complete, ColdFusion launches your Web browser and completes a few additional configuration steps. This does not require your input and generally takes only a few minutes. When the installation succeeds, you are taken to the login page for the administrator. You can log in to explore the configuration and administrative settings for the server, but these are beyond the scope of this book, as the standard settings will all work well. You can return to the administrator at any point by clicking Start
The License Agreement screen appears.

The Install Type screen appears.
The Installer Configuration screen appears.

Note
If you do not want to use IIS or Apache, click Built-in Web Server.
The Administrator Password screen appears.


Note
If you do not want to use RDS, skip to step 19.


The Pre-Installation Summary screen appears.

The application installs. Once complete, a message is displayed.

Along the way when installing ColdFusion, you will be asked to install and configure LiveCycle Data Services ES. This is a free, somewhat limited version of Adobe's LiveCycle Data Services, or LCDS. Although LCDS is not used in normal Flash development, it plays an important role in the overall Flash platform, as it is the primary means by which Flex applications communicate with server resources. Flex is a companion development environment to Flash. It offers a more developer-centric and code-oriented workflow, in which you can build applications using a combination of ActionScript and an XML-based markup language known as MXML. You can learn more about Flex in Flex 3 Bible, by David Gassner, published by Wiley.
Sometime in late 2009 or early 2010, Adobe is planning to release the next version of Flex, along with a new application in the Flash platform, known as Flash Catalyst, which will provide a more designer-based workflow for building Flex applications.
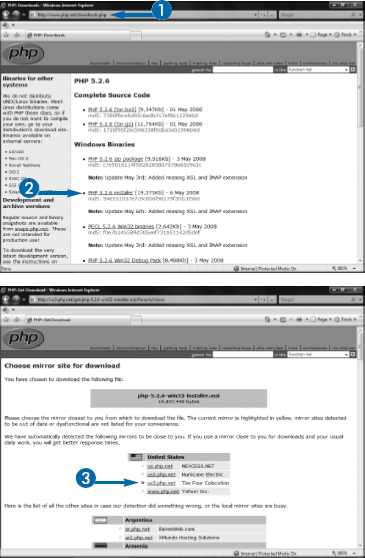
PHP, like the Apache server, is open source and can be downloaded and used without charge. When you visit the download site at www.php.net/downloads, you will see several options for downloading the same version of PHP. You can download the raw source code for PHP, but this should only be attempted by experienced developers. Instead, you should download either a Windows installer that provides a simple wizard-based installation or a ZIP archive that contains all the files you need but requires that you manually copy them to specific locations on your computer and then manually configure your Web server to work with PHP. Although some developers like the fine-tuned control offered by the ZIP method, it is fastest and easiest to use the Windows installer.
You should download the latest stable release of PHP. At the time of this writing, that is version 5.2.9; however, a later version, possibly even PHP 6, may be available when you visit the site. For the purposes of the examples presented in this book, any version of PHP will work.
If you are using a Macintosh running OS X or later, PHP should already be installed on your system. Therefore, you do not need to do anything to get started developing sites in PHP on the Mac, other than configuring the Apache server. See the section "Download the Apache Web Server" earlier in this chapter for details on configuring the server on the Mac. However, if you have had your Mac for a while, you may want to see if a more up-to-date version of PHP is available if you want to become a more advanced developer.
Note
The version number may be different.
The Get Download page appears.
The File Download dialog box appears.
The Save As dialog box appears.
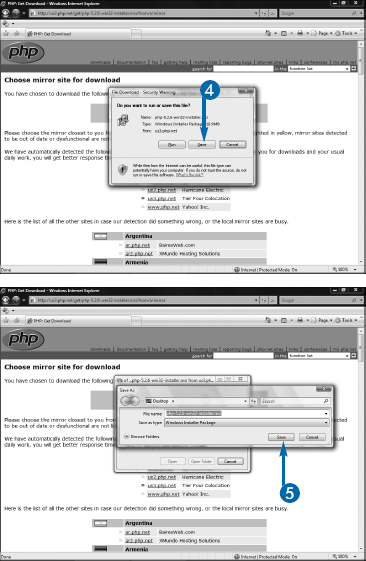
The file downloads.
When you download PHP, you will have the option to download it from one of many mirror sites. These are merely Web servers that host the download files, as a way of spreading the bandwidth costs. Which mirror site you choose only matters to a point. Mirror sites that are closer to you may download the file faster than those far away, particularly if they are on a different continent, but there are many other factors that may affect your download speed, including your connection speed and the number of other users currently attempting to download from the same server. Most likely, you will not see any noticeable difference between downloading from one mirror or another.
The various subreleases of PHP 5 do not have significant differences, so although the text discusses PHP 5.2.6, everything will work the same if you have a slightly later or earlier release. PHP 6, on the other hand, will likely offer many very big differences from past versions, but it is supposed to be backwards-compatible, so the examples in the text should work even if you end up downloading that version.
After you have downloaded PHP, you can install it by following the steps outlined in the installation wizard. You need to be sure that either Apache or IIS is installed and running on your computer before you begin the installation.
As with other software installers, PHP begins by asking you to read and agree to an end-user license agreement. It then asks you to confirm the directory into which you want to have it installed and the Web server you are using.
A default installation of PHP installs only the minimum files needed to run it. In order to communicate with a database, you must install the appropriate database modules. You can do this in the installer on the Choose Items to Install page by expanding Extensions and then selecting the appropriate modules. Although almost any database can be used with PHP, the overwhelming majority of PHP developers use MySQL. The examples later in this chapter that discuss communicating with databases use MySQL as well, so you will want to choose the MySQL extensions. After you have completed these steps, the actual installation should be fairly quick.
As mentioned previously, Macintosh computers come with PHP preinstalled. If, however, you find that you want to upgrade your preinstalled version of PHP to a newer one, the easiest method is to use MAMP, which contains Apache, MySQL, and PHP in a single package, specifically designed for Macs. You can download the latest version of MAMP and read details on installing and configuring it at www.mamp.info/en/index.html.
The Windows security warning appears.
The installer Welcome screen appears.
The End-User License Agreement screen appears.

The Destination Folder screen appears.
The Web Server Setup screen appears.
Note
If you are using a recent version of Apache, click Apache 2.2.x Module; if you use IIS, you want the IIS ISAPI Module.
The Choose Items to Install screen appears.
The Ready to Install PHP screen appears.

PHP installs. When complete, a message appears.
If you forget to install the MySQL extensions or you decide later that you want to modify other aspects of your installation, you can run the installer again. If PHP detects that the same version is already installed, it will run in Repair mode. You can tell it that you want to change your installation and then select the modules that you want to install.
You can also manually install modules by downloading the files from http://pecl.php.net/packages.php or http://pear.php.net, following the instructions provided in the PHP documentation online to install the module, and configuring PHP to use it. Note that many of the modules are packaged as TAR files, so you need a special application such as gzip or WinRAR to extract them if you are running Windows, as the WinZip utility installed on most Windows machines does not support the TAR format. You can use a search engine such as Google to find those applications.
After you have your testing environment set up by installing a Web server and an application server, you can configure your Flash application to connect to the server to send and retrieve data. This is most often handled with the URLRequest class.
Flash Player ultimately connects to Web servers in exactly the same way as a regular HTML page. Both send a request via HTTP to a server and then await a response. Two methods exist for sending this data: get and post. A request via get appends the data being sent from the client, whether Flash or HTML-based, to the URL in name=value pairs. For example, if you are sending a get request to a server at www.bradystudios.net and have a variable userName with a value Mal, the get request would look like www.bradystudios.com?userName=Mal. You can have multiple data points, but servers do limit the total length of the URL string, usually to about 1,024 characters, so large blocks of data cannot be sent. post, on the other hand, allows you to send large blocks of data, as the information is sent in the background of the request. post requests are hidden from direct view from users.
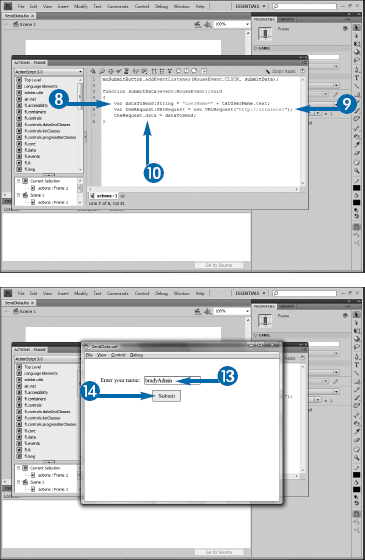
The address to which you are making the request is provided directly to the constructor for the class. Additional data points can be added by placing them within a single variable and then assigning this variable to the data property of the class.
The default method when sending data with URLRequest is get, but this can be changed by setting the method property of the class to a constant, either URLRequestMethod.GET or URLRequstMethod.POST.

In order to respond to requests for documents, Web servers have a root directory configured. All documents that you want to be accessible from the server need to be saved either in this directory or a subdirectory of it.
On Windows, the default root directory for the Apache server, assuming a default installation, is c:/Program Files/Apache Software Foundation/Apache2.2/htdocs. The default directory for a normal installation of Internet Information Services is c:/intepub/wwwroot. The configuration settings for either server allow you to change this root.
On the Macintosh, the default root directory for Apache can be found at /Library/WebServer/Documents/.
You need to be sure to save any files that you want to use for communication with the server in this root directory. Otherwise, you will get an error.
You can make a request to the server located on your machine using the special reserved URL localhost. This will send a request to the local server, which will attempt to find the document in the root directory.
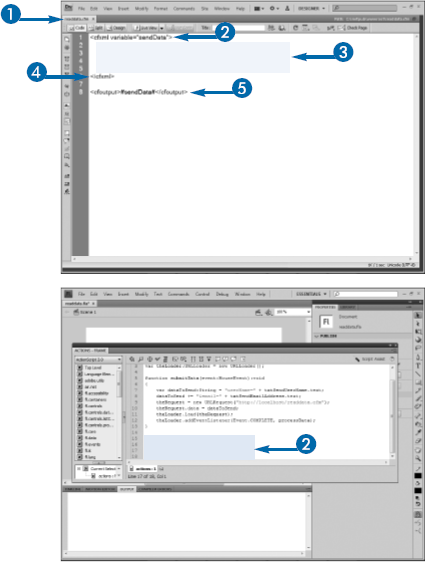
In order to respond to a request from the client, rather than from Flash Player or an HTML document, you need to write a script in the language supported by the application server you are using. For ColdFusion, this involves writing in CFML, of ColdFusion Markup Language. CFML closely resembles HTML in that it uses a tag-based architecture.
You can write CFML in any text editor. However, Adobe Dreamweaver provides several important features that make coding CFML easier. If you purchased Flash in one of the CS4 suites, you likely already have Dreamweaver as they are included together in the suites.
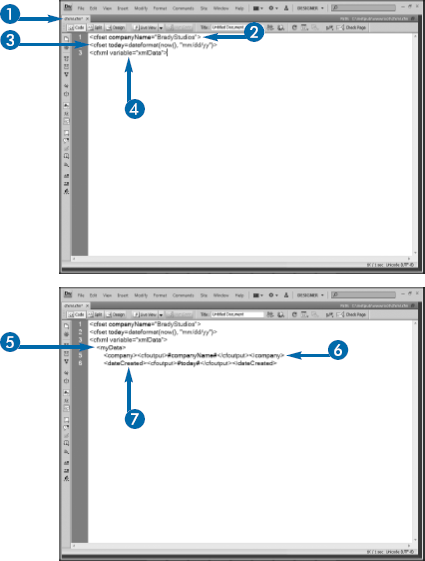
You can create a variable in CFML using the <cfset> tag. Variables in ColdFusion follow the same naming rules as ActionScript variables: They must begin with a letter and then can only contain letters, numbers, and underscores. However, unlike ActionScript, CFML is not case-sensitive.
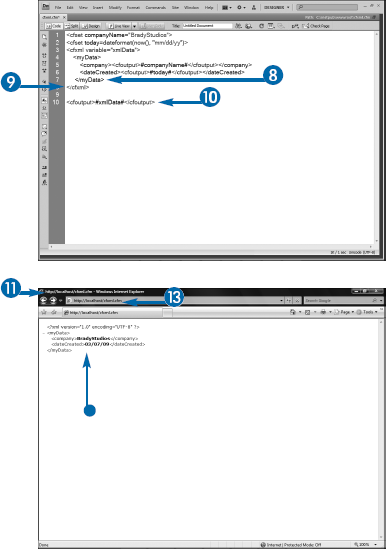
The easiest format to use when sending data back to Flash is XML. CFML has many tags that it can use to both read and write XML. The simplest of these is simply <cfxml>. You provide a name for the variable for reference later via the variable attribute of the tag. Between the opening and closing tags, you can provide a valid XML document, which may either be hard-coded or constructed with variables or other ColdFusion tags.
You can view the value of ColdFusion variables with the <cfoutput> tag. Literal text can be output directly with the tag, whereas ColdFusion values must be placed within pound, or hash, symbols. You can determine the current date and time from the server with the now() function and format it by using the dateformat() function.
Note
If your editor adds any code to the page by default, delete it.
A detailed explanation of ColdFusion is well beyond the scope of this book. Additional details on the language can be found online. You can visit http://livedocs.adobe.com/coldfusion/8/htmldocs/help.html to browse Adobe's official ColdFusion documentation. Many ColdFusion tutorials are available at the Adobe Developer Center at http://developer.adobe.com, and Adobe has a series of video tutorials on the topic at http://tv.adobe.com. In addition, ColdFusion enjoys a large and vibrant developer community. You may have a ColdFusion user group in your area that you can join to learn more about the language and network with other local developers; go to http://groups.adobe.com to see if one is available.
ColdFusion is not case-sensitive, but you should keep in mind that XML is, so although you can use any case that you want for the ColdFusion tags and variable names, you need to be sure that the resulting XML will use a consistent case.
You can create PHP documents in any plain text editor. Most HTML editors, including visual editors such as Adobe Dreamweaver, also support PHP development. Your documents will contain a mixture of PHP and regular HTML. All PHP will be placed within PHP delimiters, which begin with <?php and end with ?>. Like ActionScript, PHP variable names are case-sensitive; function names, however, are not.
PHP, via its DOM XML extension, provides the ability to read and write XML. The extension includes a series of objects, properties, and methods to manipulate XML.
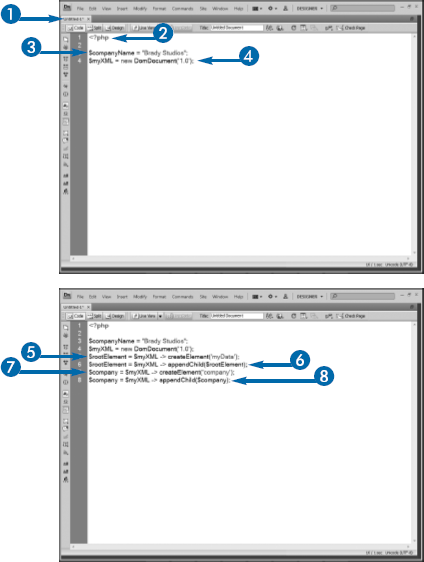
You can begin writing an XML document in PHP by creating a new instance of DomDocument, passing the version of XML that you want to use to its constructor. Creating new instances of objects in PHP uses the exact same syntax as ActionScript, except that PHP variables must begin with a dollar sign.
You can then create elements within your XML document via the createElement method. Once created, you can insert an element into your document via the appendChild method. In both cases, you associate the method with the object using the -> characters.
You can add text data to the XML with the createTextNode method. The syntax is basically the same as creating an element, so you need to also call appendChild to add the text node to the document.
After the XML has been created, you can output the entire result by setting a variable to a call to the DOM XML instance's saveXML() method. In PHP, you can output strings to the browser by calling the echo method.
Note
If your editor adds anything to the document by default, delete it.
Save the file to the root of your Web server.

A detailed examination of PHP is beyond the scope of this book. Additional information about the language can be found online. The official Web site of PHP at www.php.net contains a detailed reference guide to the language. In addition, many detailed tutorials exist online; you can use a search engine such as Google to search for tutorials on any specific topic. You can also learn the language through books such as PHP 5: Your visual blueprint for creating open source, server-side content, by Toby Boudreaux, and Flash and PHP Bible, by Matthew Keefe, both published by Wiley.
The DOM XML was introduced into the language in version 4 but was subsequently removed with version 5. Therefore, if you are using PHP 5 or later, you will need to download and install it as a separate extension. You can visit the PECL library of PHP extensions at http://pecl.php.net. From there, simply search for "DOM XML" and follow the instructions provided on the site to download and install the extension.
The process of receiving data from the server is essentially the same as that for sending the data. When a client makes a request to a server-side script, the Web server will automatically send any data created by the script back to the client. This is true regardless of the technologies used, so whether the client uses HTML or a Flash-based solution and whether the server script is written in ColdFusion, PHP, or some other language, the process is the same.
To use data from a server in your Flash application, you must therefore begin by having the application send a request to the server. Often, this will involve creating a form with input text fields for your users to input the data that they want to send. This data will be appended to the URLRequest object's data property. It can be structured as a simple string, or for larger, more complex data, it may be easier to work with it as XML.
You will also need to have your Flash movie set up to handle the data that is returned. This can be accomplished by simply adding dynamic text fields that will display the information from the server.
In the example shown here, a simple form will request that the user enter his or her name and email address. This data will be sent to the server; in the second half of this section, a ColdFusion script will process the data and send it back to the Flash movie for display. In this example, the data will be structured as a string for simplicity.


This example focuses on a simple send-response mechanism, which is the standard method by which browsers and servers communicate. If you have experience building HTML-based Web applications, this method should be familiar to you.
However, ActionScript does support the use of sockets. Send-response systems are equivalent to email communication: Each side sends its data and then closes its connection to the server. By comparison, a socket-based system allows the client to open a connection to the server and then hold it open, allowing the client and server to communicate back and forth as much as necessary. Server-side push, whereby the server sends data to the client without the client requesting it, is only possible with sockets.
Unfortunately, socket communication requires that additional software be installed on the server. Many Java-based socket servers exist, including red5, Unity, and Electro Server. Adobe's BlazeDS, an open source implementation of its commercial LiveCycleDS, can also be used.
You will need a script on the server to process the data being sent by Flash. This script may compare the data sent from Flash with existing database information, as is the case in application login scripts, or it may insert that data into the database. ColdFusion and PHP, along with other languages such as ASP.NET and JSP, are practically limitless as to what they can do with the data, including sending and receiving email and reading and writing files on the server. The details of using any of these languages are beyond the scope of this book; you should explore the possibilities of your language of choice to get a better idea of what can be done.
Regardless of what the script does, in the end it needs to send its data back to your Flash application. Although there are many possibilities as to how this data can be structured, XML is generally the easiest format in which to work, as XML is recognized as a native data format in ActionScript. See the sections earlier in this chapter for examples of how to use ColdFusion or PHP to construct the XML data.
Once received, the data can simply be handled as would any other XML data. As with any interaction with the server, you should wrap the code needed to receive the data into an event handler and the Complete event of the request. This will ensure that the data has been received before ActionScript attempts to use it; otherwise, runtime errors may occur if the data is delayed from the server.
Note
Be sure that the filename matches the one referenced by the
URLRequestobject. See step 14 in the first half of this section.
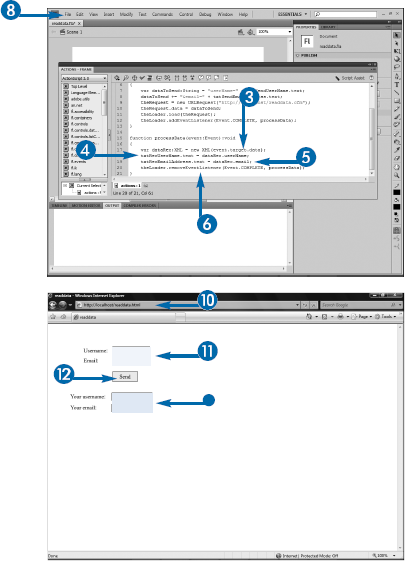
Ideally, the ActionScript should include a mechanism to inform the user in case the server script fails or is unavailable. This can be accomplished by adding code to handle the IOError event, which is automatically fired whenever an error occurs when receiving data:
myRequest.addEventListener(IOErrorEvent.IO_ERROR, handleError);
function handleError(event:IOErrorEvent):void
{
     txtErrorField.text = "An error occurred: " + event.text;
}