WHAT YOU WILL LEARN IN THIS CHAPTER:
The basic structure of a window
The Windows API and how it is used
Windows messages and how you deal with them
The notation that is commonly used in Windows programs
The basic structure of a Windows program
How you create an elementary program using the Windows API and how it works
Microsoft Foundation Classes
The basic elements of an MFC-based program
Windows Forms
The basic elements of a Windows Forms application
In this chapter, you will take a look at the basic ideas that are involved in every Windows program in C++. You'll first develop a very simple example that uses the Windows operating system API directly. This will enable you to understand how a Windows application works behinds the scenes, which will be useful to you when you are developing applications using the more sophisticated facilities provided by Visual C++ 2010. You will then see what you get when you create a Windows program using the Microsoft Foundation Classes, better known as the MFC. Finally, you'll create a basic program using Windows Forms that will execute with the CLR, so by the end of the chapter you'll have an idea of what each of the three approaches to developing a Windows application involves.
With Visual C++ 2010 you have three basic ways of creating an interactive Windows application:
Using the Windows API. This is the fundamental interface that the Windows operating system provides for communications between itself and the applications that are executing under its control.
Using the Microsoft Foundation Classes, better known as the MFC. This is a set of C++ classes that encapsulate the Windows API.
Using Windows Forms. This is a forms-based development mechanism for creating applications that execute with the CLR.
In a way, these three approaches form a progression from the most programming-intensive to the least programming-intensive. With the Windows API, you are writing code throughout — all the elements that make up the GUI for your application must be created programmatically. With MFC applications there's some help with GUI build in that you can assemble controls on a dialog form graphically and just program the interactions with the user; however, you still are involved in a lot of coding. With a Windows Forms application, you can build the complete GUI, including the primary application window, by assembling the controls that the user interacts with graphically. You just place the controls wherever you want them in a form window, and the code to create them is generated automatically. Using Windows Forms is by far the fastest and easiest mechanism for generating an application because the amount of code that you have to write is greatly reduced compared with the other two possibilities. The code for a Windows Forms application also gains all the benefits of executing with the CLR.
Using the MFC involves more programming effort than Windows Forms, but you have more control over how the GUI is created and you end up with a program that will execute natively on your PC. Because using the Windows API directly is the most laborious method for developing an application, I won't go into this in detail. However, you will put together a basic Windows API application so you'll have an opportunity to understand the principles of the mechanism that all Windows applications use to work with the operating system under the covers. You'll explore the fundamentals involved in all three possibilities for Windows application development in this chapter and investigate using MFC and Windows Forms in more detail later in the book. Of course, it also is possible to develop applications in C++ that do not require the Windows operating system, and games programs often take this approach when the ultimate in graphics performance is required. Although this is itself an interesting topic, it would require a whole book to do it justice, so I won't pursue this topic further.
Before getting to the examples in this chapter, I'll review the terminology that is used to describe an application window. You have already created a Windows program in Chapter 1 without writing a single line of code yourself, and I'll use the window generated by this to illustrate the various elements that go to make up a window.
You will inevitably be familiar with most, if not all, of the principal elements of the user interface to a Windows program. However, I will go through them anyway just to be sure we have a common understanding of what the terms mean. The best way to understand what the elements of a window can be is to look at one. An annotated version of the window displayed by the example that you saw in Chapter 1 is shown in Figure 12-1.
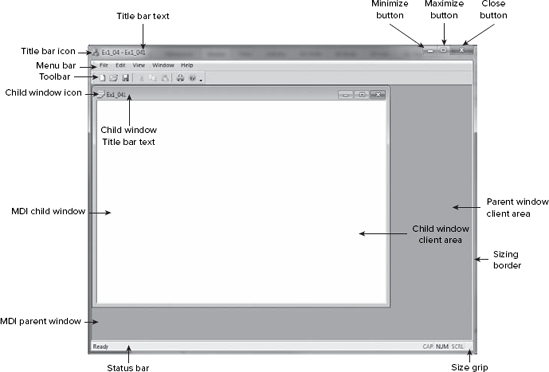
The example actually generated two windows. The larger window with the menu and the tool bars is the main, or parent window, and the smaller window is a child window of the parent. Although the child window can be closed without closing the parent window by double-clicking the title bar icon that is in the upper-left corner of the child window, closing the parent window automatically closes the child window as well. This is because the child window is owned by, and dependent upon, the parent window. In general, a parent window may have a number of child windows, as you'll see.
The most fundamental parts of a typical window are its border, the title bar that shows the name that you give to the window, the title bar icon that appears at the left end of the title bar, and the client area, which is the area in the center of the window not used by the title bar or borders. You can get all of these created for free in a Windows program. As you will see, all you have to do is provide some text for the title bar.
The border defines the boundary of a window and may be fixed or resizable. If the border is resizable, you can drag it to alter the size of the window. The window also may possess a size grip, which you can use to alter the size of a window. When you define a window, you can modify how the border behaves and appears if you want. Most windows will also have the maximize, minimize, and close buttons in the upper-right corner of the window. These allow the window to be increased to full screen size, reduced to an icon, or closed.
When you click the title bar icon with the left mouse button, it provides a standard menu for altering or closing the window called the system menu or control menu. The system menu also appears when you right-click the title bar of a window. Although it's optional, it is a good idea always to include the title bar icon in any main windows that your program generates. Including the title bar icon provides you with a very convenient way of closing the program when things don't work during debugging.
The client area is the part of the window where you usually want your program to write text or graphics. You address the client area for this purpose in exactly the same way as the yard that you saw in Figure 7-1 in chapter 7. The upper-left corner of the client area has the coordinates (0, 0), with x increasing from left to right, and y increasing from top to bottom.
The menu bar is optional in a window but is probably the most common way to control an application. Each menu in the menu bar displays a drop-down list of menu items when you click it. The contents of a menu and the physical appearance of many objects that are displayed in a window, such as the icons on the toolbar that appear above, the cursor, and many others, are defined by a resource file. You will see many more resource files when we get to write some more sophisticated Windows programs.
The toolbar provides a set of icons that usually act as alternatives to the menu options that you use most often. Because they give a pictorial clue to the function provided, they can often make a program easier and faster to use.
I'll mention a caveat about terminology that you need to be conscious of before I move on. Users tend to think of a window as the thing that appears on the screen with a border around it, and, of course, it is, but it is only one kind of window; however, in Windows a window is a generic term covering a whole range of entities. In fact, almost any entity that is displayed is a window — for example, a dialog box is a window and each button is also a window. I will generally use terminology to refer to objects that describe what they are, buttons, dialogs, and so on, but you need to have tucked in the back of your mind that they are windows, too, because you can do things to them that you can do with a regular window — you can draw on a button, for instance.
When you write a Windows program, your program is subservient to the operating system and Windows is in control. Your program must not deal directly with the hardware, and all communications with the outside world must pass through Windows. When you use a Windows program, you are interacting primarily with Windows, which then communicates with the application program on your behalf. Your Windows program is the tail, Windows is the dog, and your program wags only when Windows tells it to.
There are a number of reasons why this is so. First and foremost, because your program is potentially always sharing the computer with other programs that may be executing at the same time, Windows has to have primary control to manage the sharing of machine resources. If one application were allowed to have primary control in a Windows environment, this would inevitably make programming more complicated because of the need to provide for the possibility of other programs, and information intended for other applications could be lost. A second reason for Windows being in control is that Windows embodies a standard user interface and needs to be in charge to enforce that standard. You can only display information on the screen using the tools that Windows provides, and then only when authorized.
You have already seen, in Chapter 1, that a Windows program is event-driven, so a Windows program essentially waits around for something to happen. A significant part of the code required for a Windows application is dedicated to processing events that are caused by external actions of the user, but activities that are not directly associated with your application can nonetheless require that bits of your program code are executed. For example, if the user drags the window of another application that is active alongside your program and this action uncovers part of the client area of the window devoted to your application, your application may need to redraw that part of the window.
Events in a Windows application are occurrences such as the user clicking the mouse or pressing a key, or a timer reaching zero. The Windows operating system records each event in a message and places the message in a message queue for the program for which the message is intended. Thus a Windows message is simply a record of the data relating to an event, and the messagequeue for an application is just a sequence of such messages waiting to be processed by the application. By sending a message, Windows can tell your program that something needs to be done, or that some information has become available, or that an event such as a mouse click has occurred. If your program is properly organized, it will respond in the appropriate way to the message. There are many different kinds of messages and they can occur very frequently — many times per second when the mouse is being dragged, for example.
A Windows program must contain a function specifically for handling these messages. The function is often called WndProc() or WindowProc(), although it doesn't have to have a particular name because Windows accesses the function through a pointer to a function that you supply. So the sending of a message to your program boils down to Windows calling a function that you provide, typically called WindowProc(), and passing any necessary data to your program by means of arguments to this function. Within your WindowProc() function, it is up to you to work out what the message is from the data supplied and what to do about it.
Fortunately, you don't need to write code to process every message. You can filter out those that are of interest in your program, deal with those in whatever way you want, and pass the rest back to Windows. You pass a message back to Windows by calling a standard function provided by Windows called DefWindowProc(), which provides default message processing.
All of the communications between any Windows application and Windows itself use the Windows application programming interface, otherwise known as the Windows API. This consists of literally hundreds of functions that are provided as a standard with the Windows operating system that provides the means by which an application communicates with Windows, and vice versa. The Windows API was developed in the days when C was the primary language in use, long before the advent of C++, and for this reason, structures rather than classes are frequently used for passing some kinds of data between Windows and your application program.
The Windows API covers all aspects of the communications between Windows and your application. Because there is such a large number of functions in the API, using them in the raw can be very difficult — just understanding what they all are is a task in itself. This is where Visual C++ 2010 makes the life of the application developer very much easier. Visual C++ 2010 packages the Windows API in a way that structures the API functions in an object-oriented manner, and provides an easier way to use the interface in C++ with more default functionality. This takes the form of the Microsoft Foundation Classes, MFC. Also, for applications targeting the CLR, you have a facility called Windows Forms where the code necessary to create a GUI is all created automatically. All you have to do is supply the code necessary to handle the events in the way that your application requires. You'll be creating a Windows Forms application a little later in this chapter.
Visual C++ also provides Application Wizards that create basic applications of various kinds, including MFC and Windows Forms-based applications. The Application Wizard can generate a complete working application that includes all of the boilerplate code necessary for a basic Windows application, leaving you just to customize this for your particular purposes. The example in Chapter 1 illustrated how much functionality Visual C++ is capable of providing without any coding effort at all on your part. I will discuss this in much more detail when we get to write some more practical examples using the MFC Application Wizard.
Windows defines a significant number of data types that are used to specify function parameter types and return types in the Windows API. These Windows-specific types also propagate through to functions that are defined in MFC. Each of these Windows types will map to some C++ type, but because the mapping between Windows types and C++ types can change, you should always use the Windows type where this applies. For example, in the past the Windows type WORD has been defined in one version of Windows as type unsigned short and in another Windows version as type unsigned int. On 16-bit machines these types are equivalent, but on 32-bit machines they are decidedly different so anyone using the C++ type rather than the Windows type could run into problems.
You can find the complete list of Windows data types in the documentation, but here are a few of the most common you are likely to meet:
| A Boolean variable can have the values |
| An 8-bit byte. |
| An 8-bit character. |
| A 32-bit unsigned integer that corresponds to type |
| A handle to an object — a handle being a 32-bit integer value that records the location of an object in memory, or 64-bit when compiling for 64 bit. |
| A handle to a brush, a brush being used to fill an area with color. |
| A handle to a cursor. |
Handle to a device context — a device context being an object that enables you to draw on a window. | |
| Handle to an instance. |
| A message parameter. |
|
|
| A pointer to a constant null-terminated string of 16-bit characters. |
| A pointer to a constant null-terminated string of 8-bit characters. |
| A pointer to a handle. |
| A signed value that results from processing a message. |
| A 16-bit unsigned integer, so it corresponds to type unsigned short in C++. |
I'll introduce any other Windows types we are using in examples as the need arises. All the types used by Windows, as well as the prototypes of the Windows API functions, are contained in the header file windows.h, so you need to include this header file when you put your basic Windows program together.
In many Windows programs, variable names have a prefix, which indicates what kind of value the variable holds and how it is used. There are quite a few prefixes and they are often used in combination. For example, the prefix lpfn signifies a long pointer to a function. A sample of the prefixes you might come across is:
PREFIX | MEANING |
|---|---|
b | a logical variable of type |
by | type |
c | type |
dw | type |
fn | a function |
h | a handle, used to reference something. |
i | type |
l | type |
lp |
|
n | type |
a pointer | |
s | a string |
sz | a zero terminated string |
w | type |
This use of these prefixes is called Hungarian notation. It was introduced to minimize the possibility of misusing a variable by interpreting it differently from how it was defined or intended to be used. Such misinterpretation was easily done in the C language, a precursor of C++. With C++ and its stronger type checking, you don't need to make such a special effort with your notation to avoid such problems. The compiler always flags an error for type inconsistencies in your program, and many of the kinds of bugs that plagued earlier C programs can't occur with C++.
On the other hand, Hungarian notation can still help to make programs easier to understand, particularly when you are dealing with a lot of variables of different types that are arguments to Windows API functions. Because Windows programs are still written in C, and, of course, because parameters for Windows API functions are still defined using Hungarian notation, the method is still used quite widely.
You can make up your own mind as to the extent to which you want to use Hungarian notation, as it is by no means obligatory. You may choose not to use it at all, but in any event, if you have an idea of how it works, you will find it easier to understand what the arguments to the Windows API functions are. There is a small caveat, however. As Windows has developed, the types of some of the API function arguments have changed slightly, but the variable names that are used remain the same. As a consequence, the prefix may not be quite correct in specifying the variable type.
For a minimal Windows program that just uses the Windows API, you will write two functions. These are a WinMain() function, where execution of the program begins and basic program initialization is carried out, and a WindowProc() function that is called by Windows to process messages for the application. The WindowProc() part of a Windows program is usually the larger portion because this is where most of the application-specific code is, responding to messages caused by user input of one kind or another.
Although these two functions make up a complete program, they are not directly connected. WinMain() does not call WindowProc(), Windows does. In fact, Windows also calls WinMain(). This is illustrated in Figure 12-2.
The function WinMain() communicates with Windows by calling some of the Windows API functions. The same applies to WindowProc(). The integrating factor in your Windows program is Windows itself, which links to both WinMain() and WindowProc(). You will take a look at what the pieces are that make up WinMain() and WindowProc() and then assemble the parts into a working example of a simple Windows program.
The WinMain() function is the equivalent of the main() function in a console program. It's where execution starts and where the basic initialization for the rest of the program is carried out.
To allow Windows to pass data to it, WinMain() has four parameters and a return value of type int. Its prototype is:
int WINAPI WinMain(HINSTANCE hInstance,
                   HINSTANCE hPrevInstance,
                   LPSTR lpCmdLine,
                   int nCmdShow
                  );
Following the return type specifier, int, you have a specification for the function, WINAPI, which is new to you. This is a Windows-defined macro that causes the function name and arguments to be handled in a special way that is specific to Windows API functions. This is different from the way functions are normally handled in C++. The precise details are unimportant — this is simply the way Windows requires things to be, so you need to put the WINAPI macro name in front of the names of functions called by Windows.
Note
If you really want to know about calling conventions, they are described in the documentation that comes with Visual C++ 2010. WINAPI is defined as __ stdcall, and putting this modifier before a function name indicates that the standard Windows calling convention is to be used. This requires that the parameters are pushed on the stack in reverse order and that the function called will clean up the stack when it ends. The CALLBACK modifier that you will see later in this chapter is also defined as __stdcall and is therefore the equivalent of WINAPI. The standard C++ calling convention is specified by the __cdecl modifier.
The four arguments that are passed by Windows to your WinMain() function contain important data. The first argument, hInstance, is of type HINSTANCE, which is a handle to an instance — an instance here being a running program. A handle is an integer value that identifies an object of some kind — in this case, the instance of the application. The actual integer value of a handle is not important. There can be several programs in execution under Windows at any given instant. This raises the possibility of several copies of the same application being active at once, and this needs to be recognized. Hence, the hInstance handle identifies a particular copy. If you start more than one copy of a program, each one has its own unique hInstance value. As you will see shortly, handles are also used to identify all sorts of other things. Of course, all handles in a particular context — application instance handles, for example — need to be different from one another.
The next argument passed to your WinMain() function, hPrevInstance, is a legacy from the 16-bit versions of the Windows operating system, and you can safely ignore it. On current versions of Windows, it is always null. The next argument, lpCmdLine, is a pointer to a string containing the command line that started the program. For instance, if you started it using the Run command from the Start button menu of Windows, the string contains everything that appears in the Open box. Having this pointer allows you to pick up any parameter values that may appear in the command line. The type LPSTR is another Windows type, specifying a 32-bit (long) pointer to a string, or 64-bit when compiling in 64-bit mode.
The last argument, nCmdShow, determines how the window is to look when it is created. It could be displayed normally or it might need to be minimized; for example, the shortcut for the program might specify that the program should be minimized when it starts. This argument can take one of a fixed set of values that are defined by symbolic constants such as SW_SHOWNORMAL and SW_SHOWMINNOACTIVE. There are a number of other constants like these that define the way a window is to be displayed, and they all begin SW_. Other examples are SW_HIDE or SW_SHOWMAXIMIZED. You don't usually need to examine the value of nCmdShow. You typically pass it directly to the Windows API function responsible for displaying your application window.
If you want to know what all the other constants are that specify how a window displays, you can find a complete list of the possible values if you search for WinMain in the MSDN Library. You can access the MSDN library online at http://msdn2.microsoft.com/en-us/library/default.aspx.
The function WinMain() in your Windows program needs to do four things:
Tell Windows what kind of window the program requires
Create the program window
Initialize the program window
Retrieve Windows messages intended for the program
We will take a look at each of these in turn and then create a complete WinMain() function.
The first step in creating a window is to define just what sort of window it is that you want to create. Windows defines a special struct type called WNDCLASSEX to contain the data specifying a window. The data that is stored in an instance of the struct defines a window class, which determines the type of window. Do not confuse this with a C++ class — the MFC defines a class that represents a window but, this is not the same at all. You need to create a variable of type WNDCLASSEX, and give values to each of its members (just like filling in a form). After you've filled in the variables, you can pass it to Windows (via a function that you'll see later) to register the class. When that's been done, whenever you want to create a window of that class, you can tell Windows to look up the class that you've already registered.
The definition of the WNDCLASSEX structure is as follows:
struct WNDCLASSEX
{
  UINT cbSize;            // Size of this object in bytes
  UINT style;             // Window style
  WNDPROC lpfnWndProc;    // Pointer to message processing function
  int cbClsExtra;         // Extra bytes after the window class
  int cbWndExtra;         // Extra bytes after the window instance
  HINSTANCE hInstance;    // The application instance handle
  HICON hIcon;            // The application icon
  HCURSOR hCursor;        // The window cursor
  HBRUSH hbrBackground;   // The brush defining the background color
  LPCTSTR lpszMenuName;   // A pointer to the name of the menu resource
LPCTSTR lpszClassName; // A pointer to the class name HICON hIconSm; // A small icon associated with the window };
You construct an object of type WNDCLASSEX in the way that you saw when I discussed structures, for example:
WNDCLASSEX WindowClass; // Create a window class object
All you need to do now is fill in values for the members of WindowClass. They are all public by default because WindowClass is a struct.
Setting the value for the cbSize member of the struct is easy when you use the sizeof operator:
WindowClass.cbSize = sizeof(WNDCLASSEX);
The style member of the struct determines various aspects of the window's behavior, in particular, the conditions under which the window should be redrawn. You can select from a number of options for this member's value, each defined by a symbolic constant beginning CS_.
Note
You'll find all the possible constant values for style if you search for WNDCLASSEX in the MSDN Library that you'll find at http://msdn2.microsoft.com/en-us/library.
Where two or more options are required, the constants can be combined to produce a composite value using the bitwise OR operator, |. For example:
WindowClass.style = CS_HREDRAW | CS_VREDRAW;
The option CS_HREDRAW indicates to Windows that the window is to be redrawn if its horizontal width is altered, and CS_VREDRAW indicates that it is to be redrawn if the vertical height of the window is changed. In the preceding statement, you have elected to have the window redrawn in either case. As a result, Windows sends a message to your program indicating that you should redraw the window whenever the width or height of the window is altered by the user. Each of the possible options for the window style is defined by a unique bit in a 32-bit word being set to 1. That's why the bitwise OR is used to combine them. These bits indicating a particular style are usually called flags. Flags are used very frequently, not only in Windows but also in C++, because they are an efficient way of representing and processing features that are either there or not, or parameters that are either true or false.
The member lpfnWndProc stores a pointer to the function in your program that handles messages for the window you create. The prefix to the name signifies that this is a long pointer to a function. If you followed the herd and called the function to handle messages for the application WindowProc(), you would initialize this member with the statement:
WindowClass.lpfnWndProc = WindowProc;
The next two members, cbClsExtra and cbWndExtra, allow you to ask that extra space be provided internally to Windows for your own use. An example of this could be when you want to associate additional data with each instance of a window to assist in message handling for each window instance. Normally you won't need extra space allocated for you, in which case you must set the cbClsExtra and cbWndExtra members to zero.
The hInstance member holds the handle for the current application instance, so you should set this to the hInstance value that was passed to WinMain() by Windows.
The members hIcon, hCursor, and hbrBackground are handles that in turn define the icon that represents the application when minimized, the cursor the window uses, and the background color of the client area of the window. (As you saw earlier, a handle is just a 32-bit integer (or 64-bit when compiled in 64-bit mode) used as an ID to represent something.) These are set using Windows API functions. For example:
WindowClass.hIcon = LoadIcon(0, IDI_APPLICATION);
WindowClass.hCursor = LoadCursor(0, IDC_ARROW);
WindowClass.hbrBackground = static_cast<HBRUSH>(GetStockObject(GRAY_BRUSH));
All three members are set to standard Windows values by these function calls. The icon is a default provided by Windows and the cursor is the standard arrow cursor used by the majority of Windows applications. A brush is a Windows object used to fill an area, in this case the client area of the window. The function GetStockObject() returns a generic type for all stock objects, so you need to cast it to type HBRUSH. In the preceding example, it returns a handle to the standard gray brush, and the background color for our window is thus set to gray. This function can also be used to obtain other standard objects for a window, such as fonts, for example. You could also set the hIcon and hCursor members to null, in which case Windows would provide the default icon and cursor. If you set hbrBackground to null, your program is expected to paint the window background, and messages are sent to your application whenever this becomes necessary.
The lpszMenuName member is set to the name of a resource defining the window menu, or to zero if there is no menu for the window. You will look into creating and using menu resources when you use the AppWizard.
The lpszClassName member of the struct stores the name that you supply to identify this particular class of window. You would usually use the name of the application for this. You need to keep track of this name because you will need it again when a window is created. This member would therefore be typically set with the statements:
static LPCTSTR szAppName = L"OFWin";       // Define window class name
WindowClass.lpszClassName = szAppName;     // Set class name
I have defined szAppName as a Unicode string here. In fact, the LPCTSTR type is defined as const wchar_t* if UNICODE is defined for the application, or const char* if it is not. Thus, the definition for szAppName here assumes a Unicode application.
The last member is hIconSm, which identifies a small icon associated with the window class. If you specify this as null, Windows searches for a small icon related to the hIcon member and uses that.
In fact, the WNDCLASSEX structure replaces another structure, WNDCLASS, that was used for the same purpose. The old structure did not include the cbSize member that stores the size of the structure in bytes or the hIconSm member.
After all the members of your WNDCLASSEX structure have been set to the values required, the next step is to tell Windows about it. You do this using the Windows API function RegisterClassEx(). Given that your structure is WindowClass, the statement to do this would be:
RegisterClassEx(&WindowClass);
Easy, isn't it? The address of the struct is passed to the function, and Windows extracts and squirrels away all the values that you have set in the structure members. This process is called registering the window class. Just to remind you, the term class here is used in the sense of classification and is not the same as the idea of a class in C++, so don't confuse the two. Each instance of the application must make sure that it registers the window classes that it needs. If you were using the obsolete WNDCLASS structure that I mentioned, you would have to use a different function here, RegisterClass().
After Windows knows the characteristics of the window that you want, and the function that is going to handle messages for it, you can go ahead and create it. You use the function CreateWindow() for this. The window class that you've already created determines the broad characteristics of a window, and further arguments to the function CreateWindow() add additional characteristics. Because an application may have several windows in general, the function CreateWindow() returns a handle to the window created that you can store to enable you to refer to that particular window later. There are many API calls that require you to specify the window handle as a parameter if you want to use them. You will look at a typical use of the CreateWindow() function at this point. This might be:
HWND hWnd;                              // Window handle
...
hWnd = CreateWindow(
        szAppName,                      // the window class name
        "A Basic Window the Hard Way",  // The window title
        WS_OVERLAPPEDWINDOW,            // Window style as overlapped
        CW_USEDEFAULT,                  // Default screen position of upper left
        CW_USEDEFAULT,                  // corner of our window as x,y...
        CW_USEDEFAULT,                  // Default window size, width...
        CW_USEDEFAULT,                  // ...and height
        0,                              // No parent window
        0,                              // No menu
        hInstance,                      // Program Instance handle
        0                               // No window creation data
      );
The variable hWnd of type HWND is a 32-bit integer handle to a window, or 64-bit in 64-bit mode. You'll use this variable to record the value that the CreateWindow() function returns that identifies the window. The first argument that you pass to the function is the class name. This is used by Windows to identify the WNDCLASSEX struct that you passed to it previously, in the RegisterClassEx() function call, so that the information from this struct can be used in the window creation process.
The second argument to CreateWindow() defines the text that is to appear on the title bar. The third argument specifies the style that the window has after it is created. The option specified here, WS_OVERLAPPEDWINDOW, actually combines several options. It defines the window as having the WS_OVERLAPPED, WS_CAPTION, WS_SYSMENU, WS_THICKFRAME, WS_MINIMIZEBOX, and WS_MAXIMIZEBOX styles. This results in an overlapped window, which is a window intended to be the main application window, with a title bar and a thick frame, which has a title bar icon, system menu, and maximize and minimize buttons. A window that you specify as having a thick frame has borders that can be resized.
The next four arguments determine the position and size of the window on the screen. The first two are the screen coordinates of the upper-left corner of the window, and the second two define the width and height of the window. The value CW_USEDEFAULT indicates that you want Windows to assign the default position and size for the window. This tells Windows to arrange successive windows in cascading positions down the screen. CW_USEDEFAULT only applies to windows specified as WS_OVERLAPPED.
The next argument value is zero, indicating that the window being created is not a child window (a window that is dependent on a parent window). If you wanted it to be a child window, you would set this argument to the handle of the parent window. The next argument is also zero, indicating that no menu is required. You then specify the handle of the current instance of the program that was passed to the program by Windows. The last argument for window creation data is zero because you just want a simple window in the example. If you wanted to create a multiple-document interface (MDI) client window, the last argument would point to a structure related to this. You'll learn more about MDI windows later in the book.
Note
The Windows API also includes a CreateWindowEx() function that you use to create a window with extended style information.
After calling the CreateWindow() function, the window now exists but is not yet displayed on the screen. You need to call another Windows API function to get it displayed:
ShowWindow(hWnd, nCmdShow); // Display the window
Only two arguments are required here. The first identifies the window and is the handle returned by the function CreateWindow(). The second is the value nCmdShow that was passed to WinMain(), and that indicates how the window is to appear onscreen.
After calling the function ShowWindow(), the window appears onscreen but still has no application content, so you need to get your program to draw in the client area of the window. You could just put together some code to do this directly in the WinMain() function, but this would be most unsatisfactory: in this case, the contents of the client area are not considered to be permanent — if you want the client area contents to be retained, you can't afford to output what you want and forget about it. Any action on the part of the user that modifies the window in some way, such as dragging a border or dragging the whole window, typically requires that the window and its client area are redrawn.
When the client area needs to be redrawn for any reason, Windows sends a particular message to your program, and your WindowProc() function needs to respond by reconstructing the client area of the window. Therefore, the best way to get the client area drawn in the first instance is to put the code to draw the client area in the WindowProc() function and get Windows to send the message requesting that the client area be redrawn to your program. Whenever you know in your program that the window should be redrawn (when you change something, for example), you need to tell Windows to send a message back to get the window redrawn.
You can ask Windows to send your program a message to redraw the client area of the window by calling another Windows API function, UpdateWindow(). The statement to accomplish this is:
UpdateWindow(hWnd); // Cause window client area to be drawn
This function requires only one argument: the window handle hWnd, which identifies your particular program window. (In general, there can be several windows in an application.) The result of the call is that Windows sends a message to your program requesting that the client area be redrawn.
The last task that WinMain() needs to address is dealing with the messages that Windows may have queued for your application. This may seem a bit odd because I said earlier that you needed the function WindowProc() to deal with messages, but let me explain a little further.
I oversimplified Windows messaging when I introduced the idea earlier. There are, in fact, two kinds of Windows messages:
There are queued messages that Windows places in a queue, and the WinMain() function must extract these messages from the queue for processing. The code in WinMain() that does this is called the message loop. Queued messages include those arising from user input from the keyboard, moving the mouse, and clicking the mouse buttons. Messages from a timer and the Windows message to request that a window be redrawn are also queued.
There are non-queued messages that result in the WindowProc() function being called directly by Windows. A lot of the non-queued messages arise as a consequence of processing queued messages. What you are doing in the message loop in WinMain() is retrieving a message that Windows has queued for your application and then asking Windows to invoke your WindowProc() function to process it. Why can't Windows just call WindowProc() whenever necessary? Well, it could, but it just doesn't work this way. The reasons have to do with how Windows manages multiple applications executing simultaneously.
As I said, retrieving messages from the message queue is done using a standard mechanism in Windows programming called the message pump or message loop. The code for this would be:
MSG msg;                                  // Windows message structure
while(GetMessage(&msg, 0, 0, 0) == TRUE)  // Get any messages
{
TranslateMessage(&msg); // Translate the message DispatchMessage(&msg); // Dispatch the message }
This involves three steps in dealing with each message:
GetMessage(). Retrieves a message from the queueTranslateMessage(). Performs any conversion necessary on the message retrievedDispatchMessage(). Causes Windows to call theWindowProc()function in your application to deal with the message
The operation of GetMessage() is important because it has a significant contribution to the way Windows works with multiple applications, so we should explore it in a little more detail.
The GetMessage() function retrieves a message queued for the application window and stores information about the message in the variable msg, pointed to by the first argument. The variable msg, which is a struct of type MSG, contains a number of different members that you are not accessing here. Still, for completeness, the definition of the structure looks like this:
struct MSG
{
HWND hwnd; // Handle for the relevant window
UINT message; // The message ID
WPARAM wParam; // Message parameter (32-bits)
LPARAM lParam; // Message parameter (32-bits)
DWORD time; // The time when the message was queued
POINT pt; // The mouse position
};The wParam member is an example of a slightly misleading Hungarian notation prefix that I mentioned was now possible. You might assume that it was of type WORD (which is a 16-bit unsigned integer), which used to be true in earlier Windows versions, but now it is of type WPARAM, which is a 32-bit integer value.
The exact contents of the wParam and lParam members are dependent on what kind of message it is. The message ID in the member message is an integer value and can be one of a set of values that are predefined in the header file, windows.h, as symbolic constants. Message IDs for general windows all start with WM_; typical examples are shown in the following table. General windows messages cover a wide variety of events and include messages relating to mouse and menu events, keyboard input, and window creation and management.
ID | DESCRIPTION |
|---|---|
| The window should be redrawn. |
| The window has been resized. |
| The left mouse button is down. |
| The right mouse button is down. |
| The mouse has moved. |
| The window or application should close. |
| The window is being destroyed. |
| The program should be terminated. |
The function GetMessage() always returns TRUE unless the message is WM_QUIT to end the program, in which case the value returned is FALSE, or unless an error occurs, in which case the return value is −1. Thus, the while loop continues until a quit message is generated to close the application or until an error condition arises. In either case, you need to end the program by passing the wParam value back to Windows in a return statement.
Note
There are prefixes other than WM for messages destined for other types of windows than a general window.
The second argument in the call to GetMessage() is the handle of the window for which you want to get messages. This parameter can be used to retrieve messages for one window separately from another. If this argument is 0, as it is here, GetMessage() retrieves all messages for an application. This is an easy way of retrieving all messages for an application regardless of how many windows it has. It is also the safest way because you are sure of getting all the messages for your application. When the user of your Windows program closes the application window, for example, the window is closed before the WM_QUIT message is generated. Consequently, if you only retrieve messages by specifying a window handle to the GetMessage() function, you cannot retrieve the WM_QUIT message and your program is not able to terminate properly.
The last two arguments to GetMessage() are integers that hold minimum and maximum values for the message IDs you want to retrieve from the queue. This allows messages to be retrieved selectively. A range is usually specified by symbolic constants. Using WM_MOUSEFIRST and WM_MOUSELAST as these two arguments would select just mouse messages, for example. If both arguments are zero, as you have them here, all messages are retrieved.
If there are no messages queued, the GetMessage() function does not come back to your program. Windows allows execution to pass to another application, and you only get a value returned from calling GetMessage() when a message appears in the queue. This mechanism was fundamental in enabling multiple applications to run under older versions of Windows and is referred to as cooperative multitasking because it depends on concurrent applications giving up their control of the processor from time to time. After your program calls GetMessage(), unless there is a message for your program, another application is executed and your program gets another opportunity to do something only if the other application releases the processor, perhaps by a call to GetMessage() when there are no messages queued for it, but this is not the only possibility.
With current versions of Windows, the operating system can interrupt an application after a period of time and transfer control to another application. This mechanism is called pre-emptive multitasking because an application can be interrupted in any event. With pre-emptive multitasking, however, you must still program the message loop in WinMain() using GetMessage() as before, and make provision for relinquishing control of the processor to Windows from time to time in a long-running calculation (this is usually done using the PeekMessage() API function). If you don't do this, your application may be unable to respond to messages to repaint the application window when these arise. This can be for reasons that are quite independent of your application — when an overlapping window for another application is closed, for example.
The conceptual operation of the GetMessage() function is illustrated in Figure 12-3.
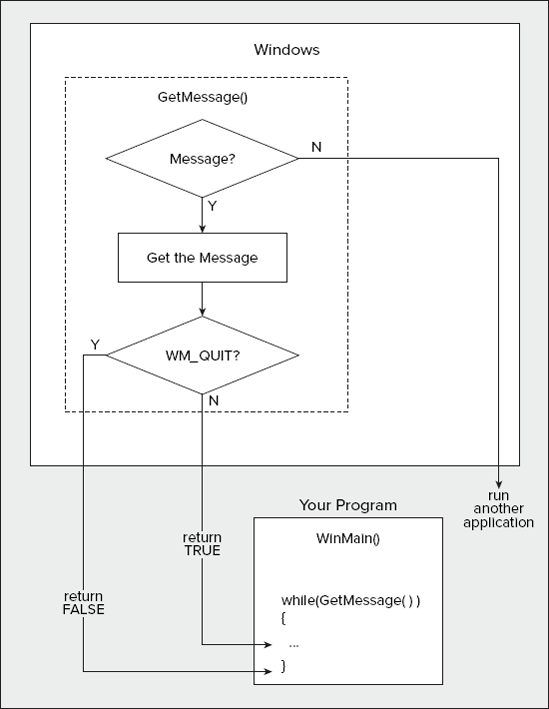
Within the while loop, the first function call to TranslateMessage() requests Windows to do some conversion work for keyboard-related messages. Then the call to the function DispatchMessage() causes Windows to dispatch the message or, in other words, to call the WindowProc() function in your program to process the message. The return from DispatchMessage() does not occur until WindowProc() has finished processing the message. The WM_QUIT message indicates that the program should end, so this results in FALSE being returned to the application that stops the message loop.
You have looked at all the bits that need to go into the function WinMain(). So now you can assemble them into a complete function:
// Listing OFWIN_1
int WINAPI WinMain(HINSTANCE hInstance, HINSTANCE hPrevInstance,
LPSTR lpCmdLine, int nCmdShow)
{
WNDCLASSEX WindowClass; // Structure to hold our window's attributes
static LPCTSTR szAppName = L"OFWin"; // Define window class name
HWND hWnd; // Window handle
MSG msg; // Windows message structure
WindowClass.cbSize = sizeof(WNDCLASSEX); // Set structure size
// Redraw the window if the size changes
WindowClass.style = CS_HREDRAW | CS_VREDRAW;
// Define the message handling function
WindowClass.lpfnWndProc = WindowProc;
WindowClass.cbClsExtra = 0; // No extra bytes after the window class
WindowClass.cbWndExtra = 0; // structure or the window instance
WindowClass.hInstance = hInstance; // Application instance handle
// Set default application icon
WindowClass.hIcon = LoadIcon(0, IDI_APPLICATION);
// Set window cursor to be the standard arrow
WindowClass.hCursor = LoadCursor(0, IDC_ARROW);
// Set gray brush for background color
WindowClass.hbrBackground = static_cast<HBRUSH>(GetStockObject(GRAY_BRUSH));
WindowClass.lpszMenuName = 0; // No menu
WindowClass.lpszClassName = szAppName; // Set class name
WindowClass.hIconSm = 0; // Default small icon
// Now register our window class
RegisterClassEx(&WindowClass);// Now we can create the window
hWnd = CreateWindow(
szAppName, // the window class name
L"A Basic Window the Hard Way", // The window title
WS_OVERLAPPEDWINDOW, // Window style as overlapped
CW_USEDEFAULT, // Default screen position of upper left
CW_USEDEFAULT, // corner of our window as x,y...
CW_USEDEFAULT, // Default window size
CW_USEDEFAULT, // ....
0, // No parent window
0, // No menu
hInstance, // Program Instance handle
0 // No window creation data
);
ShowWindow(hWnd, nCmdShow); // Display the window
UpdateWindow(hWnd); // Cause window client area to be drawn
// The message loop
while(GetMessage(&msg, 0, 0, 0) == TRUE) // Get any messages
{
TranslateMessage(&msg);                // Translate the message
   DispatchMessage(&msg);                 // Dispatch the message
}
return static_cast<int>(msg.wParam); // End, so return to Windows
}

After declaring the variables you need in the function, all the members of the WindowClass structure are initialized and the window is registered.
The next step is to call the CreateWindow() function to create the data for the physical appearance of the window, based on the arguments passed and the data established in the WindowClass structure that was previously passed to Windows using the RegisterClassEx() function. The call to ShowWindow() causes the window to be displayed according to the mode specified by nCmdShow, and the UpdateWindow() function signals that a message to draw the window client area should be generated.
Finally, the message loop continues to retrieve messages for the application until a WM_QUIT message is obtained, whereupon the GetMessage() function returns FALSE and the loop ends. The value of the wParam member of the msg structure is passed back to Windows in the return statement.
The function WinMain() contained nothing that was application-specific beyond the general appearance of the application window. All of the code that makes the application behave in the way that you want is included in the message processing part of the program. This is the function WindowProc() that you identify to Windows in the WindowClass structure. Windows calls this function each time a message for your main application window is dispatched.
This example is simple, so you will be putting all the code to process messages in the one function, WindowProc(). More generally, though, the WindowProc() function is responsible for analyzing what a given message was and which window it was destined for and then calling one of a whole range of functions, each of which would be geared to handling a particular message in the context of the particular window concerned. However, the overall sequence of operations, and the way in which the function WindowProc() analyses an incoming message, is much the same in most application contexts.
The prototype of our WindowProc() function is:
LRESULT CALLBACK WindowProc(HWND hWnd, UINT message,
                            WPARAM wParam, LPARAM lParam);
The return type is LRESULT, which is a type defined by Windows and is normally equivalent to type long. Because the function is called by Windows through a pointer (you set the pointer up in WinMain() in the WNDCLASSEX structure), you need to qualify the function as CALLBACK. I mentioned this specifier earlier, and its effect is the same as the WINAPI defined by Windows that determines how the function arguments are handled. Therefore, you could use WINAPI here instead of CALLBACK, although the latter expresses better what this function is about. The four arguments that are passed provide information about the particular message causing the function to be called. The meaning of each of these arguments is described in the following table:
ARGUMENT | MEANING |
|---|---|
| A handle to the window in which the event causing the message occurred. |
| The message ID, which is a 32-bit value indicating the type of message. |
| A 32-bit (or 64-bit in 64-bit mode) value containing additional information depending on what sort of message it is. |
| A 32-bit (or 64-bit in 64-bit mode) value containing additional information depending on what sort of message it is. |
The window that the incoming message relates to is identified by the first argument, hWnd, which is passed to the function. In this case, you have only one window, so you can ignore it.
Messages are identified by the value message that is passed to WindowProc(). You can test this value against predefined symbolic constants, each of which relates to a particular message. General windows messages begin with WM_, and typical examples are WM_PAINT, which corresponds to a request to redraw part of the client area of a window, and WM_LBUTTONDOWN, which indicates that the left mouse button was pressed. You can find the whole set of these by searching for WM_ in the MSDN Library.
The process of decoding the message that Windows is sending is usually done using a switch statement in the WindowProc() function, based on the value of message. Selecting the message types that you want to process is then just a question of putting a case statement for each case in the switch. The typical structure of such a switch statement, with arbitrary cases included, is as follows:
switch(message)
{
  case WM_PAINT:
    // Code to deal with drawing the client area
    break;

  case WM_LBUTTONDOWN:
    // Code to deal with the left mouse button being pressed
    break;

  case WM_LBUTTONUP:
    // Code to deal with the left mouse button being released
    break;

  case WM_DESTROY:
    // Code to deal with a window being destroyed
    break;

  default:
    // Code to handle any other messages
}
Every Windows program has something like this somewhere, although it may be hidden from sight in the Windows programs that you will write later using MFC. Each case corresponds to a particular value for the message ID and provides suitable processing for that message. Any messages that a program does not want to deal with individually are handled by the default statement, which should hand the messages back to Windows by calling DefWindowProc(). This is the Windows API function providing default message handling.
In a complex program dealing specifically with a wide range of possible Windows messages, this switch statement can become large and rather cumbersome. When you get to use the Application Wizard to generate a Windows application, you won't have to worry about this because it is all taken care of for you and you never see the WindowProc() function. All you need to do is to supply the code to process the particular messages in which you are interested.
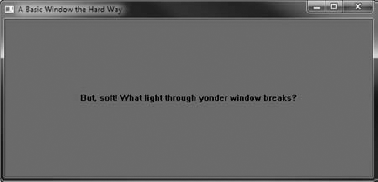
Windows sends a WM_PAINT message to the program to signal that the client area of an application should be redrawn. So in your example, you need to draw the text in the window in response to the WM_PAINT message.
You can't go drawing in the window willy-nilly. Before you can write to the application window, you need to tell Windows that you want to do so, and get Windows' authority to go ahead.
You do this by calling the Windows API function BeginPaint(), which should only be called in response to a WM_PAINT message. It is used as follows:
HDC hDC;                               // A display context handle
PAINTSTRUCT PaintSt;                   // Structure defining area to be redrawn

hDC = BeginPaint(hWnd, &PaintSt);  // Prepare to draw in the window
The type HDC defines what is called a display context, or more generally a device context. A device context provides the link between the device-independent Windows API functions for outputting information to the screen or a printer, and the device drivers that support writing to the specific devices attached to your PC. You can also regard a device context as a token of authority that is handed to you on request by Windows and grants you permission to output some information. Without a device context, you simply can't generate any output.
The BeginPaint() function provides you with a display context as a return value and requires two arguments to be supplied. The window to which you want to write is identified by the window handle, hWnd, which you pass as the first argument. The second argument is the address of a PAINTSTRUCT variable PaintSt, in which Windows places information about the area to be redrawn in response to the WM_PAINT message. I will ignore the details of this because you are not going to use it. You will just redraw the whole of the client area. You can obtain the coordinates of the client area in a RECT structure with the statements:
RECT aRect;                         // A working rectangle
GetClientRect(hWnd, &aRect);
The GetClientRect() function supplies the coordinates of the upper-left and lower-right corners of the client area for the window specified by the first argument. These coordinates are stored in the RECT structure aRect, which is passed through the second argument as a pointer. You can then use this definition of the client area for your window when you write the text to the window using the DrawText() function. Because your window has a gray background, you should alter the background of the text to be transparent, to allow the gray to show through; otherwise, the text appears against a white background. You can do this with this API function call:
SetBkMode(hDC, TRANSPARENT); // Set text background mode
The first argument identifies the device context and the second sets the background mode. The default option is OPAQUE.
You can now write the text with the statement:
DrawText(hDC,                     // Device context handle
         L"But, soft! What light through yonder window breaks?",
         −1,                      // Indicate null terminated string
         &aRect,              // Rectangle in which text is to be drawn
         DT_SINGLELINE|           // Text format - single line
         DT_CENTER|               //             - centered in the line
         DT_VCENTER               //             - line centered in aRect
      );
The first argument to the DrawText() function is your certificate of authority to draw on the window, the display context hDC. The next argument is the text string that you want to output. You could equally well have defined this in a variable and passed the pointer to the text as the second argument in the function call. The next argument, with the value −1, signifies that your string is terminated with a null character. If it weren't, you would put the count of the number of characters in the string here. The fourth argument is a pointer to a RECT structure defining a rectangle in which you want to write the text. In this case, it is the whole client area of the window defined in aRect. The last argument defines the format for the text in the rectangle. Here you have combined three specifications with a bitwise OR (|). The string is written as a single line, with the text centered on the line and the line centered vertically within the rectangle. This places it nicely in the center of the window. There are also a number of other options, which include the possibility to place text at the top or the bottom of the rectangle, and to left or right justify it.
After you have written all that you want to display, you must tell Windows that you have finished drawing the client area. For every BeginPaint() function call, there must be a corresponding EndPaint() function call. Thus, to end processing the WM_PAINT message, you need the statement:
EndPaint(hWnd, &PaintSt); // Terminate window redraw operation
The hWnd argument identifies your program window, and the second argument is the address of the PAINTSTRUCT structure that was filled in by the BeginPaint() function.
You might assume that closing the window closes the application, but to get this behavior, you actually have to add some more code. The reason that the application won't close by default when the window is closed is that you may need to do some clearing up. It is also possible that the application may have more than one window. When the user closes the window by double-clicking the title bar icon or clicking the Close button, this causes a WM_DESTROY message to be generated. Therefore, to close the application, you need to process the WM_DESTROY message in the WindowProc() function. You do this by generating a WM_QUIT message with the following statement:
PostQuitMessage(0);
The argument here is an exit code. This Windows API function does exactly what its name suggests: it posts a WM_QUIT message in the message queue for your application. This results in the GetMessage() function in WinMain() returning FALSE and ending the message loop, so ending the program.
You have covered all the elements necessary to make up the complete WindowProc() function for your example. The code for the function is as follows:
// Listing OFWIN_2
LRESULT CALLBACK WindowProc(HWND hWnd, UINT message,
                          WPARAM wParam, LPARAM lParam)
{
HDC hDC; // Display context handle
PAINTSTRUCT PaintSt; // Structure defining area to be drawn
RECT aRect; // A working rectangle
switch(message) // Process selected messages
{
case WM_PAINT: // Message is to redraw the window
hDC = BeginPaint(hWnd, &PaintSt);// Prepare to draw the window
// Get upper left and lower right of client area
GetClientRect(hWnd, &aRect);
SetBkMode(hDC, TRANSPARENT); // Set text background mode
// Now draw the text in the window client area
DrawText(
hDC, // Device context handle
L"But, soft! What light through yonder window breaks?",
−1, // Indicate null terminated string
&aRect, // Rectangle in which text is to be drawn
DT_SINGLELINE| // Text format - single line
DT_CENTER| // - centered in the line
DT_VCENTER); // - line centered in aRect
EndPaint(hWnd, &PaintSt); // Terminate window redraw operation
return 0;
case WM_DESTROY: // Window is being destroyed
PostQuitMessage(0);
return 0;
default: // Any other message - we don't
// want to know, so call
// default message processing
return DefWindowProc(hWnd, message, wParam, lParam);
}
}

The entire function body is just a switch statement. A particular case is selected, based on the message ID that is passed to the function through the message parameter. Because this example is simple, you need to process only two different messages: WM_PAINT and WM_DESTROY. You hand all other messages back to Windows by calling the DefWindowProc() function in the default case for the switch. The arguments to DefWindowProc() are those that were passed to the function, so you are just passing them back as they are. Note the return statement at the end of processing each message type. For the messages you handle, a zero value is returned.
Because you have written WinMain() and WindowProc() to handle messages, you have enough to create a complete source file for a Windows program using just the Windows API. The complete source file simply consists of an #include directive for the windows.h header file, a prototype for the WindowProc function, and the WinMain and WindowProc functions that you have already seen:
// Ex12_01.cpp   Native windows program to display text in a window
#include <windows.h>

LRESULT CALLBACK WindowProc(HWND hWnd, UINT message,
                          WPARAM wParam, LPARAM lParam);

   // Insert code for WinMain() here (Listing OFWIN_1)

   // Insert code for WindowProc() here (Listing OFWIN_2)

Of course, you'll need to create a project for this program, but instead of choosing Win32 Console Application as you've done up to now, you should create this project using the Win32 Project template. You should elect to create it as an empty project and then add the Ex12_01.cpp file to hold the code.
TRY IT OUT: A Simple Windows API Program
If you build and execute the example, it produces the window shown in Figure 12-4.
Note that the window has a number of properties provided by the operating system that require no programming effort on your part to manage. The boundaries of the window can be dragged to resize it, and the whole window can be moved about onscreen. The maximize and minimize buttons also work. Of course, all of these actions do affect the program. Every time you modify the position or size of the window, a WM_PAINT message is queued and your program has to redraw the client area, but all the work of drawing and modifying the window itself is done by Windows.
The system menu and Close button are also standard features of your window because of the options that you specified in the WindowClass structure. Again, Windows takes care of the management. The only additional effect on your program arising from this is the passing of a WM_DESTROY message if you close the window, as previously discussed.
In the previous example, you saw an elementary Windows program that used the Windows API and displayed a short quote from the Bard. It's unlikely to win any awards, being completely free of any useful functionality, but it does serve to illustrate the two essential components of a Windows program: the WinMain() function that provides initialization and setup, and the WindowProc() function that services Windows messages. The relationship between these is illustrated in Figure 12-5.
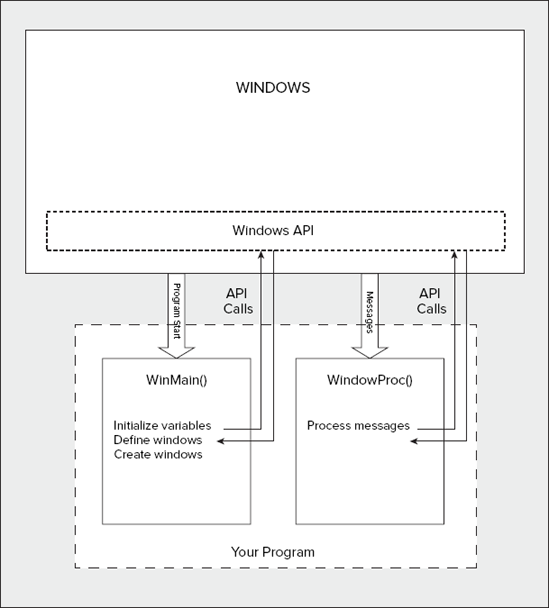
It may not always be obvious in the code that you will see, but this structure is at the heart of all Windows programs, including programs written for the CLR. Understanding how Windows applications are organized can often be helpful when you are trying to determine why things are not working as they should be in an application. The WinMain() function is called by Windows at the start of execution of the program, and the WindowProc() function, which you'll sometimes see with the name WndProc(), is called by the operating system whenever a message is to be passed to your application's window. In general, there typically is a separate WindowProc() function in an application for each window in an application.
The WinMain() function does any initialization that's necessary and sets up the window or windows that are the primary interface to the user. It also contains the message loop for retrieving messages that are queued for the application.
The WindowProc() function handles all the messages for a given window that aren't queued, which includes those initiated in the message loop in WinMain(). WindowProc(), therefore, ends up handling both kinds of messages. This is because the code in the message loop sorts out what kind of message it has retrieved from the queue, and then dispatches it for processing by WindowProc(). WindowProc() is where you code your application-specific response to each Windows message, which should handle all the communications with the user by processing the Windows messages generated by user actions, such as moving or clicking the mouse or entering information at the keyboard.
The queued messages are largely those caused by user input from either the mouse or the keyboard. The non-queued messages, for which Windows calls your WindowProc() function directly, are either messages that your program created, typically as a result of obtaining a message from the queue and then dispatching it, or messages that are concerned with window management — such as handling menus and scrollbars, or resizing the window.
The Microsoft Foundation Classes (MFC) are a set of predefined classes upon which Windows programming with Visual C++ is built. These classes represent an object-oriented approach to Windows programming that encapsulates the Windows API. MFC does not adhere strictly to the object-oriented principles of encapsulation and data hiding, principally because much of the MFC code was written before such principles were well established.
The process of writing a Windows program involves creating and using MFC objects or objects of classes derived from MFC. In the main, you'll derive your own classes from MFC, with considerable assistance from the specialized tools in Visual C++ 2010 that make this easy. The objects of these MFC-based class types incorporate member functions for communicating with Windows, for processing Windows messages, and for sending messages to each other. These derived classes, of course, inherit all of the members of their base classes. These inherited functions do practically all of the general grunt work necessary for a Windows application to work. All you need to do is to add data and function members to customize the classes to provide the application-specific functionality that you need in your program. In doing this, you'll apply most of the techniques that you've been grappling with in the preceding chapters, particularly those involving class inheritance and virtual functions.
All the classes in MFC have names beginning with C, such as CDocument or CView. If you use the same convention when defining your own classes, or when deriving them from those in the MFC library, your programs will be easier to follow. Data members of an MFC class are prefixed with m_. I'll also follow this convention in the examples that use MFC.
You'll find that MFC uses Hungarian notation for many variable names, particularly those that originate in the Windows API. As you recall, this involves using a prefix of p for a pointer, n for an unsigned int, l for long, h for a handle, and so on. The name m_lpCmdLine, for example, refers to a data member of a class (because of the m_ prefix) that is of type 'pointer to long'. This practice of explicitly showing the type of a variable in its name was important in the C environment because of the lack of type checking; because you could determine the type from the name, you had a fair chance of not using or interpreting its value incorrectly. The downside is that the variable names can become quite cumbersome, making the code look more complicated than it really is. Because C++ has strong type checking that picks up the sort of misuse that used to happen regularly in C, this kind of notation isn't essential, so I won't use it generally for variables in the examples in the book. I will, however, retain the p prefix for pointers and some of the other simple type denotations because this helps to make the code more readable.
You know from Chapter 1 that you can produce a Windows program using the Application Wizard without writing a single line of code. Of course, this uses the MFC library, but it's quite possible to write a Windows program that uses MFC without using the Application Wizard. If you first scratch the surface by constructing the minimum MFC-based program, you'll get a clearer idea of the fundamental elements involved.
The simplest program that you can produce using MFC is slightly less sophisticated than the example that you wrote earlier in this chapter using the raw Windows API. The example you'll produce here has a window, but no text displayed in it. This is sufficient to show the fundamentals, so try it out.
TRY IT OUT: A Minimal MFC Application
Create a new project using the File
With the project created, you can create a new source file in the project as Ex12_02.cpp. So that you can see all the code for the program in one place, put the class definitions you need together with their implementations in this file. To achieve this, just add the code manually in the edit window — there isn't very much of it.
To begin with, add a statement to include the header file afxwin.h, as this contains the definitions for many MFC classes. This allows you to derive your own classes from MFC.
#include <afxwin.h> // For the class library
To produce the complete program, you'll only need to derive two classes from MFC: an application class and a window class. You won't even need to write a WinMain() function, as you did in the previous example in this chapter, because this is automatically provided by the MFC library behind the scenes. Take a look at how you define the two classes that you need.
The Application Class
The class CWinApp is fundamental to any Windows program written using MFC. An object of this class includes everything necessary for starting, initializing, running, and closing the application. You need to produce the application to derive your own application class from CWinApp. You will define a specialized version of the class to suit your application needs. The code for this is as follows:
class COurApp: public CWinApp
{
   public:
      virtual BOOL InitInstance();
};
As you might expect for a simple example, there isn't a great deal of specialization necessary in this case. You've only included one member in the definition of the class: the InitInstance() function. This function is defined as a virtual function in the base class, so it's not a new function in your derived class; you are simply redefining the base class function for your application class. All the other data and function members that you need in the class, you'll inherit from CWinApp unchanged.
The application class is endowed with quite a number of data members defined in the base, many of which correspond to variables used as arguments in Windows API functions. For example, the member m_pszAppName stores a pointer to a string that defines the name of the application. The member m_nCmdShow specifies how the application window is to be shown when the application starts up. You don't need to go into all the inherited data members now. You'll see how they are used as the need arises in developing application-specific code.
In deriving your own application class from CWinApp, you must override the virtual function InitInstance(). Your version is called by the version of WinMain() that's provided for you by MFC, and you'll include code in the function to create and display your application window. However, before you write InitInstance(), I should introduce you to a class in the MFC library that defines a window.
The Window Class
Your MFC application needs a window as the interface to the user, referred to as a frame window. You derive a window class for the application from the MFC class CFrameWnd, which is designed specifically for this purpose. Because the CFrameWnd class provides everything for creating and managing a window for your application, all you need to add to the derived window class is a constructor. This enables you to specify a title bar for the window to suit the application context:
class COurWnd: public CFrameWnd
{
  public:
    // Constructor
    COurWnd()
    {
      Create(0, L"Our Dumb MFC Application");
    }
};
The Create() function that you call in the constructor is inherited from the base class. It creates the window and attaches it to the COurWnd object that is being created. Note that the COurWnd object is not the same thing as the window that is displayed by Windows — the class object and the physical window are distinct entities.
The first argument value for the Create() function, 0, specifies that you want to use the base class default attributes for the window — you'll recall that you needed to define window attributes in the previous example in this chapter that used the Windows API directly. The second argument specifies the window name that is used in the window title bar. You won't be surprised to learn that there are other parameters to the function Create(), but they all have default values that are quite satisfactory, so you can afford to ignore them here.
Completing the Program
Having defined a window class for the application, you can write the InitInstance() function in our COurApp class:
BOOL COurApp::InitInstance(void)
{
   // Construct a window object in the free store
   m_pMainWnd = new COurWnd;
   m_pMainWnd->ShowWindow(m_nCmdShow);   // ...and display it
   return TRUE;
}
This overrides the virtual function defined in the base class CWinApp, and as I said previously, it is called by the WinMain() function that's automatically supplied by the MFC library. The InitInstance() function constructs a main window object for the application in the free store by using the operator new. You store the address that is returned in the variable m_pMainWnd, which is an inherited member of your class COurApp. The effect of this is that the window object is owned by the application object. You don't even need to worry about freeing the memory for the object you have created — the supplied WinMain() function takes care of any cleanup necessary.
The only other item you need for a complete, albeit rather limited, program is to define an application object. An instance of our application class, COurApp, must exist before WinMain() is executed, so you must declare it at global scope with the statement:
COurApp AnApplication; // Define an application object
The reason that this object needs to exist at global scope is that it is the application, and the application needs to exist before it can start executing. The WinMain() function that is provided by MFC calls the InitInstance() function member of the application object to construct the window object and, thus, implicitly assumes the application object already exists.
The Finished Product
Now that you've seen all the code, you can add it to the Ex12_02.cpp source file in the project. In a Windows program, the classes are usually defined in .h files, and the member functions that are not defined within the class definitions are defined in .cpp files. Your application is so short, though, that you may as well put it all in a single .cpp file. The merit of this is that you can view the whole lot together. The program code is structured as follows:
// Ex12_02.cpp  An elementary MFC program
#include <afxwin.h>                        // For the class library

// Application class definition
class COurApp:public CWinApp
{
   public:
      virtual BOOL InitInstance();
};

// Window class definition
class COurWnd:public CFrameWnd
{
   public:
      // Constructor
      COurWnd()
      {
         Create(0, L"Our Dumb MFC Application");
      }
};

// Function to create an instance of the main application window
BOOL COurApp::InitInstance(void)
{
   // Construct a window object in the free store
   m_pMainWnd = new COurWnd;
   m_pMainWnd->ShowWindow(m_nCmdShow);     // ...and display it
   return TRUE;
}

// Application object definition at global scope
COurApp AnApplication;                     // Define an application object

That's all you need. It looks a bit odd because no WinMain() function appears, but as noted previously, there is a WinMain() function supplied by the MFC library.
How It Works
Now you're ready to roll, so build and run the application. Select the Build
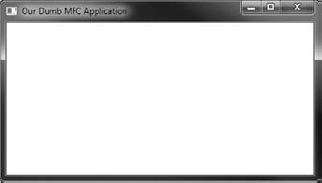
You can resize the window by dragging the border, move the whole thing around, and minimize or maximize it in the usual ways. The only other function that the program supports is "close," for which you can use the system menu, the Close button at the upper right of the window, or just key Alt+F4. It doesn't look like much, but considering that there are so few lines of code, it's quite impressive.
A Windows form is an entity that represents a window of some kind. By a window, I mean window in its most general sense, being an area on the screen that can be a button, a dialog, a regular window, or any other kind of visible GUI component. A Windows form is encapsulated by a subclass of the System::Windows::Forms::Form class, but you don't need to worry about this much initially, because all the code to create a form is created automatically. To see just how easy it's going to be, create a basic window using Windows Forms that has a standard menu.
TRY IT OUT: A Windows Forms Application
Choose the CLR project type in the New Project dialog and select the Windows Forms Application as the template for the project. Enter the project name as Ex12_03. When you click the OK button, the Application Wizard generates the code for the Windows form application and displays the design window containing the form as it is displayed by the application. This is shown in Figure 12-7.
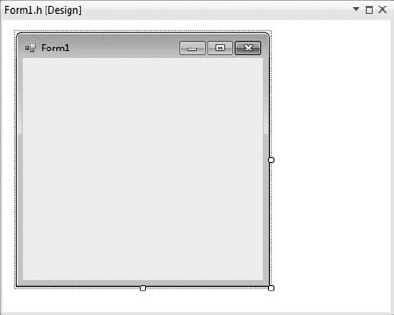
You can now make changes to the form in the design pane graphically, and the changes are automatically reflected in the code that creates the form. For a start, you can drag the bottom corner of the form with the mouse cursor to increase the size of the form window. You can also change the text in the title bar — right-click in the client area of the form and select Properties from the context menu. This displays the Properties window that allows you to change the properties for the form. From the list of properties to the right of the design pane, select Text, and then enter the new title bar text in the adjacent column showing the property value — I entered A Simple Form Window. When you press the Enter key, the new text appears in the title bar of the form.
Just to see how easy it really is to add something to the form window, display the Toolbox pane by selecting the tab on the right of the window if it is present, or by pressing Ctrl+Alt+X or selecting Toolbox from the View menu. Find the MenuStrip option in the Menus and Toolbars list and drag it on to the form window in the Design tab pane. Right-click the MenuStrip1 that appears below the form window and select Insert Standard Items from the pop-up. You'll then have the menu in the form window populated with the standard File, Edit, Tools, and Help menus, each complete with its drop-down list of menu items. The result of this operation is shown in Figure 12-8.
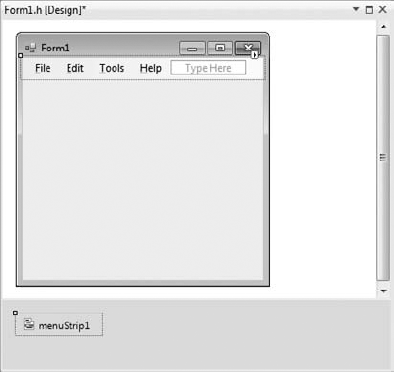
How It Works
If you build the project by pressing the Ctrl+Shift+B and then execute it by pressing Ctrl+F5, you'll see the form window displayed complete with its menus. Naturally, the menu items don't do anything because you haven't added any code to deal with the events that result from clicking on them, but the icons at the right end of the title bar work, so you can close the application. You'll look into how to develop a Windows Forms application further, including handling events, later in the book.
In this chapter you've seen three different ways of creating an elementary Windows application with Visual C++ 2010. You should now have a feel for the essential differences between these three approaches. In later chapters of the book, you'll be exploring in more depth how you develop applications using the MFC and using Windows Forms.
WHAT YOU LEARNED IN THIS CHAPTER
TOPIC | CONCEPT |
|---|---|
Windows API | The Windows API provides a standard programming interface by which an application communicates with the operating system. |
The WinMain() function | All Windows applications include a |
Message processing | The Windows operating system calls a particular function in an application to handle processing of specific messages. An application identifies the message processing function for each window in an application by calling a Windows API function. |
The MFC | The MFC consists of a set of classes that encapsulate the Windows API and simplify programming using the Windows API. |
Windows Forms applications | A Windows Forms application executes with the CLR. The windows in a Windows Forms application can be created graphically with all the required code being generated automatically. |