
While Microsoft SharePoint Server 2010 is an excellent platform upon which to build information solutions, it will never be the only system in an organization. The simple fact is that organizations will always have additional systems — such as customer relationship management (CRM) and enterprise resource planning (ERP) systems — that target specific data sets and business processes. Additionally, organizations may have other custom applications, databases, and web services that are not part of the SharePoint infrastructure. These external systems (external to SharePoint that is) contain significant amounts of data and represent significant financial investments. As a consequence, these systems will not be replaced by any solution created solely in SharePoint.
The challenge, however, is that SharePoint solutions are often closely related to the data and processes contained in external systems. For example, a document library containing invoices may contain metadata also found in the ERP system or be addressed to a customer whose information is also in the CRM system. Without some way of utilizing data from the external systems, the SharePoint solution would be forced to duplicate the same information. This duplication would then lead to data maintenance issues between the external system and the SharePoint solution.
In addition to the data challenges presented within SharePoint itself, there are challenges when integrating external data with Office 2010 documents. When sales people create a quote, for example, they often look up customer contact information in a CRM system, copy it to the clipboard, and then paste it into the document. This duplication of effort obviously increases the time necessary to create documents. Furthermore, sales people must be connected to the network in order to access the CRM system; they cannot easily create a quote while offline.
Failure to sufficiently integrate external systems with SharePoint solutions can slow the adoption of SharePoint within an organization. After all, the most important data used by information workers is often in external systems. Therefore, your solutions must consider how to integrate external data and that is where Business Connectivity Services (BCS) comes into play. BCS is a broad and deep topic that cannot be completely covered in a single chapter. While this chapter provides significant technical information, readers interested in complete coverage should read the upcoming Professional Business Connectivity Services from Wiley in 2011.
BCS is an umbrella term for a set of technologies that brings data from external systems into SharePoint Server 2010 and Office 2010. If you have worked previously with the Microsoft Office SharePoint Server 2007 Business Data Catalog, then you might think of BCS as the evolution of the Business Data Catalog. If you have not previously worked with the Business Data Catalog, don't worry; no prior experience is required to understand or use BCS in SharePoint solutions. Figure 11-1 shows a diagram of the major functional blocks that make up BCS.
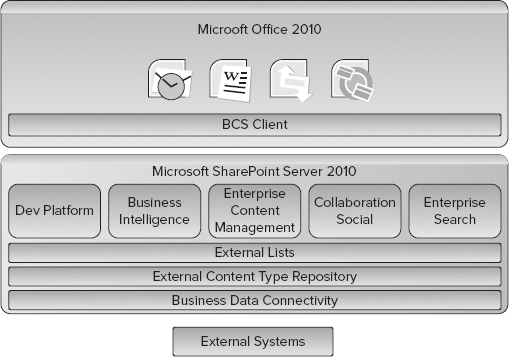
In the context of BCS, the term external system refers to any datasource that is outside of the SharePoint infrastructure. As previously noted, this can include third-party software, custom applications, databases, web services, and even cloud computing solutions. BCS communicates with external systems through the Business Data Connectivity (BDC) layer. The BDC layer contains the plumbing, runtime API, and connectivity functionality necessary to communicate with external systems.
While the BDC layer provides connectivity to the external system, it does not dictate what data is returned from the system. The operations and schema for the returned data is instead defined by an External Content Type (ECT). An ECT contains an entity definition that specifies the exact fields that should be returned from an external source. For example, a "Customer" ECT might specify that CustomerID, FirstName, and LastName fields be returned from the CRM system. Additionally, an ECT defines the operations that can be performed. The available operations include create, read, update, and delete (CRUD). Defining ECTs is one of the primary activities involved in creating a BCS solution and may be performed in either Microsoft SharePoint Designer 2010 (SPD) or Microsoft Visual Studio 2010 (VS2010). When completed, ECTs are stored in the External Content Type Catalog.
While it is possible to create many different custom solutions using BCS, the simplest way to surface external data in SharePoint is to use an External List. An External List is a SharePoint list that is based on an ECT. Just as standard lists (tasks, announcements, calendars, libraries, etc.) are based on content types, External Lists are based on External Content Types. External lists behave similarly to standard lists, support views, and item editing. External Lists can be used in support of any of the key functional areas within SharePoint Server.
In Office 2010, the BCS Client layer has the ability to use External Content Types to display external data in Office clients. This data may be displayed in Outlook using standard forms such as contact lists, or utilized in Word to support metadata and document creation. In all cases, you can make use of InfoPath to enhance the presentation of external data. Finally, External Lists may be taken offline with support from both Outlook and the SharePoint Workspace.
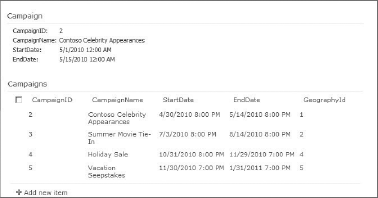
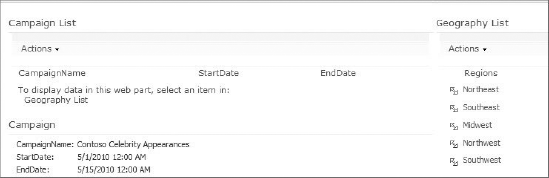
While BCS solutions can be complex, they can also be created with no code. Using the tools found in SharePoint Designer (SPD) and SharePoint, you can easily create an External Content Type and External List. This data may then be edited in SharePoint or Office clients. In this section, you'll walk through a simple BCS solution based on a SQL Server database. The database contains a single table of marketing campaign information, as shown in Figure 11-2. The goal of the walk-through is to create a list in SharePoint and a calendar in Outlook based on this data.

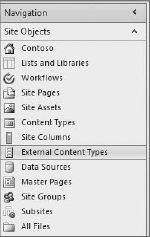
The solution begins with the definition of External Content Types to define the schema and operations to perform on the data. Whether your BCS solution ultimately uses code or not, you will almost always define the ECTs using the SharePoint Designer. The tooling in SPD for creating ECTs was designed to be sophisticated enough to be used by professional developers across all types of BCS solutions. To begin, you simply open a development site in SPD and click on the External Content Types object under the list of Site Objects, as shown in Figure 11-3.
Clicking on the New External Content Type button allows you to start defining basic ECT information. The basic ECT information consists of a Name, Display Name, Namespace, and Version. You may also select from a list of various Office Types, which determines what form will be used to render the information when it is displayed in Outlook. Figure 11-4 shows the basic ECT information for the walk-through with the Appointment Office Type selected.
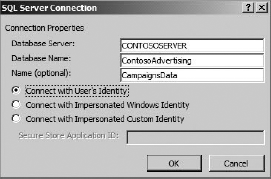
Clicking on the Operations Design View button presents a form for defining connection information to an external system. Clicking the Add Connection button allows you to select from three types of connections: WCF, SQL, and .NET Type. Selecting WCF allows you to connect to a web service, SQL allows you to connect to a database, and .NET Type allows you to utilize a custom .NET Assembly Connector, which is covered later in the chapter. For this walk-through, the SQL connection type was used, and the information shown in Figure 11-5 was specified.

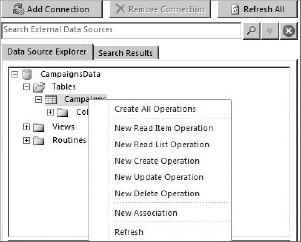
Once the datasource connection is made, SPD can create operations for the ECT. When using a SQL connection, SPD can infer a significant amount of information about the datasource and the operations, so it is easier to create the entire set of CRUD operations. In fact, all you have to do is right-click the table in the connection and select Create All Operations from the context menu, which will launch a wizard to collect the small amount of information required to complete the operation definitions. Figure 11-6 shows the context menu in SPD.
In order to complete the operation definitions, you must at least map fields from the ECT to fields in Outlook. This mapping determines how the ECT is displayed in the Outlook form. In the case of the walk-through, the Subject, Start, and End fields in Outlook must be mapped to the ECT. This is because Appointment was selected as the Office Type. For this walk-through, the CampaignName was mapped to Subject, StartDate to Start, and EndDate to End. When the wizard finishes, the ECT definition is complete and may be saved in SPD by clicking the Save button. The ECT is then visible in the list of ECTs for the site.
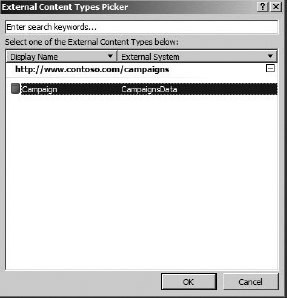
Once the ECT is created, it can be used as the basis for an External List. External Lists can be created directly in SPD or in the browser, using the Create menu in SharePoint. For this walk-through, a new External List was created by selecting the Lists and Libraries object from the list of Site Objects and then clicking the New External List button. When you create a new External List, the set of available ECTS is presented. Figure 11-7 shows the list of available ECTs with the new Campaign type visible.
Once the new External List is created, it may be viewed immediately in the browser. Because all of the CRUD operations were created, the list supports editing items, adding items, and deleting items. Figure 11-8 shows the new list in SharePoint Server 2010.

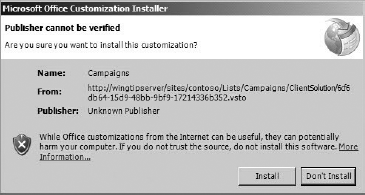
SharePoint Server 2010 supports taking lists offline through Microsoft Outlook. For this walk-through, the External List was defined as an Appointment Office Type, and it can be synchronized with Outlook by selecting the Connect to Outlook button in the List tab of the Ribbon within SharePoint. When this button is clicked, a Visual Studio Tools for Office (VSTO) package is accessed and an installation screen is presented. This VSTO package must be installed for synchronization to continue. Figure 11-9 shows the installation screen that is presented to the user.
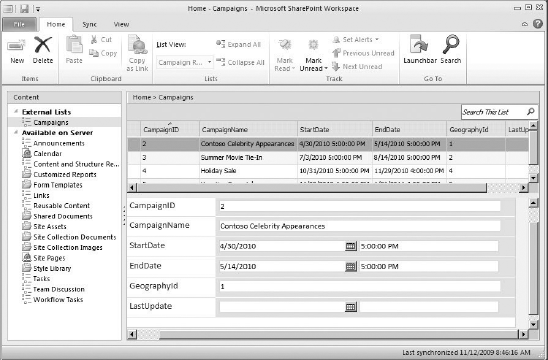
In addition to taking the list offline through Outlook, you can also take it offline through the SharePoint Workspace. In this case, you click the Sync to SharePoint Workspace button on the list tab in the SharePoint Ribbon. In a fashion similar to Outlook, a VSTO package will be installed and then the list will be available in the SharePoint Workspace. Figure 11-10 shows the list in the SharePoint Workspace.
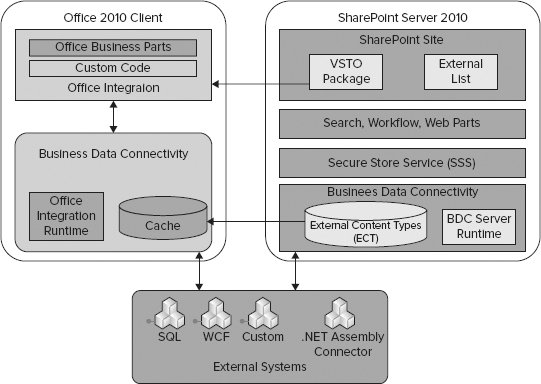
BCS is made up of several different components and interacts with many services within SharePoint. In order to create effective BCS solutions, it is important to understand the architecture, components, and service interfaces available to the developer. A detailed diagram of this architecture is presented in Figure 11-11.
As mentioned previously, BCS communicates with external systems using several different connectors. The simple solution presented earlier utilized the SQL connector to access a SQL Server database, but BCS also supports a WCF connector for accessing web services. Together, the SQL and WCF connector cover a significant number of datasources, but they can't cover all possible scenarios.
For systems that cannot be accessed as a database or a web service, a custom connector could be built. Custom connectors are intended to be built for a particular type of system. For example, you could build a custom connector for Microsoft Exchange. If you did this, then you would have options in SPD for connecting to SQL, WCF, and Exchange. Creating custom connectors is beyond the scope of this chapter.
In scenarios where you need more flexibility than is provided by the SQL and WCF connectors, you will likely build a .NET Assembly Connector instead. A .NET Assembly Connector is a project that you create in Visual Studio 2010 that contains the ECT definition and associated business logic for accessing a specific external system. The .NET Assembly Connector differs from the custom connector because it targets a specific instance of a system, as opposed to all instances of a specific system type. In other words, you can use a .NET Assembly Connector to access a specific folder in Exchange, while a custom connector could be used to access any folder in Exchange.
The .NET Assembly Connector is also useful for aggregating data from multiple sources into a single ECT, which cannot be accomplished using a custom connector. While accessing an external system, the .NET Assembly Connector can also apply business rules to data before it is made available in SharePoint, and facilitate search indexing of a specific external system. The .NET Assembly Connector is covered in detail later in the chapter.
As stated previously, BDC is the term that encompasses the plumbing and runtime components of BCS. Both the server and the client have BDC components. These components are complementary, so you can use a similar approach to creating BCS solutions whether you are focused on the server, client, or both. On the server, the BDC components consist of the ECT catalog and the server-side BDC runtime. On the client, the BDC components consist of a metadata cache and the client-side BDC runtime.
When you create ECTs in SPD and save them, they are stored in the ECT Catalog (also referred to as the metadata catalog). This catalog is a database that is accessed through the Business Data Connectivity service application. Figure 11-12 shows the basic architecture of the BDC service application.

External Connectors and ECT metadata are used to access the external systems and retrieve data through the runtime object model. The BDC service application then provides that data for use inside of SharePoint. A metadata cache is maintained in the service so that ECT data is easily accessed without having to read it from the database. This metadata cache is updated every minute to ensure that the latest ECT data is available to the farm.
Along with caching metadata to improve performance, BCS also can limit the total number of connections made to the external system. Additionally, the BDC service application implements five different throttle settings to limit the connections made and data returned from external systems. Table 11-1 lists the throttles and the default settings.
Table 11.1. BDC Service Application Throttles
TYPE | DESCRIPTION | SCOPE | DEFAULT | MAXIMUM |
|---|---|---|---|---|
Connections | Total number of connections allowed to external systems | Global | 100 | 500 |
Items | Number of rows returned from a database query | Database | 2000 | 25,000 |
Timeout | Database connection timeout | Database | 60 sec | 600 sec |
Size | Size of returned data | WCF | 3Mb | 150Mb |
Timeout | Web service connection timeout | WCF | 60 sec | 600 sec |
Managing throttles is accomplished using PowerShell scripts. The following code displays the current throttle settings:
Add-PSSnapin Microsoft.SharePoint.PowerShell -ErrorAction SilentlyContinue
$bdc = Get-SPServiceApplicationProxy
       | Where {$_ -match "Business Data Connectivity"}

Get-SPBusinessDataCatalogThrottleConfig -ThrottleType Connections -Scope Global
                                        -ServiceApplicationProxy $bdc
Get-SPBusinessDataCatalogThrottleConfig -ThrottleType Items -Scope Database
                                        -ServiceApplicationProxy $bdc
Get-SPBusinessDataCatalogThrottleConfig -ThrottleType Timeout -Scope Database
                                        -ServiceApplicationProxy $bdc
Get-SPBusinessDataCatalogThrottleConfig -ThrottleType Size -Scope Wcf
                                        -ServiceApplicationProxy $bdc
Get-SPBusinessDataCatalogThrottleConfig -ThrottleType Timeout -Scope Wcf
                                        -ServiceApplicationProxy $bdc

Each of the throttle settings may be modified using PowerShell. The following code shows how to change the number of items that can be returned from a database:
Add-PSSnapin Microsoft.SharePoint.PowerShell -ErrorAction SilentlyContinue
$bdc = Get-SPServiceApplicationProxy
       | Where {$_ -match "Business Data Connectivity"}

$throttle = Get-SPBusinessDataCatalogThrottleConfig
            -ThrottleType Items
            -Scope Database
            -ServiceApplicationProxy $bdc
Set-SPBusinessDataCatalogThrottleConfig
            -Maximum 3000
            -Default 1000
            -Identity $throttle
Alternately, you can simply disable any throttle. The following code shows how to disable the connections throttle:
Add-PSSnapin Microsoft.SharePoint.PowerShell -ErrorAction SilentlyContinue
$bdc = Get-SPServiceApplicationProxy
       | Where {$_ -match "Business Data Connectivity"}

$throttle = Get-SPBusinessDataCatalogThrottleConfig -ThrottleType Connections
            -Scope Global
            -ServiceApplicationProxy $bdc
Set-SPBusinessDataCatalogThrottleConfig -Enforced $false -Identity $throttle
The BDC service application is part of the service application framework in SharePoint. The management interface for the BDC service application is accessible through Central Administration by selecting Application Management
From the Service Applications page, you can click the Properties button in the Ribbon and see the basic service properties for the BDC service application. In the Properties dialog, you will see the name of the database where the ECTs are stored. This database is set up when the BDC service application is first created during farm installation and configuration. As with all services, you can also set administrative and connection permissions for the service so that it can be used by other servers in the SharePoint farm.
Clicking the Manage button on the Service Applications page will open the View External Content Types page. This page lists all of the ECTs that are currently stored in the catalog. Initially, the page is in Browse mode, but clicking the Edit tab in the Ribbon reveals administrative functionality for the ECTs. On the Edit tab, you can grant rights to manage the ECT catalog by clicking the Set Catalog Permissions button, and you can set rights for individual ECTs by clicking the Set Object Permissions button. This allows you to control the users that are able to use ECTs to access external systems.
On the Edit tab, there is also a drop-down list that determines how ECT information is presented on the page. Initially, the drop-down is set to External Content Types, which shows the ECTs in a list. Selecting External Datasources from the drop-down list will show all of the available connections that are defined. Selecting Application Models, on the other hand, will list the models, along with both connection and ECT information.
The list of Application Models is of special importance to the developer. This is because the Application Model contains the reference to the ECT, the connection information for the external systems, security information, and more. Furthermore, the model can be exported using the drop-down menu on the list item and then subsequently imported into another catalog. When a model is exported, it is saved as an XML file. Models can also be exported directly from SPD by right-clicking the ECT and selecting Export Application Model.
The following code shows part of a model based on the walk-through earlier in the chapter. Developers who have previous experience with the MOSS Business Data Catalog will immediately recognize many of the elements in the listing. Take special note of the highlighted code. In the LobSystemInstance properties, you can see the basic connection information for the external system. These values were all set when the external system connection was specified in SPD.
<?xml version="1.0" encoding="utf-16" standalone="yes"?>
<Model xmlns:xsi="http://www.w3.org/2001/XMLSchema-instance"
xsi:schemaLocation="http://schemas.microsoft.com/windows/2007/BusinessDataCatalog
BDCMetadata.xsd"
Name="SharePointDesigner-CampaignsData-Administrator"
 xmlns="http://schemas.microsoft.com/windows/2007/BusinessDataCatalog">
<Properties>
   <Property Name="Discovery" Type="System.String"></Property>
  </Properties>
  <LobSystems>
    <LobSystem Type="Database" Name="SharePointDesigner-CampaignsData">
      <Properties>
        <Property Name="DiscoveryVersion" Type="System.Int32">0</Property>
        <Property Name="WildcardCharacter" Type="System.String">%</Property>
        <Property Name="Discovery" Type="System.String"></Property>
      </Properties>
      <LobSystemInstances>
        <LobSystemInstance Name="SharePointDesigner-CampaignsData">
          <Properties>
            <Property Name="AuthenticationMode" Type="System.String">
              PassThrough
            </Property>
            <Property Name="DatabaseAccessProvider" Type="System.String">
              SqlServer
            </Property>
            <Property Name="RdbConnection Data Source" Type="System.String">
              Localhost
            </Property>
            <Property Name="RdbConnection Initial Catalog"
                      Type="System.String">ContosoAdvertising</Property>
            <Property Name="RdbConnection Integrated Security"
                      Type="System.String">SSPI</Property>
            <Property Name="RdbConnection Pooling" Type="System.Boolean">
              True
            </Property>
            <Property Name="Discovery" Type="System.String"></Property>
            <Property Name="ConnectionName" Type="System.String">
              CampaignsData
            </Property>
          </Properties>
        </LobSystemInstance>
      </LobSystemInstances>
    </LobSystem>
  </LobSystems>
</Model>

The AuthenticationMode in the code sample is set to PassThrough. When set to this value, BCS will attempt to connect to the external system using the credentials of the current user. As you saw in the walk-through, options also exist to provide an explicit set of credentials or to map credentials using the Secure Store Service (SSS), which is covered later in the chapter.
The BDC Server Runtime consists of the runtime object model, the administration object model, and the security infrastructure. The runtime object model provides access to ECTs, while the administration object model provides objects for managing the ECTs catalog. The security infrastructure facilitates authentication and authorization for ECT operations and external system access.
When BCS solutions are taken to Office clients, a client cache is used to store external data for display with automatic synchronization between the client cache and the associated external system. The client cache is a SQL Server Compact Edition (SQLCE) database that is installed as part of the Office 2010 installation. There is no reason for developers to ever access the database directly, and doing so can damage the BCS installation.
A synchronization process (BCSSync.exe) runs on the client to synchronize the cache with the associated external systems. When CRUD operations are performed on data within the Office clients, the operations are queued inside the client cache and synchronized with the external system when it is available. The synchronization process will also attempt, at various intervals, to update data in the cache from the external system according to the user settings and availability of the external system. Conflicts between the cache and the external system are flagged for the end user so that they may be resolved.
The Office Integration Runtime (OIR) is the set of components and the associated API that binds ECTs to the Office clients and your own custom solutions. The OIR loads whenever a host Office client is started. The OIR is installed on the client as part of the Office 2010 installation process.
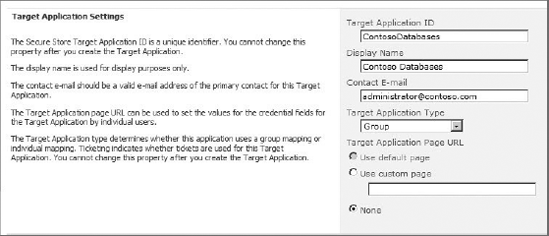
The Secure Store Service (SSS) is a service application that provides for the storage, mapping, and retrieval of credential information. Typically, the credentials stored by SSS are used to access external systems that do not support Windows authentication. This is accomplished by mapping the stored credentials to an existing Windows user or group.
In order to store credential sets for an external system, a new Target Application must be created in SSS. The Target Application acts as a container for credential sets mapped to an external system. The Target Application settings page contains a name for the application and a setting to specify whether each individual user will have a separate set of mapped credentials or whether every user will map to a single common set of credentials. Figure 11-14 shows application settings mapping a single set or credentials to an Active Directory group.
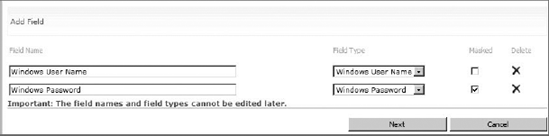
After the Target Application is defined, credential fields are defined. In most cases, the Target Application will save a username and password, but it is important to point out that SSS can save any text-based credential information. For example, a "domain" field could be added so that the credential sets consisted of username, password, and domain. Figure 11-15 shows typical username and password fields defined for an application.
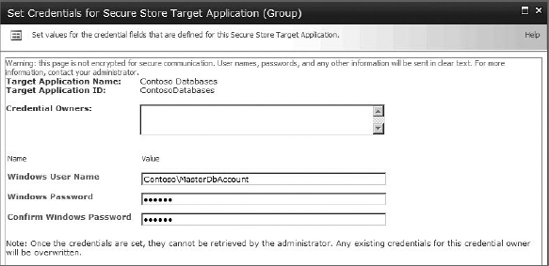
Once the application and credential fields are defined, you must enter the actual credential information. For each user or group that will access the external system, a set of credentials must be created using the field definitions for the application. Figure 11-16 shows credentials being entered for an application. Once the credentials are in place, the application can be used during the definition of an ECT to allow access to the external system using the credentials stored in the SSS. If an end user should attempt to access the system without proper credentials in SSS, then they will be directed to a login page so the credentials can be entered and stored.
While BCS and SSS work well together to provide authentication in many scenarios, there will be times when you want to utilize SSS in custom solutions. In these cases, you can access SSS programmatically to retrieve credentials. These credentials are often used by connectors to access external systems that have proprietary security systems. Additionally, they can be used by web parts to access external systems directly without using BCS. The following code shows how to access the credentials in the default instance of SSS. Note that the credentials are stored as SecureString objects.
ISecureStoreProvider p = SecureStoreProviderFactory.Create();
string username = string.Empty;
string password = string.Empty;

using (SecureStoreCredentialCollection creds =
       p.GetCredentials("ContosoDatabases"))
{
    foreach (SecureStoreCredential c in creds)
    {
        switch (c.CredentialType)
        {
            case SecureStoreCredentialType.UserName:
                username = c.Credential.ToString();
                break;

            case SecureStoreCredentialType.Password:
                password = c.Credential.ToString();
                break;

            case SecureStoreCredentialType.WindowsUserName:
                username = c.Credential.ToString();
                break;

            case SecureStoreCredentialType.WindowsPassword:
                password = c.Credential.ToString();
                break;

            case SecureStoreCredentialType.Generic:
                //Generic credentials
                break;

            case SecureStoreCredentialType.Key:
                //Key
                break;

            case SecureStoreCredentialType.Pin:
                //Pin
                break;
        }
    }

    //Log in using the credentials
}

When an end user elects to synchronize an external list with Outlook or the SharePoint Workspace, BCS creates a VSTO Click-Once deployment package that contains all of the elements necessary to work with the list on the client. The package is created by BCS just-in-time and stored under the list in a folder named ClientSolution. After the package is created, the deployment is started automatically.
The package contains the BDC Metadata Model defining the external system, ECTs, operations, and security information necessary to access and modify data. The package also contains subscription information, which tells the client cache what data to manage and how it should be refreshed. Finally, the package contains pre- and post-deployment steps that should be taken, such as creating custom forms in the client application to display the data.
Once deployed, the add-in can make use of Office Business Parts on the client to help render data. Office Business Parts are Windows form controls that display a single item or list of items in a task pane. These parts simplify the rendering process so that custom task panes do not have to be created for the client. In fact, BCS supports a special type of declarative solution for Outlook that makes use of Office Business Parts. This solution type is beyond the scope of this chapter.
When connecting to backend systems, BCS must deal with several different authentication scenarios. In the simplest case, BCS may be passing Windows credentials from the user through to the external system. However, most real-world applications have more complex requirements, for example, proprietary authentication mechanisms such as tokens or claims. For BCS solutions to be secure, they must gracefully deal with these situations.
The most common BCS authentication scenario involves a database or web service as the external system. Most often, these systems are internal to the organization and use either Windows authentication or username/password authentication. In these scenarios, BCS supports two authentication models: Trusted Subsystem and Impersonation and Delegation. In the Trusted Subsystem model, BCS utilizes a single account to access the external system regardless of the end user's identity. Under Impersonation and Delegation, BCS attempts to impersonate the end user and access the external system. The AuthenticationMode element in the BDC Metadata Model determines how authentication is performed.
Passthrough authentication falls within the Impersonation and Delegation authentication model. Setting the value of the AuthenticationMode element to Passthrough causes BCS to use the credentials of the current user to access the external system. Passthrough is simple to set up by selecting "Connect with User's Identity" when configuring the external system connection in SPD, as was shown in the walk-through earlier in this chapter. However, Passthrough authentication is unlikely to be useful in many situations because of limitations inherent in Windows authentication.
Windows authentication takes two forms: NTLM and Kerberos. NTLM is the classic challenge-response protocol used to authenticate users. Kerberos is an advanced ticket-based protocol that is much more secure. While Kerberos authentication is considered to be a best practice for SharePoint deployment, it requires modification to Active Directory that many organizations avoid. As a result, the vast majority of networks still run under NTLM authentication.
The problem for BCS under NTLM authentication involves something known as the double-hop issue. The double-hop issue describes a scenario where the web server attempts to impersonate an end user through a series of "hops" involving authenticating to multiple servers. As a practical example, imagine that a BCS solution is created that connects to a web service using Passthrough authentication, which in turn wraps a secure datasource.
When an end user makes a request to view an external list based on the web service source, BCS attempts to impersonate the user when calling the web service. Because SharePoint itself is configured to impersonate end users, this first call will succeed. However, when the web service subsequently attempts to access the wrapped datasource, it will be prevented from continuing to impersonate the end user, and the account identity will change to that of the web service. At this point the original end-user identity is lost, and access to the datasource will be denied. This is the double-hop issue.
The double-hop issue is not a bug; it exists by design. The limitation is designed to prevent viruses from accessing network resources should credentials be compromised. Kerberos, however, does not suffer from this limitation because its ticketing-based protocol is more secure than challenge-response. So changing the network authentication mechanism from NTLM to Kerberos will solve the problem. Otherwise, you must use a different BCS authentication mechanism.
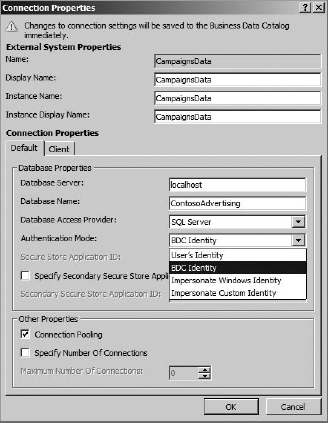
RevertToSelf falls within the Trusted Subsystem model of authentication. Setting the value of the AuthenticationMode element to RevertToSelf causes BCS to use the credentials of the application pool to access the external system. Configuring RevertToSelf is accomplished by editing the connection information to the external system after it is defined. In the SharePoint Designer, on the Summary View for the ECT, the connection information may be edited by clicking the hyperlink for the external system. Figure 11-17 shows the Connection Properties dialog. RevertToSelf is specified by selecting the option BDC Identity.
Using RevertToSelf authentication can help reduce double-hop problems. This is because BCS is no longer attempting to impersonate the end user all the way to the external system. The drawback, however, is that all access is accomplished by using the same account. Therefore, there is no mechanism to know who made changes to the external system.
Earlier in the chapter, you saw how to set up the SSS to map credentials from BCS to an external system. SSS is a flexible credential management service that supports both the Trusted Subsystem and Impersonation and Delegation authentication models. If you map all end-user credentials to a single group account in SSS, then you can support the Trusted Subsystem authentication model. If, on the other hand, you map end user credentials to a unique set of credentials per user, then SSS is supporting the Impersonation and Delegation authentication model.
Regardless of which authentication model you are implementing, SSS is capable of managing three different types of credentials: Windows, SQL, and username/password. These three credential types correspond to three different settings for the AuthenticationMode element: WindowsCredentials, RdbCredentials, and Credentials.
Setting the AuthenticationMode element to WindowsCredentials is done when the external system supports Windows authentication. Setting the AuthenticationMode to RdbCredentials is done when the external system is a database supporting SQL authentication. Setting the AuthenticationMode to Credentials is done when the external system supports simple username/password authentication. The WindowsCredentials and RdbCredentials settings work with both databases and web services when you select "Impersonate Windows Identity" or "Impersonate Custom Identity" in the Connection Properties dialog. The Credentials setting is used only with web services that do not support Windows authentication.
In addition to the primary SSS application, BCS supports a secondary SSS application that can be used for application-level authentication. This functionality exists to support special situations in which the external system requires credentials to be passed to the system as part of each operation. The credentials held in the secondary application can be configured as a filter to restrict the results returned from the external systems. Filters are discussed later in the chapter.
Because SharePoint 2010 supports claims authentication, BCS can also use claims to authenticate against external systems. Of course, to implement claims authentication, the external system must support claims and trust the claims provider used with SharePoint. At this writing, there are few systems that support claims authentication in most organizations, but the number will increase over time. A likely scenario today involves a custom Windows Communication Foundation (WCF) service that implements claims authentication.
In order to implement claims authentication, the AuthenticationMode should be set to Passthrough. As previously discussed, this will cause BCS to try to authenticate with the current user's credentials. However, when BCS attempts authentication, the WCF service will request a Security Assertion Markup Language (SAML) token, which is the currency used for authentication in a claims environment.
When BCS receives the request for a SAML token, it contacts the Secure Token Service (STS), a shared service running in the SharePoint farm. STS looks at the end user credentials and issues a SAML token. This SAML token is then used by the WCF connector to authenticate against the WCF service. For the most part, claims-based authentication happens automatically, provided that the external system accepts the SAML token provided by BCS.
Today, many web-based applications utilize a token-based authentication system. These systems typically have a logon mechanism that is separate from the applications that they support. For example, Windows Live has a logon system that utilizes a Windows Live ID. This ID is used for many applications, including HotMail, SkyDrive, and Live Mesh. Regardless of the application, however, end users always use the same logon screen to authenticate themselves and receive a token that is trusted by the applications.
BCS can support authentication against token-based systems, but it requires the creation of a custom SSS provider designed to work with the particular token system. Additionally, a custom handler must be created to redirect users to the appropriate logon page for the system. Creating these customizations is beyond the scope of this chapter.
Generally, BCS clients have symmetry with the server-side functionality. The Application Model created in SPD is synchronized with clients when external lists are accessed through Office clients. However, some authentication settings, like those that use SSS, will not work correctly from the client because the client always accesses the external system directly without going through the server. In these cases, special consideration must be given to how the client handles authentication. Fortunately, the connection settings for the ECT allow you to specify different authentication values for client and server.
When the AuthenticationMode is set to Passthrough, the client will always try to connect to the external system using the Windows credentials of the current user. This means that the external system must support Windows authentication, and the current user must have rights to perform the requested operations. Otherwise, the call will fail.
When the AuthenticationMode is set to RevertToSelf, BCS is supposed to use the application pool account when accessing the external system. However, clients have no mechanism with which to use this account because they always access the external systems directly. In this case, authentication will fail.
Additional problems can occur when a Trusted Subsystem authentication model that maps to group credentials in SSS is used. This is because the BCS runtime on the client has no mechanism to determine whether the end user is in a particular Active Directory group. In this case, as well, authentication may fail.
Regardless of the authentication settings, the client will store its BCS credentials in the Credential Manager. The Credential Manager is a password store system that supports single sign-on (SSO) to a variety of systems, including websites and remote computers. Credential Manager is part of the operating system, so you can open it within Windows and view and manage your credentials. If authentication fails from the client, BCS automatically deletes the credentials from the Credential Manager store.
Authentication is only the first part of accessing data from external systems. Even after the user is authenticated, BCS must determine whether the user is authorized to call a particular operation on an ECT. BCS has four different permissions that may be assigned. These are Edit, Execute, Set Permissions, and Selectable in Clients. The Edit right grants the ability to create, delete, and update BCS metadata. The Execute right grants the ability to make a call to an external system. The Set Permissions right grants the ability to assign rights to other users, and the Selectable in Clients right provides access to utilities such as the entity picker. These rights can be assigned at the model, system, entity, and operation levels using the interface in Central Administration for the BDC shared service.
External Content Types are at the heart of BCS; every BCS solution will have at least one ECT defined. The definition of an ECT includes all of the information schema, data operations, relationships, filters, actions, and security descriptors necessary to bring external system data into SharePoint. All of this information is defined inside of the Application Model, which centers on the definition of entities. The following code shows where entities are defined inside of the Application Model XML:
<?xml version="1.0" encoding="utf-16" standalone="yes"?>
<Model>
  <LobSystems>
    <LobSystem Type="Database" Name="CampaignsData">
      <LobSystemInstances>
        <LobSystemInstance Name="CampaignsData">
        </LobSystemInstance>
      </LobSystemInstances>
      <Entities>
        <Entity Namespace="http://www.contoso.com" Version="1.1.0.0"
         EstimatedInstanceCount="10000" Name="Campaign"
         DefaultDisplayName="Campaign">
        </Entity>
      </Entities>
    </LobSystem>
  </LobSystems>
</Model>

BCS supports a wide variety of operations designed to facilitate accessing systems and performing CRUD functions. Generally, you will be concerned with basic reading and writing to external systems using Finder (Read List), SpecificFinder (Read Item), Creator (Create), Updater (Update), and Deleter (Delete), methods. These methods are also supported in SPD through menus in the Operations Design View. Methods that are not supported by SPD offer additional functionality and control, but must be created by hand-editing the BDC Metadata Model. Table 11-2 lists all of the supported BCS operations.
Table 11.2. Supported BCS Operations
NAME | DESCRIPTION |
|---|---|
Finder | Returns multiple records from an external system based on a wildcard |
SpecificFinder | Returns a single record from an external system based on a primary key |
IdEnumerator | Returns all primary keys from an external system to support search indexing |
Scalar | Returns a scalar value from an external system |
AccessChecker | Checks to see what rights are allowed for a user |
Creator | Creates a new record in an external system |
Updater | Updates an existing record in an external system |
Deleter | Deletes a record in an external system |
ChangedIdEnumerator | Returns primary keys for records that have changed to support incremental search indexing |
DeletedIdEnumerator | Returns primary keys for records that have been deleted to support incremental search indexing |
AssociationNavigator | Navigates from one entity to a related entity |
Associator | Associates an entity with another entity |
Disassociator | Disassociates one entity from another |
GenericInvoker | Used to perform operations not supported by any of the defined operations |
StreamAccessor | Supports accessing BLOB data from an external system |
BinarySecurityDescriptorAccessor | Returns a security descriptor |
BulkSpecificFinder | Returns a set of records from the external system in a batch based on a set of primary keys |
BulkAssociatedIdEnumerator | Returns a set of primary keys representing records associated with an entity |
BulkAssociationNavigator | Supports navigation from one entity to many related entities |
BulkIdEnumerator | Returns all primary keys in a batch from an external system to support search indexing |
Finder methods are used to return a result set from the external system and are a requirement for creating external lists. You can create a Finder method in SPD by selecting to create a "New Read List" operation. The following code snippet shows the definition of a Finder method:
<Method Name="Read List" DefaultDisplayName="Campaign Read List"><Properties> <Property Name="RdbCommandType" Type="System.Data.CommandType, System.Data, Version=2.0.0.0, Culture=neutral, PublicKeyToken=b77a5c561934e089">Text</Property><Property Name="RdbCommandText" Type="System.String">SELECT TOP(@CampaignID) [CampaignID] , [CampaignName] , [StartDate] , [EndDate] , [GeographyId] , [LastUpdate] FROM [dbo].[Campaigns] ORDER BY [CampaignID] </Property> <Property Name="BackEndObjectType" Type="System.String"> SqlServerTable </Property> <Property Name="BackEndObject" Type="System.String">Campaigns</Property> <Property Name="Schema" Type="System.String">dbo</Property> </Properties> <Parameters> <Parameter Direction="In" Name="@CampaignID"> <TypeDescriptor TypeName="System.Int64" AssociatedFilter="Filter" Name="CampaignID"> <DefaultValues> <DefaultValue MethodInstanceName="Read List" Type="System.Int64"> 100 </DefaultValue> </DefaultValues> </TypeDescriptor> </Parameter><Parameter Direction="Return" Name="Read List"><TypeDescriptor TypeName="System.Data.IDataReader, System.Data, Version=2.0.0.0, Culture=neutral, PublicKeyToken=b77a5c561934e089" IsCollection="true" Name="Read List"> <TypeDescriptors> <TypeDescriptor TypeName="System.Data.IDataRecord, System.Data, Version=2.0.0.0, Culture=neutral, PublicKeyToken=b77a5c561934e089" Name="Read ListElement"> <TypeDescriptors> <TypeDescriptor TypeName="System.Int32" ReadOnly="true" IdentifierName="CampaignID" Name="CampaignID" /> <TypeDescriptor TypeName="System.String" Name="CampaignName"> <Properties> <Property Name="Size" Type="System.Int32">50</Property> <Property Name="RequiredInForms" Type="System.Boolean"> true </Property> <Property Name="ShowInPicker" Type="System.Boolean">
true
                  </Property>
                </Properties>
                 ...
    </Parameter>
  </Parameters>
  <MethodInstances>
    <MethodInstance Type="Finder" ReturnParameterName="Read List" Default="true"
    Name="Read List" DefaultDisplayName="Campaign Read List">
      <Properties>
        <Property Name="UseClientCachingForSearch" Type="System.String"></Property>
        <Property Name="RootFinder" Type="System.String"></Property>
        <Property Name="LastModifiedTimeStampField" Type="System.String">
          LastUpdate
        </Property>
      </Properties>
    </MethodInstance>
  </MethodInstances>
</Method>

In the definition for the Finder method, SPD automatically generates a SQL query to retrieve items for display in the list. This is done when the methods are created in the wizard. Optionally, you could edit these entries to use stored procedures instead of dynamic SQL. Also, take note of how the return parameters are defined so that BCS understands the data returned from the external system. In particular, note the use of the TypeDescriptor element. The TypeDescriptor is used to map data types in the external system to .NET data types in BCS.
You can create multiple Finder methods, but one will always be designated as the default. The default Finder method forms the basis of the default view of an external list and provides support for crawling the external system so that it can be searched. SPD automatically adds a RootFinder property to the default Finder method. This property is used when crawling the external system to specify the records in the external system that should be indexed. Additionally, the method can be designated as a timestamp field to support incremental crawls. Designating a field as a timestamp is done in the Return Parameters section of the Operation Wizard and appears in the BDC Metadata Model as a LastModifiedTimeStamp property.
SpecificFinder methods are used to return a single item from the external system and are also required to support external lists. The Creator, Updater, and Deleter methods are optional for external lists. All of the methods have similar XML structures in the BDC Metadata Model.
BCS supports the definition of relationships between entities, which allows you to display one-to-many relationships and navigate between entities within SharePoint. In order to create a relationship, select New Association from the context menu in the Operations Design View.
This will start a wizard to help you define the new association. The wizard will ask you to select another ECT with which to make the association. If the ECTs are based on related tables in a database, SPD will infer the relationship using the foreign key. If not, you will have to specify the relationship manually by associating fields from the parent to child ECT. The following code shows a relationship between a Campaign entity and a Geography entity, where the relationship references the geography in which the campaign will occur.
<Method IsStatic="false" Name="GeographyAssociation">
  <Properties>
    ...
  </Properties>
  <Parameters>
    <Parameter Direction="In" Name="@GeographyId">
      <TypeDescriptor ... />
    </Parameter>
    <Parameter Direction="Return" Name="GeographyAssociation">
      <TypeDescriptor ...>
        <TypeDescriptors>
          ...
        </TypeDescriptors>
      </TypeDescriptor>
    </Parameter>
  </Parameters>
  <MethodInstances>
    <Association Name="GeographyAssociation" Type="AssociationNavigator"
     ReturnParameterName="GeographyAssociation"
     DefaultDisplayName="Geography Association">
      <Properties>
        <Property Name="ForeignFieldMappings" Type="System.String">
        ... ForeignFieldMapping ForeignIdentifierName="GeographyId" ...
        </Property>
      </Properties>
      <SourceEntity Namespace="http://www.contoso.com/marketing"
                    Name="Geography" />
      <DestinationEntity Namespace="http://www.contoso.com/marketing"
                    Name="Campaign" />
    </Association>
  </MethodInstances>
</Method>

When creating Finder and SpecificFinder methods, you quite often want to limit the information that is returned from the external system. You may want to limit the returned data simply to prevent a large amount of data from being requested, and support conditional queries or wildcards. Table 11-3 lists all of the filters supported in BCS along with a description.
Table 11.3. Supported BCS Filters
Whenever you are creating Finder and SpecificFinder methods, you should define either a Limit or PageNumber filter for the operation. These filters ensure that large result sets are not returned to an external list. While BCS does implement throttling, the ECT should implement its own tighter limits to ensure that query performance is maintained.
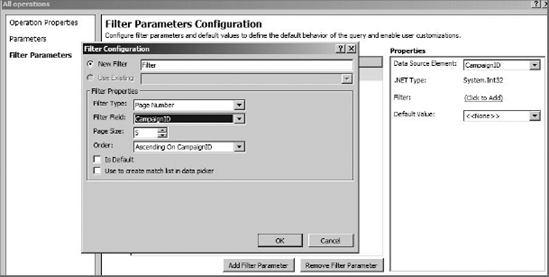
Defining filters in SPD is done in the Operation Wizard on the Filter Parameters Configuration page. On this page, you may click the Add Filter Parameter button to add a new filter. After adding a new filter, you must then click the Filter hyperlink to open the Filter Configuration dialog. Figure 11-18 shows the Filter Configuration dialog within the Operation Wizard.
Once you have created ECTs, they can be used in SharePoint in a variety of ways. Initially, the external list is the simplest and most obvious way to surface external data. External lists, however, are only one way to use ECTs in SharePoint. SharePoint can also use ECTs to display data in web parts, support enhancements to other lists and facilities, and as a source for custom solutions. This section goes beyond the simple creation of an external list to show additional uses for ECTs.
External lists may be created from either SPD or from the Create page within SharePoint, and have many of the same capabilities as a standard list. When they are created from SPD, for example, you may also select to create an InfoPath form for editing items, by clicking the Create Lists and Form button. Creating an InfoPath form allows you to customize the appearance of the form as well as add validation logic.
Once you have created the InfoPath form, you can edit it by clicking the Design Forms in InfoPath button, which is available from the List Settings tab. Clicking this button will open the form in InfoPath, where you will have complete control over the appearance and functionality of the form. Figure 11-19 shows a simple item edit form that has been modified in InfoPath.
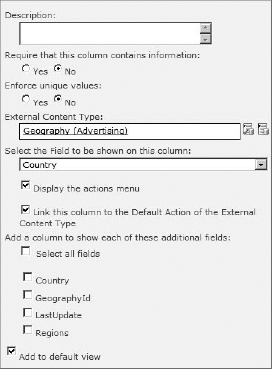
Along with using an ECT as the basis for a list, you can also use an ECT as the source for a column in another list. This capability is known as creating an external column. When you create an external column for a list, you select the ECT to use as the basis for the column. You may then select one or more of the fields available in the ECT to display alongside the column you are creating.
These additional fields are known as projected fields because they project data from the ECT into the parent list. Figure 11-20 shows an external column definition.
Another way to use ECTs is through a set of web parts that ships with SharePoint Server 2010, known as Business Data Parts. Business Data Parts are designed specifically to display ECT data. The available parts include the Business Data List, Business Data Related List, and Business Data Item. These web parts display a list based on an ECT, a list based on an ECT association, or a single item, respectively.
The Business Data List part allows you to select an ECT and then displays a list of data based on a Finder method that you specify. In many ways, this web part is like an external list. You can, for example, modify the view by selecting which columns to display. If you have filters defined for the Finder method, these can be used to run simple queries against the list in order to change the view. Finally, you can change the appearance of the list by altering the XSLT contained within the web part. This XSLT is used to transform the data returned for display in the web part.
The Business Data Related List is meant to be used in conjunction with the Business Data List to show data based on an association between two ECTs. After selecting an ECT for both the Business Data and Business Data Related lists, you can use the web part menu to connect the two lists. Once connected, the Business Data List web part acts as a filter against the Business Data Related List web part. This gives end users a simple way to filter the list view by clicking on items in the related list.
The Business Data Item web part is used to display a single record based on an ECT. This web part is configured by first selecting the ECT and then selecting the particular record to display. This web part is especially useful when combined with the Business Data Item Builder web part, which builds a business item from query string parameters in the page URL. This combination of the Business Data Item Builder web part and Business Data Item web part is used by BCS to create a profile page for an ECT. Profile pages are discussed in the next section. Figure 11-21 shows the Business Data List, Business Data Related List, and Business Data Item Builder web parts on a page.
When SharePoint surfaces ECT data in lists and web parts, it does not necessarily show all of the available fields and associations. For example, when an ECT is used as the source for an external column, only a single field is required for display. When an end user sees partial ECT data, however, they are quite often interested in being able to drill into the data behind. This is where profile pages come into play. A profile page is a dedicated page that shows all of the ECT data for a specific record. This way, end users can jump from partial ECT data to a complete view of the record.
Profile pages are built using the Business Data Item Builder and Business Data Item web parts deployed onto a dedicated profile page. The profile page is typically accessed through an action. An action is defined as a hyperlink containing query string parameters that can be used by the Business Data Item Builder web part to construct the profile page. Actions are often surfaced as a drop-down menu associated with the displayed ECT data. Figure 11-22 shows an action menu associated with an external column.

Before you can create profile pages, they must be enabled through the BDC service application. On the Edit tab for the BDC service application, you can click the Configure button in the Profile Pages group. In the dialog that opens, you must specify a SharePoint site where the profile pages can be created. After that, you can simply select ECTs and click the Create/Upgrade button to make profile pages for the ECTs you select. You can also make profile pages in SPD when you are designing your ECT.
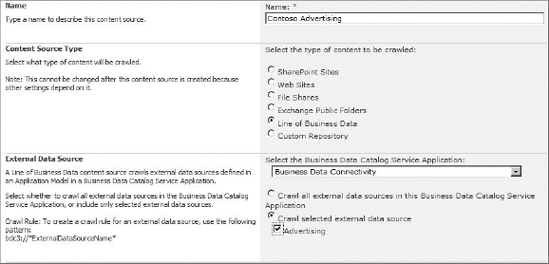
As discussed earlier, ECTs created with SPD already support indexing by SharePoint Search. However, external systems will only be indexed if you explicitly set up a content source that includes the ECT. Content sources can be created within the Search service application, where you will have the option to create a content source associated with an external system.
When you select to create a new content source from an ECT, you will be presented with a drop-down list of the available BDC service applications. When you select a BDC service application, you will then have the option to index all external systems associated with the select service or to pick particular systems. Figure 11-23 shows the content source creation options.
After a content source is created and crawled, it may be used in the standard ways. This means that you may simply go to the Search Center, type a keyword, and return records from the external system. These results include a hyperlink to the profile page so that users can see the full details of the returned records. You may also set up search scopes and use them to search only the external system data.
The User Profile service application is used to synchronize data from Active Directory to the profile database maintained by SharePoint. The profile database contains rich information about end users that can be displayed in sites. The User Profile service application maps Active Directory fields to fields in the user's profile. On a scheduled basis, this information is imported from Active Directory.
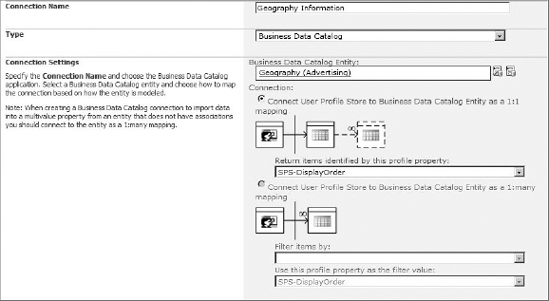
In much the same way that you can add search connections to external systems through ECTs, you can also add profile synchronization connections. Adding a new synchronization connection allows you to use data from external systems to supplement the data in the profile system. This is often useful in organizations that maintain a human resources (HR) system, but do not have rich data in their Active Directory system. In such cases, ECTs are designed against the HR system and mapped to fields in the profile database. Figure 11-24 shows a new connection being created in the User Profile service application.
Along with using ECTs on the SharePoint server, you can also utilize them in Office 2010 clients. With little effort, ECTs can be surfaced as lists in the SharePoint Workspace, items in Microsoft Outlook, or metadata columns in Microsoft Word. Furthermore, Office clients can sync with SharePoint to allow external lists to be managed offline.
The SharePoint Workspace (SPW) is an Office 2010 client designed to be the central player in managing SharePoint data offline. Using SPW, end users can select to synchronize sites, lists, and libraries between their client and the SharePoint server.
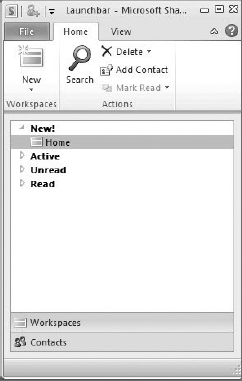
SPW has a simple interface that allows for synchronization to be initiated either through the browser or the SPW client. In the browser, end users can synchronize a single list or an entire site. Clicking the Sync to SharePoint Workspace button on the List tab causes SPW to synchronize a list. Clicking the same button on the Site Actions menu causes SPW to synchronize an entire site. The SPW client contains a Launch Bar that is accessible from an icon in the tray. The Launch Bar lists the available sites and allows you to specify new sites to synchronize by providing a URL. Figure 11-25 shows the Launch Bar.
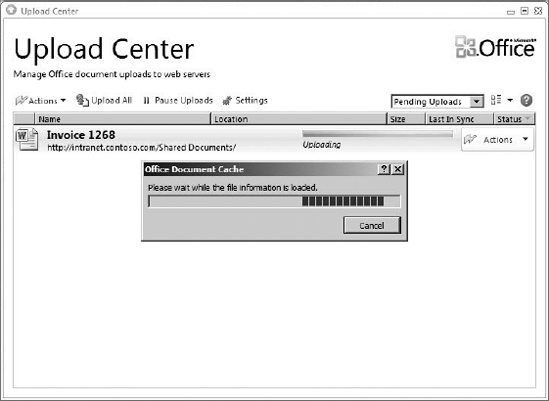
SPW also contains a Workspace Window that can be opened to show all of the available lists and libraries in a site. In the walk-through earlier in the chapter, the Workspace Window was used to view an external list. The Workspace Window can be used to work with both lists and library documents, make changes, and synchronize them with the server. When documents are added to the workspace, SPW will upload them to the server if it is online. If the client is offline, then documents are queued for upload in the Upload Center. The Upload Center presents the status of document upload and is accessible through an icon in the tray. Figure 11-26 shows the Upload Center.
Synchronization permissions can be managed through the SharePoint site. Site Collection administrators can use the standard permission settings to control who has access to the site. An additional option on the Site Settings page allows the administrator to set whether or not a particular site is available for offline use.
While SPW is a powerful client for managing SharePoint sites, many end users prefer to have data available to them in Microsoft Outlook as well. Lists can be synchronized with Microsoft Outlook by clicking the Connect to Outlook button on the List tab. Just like SPW, Outlook allows users to work with data offline and then synchronize it with SharePoint later.
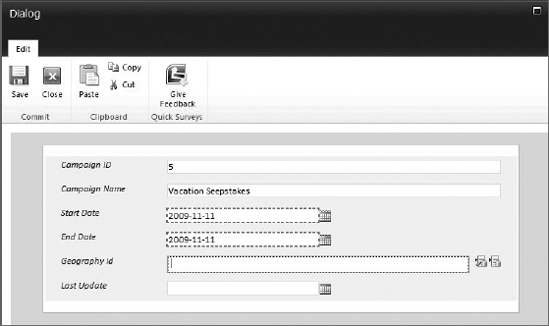
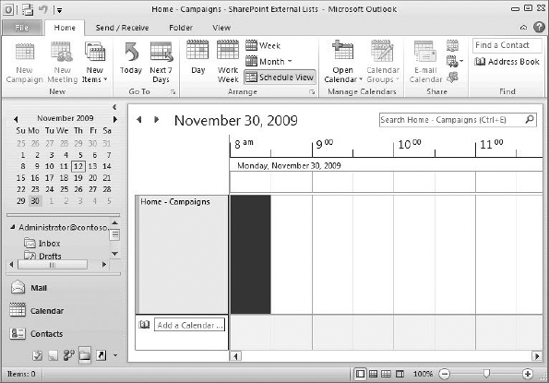
When synchronizing external lists, ECTs can utilize Outlook forms by explicitly declaring that they should be displayed as an appointment, contact, task, or post when they are designed in SPD. Selecting the option to display an ECT as a particular type of Office item requires that external system fields be mapped to Outlook fields in the SPD wizard. Generally, the SPD wizards will prompt for the correct mapping through messages in the wizard. This mapping ensures that the data is correctly displayed inside of Outlook. Figure 11-27 shows sales campaign data from the earlier walkthrough displayed as a calendar in Outlook.
Synchronizing lists to Outlook brings along a VSTO solution for working with the items. While the synchronization behavior described in this section requires no customizations to work, you could choose to create your own VSTO solution to enhance the functionality of Outlook. This solution could be a full-blown custom VSTO solution created in Outlook or a special declarative solution unique to BCS. Creating custom VSTO solutions and declarative solutions is beyond the scope of this chapter but is worth investigating for more advanced needs.
When you choose to create an external column for a document library, this column will surface in Microsoft Word in the Document Information Pane (DIP) at the top of the document. The DIP is designed to present metadata information so that it can be filled in during the document creation process as opposed to prompting for metadata values when the document is saved.
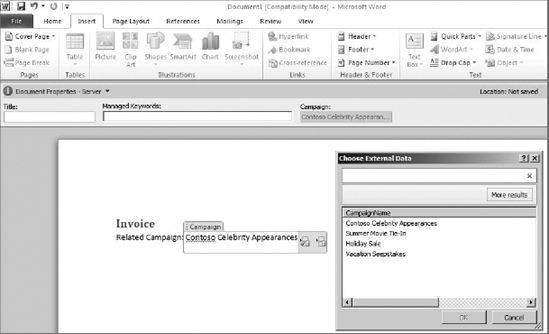
In conjunction with viewing the metadata values in the DIP, document templates can also make use of Quick Parts. Quick Parts in Microsoft Word allow you to insert fields into the document template that are bound to the metadata fields of the document. When an end user fills in the field as part of the document creation process, the metadata values are set automatically. Adding Quick Parts to a document is done by selecting the appropriate metadata field from the Quick Parts list, which appears on the Insert tab in Microsoft Word.
While Quick Parts work well with all manner of document metadata, they work especially well with ECTs. This is because the Quick Parts will display a picker dialog for metadata that is based on an ECT. This makes it easy for end users to select valid values for the metadata, while improving the document creation experience. Figure 11-28 shows a document with a Quick Part based on the ECT created earlier in the walk-through. In the image, you can see the Quick Part field, the picker dialog, and the Quick Part list on the Insert tab.
While BCS offers significant functionality without writing any code at all, there are advanced scenarios in which you will want to write custom BCS solutions. To support custom solutions, BCS has a complete set of object models for manipulating external data and managing ECT metadata. These models can be used on both the client and the server and have a high degree of symmetry between the two programming models.
Along with coding against the client and server model, you can also create your own external system connectors, as mentioned previously. These connectors are one of the most common BCS customizations because they give you a significant amount of control over the business logic applied to external data.
The Runtime Object Model is the API used for manipulating external data. Using the Runtime Object Model, you can perform full CRUD operations on external data through custom code. This is the programming interface used by external lists, which means that you can recreate the functionality of an external list in your own custom projects.
Using the Runtime Object Model requires you to set references in Visual Studio 2010 to the appropriate assemblies where the programming interface is defined. Selecting the correct assemblies is first a matter of deciding whether you are creating a server-side customization or a client-side customization. For server-side customizations, you will need to set references to the assemblies Microsoft.BusinessData.dll and Microsoft.SharePoint.dll. For client-side customizations, you will need to set a reference to Microsoft.BusinessData.dll and Microsoft.Office.BusinessApplications.Runtime.dll.
After you set a reference to the appropriate assemblies, the first challenge is to connect to the appropriate catalog. If you are on the server, then you will connect with the metadata catalog associated with the BDC service application. If you are on the client, then you will connect with the client cache.
Connecting to the metadata catalog on the server can be done with or without a SharePoint context, but the code will be different. In any case, you must get a reference to the BdcServiceApplicationProxy. The BdcServiceApplicationProxy can then be used to connect with the metadata catalog, which is represented by the DatabaseBackedMetadataCatalog object. If your code is running with a SharePoint context, then the following code will connect to the metadata catalog:
BdcServiceApplicationProxy p =
      (BdcServiceApplicationProxy)SPServiceContext.Current.GetDefaultProxy(
      typeof(BdcServiceApplicationProxy));
DatabaseBackedMetadataCatalog catalog = sap.GetDatabaseBackedMetadataCatalog();

If your code is running outside of a SharePoint context, then you will need additional code to connect with the BdcServiceApplicationProxy. The following code shows how to create a LINQ query to return the application proxy:
SPFarm farm = SPFarm.Local;
SPServiceProxyCollection spc = farm.ServiceProxies;
BdcServiceApplicationProxy sap = (BdcServiceApplicationProxy)((from sp in spc
                       where sp.TypeName.Equals("Business Data Connectivity")
                                 select sp).First().ApplicationProxies.First());
DatabaseBackedMetadataCatalog catalog = sap.GetDatabaseBackedMetadataCatalog();

If your code is running on the client, then you will connect to the client cache instead of the metadata catalog. The client cache is represented by the RemoteSharedFileBackedMetadataCatalog object. The following code shows how to make the connection:
RemoteSharedFileBackedMetadataCatalog catalog =
   new RemoteSharedFileBackedMetadataCatalog();
Once you make a connection to the appropriate catalog, you can read or write to the entities it contains. These changes will be reflected in the external system, as well as any external lists based on the ECT. The following code shows how to retrieve an entity and print out the values of its fields:
IEntity ect = catalog.GetEntity("http://www.contoso.com/marketing", "Campaign");
ILobSystem lob = ect.GetLobSystem();
ILobSystemInstance lobi = lob.GetLobSystemInstances()["Advertising"];
IFilterCollection filter = ect.GetDefaultFinderFilters();
IEntityInstanceEnumerator ects = ect.FindFiltered(filter, lobi);
while (ects.MoveNext())
{
    Console.WriteLine(ects.Current["CampaignName"].ToString());
}

Along with reading or updating entities, you can also create new ones. As with other operations, these changes will flow all the way back to the external system. Of course, if you are writing to the client cache, the changes will only be made when the client is online. The following code shows how to add a new record to an external system through the ECT:
IView v = ect.GetCreatorView("Create");
IFieldValueDictionary dict = v.GetDefaultValues();
dict["CampaignName"] = "Fantastic Fall";
dict["StartDate"] = new DateTime(2009, 10, 15);
dict["EndDate"] = new DateTime(2009, 12, 1);
dict["GeographyId"] = 1;
dict["LastUpdate"] = DateTime.Today;
Identity id = ect.Create(dict, lobi);

Along with the Runtime Object Model, BCS also has an Administration Object Model. The Administration Object Model allows you to manipulate the BDC Metadata Model. In order to work with the Administration Object Model, you must set a reference to Microsoft.BusinessData.dll and Microsoft.SharePoint.
As with the Runtime Object Model, you must first connect to the appropriate catalog before you can manipulate the data. In the case of the Administration Object Model, you must connect to the AdministrationMetadataCatalog object. Connecting to this catalog requires a reference to the BdcServiceApplicationProxy just as it did with the Runtime Object Model. The following code shows how to connect with the catalog if your code is running outside of a SharePoint context. Inside the context, you can use the SPServiceContext object, as shown previously.
SPFarm farm = SPFarm.Local;
SPServiceProxyCollection spc = farm.ServiceProxies;
BdcServiceApplicationProxy sap = (BdcServiceApplicationProxy)((from sp in spc
                       where sp.TypeName.Equals("Business Data Connectivity")
select sp).First().ApplicationProxies.First()); AdministrationMetadataCatalog catalog = sap.GetAdministrationMetadataCatalog();
The Administration Object Model provides a set of objects that allow you to manipulate the Application Model XML. The names of the objects correspond closely to the names of the elements in the Application Model. The following code shows a complete example of creating a simple Application Model from code and saving it into the metadata catalog:
Model model = Model.Create("MiniCRM", true, catalog);
LobSystem lob = model.OwnedReferencedLobSystems.Create(
                "Customer", true, SystemType.Database);
LobSystemInstance lobi = lob.LobSystemInstances.Create("MiniCRM", true);

lobi.Properties.Add("AuthenticationMode", "PassThrough");
lobi.Properties.Add("DatabaseAccessProvider", "SqlServer");
lobi.Properties.Add("RdbConnection Data Source", "CONTOSOSERVER");
lobi.Properties.Add("RdbConnection Initial Catalog", "MiniCRM.Names");
lobi.Properties.Add("RdbConnection Integrated Security", "SSPI");
lobi.Properties.Add("RdbConnection Pooling", "true");

Entity ect = Entity.Create("Customer", "MiniCRM", true,
             new Version("1.0.0.0"), 10000,
             CacheUsage.Default, lob, model, catalog);

ect.Identifiers.Create("CustomerId", true, "System.Int32");

Method specificFinder = ect.Methods.Create(
"GetCustomer", true, false, "GetCustomer");

specificFinder.Properties.Add("RdbCommandText",
   "SELECT [CustomerId] ,[FullName] FROM MiniCRM.Names
    WHERE [CustomerId] = @CustomerId");
specificFinder.Properties.Add("RdbCommandType", "Text");

Parameter idParam = specificFinder.Parameters.Create(
               "@CustomerId", true, DirectionType.In);

idParam.CreateRootTypeDescriptor(
    "CustomerId", true, "System.Int32", "CustomerId",
     new IdentifierReference("CustomerId",
        new EntityReference("MiniCRM", "Customer", catalog), catalog),
     null, TypeDescriptorFlags.None, null, catalog);

Parameter custParam = specificFinder.Parameters.Create(
               "Customer", true, DirectionType.Return);

TypeDescriptor returnRootCollectionTypeDescriptor =
    custParam.CreateRootTypeDescriptor(
        "Customers", true,
        "System.Data.IDataReader, System.Data, Version=2.0.0.0, Culture=neutral,
PublicKeyToken=b77a5c561934e089",
"Customers", null, null, TypeDescriptorFlags.IsCollection, null, catalog);
TypeDescriptor returnRootElementTypeDescriptor =
returnRootCollectionTypeDescriptor.ChildTypeDescriptors.Create(
"Customer", true,
"System.Data.IDataRecord, System.Data, Version=2.0.0.0, Culture=neutral,
PublicKeyToken=b77a5c561934e089",
"Customer", null, null, TypeDescriptorFlags.None, null);
returnRootElementTypeDescriptor.ChildTypeDescriptors.Create(
"CustomerId", true, "System.Int32", "CustomerId",
new IdentifierReference("CustomerId",
new EntityReference("MiniCRM", "Customer", catalog), catalog),
null, TypeDescriptorFlags.None, null);
returnRootElementTypeDescriptor.ChildTypeDescriptors.Create(
"FirstName", true, "System.String", "FullName",
null, null, TypeDescriptorFlags.None, null);
specificFinder.MethodInstances.Create(
"GetCustomer", true, returnRootElementTypeDescriptor,
MethodInstanceType.SpecificFinder, true);
Method finder = ect.Methods.Create("GetCustomers", true, false, "GetCustomers");
finder.Properties.Add("RdbCommandText", "SELECT [CustomerId] ,
[FullName]FROM MiniCRM.Names");
finder.Properties.Add("RdbCommandType", "Text");
Parameter custsParam = finder.Parameters.Create(
"Customer", true, DirectionType.Return);
TypeDescriptor returnRootCollectionTypeDescriptor2 =
custsParam.CreateRootTypeDescriptor(
"Customers", true,
"System.Data.IDataReader, System.Data, Version=2.0.0.0, Culture=neutral,
PublicKeyToken=b77a5c561934e089",
"Customers", null, null, TypeDescriptorFlags.IsCollection, null, catalog);
TypeDescriptor returnRootElementTypeDescriptor2 =
returnRootCollectionTypeDescriptor2.ChildTypeDescriptors.Create(
"Customer", true,
"System.Data.IDataRecord, System.Data, Version=2.0.0.0, Culture=neutral,
PublicKeyToken=b77a5c561934e089",
"Customer", null, null, TypeDescriptorFlags.None, null);
returnRootElementTypeDescriptor2.ChildTypeDescriptors.Create(
"CustomerId", true, "System.Int32", "CustomerId",
new IdentifierReference("CustomerId",
new EntityReference("MiniCRM", "Customer", catalog), catalog),
null, TypeDescriptorFlags.None, null);returnRootElementTypeDescriptor2.ChildTypeDescriptors.Create(
"FirstName", true, "System.String", "FullName",
null, null, TypeDescriptorFlags.None, null);
finder.MethodInstances.Create(
"GetCustomers", true, returnRootCollectionTypeDescriptor2,
MethodInstanceType.Finder, true);
ect.Activate();

A .NET Assembly Connector associates a custom assembly with an ECT so that you can precisely control how information is accessed, processed, and returned from external systems. Creating a .NET Assembly Connector is done using Visual Studio 2010, and starts by selecting the Business Data Connectivity Model project in the SharePoint 2010 group.
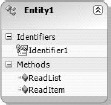
The new project template provides a simple entity definition to use as the starting point for your ECT. The starting entity is visible immediately on the design surface in the project. The design surface displays the identifier field and the methods for the entity. When the project is first created, the entity has an identifier field named Identitfier1 and methods named ReadList and ReadItem. The identifier is essentially the primary key for the entity. The ReadList and ReadItem method represent the Finder and SpecificFinder methods for the entity. Figure 11-29 shows the starting entity.
One of the first tasks to perform in the project is to define any additional methods you need for the entity. Right-clicking the entity and selecting New Method will create a new method definition. When the new method definition is created, the Method Details pane will open so that you may further define the method. In particular, you must select the Method Instance type to use. Visual Studio supports all of the available method types described earlier in the chapter.
Along with the entity on the design surface, the template project provides two classes: Entity1 and Entity1Service. The Entity1 class contains the definitions for all of the fields in the entity, while the Entity1Service class contains the implementation for the methods.
The project template defines a simple entity with two fields: Identifer1 and Message. Identifier1 is the primary key for the entity and Message is a field that contains a text message. There is nothing special about these fields or methods — the project template simply creates them as an example to get you started. In fact, the project is complete as soon as it is created. You can run it directly from Visual Studio and create a new external list. So the project template functions as a starting point for your project as well as a sample application.
As a more practical example, this section will present a walk-through that creates a .NET Assembly Connector that returns data from an XML chunk. The XML chunk has product data that will be the basis for an external list. This XML chunk is accessible through a simple method, as shown in the following code.
private static string GetData()
{
  StringBuilder xml = new StringBuilder();
  xml.Append("<Products>");
  xml.Append("<Product ID="1" Manufacturer="Microsoft" Name="XBox-360" />");
  xml.Append("<Product ID="2" Manufacturer="Seagate" Name="Harddrive" />");
  xml.Append("<Product ID="3" Manufacturer="Dell" Name="Laptop" />");
  xml.Append("<Product ID="4" Manufacturer="Microsoft" Name="Zune" />");
  xml.Append("</Products>");

  return xml.ToString();
}

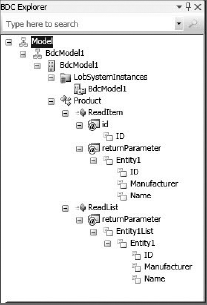
After creating a new Business Data Connectivity Model project, the entity was named Product and the model was updated to have an identifier named ID. The method definitions were also updated to return additional fields for Name and Manufacturer. The complete model can be seen by using the BDC Model Explorer, which is part of the project. Figure 11-30 shows the complete model for the Product entity.
After the methods are updated, the entity class itself must be updated to reflect the actual fields to be returned from the external system. In this example, ID, Name, and Manufacturer fields had to be added. The following code shows the final definition for the entity:
public partial class Product
{
    public string ID { get; set; }
    public string Manufacturer { get; set; }
    public string Name { get; set; }
}

Once the entity definition is complete, the method implementations must be coded. Each method in the entity corresponds to a method in code. For the example, this means coding a ReadList and ReadItem method. The following code shows the implementation for the methods:
public static Product ReadItem(string id)
{
    XDocument d = XDocument.Parse(GetData());

    var q = from c in d.Descendants("Product")
            where c.Attribute("ID").Equals(id)
            select new
            {
                ID = c.Attribute("ID").Value,
Name = c.Attribute("Name").Value,
Manufacturer = c.Attribute("Manufacturer").Value
};
Product product = new Product();
product.ID = q.First().ID;
product.Name = q.First().Name;
product.Manufacturer = q.First().Manufacturer;
return product;
}
public static IEnumerable<Product> ReadList()
{
XDocument d = XDocument.Parse(GetData());
var q = from c in d.Descendants("Product")
select new
{
ID = c.Attribute("ID").Value,
Name = c.Attribute("Name").Value,
Manufacturer = c.Attribute("Manufacturer").Value
};
List<Product> products = new List<Product>();
foreach (var p in q)
{
Entity1 product = new Product();
product.ID = p.ID;
product.Name = p.Name;
product.Manufacturer = p.Manufacturer;
products.Add(product);
}
return products;
}

Because the datasource is an XML chunk, it was simple to implement an XDocument to load the XML. LINQ queries were then used against the XML chunk to return the desired data. After the methods are implemented, the .NET Assembly Connector is complete. The project may be deployed directly to SharePoint, and an external list can be created against the Product ECT.
The key thing to note about the .NET Assembly Connector is that it gives complete control over the method implementations. This means you can easily implement additional business rules or security functions when retrieving data from external systems.
Business Connectivity Services is a broad topic. The range of solutions includes simple no-code solutions all the way through fully customized Visual Studio projects. This chapter gave you a broad overview of the capabilities of BCS, including solutions and administration. However, there are several areas, such as declarative solutions and custom VSTO solutions, that simply cannot be covered in a single chapter. All-in-all, there are a lot of possibilities to consider. As you move forward with BCS, you should start with the simple solutions and add to them as you learn. This will help you grasp the more difficult technical details and incorporate them in your solutions.