
WHAT'S IN THIS CHAPTER?
Android security using Permissions
Using Wake Locks
The Text to Speech libraries
Interprocess communication (IPC) using AIDL and Parcelables
Creating frame-by-frame and tweened animations
Advanced Canvas drawing
Using the Surface View
Listening for key presses, screen touches, and trackball movement
In this chapter, you'll be returning to some of the possibilities touched on in previous chapters and exploring some of the topics that deserve more attention.
In the first seven chapters, you learned the fundamentals of creating mobile applications for Android devices. In Chapters 8 through 14 you were introduced to some of the more powerful and some optional APIs, including location-based services, maps, Bluetooth, and hardware monitoring and control.
This chapter starts by taking a closer look at security, in particular, how Permissions work and how to use them to secure your own applications.
Next you'll examine Wake Locks and the text to speech libraries before looking at the Android Interface Definition Language (AIDL). You'll use AIDL to create rich application interfaces that support full object-based interprocess communication (IPC) between Android applications running in different processes.
You'll then take a closer look at the rich toolkit available for creating user interfaces for your Activities. Starting with animations, you'll learn how to apply tweened animations to Views and View Groups, and construct frame-by-frame cell-based animations.
Next is an in-depth examination of the possibilities available with Android's raster graphics engine. You'll be introduced to the drawing primitives available before learning some of the more advanced possibilities available with Paint. Using transparency, creating gradient Shaders, and incorporating bitmap brushes are then covered, before you are introduced to mask and color filters, as well as Path Effects and the possibilities of using different transfer modes.
You'll then delve a little deeper into the design and execution of more complex user interface Views, learning how to create three-dimensional and high frame-rate interactive controls using the Surface View, and how to use the touch screen, trackball, and device keys to create intuitive input possibilities for your UIs.
Much of Android's security is native to the underlying Linux kernel. Resources are sandboxed to their owner applications, making them inaccessible from others. Android provides broadcast Intents, Services, and Content Providers to let you relax these strict process boundaries, using the permission mechanism to maintain application-level security.
You've already used the permission system to request access to native system services — notably the location-based services and contacts Content Provider — for your applications using the <uses-permission> manifest tag.
The following sections provide a more detailed look at the security available. For a comprehensive view, the Android documentation provides an excellent resource that describes the security features in depth at developer.android.com/guide/topics/security/security.html
Each Android package has a unique Linux user ID assigned to it during installation. This has the effect of sandboxing the process and the resources it creates, so that it can't affect (or be affected by) other applications.
Because of this kernel-level security, you need to take additional steps to communicate between applications. Enter Content Providers, broadcast Intents, and AIDL interfaces. Each of these mechanisms opens a tunnel through which information can flow between applications. Android permissions act as border guards at either end to control the traffic allowed through.
Permissions are an application-level security mechanism that lets you restrict access to application components. Permissions are used to prevent malicious applications from corrupting data, gaining access to sensitive information, or making excessive (or unauthorized) use of hardware resources or external communication channels.
As you've learned in earlier chapters, many of Android's native components have permission requirements. The native permission strings used by native Android Activities and Services can be found as static constants in the android.Manifest.permission class.
To use permission-protected components, you need to add <uses-permission> tags to application manifests, specifying the permission string that each application requires.
When an application package is installed, the permissions requested in its manifest are analyzed and granted (or denied) by checks with trusted authorities and user feedback.
Unlike many existing mobile platforms, all Android permission checks are done at installation. Once an application is installed, the user will not be prompted to reevaluate those permissions.
Before you can assign a permission to an application component, you need to define it within your manifest using the <permission> tag as shown in the Listing 15-1.
Example 15-1. Declaring a new permission
<permission
  android:name="com.paad.DETONATE_DEVICE"
  android:protectionLevel="dangerous"
  android:label="Self Destruct"
  android:description="@string/detonate_description">
</permission>
Within the permission tag, you can specify the level of access that the permission will permit (normal, dangerous, signature, signatureOrSystem), a label, and an external resource containing the description that explains the risks of granting this permission.
To include permission requirements for your own application components, use the permission attribute in the application manifest. Permission constraints can be enforced throughout your application, most usefully at application interface boundaries, for example:
Activities Add a permission to limit the ability of other applications to launch an Activity.
Broadcast Receivers Control which applications can send broadcast Intents to your Receiver.
Content Providers Limit read access and write operations on Content Providers.
Services Limit the ability of other applications to start, or bind to, a Service.
In each case, you can add a permission attribute to the application component in the manifest, specifying a required permission string to access each component. Listing 15-2 shows a manifest excerpt that requires the permission defined in Listing 15-1 to start an Activity.
Example 15-2. Enforcing a permission requirement for an Activity
<activity
  android:name=".MyActivity"
  android:label="@string/app_name"
  android:permission="com.paad.DETONATE_DEVICE">
</activity>
Content Providers let you set readPermission and writePermission attributes to offer a more granular control over read/write access.
As well as requiring permissions for Intents to be received by your Broadcast Receivers, you can also attach a permission requirement to each Intent you broadcast.
When calling sendIntent, you can supply a permission string required by Broadcast Receivers before they can receive the Intent. This process is shown here:
sendBroadcast(myIntent, REQUIRED_PERMISSION);
In order to prolong battery life, over time Android devices will first dim, then turn off the screen, before turning off the CPU. WakeLocks are a Power Manager system Service feature, available to your applications to control the power state of the host device.
Wake Locks can be used to keep the CPU running, prevent the screen from dimming, prevent the screen from turning off, and prevent the keyboard backlight from turning off.
Warning
Creating and holding Wake Locks can have a dramatic influence on the battery drain associated with your application. It's good practice to use Wake Locks only when strictly necessary, for as short a time as needed, and to release them as soon as possible.
Screen Wake Locks are typically used to prevent the screen from dimming during applications that are likely to involve little user interaction while users observe the screen (e.g., playing videos).
CPU Wake Locks are used to prevent the device from going to sleep until an action is performed. This is most commonly the case for Services started within Intent Receivers, which may receive Intents while the device is asleep. It's worth noting that in this case the system will hold a CPU Wake Lock throughout the onReceive handler of the Broadcast Receiver.
Warning
If you start a Service, or broadcast an Intent within the onReceive handler of a Broadcast Receiver, it is possible that the Wake Lock it holds will be released before your Service has started. To ensure the Service is executed you will need to put a separate Wake Lock policy in place.
To create a Wake Lock, call newWakeLock on the Power Manager, specifying one of the following Wake Lock types:
FULL_WAKE_LOCKKeeps the screen at full brightness, the keyboard backlight illuminated, and the CPU running.SCREEN_BRIGHT_WAKE_LOCKKeeps the screen at full brightness, and the CPU running.SCREEN_DIM_WAKE_LOCKKeeps the screen on (but lets it dim) and the CPU running.PARTIAL_WAKE_LOCKKeeps the CPU running.PowerManager pm = (PowerManager)getSystemService(Context.POWER_SERVICE); WakeLock wakeLock = pm.newWakeLock(PowerManager.PARTIAL_WAKE_LOCK, "MyWakeLock");
Once you have created it, acquire the Wake Lock by calling acquire. You can optionally specify a timeout to ensure the maximum duration the Wake Lock will be held for. When the action for which you're holding the Wake Lock completes, call release to let the system manage the power state.
Listing 15-3 shows the typical use pattern for creating, acquiring, and releasing a Wake Lock.
Android 1.6 (SDK API level 4) introduced the text to speech (TTS) engine. You can use this API to produce speech synthesis from within your applications, allowing them to "talk" to your users.
Due to storage space constraints on some Android devices, the language packs are not always preinstalled on each device. Before using the TTS engine, it's good practice to confirm the language packs are installed.
Start a new Activity for a result using the ACTION_CHECK_TTS_DATA action from the TextToSpeech.Engine class to check for the TTS libraries.
Intent intent = new Intent(TextToSpeech.Engine.ACTION_CHECK_TTS_DATA);
startActivityForResult(intent, TTS_DATA_CHECK);
The onActivityResult handler will receive CHECK_VOICE_DATA_PASS if the voice data has been installed successfully.
If the voice data is not currently available, start a new Activity using the ACTION_INSTALL_TTS_DATA action from the TTS Engine class to initiate its installation.
Once you've confirmed the voice data is available, you need to create and initialize a new TextToSpeech instance. Note that you cannot use the new Text To Speech object until initialization is complete. Pass an OnInitListener into the constructor (as shown in Listing 15-4) that will be fired when the TTS engine has been initialized.
Example 15-4. Initializing Text to Speech
boolean ttsIsInit = false;
TextToSpeech tts = null;

tts = new TextToSpeech(this, new OnInitListener() {
       public void onInit(int status) {
         if (status == TextToSpeech.SUCCESS) {
           ttsIsInit = true;
           // TODO Speak!
         }
       }
      });
When Text To Speech has been initialized you can use the speak method to synthesize voice using the default device audio output.
tts.speak("Hello, Android", TextToSpeech.QUEUE_ADD, null);The speak method lets you specify a parameter to either add the new voice output to the existing queue, or flush the queue and start speaking straight away.
You can affect the way the voice output sounds using the setPitch and setSpeechRate methods. Each accepts a float parameter that modifies the pitch and speed, respectively, of the voice output.
More importantly, you can change the pronunciation of your voice output using the setLanguage method. This method takes a Locale value to specify the country and language of the text being spoken. This will affect the way the text is spoken to ensure the correct language and pronunciation models are used.
When you have finished speaking, use stop to halt voice output and shutdown to free the TTS resources.
Listing 15-5 determines whether the TTS voice library is installed, initializes a new TTS engine, and uses it to speak in UK English.
Example 15-5. Using Text to Speech
private static int TTS_DATA_CHECK = 1;

private TextToSpeech tts = null;
private boolean ttsIsInit = false;

private void initTextToSpeech() {
  Intent intent = new Intent(Engine.ACTION_CHECK_TTS_DATA);
  startActivityForResult(intent, TTS_DATA_CHECK);
}

protected void onActivityResult(int requestCode,
                                int resultCode, Intent data) {
  if (requestCode == TTS_DATA_CHECK) {
    if (resultCode == Engine.CHECK_VOICE_DATA_PASS) {
tts = new TextToSpeech(this, new OnInitListener() {
public void onInit(int status) {
if (status == TextToSpeech.SUCCESS) {
ttsIsInit = true;
if (tts.isLanguageAvailable(Locale.UK) >= 0)
tts.setLanguage(Locale.UK);
tts.setPitch(0.8f);
tts.setSpeechRate(1.1f);
speak();
}
}
});
} else {
Intent installVoice = new Intent(Engine.ACTION_INSTALL_TTS_DATA);
startActivity(installIntent);
}
}
}
private void speak() {
if (tts != null && ttsIsInit) {
tts.speak("Hello, Android", TextToSpeech.QUEUE_ADD, null);
}
}
@Override
public void onDestroy() {
if (tts != null) {
tts.stop();
tts.shutdown();
}
super.onDestroy();
}One of the more interesting possibilities of Services is the idea of running independent background processes to supply processing, data lookup, or other useful functionality to multiple independent applications.
In Chapter 9, you learned how to create Services for your applications. Here, you'll learn how to use the Android Interface Definition Language (AIDL) to support rich interprocess communication (IPC) between Services and application components. This will give your Services the ability to support multiple applications across process boundaries.
To pass objects between processes, you need to deconstruct them into OS-level primitives that the underlying operating system can then marshal across application boundaries.
AIDL is used to simplify the code that lets your processes exchange objects. It's similar to interfaces like COM or Corba in that it lets you create public methods within your Services that can accept and return object parameters and return values between processes.
AIDL supports the following data types:
List(including generic) objects, where each element is a supported type. The receiving class will always receive the List object instantiated as anArrayList.Map(not including generic) objects, when every key and element is of a supported type. The receiving class will always receive theMapobject instantiated as aHashMap.AIDL-generated interfaces (covered later). An
importstatement is always needed for these.Classes that implement the
Parcelableinterface (covered next). Animportstatement is always needed for these.
The following sections demonstrate how to make your application classes AIDL-compatible by implementing the Parcelable interface, before creating an AIDL interface definition and implementing it within your Service.
For non-native objects to be passed between processes, they must implement the Parcelable interface. This lets you decompose your objects into primitive types stored within a Parcel that can be marshaled across process boundaries.
Implement the writeToParcel method to decompose your class object, then implement the public static Creator field (which implements a new Parcelable.Creator class), which will create a new object based on an incoming Parcel.
Listing 15-6 shows a basic example of using the Parcelable interface for the Quake class you've been using in the ongoing Earthquake example.
Example 15-6. Making the Quake class a Parcelable
package com.paad.earthquake;

import java.util.Date;
import android.location.Location;
import android.os.Parcel;
import android.os.Parcelable;

public class Quake implements Parcelable {
  private Date date;
  private String details;
  private Location location;
  private double magnitude;
  private String link;
public Date getDate() { return date; }
public String getDetails() { return details; }
public Location getLocation() { return location; }
public double getMagnitude() { return magnitude; }
public String getLink() { return link; }
public Quake(Date _d, String _det, Location _loc,
double _mag, String _link) {
date = _d;
details = _det;
location = _loc;
magnitude = _mag;
link = _link;
}
@Override
public String toString(){
SimpleDateFormat sdf = new SimpleDateFormat("HH.mm");
String dateString = sdf.format(date);
return dateString + ":" + magnitude + " " + details;
}
private Quake(Parcel in) {
date.setTime(in.readLong());
details = in.readString();
magnitude = in.readDouble();
Location location = new Location("generated");
location.setLatitude(in.readDouble());
location.setLongitude(in.readDouble());
link= in.readString();
}
public void writeToParcel(Parcel out, int flags) {
out.writeLong(date.getTime());
out.writeString(details);
out.writeDouble(magnitude);
out.writeDouble(location.getLatitude());
out.writeDouble(location.getLongitude());
out.writeString(link);
}
public static final Parcelable.Creator<Quake> CREATOR =
new Parcelable.Creator<Quake>() {
public Quake createFromParcel(Parcel in) {
return new Quake(in);
}
public Quake[] newArray(int size) {
return new Quake[size];
}
};
public int describeContents() {
return 0;
}
}Now that you've got a Parcelable class, you need to create an AIDL definition to make it available when defining your Service's AIDL interface.
Listing 15-7 shows the contents of the Quake.aidl file you need to create for the Quake Parcelable defined in the preceding listing.
Remember that when you're passing class objects between processes, the client process must understand the definition of the object being passed.
In this section, you will be defining a new AIDL interface definition for a Service you'd like to use across processes.
Start by creating a new .aidl file within your project. This will define the methods and fields to include in an interface that your Service will implement.
The syntax for creating AIDL definitions is similar to that used for standard Java interface definitions.
Start by specifying a fully qualified package name, then import all the packages required. Unlike normal Java interfaces, AIDL definitions need to import packages for any class or interface that isn't a native Java type even if it's defined in the same project.
Define a new interface, adding the properties and methods you want to make available.
Methods can take zero or more parameters and return void or a supported type. If you define a method that takes one or more parameters, you need to use a directional tag to indicate if the parameter is a value or reference type using the in, out, and inout keywords.
Note
Where possible, you should limit the direction of each parameter, as marshaling parameters is an expensive operation.
Listing 15-8 shows a basic AIDL definition in the IEarthquakeService.aidl file.
If you're using the ADT plug-in, saving the AIDL file will automatically code-generate a Java Interface file. This interface will include an inner Stub class that implements the interface as an abstract class.
Have your Service extend the Stub and implement the functionality required. Typically, you'll do this using a private field variable within the Service whose functionality you'll be exposing.
Listing 15-9 shows an implementation of the IEarthquakeService AIDL definition created in Listing 15-8.
Example 15-9. Implementing the AIDL Interface definition within a Service
IBinder myEarthquakeServiceStub = new IEarthquakeService.Stub() {
  public void refreshEarthquakes() throws RemoteException {
    EarthquakeService.this.refreshEarthquakes();
  }

  public List<Quake> getEarthquakes() throws RemoteException {
    ArrayList<Quake> result = new ArrayList<Quake>();

    ContentResolver cr = EarthquakeService.this.getContentResolver();
    Cursor c = cr.query(EarthquakeProvider.CONTENT_URI,
                        null, null, null, null);
    if (c.moveToFirst())
      do {
        Double lat = c.getDouble(EarthquakeProvider.LATITUDE_COLUMN);
        Double lng = c.getDouble(EarthquakeProvider.LONGITUDE_COLUMN);
        Location location = new Location("dummy");
        location.setLatitude(lat);
        location.setLongitude(lng);

        String details = c.getString(EarthquakeProvider.DETAILS_COLUMN);
        String link =  c.getString(EarthquakeProvider.LINK_COLUMN);

        double magnitude =
          c.getDouble(EarthquakeProvider.MAGNITUDE_COLUMN);

        long datems =  c.getLong(EarthquakeProvider.DATE_COLUMN);
        Date date = new Date(datems);

        result.add(new Quake(date, details, location, magnitude, link));
      } while(c.moveToNext());
    return result;
  }
};
When implementing these methods, be aware of the following:
All exceptions will remain local to the implementing process; they will not be propagated to the calling application.
All IPC calls are synchronous. If you know that the process is likely to be time-consuming, you should consider wrapping the synchronous call in an asynchronous wrapper or moving the processing on the receiver side onto a background thread.
With the functionality implemented, you need to expose this interface to client applications. Expose the IPC-enabled Service interface by overriding the onBind method within your Service implementation to return an instance of the interface.
Listing 15-10 demonstrates the onBind implementation for the EarthquakeService.
Example 15-10. Exposing an AIDL Interface implementation to Service clients
@Override
public IBinder onBind(Intent intent) {
  return myEarthquakeServiceStub;
}
To use the IPC Service from within an Activity, you must bind it as shown in Listing 15-11, taken from the Earthquake Activity.
Example 15-11. Using an IPC Service method
IEarthquakeService earthquakeService = null;

private void bindService() {
  bindService(new Intent(IEarthquakeService.class.getName()),
              serviceConnection, Context.BIND_AUTO_CREATE);
}

private ServiceConnection serviceConnection = new ServiceConnection() {
  public void onServiceConnected(ComponentName className,
                                 IBinder service) {
    earthquakeService = IEarthquakeService.Stub.asInterface(service);
  }

  public void onServiceDisconnected(ComponentName className) {
    earthquakeService = null;
  }
};Software as a service, or cloud computing, is becoming increasingly popular as companies try to reduce the cost overheads associated with installation, upgrades, and maintenance of deployed software. The result is a range of rich Internet services with which you can build thin mobile applications that enrich online services with the personalization available from your mobile.
The idea of using a middle tier to reduce client-side load is not a novel one, and happily there are many Internet-based options to supply your applications with the level of service you need.
The sheer volume of Internet services available makes it impossible to list them all here (let alone look at them in any detail), but the following list shows some of the more mature and interesting Internet services currently available.
Google's gData Services As well as the native Google applications, Google offers web APIs for access to their calendar, spreadsheet, Blogger, and Picasaweb platforms. These APIs collectively make use of Google's standardized gData framework, a form of read/write XML data communication.
Yahoo! Pipes Yahoo! Pipes offers a graphical web-based approach to XML feed manipulation. Using pipes, you can filter, aggregate, analyze, and otherwise manipulate XML feeds and output them in a variety of formats to be consumed by your applications.
Google App Engine Using the Google App Engine, you can create cloud-hosted web services that shift complex processing away from your mobile client. Doing so reduces the load on your system resources but comes at the price of Internet-connection dependency.
Amazon Web Services Amazon offers a range of cloud-based services, including a rich API for accessing its media database of books, CDs, and DVDs. Amazon also offers a distributed storage solution (S3) and Elastic Compute Cloud (EC2).
Mobile phone user interfaces have improved dramatically in recent years, thanks not least of all to the iPhone's innovative take on mobile UI.
In this section, you'll learn how to use more advanced UI visual effects like Shaders, translucency, animations, touch screens with multiple touch, and OpenGL to add a level of polish to your Activities and Views.
In Chapter 3, you learned how to define animations as external resources. Now, you get the opportunity to put them to use.
Android offers two kinds of animation:
Frame-by-Frame Animations Traditional cell-based animations in which a different Drawable is displayed in each frame. Frame-by-frame animations are displayed within a View, using its Canvas as a projection screen.
Tweened Animations Tweened animations are applied to Views, letting you define a series of changes in position, size, rotation, and opacity that animate the View contents.
Note
Both animation types are restricted to the original bounds of the View they're applied to. Rotations, translations, and scaling transformations that extend beyond the original boundaries of the View will result in the contents being clipped.
Tweened animations offer a simple way to provide depth, movement, or feedback to your users at a minimal resource cost.
Using animations to apply a set of orientation, scale, position, and opacity changes is much less resource-intensive than manually redrawing the Canvas to achieve similar effects, not to mention far simpler to implement.
Tweened animations are commonly used to:
Transition between Activities.
Transition between layouts within an Activity.
Transition between different content displayed within the same View.
Provide user feedback such as:
Indicating progress.
"Shaking" an input box to indicate an incorrect or invalid data entry.
Tweened animations are created using the Animation class. The following list explains the animation types available.
AlphaAnimationLets you animate a change in the View's transparency (opacity or alpha blending).RotateAnimationLets you spin the selected View canvas in the XY plane.ScaleAnimationAllows you to zoom in to or out from the selected View.TranslateAnimationLets you move the selected View around the screen (although it will only be drawn within its original bounds).
Android offers the AnimationSet class to group and configure animations to be run as a set. You can define the start time and duration of each animation used within a set to control the timing and order of the animation sequence.
Note
It's important to set the start offset and duration for each child animation, or they will all start and complete at the same time.
Listings 15-12 and 15-13 demonstrate how to create the same animation sequence in code or as an external resource.
Example 15-12. Creating a tweened animation in code
// Create the AnimationSet
AnimationSet myAnimation = new AnimationSet(true);
// Create a rotate animation.
RotateAnimation rotate = new RotateAnimation(0, 360,
  RotateAnimation.RELATIVE_TO_SELF, 0.5f,
  RotateAnimation.RELATIVE_TO_SELF, 0.5f);
rotate.setFillAfter(true);
rotate.setDuration(1000);

// Create a scale animation
ScaleAnimation scale = new ScaleAnimation(1, 0,
                                          1, 0,
                                          ScaleAnimation.RELATIVE_TO_SELF,
                                          0.5f,
                                          ScaleAnimation.RELATIVE_TO_SELF,
                                          0.5f);
scale.setFillAfter(true);
scale.setDuration(500);
scale.setStartOffset(500);

// Create an alpha animation
AlphaAnimation alpha = new AlphaAnimation(1, 0);
scale.setFillAfter(true);
scale.setDuration(500);
scale.setStartOffset(500);

// Add each animation to the set
myAnimation.addAnimation(rotate);
myAnimation.addAnimation(scale);
myAnimation.addAnimation(alpha);
The code snippet in Listing 15-12 above implements the same animation sequence shown in the XML snippet in Listing 15-13 below.
Example 15-13. Defining a tweened animation in XML
<?xml version="1.0" encoding="utf-8"?>
<set
  xmlns:android="http://schemas.android.com/apk/res/android"
  android:shareInterpolator="true">
  <rotate
    android:fromDegrees="0"
    android:toDegrees="360"
    android:pivotX="50%"
    android:pivotY="50%"
    android:startOffset="0"
    android:duration="1000" />
  <scale
    android:fromXScale="1.0"
    android:toXScale="0.0"
    android:fromYScale="1.0"
    android:toYScale="0.0"
    android:pivotX="50%"
android:pivotY="50%"
android:startOffset="500"
android:duration="500" />
<alpha
android:fromAlpha="1.0"
android:toAlpha="0.0"
android:startOffset="500"
android:duration="500" />
</set>As you can see, it's generally both easier and more intuitive to create your animation sequences using an external animation resource.
Animations can be applied to any View by calling its startAnimation method and passing in the Animation or Animation Set to apply.
Animation sequences will run once and then stop, unless you modify this behavior using the setRepeatMode and setRepeatCount methods on the Animation or Animation Set. You can force an animation to loop or repeat in reverse by setting the repeat mode of RESTART or REVERSE respectively. Setting the repeat count controls the number of times the animation will repeat.
Listing 15-14 shows an Animation that repeats indefinitely.
The AnimationListener lets you create an event handler that's fired when an animation begins or ends. This lets you perform actions before or after an animation has completed, such as changing the View contents or chaining multiple animations.
Call setAnimationListener on an Animation object, and pass in a new implementation of AnimationListener, overriding onAnimationEnd, onAnimationStart, and onAnimationRepeat as required.
Listing 15-15 shows the basic implementation of an Animation Listener.
Example 15-15. Creating an Animation Listener
myAnimation.setAnimationListener(new AnimationListener() {
  public void onAnimationEnd(Animation _animation) {
   // TODO Do something after animation is complete.
  }
public void onAnimationRepeat(Animation _animation) {
// TODO Do something when the animation repeats.
}
public void onAnimationStart(Animation _animation) {
// TODO Do something when the animation starts.
}
});In this example, you'll create a new Activity that uses an Animation to smoothly change the content of the user interface based on the direction pressed on the D-pad.
Start by creating a new
ContentSliderproject featuring aContentSliderActivity.package com.paad.contentslider; import android.app.Activity; import android.view.KeyEvent; import android.os.Bundle; import android.view.animation.Animation; import android.view.animation.Animation.AnimationListener; import android.view.animation.AnimationUtils; import android.widget.TextView; public class ContentSlider extends Activity { @Override public void onCreate(Bundle savedInstanceState) { super.onCreate(savedInstanceState); setContentView(R.layout.main); } }Next, modify the main.xml layout resource. It should contain a single
TextViewwith the text bold, centered, and relatively large.<?xml version="1.0" encoding="utf-8"?> <LinearLayout xmlns:android="http://schemas.android.com/apk/res/android" android:orientation="vertical" android:layout_width="fill_parent" android:layout_height="fill_parent"> <TextView android:id="@+id/myTextView" android:layout_width="fill_parent" android:layout_height="fill_parent" android:gravity="center"android:textStyle="bold" android:textSize="30sp" android:text="CENTER"android:editable="false" android:singleLine="true" android:layout_margin="10dp" /> </LinearLayout>Then create a series of animations that slide the current View out-of, and the next View into, the frame for each direction: left, right, up, and down. Each animation should have its own file.
3.1 Create
slide_bottom_in.xml.<set xmlns:android="http://schemas.android.com/apk/res/android" android:interpolator="@android:anim/accelerate_interpolator"> <translate android:fromYDelta="-100%p" android:toYDelta="0" android:duration="700" /> </set>3.2 Create
slide_bottom_out.xml.<set xmlns:android="http://schemas.android.com/apk/res/android" android:interpolator="@android:anim/accelerate_interpolator"> <translate android:fromYDelta="0" android:toYDelta="100%p" android:duration="700" /> </set>3.3 Create
slide_top_in.xml.<set xmlns:android="http://schemas.android.com/apk/res/android" android:interpolator="@android:anim/accelerate_interpolator"> <translate android:fromYDelta="100%p" android:toYDelta="0" android:duration="700" /> </set>3.4 Create
slide_top_out.xml.<set xmlns:android="http://schemas.android.com/apk/res/android" android:interpolator="@android:anim/accelerate_interpolator"> <translate android:fromYDelta="0" android:toYDelta="-100%p" android:duration="700" /> </set>3.5 Create
slide_left_in.xml.<set xmlns:android="http://schemas.android.com/apk/res/android" android:interpolator="@android:anim/accelerate_interpolator"> <translate android:fromXDelta="100%p" android:toXDelta="0" android:duration="700" /> </set>3.6 Create
slide_left_out.xml.<set xmlns:android="http://schemas.android.com/apk/res/android" android:interpolator="@android:anim/accelerate_interpolator"> <translate android:fromXDelta="0" android:toXDelta="-100%p" android:duration="700" /> </set>3.7 Create
slide_right_in.xml.<set xmlns:android="http://schemas.android.com/apk/res/android" android:interpolator="@android:anim/accelerate_interpolator"> <translate android:fromXDelta="-100%p" android:toXDelta="0" android:duration="700" /> </set>3.8 Create
slide_right_out.xml.<set xmlns:android="http://schemas.android.com/apk/res/android" android:interpolator="@android:anim/accelerate_interpolator"> <translate android:fromXDelta="0" android:toXDelta="100%p" android:duration="700" /> </set>
Return to the
ContentSliderActivity and get references to the Text View and each of the animations you created in Step 3.Animation slideInLeft; Animation slideOutLeft; Animation slideInRight; Animation slideOutRight; Animation slideInTop; Animation slideOutTop; Animation slideInBottom; Animation slideOutBottom; TextView myTextView; @Override public void onCreate(Bundle savedInstanceState) { super.onCreate(savedInstanceState); setContentView(R.layout.main); slideInLeft = AnimationUtils.loadAnimation(this, R.anim.slide_left_in); slideOutLeft = AnimationUtils.loadAnimation(this, R.anim.slide_left_out); slideInRight = AnimationUtils.loadAnimation(this, R.anim.slide_right_in);slideOutRight = AnimationUtils.loadAnimation(this, R.anim.slide_right_out); slideInTop = AnimationUtils.loadAnimation(this, R.anim.slide_top_in); slideOutTop = AnimationUtils.loadAnimation(this, R.anim.slide_top_out); slideInBottom = AnimationUtils.loadAnimation(this, R.anim.slide_bottom_in); slideOutBottom = AnimationUtils.loadAnimation(this, R.anim.slide_bottom_out); myTextView = (TextView)findViewById(R.id.myTextView); }Each screen transition consists of two animations chained together: sliding out the old text before sliding in the new text. Rather than create multiple Views, you can change the value of the View once it's "off screen" before sliding it back in from the opposite side.
Create a new method that applies a slide-out animation and waits for it to complete before modifying the text and initiating the slide-in animation.
private void applyAnimation(Animation _out,
                            Animation _in,
                            String _newText) {
  final String text = _newText;
  final Animation in = _in;

  // Ensure the text stays out of screen when the slide-out
  // animation has completed.
  _out.setFillAfter(true);

  // Create a listener to wait for the slide-out
  // animation to complete.
  _out.setAnimationListener(new AnimationListener() {
    public void onAnimationEnd(Animation _animation) {
      // Change the text
      myTextView.setText(text);
      // Slide it back in to view
      myTextView.startAnimation(in);
    }

    public void onAnimationRepeat(Animation _animation) {}
    public void onAnimationStart(Animation _animation) {}
  });

  // Apply the slide-out animation
  myTextView.startAnimation(_out);
}
The text displayed can represent nine positions. To keep track of the current location, create an
enumfor each position and an instance variable to track it.TextPosition textPosition = TextPosition.Center; enum TextPosition { UpperLeft, Top, UpperRight, Left, Center, Right, LowerLeft, Bottom, LowerRight };Create a new method
movePositionthat takes the current position, and the direction to move, and calculates the new position. It should then execute the appropriate animation sequence created in Step 5.private void movePosition(TextPosition _current, TextPosition _directionPressed) { Animation in; Animation out; TextPosition newPosition; if (_directionPressed == TextPosition.Left){ in = slideInLeft; out = slideOutLeft; } else if (_directionPressed == TextPosition.Right){ in = slideInRight; out = slideOutRight; } else if (_directionPressed == TextPosition.Top){ in = slideInTop; out = slideOutTop; } else { in = slideInBottom; out = slideOutBottom; } int newPosValue = _current.ordinal(); int currentValue = _current.ordinal(); // To simulate the effect of 'tilting' the device moving in one // direction should make text for the opposite direction appear. // Ie. Tilting right should make left appear. if (_directionPressed == TextPosition.Bottom) newPosValue = currentValue - 3; else if (_directionPressed == TextPosition.Top) newPosValue = currentValue + 3; else if (_directionPressed == TextPosition.Right) { if (currentValue % 3 != 0) newPosValue = currentValue - 1; } else if (_directionPressed == TextPosition.Left) { if ((currentValue+1) % 3 != 0) newPosValue = currentValue + 1; } if (newPosValue != currentValue && newPosValue > −1 && newPosValue < 9){ newPosition = TextPosition.values()[newPosValue]; applyAnimation(in, out, newPosition.toString()); textPosition = newPosition; } }Wire up the D-pad by overriding the Activity's
onKeyDownhandler to listen for key presses and triggermovePositionaccordingly.@Override public boolean onKeyDown(int _keyCode, KeyEvent _event) { if (super.onKeyDown(_keyCode, _event)) return true; if (_event.getAction() == KeyEvent.ACTION_DOWN){ switch (_keyCode) { case (KeyEvent.KEYCODE_DPAD_LEFT): movePosition(textPosition, TextPosition.Left); return true; case (KeyEvent.KEYCODE_DPAD_RIGHT): movePosition(textPosition, TextPosition.Right); return true; case (KeyEvent.KEYCODE_DPAD_UP): movePosition(textPosition, TextPosition.Top); return true; case (KeyEvent.KEYCODE_DPAD_DOWN): movePosition(textPosition, TextPosition.Bottom); return true; } } return false; }
Running the application now will show a screen displaying "Center"; pressing any of the four directions will slide out this text and display the appropriate new position.
Note
As an extra step, you could wire up the accelerometer sensor rather than relying on pressing the D-pad.
A LayoutAnimation is used to animate View Groups, applying a single Animation (or Animation Set) to each child View in a predetermined sequence.
Use a LayoutAnimationController to specify an Animation (or Animation Set) that's applied to each child View in a View Group. Each View it contains will have the same animation applied, but you can use the Layout Animation Controller to specify the order and start time for each View.
Android includes two LayoutAnimationController classes.
LayoutAnimationControllerLets you select the start offset of each View (in milliseconds) and the order (forward, reverse, andrandom) to apply the animation to each child View.GridLayoutAnimationControllerIs a derived class that lets you assign the animation sequence of the child Views using grid row and column references.
To create a new Layout Animation, start by defining the Animation to apply to each child View. Then create a new LayoutAnimation, either in code or as an external animation resource, that references the animation to apply and defines the order and timing in which to apply it.
Listing 15-16 show the definition of a simple Animation stored as popin.xml in the res/anim folder, and a Layout Animation definition stored as popinlayout.xml.
The Layout Animation applies a simple "pop-in" animation randomly to each child View of any View Group it's assigned to.
Example 15-16. Creating a Layout Animation
res/anim/popin.xml<set xmlns:android="http://schemas.android.com/apk/res/android" android:interpolator="@android:anim/accelerate_interpolator"> <scale android:fromXScale="0.0" android:toXScale="1.0" android:fromYScale="0.0" android:toYScale="1.0" android:pivotX="50%" android:pivotY="50%" android:duration="400" /> </set>res/anim/popinlayout.xml<layoutAnimation xmlns:android="http://schemas.android.com/apk/res/android" android:delay="0.5" android:animationOrder="random" android:animation="@anim/popin" />
Once you've defined a Layout Animation, you can apply it to a View Group either in code or in the layout XML resource. In XML this is done using the android:layoutAnimation tag in the layout definition:
android:layoutAnimation="@anim/popinlayout"
To set a Layout Animation in code, call setLayoutAnimation on the View Group, passing in a reference to the LayoutAnimation object you want to apply.
In each case, the Layout Animation will execute once, when the View Group is first laid out. You can force it to execute again by calling scheduleLayoutAnimation on the ViewGroup object. The animation will then be executed the next time the View Group is laid out.
Layout Animations also support Animation Listeners.
In Listing 15-17, a View Group's animation is re-run with a listener attached to trigger additional actions once it's complete.
Example 15-17. Applying a Layout Animation and Animation Listener
aViewGroup.setLayoutAnimationListener(new AnimationListener() {
  public void onAnimationEnd(Animation _animation) {
    // TODO: Actions on animation complete.
  }
  public void onAnimationRepeat(Animation _animation) {}
  public void onAnimationStart(Animation _animation) {}
});

aViewGroup.scheduleLayoutAnimation();Frame-by-frame animations are akin to traditional cel-based cartoons in which an image is chosen for each frame. Where tweened animations use the target View to supply the content of the animation, frame-by-frame animations let you specify a series of Drawable objects that are used as the background to a View.
The AnimationDrawable class is used to create a new frame-by-frame animation presented as a Drawable resource. You can define your Animation Drawable resource as an external resource in your project's res/drawable folder using XML.
Use the <animation-list> tag to group a collection of <item> nodes, each of which uses a drawable attribute to define an image to display, and a duration attribute to specify the time (in milliseconds) to display it.
Listing 15-18 shows how to create a simple animation that displays a rocket taking off (rocket images not included). The file is stored as res/drawable/animated_rocket.xml.
Example 15-18. Creating a frame-by-frame animation in XML
<animation-list
  xmlns:android="http://schemas.android.com/apk/res/android"
  android:oneshot="false">
  <item android:drawable="@drawable/rocket1" android:duration="500" />
  <item android:drawable="@drawable/rocket2" android:duration="500" />
  <item android:drawable="@drawable/rocket3" android:duration="500" />
</animation-list>
To display your animation, set it as the background to a View using the setBackgroundResource method.
ImageView image = (ImageView)findViewById(R.id.my_animation_frame);
image.setBackgroundResource(R.drawable.animated_rocket);
Alternatively, use the setBackgroundDrawable to use a Drawable instance instead of a resource reference. Run the animation calling its start method.
AnimationDrawable animation = (AnimationDrawable)image.getBackground();
animation.start();You were introduced to the Canvas class in Chapter 4, where you learned how to create your own Views. The Canvas was also used in Chapter 8 to annotate Overlays for MapViews.
The concept of the canvas is a common metaphor used in graphics programming and generally consists of three basic drawing components:
Most of the advanced techniques described in this chapter involve variations and modifications to the Paint object that let you add depth and texture to otherwise flat raster drawings.
The Android drawing API supports translucency, gradient fills, rounded rectangles, and anti-aliasing. Unfortunately, owing to resource limitations, it does not yet support vector graphics; instead, it uses traditional raster-style repaints.
The result of this raster approach is improved efficiency, but changing a Paint object will not affect primitives that have already been drawn; it will affect only new elements.
Note
If you've got a Windows development background, the two-dimensional (2D) drawing capabilities of Android are roughly equivalent to those available in GDI+.
The Canvas class wraps up the bitmap that's used as a surface for your artistic endeavors; it also exposes the draw* methods used to implement your designs.
Without going into detail about each of the draw methods, the following list provides a taste of the primitives available:
drawARGB/drawRGB/drawColorFill the canvas with a single color.drawArcDraws an arc between two angles within an area bounded by a rectangle.drawBitmapDraws a bitmap on the Canvas. You can alter the appearance of the target bitmap by specifying a target size or using a matrix to transform it.drawBitmapMeshDraws a bitmap using a mesh that lets you manipulate the appearance of the target by moving points within it.drawCircleDraws a circle of a specified radius centered on a given point.drawLine(s)Draws a line (or series of lines) between two points.drawPathDraws the specified Path. APathobject is often used to hold a collection of drawing primitives within a single object.drawPictureDraws aPictureobject within the specified rectangle.drawPosTextDraws a text string specifying the offset of each character.drawTextDraws a text string on the Canvas. The text font, size, color, and rendering properties are all set in thePaintobject used to render the text.drawTextOnPathDraws text that follows along a specified path.drawVerticesDraws a series of tri-patches specified as a series of vertex points.
Each of these drawing methods lets you specify a Paint object to render it. In the following sections, you'll learn how to create and modify Paint objects to get the most out of your drawing.
The Paint class represents a paint brush and palette. It lets you choose how to render the primitives you draw onto the Canvas using the draw methods described in the previous section. By modifying the Paint object, you can control the color, style, font, and special effects used when drawing.
Most simply, setColor lets you select the color of a Paint while the style of a Paint object (controlled using setStyle) lets you decide if you want to draw only the outline of a drawing object (STROKE), just the filled portion (FILL), or both (STROKE_AND_FILL).
Beyond these simple controls, the Paint class also supports transparency and can also be modified with a variety of Shaders, filters, and effects to provide a rich palette of complex paints and brushes.
The Android SDK includes several excellent projects that demonstrate most of the features available in the Paint class. They are available in the graphics subfolder of the API demos at:
[sdk root folder]samplesApiDemossrccomandroidsamplesgraphics
In the following sections, you'll learn what some of these features are and how to use them. These sections outline what can be achieved (such as gradients and edge embossing) without exhaustively listing all possible alternatives.
All colors in Android include an opacity component (alpha channel).
You define an alpha value for a color when you create it using the argb or parseColor methods:
// Make color red and 50% transparent
int opacity = 127;
int intColor = Color.argb(opacity, 255, 0, 0);
int parsedColor = Color.parseColor("#7FFF0000");
Alternatively, you can set the opacity of an existing Paint object using the setAlpha method:
// Make color 50% transparent
int opacity = 127;
myPaint.setAlpha(opacity);
Creating a paint color that's not 100 percent opaque means that any primitive drawn with it will be partially transparent — making whatever is drawn beneath it partially visible.
You can use transparency effects in any class or method that uses colors including Paint colors, Shaders, and Mask Filters.
Extensions of the Shader class let you create Paints that fill drawn objects with more than a single solid color.
The most common use of Shaders is to define gradient fills; gradients are an excellent way to add depth and texture to 2D drawings. Android includes three gradient Shaders as well as a Bitmap Shader and a Compose Shader.
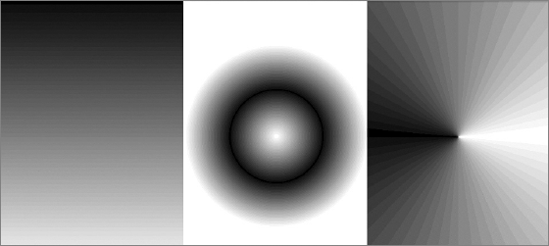
Trying to describe painting techniques seems inherently futile, so have a look at Figure 15-1 to get an idea of how each of the Shaders works. Represented from left to right are LinearGradient, RadialGradient, and SweepGradient.
Note
Not included in the image in Figure 15-1 is the ComposeShader, which lets you create a composite of multiple Shaders and the BitmapShader that lets you create a paint brush based on a bitmap image.
To use a Shader when drawing, apply it to a Paint using the setShader method:
Paint shaderPaint = new Paint();
shaderPaint.setShader(myLinearGradient);
Anything you draw with this Paint will be filled with the Shader you specified rather than the paint color.
As shown in the previous section, using gradient Shaders lets you fill drawings with an interpolated color range; you can define the gradient in two ways. The first is a simple transition between two colors, as shown in the LinearGradientShader in the Listing 15-19.
Example 15-19. Creating a Linear Gradient Shader
int colorFrom = Color.BLACK;
int colorTo = Color.WHITE;

LinearGradient linearGradientShader = new LinearGradient(x1, y1, x2, y2,
                                                         colorFrom,
                                                         colorTo,
                                                         TileMode.CLAMP);
The second alternative is to specify a more complex series of colors distributed at set proportions, as shown in Listing 15-20.
Example 15-20. Creating a Radial Gradient Shader
int[] gradientColors = new int[3];
gradientColors[0] = Color.GREEN;
gradientColors[1] = Color.YELLOW;
gradientColors[2] = Color.RED;

float[] gradientPositions = new float[3];
gradientPositions[0] = 0.0f;
gradientPositions[1] = 0.5f;
gradientPositions[2] = 1.0f;

RadialGradient radialGradientShader = new RadialGradient(centerX, centerY,
                                                         radius,
                                                         gradientColors,
                                                         gradientPositions,
                                                         TileMode.CLAMP);
Each of the gradient Shaders (linear, radial, and sweep) lets you define the gradient fill using either of these techniques.
The brush sizes of the gradient Shaders are defined using explicit bounding rectangles or center points and radius lengths; the Bitmap Shader implies a brush size through its bitmap size.
If the area defined by your Shader brush is smaller than the area being filled, the TileMode determines how the remaining area will be covered.
The MaskFilter classes let you assign edge effects to your Paint.
Extensions to MaskFilter apply transformations to the alpha-channel of a Paint along its outer edge. Android includes the following Mask Filters:
To apply a Mask Filter, use the setMaskFilter method, passing in a MaskFilter object. Listing 15-21 applies an EmbossMaskFilter to an existing Paint.
Example 15-21. Applying an Emboss Mask Filter to a Paint
// Set the direction of the light source
float[] direction = new float[]{ 1, 1, 1 };
// Set the ambient light level
float light = 0.4f;
// Choose a level of specularity to apply
float specular = 6;
// Apply a level of blur to apply to the mask
float blur = 3.5f;
EmbossMaskFilter emboss = new EmbossMaskFilter(direction, light,
                                               specular, blur);

// Apply the mask
myPaint.setMaskFilter(emboss);
The FingerPaint API demo included in the SDK is an excellent example of how to use MaskFilters. It demonstrates the effect of both the emboss and blur filters.
Where Mask Filters are transformations of the alpha-channel of a Paint, a ColorFilter applies a transformation to each of the RGB channels. All ColorFilter-derived classes ignore the alpha-channel when performing their transformations.
Android includes three Color Filters:
ColorMatrixColorFilterLets you specify a 4 × 5ColorMatrixto apply to a Paint. Color Matrixes are commonly used to perform image processing programmatically and are useful as they support chaining transformations using matrix multiplication.LightingColorFilterMultiplies the RGB channels by the first color before adding the second. The result of each transformation will be clamped between 0 and 255.PorterDuffColorFilterLets you use any one of the 16 Porter-Duff rules for digital image compositing to apply a specified color to the Paint.
Apply ColorFilters using the setColorFilter method:
myPaint.setColorFilter(new LightingColorFilter(Color.BLUE, Color.RED));
There is an excellent example of using a Color Filter and Color Matrixes in the ColorMatrixSample API example.
The effects so far have affected the way the Paint fills a drawing; Path Effects are used to control how its outline (or stroke) is drawn.
Path Effects are particularly useful for drawing Path primitives, but they can be applied to any Paint to affect the way the stroke is drawn.
Using Path Effects, you can change the appearance of a shape's corners and control the appearance of the outline. Android includes several Path Effects including:
CornerPathEffectLets you smooth sharp corners in the shape of a primitive by replacing them with rounded corners.DashPathEffectRather than drawing a solid outline, you can use theDashPathEffectto create an outline of broken lines (dashes/dots). You can specify any repeating pattern of solid/empty line segments.DiscretePathEffectSimilar to theDashPathEffect, but with added randomness. Specifies the length of each segment and a degree of deviation from the original path to use when drawing it.PathDashPathEffectThis effect lets you define a new shape (path) to use as a stamp to outline the original path.
The following effects let you combine multiple Path Effects to a single Paint.
Path Effects that modify the shape of the object being drawn will change the area of the affected shape. This ensures that any fill effects being applied to the same shape are drawn within the new bounds.
Path Effects are applied to Paint objects using the setPathEffect method.
borderPaint.setPathEffect(new CornerPathEffect(5));
The Path Effects API sample gives an excellent guide to how to apply each of these effects.
Change a Paint's Xfermode to affect the way it paints new colors on top of what's already on the Canvas.
Under normal circumstances, painting on top of an existing drawing will layer the new shape on top. If the new Paint is fully opaque, it will totally obscure the paint underneath; if it's partially transparent, it will tint the colors underneath.
The following Xfermode subclasses let you change this behavior:
AvoidXfermodeSpecifies a color and tolerance to force your Paint to avoid drawing over (or only draw over) it.PixelXorXfermodeApplies a simple pixel XOR operation when covering existing colors.PorterDuffXfermodeThis is a very powerful transfer mode with which you can use any of the 16 Porter-Duff rules for image composition to control how the paint interacts with the existing canvas image.
To apply transfer modes, use the setXferMode method:
AvoidXfermode avoid = new AvoidXfermode(Color.BLUE, 10,
                                        AvoidXfermode.Mode.AVOID);
borderPen.setXfermode(avoid);When you create a new Paint object, you can pass in several flags that affect the way the Paint will be rendered. One of the most interesting is the ANTI_ALIAS_FLAG, which ensures that diagonal lines drawn with this paint are anti-aliased to give a smooth appearance (at the cost of performance).
Anti-aliasing is particularly important when drawing text, as anti-aliased text can be significantly easier to read. To create even smoother text effects, you can apply the SUBPIXEL_TEXT_FLAG, which will apply subpixel anti-aliasing.
You can also set both of these flags manually using the setSubpixelText and setAntiAlias methods:
myPaint.setSubpixelText(true);
myPaint.setAntiAlias(true);
2D owner-draw operations tend to be expensive in terms of processor use; inefficient drawing routines can block the GUI thread and have a detrimental effect on application responsiveness. This is particularly true in a resource-constrained environment with a single, limited processor.
You need to be aware of the resource drain and CPU-cycle cost of your onDraw methods, to ensure you don't end up with an attractive application that's completely unresponsive.
A lot of techniques exist to help minimize the resource drain associated with owner-drawn controls. Rather than focus on general principles, I'll describe some Android specific considerations for ensuring that you can create activities that look good and remain interactive (note that this list is not exhaustive):
Consider size and orientation When you're designing your Views and Overlays, be sure to consider (and test!) how they will look at different resolutions, pixel densities, and sizes.
Create static objects once Object creation and garbage collection are particularly expensive. Where possible, create drawing objects like
Paintobjects, Paths, and Shaders once, rather than recreating them each time the View is invalidated.Remember
onDrawis expensive Performing theonDrawmethod is an expensive process that forces Android to perform several image composition and bitmap construction operations. Many of the following points suggest ways to modify the appearance of your Canvas without having to redraw it:Use Canvas transforms Use Canvas transforms like
rotateandtranslateto simplify complex relational positioning of elements on your canvas. For example, rather than positioning and rotating each text element around a clock face, simply rotate the canvas 22.5 degrees, and draw the text in the same place.Use Animations Consider using Animations to perform pre-set transformations of your View rather than manually redrawing it. Scale, rotation, and translation Animations can be performed on any View within an Activity and provide a resource-efficient way to provide zoom, rotate, or shake effects.
Consider using Bitmaps, 9 Patches, and Drawable resources If your Views feature static backgrounds, you should consider using a Drawable like a bitmap, scalable NinePatch, or static XML Drawable rather than dynamically creating it.
In Chapter 4, you created a simple compass UI. In Chapter 14 you returned to it, extending it to display the pitch and roll using the accelerometer hardware.
The UI of the View used in those examples was kept simple to keep the code in those chapters as clear as possible.
In the following example, you'll make some significant changes to the Compass View's onDraw method to change it from a simple, flat compass into a dynamic artificial horizon, as shown in Figure 15-2.
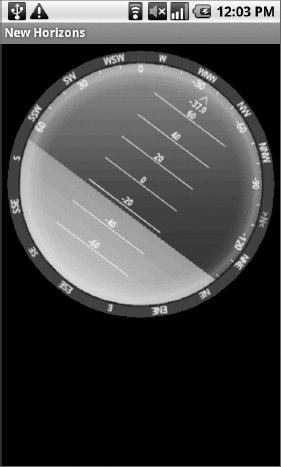
As the previous image is limited to black and white, you'll need to create the control in order to see the full effect.
Start by modifying the colors.xml resource file to include color values for the border gradient, the glass compass shading, the sky, and the ground. Also update the colors used for the border and the face markings.
<?xml version="1.0" encoding="utf-8"?>
<resources>
  <color name="text_color">#FFFF</color>
  <color name="background_color">#F000</color>
  <color name="marker_color">#FFFF</color>
  <color name="shadow_color">#7AAA</color>
  <color name="outer_border">#FF444444</color>
  <color name="inner_border_one">#FF323232</color>
  <color name="inner_border_two">#FF414141</color>
  <color name="inner_border">#FFFFFFFF</color>
  <color name="horizon_sky_from">#FFA52A2A</color>
  <color name="horizon_sky_to">#FFFFC125</color>
  <color name="horizon_ground_from">#FF5F9EA0</color>
  <color name="horizon_ground_to">#FF00008B</color>
</resources>
The
PaintandShaderobjects used for the sky and ground in the artificial horizon are created based on the size of the current View, so they're not static like thePaintobjects you created in Chapter 4. Instead of creatingPaintobjects, construct the gradient arrays and colors they use.int[] borderGradientColors; float[] borderGradientPositions; int[] glassGradientColors; float[] glassGradientPositions; int skyHorizonColorFrom; int skyHorizonColorTo; int groundHorizonColorFrom; int groundHorizonColorTo;
Update the Compass View's
initCompassViewmethod to initialize the variables created in Step 2 using the resources from Step 1. The existing method code can be left largely intact, with some changes to thetextPaint, circlePaint, andmarkerPaintvariables, as highlighted in the following code:protected void initCompassView() { setFocusable(true); // Get external resources Resources r = this.getResources(); circlePaint = new Paint(Paint.ANTI_ALIAS_FLAG); circlePaint.setColor(R.color.background_color); circlePaint.setStrokeWidth(1);circlePaint.setStyle(Paint.Style.STROKE);northString = r.getString(R.string.cardinal_north); eastString = r.getString(R.string.cardinal_east); southString = r.getString(R.string.cardinal_south);westString = r.getString(R.string.cardinal_west); textPaint = new Paint(Paint.ANTI_ALIAS_FLAG); textPaint.setColor(r.getColor(R.color.text_color));
textPaint.setFakeBoldText(true); textPaint.setSubpixelText(true); textPaint.setTextAlign(Align.LEFT);textHeight = (int)textPaint.measureText("yY"); markerPaint = new Paint(Paint.ANTI_ALIAS_FLAG); markerPaint.setColor(r.getColor(R.color.marker_color));markerPaint.setAlpha(200); markerPaint.setStrokeWidth(1); markerPaint.setStyle(Paint.Style.STROKE); markerPaint.setShadowLayer(2, 1, 1, r.getColor(R.color.shadow_color));3.1 Create the color and position arrays that will be used by a radial Shader to paint the outer border.
borderGradientColors = new int[4];
  borderGradientPositions = new float[4];

  borderGradientColors[3] = r.getColor(R.color.outer_border);
  borderGradientColors[2] = r.getColor(R.color.inner_border_one);
  borderGradientColors[1] = r.getColor(R.color.inner_border_two);
  borderGradientColors[0] = r.getColor(R.color.inner_border);
  borderGradientPositions[3] = 0.0f;
  borderGradientPositions[2] = 1-0.03f;
  borderGradientPositions[1] = 1-0.06f;
  borderGradientPositions[0] = 1.0f;
3.2 Now create the radial gradient color and position arrays that will be used to create the semitransparent "glass dome" that sits on top of the View to give it the illusion of depth.
glassGradientColors = new int[5];
  glassGradientPositions = new float[5];

  int glassColor = 245;
  glassGradientColors[4] = Color.argb(65, glassColor,
                                      glassColor, glassColor);
  glassGradientColors[3] = Color.argb(100, glassColor,
                                      glassColor, glassColor);
  glassGradientColors[2] = Color.argb(50, glassColor,
                                      glassColor, glassColor);
  glassGradientColors[1] = Color.argb(0, glassColor,
                                      glassColor, glassColor);
  glassGradientColors[0] = Color.argb(0, glassColor,
                                      glassColor, glassColor);
  glassGradientPositions[4] = 1-0.0f;
  glassGradientPositions[3] = 1-0.06f;
  glassGradientPositions[2] = 1-0.10f;
  glassGradientPositions[1] = 1-0.20f;
  glassGradientPositions[0] = 1-1.0f;
3.3 Finally, get the colors you'll use to create the linear gradients that will represent the sky and the ground in the artificial horizon.
skyHorizonColorFrom = r.getColor(R.color.horizon_sky_from);
  skyHorizonColorTo = r.getColor(R.color.horizon_sky_to);

  groundHorizonColorFrom = r.getColor(R.color.horizon_ground_from);
  groundHorizonColorTo = r.getColor(R.color.horizon_ground_to);
}
Before you start drawing the face, create a new
enumthat stores each of the cardinal directions.private enum CompassDirection { N, NNE, NE, ENE, E, ESE, SE, SSE, S, SSW, SW, WSW, W, WNW, NW, NNW }
Now you need to completely replace the existing onDraw method. You'll start by figuring out some size-based values including the center of the View, the radius of the circular control, and the rectangles that will enclose the outer (heading) and inner (tilt and roll) face elements.
@Override
protected void onDraw(Canvas canvas) {
Calculate the width of the outer (heading) ring based on the size of the font used to draw the heading values.
float ringWidth = textHeight + 4;
Then calculate the height and width of the View, and use those values to establish the radius of the inner and outer face dials, as well as create the bounding boxes for each face.
int height = getMeasuredHeight();
  int width =getMeasuredWidth();

  int px = width/2;
  int py = height/2;
  Point center = new Point(px, py);

  int radius = Math.min(px, py)-2;

  RectF boundingBox = new RectF(center.x - radius,
                                center.y - radius,
                                center.x + radius,
                                center.y + radius);

  RectF innerBoundingBox = new RectF(center.x - radius + ringWidth,
                                     center.y - radius + ringWidth,
                                     center.x + radius - ringWidth,
                                     center.y + radius - ringWidth);

  float innerRadius = innerBoundingBox.height()/2;
With the dimensions of the View established, it's time to start drawing the faces.
Start from the bottom layer at the outside, and work your way in and up, starting with the outer face (heading). Create a new
RadialGradientShader using the colors and positions you defined in Step 3.2 of the previous code sample, and assign that Shader to a new Paint before using it to draw a circle.RadialGradient borderGradient = new RadialGradient(px, py, radius, borderGradientColors, borderGradientPositions, TileMode.CLAMP); Paint pgb = new Paint(); pgb.setShader(borderGradient); Path outerRingPath = new Path(); outerRingPath.addOval(boundingBox, Direction.CW); canvas.drawPath(outerRingPath, pgb);
Next you need to draw the artificial horizon. You do this by dividing the circular face into two sections, one representing the sky and the other the ground. The proportion of each section depends on the current pitch.
Start by creating the
ShaderandPaintobjects that will be used to draw the sky and earth.LinearGradient skyShader = new LinearGradient(center.x, innerBoundingBox.top, center.x, innerBoundingBox.bottom, skyHorizonColorFrom, skyHorizonColorTo, TileMode.CLAMP); Paint skyPaint = new Paint(); skyPaint.setShader(skyShader); LinearGradient groundShader = new LinearGradient(center.x, innerBoundingBox.top, center.x, innerBoundingBox.bottom, groundHorizonColorFrom, groundHorizonColorTo, TileMode.CLAMP); Paint groundPaint = new Paint(); groundPaint.setShader(groundShader);
Now normalize the pitch and roll values to clamp them within ±90 degrees and ±180 degrees, respectively.
float tiltDegree = pitch;
while (tiltDegree > 90 || tiltDegree < −90)
{
  if (tiltDegree > 90) tiltDegree = −90 + (tiltDegree - 90);
    if (tiltDegree < −90) tiltDegree = 90 - (tiltDegree + 90);
}

float rollDegree = roll;
while (rollDegree > 180 || rollDegree < −180)
{
  if (rollDegree > 180) rollDegree = −180 + (rollDegree - 180);
   if (rollDegree < −180) rollDegree = 180 - (rollDegree + 180);
}
Create paths that will fill each segment of the circle (ground and sky). The proportion of each segment should be related to the clamped pitch.
Path skyPath = new Path();
skyPath.addArc(innerBoundingBox,
               -tiltDegree,
               (180 + (2 * tiltDegree)));
Spin the canvas around the center in the opposite direction to the current roll, and draw the sky and ground paths using the Paints you created in Step 4.
canvas.rotate(-rollDegree, px, py);
canvas.drawOval(innerBoundingBox, groundPaint);
canvas.drawPath(skyPath, skyPaint);
canvas.drawPath(skyPath, markerPaint);
Next is the face marking. Start by calculating the start and end points for the horizontal horizon markings.
int markWidth = radius / 3;
int startX = center.x - markWidth;
int endX = center.x + markWidth;
To make the horizon values easier to read, you should ensure that the pitch scale always starts at the current value. The following code calculates the position of the interface between the ground and sky on the horizon face:
double h = innerRadius*Math.cos(Math.toRadians(90-tiltDegree));
double justTiltY = center.y - h;
Find the number of pixels representing each degree of tilt.
float pxPerDegree = (innerBoundingBox.height()/2)/45f;
Now iterate over 180 degrees, centered on the current tilt value, to give a sliding scale of possible pitch.
for (int i = 90; i >= −90; i -= 10)
{
  double ypos = justTiltY + i*pxPerDegree;

  // Only display the scale within the inner face.
  if ((ypos < (innerBoundingBox.top + textHeight)) ||
      (ypos > innerBoundingBox.bottom - textHeight))
    continue;

  // Draw a line and the tilt angle for each scale increment.
  canvas.drawLine(startX, (float)ypos,
                  endX, (float)ypos,
                  markerPaint);
  int displayPos = (int)(tiltDegree - i);
  String displayString = String.valueOf(displayPos);
  float stringSizeWidth = textPaint.measureText(displayString);
  canvas.drawText(displayString,
                  (int)(center.x-stringSizeWidth/2),
                  (int)(ypos)+1,
                  textPaint);
}
Now draw a thicker line at the earth/sky interface. Change the stroke thickness of the
markerPaintobject before drawing the line (then set it back to the previous value).markerPaint.setStrokeWidth(2); canvas.drawLine(center.x - radius / 2, (float)justTiltY, center.x + radius / 2, (float)justTiltY, markerPaint); markerPaint.setStrokeWidth(1);To make it easier to read the exact roll, you should draw an arrow and display a text string that shows the value.
Create a new
Path, and use themoveTo/lineTomethods to construct an open arrow that points straight up. Draw the path and a text string that shows the current roll.// Draw the arrow Path rollArrow = new Path(); rollArrow.moveTo(center.x - 3, (int)innerBoundingBox.top + 14); rollArrow.lineTo(center.x, (int)innerBoundingBox.top + 10); rollArrow.moveTo(center.x + 3, innerBoundingBox.top + 14); rollArrow.lineTo(center.x, innerBoundingBox.top + 10); canvas.drawPath(rollArrow, markerPaint); // Draw the string String rollText = String.valueOf(rollDegree); double rollTextWidth = textPaint.measureText(rollText); canvas.drawText(rollText, (float)(center.x - rollTextWidth / 2), innerBoundingBox.top + textHeight + 2, textPaint);Spin the canvas back to upright so that you can draw the rest of the face markings.
canvas.restore();
Draw the roll dial markings by rotating the canvas 10 degrees at a time to draw either a mark or a value. When you've completed the face, restore the canvas to its upright position.
canvas.save();
canvas.rotate(180, center.x, center.y);
for (int i = −180; i < 180; i += 10)
{
  // Show a numeric value every 30 degrees
  if (i % 30 == 0) {
    String rollString = String.valueOf(i*-1);
    float rollStringWidth = textPaint.measureText(rollString);
    PointF rollStringCenter =
      new PointF(center.x-rollStringWidth/2,
                 innerBoundingBox.top+1+textHeight);
    canvas.drawText(rollString,
                    rollStringCenter.x, rollStringCenter.y,
                    textPaint);
  }
  // Otherwise draw a marker line
else { canvas.drawLine(center.x, (int)innerBoundingBox.top, center.x, (int)innerBoundingBox.top + 5, markerPaint); } canvas.rotate(10, center.x, center.y); } canvas.restore();The final step in creating the face is drawing the heading markers around the outside edge.
canvas.save();
canvas.rotate(-1*(bearing), px, py);

double increment = 22.5;

for (double i = 0; i < 360; i += increment) {
  CompassDirection cd = CompassDirection.values()
                        [(int)(i / 22.5)];
  String headString = cd.toString();

  float headStringWidth = textPaint.measureText(headString);
  PointF headStringCenter =
    new PointF(center.x - headStringWidth / 2,
               boundingBox.top + 1 + textHeight);

  if (i % increment == 0)
    canvas.drawText(headString,
                    headStringCenter.x, headStringCenter.y,
                    textPaint);
  else
    canvas.drawLine(center.x, (int)boundingBox.top,
                    center.x, (int)boundingBox.top + 3,
                    markerPaint);

  canvas.rotate((int)increment, center.x, center.y);
}
canvas.restore();
With the face complete, you get to add some finishing touches.
Start by adding a "glass dome" over the top to give the illusion of a watch face. Using the radial gradient array you constructed earlier, create a new
ShaderandPaintobject. Use them to draw a circle over the inner face that makes it look like it's covered in glass.RadialGradient glassShader = new RadialGradient(px, py, (int)innerRadius, glassGradientColors, glassGradientPositions, TileMode.CLAMP); Paint glassPaint = new Paint(); glassPaint.setShader(glassShader); canvas.drawOval(innerBoundingBox, glassPaint);All that's left is to draw two more circles as clean borders for the inner and outer face boundaries. Then restore the canvas to upright, and finish the
onDrawmethod.// Draw the outer ring canvas.drawOval(boundingBox, circlePaint); // Draw the inner ring circlePaint.setStrokeWidth(2); canvas.drawOval(innerBoundingBox, circlePaint); canvas.restore(); }

In Chapter 8, you learned how to use Overlays to add annotation layers to Map Views. The Canvas used for annotating Map View Overlays is the same class as the one used to draw new View controls. As a result, all of the advanced features described so far in this section can be used to enhance map Overlays.
That means you can use any of the draw methods, transparency, Shaders, Color Masks, and Filter Effects to create rich Overlays using the Android graphics framework.
Touch-screen interaction in Map Views is handled individually by each of its Overlays. To handle map taps within an Overlay, override the onTap event.
Listing 15-22 shows an onTap implementation that receives the map coordinates of the tap and the MapView on which the tap occurred.
Example 15-22. Handling Map View Overlay touch events
@Override
public boolean onTap(GeoPoint point, MapView map) {
  // Get the projection to convert to and from screen coordinates
  Projection projection = map.getProjection();

  // Return true if we handled this onTap()
  return [ ... hit test passed ... ];
}
The MapView can be used to obtain the Projection of the map when it was tapped. By using it in conjunction with the GeoPoint parameter, you can determine the position on screen of the real-world longitude and latitude pressed.
The onTap method of an Overlay derived class should return true if it has handled the tap (and false otherwise). If none of the Overlays assigned to a Map View return true, the tap event will be handled by the Map View itself, or failing that, by the Activity.
Under normal circumstances, your applications' Views are all drawn on the same GUI thread. This main application thread is also used for all user interaction (such as button clicks or text entry).
In Chapter 9, you learned how to move blocking processes onto background threads. Unfortunately, you can't do this with the onDraw method of a View, as modifying a GUI element from a background thread is explicitly disallowed.
When you need to update the View's UI rapidly, or the rendering code blocks the GUI thread for too long, the SurfaceView class is the answer. A Surface View wraps a Surface object rather than a Canvas. This is important because Surfaces can be drawn on from background threads. This is particularly useful for resource-intensive operations, or where rapid updates or high frame rates are required, such as when using 3D graphics, creating games, or previewing the camera in real time (as shown in Chapter 11).
The ability to draw independently of the GUI thread comes at the price of additional memory consumption, so while it's a useful — sometimes necessary — way to create custom Views, Surface Views should be used with caution.
A Surface View can be used in exactly the same way as any View-derived class. You can apply animations and place them in layouts as you would any other View.
The Surface encapsulated by the Surface View supports drawing, using most of the standard Canvas methods described previously in this chapter, and also supports the full OpenGL ES library.
Using OpenGL, you can draw any supported 2D or 3D object onto the Surface, relying on hardware acceleration (where available) to significantly improve performance compared to simulating the same effects on a 2D canvas.
Surface Views are particularly useful for displaying dynamic 3D images, such as those featured in interactive games that provide immersive experiences. They're also the best choice for displaying real-time camera previews.
To create a new Surface View, create a new class that extends SurfaceView and implements SurfaceHolder.Callback.
The SurfaceHolder callback notifies the View when the underlying Surface is created, destroyed, or modified. It passes a reference to the SurfaceHolder object that contains a valid Surface.
A typical Surface View design pattern includes a Thread-derived class that accepts a reference to the current SurfaceHolder and independently updates it.
Listing 15-23 shows a Surface View implementation for drawing using a Canvas. A new Thread-derived class is created within the Surface View control, and all UI updates are handled within this new class.
Example 15-23. Surface View skeleton implementation
import android.content.Context;
import android.graphics.Canvas;
import android.view.SurfaceHolder;
import android.view.SurfaceView;

public class MySurfaceView extends SurfaceView implements
  SurfaceHolder.Callback {

  private SurfaceHolder holder;
  private MySurfaceViewThread mySurfaceViewThread;
  private boolean hasSurface;

  MySurfaceView(Context context) {
    super(context);
    init();
  }

  private void init() {
    // Create a new SurfaceHolder and assign this class as its callback.
    holder = getHolder();
    holder.addCallback(this);
    hasSurface = false;
  }

  public void resume() {
    // Create and start the graphics update thread.
    if (mySurfaceViewThread == null) {
      mySurfaceViewThread = new MySurfaceViewThread();

      if (hasSurface == true)
        mySurfaceViewThread.start();
    }
  }

  public void pause() {
    // Kill the graphics update thread
    if (mySurfaceViewThread != null) {
      mySurfaceViewThread.requestExitAndWait();
      mySurfaceViewThread = null;
    }
  }

  public void surfaceCreated(SurfaceHolder holder) {
    hasSurface = true;
    if (mySurfaceViewThread != null)
      mySurfaceViewThread.start();
  }

  public void surfaceDestroyed(SurfaceHolder holder) {
    hasSurface = false;
    pause();
  }
public void surfaceChanged(SurfaceHolder holder, int format,
int w, int h) {
if (mySurfaceViewThread != null)
mySurfaceViewThread.onWindowResize(w, h);
}
class MySurfaceViewThread extends Thread {
private boolean done;
MySurfaceViewThread() {
super();
done = false;
}
@Override
public void run() {
SurfaceHolder surfaceHolder = holder;
// Repeat the drawing loop until the thread is stopped.
while (!done) {
// Lock the surface and return the canvas to draw onto.
Canvas canvas = surfaceHolder.lockCanvas();
// TODO: Draw on the canvas!
// Unlock the canvas and render the current image.
surfaceHolder.unlockCanvasAndPost(canvas);
}
}
public void requestExitAndWait() {
// Mark this thread as complete and combine into
// the main application thread.
done = true;
try {
join();
} catch (InterruptedException ex) { }
}
public void onWindowResize(int w, int h) {
// Deal with a change in the available surface size.
}
}
}Android includes full support for the OpenGL ES 3D rendering framework including support for hardware acceleration on devices that offer it. The SurfaceView provides a Surface onto which you can render your OpenGL scenes.
OpenGL is commonly used in desktop applications to provide dynamic 3D interfaces and animations. Resource-constrained devices don't have the capacity for polygon handling that's available on desktop PCs and gaming devices that feature dedicated 3D graphics processors. Within your applications, consider the load your 3D Surface View will be placing on your processor, and attempt to keep the total number of polygons being displayed, and the rate at which they're updated, as low as possible.
Creating a Doom clone for Android is well out of the scope of this book, so I'll leave it to you to test the limits of what's possible in a mobile 3D user interface. Check out the GLSurfaceView API demo example included in the SDK distribution to see an example of the OpenGL ES framework in action.
Anyone who's used a mobile phone will be painfully aware of the challenges associated with designing intuitive user interfaces for mobile devices. Touch screens have been available on mobiles for many years, but it's only recently that touch-enabled interfaces have been designed to be used by fingers rather than styluses.
Full physical keyboards have also become common, with the compact size of the slide-out or flip-out keyboard introducing its own challenges.
As an open framework, Android is expected to be available on a wide variety of devices featuring many different permutations of input technologies including touch screens, D-pads, trackballs, and keyboards.
The challenge for you as a developer is to create intuitive user interfaces that make the most of whatever input hardware is available, while introducing as few hardware dependencies as possible.
The techniques described in this section show how to listen for (and react to) user input from key presses, trackball events, and touch-screen taps using the following event handlers in Views and Activities:
Mobile touch screens have existed since the days of the Apple Newton and the Palm Pilot, although their usability has had mixed reviews. Recently this technology has enjoyed a popular resurgence, with devices like the Nintendo DS and the Apple iPhone using touch screens in innovative ways.
Modern mobiles are all about finger input — a design principle that assumes users will be using their fingers rather than a specialized stylus to touch the screen.
Finger-based touch makes interaction less precise and is often based more on movement than simple contact. Android's native applications make extensive use of finger-based touchscreen interfaces, including the use of dragging motions to scroll through lists or perform actions.
To create a View or Activity that uses touch-screen interaction, override the onTouchEvent handler.
@Override
public boolean onTouchEvent(MotionEvent event) {
  return super.onTouchEvent(event);
}
Return true if you have handled the screen press; otherwise, return false to pass events through a stack of Views and Activities until the touch has been successfully handled.
The onTouchEvent handler is fired when the user touches the screen, once each time the position changes, and again when the contact ends. Android 2.0 (API level 5) introduced platform support for processing an arbitrary number of simultaneous touch events. Each touch event is allocated a separate pointer identifier that is referenced in the Motion Event parameter.
Note
Not all touch-screen hardware reports multiple simultaneous screen presses. In cases where the hardware does not support multiple touches, the platform will return a single touch event.
Call getAction on the MotionEvent parameter to find the event type that triggered the handler. For either a single touch device, or the first touch event on a multitouch device, you can use the ACTION_UP/DOWN/MOVE/CANCEL/OUTSIDE constants to find the event type as shown in Listing 15-24.
Example 15-24. Handling single (or first) touch events
@Override
public boolean onTouchEvent(MotionEvent event) {
  int action = event.getAction();
  switch (action) {
    case (MotionEvent.ACTION_DOWN)   : // Touch screen pressed
                                       break;
    case (MotionEvent.ACTION_UP)     : // Touch screen touch ended
                                       break;
    case (MotionEvent.ACTION_MOVE)   : // Contact has moved across screen
                                       break;
    case (MotionEvent.ACTION_CANCEL) : // Touch event cancelled
                                       break;
    case (MotionEvent.ACTION_OUTSIDE): // Movement has occurred outside the
                                       // bounds of the screen element
                                       // being monitored
                                       break;
  }
  return super.onTouchEvent(event);
}
To track touch events from multiple pointers, you need to apply the MotionEvent.ACTION_MASK and MotionEvent.ACTION_POINTER_ID_MASK to find the touch event (either ACTION_POINTER_DOWN or ACTION_POINTER_UP) and the pointer ID that triggered it, respectively. Call getPointerCount to find if this is a multiple-touch event as shown in Listing 15-25.
Example 15-25. Handling multiple-touch events
@Override
public boolean onTouchEvent(MotionEvent event) {
  int action = event.getAction();

  if (event.getPointerCount() > 1) {
    int actionPointerId = action & MotionEvent.ACTION_POINTER_ID_MASK;
    int actionEvent = action & MotionEvent.ACTION_MASK;
    // Do something with the pointer ID and event.
  }
  return super.onTouchEvent(event);
}
The Motion Event also includes the coordinates of the current screen contact. You can access these coordinates using the getX and getY methods. These methods return the coordinate relative to the responding View or Activity.
In the case of multiple-touch events, each Motion Event includes the current position of each pointer. To find the position of a given pointer, pass its index into the getX or getY methods. Note that its index is not equivalent to the pointer ID. To find the index for a given pointer use the findPointerIndex method, passing in the pointer ID whose index you need as shown in Listing 15-16.
Example 15-26. Finding screen touch coordinates
int xPos = −1;
int yPos = −1;

if (event.getPointerCount() > 1) {
  int actionPointerId = action & MotionEvent.ACTION_POINTER_ID_MASK;
  int actionEvent = action & MotionEvent.ACTION_MASK;

  int pointerIndex = findPointerIndex(actionPointerId);
  xPos = (int)event.getX(pointerIndex);
  yPos = (int)event.getY(pointerIndex);
}
else {
  // Single touch event.
  xPos = (int)event.getX();
  yPos = (int)event.getY();
}
The Motion Event parameter also includes the pressure being applied to the screen using getPressure, a method that returns a value usually between 0 (no pressure) and 1 (normal pressure).
Note
Depending on the calibration of the hardware, it may be possible to return values greater than 1.
Finally, you can also determine the normalized size of the current contact area using the getSize method. This method returns a value between 0 and 1, where 0 suggests a very precise measurement and 1 indicates a possible "fat touch" event in which the user may not have intended to press anything.
Whenever the current touch contact position, pressure, or size changes, a new onTouchEvent is triggered with an ACTION_MOVE action.
As well as the fields described previously, the Motion Event parameter can include historical values. This history represents all the movement events that have occurred between the previously handled onTouchEvent and this one, allowing Android to buffer rapid movement changes to provide fine-grained capture of movement data.
You can find the size of the history by calling getHistorySize, which returns the number of movement positions available for the current event. You can then obtain the times, pressures, sizes, and positions of each of the historical events, using a series of getHistorical* methods and passing in the position index, as shown in Listing 15-27. Note that as with the getX and getY methods described earlier, you can pass in a pointer index value to track historical touch events for multiple cursors.
Example 15-27. Finding historical touch event values
int historySize = event.getHistorySize();
long time = event.getHistoricalEventTime(i);

if (event.getPointerCount() > 1) {
  int actionPointerId = action & MotionEvent.ACTION_POINTER_ID_MASK;
  int pointerIndex = findPointerIndex(actionPointerId);
  for (int i = 0; i < historySize; i++) {
    float pressure = event.getHistoricalPressure(pointerIndex, i);
    float x = event.getHistoricalX(pointerIndex, i);
    float y = event.getHistoricalY(pointerIndex, i);
    float size = event.getHistoricalSize(pointerIndex, i);
    // TODO: Do something with each point
  }
}
else {
  for (int i = 0; i < historySize; i++) {
    float pressure = event.getHistoricalPressure(i);
    float x = event.getHistoricalX(i);
    float y = event.getHistoricalY(i);
    float size = event.getHistoricalSize(i);
    // TODO: Do something with each point
  }
}
The normal pattern used for handling movement events is to process each of the historical events first, followed by the current Motion Event values, as shown in Listing 15-28.
Example 15-28. Handling touch screen movement events
@Override
public boolean onTouchEvent(MotionEvent event) {

  int action = event.getAction();

  switch (action) {
    case (MotionEvent.ACTION_MOVE)
    {
      int historySize = event.getHistorySize();
      for (int i = 0; i < historySize; i++) {
        float x = event.getHistoricalX(i);
        float y = event.getHistoricalY(i);
        processMovement(x, y);
      }

      float x = event.getX();
      float y = event.getY();
      processMovement(x, y);

      return true;
    }
  }

  return super.onTouchEvent(event);
}

private void processMovement(float _x, float _y) {
  // Todo: Do something on movement.
}You can listen for touch events without subclassing an existing View by attaching an OnTouchListener to any View object, using the setOnTouchListener method. Listing 15-29 demonstrates how to assign a new OnTouchListener implementation to an existing View within an Activity.
Button and key-press events for all hardware keys are handled by the onKeyDown and onKeyUp handlers of the active Activity or the focused View. This includes keyboard keys, D-pad, volume, back, dial, and hang-up buttons. The only exception is the home key, which is reserved to ensure that users can never get locked within an application.
To have your View or Activity react to button presses, override the onKeyUp and onKeyDown event handlers as shown in Listing 15-30.
Example 15-30. Handling key press events
@Overridepublic boolean onKeyDown(int _keyCode, KeyEvent _event) {// Perform on key pressed handling, return true if handled return false; } @Overridepublic boolean onKeyUp(int _keyCode, KeyEvent _event) {// Perform on key released handling, return true if handled return false; }
The keyCode parameter contains the value of the key being pressed; compare it to the static key code values available from the KeyEvent class to perform key-specific processing.
The KeyEvent parameter also includes the isAltPressed, isShiftPressed, and isSymPressed methods to determine if the function, shift, and symbol/alt keys are also being held. The static isModifierKey method accepts the keyCode and determines if this key event was triggered by the user pressing one of these modifier keys.
To respond to key presses within existing Views in your Activities, implement an OnKeyListener, and assign it to a View using the setOnKeyListener method. Rather than implementing a separate method for key-press and key-release events, the OnKeyListener uses a single onKey event, as shown in Listing 15-31.
Example 15-31. Implementing an On Key Listener within an Activity
myView.setOnKeyListener(new OnKeyListener() {
  public boolean onKey(View v, int keyCode, KeyEvent event)
  {
    // TODO Process key press event, return true if handled
    return false;
  }
});
Use the keyCode parameter to find the key pressed. The KeyEvent parameter is used to determine if the key has been pressed or released, where ACTION_DOWN represents a key press, and ACTION_UP signals its release.
Many mobile devices offer a trackball as a useful alternative (or addition) to the touch screen and D-pad. Trackball events are handled by overriding the onTrackballEvent method in your View or Activity.
Like touch events, trackball movement is included in a MotionEvent parameter. In this case, the MotionEvent contains the relative movement of the trackball since the last trackball event, normalized so that 1 represents the equivalent movement caused by the user pressing the D-pad key.
Vertical change can be obtained using the getY method, and horizontal scrolling is available through the getX method, as shown in Listing 15-32.
This final chapter has served as a catch-all for some of the more complex Android features that were glossed over in earlier chapters.
You learned more about Android's security mechanisms, in particular, examining the permissions mechanism used to control access to Content Providers, Services, Activities, Broadcast Receivers, and broadcast Intents.
You explored the possibilities of interprocess communication using the Android Interface Definition Language to create rich interfaces between application components.
Much of the last part of the chapter focused on the Canvas class, as some of the more complex features available in the 2D drawing library were exposed. This part of the chapter included an examination of the drawing primitives available and a closer look at the possibilities of the Paint class.
You learned to use transparency and create gradient Shaders before looking at Mask Filters, Color Filters, and Path Effects. You also learned how to use hardware acceleration on 2D canvas-based Views, as well as some Canvas drawing best-practice techniques.
You were then introduced to the SurfaceView — a graphical control that lets you render graphics onto a surface from a background thread. This led to an introduction of rendering 3D graphics using the OpenGL ES framework and using the Surface View to provide live camera previews.
Finally, you learned the details for providing interactivity within your Activities and View by listening for and interpreting touch screen, trackball, and key press events.
You also investigated:
How to use Wake Locks to prevent the host device from going into standby mode.
Using the Text To Speech engine to add voice output to your applications.
Some of the possibilities of using the Internet as a data source, or processing middle tier, to keep your applications lightweight and information-rich.
How to animate Views and View Groups using tweened animations.
How to create frame-by-frame animations.
Which drawing primitives you can use to draw on a canvas.
How to get the most out of the
Paintobject using translucency, Shaders, Mask Filters, Color Filters, and Path Effects.Some of the best-practice techniques for drawing on the canvas.
How to apply hardware acceleration to 2D graphics drawing.