
Chapter 16
Advanced Installation and Configuration
Generally you install SharePoint on your network for a reason. Maybe you intend to use it for document storage, collaboration, data gathering, or calendar and contact management. But behind the scenes you might need more than the default settings allow. You may need to host isolated site collections for clients or separate departments of your business. You might be considering offering access, from within SharePoint, to external data for your users to view or modify. Your data might need the security of SSL, or you might need Kerberos authentication. You might be planning on having tens of thousands of users and require multiple front-end servers managed centrally from one Central Administration site. These requirements involve a more complicated SharePoint installation and configuration. They will also have limitations that must be considered before implementation.
This chapter covers the more advanced features, configurations, and settings that were not appropriate earlier in the book. These include the practical concepts behind installing additional servers to the SharePoint farm and network load balancing SharePoint; securing SharePoint web applications with SSL; and enabling Kerberos authentication. Other useful concepts include multi-tenancy, configuring Business Data Connectivity to create an external list and explore a lookup field, Office Web Apps.
In this chapter, you'll learn to
- Use the Business Data Connectivity service to create external data connections
- Set a service principal name
- Configure Network Load Balancing
- Configure Multi-tenancy
Configuring New SharePoint Capabilities
Business Data Connectivity is new to SharePoint Foundation. Until this point, the free version of SharePoint could not make use of this external data access tool. However, because the Foundation version of SharePoint is intended to contain more of the true SharePoint infrastructure features, things such as Business Data Connectivity are now built right in. There may be added features and conveniences in the paid for version, SharePoint Server 2010, but there are quite a number of things you can do in SharePoint Foundation, as long you know how to configure them.
Using Business Data Connectivity
To start, Business Data Connectivity (BDC, but also known as Business Connectivity Services or BCS) is a service application used by SharePoint to access data external to SharePoint's content databases. Up until this version, Windows SharePoint Services could not access external data and use it natively in lists or libraries without considerable customization. Now, with SharePoint Foundation, access to external business data is possible. Using BDC models and external content types (which basically define the external connection parameters, data source being accessed, and so on), you can create external lists at the site level that users can read or even edit and add data to the external source. External data lookup fields can be added to SharePoint lists as well, giving them access to data from the external source that otherwise would not have been available.
The BDC service needs to be configured on the SharePoint server first, and then external content types need to be set up using SharePoint Designer 2010 or Visual Studio 2010. SharePoint Designer 2010 (SPD) is free and is meant to be used to customize SharePoint without writing code, so we will be using it in this chapter to set up external content types for BDC.
We configured and enabled the service in Central Administration in Chapter 3, and now it's time to set up an external connection.
To do that, you need to have SharePoint Designer 2010 (earlier versions are not compatible) installed on your network, and an external data source, such as a non-SharePoint related SQL database. You need to be logged in as a farm administrator because SPD will be using your credentials for this endeavor. I have installed SPD 2010 32-bit on a Windows 7 client on the network. (I installed the 32-bit version because I already had the 32-bit version of Office 2010 on that workstation, and the two products must match in architecture.) This book has not really explored SharePoint Designer 2010, because there are numerous good books dedicated to learning SPD 2010, so teaching it again here would be redundant. Therefore I am going to cover just enough about SPD to accomplish our task. But it should give you some idea of the usefulness of the tool, and why it is well worth downloading and installing.
![]() Real World Scenario
Real World Scenario
PERMISSIONS CHECK
Something to keep in mind when preparing to use the Business Data Connectivity service to access external content is the permissions required. The account you will use to configure the external connection for BDC, the BDC service account itself, and the content database account for the web application containing the site that will use the external list or lookup fields must have at least read and write access to the external data source (in my case, that will be a SQL database called sampleDB).
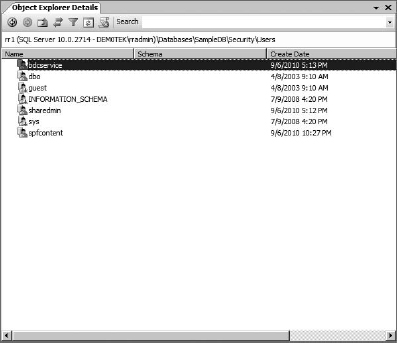
To enable the BDC service to access the SQL database, I had to add its account, in my case dem0tek spfbdc, to the database's users and give it db_datareader and db_datawriter permissions (it does not need to be an owner of the database; least privilege is good). The account I am using to set up the external content type for the database (for me that's dem0tekshareadmin) and the content database account for the web application to contain the external list (for me, dem0tekspfcontent) will also need to be added as users with the same permissions (db_datareader and db_datawriter) to the data source.
All farm administrators have the right to administer service applications, regardless of whether they are explicitly added to the service application's permissions. The only caveat to this is, in order to apply permissions directly to accounts for the service application, you do need the right specifically to do so (we'll set that up later in the chapter).Therefore, when I configure permissions on the external content type for the BDC service in Central Administration, I am going to give my shareadmin account full rights to manage permissions. Although it's not strictly required, I am also going to be logged in as that shareadmin account when creating the external list that points to the external content type.
CREATING AN EXTERNAL CONTENT TYPE
Take the following steps to begin creating an external content type in SharePoint Designer 2010, once you've installed it:
- Make certain you are logged in with a farm account (in my case, that's my shareadmin account). Open SharePoint Designer. If you have never opened the product before, it will be located under the SharePoint folder in All Programs.
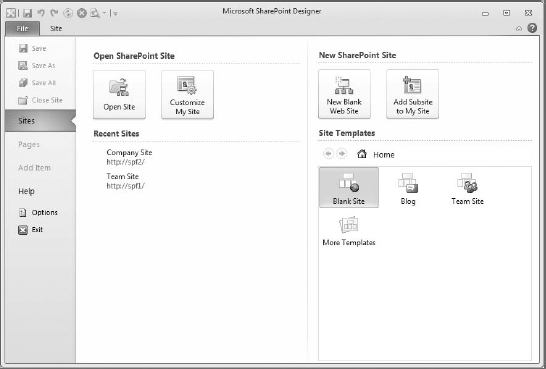
SharePoint Designer 2010 opens to a Sites page (as you can see in Figure 16.1). In my case, I have http://spf2 and http://spf1 listed under Recent Sites because I've been doing work with my SharePoint servers using this product. Your Recent Sites might be blank at this point if you've never used any Office product on the workstation to access a SharePoint site.
FIGURE 16.1. The SharePoint Designer 2010 Sites page
SharePoint Designer focuses on a particular site and its resources, such as lists, pages, libraries, workflows, or web parts. So if you are planning on using BDC external content on a particular site on a server, it's convenient to have its address here under Recent Sites. In my case, I am going to use http://spf2. This is the address of the Company Site created early in the book and will be the site that eventually will use the external data we are connecting to in a list. It is a site collection in a web application that has the BDC service application connection enabled.
REMEMBER SERVICE APPLICATION CONNECTIONS?
Back when you were creating web applications, there was a setting for service application connections. The default was to simply allow all service applications, of which we have two out of the box (if configured): BDC and Usage and Health. Because a web application contains the site you might be working on, it defines whether the site can use a service. If one of yours can't, check to see whether that service application connection (elsewhere in the interface it is called a service application association) was disabled for that web application.
- To open a site to work on, click Open Site, type in its address in the Open Site dialog box, and click Open.
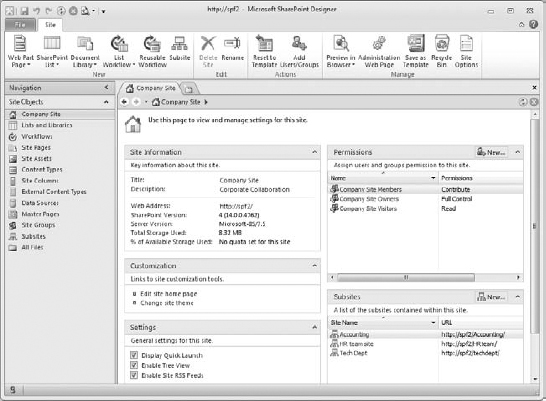
It may take a moment as SPD establishes communication with the site. Then it will display the workspace for the site. Here you have a plethora of objects to work on, everything from web parts and site groups to master pages and external content types. Notice in Figure 16.2 that site objects are listed in the pane on the left, and the workspace currently displays a page to view and manage settings for the site. When you select something in the Site Objects pane, its properties and relevant information display in the workspace on its own page. The workspace can be tabbed, so there can be more than one page to look at in that area (it basically remembers everything you've worked on while you've had the program open). And it can get crowded, so remember that tabs can be closed. Pay attention to which one you are working on if objects are similar.
FIGURE 16.2 The workspace for a selected site
For this exercise, we are going to focus on creating an external content type to use with our Business Data Connectivity service. It should be noted that this is a great place to get to know for customizing and extending the use of SharePoint. For busy administrators in particular, it is simply the best and easiest way to set up BDC external data access.
You will be working on the external content type as a farm administrator who also has access to the data source. Remember that the BDC service, the account you're using, and the content database for the web application that will contain the external list must have read and write permissions to the data source.
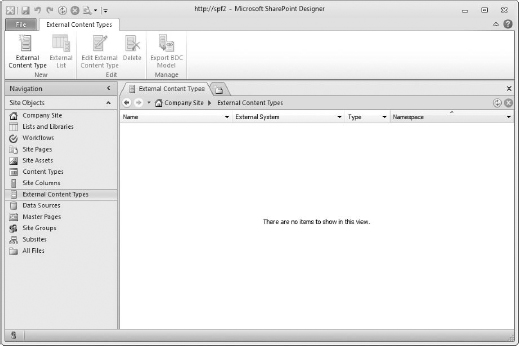
- Click the External Content Types object in the Site Objects pane.
There may be a delay while data is gathered from the server concerning the BDC service and its external content types (or ECTs). In my case, I have no external content types yet, so this page should be blank until I create one (Figure 16.3).
FIGURE 16.3. The External Content Types page before a type is created
- To create a new content type, click the External Content Type button in the New section of the ribbon (you may need to click in the empty workspace to activate the External Content Type button if it is grayed out).
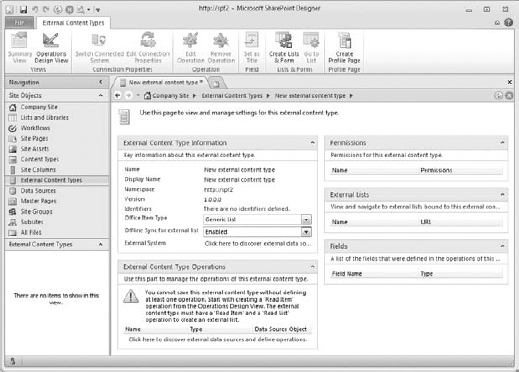
The tab in the workspace will change to New External Content Type * (the asterisk means it's new and hasn't been saved yet, or there are unsaved changes), as shown in Figure 16.4. It will fill with sections related to creating and managing an external content type. There are two views for this tab—Summary, which opens by default and contains the sections, and Operations Design, which is the view you use to create the connection to external data sources.
FIGURE 16.4 The new ECT workspace
In the Summary view, External Content Type information lists the Name, Display Name (essentially the friendly name is optional), Namespace (URL of site), and Version. (You can specify the version of the external content type if you want to track changes you make. Use the four digits separated by period format to avoid issues.) If there is an identifier specified for the external content type, it will be here. There are also fields for specifying the type of list to use for the external content type (I'm just keeping the generic list option) and whether to allow offline sync for the external list. Offline sync is enabled by default (used by SharePoint Workspace), but if the data pulled by the external content type is really large, you might want to disable it. Finally, the external system information (the source for the data) will be displayed at the bottom of the section.
THE OFFICE ITEM TYPE
Although we are just going to use a generic list type for this example, you could select a type of list that would map to something Outlook could use, such as a Task, Contact, or Calendar. So if you have data in the external content that would map to the fields of an existing list type, you can select it and map the fields in the field parameters when setting up operations for the external content type.
The other sections, External Content Type Operations, Permissions, External Lists, and Fields, will propagate with data after the external content type is configured, as you will see in a moment.
- To get started with configuration, give the external content type a name by clicking New External Content type in the Name field. For my example, I am going to enter ExampleData. If you tab out of the field, it will propagate the display name with the same data.
You can also specify a display name if you'd like; I'm going to use the same name (often the name of a connection isn't as friendly as the display name).
Now that you've named the external content type, it's time to create a connection to an external data source and define the operations that can be done with that connection.
- To create a new connection, either click the Operations Design View button in the ribbon or click the Click Here To Discover The External Data Source Link In The External System field at the bottom of the External Connection Type Information section in the summary view.
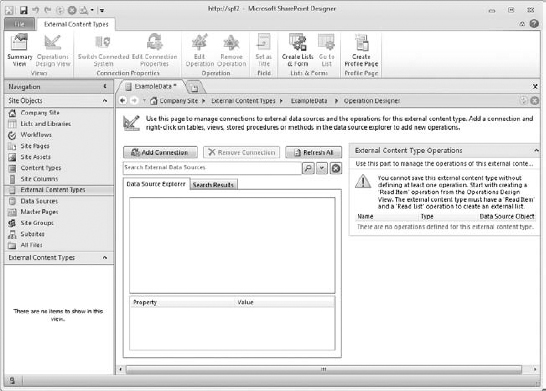
Once on the Operations Design View page, you'll see that this is where you click the big Add Connection button to specify your data source (Figure 16.5).
The data source I am using for my example is a little database I made in SQL with one small sample table in it. With this version of SharePoint, external data sources can be accessed via SharePoint to do more than just passively read the data. Now (depending on your source database) you can also CRUD (do create, read, update, and delete operations) on the database. When setting up these operations, remember that fields can be required, read-only, and identifiers (or primary keys). Keep in mind that tables can be designed with autogenerating data that is read-only (identifier fields often are) and might make it hard for SharePoint to create a new item if there are fields that can't be empty but can't be filled with anything from SharePoint either. Test your database as a data source for an external list to be sure what will work and what won't.
FIGURE 16.5. Adding a new connection on the Operations Design View page
- To add a data source connection to the external content type, click Add Connection in the workspace.
This will trigger a dialog box in which to select the data source type for the external connection. In my case, the type of data I will be accessing is SQL Server (see Figure 16.6 for my example selection). The other types of data connection require some coding and are .NET type and WCF service (WCF stands for Windows Communications Foundation). If you have data stored in a form not available through SQL Server, you may need to opt for using .NET or WCF connectors for the BDC to be able to figure out how to access the data.
- In my case, my external, non-SharePoint data is stored in a SQL database. So, I will select SQL Server as my data source. Select the correct data source for you.
FIGURE 16.6 Selecting the external data source type
Once you've selected the type of data source access you'll be using, a Connection dialog box will come up (in my case, it's a SQL Server Connection box). This dialog box requires a server name, a database name, a name for the connection (that one's optional), and the type of identity that will be used to access the database.
The User Identity option simply passes through the user's identity they are using to access the external list to the back-end data source to access the data. That user account (and all user accounts that will use the data on the site) needs to have permissions to the database. This option also requires Kerberos to be configured.
Connect with Impersonated Windows Identity and Connect with Impersonated Custom Identity both have to do with the Secure Store service, which is not available for SharePoint Foundation.
So at this point, the only option available to give users access to the data source is to choose User Identity. And that would work if the users all had permissions set on the source database and if you had Kerberos set up (we'll look at Kerberos later in the chapter).
However, there is another option. And because it isn't obvious, it's the one I am going to demonstrate—using the BDC identity for this external content type to access the data source on behalf of the users so they don't all have to be added to the database's permissions nor Kerberos-configured (this is particularly good if you are looking at doing this for external or anonymous users, although anonymous users take extra configuration).
Now you may have noticed that using the BDC identity is not an option in the dialog box. It becomes available after you create the connection. So, we'll create the connection, configure a few things, and then come back and change User Identity to BDC Identity.
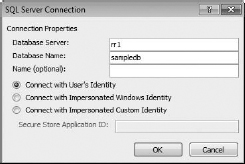
- In the dialog box, enter the data source (mine would be the SQL server name), the database you are going to use as the source (mine is sampledb), enter a shorter friendly name if you want, and select Connect With User's Identity, because that's the only option of the three that SharePoint Foundation can use. You can see Figure 16.7 for my example.
FIGURE 16.7 Configuring connection properties in the SQL Server Connection dialog box
- Once the connection properties are configured as you wish, click OK to continue.
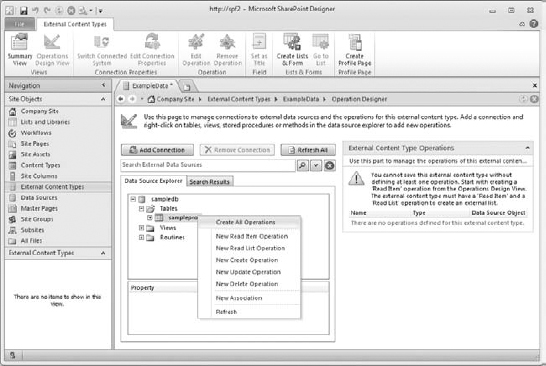
Back in the workspace, the database you chose as the data source is displayed in the data source explorer list. You can select a table to use or a view. In my case, I am going to use a simple table I made for this example.
At this point, you need to navigate in the Data Source Explorer to the item you are going to use for this connection. Once you can see the table or view you want to use for your data source, you need to decide what operations the users can do in the external list on the site connected to this data source. With this version of SharePoint Designer and SharePoint Foundation, you can allow (depending on the data source) the user to read (item and/or list), as well as write, update, and delete items in the list and therefore the underlying external database. Once you can see your data source listed, you right-click it to select the operations you want your users to be able to do on the data source.
- Right-click your data source to access the operations available to give to your users. In the drop-down menu, select the operation you want to offer (this has to be done one at a time if you want more than one); or, if you want to give users all the options (which I do), select Create All Operations (Figure 16.8). In my case, this will give my users the right to read, create, edit, and delete items from the data source.
FIGURE 16.8 Selecting Operations to apply to data source
- An Operations configuration window will open. It starts with an Operation Properties page to confirm the operations you selected. Click Next to set up field parameters for your operations.
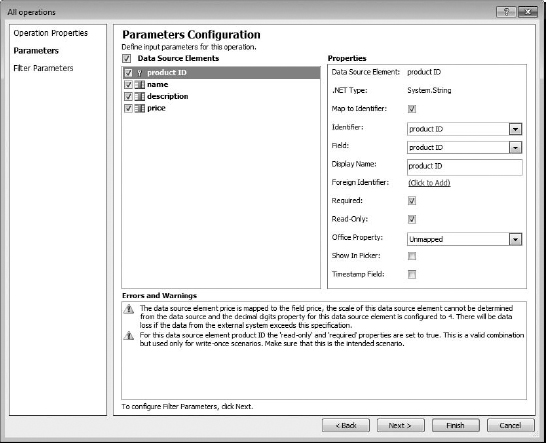
- Once on the Parameters page, you select the fields and set up their properties. Properties for fields are listed on the right, such as Map To Identifier, Required, Read-Only, Show In Picker, and TimeStamp Field. If a field is a unique key or ID field, set it to Map To Identifier, so it will be identified with a key (see Figure 16.9). The fields should be configured here to match their configuration in the underlying table, except that you also choose which field will be the main field for searching (the Show In Picker field). Keep in mind that SPD can only handle identifier fields that are read-only and required. In this context, when you add a new item, you can enter data into that field (if it's not read-only in the underlying database) but you cannot edit the identifier field otherwise. See the sidebar below for more. If you selected a type of list (instead of generic) for the external content type, you can map the field from the external data source to the type of list's field, in the Office Property field.
You will notice that there are some warnings and suggestions at the bottom of the page. You will find that some warnings can be ignored (it doesn't like that my Price field has a decimal limit, for example). In addition, at least one field needs to be set to Show In Picker. This field controls how the external content type will show up in the picker box when you need to select an external content type to create a new external list. For this example, the Name field should have Show In Picker selected. At a minimum, you need to set a Map To Identifier field and one to Show In Picker.
FIGURE 16.9 Configuring field parameters in All Operations
PRE-UPDATER FIELD WARNING
Even if you set the identifier field of your data source not to be read-only in SPD, you will still not be able to edit data in the external list using that data source. You will easily be able to create, delete, or read data, but in order for identifier fields to be editable, the UpdaterField = True attribute in the underlying BDC model XML file must be changed to PreUpdaterField = True for the identifier field in the Update method instance. By design, SPD cannot make that change, so you must either edit the BDC model manually or purchase, install, and use Visual Studio to do it (both of which are a bit outside the scope of this book). SharePoint Designer cannot edit an external connection if its BDC model has been edited.
- Once you've configured your field parameters, click Next to continue.
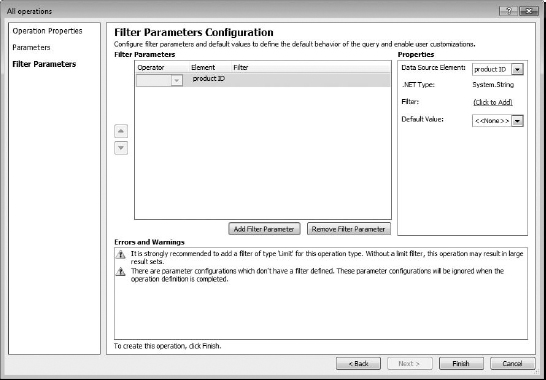
On the Filter Parameters page, in the Errors And Warnings area, you'll see that it suggests you set up at least a filter to limit the number of items returned to avoid large result sets. Remember that if the data source has thousands of records and the users need to see all of them, limiting the results they get in SharePoint may not be a good idea. For this example, however, let's create a filter that limits the items to 1,000 (the maximum for a limit filter is 2,000 items).
- To do this, click the Add Filter Parameters button. It will add some unconfigured filter parameters to the page (Figure 16.10).
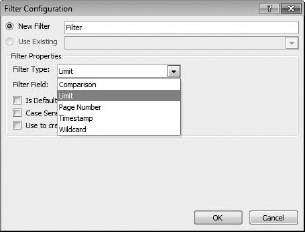
- To create a limits filter, click (Click To Add) in the Properties area on the right of the page, in the Filter field.
This will open a Filter Configuration dialog box. In the box, you can name the new filter (I'm not going to bother). In the Filter Properties area, click the Filter Type down arrow, and select Limit (Figure 16.11).
FIGURE 16.11 Setting Filter Properties in the Filter Configuration dialog box
- There are other options in the dialog box that aren't really applicable to the limit filter, so simply click OK to finish configuration.
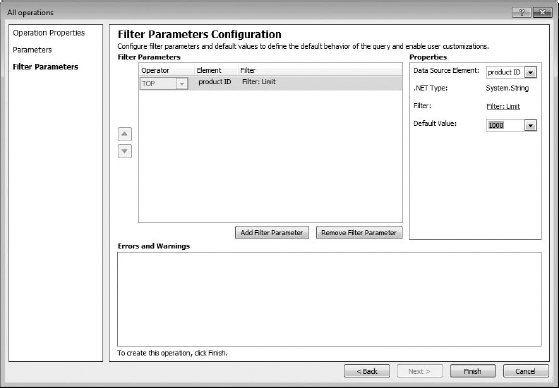
- Back on the Filter Parameters page, you now need to configure the default value—the amount you want the filter to limit data that will display from this data source in the external list in SharePoint. For this example, enter 1000 as the limit (Figure 16.12), but keep in mind how many items your data source actually contains.
FIGURE 16.12 Entering a default value in Filter Parameters
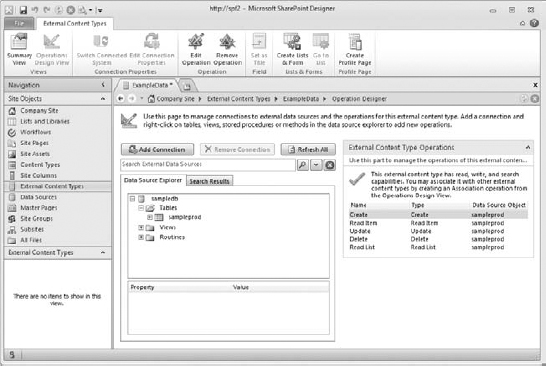
- To finish configuring parameters for your operations, click Finish. This will bring you back to the workspace. Notice that your connection is listed, with the data source you selected on the left, and the operations you configured are now listed under External Content Type Operations on the right (Figure 16.13).
FIGURE 16.13 External Content Type Operations in Design view with operations listed

WHY USING A VIEW AS A DATA SOURCE CAN BE HANDY
I've mentioned that you can select either a table or a view in a database as the data source. If you have a table of data that has far more than 1,000 to 2,000 records (the maximum the Limit filter can allow), you can simply choose not to limit the data that returns from this source. However, that can really slow down the experience of the user trying to open the external list. So if you are going to limit the result set of a connection, you should consider filtering the data at the database by creating views. That way, the users will get all the relevant records they need but fewer of the ones they don't need. Then create multiple connections, one to each view, and multiple external lists. Then the users can go to the correct list to get the data they need and, if you're good, never exceed 2,000 records.
Now that we've set up the external content type's connection and operations, you need to consider what kind of identity you are going to use so that the users can access the external data source. Initially we selected Connect With User Identity as the authentication mode for the external content type, but that was essentially just a placeholder until we could go back in and select BDC Identity.
CONFIGURING A SERVICE APPLICATION FOR BDC IDENTITY
To use the User identity, SharePoint just passes the credentials through to the data source. This works if you have Kerberos enabled and configured properly, and all users who will need to use the external list in SharePoint personally have permissions set up on the data source (the SQL database in my case). When you use BDC identity, only a few accounts need read and write access to the data source (the BDC service, the content database account that will house the external lists, and the account that is configuring the external content type). In addition, when you choose to use the BDC identity, the service needs to be able to revert to self for its credentials. This allows SharePoint to act as the BDC identity when accessing the data source on behalf of the users.
The Revert To Self capability is not enabled by default for the BDC service, so you need to enable it in order for the BDC identity to work. This is a sneaky extra thing you have to do, and it requires PowerShell.
- Go back to your SharePoint server's desktop, and make sure you are logged in with an account with the correct PowerShell permissions. That can be a super shell admin account (one with PowerShell admin permissions to all databases in the farm, and the right to create new shell admins), or at least one that is a farm administrator, that has access (actually owner permissions) to the BDC service's database, the content database that will be using the external lists, and the configuration database. If you are logged in with the correct account, open the SharePoint management shell console.
When the management shell console opens, you will need to know the BDC service application's GUID, because you will have to change the property RevertToSelfAllowed from False to True.
Now there are ways to pipe a PowerShell command so that it passes the correct GUID to the variable, but I am going to simply mark and paste the GUID for simplicity's sake. It's a straightforward way to make sure you are using the correct data.
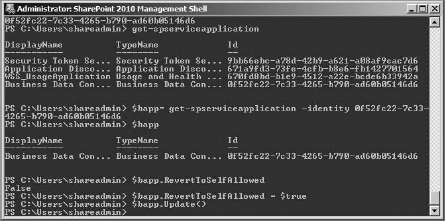
- To get that information (which you can see in Figure 16.14), first list the service applications:
Get-SPServiceApplication
- Then you can mark the GUID for the service and copy it. (To mark, right-click in the console and select Mark in the menu; then click and drag to select the GUID. When it is high-lighted, press Enter to copy it to the Clipboard.)
- You will need to fill a variable with the BDC service information, so use the following command, pasting (by right-clicking) the GUID marked earlier as the identity value:
$bapp= get-spserviceapplication -identity <BDCserviceGUID>
(I just made up my own variable, $bapp; you don't have to use mine exactly.) For confirmation, just type the variable name and hit Enter to see what it returns. It should display the correct service application information.
- It is a good idea to check what the current state of RevertToSelfAllowed is for the service application. RevertToSelf is a property of the BDC service application, so it's easy to check what its value is. To do so, use this command:
$bapp.RevertToSelfAllowed
It should return the value of False, which is the default and means it hasn't been changed. And it means you need to change it to True. (If it's already True, then you got lucky and can skip having to change or update it.)
- To change the BDC service's RevertToSelfAllowed property value to True, enter the following:
$bapp.RevertToSelfAllowed = $true
- Finally, to make sure the value updates immediately, enter this:
$bapp.Update()
You can again check the state of RevertToSelf by using the variable to make sure it is $True. And that's it; the BDC service will now be able to use its identity.
FIGURE 16.14 PowerShell commands to enable BDC Identity
Keep in mind that there are a few things that really can't be done outside PowerShell. And this appears to be one of them. Later, when we enable subscription services to do multi-tenant site hosting, you'll see that almost all of the process is done in the SharePoint management shell console. So, it would help for you to become comfortable with PowerShell. If you aren't, you may want to check out Chapter 14, “STSADM and PowerShell.“ Also keep in mind that since the console can run both PowerShell commands and STSADM, it's no problem to do a PowerShell command, then an STSADM one, and then go back to some more PowerShell. Do whatever is easiest. Experiment and find what works for you, but don't avoid the console just because it's new. You'll be shortchanging yourself.
And now we can go back to SharePoint Designer 2010 and reset the authentication mode for the external content type.
RESETING AUTHENTICATION MODE TO BDC IDENTITY
To do that, back in the workspace (we were in Operation Design view adding a connection type), we need to be in the summary view for the External Content Type.
Click the Summary View button on the ribbon.
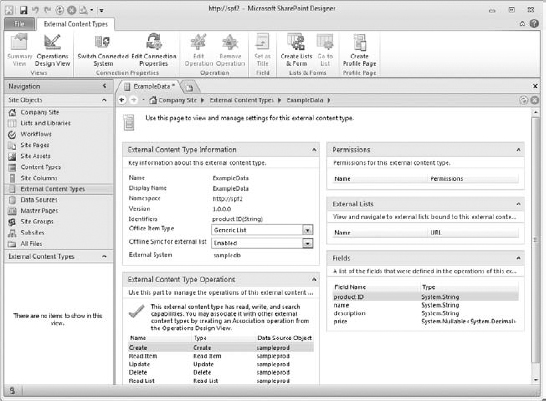
On the Summary View page (Figure 16.15), you'll see that many of the sections are now full of information.
FIGURE 16.15 Summary View with external content type data
You might have noticed that the option to change the identity for authentication is not openly displayed anywhere. SPD thinks of this process in terms of the external content type, which defines the settings in terms of name, version, and URL for the site, and contains the connection and external system information. An external connection simply defines what type of data source connection will be made (be it .NET, SQL Server, or WCF), what operations will be done on the data source, and their parameters. And an external system is the data source itself and the connection properties to access the source.
Given that the way to change the identity to do authentication, or authentication mode, is to go to External System in the External Content Type section and click its data source name (in my case sampledb).
That will open a Connection Properties dialog box (Figure 16.16). There are two tabs for Connection Properties, but stay on the Default tab. Notice that most settings concerning the data source are here, such as server name, database name, and data source type (now called Database Access Provider).
For the Authentication Mode field, change the value from User Identity to BDC Identity (it will be in the drop-down list now).
FIGURE 16.16 Connection Properties for the external system, changing to BDC Identity
Once you've changed the authentication mode to BDC Identity, click OK.
Back on the workspace, it's time to save this external content type and go back to SharePoint and see what happened.
If all settings are complete for your external content type, click the Save button in the Quick Access Toolbar (that little group of icons in the title bar of the window).
There may be a delay while the external content type is saved to the business data connectivity metadata store. Once the save is complete, you could create an external list right in SharePoint Designer, but I'd rather show you how it's done in SharePoint, since that's where everyone else will be working.
- Feel free to close out of SharePoint Designer.

To continue to configure the external content type (because we're not done yet), you need to open Central Administration.
CONFIGURING PERMISSIONS FOR THE BDC SERVICE IN CENTRAL ADMINISTRATION
In Central Administration, you need to add the permissions necessary to give the BDC service some idea as to what users it can allow to use the external data. To do that, go to the Application Management page. Adding permissions, in this case, comes in two part; the first sets up the account that will be doing administration of all objects in the metadata store for the service application, and the second is to configure user access to the external content type.
- On the Application Management page, under Service Applications, click Manage Service Applications.
On the Manage Service Applications page, click the Business Data Connectivity service.
This will open a page containing the objects the BDC service uses. Currently the view of the page shows the external content type (Figure 16.17). However, what was really uploaded from SharePoint Designer was an XML file containing all the information the BDC service needs to use the external content type, its external connection, and external system. The XML file is called the BDC model and can be exported for safekeeping. That said, the external content type and external system information are surfaced in this interface so you can manage their settings, such as changing the authentication mode.
EXTERNAL ACTIONS AND ASSOCIATIONS
An interesting capability of external content types is that you can set up actions for the fields it will pull from the data source. What this means is you can have that action listed in a drop-down menu for a specified field or all fields when used as lookup fields only.
External content types can also have associations. This means the underlying table data sources might have a one-to-many or many-to-one relationship with each other, allowing them to have connected data as well.
As you can see, the external content type we created in SharePoint Designer is listed here, showing the display name, namespace, version, and external system. Right now the external content type has no permissions set on it. So if you were to just skip to the site and create a new external list based on it, it would fail, because no one is set to access it yet. It is here that you tell BDC who is allowed to access the external data and how.
FIGURE 16.17 The View External Content Types page for a Business Data Connectivity service application
There are essentially three levels of permissions. One is for the BDC service itself. That's set to allow farm administrators full control by default (and that setting works, so we're not going to change it in this exercise). That's farm-wide. Then there is the metadata store, which stores all the external content types (and other information) for the BDC service. Finally, there is the object permissions for the object, such as an individual external content type. If all your external content types require granting the same permissions to the same people, then configure permissions on the metadata store.
Before you can set permissions for the external content type, you need to set a permission to allow someone to set permissions; that is a requirement. In my case, I want to give my SharePoint admin account the right to simply administer all external content types in one effort.
To do this, click the Metadata Store button.
In the Metadata Store Permissions box, you will need to add an account and give it permissions, especially Set Permissions. In my case, I am going to give my shareadmin account all the permissions to all items in the metadata store. This will let me test any part of the BDC service with this account. That said, always test your external lists and lookup fields while logged in as a user to see what their more limited permissions do. It would be a shame if it worked only for you.
The following is a quick rundown of the permissions listed. Keep in mind that although these permissions are being applied to the metadata store, they are basically the same set for all BDC permission levels:
Edit This permission should be for administrators only and has to do with editing settings on the objects at the administrative level. It has nothing to do with editing fields in an external list.
Execute This permission gives access the external systems. It's a permission often given, at the object level, to users so they can access data sources.
Selectable in Clients This oddly named permission lets you select the external content type to create lists and lookup fields. Another permission that is useful for user access, this allows users to use the picker box to select items.
Set Permissions This permission is specifically to give the assignee the right to apply permissions. Permissions cannot be applied to anyone until there is at least one account with this permission to do so. Administrative only.
Notice in Figure 16.18 that beneath the permissions list is a check box to propagate these settings to all BDC models, external systems, and external content types. Checking it allows this account to have access to everything with the selected permissions.
FIGURE 16.18 Metadata store permissions
Enter the name of the account or security group you want to apply these permissions to, and click Add. Once they are in the center box, select the permissions you want to apply (in my case that is all of them). You can also select to have these permissions propagate to everything else in the metadata store, which is what I am going to do. Once your settings are complete, click OK. That will take you back to the View External Content Types page.
Now you can set permissions on all other objects related to the BDC service. So, let's give our authenticated users permission to access and use the external content type.
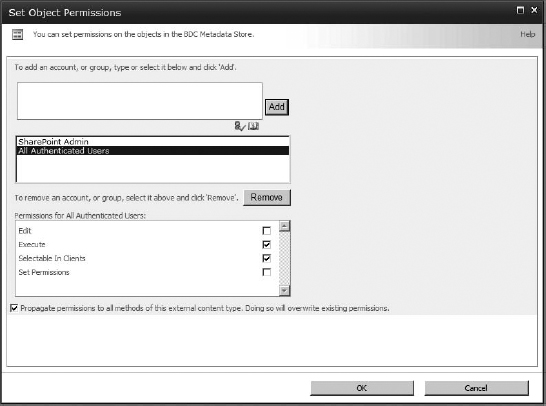
Click the selection box for the external content type, and then click Set Object Permissions in the ribbon (or you can select Permissions from the item's drop-down menu; this is a list after all).
Once in the Set Object Permissions box, you'll see that the administrator you added at the metadata store level is already here. You could add the individual users you want to be able to access this external content type, their AD security group, or all authenticated users.
To follow my example, add All Authenticated Users, and give them Execute And Selectable in Clients permissions (Figure 16.19); then click OK (propagating to all methods for this external content type is fine). You could also specify a certain group of users to have access. In my case, I want all users who are authorized to access SharePoint to be able to use the external content.
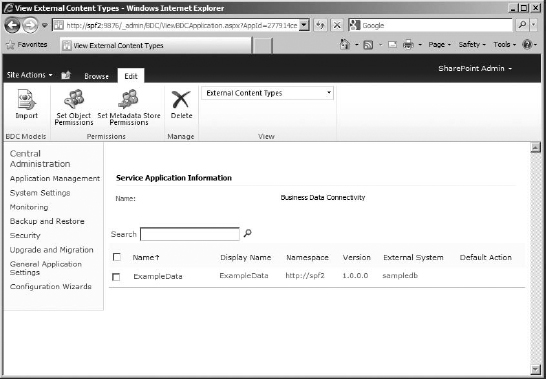
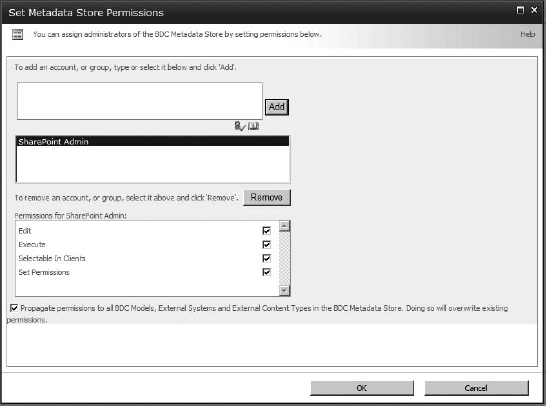
FIGURE 16.19 Set Object Permissions for the ExampleData external content type
That's it for setting up permissions for the users. Now it's time to create an external list.
CREATING AN EXTERNAL LIST
Now that we have the external connection to the data source set up, with access and permissions configured, it's time to use the external data from within SharePoint. Two ways are supported: create External Lists, which simply display the table or view for the external content type for users to work with, or use lookup fields from the external content type in lists and libraries.
- Go to the site you intended to add the external list. In my case, that is http://spf2. Log in as the administrator with full permissions to the external content type, in my case that would be shareadmin.
- On the home page, click Site Actions, and select More Options in the menu.
On the Create page, select External List (Figure 16.20).
FIGURE 16.20 Selecting External List on the Create page
Notice, in Figure 16.21, that the options to set for this list are pretty sparse. For this example, let's name the list ExampleList.
FIGURE 16.21 Creating the new external list
To enter an external content type for the data source, you can simply type it in the External Content Type field, but if you click the Select Internal Content Type button (the second icon after the field), you can see the external content types available for the site.
As you can see in Figure 16.22, the ExampleData external content type will be listed in this case. Simply select it (or whatever you named your external content type), and click OK.
FIGURE 16.22 The external content type picker
Back on the New List page, the external content type you selected will display in the field. Click Create to create the list.
It might take a moment, but the list will be created, with all of its contents displayed (as you can see, by my sample data in Figure 16.23). The identifier field (in my case, that's product ID) is the linked field for this list, meaning it will have the drop-down menu for the list items.
You should be currently logged in as the account with full permissions on the list. To truly be sure that it works, you need to log in as a user. This list was supposed to support all operations, meaning that items can be viewed, added, deleted, and edited for all authenticated users. For this example, we are just going to add an item.
To test the list, log in as a user with contribute permissions (in my case, that's the user Saffron, a member of the site with no special permissions). Logging in with the user account while on the list will verify that she can see the external list's contents (Figure 16.24). If you can't, check your permissions; first on the data source itself (remember, the BDC service and the content database account for the web application containing the list have dbreader and dbwriter roles), make sure the BDC identity is selected in SPD for the external connection, RevertToSelfAllowed on the server is set to true, and that the permissions for the external content type in Central Administration is correct.
FIGURE 16.23 The new external list, filled with sample data from data source
FIGURE 16.24 The external list works for a site member.
- Now that we're sure the user can see the list, you can try adding an item using her account. There is no convenient Add Item link in the list itself, so use the New Item button in the Items ribbon.
Create a list item using the user's name in one of the fields; in my case, that would be Saffron in the Name field for the item. As you can see in Figure 16.25, her item is added (I selected it for better visibility).
FIGURE 16.25 The site member added as a list item
You can also delete and edit items here, although the product ID cannot be modified after an item is saved.
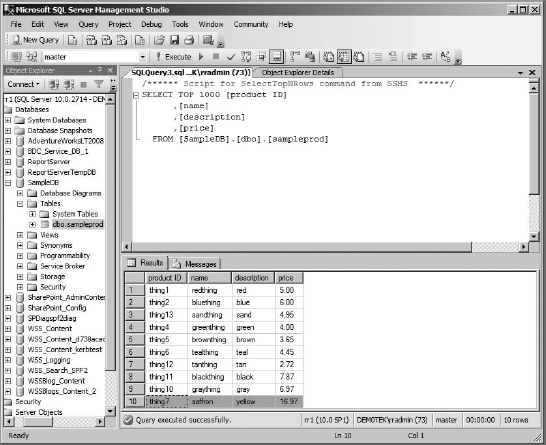
- To prove that the data you've added here with the user account was added to the underlying table, you can go to the database on the database server and check. The table now contains the new item (Figure 16.26).
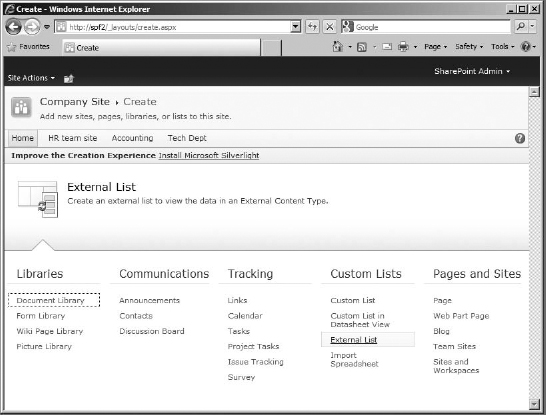

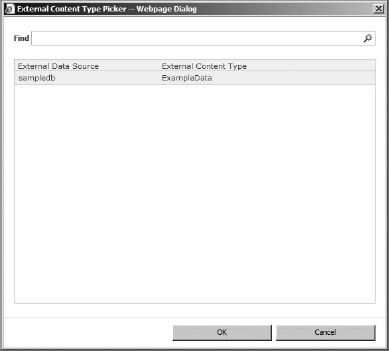
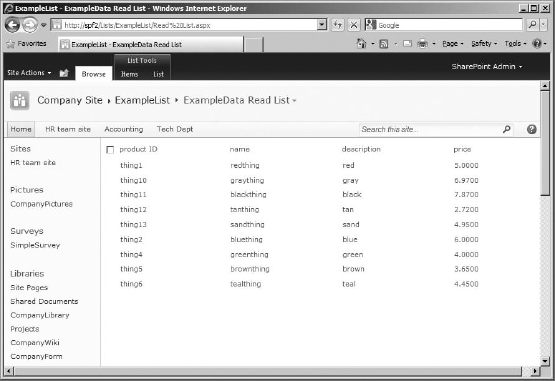
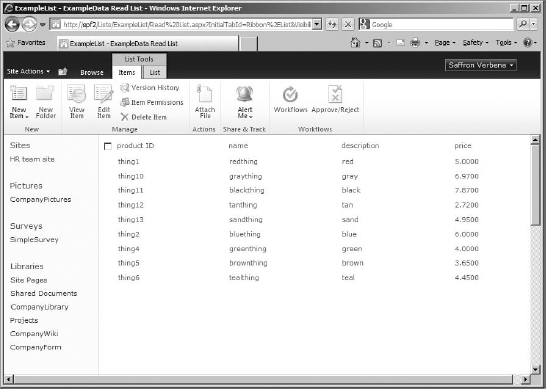
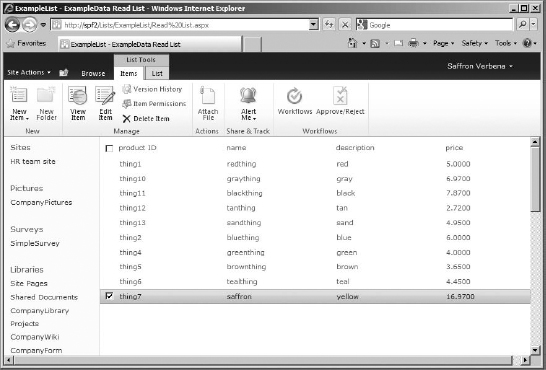
FIGURE 16.26 The underlying table in the data source with the new list item added
CREATING AN EXTERNAL LOOKUP FIELD
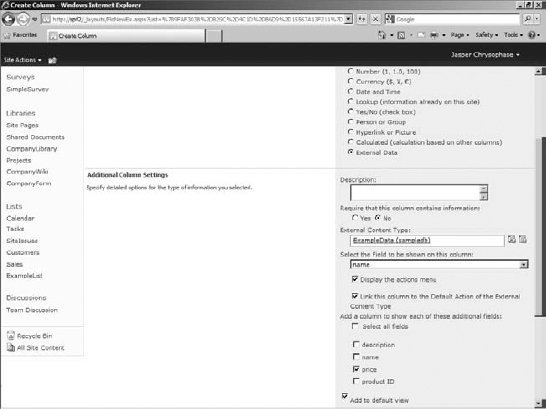
You can also use the external content type to pull lookup field information for lists. I used an existing list (make sure you're logged in with an account able to create lists or modify them) and simply added a new column. In the settings for a new column, External Data is available (Figure 16.27). If the option is selected, you can specify the external content type and then the field. As with any lookup field, you can also show additional fields. Notice that there is an option to display an Actions menu if you configured it for the external content type in Central Administration. If it's on and no actions are set, the menu will show up but be empty, leaving it available for use should you configure actions later.
In the list to which you want to add the external data lookup field, go to List Settings, and add a column. Name it what you'd like (in my case, mine is named External), and select External Data for the type of information for the column. This example uses the Name field for the Lookup and Price as an additional field.
FIGURE 16.27 Creating an External Data lookup field
- Once you've created the new column, you can add a new item to the list. You can see in Figure 16.28 that there is a field for the new external data lookup.
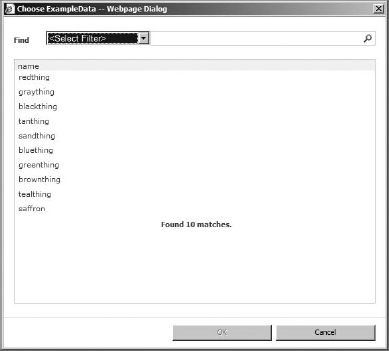
If you click the Select External Item(s) button (second on to the right of the field), a Choose ExampleData (the name of my external content type, if you remember; yours might be different) box comes up. Notice in Figure 16.29 that items are listed by the field I chose to show in the picker back when setting up operation parameters. Choose a name, and click OK.
FIGURE 16.28 New External Data field in New Item form for list
FIGURE 16.29 Choosing external data list item
- For the new item itself, click Save to create the new list item.

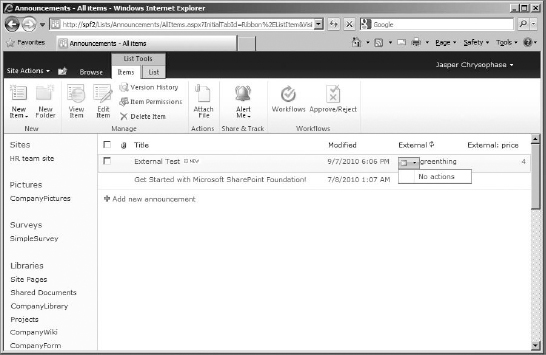
Once on the list, you'll see that the external field and its additional field are visible (this list was cleared of other items so this would be easier to see). Note that there is an icon next to the first external lookup field. It's for the Actions menu. If you were to click it, it would be empty at this point (Figure 16.30).
FIGURE 16.30 External data lookup fields in list, with Actions drop-down menu
You've now seen how to use that Business Data Connectivity service we enabled at the beginning of the book. It took several steps, but because you know how to use it, you have your permissions set up in the metadata store, you know how to set the BDC identity (and how to be sure the service is set to allow that authentication mode to work), and you know how to use SharePoint Designer, you can now create many more external content types more easily. You know what permissions it takes for users to be able to access the external content and how to create the external lists and lookup fields.
Now let's take a look at something else built into this version of SharePoint—multi-tenancy. This capability, based on the Subscription Settings Service, lets you host isolated site collections for your clients, departments, or whatever entity in your environment might need isolated site collections, users, and features.
Using this capability is very PowerShell-intensive. If you do not have much understanding of PowerShell, I suggest you check out Chapter 14 first and then come back to try this capability.
Enabling Multi-Tenancy
In many SharePoint environments, it would be handy to offer departments or clients the ability to control their own site collections. You know how to create a web application and give users the right to create their own site collections, but that has limited management control. With multi-tenancy (also called hosting), you can offer a “tenant“ administrator the right to create, control, and manage site collections grouped together under a subscription ID. This adds a level of self-administration for a subscription of site collections that otherwise is missing from the self-service scenario. This allows you, with some configuration, to isolate management of the site collections to a qualified administrator. Giving them the administrative rights to manage the site collections (including adding other accounts and create groups as site collection administrators to the individual site collections), apply quotas, see the status of the site collections, and access site collection settings. You can configure separate subscriptions of site collections to have (or be blocked from having) certain features and isolate what users are available to add to the site collections for that subscription.
Multi-tenancy for SharePoint Foundation overall is a great way to allow you to offer hosting of site collections for departments, division, clients, and whoever might need to be able to manage a group of site collections in a set. This lets you isolate, delegate control, and identify what resources those site collections are using. However, it is still early days for multi-tenancy, and it can be clunky. There are some caveats to consider:
- Tenants (as the site collection subscription administrators and their users are called) can have their own administration website to administer the site collections in their subscription. They can add new site collections (if you enable it for the web application containing the subscription) and manage those they have. Although that may be a good thing, some might find it limited.
- You have to manage the source of user accounts. That's not a big deal if the tenant is allowed to pull users from the entire authentication provider's pool of accounts. But if you need to isolate those users to just a particular group, it will take extra configuration. Even if you are simply isolating users by OU in AD, for example, there will need to be ongoing management of those accounts in terms of adding and removing users from the OU, since you won't want the tenants to have administrative rights to Active Directory.
- If you want your tenants to be able to create site collections for their subscription, you will need to enable self-service site creation on the web application containing the tenants. Keep in mind that there is still no limit on how many they can create. There will also need to be a root site collection, even if no one uses it. Something else to consider, if you have tenants that you do not want to be able to create their own site collections, they will need to be in a different web application with self-service site creation disabled.
- Site collections can have host headers for their address, rather than being in a managed path, of course. But, you have to set the site collections up manually (using STSADM or PowerShell so you can specify the host header). If a tenant wants to use their administrative site to create more site collections, their only option will be to use a managed path, because that's what the GUI offers for self-service site creation. If they truly want a custom header for their site collections, they may need to be in their own web application (which defeats the purpose of multi-tenancy) or at least access their sites through an extended web application just for them (and you have very few zones per web application for that sort of thing).
- Features available to site collections in a subscription can be managed in feature packs, which group together the features allowed for a subscription. Features can be scoped at either the farm, web application, site collection, even subsite level, and explicitly selected to be applied to subscriptions. However, you will need to manage deploying or adding features to the farm, and what features are available to subscriptions manually. However, if a tenant pays for a solution that is deployed to the whole web application, you can isolate that solution's features to only that tenant. This makes sure tenants that don't pay for them, don't get them. Feature packs are managed in PowerShell, so tenants can't manage that themselves; you will have to. As an alternative, sandboxed solutions can be uploaded, activated, and managed at the site collection level (and have the added bonus of being limited in the resources they use on the server overall).
So, planning for your multi-tenant or hosted environment does take some effort. But if this is something you need, it's good to know.
There are a few steps required to prepare to set up multi-tenancy for SharePoint. We'll actually do them later in the chapter, but this shows the overall tasks in a reasonable order:
- Create a managed account for the Subscription service. SharePoint will want that service to have a different account than the farm account, which it will use by default.
- Enable the Subscription service in Central Administration.
- Create a web application for the tenants. Subscriptions are per site collection. This is optional; you can use an existing web application, but it's best to plan for a good, general URL for the web application such as my example, hosted.dem0tek.com. Also plan its available zones as alternate addresses as well. Create the site collection at the root of the web application if you are going to enable self-service site creation.
- Make sure you have an account with the spshelladmin capability for that web applications database as well as the configuration database. The account must also have the dbcreator and securityadmin login roles on the SQL server (it will be creating the database for the Subscription Settings service, which means it will own it as well).
- If you want your tenants to be able to make more site collections within a subscription, you need to enable self-service site creation on the web application.
- You also may want to consider creating custom managed paths for your tenants, if the /Sites/ path isn't enough. For this example, we are going to add a wildcard managed path, /admin/, for the tenant administrative sites. This will put the administrative sites on a different path than the hosted site collections.
- Consider how to manage the tenant user accounts and set up that infrastructure. There will need to be accounts for the tenant administrators and tenant users. If OU s will be used to isolate user accounts for example, create and populate them in Active Directory.
- Finally, using PowerShell, configure the service application, database, and proxy.
At that point you will be ready and able to generate new subscription IDs and apply them to new or existing site collections, as well as generate tenant administration sites. Multi-tenancy will be up and running. You can create and apply feature packs as necessary. These plans may seem extensive, but once you know what you plan to do, it makes creating and maintaining the subscriptions much easier.
Now that you've prepared yourself, let's configure multi-tenancy.
REGISTERING A MANAGED ACCOUNT AND STARTING THE SUBSCRIPTION SETTINGS SERVICE
In Central Administration, to add a managed account for the Subscription Settings service, go to Configure Managed Accounts on the Security page.
In the Configure Managed Accounts page, click the Register Managed Account link to do your account registration. I will be using an account I created in AD, dem0tekspsubset, for my example (Figure 16.31). You can have it manage the password if you'd like, but I am not going to bother for this example.
FIGURE 16.31 Register the managed account for the Subscription Settings service.
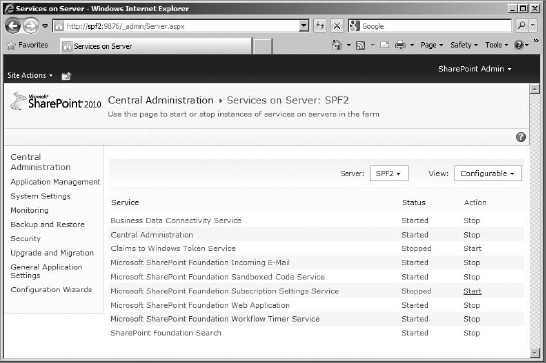
- Once you've added the account, start the Subscription Settings service. To do that, go to the Services On The Farm page, click the Manage Services On Server link, and then choose the System Settings page.
- The SharePoint Foundation Subscription Settings service is stopped by default. To start it, click Start for the service (Figure 16.32).
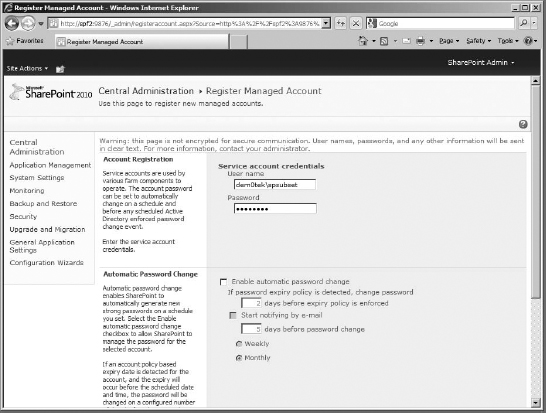
FIGURE 16.32 Starting the Subscription Settings service
CREATING A WEB APPLICATION FOR MULTI-TENANT SITE COLLECTIONS
Now that the service is started, we need to create the web application to contain the tenant site collections.
- To do that, go to the Application Management page and choose Manage Web Applications.
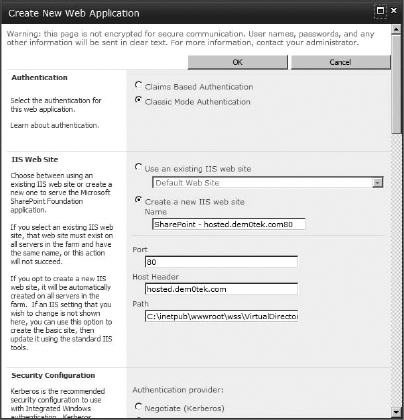
- On the Manage Web Application page, create a web application (click the New button). Figure 16.33 shows the settings I've chosen: Classic Authentication (you could choose Claims-Based if you wanted to; Classic works fine for me here), the host header hosted.dem0tek.com (be sure that if you use a host header, it resolves in DNS), using port 80. Also give the content database an identifiable name, name the application pool (or keep the default name), use a managed account for the database account, and so on. Once the settings are complete, click OK to create the web application. After the web application is created, feel free to create a root site collection. You don't need to create a site collection at the root of the web application's URL unless you are going to enable self-service site creation. Self-service site creation requires a site collection to put its announcement, even if no one ever sees it.
FIGURE 16.33 Creating a web application to use for multi-tenant site collections
At this point be sure to enable self-service site creation (in the Web Applications management page, select the web application and click the Self-service site creation button) and turn it on. Requiring a secondary administrator is not necessary.
Also, to have an admin path for the tenant administration sites, be sure to click the Manage Paths button for the web application, and configure it there. For more step-by-step details about creating and configuring web applications and site collections, see Chapter 10, “Site Collections and Web Applications.“
PERMISSION TO CONFIGURE SUBSCRIPTION SETTINGS SERVICES
Once you've created your web application (and root site collection if necessary), be sure you are logged into the SharePoint server with an account that has shell admin permissions to at least the configuration database and the content database for the web application you are using for subscription services in PowerShell (for more about that, see Chapter 14). Then open the SharePoint management shell.
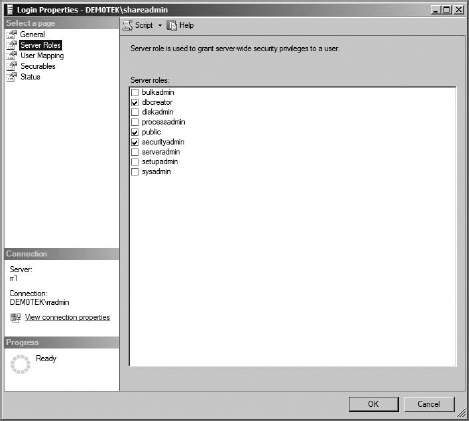
After you are certain that the account you will be using to do this task has the correct permissions in PowerShell, open the SQL Management Studio on the SQL server, and make sure that account has a SQL login and actually has the permission to create databases and assign users to them. Just like the setup account, that means the account requires at least dbcreator and securityadmin roles on the SQL server, as you can see in Figure 16.34.
FIGURE 16.34 Confirm permission in SQL for the account configuring the Subscription Settings service.
Once you are sure your SQL permissions are in order, you can start using the commands necessary to set up the Subscription Settings service and the multi-tenant site collections.
CONFIGURING THE SUBSCRIPTION SETTINGS SERVICE APPLICATION POOL ACCOUNT, SERVICE APPLICATION, AND PROXY
Make sure you are logged into the SharePoint server with the account with the correct permissions, and that the SharePoint management shell is open. Once in the console, you need to start by first setting up the application pool account to access the service's database. This will be the account you registered earlier as a managed account.
It will be helpful to create a variable, $appPool (you can actually name it anything you like), to use for creating the new application pool for the Subscription Settings service and then configuring the Subscription Settings service's database. The application pool account in my case will be dem0tekspsubset. The variable will contain the application pool account information so it can be reused in more than one command.
The command to enter in this case is this:
SappPool = New-SPServiceApplicationPool -Name SettingsServiceApppool -Account dem0tekspsubset
After you hit Enter, you will not see any indication that anything happened. That means it worked.
Then to create the service application and its database, I am going to use a new variable name, $sapp, to contain the Subscription Settings service, as well as use the $appPool variable again (when you enter commands, they generally need to be one line):
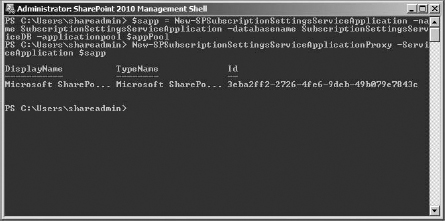
$sapp = new-spsubscriptionsettingsserviceapplication
 -Name SubscriptionSettingsServiceApplication -Databasename
SubscriptionSettingsServiceDB -applicationpool SappPool
Once the subscription setting service and its database is created (this may take a moment), you need to create the service proxy. This is what the web application actually connects to instead of the service application directly:
new-SPSubscriptionSettingsServiceApplicationProxy -ServiceAppli cation $sapp
This will generate a display name, type name, and GUID for the proxy (Figure 16.35). And that's it. After all that prep of setting up a web application, setting up a managed path, enabling self-service site creation, and getting the permissions configured, all it took was three PowerShell commands to configure the service application. Now it's on to creating the new site subscriptions and site collections and then exploring them.
FIGURE 16.35 Creating new Subscription Settings service application pool, service application and database, and service application proxy
CREATE NEW SITE SUBSCRIPTIONS AND THEIR SITE COLLECTIONS
Now that the Subscription Settings service is up and running, it's time to create some site subscriptions. In this example, there are going to be two subscriptions—one for the red tenant and one for the blue tenant. I have added accounts in AD for the tenant administrators, redtenantadmin and bluetenantadmin, as well as OUs (Red Tenant and Blue Tenant) and user accounts in Active Directory for each tenant in this scenario. I am assuming you know how to create user accounts and OUs, so I am not going to walk you through it.
We will create each site subscription, and then the site collections that belong with them, including the tenant administration site collections.
This will require a variable to use for the subscription ID when creating the site collections. You can create a variable for each subscription, or you can reuse the same one. It's up to you.
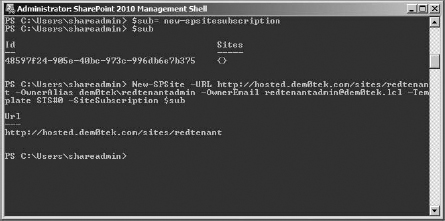
So, to create the new site subscription, you invoke a new site subscription that will generate a new subscription ID, which the variable will contain. To do this, you can enter the following:
$sub = New-SPSiteSubscription
The site subscription will be created with no real feedback. You can check to see whether the command worked by just typing the variable and pressing Enter. It should return the value it is holding. If it's blank, run get-spsitesubscription, and see whether the new site subscription GUID is listed. You should be able to use that instead of the variable if necessary.
Now that we have the site subscription ID generated, we can apply it to site collections. In this example, we are creating new site collections to use the subscription now. We are also not using host headers (otherwise known as host-named) site collections for this, but you can easily do so if you'd like. It's just a site collection. Keep in mind that if you want your clients to have host-named site collections, you will have to create them manually. Tenants can't use the self-service site creation capability of the administration page to create host named site collections; they can only use managed paths off the web application URL (or extended web application address).
The command to create a new site collection has a parameter, OwnerAlias, to specify the site collection administrator; for this, use the tenant admin account you created (remember that I have my tenant admins ready, redtenantadmin and bluetenantadmin).It also specifies the Team Site template for the site collection's top-level site with STS#0. If you didn't specify a site template, you'd be prompted to select one when you log into the site for the first time. In addition, I used the OwnerEmail parameter, so notifications for the site collection will have an address to be sent to. It is good practice, but not required.
Here is an example of how to create a new site collection with the subscription ID (see Figure 16.36 for an example of the command completed successfully) for the first of my two tenants:
New-SPSite -Url http://hosted.dem0tek.com/sites/redtenant“-0wnerA1ias dem0tek
redtenantadmin -OwnerEmail [email protected] -Template STS#0
-SiteSubscription $sub
FIGURE 16.36 New site collection with subscription ID
SITE TEMPLATES
I specified a site template for the site by using its template ID. To find out what the different template IDs are, use the command get-SPWebTemplate. It will list all templates available.
Now that you've created the site collection to be used by the tenant (in my case the red tenant), let's create the administrative site collection for the subscription. You can create them in either order.
To create the tenant administration site for the subscription, enter the following (note that this example is using the admin managed path created earlier):
New-SPSite -Url http://hosted.dem0tek.com/admin/redtenant“ -OwnerAlias
dem0tek
edtenantadmin “-OwnerEmail [email protected]“
-Template tenantadmin#0“ -SiteSubscription Ssub -AdministrationSiteType
tenantadministration
Now that the subscription and sites for the red tenant are complete, simply do the same for the blue tenant (or whatever you want to name your second tenant). To review, you need to create a new site subscription, create a new site and use the subscription ID, and create a new tenant administration site using the subscription ID. There should always be only one administration site, but you can have as many sites collections in the subscription as you'd like.
If you forget which ID to use, enter Get-SPSiteSubscription, and see what IDs show up. And to see what site collections belong to those site subscriptions, you can use Get- SPSiteSubscription | Format-List. That command will display not only the subscription GUIDs but the site collections using them.
Now that we have some site collections to play with, let's take a look at them.
WHAT IF YOU HAVE A SITE COLLECTION YOU WANT TO ADD TO A SUBSCRIPTION?
As long as the site collection is in the web application that is using the Subscription Settings service, you can apply the subscription ID to it. To do so, simply use the - identity switch with the Set-SPSite command:
SPSite -identity <URLofSiteCo11ection> -SiteSubscription <GUIDofsubscription>
EXPLORING THE TENANT ADMINISTRATION SITE
First, let's look at the tenant administration site for the first subscription tenant (in this example, that is the red tenant).
- Open a browser, and browse to the address of the tenant administration site (for this example, that would be http://hosted.dem0tek.com/admin/redtenant).
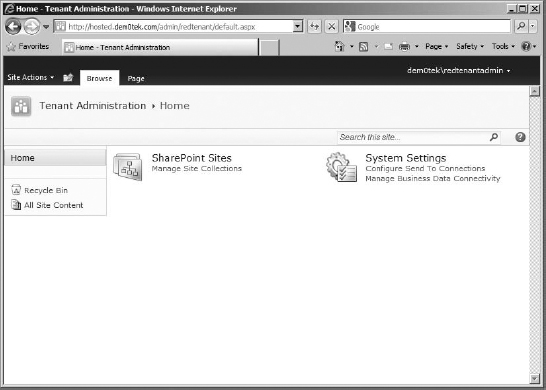
Log in with the account you specified as the OwnerAlias; in my case that would be dem0tek edtenantadmin. Once logged in, you will come to a very abbreviated Central Administration site (Figure 16.37).
FIGURE 16.37 Tenant Administration site
You can see that the site has the top ribbon bar, the Quick Launch bar, and a central content area containing only two categories, SharePoint Sites and System Settings. Beneath SharePoint Sites is a link to manage site collections.
- Managing the site collections is the focus now, so click the Manage Site Collections link beneath the SharePoint Sites heading.
- On the page that comes up (see Figure 16.41 for an idea of the page), you'll see the other site collection in this subscription. Select it, and you'll see some options in the ribbon bar to explore. The buttons available to manage site collections are Properties, Owners, and Disk Quota.
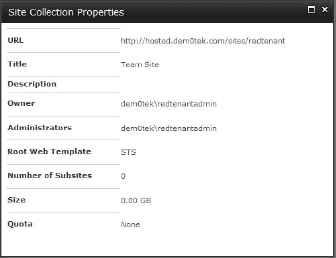
If you click the Properties button, there is a limited report concerning the site collection (Figure 16.38). There you can see some fundamentals about the site collection, such as the Owner (the primary site collection administrator), any other site collection administrators who might have been added, the template the top-level site is using, how big the site collection is in megabytes, and if a quota is applied.
- The Owners button on the Manage Site Collections page is something of a misnomer, and offers you a box listing the primary site collection administrator for the site, and a field to add and display additional administrators.
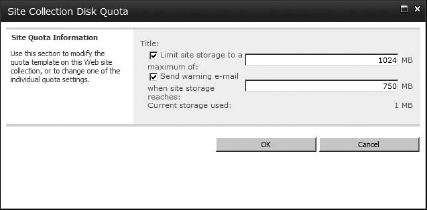
The Disk Quota button allows you to set a quota on the selected site collection (Figure 16.39).
FIGURE 16.39 Disk Quota settings for a selected site collection
- The New button available on the ribbon makes it possible for the tenant administrator to create new site collections in the subscription. This works only if self-service site creation is enabled for the web application.
In this example, we enabled self-service site creation, so you could try creating another site collection from here that will also be in the same subscription.
To test it, click the New button.
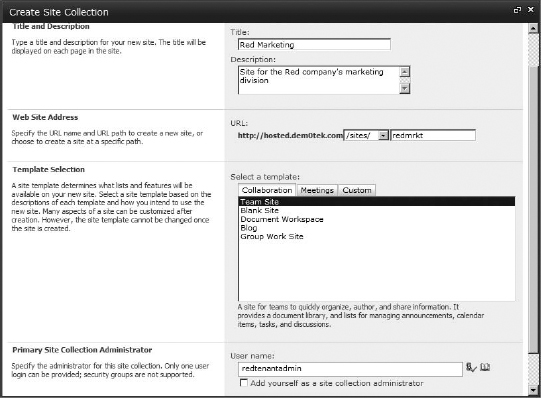
It opens a New Site Collection box, which lets you configure the title, description, URL (from the web application's managed paths), template, and site collection administrator. You can also add your account as an administrator, as a convenience.
- In this case, we're going to create a site collection for the red marketing division. We are also going to make the red tenant administrator the primary site collection administrator, so we don't need to add the account as well (Figure 16.40). Click OK when the settings are complete to create the site collection.
FIGURE 16.40 Creating a new tenant site collection
Back on the Tenant Administration page, you'll see that there are now two site collections to be managed for this tenant. For each site collection listed, there is a Manage icon (Figure 16.41).
FIGURE 16.41 The new site collection listed
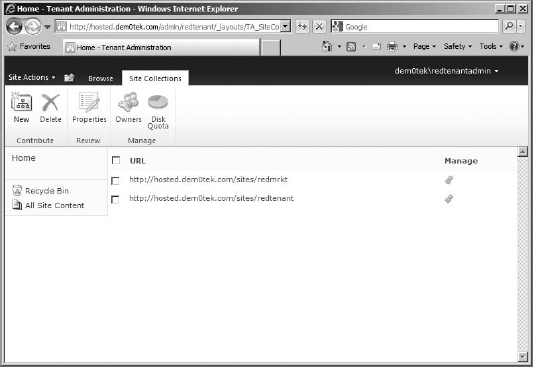
To manage one of the site collections, click its Manage icon, and it will take you to the Site Collection Settings page for that site collection. If your account doesn't have permissions to the site, you will be prompted to log in.
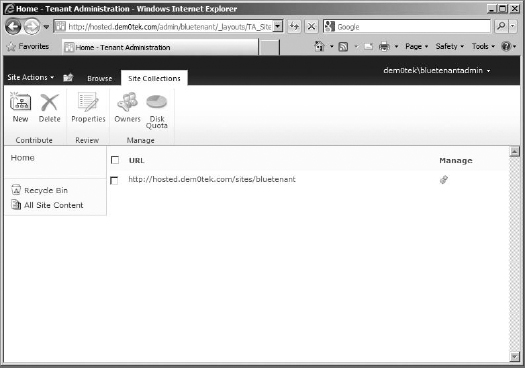
You may remember that there were two subscriptions created for this scenario, with additional site collections. To see the difference between the two subscriptions, browse to the other tenant's administration site (in my case that would be http://hosted.dem0tek.com/admin/b1uetenant).
If you click to Manage Site Collections, once you've logged into the site, you'll see that it contains a single site collection, the one meant to be in this subscription (Figure 16.42). This demonstrates that what happens in one subscription really does not affect the other.
FIGURE 16.42 The second tenant administration site
So far, we've proven that the subscription works, seen what the tenant administration pages look like, and added a new site collection. Now let's take a look at isolating users and then, finally, applying feature packs.
The two subscriptions have their own administrators, but when it comes to users, because you are using classic Windows authentication, they will use the same Active Directory users to populate their site collections.
ISOLATING THE TENANT ACCOUNTS
There are a number of ways to fix this, and one of the simplest is that you can create some OUs in Active Directory and then run a quick STSADM command to point the site collections to look only in their OU to find users. In this example, two OUs have been created in AD, one called Red Tenant and one called Blue Tenant. These OUs have one user apiece (red user and blue user, one for each tenant).
To get the site collections to look only for users in the correct OU, go back to the SharePoint management shell console, and use the following command. You can see Figure 16.43 for an example of the command completing successfully. The syntax for the OU is the common name (CN) path.
stsadm -o setsiteuseraccountdirectorypath -path “OU=Red
Tenant,DC=dem0tek,DC=1c1“ -url http://hosted.dem0tek.com/sites/redtenant
- To prove the command was successful, log into the site you just applied the STSADM setting to (for this example, the redtenant site collection), and open the site's permissions page.
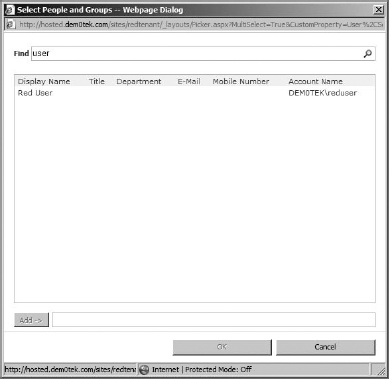
- Click the Grant Permission button, and in the Grant Permission box, click the People Picker button.
- In the People Picker box, try typing in a user that you know is in Active Directory but not in the OU you specified. It will fail. This shows that it will not let you search outside the OU for users, nor will it display anyone from outside the OU (unless they are already in the site permissions).
- If you try part of a name you know is in the OU, it will appear in the list (Figure 16.44). You can add the user to the site if you'd like. Feel free to also set up the user account directory path for the other tenant site as well, now that you know how.
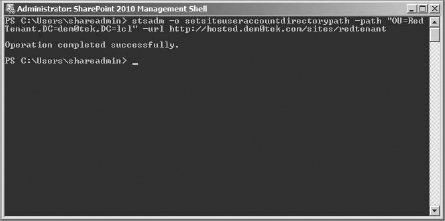
FIGURE 16.44 A user from the specified OU in the People Picker
Now that we've gotten the hang of creating site collections from the tenant administration site and have learned to isolate tenant site users from the rest of Active Directory so the tenants can only add users they are allowed to, we need to take a look at specifying what features the site collections can have. When a solution is deployed at the farm level, it often adds features scoped to the site collection or subsite level.
MANAGING FEATURES
You can control what features a tenant site may have, so if a tenant asks for a solution to be deployed, you can let that tenant have the features the solution offers but block it from being used by other tenants.
Doing this requires feature packs (as I mentioned earlier). These are combinations of features that make up the functionality of a site collection. What is not widely known is that most things available on a site created by a site template (such as the team site) are features. If you specify that a feature pack be applied to a site collection, then any feature that was part of the site collection but isn't listed in the feature pack is gone for that site collection, until you add it to the feature pack and apply it again. In other words, if you apply no feature pack, then the site collections in a subscription will get all the features available. If you want to use a feature pack to block some features, then you need to explicitly specify what features are allowed in order for the site collections to get any features.
There are a few useful PowerShell commands concerning features. First, to find out just what features are available to the site collections in this web application, you need to run this command:
Get-SPFeature
You can see in Figure 16.45 that there are a lot of features applied to a new site collection. Some of them are scoped to the web application or farm level. Those features cannot be managed with feature packs, only those applied to the site collection or subsite.
After scrolling through the list, to see all the features, you probably realize you want most of them. If you just create a new feature pack, it's empty. If you apply it to a site collection, it will empty the site collection of all features, such as collaborative lists, many web parts, search, and so on.
So, what you need to do is create a feature pack and then add back in all the features you might need, such as those that are scoped at the site collection and subsite (called Web in PowerShell) levels. Then you can take out the ones you want. There is also a command to add features one by one, in case there are features you want to add in the future.
Creating a New Feature Pack
To start, let's create a new feature pack with a variable that will hold its identity to use later:
$fp = new-SPsiteSubscriptionFeaturePack
FIGURE 16.45 Listing all features available for a site collection

Adding Features to the Feature Pack
Then let's fill the feature pack with all the features scoped for the subsite level first.
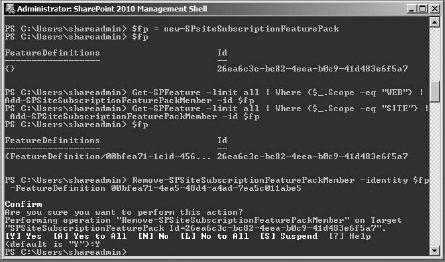
The command for this is a little complex. It gets the features list and filters it to just items scoped to “Web” and then adds those items (considered Site Subscription feature pack members) to the feature pack we created. The command is as follows:
Get-SPFeature -limit all | Where{ $_.Scope -eq “WEB” } | Add-SPSiteSubscriptionFe
aturePackMember -id $fp
Then enter this command to get all the features scoped at the site collection level (“Sites“) and add them to the feature pack:
Get-SPFeature -limit all | Where{ $_.Scope -eq “SITE“ } | Add-SPSiteSubscriptionF
eaturePackMember -id $fp
(Tip: To do this quickly, you can just hit the up arrow at the command prompt in the console and then change WEB to SITE and hit Enter.) That gives you a feature pack that contains, basically, all the features already available to the site collections.
To add a single feature to a feature pack, get the GU1D for the feature, and then type the following:
Add-SPSiteSubscriptionFeaturePackMember -identity $fp -FeatureDefinition
<feature id>
Removing Features from a Feature Pack
Now that you've added a lot of the features back to the pack, you might want to remove a few. To remove features, you first need to select them, and to do that, you need to know their GUIDs. Then, when you apply the feature pack, the site collections in the subscription will lose the removed features.
The features in question for my example are the team collaboration lists and the wiki home page feature. You can get their GUIDs in the feature list you retrieved earlier:
| TeamCollab | 00bfea71-4ea5-48d4-a4ad-7ea5c011abe5 |
| WikiPageHomePage | 00bfea71-d8fe-4fec-8dad-01c19a6e4053 |
So to remove the Team Collaboration feature for example, you can use the following command, pasting the GUID you marked from the get-feature list:
Remove-SPSiteSubscriptionFeaturePackMember -identity $fp -FeatureDefinition
00bfea71-4ea5-48d4-a4ad-7ea5c011abe5
The console will want confirmation before continuing, as shown in Figure 16.46. To continue, press Y and press Enter.
FIGURE 16.46 Last command confirming the removal of a feature from a feature pack
To remove the wiki page home page feature, just replace the GUID for the TeamCollab feature with the wiki page home page GUID, and run the command again (expect the confirmation prompt as well).
Once the two features are removed from the pack, you need to apply them to the site subscription of your choice so all new site collections will be missing the features.
Apply the Feature Pack to a Site Subscription
You may need to reset the $sub variable to match the correct site subscription. In this example, you are going to apply this feature pack to the red tenant's site subscription, so the command is this:
$sub = Get-SPSiteSubscription -Identity http://hosted.dem0tek.com/sites/redtenant
Then, once the variable, in this case, $sub, contains the correct subscription information, you can use it apply the feature pack to the site subscription with this command:
Set-SPSiteSubscriptionConfig -Identity $sub -FeaturePack $fp
That will apply the feature pack to the red tenant's site collection.
If you browse to the site collection and look at its site features, you'll see that the two features you removed are now missing (Figure 16.47).
FIGURE 16.47 Missing features for site collection with feature pack applied
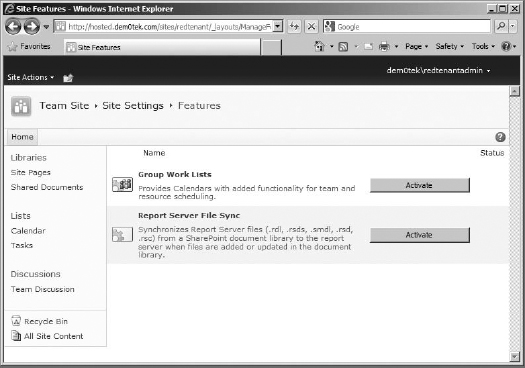
But if you were to browse to the other tenant's site collection, which has a different site subscription, you'd see that it has been unaffected (Figure 16.48).
FIGURE 16.48 No missing features for site collection using a different site subscription
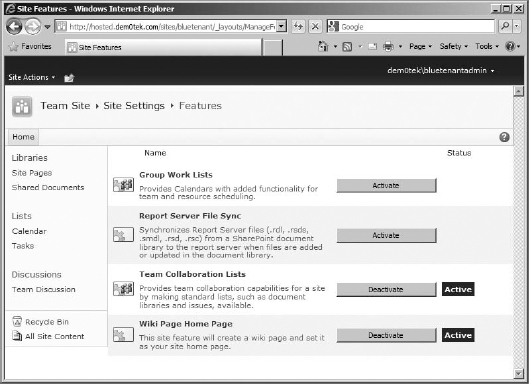
You should now have a solid understanding of multi-tenancy fundamentals. You configured the Subscription Settings service, its application pool and database, and the service proxy. You then created some site subscriptions and applied them to new site collections and administration sites for those tenants. User accounts were isolated by site collection, and features were managed per site subscription. There are a few more things that can be done with multi-tenancy, but this gives you a solid foundation to work with when considering SharePoint multi-tenant hosting.
Now that you've configured some new capabilities for this version of SharePoint Foundation, it's time to step back and cover some of the fundamentals concerning installing more SharePoint servers, load balancing them, applying SSL to their web applications, and more.
Advanced Installation
The advanced installation topics covered next include installing additional web front-end servers for the SharePoint farm, load-balancing them, and spreading some services between the two servers. Depending on your requirements, how you install SharePoint is integral to its function. A single mouse click or a single missed button will change a web front-end server's function, even the whole farm's function, if you are not careful.
An example of this is installing a second SharePoint server in a farm. That installation of the second web front-end server is a bit different from the installation for the first server in the farm, as is its configuration.
Installing an Additional SharePoint Server on a Server Farm
Because SharePoint was meant to be able to support tens of thousands of users, it can be deployed in a server farm fashion. Up to this point, we have been using a server farm/web front-end installation of SharePoint for the single SharePoint server to make use of SQL 2008 for the SharePoint databases (instead of using SQL Express databases locally). But the real point of having a SharePoint server farm is to have multiple, identical, front-end web servers offering the same content for uninterrupted user access and to spread out the services that might consume extra processor time, such as Search, among those servers.
To make this possible, you must install at least a second web front-end server (probably more). This server will simply access the same configuration and content databases as the first SharePoint server, with the intention of being used to continue to offer SharePoint to clients without a hitch or break in service, should the first server become busy or unresponsive. The additional server will literally be a mirror of the first SharePoint server and is not really intended to host web applications and sites independently.
SOMETIMES YOU FEEL LIKE MIRRORING, SOMETIMES YOU DON'T
If you want to manage your resources by splitting web applications between the first server and additional servers, then you may not want to add the extra servers to the existing server farm. Instead, if you want them to be accessible individually, install them each as independent server farms (or if it works for you, as standalone servers).
The problem then becomes trying to remember what site is on what server and teaching users which server to access for what resource.
When you offer load balancing by having all the servers mirror the first, all the web applications are identical among the servers. With load balancing, this allows the users to learn one server address to access their SharePoint resources. Then, if the first server becomes overloaded or nonresponsive, the users are transparently sent to one of the other servers that can host the same data.
Each option has its strengths and weaknesses, so choose carefully before you install SharePoint on any additional servers.
Installing SharePoint on a server intended to be part of a farm is easy. It's just like installing SharePoint on a server intended to be the first in a server farm, except that in the configuration wizard, you choose to connect to an existing configuration database rather than creating a new one. Once you choose to add the server to an existing farm, you will be prompted to enter a passphrase, ensuring that you are qualified to be adding servers to the farm (a new security feature for this version of SharePoint).
When you install SharePoint on the first server of the farm, you need to enable all the services on that server if you want to use them. However, when other SharePoint servers are added to the farm, some of those services can be assigned to the new servers instead, easing the strain on the resources of the first server.
When installing SharePoint on a server intended to be an addition to the SharePoint server farm, you need to be sure that the server meets the minimum hardware requirements or better and is running Windows 2008 SP2 (or higher). The Prerequisites tool will install the various bits required behind the scenes (for more about the prerequisites, see Chapter 2 or 3) for SharePoint to function. Be sure to have Internet access for the installer to acquire those prerequisites. SharePoint will require IIS 7.0 (or higher), and it is a good idea to also enable SMTP in IIS for incoming email (in case the service needs to be supported on the new server at any point), if it isn't already installed.
ADDING A SHAREPOINT SERVER TO AN EXISTING SERVER FARM
To have the installation go smoothly, you should be logged in with the farm's setup account, or at least an account that is a farm administrator, which has the right to install software and modify services on the local server and has dbcreator and securityadmin rights on the SQL server.
- When installing the SharePoint software itself, make certain you are logged in to the server locally (mine is SPF3) with the correct account. When you double-click the SharePointFoundation.exe installer, you will go through the wizard screens just as you would any other server farm install: install the software prerequisites (you may have to reboot), and then install the SMTP service (make sure it's on). Then, on the installer screen, select to Install SharePoint Foundation, accept the license terms, choose Server Farm, select Complete as the Server Type, and click Install Now. It is only when you get to the Configuration Wizard that you specify that this will be an additional server and not a new server farm installation.
INSTALLATION LOCATION MATTERS
Something to keep in mind about installing SharePoint on additional servers in a server farm is the need to install it on the same drive for each server. SharePoint has some file location information written to the configuration database that requires that the same SharePoint files be in the same location on each web front-end server.
- After you choose to Run Configuration Wizard, you'll need to click Next past the welcome screen and click Yes in the warning dialog box to reach the screen where you make the choice that decides whether the server will be part of an existing farm or beginning a new farm.
- On that Connect To A Server Farm screen (Figure 16.49), you have two choices: to make this installation part of an existing server farm or to create a new farm. To make this installation part of an existing server farm, make certain Connect To An Existing Server Farm is chosen. It is the default, conveniently enough. To continue the installation, click Next.
- On the Specify Configuration Database Settings screen, enter the SQL server name (my example is RR1). To confirm that the server can be found from here, click Retrieve Database Names. This will also, once the database server is found, populate the Database Name field with the most likely configuration databases that are available on that server (if there is more than one, they'll all be listed). In my case, it was correct, choosing SharePoint_Config from the databases on my SQL 2008 server (Figure 16.50). Click Next to continue the installation. You might notice that there is no field to specify the farm account to access the configuration database. That because it assumes you'll be using the existing account already set up for the farm.
FIGURE 16.49 Connect To A Server Farm screen
FIGURE 16.50 Specify Configuration Database Settings screen
The Specify Farm Security Settings screen will appear (Figure 16.51). This is new to this version of SharePoint and is used to confirm that you are qualified to add servers to the farm by offering the correct passphrase. This passphrase was created when the first server in the farm was installed.
- In my case, that passphrase was MasteringSPF2010. Enter your passphrase, and click Next.
FIGURE 16.51 The passphrase screen
FORGET YOUR PASSPHRASE?
It can happen. And if it does, you can reset your passphrase by using PowerShell. Although there doesn't seem to be any way to retrieve an existing one, it is easy to change your farm passphrase in PowerShell.
The command is Set-SPPassphrase. The command needs to be run in the SharePoint management shell console on a SharePoint server already in the farm. When you use Set-SPPassphrase at the prompt in the SharePoint management shell console (with a farm administrator's account with the permissions to perform shell admin commands), it will prompt you to enter a new farm passphrase, prompt you to retype again, and then ask you for confirmation.
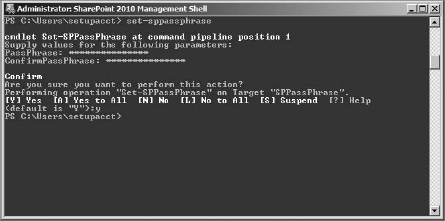
Once you've confirmed that you want to change the passphrase, there is no indication that it worked, but it did. Keep in mind that the new passphrase may not propagate to all servers on the farm immediately, so you can set it manually on each one (just in case) using the -local serveronly parameter. For more information about PowerShell, see Chapter 14.
- A Completing SharePoint Products and Technologies Configuration Wizard Summary screen will be next. Make certain that the database server and database name are correct (Figure 16.52).
FIGURE 16.52 Completing Configuration Wizard Summary screen
The Advanced Settings button on this screen allows you to configure whether this server will be used to also host the Central Administration website.
The option to not use this machine to host the Central Administration website is selected by default (Figure 16.53). This means that the Central Administration web application will not be created in IIS on this server. If load-balancing Central Administration was required for the server farm, then using the server to host the website on this machine would be necessary. Often the site is isolated to one server for security's sake.
Although SharePoint is being installed on a second server to mirror the content of the SharePoint sites on the original server, we are not going to load-balance the Central Administration site at this time, so you don't need this server to host the site (we'll do it later).
- After you make your choice, you can either click OK to save the change, or click Cancel if you made no change, to just go back to the summary screen. Once on the summary screen, click Next to continue the installation.
At that point, the Configuration Wizard will connect to the configuration database and do the necessary things to get SharePoint up and running.
- Once the Configuration Wizard is done, you should get a Configuration Successful screen. Click Finish to open the default browser on the server (ideally Internet Explorer) to go to the Central Administration site.
FIGURE 16.53 Advanced Settings, host Central Administration screen
Strangely, you will be taken to a Configure Your SharePoint Farm page on the Central Administration site, despite that the farm has long since been configured (Figure 16.54). If the account you're using to install SharePoint isn't a farm administrator, you will need to log in as one to proceed.
FIGURE 16.54 Initial Farm Configuration Wizard page
- You could simply hit Cancel, but I suggest you click the Start The Wizard button, because it does some processing and then takes you to a This Completes The Farm Configuration Wizard page (Figure 16.55).
FIGURE 16.55 This Completes The Farm Configuration Wizard page
- Clicking Finish should take you out to the Central Administration home page. Notice that the address bar indicates it is actually accessing Central Administration on the original SharePoint server (in my case, http://spf2:9876).
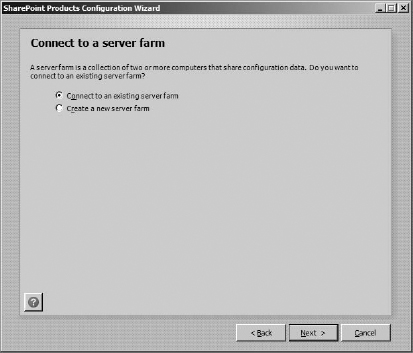
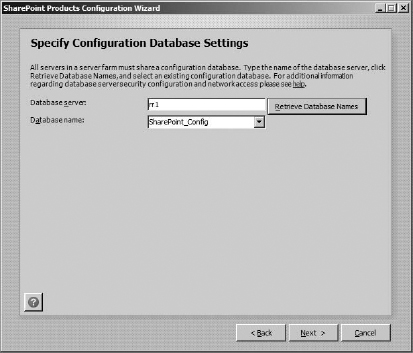
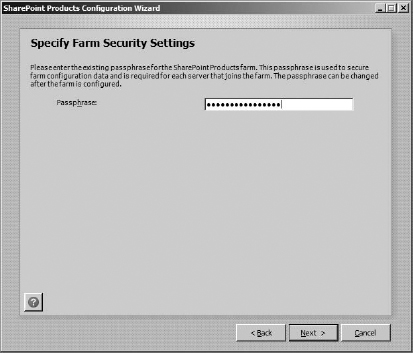
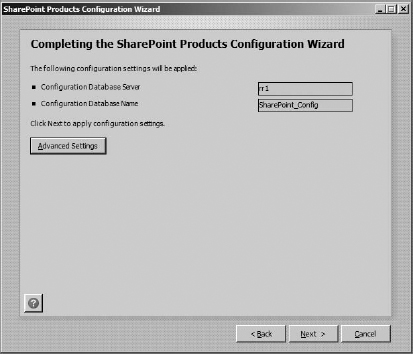
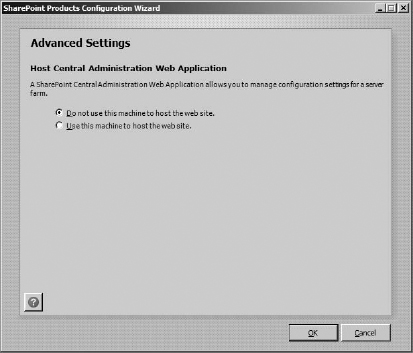

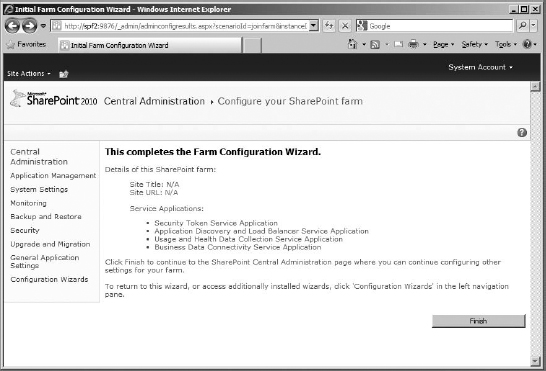
CONFIRMING THE NEW SERVER IN CENTRAL ADMINISTRATION
On the Central Administration home page, let's see whether the new server is displayed as part of the topology of the farm.
- To do that, click Manage Servers In This Farm, under System Settings. That will take you to a Servers In Farm page. In Figure 16.56, notice that I've logged in using my SharePoint admin account to avoid working with the setup account.
In the Servers In Farm page, notice that the Incoming E-mail, Business Data Connectivity, Workflow Timer, and Web Application services are running on the new server. That means this server, when used with network load balancing, will be able to support all the web application services that the first server does, as well as accept email if necessary. (You may have notice that the outgoing email server is indicated as not configured. This is a bug; it's configured.)
FIGURE 16.56 The new server listed in the farm
SOME SERVICES WERE MEANT FOR FAILOVER
Incoming email wasn't necessarily intended to be load-balanced, but if the first server's incoming email goes down, the service can be stopped there and shifted to the second server. It's more of a failover feature than a load-balancing one. In this case, Central Administration is really just reporting that SMTP is running on the second server, not that incoming email is configured there.
The additional server was meant either to host services that may need to be shared with or removed from the first server, to work with that first server in a load-balanced environment, or possibly do a bit of both. It does have the same web applications in IIS locally that the first server has, but they were meant to be used to keep service to the SharePoint clients seamlessly effective, offering its web application pages when the first server's load might slow it down.
- To see what services are available to be configured on a server, you need to go that server's Services On Server page. The easiest way to do that is to click the server's name (mine is SPF3) on the Servers In Farm page (since we're here).
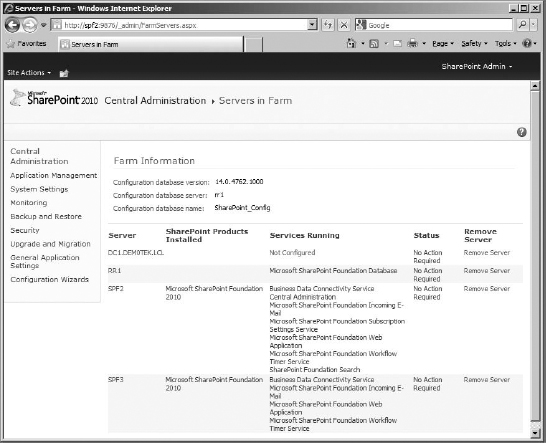
That will open the Services On Server page for that server (Figure 16.57).
FIGURE 16.57 Services On Server page
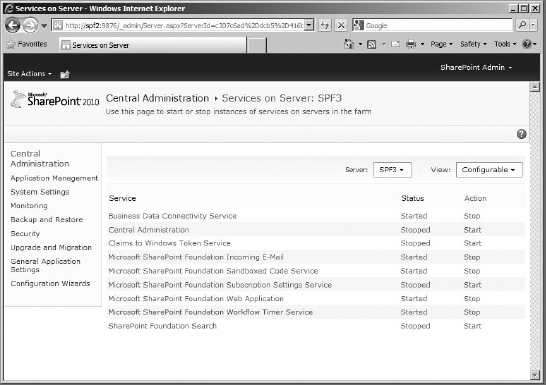
On the Services On Server page is a Server field in which you can choose the server you want to manage (if the one displayed isn't the one you want). There is also a View menu so you can see only the configurable services for a server (the default view) or all services (even the ones you can do nothing about). Beneath that are the services displayed in the chosen view for that particular server, with columns for the current status of the service on the server, and a Status column, containing the actions available concerning the service. Services that are not configured or running on the server are considered Stopped; those that are configured or running locally are considered Started.
In my example, there are only two truly configurable services for the new server (SPF3) on this page:
Microsoft SharePoint Foundation Workflow Timer Service This service processes workflow events for the server each time interval. The default is 100 per batch but can go as high as 50,000, or if you want the server not to process workflows, you can set it to 0. This service is started and running automatically on the server. You can specify, in the content database settings for a web application, which server you'd like to handle timer jobs, particularly workflow timer jobs, for that content database. This helps you keep one server from being overloaded with jobs during the course of the day.
SharePoint Foundation Search Search can be assigned to more than one server in the farm. This service is not enabled on this server. When enabled, it runs the search and index services in order for data to be indexed from the content databases and accessed via search query. Currently this service is being hosted by the first server in the farm.
Other services can be started or stopped on the Services On Server page but are configured elsewhere:
Business Data Connectivity Service This service is configured elsewhere on the site. It allows SharePoint to access external data and use that data in external lists and lookup fields at the site level. It is automatically started on new web front-end servers on the farm, so there will be no loss of service for users in a load-balanced environment.
Claims to Windows Token Service This service is managed by one server in the farm and is the service that supports claims-based authentication and token service for the SharePoint farm.
Central Administration This service both adds the Central Administration web application to the server and manages it.
Microsoft SharePoint Foundation Incoming E-mail This service is available on this server because the SMTP service is locally enabled in IIS. However, in the Incoming E-mail settings, this server is not indicated as the incoming email server for the farm. It can be, should something occur to the first server. This is primarily for failover events.
Microsoft SharePoint Foundation Web Application This service will be running by default on any web front-end server. It is what adds the SharePoint web applications to this server in IIS and keeps this server's IIS synchronized with changes that might occur on the server farm.
Microsoft SharePoint Foundation Subscription Settings Service This service supports multi-tenancy and subscription IDs. Multi-tenancy is discussed earlier in the chapter. This service is not enabled by default. In a load-balanced situation, this service should run on all servers. This is not enabled by default on additional servers on the farm if the first one has it running. It needs to be enabled manually per server.
Microsoft SharePoint Foundation Sandboxed Code Service This service supports isolating solutions to a single site collection, limiting the resources the solutions can use and the damage they can do to the rest of the farm. On standalone servers, this service is started by default, but for Complete installations, this service needs to be enabled manually. If the additional servers will be load-balanced, you should enable the service on those servers as well (it should be enabled by default if the other servers have it running). If you don't have this service enabled and you add a sandboxed solution to a site collection Solutions gallery, you will be unable to activate it. A good rule of thumb is that if the Activate button is grayed out for a solution in the Solutions gallery, something is wrong with this service.
A FRONTLESS FRONT-END SERVER
Theoretically, if you want this server to host only services such as search or incoming email, you can disable the web application service to conserve server resources. The server will then be on the farm to run those services and nothing else.
Right now, this server is not supporting the Central Administration service. This means it isn't hosting Central Administration locally but using the site on the first server. But what if, in case something happens to the first server, you want to add that service to this server as well? Adding (or provisioning) the Central Administration service to a server is one of those configuration settings you can do at any time. As a matter of fact, you can start or stop this service whenever you need to do so.
First, to confirm that the Central Administration web application is, in fact, not supported on this server, let's check the IIS management console.
CONFIRMING SHAREPOINT WEB SITES IN IIS
To check what SharePoint did or did not add to IIS for the additional server, open the IIS management console (Start ![]() Administrative Tools
Administrative Tools ![]() Internet Information Services (IIS) Manager). In the console, open the Web Sites node to view the IIS Web Sites available (Figure 16.58). You'll see that the default IIS Web Site is stopped and that there is only SharePoint-80.
Internet Information Services (IIS) Manager). In the console, open the Web Sites node to view the IIS Web Sites available (Figure 16.58). You'll see that the default IIS Web Site is stopped and that there is only SharePoint-80.
FIGURE 16.58 IIS Web Sites on the additional SharePoint server
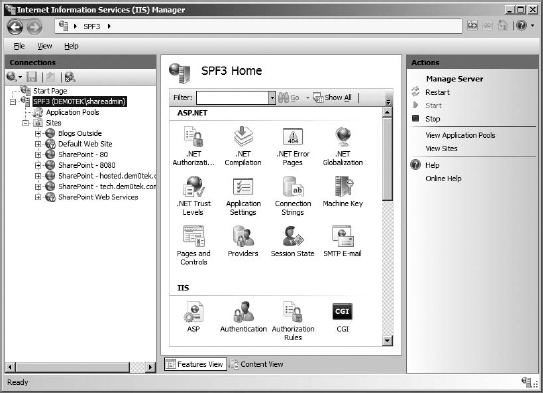
This confirms that Central Administration is not being supported on this server.
ENABLING SERVICES ON THE NEW SERVER
To enable most services on this server, you simply click their associated Start link in the Action column. They'll use the service account already applied to them for the farm. A good example of this is enabling Central Administration. It makes some big changes on the server, but it takes only a single click.
On the other hand, starting the Search service requires that specific settings be enabled. So, just clicking Start won't work in that case. It requires that you confirm service accounts, a search database, and so on.
To give you an idea, let's run through enabling both services.
CENTRAL ADMINISTRATION
In this example, Central Administration is not listed on the second server because we chose not to support it during the installation (it is running on the other server, however). Central Administration is not a service that must be run on only one server on the farm; it is up to you how many servers on your farm end up running Central Administration. It is suggested that it be enabled on at least two servers on the farm or more, for redundancy's sake. However, this point can be hotly contested by those who think Central Administration should be secured on one server only. But it's always good to know how to enable it on more than one server, even if you don't end up implementing it.
To enable the Central Administration service on the additional server, simply return to the Services On Server page for that server in your browser, find Central Administration in the services list for the additional server, and click its Start link in the Action column.
The status of the service will initially change to Starting while the web application is added to IIS and then change to Started (Figure 16.59). Also notice that, once the service is started on this server, the indicator that the service is available on a different server disappears. This does not mean the service was disabled; apparently it just isn't necessary to mention it, now that the service is running locally.
FIGURE 16.59 Central Administration started on new server in server farm
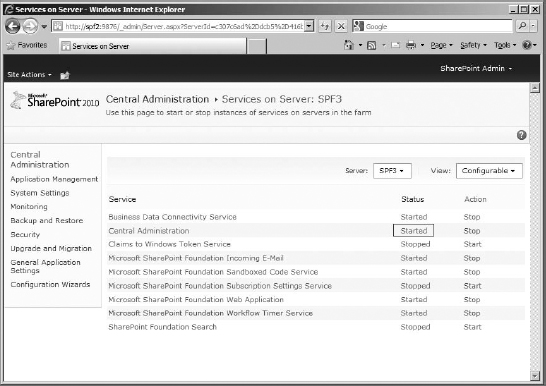
And if you go to the IIS management console on the new server (Figure 16.60), it will now contain the Central Administration Web Site (no need for an iisreset).
FIGURE 16.60 Central Administration Web Site on new server in server farm
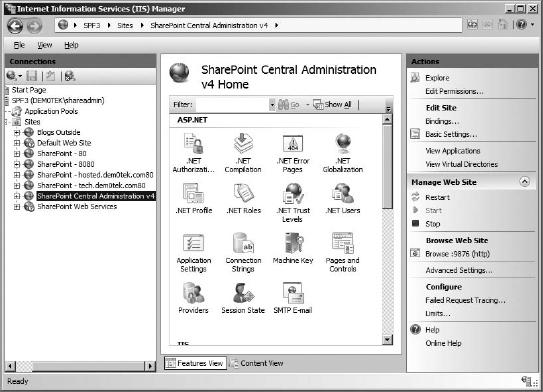
Now the new server is also hosting Central Administration. If necessary, the Central Administration site can be assigned a load-balanced URL and accessed even when the first server is unresponsive. This is an example of enabling a service on an additional server.
SEARCH
There are many reasons why a SharePoint server might be slow in its response to clients, not the least of which is while SharePoint is indexing the content databases for the Search service.
Search can be resource intensive, both when running search queries and when indexing new data. And because of that, you might want to offload all the search services to one server and free up others to support user requests. Or you can split the search queries so more than one server can be running Search and then specify what web applications (or more specifically, their content databases) will utilize which search server. This gives you more control over which server will handle the search load of particular web application.
If you are considering enabling Search for a second server, you should use the same farm search accounts that the first server uses for the Search service and the indexing service (also called crawler, gatherer, or content access account). First you enable the service on the new server, and then you set the web application content databases to use the new server for searches.
- To start the service on the second server, click Start for the SharePoint Foundation Search service on the Services on Server page (make sure you are looking at the services for the new server).
- On the search configuration page, the search account (which has to be managed) will already be listed. The content access account will have the account listed, but you will need to enter the password, because this account isn't managed for some reason (Figure 16.61). Then specify the search database account for that server (the default is WSS_Search_Servername; in my case that would be WSS_Search_SPF3). Finally, specify the index schedule for the index account to use for indexing.
FIGURE 16.61 Configuring the Search service to run on the second SharePoint server
- Once you click OK, the service will begin. You can then go to the content databases of the web applications that will use the new server to do their searching and select that server in the Search Server drop-down (Figure 16.62). The new server will also be available to be selected as the search server for any additional web applications made.
FIGURE 16.62 The new server is available as a search server for the content database.

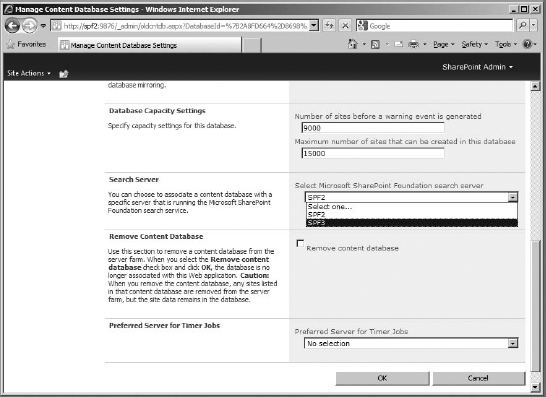
To modify a search's settings or index schedule, click the name of the service only to access the fields and make changes. Do not click Start and change settings there, because that can stop and restart the service. Search cannot reuse its database, so if you restart the service, you have to specify a new database for Search to use. So, don't play with the Start or Stop link for the Search service unless you need to do so.
INDEX JUGGLING
There is a catch to adding Search to another server. The second server you start the Search service on will automatically become the index server. This is often a good thing, because newer servers are often more powerful than old servers. But if this is not good, you can juggle the service:
- Start Search on the new server.
- Run an IISRESET, and stop the Search service on the original server.
- Do another IISRESET, this time start the Search service again on the original server. You will need to specify a new database name for the service, search cannot reuse databases.
- Do an IISRESET (preferably on both servers). So the original server gets the index service again.
You don't absolutely have to do an IISRESET on each pass, but it quickly tells SharePoint that changes have been made.
CONFIRMING ALTERNATE ACCESS MAPPING
A second server has been added to the farm. The Search service for the server farm has been added to the new server. You've seen that the new server mirrors the web applications of the original server, and you've learned how easy it is to make a SharePoint server host the Central Administration site.
But what you may not realize is that aside from supporting the Search service or a spare copy of the Central Administration site, this server is not very useful until Network Load Balancing of some sort is enabled on the web front-end servers of the farm. That's because the web applications hosted on the new server are not actually accessible on that server unless you explicitly configure the server's address in Alternate Access Mapping (AAM). Of course, you would think that if the SharePoint-80 Web Site is hosted on this server, you should be able to open a browser and access it on this server's address. But that is not the case. The new server's websites are not meant to be accessed directly but only as load-balanced content.
In SharePoint, Alternate Access Mapping controls what URLs are accepted by web applications. Up to this point, our internal URL for the main SharePoint-80 web application has been the first server's address. In this example, that is http://spf2. This address is the correct address for that site, if it were on only one server. But now it is echoed identically on a second server as well. It's the same web application, in two places. This is essentially step 1 of load balancing, to have two web servers with identical content. Step 2 is to have a shared URL that both servers recognize and accept to access that identical data. When you create a new web application, you can specify its load-balanced URL (the field is called Public URL). By default, SharePoint fills in that field for you with the URL you configured for that web application (including port, host header, whatever). But you can, and should, change it to the real shared address that you specify when implementing network load balancing. However, in this case, with SharePoint-80, the server's URL was left as the default (the original server's address) for the load-balanced, public URL because load balancing hasn't been enabled and it was the only server on the network.
This is why, in AAM, the internal URL for the SharePoint-80 web application is still http://spf2. It is assumed by SharePoint to be the load-balanced URL, even though it's not and points only to one server.
You can see this by going to the Alternate Access Mappings page. It is important enough to be listed in several places in Central Administration. The easiest is to click the Configure Alternate Access Mappings link on the Central Administration home page.
On the Alternate Access Mappings page, you can see the internal URL for the SharePoint-80 web application and Central Administration (Figure 16.63) as well as all of the other web applications created throughout this book.
Most of these addresses are the default zones for the farm's web applications, and under normal circumstances the default zone for a web application is also its load-balanced URL (although the newly enabled Central Administration site does show up for SPF3, because we specifically started that service for the server). And since there is already a load-balanced URL for these web applications (it is listed as the public URL when creating a web application, but it is the load-balanced address as well), SharePoint didn't need to enter the new server's address into AAM for any of them. That server should be responding to the public/ load-balanced URL anyway.
FIGURE 16.63 URLs listed in the Alternate Access Mappings page.
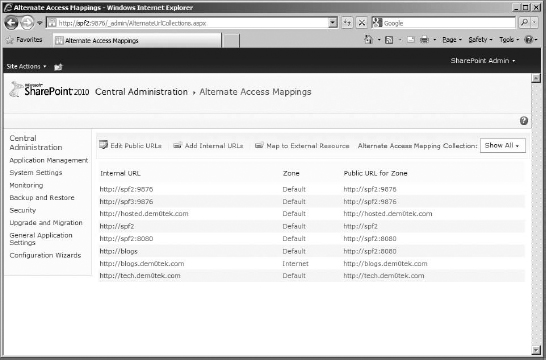
Nowhere in Alternate Access Mapping is a listing for the new server (Figure 16.64), except for Central Administration. And that makes sense now that you know the default addresses for the server farm's Internal URLs are supposed to be shared, load-balanced URLs. And when load balancing is enabled and the correct load-balancing URL is used, that default zone URL will work for both servers. If you try to access the SharePoint web applications (except Central Administration, of course) on the new server directly by using its address in the address bar of the browser (my example is http://spf3), SharePoint will try to accommodate your address request. But if you try to do a search, which you should be able to do, it will fail because there is no alternate address mapping for that server (Figure 16.64). This means it's not really resolving the new server's address correctly.
FIGURE 16.64 The address cannot be found.

To really demonstrate how both servers using the same load-balanced URL works, I need to enble network load balancing. There are numerous network load-balancing products, both hardware and software, on the market today. However, for our purposes, the network load balancing functionality built into Windows Server 2008 R2 will do just fine.
Network Load Balancing the Server Farm
Now that we have two servers in the SharePoint server farm, it's time to see what SharePoint does when network load balanced. To install SharePoint, the operating system must be Windows Server 2008 Service Pack 2 or higher. That server has the Windows Network Load Balancing (NLB) technology built in. In this section, I'll demonstrate how to enable load balancing using Windows Network Load Balancing in order to show how it applies to SharePoint. However, once you have the concept down, it is applicable to any load-balancing product your organization may use instead. NLB is not the most complex or feature rich load balancer out there, so you may want to shop around to find the most appropriate product for your needs.
The point of network load balancing is to balance the network load between web front-end servers (considered, together, a cluster) by distributing network traffic among the servers to increase availability, scalability, and performance. The servers are set up to all respond to a shared virtual IP address and full Internet name. Among the servers, each has a unique identifier called a priority number, but they also keep their dedicated addresses to respond to any packets directly addressed to them as well as address any outbound connections. In addition, the full Internet name that will be shared among the load-balanced servers must be configured in DNS to resolve to the virtual IP.
RESOLVE IN DNS?
The full Internet name requires a host name, such as SharePoint, to resolve to the virtual IP you are going to use for the NLB cluster. To do that, you can create an A record in DNS that uses the host name and resolves to the virtual IP address.
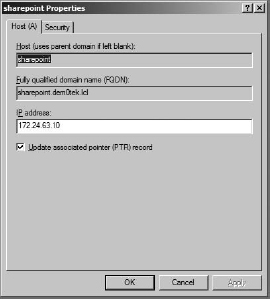
The servers in the cluster, when network load balancing, share a virtual IP (VIP) and a virtual Media Access Control (MAC) address. Essentially it looks like they all have the same network card and IP address to the clients outside the cluster. Because of this, the NLB settings among the servers in the cluster must be identical. NLB will work for servers with a single network card (the servers in this example are single-card machines). However, each server should be multihomed (have multiple network cards), with one dedicated to, and configured for, NLB.
If the servers are multihomed, with a dedicated NLB network card, they should run in Unicast mode. The shortcoming of Unicast mode is that a network card configured to use it cannot communicate directly with other hosts in the cluster, because Unicast basically means that card will be dedicated to solely support incoming NLB traffic and not be able to speak to the other members of the cluster (because as far as Unicast is concerned, they are all the same computer). This is not a problem if the servers have other network cards installed; the other network cards can be used to communicate within the cluster. However, if the servers have only one network card each (or at least one server in the cluster has only one card, because all of their clustering parameters must match), they should use Multicast mode, because that mode allows the servers within the cluster to communicate with one another directly. The shortcoming of Multicast mode is that it can cause some switch flooding issues under certain circumstances (see Windows Server's Network Load Balancing help for more information).
TESTING, TESTING…IS THIS THING ON?
Single network card hosts for NLB cluster hosts are fine for testing and demonstration. To prove it works and get practice before installing a second network card to be used in production, it is often a good idea to use multicast mode on the single network card the servers have. Then, if it works, invest in the time, effort, and money to add additional network cards to the load-balanced servers to dedicate to NLB.
Generally NLB is a Network Connection property (that is, a feature added to the function of a network card). And the network card's TCP/IP properties do need to be configured in that connection's properties, but NLB will do it for you while adding the host (server) to the cluster. Although the settings for enabling NLB are available in the properties of the network connection, it is strongly recommended you use only the NLB console to create and manage NLB clusters.
The servers that will be in the cluster must be on the same subnet. Also keep in mind that Windows NLB can support only up to 32 different hosts. If you need to load balance more, then it is time to look elsewhere for a more sophisticated load-balancing product.
When configuring NLB, keep in mind that there will be cluster parameters, host parameters, and port rules:
- Cluster parameters are the shared virtual IP, its subnet mask, cluster mode (Unicast or Multicast), and whether remote access (to manage the cluster from a machine outside of the cluster—not a good idea security-wise) will be enabled.
- Host parameters are the dedicated IP address and subnet mask of the host, as well as the initial state the server will be in when it reenters the cluster.
- Port rules, which can be configured per host or per cluster, are similar to the rules or policies used to filter packets on a router, Internet authentication service, or firewall. The port rules are used to set the cluster IP addresses (if there is more than one), the port range and protocols that the cluster will listen for and respond to, as well as the filter mode. Filter mode indicates whether the cluster contains a single server or multiple servers. Port rules also include Affinity and Load Weight. Affinity means allowing a connection to be “sticky“ or continue to try to keep a connection with the server that answered their request throughout a session. It can be set to None, Single, or Class C. Setting Affinity to None means the client can be shifted from one server to another during a session to load balance, setting it to Single (the default when UDP protocol is being supported) means that Affinity will stick a connection to the single server that responded for the entire session, and setting it to Class C means it will try to keep a client session, from within a specific class C subnet, stuck to the correct server (useful if the client accesses the server through proxy servers). Load Weight can also be set as a port rule, which specifies the relative load weight this host would hold in a cluster. A Load Weight setting of zero means the server will handle no client traffic.
CONFIGURING NETWORK LOAD BALANCING
Network Load Balancing should be configured almost exactly the same way on every server intended to be in the NLB cluster. Each server needs to enable and configure Network Load Balancing. You may want to be sure that, after a server is added to an NLB cluster, it doesn't register its connection with DNS, because two or more servers will be registering the same IP address in DNS to their name. Sharing is bad in DNS. When a host is added to an NLB cluster, then that shared virtual IP will be added to the network card's IP addresses.
Network Load Balancing is a feature of Server 2008 and 2008 R2 and needs to be added and configured on all servers that will be load-balancing content through the operating system. Take the following steps to add Network Load Balancing to a server (if necessary):
- Make sure you are logged into the SharePoint server as a domain admin or a local administrator for all servers in the cluster.
- Go to the Server Manager console, click Features in the navigation pane on the left, and select Add A Feature in the content area.
- In the Add Features Wizard, select Network Load Balancing, and click Next.
- When asked to confirm that you want to add the feature, click Install to add the feature. It may take a moment. Once the feature is installed, it will add a Network Load Balancing Manager to the Administrative Tools on the Start menu.
Once the feature is added, you can immediately start creating the cluster. If there are any changes to be made to the other servers, such as binding new IP addresses to their network cards, it will be done by the NLB Manager—which is why you need to be logged in as someone who is allowed to change network card settings on the other servers (such as a domain admin).
Be sure to install the Network Load Balancing feature on the other servers. Once you've done that, you're ready to create the cluster in Network Load Balancing Manager. To open it, go to Start ![]() Administrative Tools
Administrative Tools ![]() Network Load Balancing Manager. When the NLB Manager console opens, in the tree pane on the left you'll see an Network Load Balancing Clusters icon. On the right is the details pane, and across the bottom is a pane containing log information concerning NLB activities.
Network Load Balancing Manager. When the NLB Manager console opens, in the tree pane on the left you'll see an Network Load Balancing Clusters icon. On the right is the details pane, and across the bottom is a pane containing log information concerning NLB activities.
- To create the NLB cluster, right-click the Network Load Balancing Clusters icon in the tree pane. In the pop-up menu, select New Cluster (Figure 16.65). This will walk you through the three steps of preparing a new cluster: Cluster Parameters, Host Parameters, and Port Rules.
FIGURE 16.65 Creating a new cluster in the NLB Manager console
- On the Connect screen of this process, enter the IP address or server name (in my example it's spf2) of one of the servers that will be added to this cluster, and click the Connect button. This will display the server's network connections and their IP addresses. If the server had more than one network card installed, you could choose the one you wanted to apply Network Load Balancing to. However, as you can see in Figure 16.66, this server has only a single network card. Select its dedicated IP, and click Next.
FIGURE 16.66 Connecting the host to the cluster
- The next screen contains the Host Parameters for the host chosen in the previous screen. Each host must have a unique identifier. Keep the default of 1 in this case (Figure 16.67).
FIGURE 16.67 The Host Parameters settings
- Confirm that the server's dedicated IP address and subnet mask are correct. The server's original IP should be the only IP address listed. A dedicated IP address is the address used by the server for non clustered traffic. This should be, in our case, the original server IP address. Initial host state refers to the default state that the host should start in when being added to the cluster in the future. Leave Started as the default. Click Next.
- In the Cluster IP Address page, click the Add button, and enter the Virtual IP that you are going to use for the cluster (it's possible to have more than one, but we're keeping this example simple). My IP is going to be 172.24.63.10. Be sure your IP address and subnet mask are correct (Figure 16.68). Click Next.
FIGURE 16.68 Entering the cluster IP address
- In the Cluster Parameters screen, you need to specify (if it's not already selected) the Network Load Balancing Virtual IP, its subnet mask, and the full Internet name for the virtual IP. This name will be used as the basis for the load-balanced (Public) URL for web applications in SharePoint and must be compatible with, and configured in, your organization's DNS structure. So, be sure to add an A record for the load-balanced URL to the correct zone in DNS for your network. In my case, I have an A record in DNS for sharePoint.demOtek .ici on 172.24.63.10. So, the full Internet name for my example is sharePoint.demOtek.lcl. Notice in Figure 16.69 that below this section is the automatically generated virtual MAC address. (Tip: If you have other sites, particularly host-headered ones, that you want to load-balance, have their cname aliases in DNS point to the load-balanced A record.)
FIGURE 16.69 The Cluster Parameter settings
- In the Cluster Operating mode section, select Multicast. Do not keep the default of Unicast, unless you want the SharePoint servers with only one network card to be unable to communicate directly with each other for this cluster. Click Next if all information is correct.
This will bring you to the Port Rules screen. Notice that at the top is the Port Rules list for this cluster (each host should have identical port rules settings). The settings for port rules are similar to the rules or policies used to filter packets on a router, Internet authentication service, or firewall.
To add or edit a port rule, click the Add or Edit button below the Port Rules list. The Add/ Edit Port Rules dialog box contains settings for the Cluster IP address (or all if there are more than one Virtual IP for the network card), port range, protocols, and filtering mode. The default Port Rule settings, shown in Figure 16.70, will load-balance all virtual IPs for the server (which in our case is only one) and all ports from 0 to 65535 as well as both UDP and TCP protocols. The default of multiple host filtering mode means there will be more than one server in this cluster, and supporting UDP means that Affinity is set to Single by default.
FIGURE 16.70 The default NLB Port Rules settings
- There are no settings that require editing in the Port Rules settings at this time, so click Finish to create the new cluster.
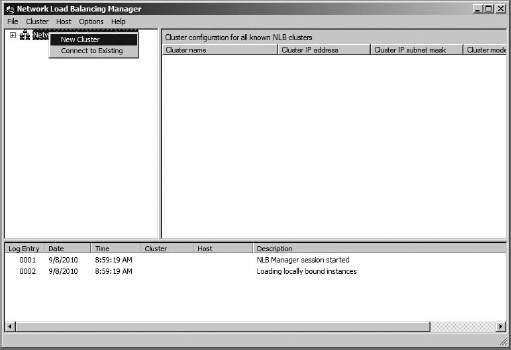
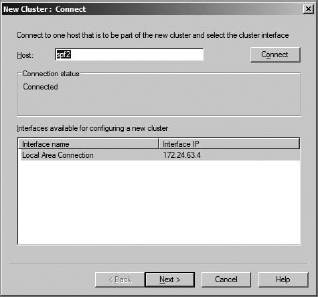
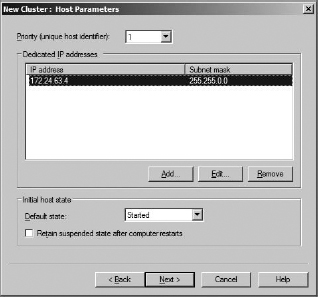
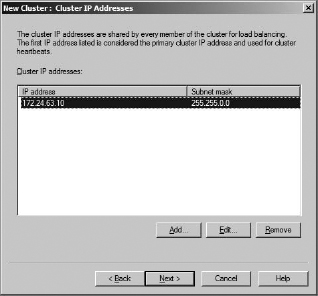
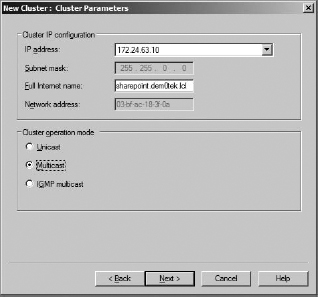
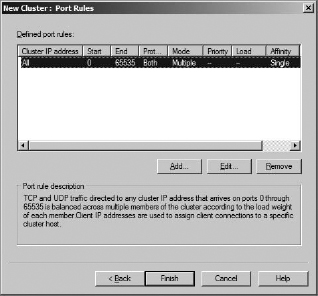
This will create the parameters of the first cluster and add the first host. The other hosts will need to be added manually. Each time you open the console to manage the cluster, it will recognize the host it is running on, and the other host will need to be added.
HOST LIST CONVENIENCE
If you expect to use the console frequently, you can create a host list to populate the console easily the next time. Once the hosts are displayed in the console, click File in the menu bar, and select Save Host List. At that point, you simply save the file to a convenient location to be opened using the File menu the next time you need to manage that cluster. If you save the host list to a file share, it can be used if you open the console on a different server in the cluster.
In the NLB Manager console, there will now be a cluster identified by the full Internet name entered during the creation process. The details pane will contain general information about the cluster, the hosts in the cluster, or a particular host, depending on what is selected in the tree pane. The tree pane should now also display the host you added, but it is obvious that the next host needs to be included to make load balancing work. The log pane at the bottom of the window will display the outcome of creating the new cluster. You can double-click the Update Succeeded log entry for more details.
To add the second server (and any others) to the cluster, right-click the cluster icon, and select Add Host To Cluster from the menu (Figure 16.71).
FIGURE 16.71 Add Host To Cluster in NLB Manager console
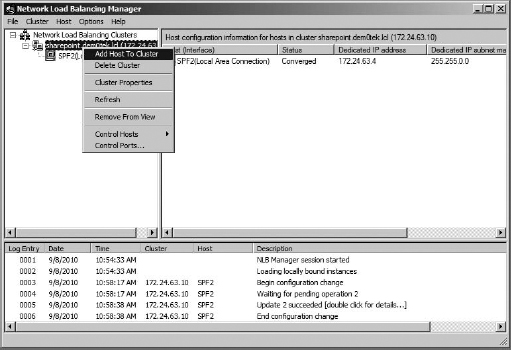
This will open a Connect dialog box. Enter the server name or IP address, click the Connect button, select the network connection that will be using NLB, and click Next. On the next screen, which contains the Host Parameters for the new host, the priority number (unique identifier) should be 2 or at least any number but 1. Confirm the dedicated host IP address and subnet mask, and leave the initial state for this host at the default Started state. Click Finish to add the host to the cluster (the virtual IP and other parameters for the cluster were already established, so no need to enter them again).
In the console, there will now be two hosts listed, although the second host may take a few moments to update. In the log area at the bottom of the console, the status of the host being added to the console will be reported as successful. You can also right-click a host and select Host Status for more information. Hosts added to the cluster are considered converged.
Check the Event logs for both servers to ensure that there are no WLBS (Windows Load Balancing Service) errors. Make certain there are no typing errors, skipped steps, or possible DNS registration issues before continuing.
NETWORK LOAD BALANCING MANAGEMENT
Once Network Load Balancing is enabled on both servers, it is time to manage the cluster. The Network Load Balancing Manager console is where clusters are stopped, started, and administered. And in this particular example, we are going to use the Network Load Balancing Manager to make sure that NLB is running on the server cluster and what servers are reporting that they are in the cluster.
It is also here that you can test if clustering is working per host. To see whether load-balancing failover is functioning, you can simply turn off one of the servers and see whether the cluster IP still services clients by using the other server. However, that is a little extreme (and it can be time-consuming to wait for the server to shut down gracefully and then boot back up). Instead, you can check to see whether NLB is working by using the NLB Manager and see whether there is an interruption of service. In this case, we will ping the full Internet name for the cluster. If service is interrupted, then you know that NLB is not working.
During this time, the cluster has been displayed (if all is working correctly) with the server icons outlined in green. This means they are functioning properly as members of the NLB cluster (Figure 16.72 shows the effect in black and white). If the icons are not both green, check the log entries at the bottom of the console for an idea as to what is malfunctioning.
FIGURE 16.72 Servers connected to the cluster as displayed in NLB Manager

If the cluster icon is selected, you can see the host information in the details pane, which shows the status of the two servers. They both indicate that they have been converged, meaning they have been added to the cluster. Convergence occurs when a member is added or returned to a cluster. All members must be informed that there is a new member so they can figure out each other's relative weight in the port rules and compare priority numbers.
Knowing that network load balancing is working by viewing it in the NLB manager console is one thing. But let's test it. For SharePoint to make use of network load balancing from a web server point of view, the full Internet name for the cluster must work and resolve correctly to the virtual IP. To test this, ping the full Internet name for the cluster:
- Open a command prompt window or the SharePoint management shell console.
- At the prompt, type ping, a space, and the cluster's name, such as ping sharepoint (the domain part of the name is not necessary for this); then press Enter.
This will cause the server to resolve that DNS name to the virtual IP address, send four sets of packets, and then report the results. As you can see in Figure 16.73, my cluster Internet name SharePoint resolved to the cluster's virtual IP of 172.24.63.10.
FIGURE 16.73 Testing the Share-Point NLB cluster virtual IP address
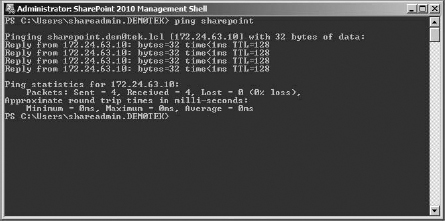
NLB looks happy in the Manager console. So if the ping test did not work, the problem is likely that DNS does not have a Host (A record) for the full Internet name of the cluster that resolves to the cluster's virtual IP address. Check the event logs on the server to make certain there are no issues concerning communicating with the DNS server and then check DNS for the cluster's host record. Repeat the ping test when the issue is resolved.
Now that you know that the cluster is working, let's see what happens if we break it—or at least, simulate breaking it. This is a standard load-balancing test of the cluster intended to demonstrate the failover capabilities of NLB. First we will try a ping test that continuously pings the cluster address. Then we will apply a test called drainstopping to one of the servers in the cluster. This cuts it off temporarily from the cluster, simulating a server failure. If NLB is working correctly, the ping test will not falter during the drainstop, because NLB will transparently, in milliseconds, transfer activity to the second server.
- To do this, first start the ping test at the command prompt (or in my case, the SharePoint management shell). Enter the ping command you used earlier but at the -t switch. Here's an example:
ping sharepoint -t
where sharepoint is the name of the cluster that resolves to the load-balancing virtual IP.
- When the test is returning results, return to the NLB Manager console. Right-click the first server (the one with the lowest number and therefore highest priority), and from the pop-up menu, choose Control Host
 Drainstop (Figure 16.74).
FIGURE 16.74 Drainstop a host in the NLB Manager console to test cluster functionality.
The server icon's outline will turn yellow as it stops and then red when it has stopped entirely. Return to the command prompt, and you will see that the ping test is still going (Figure 16.75), uninterrupted, at no loss in speed. This helps prove that NLB is working correctly.
FIGURE 16.75 Testing cluster connectivity with ping
- Of course, because we drainstopped one of the cluster's servers, it is not responding to client requests on that IP. This is not a state we want to leave that server in. To return that server to the cluster, go back to the NLB Manager console, right-click the drainstopped server, and select Start.
- The server's icon outline will turn yellow while its status is converging. Then, after its status returns to converged, the outline will return to green (if you are impatient, you can hit Refresh to speed up the color change). All the while, the cluster is still (because we haven't stopped pinging) responding to ping requests as if nothing had ever happened. To stop the ping test, you can close the command prompt window or select the window and type Ctrl+C to cancel the command.
REAL ADMINS UNPLUG THE SERVER'S NETWORK CARD
Instead of drainstopping, which is convenient, you can also simply disable the network connection of the server you want to use to emulate a failure (be careful, of course, that your users aren't using that server for anything that isn't load-balanced) or, if you can access it, just pull out the network cable from the server's physical network card. Then try pinging it directly—it should fail. Then try pinging the load-balanced host name, and it should respond correctly, because the other server in the cluster is responding to the request. As long as one of them is available, all is well.
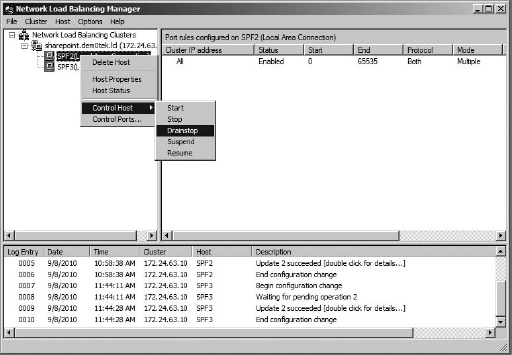
So, now we know that NLB works between the servers for uninterrupted service. But in order for requests for SharePoint resources to be captured and filtered by the NLB, the load-balanced URL must be used as the default zone for any web application you'd like to balance. For any web application that you do not want load-balanced (such as Central Administration), do not use the load-balanced URL for its default zone address.
CONFIGURE SHAREPOINT FOR NETWORK LOAD BALANCING
Currently the example SharePoint installation has a Central Administration web application and several other web applications. The SharePoint-80 web application has the default internal URL of http://spf2. This is the server's address, and it works fine to access the sites in that web application. To keep things simple, I am going to use that web application to demonstrate using the load-balanced URL. Now that we are using NLB, we should change that default address to the Internet name for the cluster. Then, clients will always be able to access the web application, even if one of the servers is off.
- To set up a load-balanced URL for a web application after it has been created, you need to accessAlternate Access Mappings. So, go to Central Administration System Settings, and click the Configure Alternate Access Mappingslink under Farm Management (or you can just click the link to configure Alternate Access Mappings from the home page).
- On the Alternate Access Mapping page, click the internal URL of the web application you'd like to change (my example is http://spf2). This will open a page that displays the current internal URL and its zone. Make certain the zone is set to Default (Figure 16.76).
- Change the URL to the Internet name for the cluster (my example will be http:// sharepoint because that will resolve to the full Internet name and the virtual IP for the cluster), and click OK. That will take you to the Alternate Access Mappings page for the web application, displaying the new default URL (Figure 16.77). If you wanted the web application to also be accessible by the server address (in case NLB has a problem), enter that address in one of the other public zones for the site. (You might think that you should just change the default Public URL for the web application, but it will do the same thing: change both the internal and public addresses for the default zone.)
FIGURE 16.76 Displaying the internal, default URL for a web application
FIGURE 16.77 The new load-balancing URL for the web application
- To test the new URL, go to a different server or workstation on the network than the SharePoint server (just to prove that the network load balancing service is working), open Internet Explorer, and browse to http://sharepoint (or whatever your load balanced address is). You may be prompted for your username and password from SharePoint (not to the server itself, which is good), and then the home page of the top-level site will load without a problem (Figure 16.78).
FIGURE 16.78 The SharePoint site address now resolves to the NLB cluster name rather than to a single server.
WANT TO KEEP ANSWERING REQUESTS ON THE ORIGINAL ADDRESS?
If you don't want to simply replace the default zone's internal URL address with the load-balanced one, you can just add a new internal URL. To add a new internal URL, click Add Internal URLs in the Alternate Access Mappings page. Select the correct Alternate Access Mapping collection (in my case that would be for SharePoint −80), and then use the load-balanced URL there. Keep the default zone, because that is what search will need to be able to return the correct address for search results. The problem with not completely replacing the original, single server's URL is that if users are still using that address to access SharePoint, their traffic will not be load-balanced.
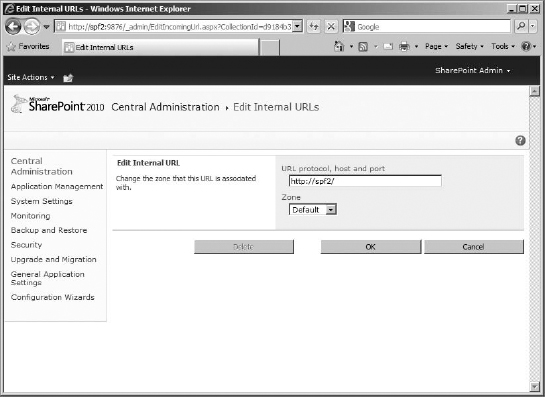
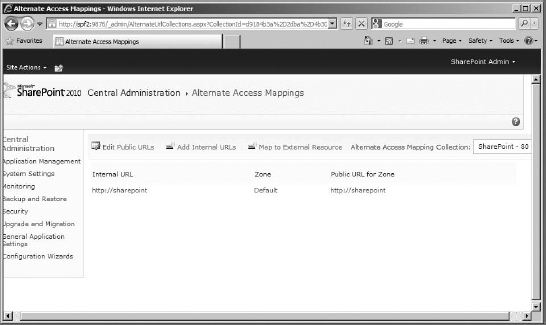
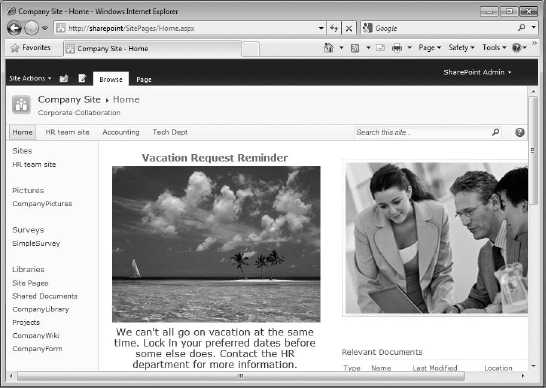
From this point on, when you create new web applications (or extended web applications) for the SharePoint server farm, you can always use the cluster's Internet name as the load-balanced URL, if you are using ports. And for host-headered web applications, make sure their CNAME Alias in DNS points to the A record for the load-balanced URL.
To see an example of a web application using the load balanced URL, create a new web application:
- Go to the Application Management page of Central Administration, and click the Create Or Extend Web Application link in the SharePoint Web Application Management category.
- On the Create Or Extend Web Application page, select Create A New Web Application.
- On the Create New Web Application page, configure the web application's address and other settings. My example uses the server name and unique port to address the web application, as you can see in Figure 16.79. In the Public URL section (named Load Balanced URL in previous versions), you may notice that the default URL is the server name and the port number. That is, it will not be load-balanced because it is pointing specifically to the server's address. To configure it properly (now that you have load balancing in place), enter the cluster Internet name rather than the server name.
FIGURE 16.79 Configuring a new, load-balanced web application
- When you have completed the rest of the web application's configuration (including defining a content database account and database name and specifying a search server), click Create to finish. Create the site collection, and then run iisreset /noforce at the command prompt of the SharePoint server.
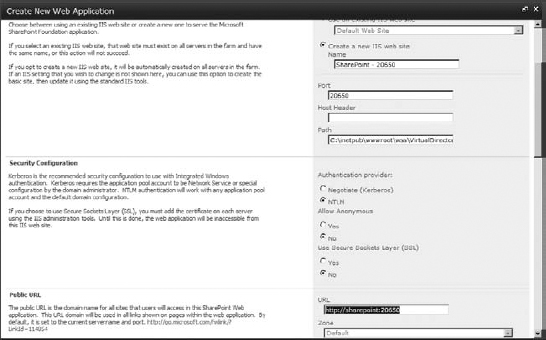
In the Alternate Access Mappings page, you'll see that the default internal URL for that web application is, in fact, the load-balanced URL (Figure 16.80).
FIGURE 16.80 Internal URL reflects load-balanced URL for new web application
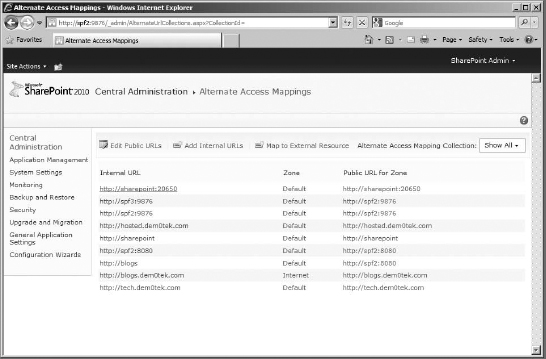
To access the site from any machine on the network, simply use the load-balanced URL. As a matter of fact, that URL is the only web address that SharePoint will accept for the web application. If you want to access the new web application by any other addresses, be sure to add them as alternate access mappings. (For more about creating web applications, site collections, and alternate access mappings, check out Chapter 10.)
CENTRAL ADMINISTRATION AND LOAD BALANCING
Since Central Administration is running on both servers, you could load-balance it, too. That is a possibility if high availability is a priority. However, it is considered a more secure practice to instead add the URLs of the additional servers that will be hosting Central Administration. This obscures the Central Administration website's address further if it is not the common load-balanced address.
To load-balance Central Administration, make certain that all servers in the NLB cluster are hosting the site. Then change the default internal URL for the site to resolve to the cluster Internet name (or whatever alias will resolve to the cluster virtual IP). In my case, that would be changing http://spf2:9876 to http://SharePoint:9876.
If you decide to go the other way and simply make it possible for the Central Administration website on the additional server to be accessible by its own address if the original server were to go offline, simply add that server's address for the site as an internal URL. In my case, that would mean adding http://spf3:9876 to AAM.
Although we have tested NLB by completely stopping access to one of the servers, remember that, in addition to failover capabilities, NLB also continuously monitors the activity of the cluster servers and distributes client requests to the server with the least load at any given time. Keep in mind that Windows NLB is not application-aware. If the web applications become unavailable in IIS on one of the servers, NLB will be unaware of it and will continue to send that server client requests if it is next in line or the least busy of the cluster.
Advanced Configuration
At this point, you know how to administer your SharePoint implementation including planning, installing, and configuring services; creating web applications and site collections; managing security at the farm, web application, and site collection levels; and monitoring, performing maintenance, and preparing for disaster. However, there were two additional, more advanced configuration settings—configuring Kerberos as an authentication method and securing a web application's data transfer with SSL—that we haven't done, until now.
Using SSL with SharePoint
Often external access to company data through SharePoint requires the additional protection of SSL. Secure Socket Layer (SSL) encrypts data sent over HTTP (making it HTTPS, the S meaning secure) to help avoid any tampering while in transit. SSL uses certificates, as well as public and private keys to encrypt and decrypt data. When a client requests access to a site that uses SSL, the server sends back the certificate and its public key. The client checks the certificate information to make certain it can be trusted (that the site is authentic and can be trusted to be who they say they are), and then it creates a premaster key of its own and encrypts that with the server's public key. The server gets the premaster key, decrypts it with its private key, and uses that to create a master key (with the agreement of the client) to create a session key to encrypt all data to that client during that session. Both the client and the server know what the session key is that encrypts and decrypts the data that is traveling between them, but no one else does. This secures the traffic from snooping or any other exploitation while it is between destinations.
To use SSL to encrypt traffic to and from your SharePoint websites, the server (servers if you are using a load-balanced server farm) must have a certificate. The URL covered by the certificate must match the URL that the user is using to access a website. There are two kinds of SSL certificates that are really relevant under these circumstances: the wildcard certificate and the standard website certificate. A wildcard certificate is more expensive and covers any site that uses the same domain name in the URL. A wildcard certificate for *.dem0tek.com would cover SharePoint.dem0tek.com, sales.demOtek.com, marketing.dem0tek.com, and so on. A standard SSL certificate must match the full address exactly. So if there were a certificate for marketing.demOtek.com, that URL is the only one that could use it.
In this example, just to demonstrate how to enable SSL with SharePoint, we are going to use a standard certificate and secure a public-facing web application. As a matter of fact, we are going to create a new web application and use a host header to address it. This site will be accessed from outside the office, and it must have the data encrypted between the server and the client.
GETTING FANCY WITH HOST HEADERS AND NLB
This exercise can also demonstrate a more advanced use of load balancing. Instead of using the Internet name for the web application, we are going to use a host header that resolves to the load-balanced IP address using DNS.
Create a new forward lookup zone for the external domain in DNS. Then create an alias for the new host header and map it to SharePoint.demOtek.lcl (or whatever your cluster's Internet name is).
When you access the site using the host header, it will resolve (as this example will demonstrate) to the cluster's VIP and therefore be load balanced; that is why its default address can also be the load-balancing address.
Setting up for SSL requires three stages. First, decide on the URL. Then, enable the web application to do SSL in SharePoint. Finally, configure SSL in IIS, generate the certificate request, and then add the certificate to the IIS Web Site. There is even an optional fourth stage, which is to export the certificate to import it to the web application on the other servers in the farm for load-balancing purposes.
CHOOSE AN APPROPRIATE URL
It is important to decide what URL will be secured. In this example, we'll use collaborate.dem0tek.com. The domain dem0tek.com has been registered by the company with the correct DNS record to allow traffic to reach your internal SharePoint server. Internally, in this example, the router is configured to pass HTTP and HTTPS traffic to the SharePoint servers, and DNS has a record for co11aborate.dem0tek.com that resolves to the internal server's VIP address.
CREATE A WEB APPLICATION TO USE SSL
Stage 2 of the process involves creating a web application and preparing it to use SSL.
- To do that, go to the Central Administration website, go to the Application Management page, and click Manage Web Applications. On the Manage Web Applications page, click New in the ribbon bar.
- Once you're in the Create New Web Application box, configure the new web application to use a host header that matches the URL to be used on the SSL certificate. As you can see in Figure 16.81, my example is co11aborate.dem0tek.com. Make certain that the port for this web application is 80 at this point (you'll change it in IIS later).
FIGURE 16.81 Configuring the new web application to use SSL
- In the Security Configuration section, leave NTLM as the authentication method, do not enable anonymous (for this example), and select Yes to enable SSL for this web application.
In the Public URL field, the protocol at the beginning of the address changes from HTTP to HTTPS and otherwise matches the host header address. That default is good for this example, because this is the address that will be used for the SSL certificate. For SSL to work, the users must type in an address for the web application that exactly matches the one used by the certificate. The host header is what you will be using and is an exact match (although you should remove the port number from the end, because it's not necessary). The Public URL will be the default zone for the web application in AAM and therefore the only address (at least initially) that SharePoint will accept for that web application. The default (minus the port number) is good.
- Configure the Content Database account and the database name, and select a search server. When configuration is complete, click OK.
- Once the web application has been created, you will be prompted to create a site collection. Create a new site collection, and then, on each SharePoint server in the farm, open a command prompt or the SharePoint management shell and run iisreset / noforce just to be sure all settings have propagated to IIS correctly.
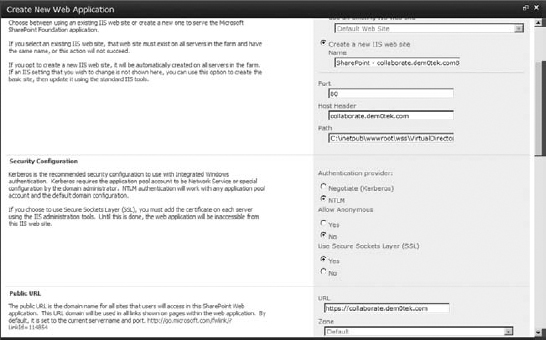
The new web application will be created with the new host header address as the default zone (in my example that's the SharePoint-co11aborate.dem0tek.com80 web application), as you can see in Figure 16.82.
FIGURE 16.82 The new web application's default, internal URL
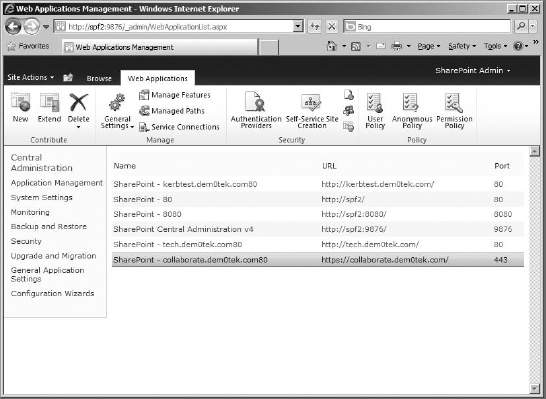
This configuration of the new web application is not entirely complete. Because the web application is supposed to be using SSL, SharePoint configures the IIS Web Site for the new web application to be stopped until SSL is configured.
To prepare to move to stage 3 of this process, the web application's IIS Web Site must be configured properly before you start it.
CONFIGURING AN EXISTING WEB APPLICATION TO USE SSL
You may wonder where the setting is to enable SSL for existing web applications. There really isn't one. You just change the URL in Alternate Access Mappings from HTTP to HTTPS. That's essentially all that the Enable SSL setting does when you create/extend a web application.
Keep in mind that enabling SSL on a SharePoint site requires that you enable SharePoint to accept requests for the web application using an HTTPS address and then you configure it in IIS.
CONFIGURE SSL FOR A SHAREPOINT WEB APPLICATION IN IIS
In the third stage of the process, with the web application created, you must get an SSL certificate and configure the IIS Web Site of the web application. You can use the Windows Certificate Authority console to create a certificate on your network. It may not be from one of the publicly trusted Certificate Authorities, but it can be trusted by your clients since you made it for them. Or you can use a trusted authority online, such as VeriSign or GeoTrust. These vendors do nothing but vouch for the authenticity of other people's websites and generate certificates for them. These authorities can put you through a rigorous application process; they'll make certain you own the domain and that your contact and company information is correct; then they'll move on to questions more appropriate when applying for security clearance.
Purchasing an SSL certificate from a third-party vendor is convenient but potentially expensive (depending on the kind of certificate you choose). It is convenient because many of them are already trusted publishers of certificates, so Internet Explorer will accept their certificates readily and because they offer additional support if the certificate expires (they generally are designed to expire), is lost, or becomes corrupt. Because companies often use third-party certificates, that's the process this example will use.
CERTIFICATES GENERATE IN-HOUSE WORK
A certificate that is generated by the certificate authority on your network may cause users outside the network to get a warning that it may have expired or is not known. Keep in mind that SSL does two things: it sends a certificate to verify the site's authenticity, and then it negotiates the master key to encrypt the session traffic. Both steps are needed: authentication and then encryption. So if a user is warned by their browser that the certificate from your company's Certificate Authority is not trusted (because the browser knows nothing about your company) and then clicks to accept the certificate manually, the key passing will proceed, and all data between the two computers, server and client, will be exchanged. If the user rejects the certificate, then they don't access the site.
Just because the browser doesn't like the look of a certificate does not mean it is automatically a problem if you know where it came from. Authenticity may not be established, but the encryption will still work if it is accepted.
Generating a Certificate Request
To get an SSL certificate, you first have to apply for one. IIS has a convenient wizard that helps you set up a certificate request that you can use to acquire a certificate from a trusted Certificate Authority. It is often a good idea to try the certificate before you buy it, so most vendors offer trial certificates that expire in a few weeks.
- To generate a certificate request for a particular IIS Web Site, open the IIS Manager console (Start Administrative Tools Internet Information Server (IIS) Manager).
You may notice that new web application is stopped. That is to be expected; SharePoint does that to keep anyone from accessing an SSL-enabled web application until SSL is in place. After you finish configuring it to require SSL, you can start it.
- In the IIS Manager console, select the server name in the navigation pane, and scroll down in the workspace to Server Certificates. Even though the certificates will be primarily for individual IIS Web Sites, they are applied to the server, and the icon to add certificates is for the server (Figure 16.83).
FIGURE 16.83 The Server Certificates icon in the IIS Manager console
- Double-click the Server Certificates icon. The workspace will display existing certificates (there might be a machine certificate for server identification in there). In the Actions pane, you can create self-signed or domain certificates, as well as create and complete certificate requests (Figure 16.84).
FIGURE 16.84 The Server Certificates workspace in IIS
- We need to create a certificate request, so click Create Certificate Request in the Actions pane.
On the first page of the Request Certificate Wizard, you need to specify required information. City/Locality must be official names and can't be abbreviated.
- This Distinguished Name screen needs quite a bit of information. The first field, Common Name, is the most important one. It must match the URL of the web application you are requesting the certificate for. In my example, that would be collaborate.dem0tek.com (Figure 16.85). If the certificate were being used by internal clients only, then the server's NetBIOS name would be acceptable. However, that is not the case in this instance.
FIGURE 16.85 The Distinguished Name screen of the Certificate Request Wizard
- Once you've entered your web application's URL into the Common Name field, enter information for the organization or company name for the certificate. You also need to enter an Organizational Unit. Even if you don't really have one, make something up (but remember that all data in a certificate can be viewed by the user, so keep it professional— my example uses SharePoint). Also enter country, state/province, city/locality information in this screen (avoid abbreviations), and click Next.
- On the Cryptographic Service Properties screen, the default of RSA SChannel Provider, 1024-bit length is good for me. You can choose a different bit length and use the DH SChannel provider if you'd like. Then click Next.
- On the next screen is a field to specify the filename and location for the certificate request. Save it to a handy location, and use an intuitive filename. For my example, I am going to use certreq.txt for the filename. The certificate request is just some hashed text, nothing fancy.
- Once you've specified the location and filename for the request, click Finish to generate the certificate request file.
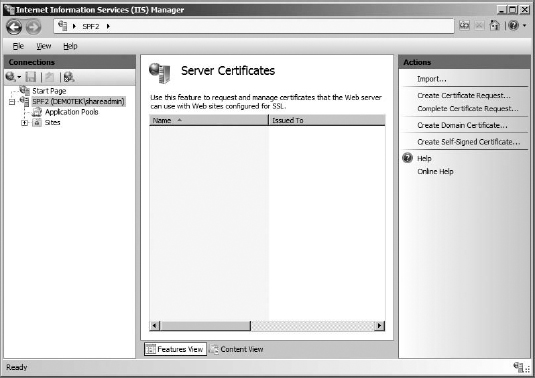
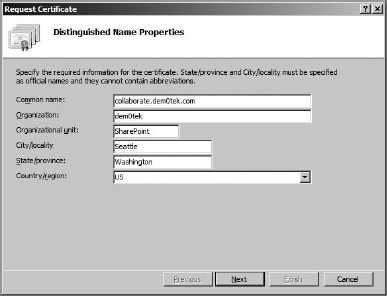
The certificate request will have been generated, and you will find yourself back in the IIS console.
Request an SSL Certificate from an Online Certificate Authority
Actually using the request information to get a certificate varies depending on which Certificate Authority you use. In many cases, you fill out a form with the name, phone number, and email address of the authoritative contact used to register the domain you are using for the common name in the certificate.
In my case, I used a trial certificate from an online Certificate Authority.
- To request a certificate, open the certificate request file that you just generated. Select the
data (be sure not to miss anything) in the text file (see Figure 16.86).
FIGURE 16.86 Selecting text in the certificate request text file
- Paste that data into the certificate request field of the Certificate Authority you've chosen. Figure 16.87 illustrates a standard request form might look like, and you can see where to paste the request data.
FIGURE 16.87 A sample request form at an online certificate authority

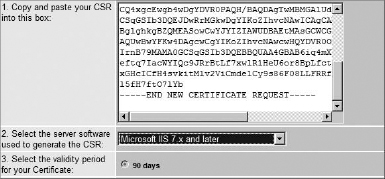
The rest of the authentication process depends on the Authority. In my case, for the trial certificate, it did a who is query on my domain. It then returned the email address of the person authoritative for that domain. The Authority then sends an email to that authoritative email address for confirmation. When you get the email, click the link to confirm that the certificate is legitimate (and one you requested). The new certificate will then be generated and sent to you in the form of a text string just like the request.
Apply the SSL Certificate from an Online Certificate Authority to a Web Site
Now you may be wondering, “What can I do with this text? Where is the attached file that is the certificate?” That text is the SSL certificate. Simply copy (from five dashes of the Begin Certificate header of the data to the last five dashes of the End Certificate footer) and paste it into a text file.
Name the text file something you can remember, with the file extension of .cer (I used the name collaborate.cer). That indicates to Windows that the file contains certificate information and the public and private key combination associated with that certificate (remember, SSL both proves authenticity and encrypts data).
Once the text file is saved somewhere accessible, it's time to add it to the web application that requested it:
- To apply a certificate to an IIS Web Site (and therefore a SharePoint web application), go back to the Internet Information Services (IIS) Manager console, and with the server name selected, scroll to and double-click the Server Certificate icon.
- In the Actions pane, click Complete Certificate Request.
- In the wizard, on the Specify Certificate Authority Response screen, browse to or enter the location of the file and the filename. Beneath that field, enter a friendly name for the certificate (I used certreq in Figure 16.88).
FIGURE 16.88 The Specify Certificate Authority Response page
Click OK to complete the certificate request and apply the certificate to the server.
That will take you back to the IIS console. Now the certificate is listed in the Server Certificate's workspace (Figure 16.89).
FIGURE 16.89 The certificate listed in its workspace in IIS
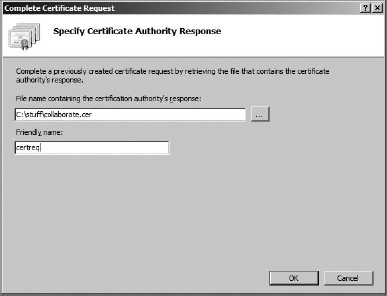
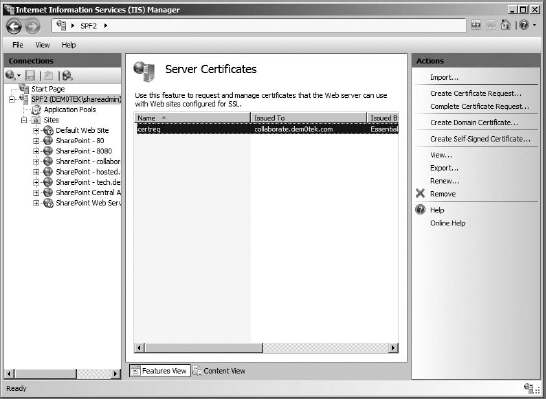
Congratulations, your server now has its a new SSL certificate, ready to be applied to the Web Site that bears the Issued To name.
There are a few steps left to complete this process. First the binding for the IIS Web Site has to be changed from 80 to 443, and the certificate needs to be specified. Then the IIS Web Site has to be started and then tested by accessing it with Internet Explorer. If it doesn't work, chances are good there is something wrong with the certificate.
If it works, then the certificate has to be exported. Why? Well, the certificate has to be imported to the other SharePoint servers in the farm for the same web application. Remember, they all have to match, and that includes having the same certificate on all servers in the cluster. Then, after the certificate is imported to the other servers, the IIS Web Site has to be started there as well.
Change the Web Site Binding and Apply the Certificate to the Web Site
Although SharePoint knows that the IIS Web Site should be listening on port 443, SSL requires a little more configuration.
To make sure the web application is listening on the correct port (we originally set the web application for port 80 in SharePoint before we enabled SSL), open the Server And Sites nodes in the Connections pane. Then right-click the IIS Web Site that you are configuring to use SSL (in my case that would be SharePoint - co11aborate.dem0tek.com80), and select Edit Bindings from the pop-up menu.
In the Site Bindings dialog box, you can see that the site is listening on the default HTTP port of 80 (Figure 16.90). It needs to be changed to port 443, which is what SSL uses.
FIGURE 16.90 The default site binding
- To change the port and select the certificate to apply to this specific IIS Web Site, select the binding you want to change, and click Edit.
- In the Edit Site Binding dialog box, change the port to 443 (leaving the IP as all unassigned is fine). And, in the SSL Certificate drop-down, select the correct certificate (my example is certreq, Figure 16.91). You can even view the certificate to be sure it's the right one by using the View button.
FIGURE 16.91 Editing the site binding to include the SSL port and certificate
- When you are certain your settings are correct, click OK.
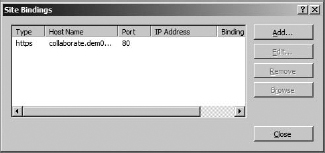
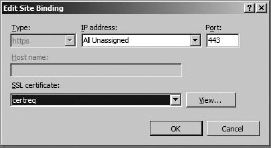
Now the IIS Web Site is bound to the correct port and uses the correct SSL certificate.
Start the Web Site
Next we need to start the IIS Web Site that we just configured to use SSL.
- Click Close to close the Site Bindings dialog box. Now that the correct port is selected and the certificate is set for the IIS Web Site, it's time to start it. In the IIS Manager console, right-click the IIS Web Site and click Start in the pop-up menu, or with the Web Site selected, click Start in the Actions pane.
- Open Internet Explorer, type the web application's URL in the address bar, and hit Enter.
Be sure to use HTTPS instead of HTTP in the address.
- It may prompt you to log in. Use the username you chose for the site collection administrator when you were configuring it. It may also prompt you to add the site to the Trusted Site zone on that computer. That is a very good sign and indicates that the browser found the site.
Once you have added the site to the Trusted sites zone, the home page for the SSL secured web application's first site collection should load (see Figure 16.92 for my example).
FIGURE 16.92 Website secured with SSL certificate
This indicates that SSL is working for the web application. To require SSL security to be used exclusively to access the site, go back to the IIS Manager console, and open the Properties dialog box (right-click the Web Site and select Properties) for the SSL-enabled Web Site we were just working on.
- Make sure the site we've applied SSL to is selected in the Connections pane and that the workspace is in Features view. Select SSL Settings.
- In the SSL Settings in the workspace, check the Require SSL check box (Figure 16.93).
- In the Actions pane, click Apply to apply the change.

Open Internet Explorer, and browse to the secure site again. Confirm that you can access the site. Once you've established that SSL is working with that site, it must be configured on all other servers on the farm. That means they all need exactly the same certificate running on their copy of the IIS Web Site to be secured.
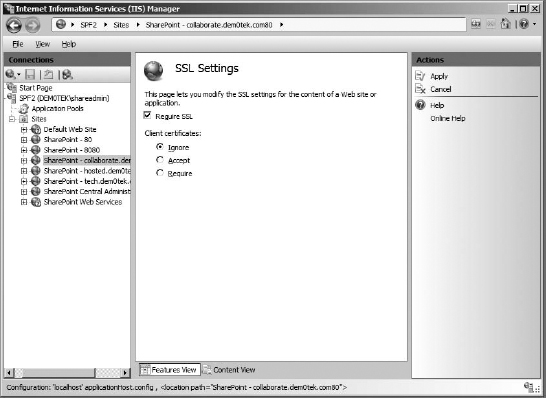
EXPORTING AND IMPORTING THE SSL CERTIFICATE TO THE OTHER FARM SERVERS
To ensure that the certificate is exactly the same for each server, the certificate needs to be exported from the working IIS Web Site and installed on all other servers.
- To do this, select the server in the connections pane, and scroll to the Server Certificates icon and double-click.
- In the workspace, select the certificate, and click Export in the Actions pane.
As you can see in Figure 16.94, a dialog box opens to export the current certificate to a .pfx file. A password will be applied to it, so it will require a password to import. Specify a filename and location, and then enter a password. Click OK.
FIGURE 16.94 Exporting the current certificate
Now that the certificate has been exported, it is time to add it to the second server on the farm. The IIS Web Site will be stopped on that server because it doesn't have an SSL certificate yet.
- To import the certificate so the IIS Web Site can become functional, go to the Service Certificate workspace, and click Import in the Actions pane.
- It will open a dialog box where you can browse to the exported certificate file, and enter the password (Figure 16.95). When you've got the correct file and password entered, click OK.
FIGURE 16.95 Importing the certificate to the second server
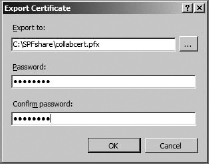
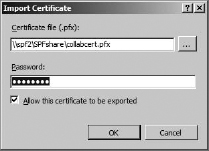
The certificate will then appear in the Server Certificate workspace. Now it can be selected when setting up the site binding for the IIS Web Site on that server.
Just as a reminder, now that you have imported the certificate, you need to bind it. Right-click the Web Site associated with the web application you enabled SSL on. In the drop-down menu, select Edit Bindings. In the Site Bindings dialog box, select the binding that is there (it will be for port 80), and click Edit. In the Edit Bindings dialog box, enter the correct port for SSL, 443, and select the imported certificate. Click OK. Then start the Web Site, while it is still selected, by clicking Start in the Actions pane.
Repeat the import certificate, and prepare the Web Site process with each server in the farm that hosts the Web Site that requires the certificate.
Keep in mind that Search may not work on the web application until the server running Search that was selected for that web application has a working, SSL-enabled IIS Web Site. Consider configuring that server's IIS Web Site first.
Here are some things to keep in mind when using SSL:
- The IIS Web Site for each server on the farm will be stopped and require manual configura-tion before they are all functional.
- If there is a web application already using the default SSL port, you will need to assign a different one. Each corresponding Web Site can have a different host header on port 80, but each Web Site must have a unique SSL port (or they need to either use a unique IP address or use a wildcard certificate). This is because traffic is encrypted when it gets to IIS, and therefore the host header information cannot be read to give IIS any change to figure out what IIS Web Site to send the data to. Thus, having a unique port for each site is critical. If you have any load-balancing port rules governing the unique port, they will, obviously, have to change.
- If the IIS Web Site needs a custom SSL port, then the SSL certificate must have the port as part of the common name (such as co11aborate.dem0tek.com:444).
- Search may be delayed and errors may occur as each server is configured to start the new web application.
- The IIS certificate for each server's copy of the web application must be an exact duplicate of the others. Do not request a new certificate for each server. Even if they contain the same data, their keys will not be the same.
- Keep in mind that SSL session IDs linger in Internet Explorer. If you move away from an SSL site on a load-balanced server farm and then try to go back, you may be redirected to a different server. However, IE will have a session ID for the other server it accessed earlier. Features of the page, such as Search or changing views, may not work properly. Try closing out of Internet Explorer altogether and then trying again. That will give IE a chance to clear the old session ID from its cache.
Using Kerberos for Authentication
When you are using Windows authentication, there are two primary authentication methods: NTLM and Kerberos (Negotiate). NTLM is the default Windows authentication method, and it requires no additional configuration to work in an Active Directory—or even a workgroup environment. Kerberos requires that both the client and server support that authentication method. Kerberos uses port 88 by default, so make certain, if you are using Kerberos authentication with external clients, that both the network firewall and the client's firewall allow Kerberos traffic on port 88. Also keep in mind that keeping the same time is critical for Kerberos to work with external clients, so make certain they are pulling time from the same source and are updating their time adequately. Often issues of time are the biggest reason not to use Kerberos for authentication.
Kerberos is a ticket-based system, allowing an authenticated user to access resources based on their session ticket given by the key distribution center—usually the domain controller. However, sometimes a front-end product needs to be allowed to delegate authentication in order to give a user access to a back-end resource like the SQL server. This means that when someone logs into SharePoint, it needs to grant that user the right to access SharePoint resources in the SQL databases through a delegated service. For each web application that will be using Kerberos, the content database account (otherwise known as the application pool account for that web application) must be given the right to access this data on behalf of the user. Only service principal accounts are allowed to delegate authentication with Kerberos. So if you want to use Kerberos authentication, the content database account must be registered as a service principal name (SPN) for the server (or servers) hosting its web application. Kerberos authentication has several bonuses. It is more secure, and in distributed environments, it works faster because of the session tickets, and it supports delegation of authentication, allowing service applications to pass through authentication to network resources, which NTLM cannot do.
Because there can be only one service principal name, per service class and per server registered, if you are going to enable Kerberos on more than one web application (especially if they are going to use custom ports and otherwise the same server address), it is recommended that you register one account that will be used as a content database account for all of those web applications. This will make it more convenient to manage Kerberos and avoid duplicate principal name errors. Keep in mind that the same account can be registered as a service principal name on several different servers. If there is more than one name used by the service being configured (such as a FQDN and NetBIOS), then each name needs to be set manually, so Kerberos knows how to do authentication for the name being used.
In addition to registering a service principal name, in more complex environments you might need to also give the account trusted for delegation rights in Active Directory. Also keep in mind that the Search service (particularly the index service) often has problems authenticating using Kerberos (particularly on web applications that are using non-standard ports). This is why it is common practice to have a main web application using NTLM authentication for the sake of search and have everyone else access the content by using an extended web application, which will be using Kerberos for authentication.
Setting up for Kerberos is pretty easy to do. The main worry is that it does give a user account (or user accounts) that otherwise ran in a least-privilege context access to the network as a service principal. However, that said, some service applications need to use Kerberos to allow pass-through authentication where the user authenticates to use SharePoint, then SharePoint needs to pass their credentials to the external resource. NTLM cannot do that, but Kerberos can. It depends on the service application, and there are often work arounds.
In a single-server installation of SharePoint, local services such as the Network Service already work with Kerberos. However, if they need to access network resources, you will need to register the computer object to be trusted for delegation and set as a service principal name on behalf of the local service. It is strongly suggested that you use a domain account for web application pools (content database accounts).
USING SETSPN TO REGISTER SERVICE PRINCIPAL NAMES
Before you enable Kerberos authentication on a web application, you need to register the content database account as a service principal name in Active Directory. The tool to use to set service principal names is SetSPN. This command is built into the Windows Server 2008/2008 R2 operating system (you used to have to download it). It will run on any server in the domain, but it needs to query the domain controller for principal names.
To register an account as a service principal name in Active Directory for a standard SharePoint web application, open a command prompt or SharePoint management shell, and run the setspn command with the following syntax:
setspn -s http/servernamefqdn domaincontentdbaccount
setspn -s http/NetBIOSname domaincontentdbaccount
where the servernamefqdn is the FQDN of the SharePoint server, NetBIOSname is the NetBIOS name of the server, domain is your domain name, and contentdbaccount is the domain account that will be used as the application pool for accessing the content database of the web applications requiring Kerberos authentication.
TO TRULY MASTER SETSPN, ONE MUST ASK FOR HELP…
There are more parameters to the setspn command than are commonly used. Most people just use the -A parameter to register arbitrary service principal names, but Server 2008 R2 also has the -S parameter, which will do the same things as -A but also check for duplicates.
For more information about setspn, use the -? parameter. It will generate informative help information about the various modes and switches available with the command. You can use it from any command prompt or SharePoint management shell on the servers in the domain.
This means you are going to register an arbitrary service principal, using the HTTP service class (because IIS needs to use it), for the server and the content database account. You are specifying HTTP as a class, and that's why there are not two slashes, only one. An example is as follows:
setspn -s http/spf2.dem0tek.1c1 dem0tekspfcontent
setspn -s http/spf2 dem0tekspfcontent
This will allow SharePoint to access resources on behalf of a SharePoint user who is using the http://spf2 website via the content database account.
If you have one server, you can register the SPN for that server and be done. In Figure 16.96, you can see the example of setting the service principal name for my SPF2 server for the content database account of dem0tekspfcontent.
FIGURE 16.96 Registering an SPN for a server

To confirm the service principal names registrations for an account, use the list parameter for
setspn:
  Setspn -l accountname
such as setspn -l spfcontent. That will, in my example, display all registrations for the dem0tekspfcontent account (Figure 16.97).
FIGURE 16.97 Listing SPN registrations for a domain account
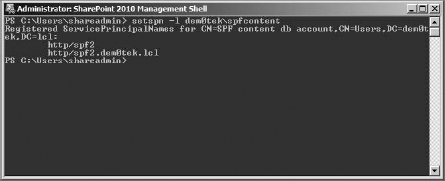
If you are doing network load balancing, there is a little more labor involved. You will need to register the content database account as a service principal name for each NLB server in the cluster, and the cluster server Internet name.
Setspn -s http/spf2.dem0tek.1c1 dem0tekspfcontent
Setspn -s http/spf3.dem0tek.1c1 dem0tekspfcontent
Setspn -s http/SharePoint.demOtek.lcl dem0tekspfcontent
QUIRKY KERBEROS
Kerberos can be a bit moody. I have worked with NLB networks that don't require the cluster Internet name to be registered, and in others all clients but the SharePoint servers themselves can access the web application without the cluster name registered. The vast majority of SharePoint deployments don't need the content database account to be trusted to delegate, but a few (usually those with custom or complex web parts) do.
Kerberos does not report errors very well. Generally, if there are Kerberos (or key distribution center, sometimes called KDC, errors), they will be on the domain controller. Otherwise (without installing a network monitoring tool), the best way to know if there is a problem is to see whether the web application can be accessed by all users and servers in the browser and if search works.
If a web application is having any problems with authentication, Search is often the first to know. Check all Application logs on the servers hosting search for the Kerberos-authenticated web applications. If search is having no problems, chances are good there are no problems.
So, I think you are seeing a pattern; you need to set the principal name for the content database account for a web application, both for its NetBIOS name and its FQDN (essentially any name it will be accessed with). But what about web applications with a host header, or host-named, address? In that case, because the users are not going to be accessing the web application using any other address, then you need to use just that address for setting up the service principal name.
For example, I created a web application at the address http://kerberos.dem0tek.com. I also created a domain account specifically for this exercise,dem0tekkerbcontent, and used it as the content database account for the web application. Use your own information if it's different.
To make sure that this content database account is set as a service principal name for its web application, its fully qualified name need to be specified (Figure 16.98). Open the SharePoint management shell (if you have the correct permissions) or a command prompt, and run the following setspn command:
setspn-s http:/kerberos.dem0tek.com dem0tekkerbcontent
FIGURE 16.98 Configuring service principal names for the content database account
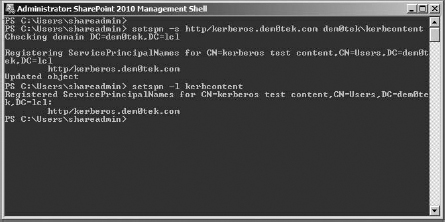
Once the registrations are complete, it is time to enable Kerberos on the web application.
JUST IN CASE
If there is a chance the users will just use the alias for an address, such as kerberos in this example, consider setting the spn for the content database account for that address too.
ENABLING KERBEROS ON A WEB APPLICATION
You can enable Kerberos on any web application or extended web application. It's easy to do while creating new ones, because there is a setting right there. It's a little less intuitive to change authentication for an existing web application (or extended web application), which is why I am going to demonstrate enabling Kerberos on an existing web application.
- To do so, you first need to open the Manage Web Applications page, select the web application in question, and click the Authentication Providers button. For my example, I created a web application that uses the host name http://kerberos.dem0tek.com.
WHERE'S THE BEEF?
To modify the authentication for an existing extended web application, first choose the web application it extends. Then click Authentication Providers, and select the zone for that extended web application uses. It is easy to forget that extended web applications are considered only zones of the web applications they extend.
- In the Authentication Providers box, select the zone you want to have Kerberos for its authentication. In my case, I only have the default zone.
- In the IIS Authentication Settings section of the Edit Authentication box is the setting to enable Kerberos. If you select it, you will get a warning (Figure 16.99) that Kerberos requires additional configuration if the application pool's account isn't the server's network service account. We already manually prepared for Kerberos, so click OK on the warning, and then save the changes.
- This will put you back on the Authentication Provider box; just close out of it to get back to the Manage Web Applications page.
- To be on the safe side, open a command prompt or SharePoint management shell, and run an iisreset /noforce on all the servers in the farm to be sure they know about the authentication change.
FIGURE 16.99 Enabling Kerberos authentication on an existing web application
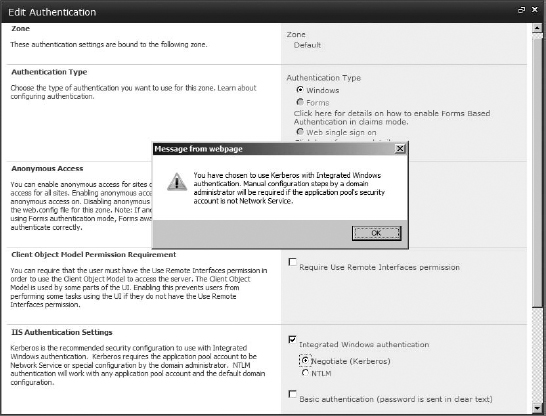
Once you have run iisreset on the servers, it's time to see whether Kerberos is working. Log into the site as a user with at least contribute permissions. To truly test it, do some common tasks. As you can see in Figure 16.100, I managed to access the top-level site at the root of the web application just fine.
FIGURE 16.100 Logged into the Kerberos-enabled site
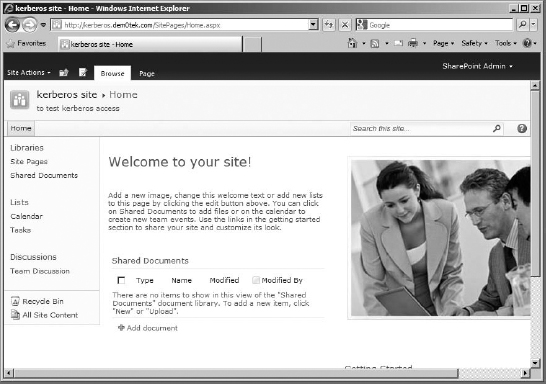
Just to be thorough, check the Event Viewer logs for errors on all servers in the cluster, as well as the domain controller. There should be no errors, but it never hurts to check. Sometimes it does take SharePoint a few minutes to realize that Kerberos is being used to access the content databases of the web application (if you don't do an iisreset).So, if Search is not working, wait at least one indexing cycle and try again before beginning troubleshooting procedures.
CAN'T LEAVE WELL ENOUGH ALONE
Because Kerberos for SharePoint negotiates, I am never completely confident that SharePoint isn't falling back to authenticating via NTLM. So, I installed Network Monitor 3.4 (it used to come free with Windows Server). I ran it while I was trying to access the Kerberos-enabled site for the first time.
According to Network Monitor, Kerberos was being used for authentication successfully. Now you know.
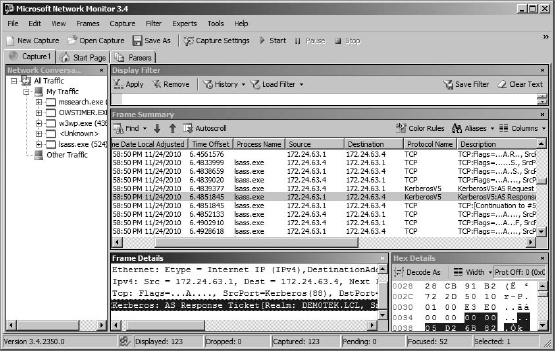
If your SharePoint environment is more complex, with web parts that access external resources, for example, you may need to set the content database account to be trusted for delegation in Active Directory. If this is the case, take the following steps:
- Open the Active Directory Users And Computers console for the domain. Click the Users node in the tree pane of the console, and then double-click the Content Database user account.
- This will open its Properties dialog box. Select the Delegation tab (Figure 16.101). You have a few options here. You can trust the user for delegation to any service (Kerberos Only), which works for me, or you can specify exactly what SPNs you want the account to be able to delegate for. This approach is more controlled and specific, and many white papers suggest it for complicated environments, when the account will be handling Because Kerberos for SharePoint negotiates, I am never completely confident that SharePoint isn't falling back to authenticating via NTLM. So, I installed Network Monitor 3.4 (it used to come free with Windows Server). I ran it while I was trying to access the Kerberos-enabled site for the first time. Kerberos for multiple services. Select (and possibly configure) the correct delegation type for you, and click OK. In my example, I am simply letting the account delegate to all services (Kerberos only).
You may have to do an iisreset/noforce on the SharePoint servers for them to realize the change.
FIGURE 16.101 Configuring the domain account for trusted delegation
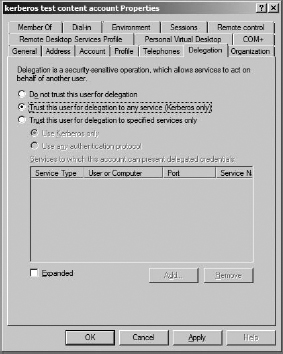
You should now be able to access the extended web application with no problems using Kerberos authentication. I have noticed that some of my servers do seem to perform a little better when Kerberos is enabled, not to mention that it can be very useful to use if you are doing authentication passthrough when using BDC. Give it a try.
TESTING THE CLUSTER
Remember that this example is built on the network that was load-balanced earlier in the chapter. This means that this Kerberos authentication is working across the cluster. To test it, feel free to drainstop a server or two (or disable its network connection) to confirm that load balancing is working.
Authenticating is an important part of accessing shared resources on a network. Being able to conveniently access sites, lists, and libraries is what SharePoint is all about.
So far in this chapter we've explored external content types and Business Data Connectivity, multi-tenancy, load balancing, SSL, and Kerberos. We installed a second server on the farm and moved the index service to it. We also enabled the Search service on the second server and enabled Central Administration for fault tolerance. These advanced capabilities come with SharePoint Foundation. However, there are some additions that can be added to SharePoint at a cost. One of those additions is Office Web Apps.
Office Web Apps adds rudimentary Office viewer and editor capabilities to SharePoint so you can open Excel, Word, PowerPoint, and OneNote files from libraries right in the browser. It is likely Office Web Apps will be a popular add-on, allowing users to do work in libraries without opening a local copy of the product.
This seems to mean that the user doesn't need to have those Office products on their computer to open and edit those files. It looks like a chance to save on licensing fees and use Word, Excel, PowerPoint, or OneNote for free.
But, just to get the installer for Office Web Apps requires a volume license of Office 2010 (you can download an installer from TechNet, but that's not for production). Each user who uses SharePoint with the Office Web Apps capability added to it must have an Office 2010 Pro Plus or Office 2010 Standard client license. Essentially, the Office 2010 license on their computer gives the user the right to use Office Web Apps from any computer. In other words, Office Web Apps was meant to be a convenience, not a free way to use Office products. (For that you have to go online and use the ad-supported Windows Live offerings).
Despite that shortcoming, it is likely to be helpful to have some idea of what makes Office Web Apps tick from an administrative standpoint before you're asked to install and maintain it on your network.
Installing Office Web Apps
To install Office Web Applications (popularly known as Office Web Apps), you must have a volume license of Office 2010 Pro Plus or Standard for your organization. This product requires a license key, that you will not get for free, to use in a production environment. The installer itself can be downloaded from the Microsoft Volume License Servicing Center (of course, you have to have a valid, volume license customer login).
It can be installed on a single Standalone server (and when it is, the Office Web App services will run as service instances) or in a server farm (where the services run per server).
When it is installing, the Office Web Apps installer runs a setup program and then the configuration wizard (otherwise referred to by its command-line equivalent,psconfig), which registers services, starts service instances (in the Standalone configuration), creates service applications and proxies, and activates features. For a farm, you can configure the service applications and proxies yourself. It's like deploying an immense solution to the farm. The Word Viewing service, PowerPoint service, and Excel Calculation services are added to the farm when Office Web Apps is installed. This essentially upgrades the SharePoint Foundation implementation to a quasi-SharePoint Server installation, meaning that when you do updates, service packs, and hotfixes, check to be sure whether you need the SharePoint Foundation ones or the SharePoint Server version. This also applies to language packs. If you install a language pack on a SharePoint Foundation server after Office Web Apps has been installed, you will need to use the SharePoint Server version.
How you install Office Web Apps, and how the services are handled, depends a bit on the type of installation you do. Just as an introduction, I am going to install it on a Standalone server. There are other installation types, such as installing Office Web Apps on an existing server farm or installing Office Web Apps on a new server farm (essentially during the installation process for the new farm after you run the SharePoint installer but before you run the configuration wizard to set up the farm for the first time).
To learn more about the different options you have for installing Office Web Apps, do an Internet search for Deploy Office Web Apps (Installed on SharePoint 2010).
Installing Office Web Apps comes in three parts. First you run the installation (after planning for it). Then you start services, and then you activate features. Of course, in a standalone environment, the services, service applications, and proxies will be started and configured, and all you really need to do is check out the settings of the service applications (to change them if you want to) and activate the Office Web App features at the site collection level.
Something to keep in mind is that Office Web Apps takes over the way Office files open from libraries. The default behavior is to open files with the desktop client software. Office Web Apps understandably changes that so just about everything opens in the browser. You can change that at the site collection level by activating the Open Documents In Client Application By Default feature. Or you can change the open file behavior for each library.
Services can be load-balanced in farm environments, and because several of the services do caching on the server (so files open faster), caching can be managed to a certain extent as well.
For farms, there can be a lag between the farm-wide default for opening files because it is changed during installation from open in client to open in browser only and during the activation of services. During this time, users might have problems opening library files. So, plan carefully—you might want to consider installing Office Web Apps when production is slow.
Office Web Apps needs basically the same hardware, software, and browser requirements as SharePoint (although it apparently runs well in the Chrome browser). It is strongly recommended that you don't install Office Web Apps on a domain controller. It is also suggested that, when you install Office Web Apps, you are logged in as a farm administrator, you are a PowerShell shell admin, and you are in the Local Administrators group on the local server. In the case of a Standalone installation of SharePoint, you need to be a local administrator, and it helps if you use the account that you installed SharePoint with to begin with.
LOOKING FOR TROUBLE
Some troubleshooting tips if a user cannot open a file: Check to see what version of Internet Explorer the user is using. Office Web App features are not entirely compatible with the 64-bit version of Internet Explorer. Nor does it play well with browsers of an older version than IE 7. It requires Active X controls, so it won't work in browsers that don't support Active X. It will work with Firefox, but you need to install the add-on so it can Open Office documents. If the user has a version of Office installed on their computer that is older than Office 2003, Office Web Apps won't work when opened on that machine. In addition, if security settings in the browser are blocking Active X, it will also cause issues.
This exercise assumes you have a volume license for Office 2010 and that you've downloaded the installer from the Microsoft licensing site. It will require a product key, so be sure to have it handy.
To start the installation, make sure you are logged in with the correct account, and then double-click the installation file for Office web apps, or you can right-click and run it as an administrator if you'd like.
During the installation, you will be prompted for a product key, to accept the EULA, and to specify where the installation files for the product (as well as the search index files, as if this were a new SharePoint installation) will be located.
After the installation files finish, the configuration wizard will start (if you didn't clear the Run The Wizard Now box, and you should't because it does need configuration). It will stop the SharePoint services temporarily (although on a standalone installation, you will need to restart the Administration service manually) and then configure 11 tasks, including installingand registering services
DELUSIONS OF GRANDEUR
The Configuration Wizard considers this an upgrade installation, although the version number in the upgrade and status page for SharePoint itself does not increase. However, a lot of new components were added.
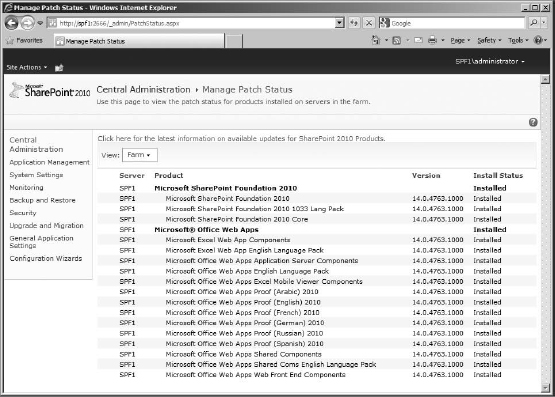
Once the installation and configuration of Office Web Apps is complete, let's go to Central Administration and see what has happened.
To see what services were installed and if they have been started, open Services On Server under System Settings on the Central Administration home page.
In Figure 16.102, you can see that the expected services, Excel Calculation, PowerPoint, and Word Viewing, were created and started by the Configuration Wizard.
FIGURE 16.102 Services now available in Services On Server page
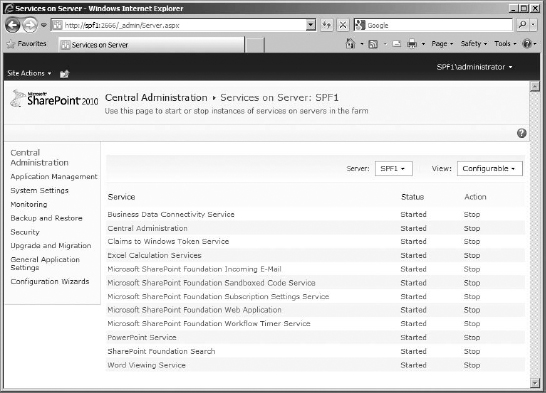
To take a closer look, because obviously the services can't be managed here, open Manage Service Applications under Service Applications on the Application Management page (Figure 16.103).
FIGURE 16.103 New Office Web Apps-related service applications
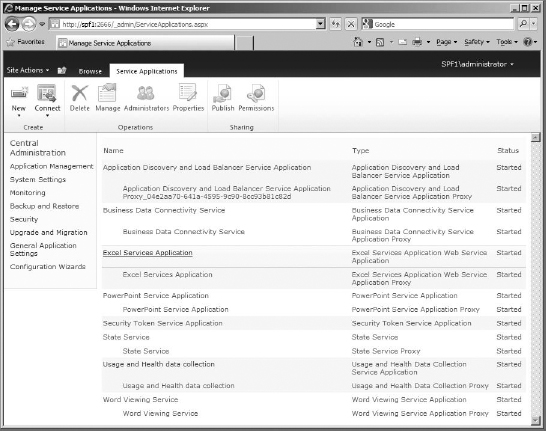
The new services are listed, along with a service that cannot be managed, State Service. It helps services that handle high quantities of data flow, such as PowerPoint broadcasts, by storing temporary data. The state service does have its own database (Figure 16.104).
FIGURE 16.104 State Service database
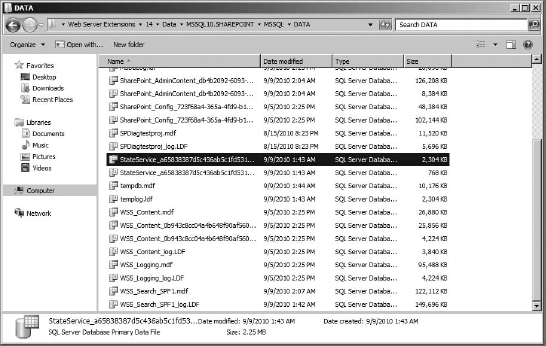
Each one of these service applications has additional management settings.
If you click the Excel Services application, it has a page of links to settings pages (Figure 16.105).
FIGURE 16.105 Manage Excel Services application page
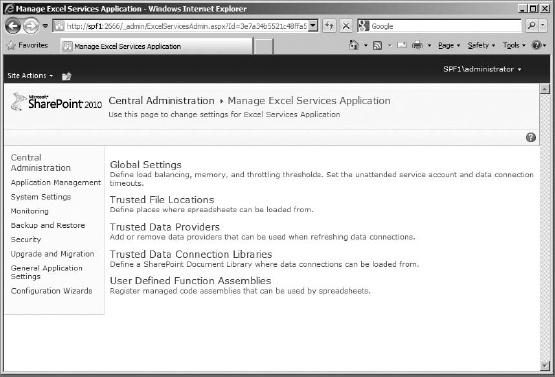
Global Settings This link goes to a page where you can manage security in terms of file access methods, connection encryption, and allowing cross-domain access, load-balancing schemes, session management with maximum sessions per users, memory utilization, workbook caching, and settings concerning external data.
Trusted File Locations The SharePoint implementation is trusted by default, but you can add more trusted file locations here. Excel will not open workbooks from untrusted locations.
Trusted Data Providers Excel Services application has a long list of trusted types of data sources for spreadsheets, from SQL server to Oracle providers to IBM. You can add providers here if what you need isn't listed.
Trusted Database Connection Library It's possible to store data connection files (such as ODC or UDC files) to use in order to make the same database connections again. To use this setting, you have to make a dedicated library for it (there isn't one by default) and then specify that library's location and description.
User Defined Function Assemblies This is used to manage and register DLL files that provide Excel functions.
The Excel Services Application also created some farm features (Figure 16.106). It is the only one to do so.
FIGURE 16.106 Excel farm features
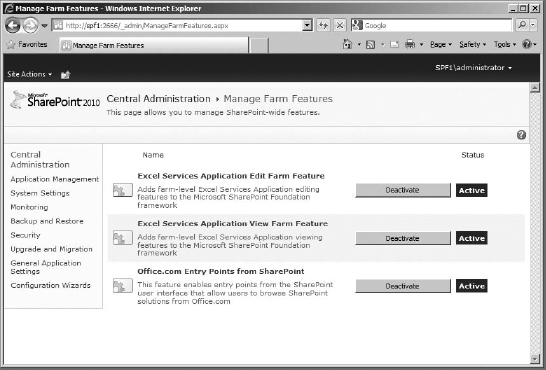
The PowerPoint Service application settings are less broad. As you can see in Figure 16.107, they primarily relate to file format support, extra checking for older format files, and presentation broadcasting. The service will scan older PowerPoint files before opening them, because those files can have issues running as a presentation. However, scanning those files is resource intensive, so this can be skipped if all files are trusted. The Broadcast site section displays the default site that gets created during installation and configuration of Office Web Apps. There is also a link to create a broadcast site at a different location using the broadcast site template.
FIGURE 16.107 PowerPoint service application settings
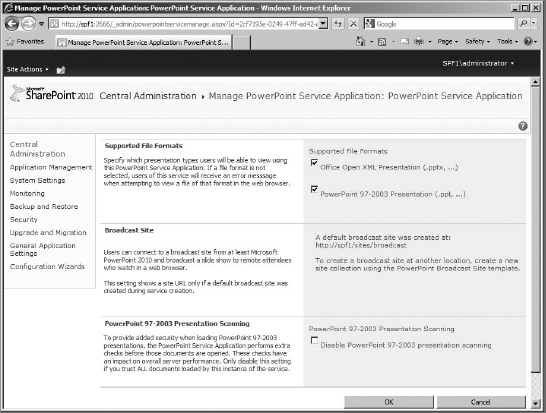
The PowerPoint broadcast site is an added capability of the PowerPoint service. The service creates a site collection specifically for broadcasting presentations. It has three member groups-Broadcast Attendees, Broadcast Presenters, and Broadcast Administrators. To be able to see a broadcast on the site, users need to be added to the Attendees group. The site is tightly integrated with PowerPoint 2010. As you can see in Figure 16.108, you need to use PowerPoint 2010 to basically publish a presentation to the site. After setting up a broadcast in PowerPoint, you'll get a temporary link to the broadcast of the presentation to give out to everyone. If they have permission to access the site, they can see a synchronized view of the slides as you present.
FIGURE 16.108 PowerPoint Broadcast Site
The Word Viewing service's application settings (Figure 16.109) include managing total active processes, recycle threshold for processes, older format document scanning, embedded font support, and supported file formats for viewing.
FIGURE 16.109 Word Viewing service's application settings
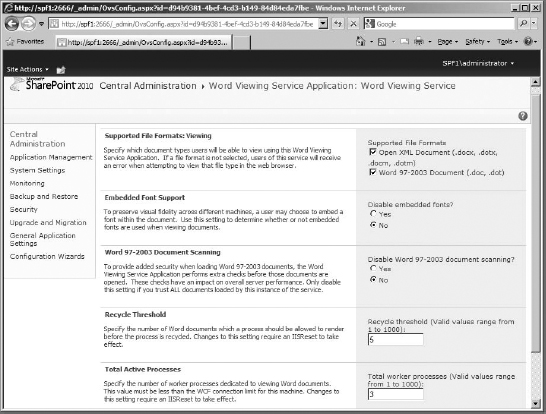
WHAT ABOUT ONENOTE
You might have noticed that OneNote doesn't have a service application and special settings. It allows editing of OneNote documents on its own onenote.aspx page and doesn't need a service application.
In IIS, several applications were created under the SharePoint Web Services Web Site; they coincide, not surprisingly, with the Office Web App service applications. Also, if you check in Central Administration (or at the command line), every web application (except Central Administration) will have a new site collection dedicated to caching views of Office files, Office_Viewing_Service_ Cache. The Broadcast site collection will be created in only one web application, usually the root. You can create more, so it can be located in a different web application if you'd like. Remember that PowerPoint broadcasting is very resource intensive. Enable and use with caution.
On the site collection level, there are two new site collection features to enable (Figure 16.110). Open Documents In Client Applications By Default allows you to override the default Office Web Apps behavior of opening all files in the browser. The other feature, simply called Office Web Apps, is what actually enables Office Web Apps in the site collection libraries.
FIGURE 16.110 Office Web Apps-related site collection features
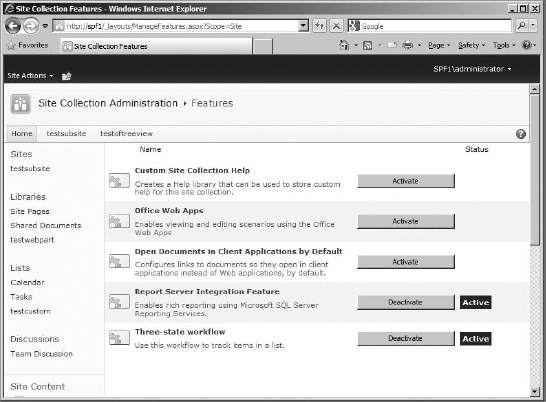
If you activate the Office Web Apps service, you can use its viewer/editor capabilities in libraries on the site. I am not going to go into the details of using the individual Office Web Apps that much because Microsoft uses Office Web Apps online at http://office.1ive.com.. All you need is a live ID and you can explore the product to your heart's content. In general, if you know how to use the Office products, you know how to use the web apps, although there will obviously be some features missing.
Briefly, if you were to click a Word document in a library, it would trigger the View capability of the Word Viewing service, opening the file in the browser in an interface with the options to open the document in Word 2010 if you have it installed, edit in browser, and even use find to search in the text. There is even a tiny button on the top right of the page that lets you “pop out” the document so it is not constrained by the boundaries of the browser window. Notice also in Figure 16.111 that there are extra features in a drop-down menu, including the option to print from SharePoint. That is a useful option.
You can also click Edit In Browser to trigger the ribbon. It is very much like the ribbon available for the rich-text area of wiki pages (Figure 16.112). There are tabs for formatting text (although it's called Home), Insert and View. To return to just viewing the document, you can use the View tab and click Reading View.
FIGURE 16.111 View document using Office Web Apps
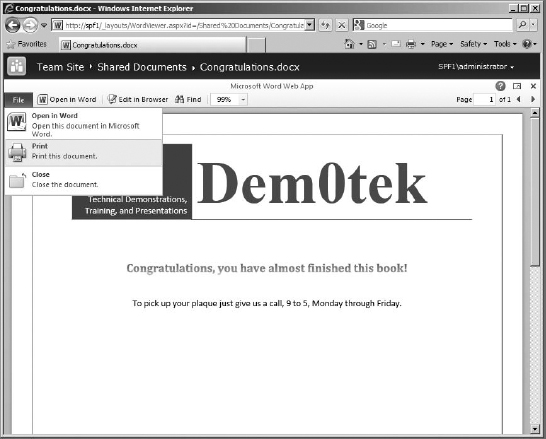
FIGURE 16.112 Editing a document in the browser
And that's my whirlwind tour of Office Web Apps from an administrator's perspective. You have a fundamental understanding of what it takes to install Office Web Apps; what service applications are created; and what databases, site collections, and farm and site collection features need to be activated.
I hope this gives you the courage to try it yourself. It can be convenient for commuting users, for those who roam and aren't always at the same workstation, or for those who just want to quickly share a document, spreadsheet, PowerPoint presentation, or OneNote file, without opening the client application locally.
As a matter of fact, I hope this chapter has given you insights into the more advanced capabilities and configurations of SharePoint and has rounded out your mastery of the product. Good luck with SharePoint and happy collaboration.
The Bottom Line
Use Business Data Connectivity and create external data connections. Business Data Connectivity is a service application that makes it possible to surface external data sources in SharePoint to create lists and lookup fields.
Master It What free product can I use to configure external content types?
Set a service principal name. For Kerberos authentication to work with SharePoint, additional configuration is required. The content database account for the web application using Kerberos must be registered as a service principal name for the SharePoint server (or servers).
Master It What executable is used to register service principal names? How do you access it?
Configure Network Load Balancing. Network Load Balancing is a network connection feature built into Windows Server 2008 and 2008 R2 (although there are other hardware and software solutions). It balances client requests and activity between servers in a cluster, effectively making them appear to be one computer from the client's perspective.
Master It What is a drainstop, and what is it for?
Configure multitenancy. Hosting multiple, isolated tenants on one SharePoint implementation is made possible by the Subscription Settings service application.
Master It What is a site subscription?