
Over the course of the past several lessons you've learned how you can handle events with HTML attributes, DOM object properties, and DOM object methods. But one vital piece of information has been withheld from you: how to access a special object that contains information about any event. Not surprisingly, the manner in which you access this object differs according to the user's browser: standards-supporting browsers use the standard Event object, and legacy versions of Internet Explorer (IE) use their own proprietary event object.
This lesson focuses on the standard Event object. You'll be introduced to IE's legacy event object in the next lesson.
When you have a moment, flip through the previous lessons regarding event handling. Pay attention to the functions assigned to handle events; notice that none of these functions accept any arguments. This is by design, as you, the developer, do not call event handlers; the browser does. So, it makes little sense to write a function that accepts arguments.
Or does it?
In actuality, the functions you wire to events should accept one argument, because, according to the standard event model, the browser passes an Event object to the function handling an event, like this:
eventUtility.addEvent(document, "click", function(event) {
    alert(event);
});
This code sets an event handler on the document object for the click event. When you click anywhere on the page, you see an alert box similar to that shown in Figure 21-1 (assuming a standards-compliant browser).
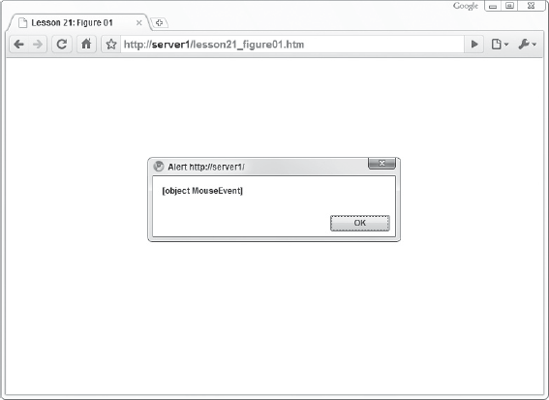
The MouseEvent mentioned in Figure 21-1 is a data type that inherits from Event, and it contains information related to the click event, such as which mouse button was clicked, the mouse pointer's coordinates, and a variety of other information. You'll look at MouseEvent objects in future lessons. For now, let's just focus on basic Event objects.
Most of the time an Event object contains the majority of information you'll want about a particular event. It contains information regarding the type of event that occurred and the element that received the event.
To determine what event took place, you use the type property, like this:
eventUtility.addEvent(document, "click", function(event) {
    alert(event.type); // click
});
This property returns a string containing the name of the event (without a preceding on). This is extremely helpful when you use one function to handle a variety of events. For example, look at the following code:
function eventHandler(event) {
    if (event.type === "click") {
alert("You clicked me!");
} else if (event.type === "keypress") {
alert("You pressed a key!");
}
}
eventUtility.addEvent(document, "click", eventHandler);
eventUtility.addEvent(document, "keypress", eventHandler);In this code a function called eventHandler() accepts an argument called event (event is the modern conventional identifier for the parameter of event handlers. Sometimes you may see just plain e used; that's old-school). Inside the function, an if statement determines whether or not the event that caused the function to execute was the click event. If so, an alert box displays the message "You clicked me!" There's also an else...if statement that checks if the event was the keypress event, and an alert box says, "You pressed a key!" if this event did indeed fire. The two final lines of this code set the eventHandler() function to handle the click and keypress events on the document object.
Using one function to handle a variety of events is actually quite common; the ability to discern what type of event occurred is an important ability that the Event object gives you.
Another piece of vital information Event objects provide you with is the target property. This property returns the DOM element object associated with the element that received the event. So if you wanted to you could manipulate the element that received the event, or use the element to locate a sibling or parent element using the DOM properties you learned about in Lesson 13. Let's look at an example that uses the following HTML:
<body>
    <div id="divElement"
        style="width: 100px; height: 100px; background-color: red; "></div>
</body>
This is a snippet of an HTML page showing the contents of the <body/> element. It has a <div/> element styled to look like a red square. You can set up an event handler to change the background color of this element when it is clicked, and you can do so in a variety of ways. One is to assign a click event handler for the <div/> element itself, like this:
eventUtility.addEvent(document.getElementById("divElement"), "click",
function(event) {
    var bgColor = event.target.style.backgroundColor;
    var color = "red";

    if (bgColor === color) {
        color = "green";
    }

    event.target.style.backgroundColor = color;
});
This event handler toggles the background color of this <div/> element between red and green. The first statement of the event handler creates two variables: one to contain the current background color of the element, called bgColor, and another to contain the text "red," called color.
The next statement determines the element's background color. If it is currently red, color is changed to green; otherwise, color stays as red. The final line changes the element's backgroundColor to the value contained within the color variable.
This code works, but what if you want to add another <div/> element to the document and provide the same functionality for it? Here's the HTML:
<body>
    <div id="divElement"
        style="width: 100px; height: 100px; background-color: red; "></div>
<br/><br/>
    <div id="divElement2"
        style="width: 100px; height: 100px; background-color: red; "></div>
</body>
Well, you could set up another click event handler for the new element, but a better solution is to use something called event delegation. Event delegation is a technique whereby you set a single event handler on a parent element. This way any event that occurs within that parent element, including its children, gets fired, and the event's target is whatever element (the parent or children) the event originated at.
This might be easier to understand with Figure 21-2.
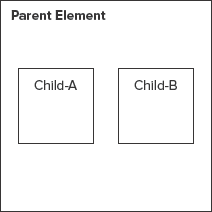
Figure 21-2 shows an element that contains two child elements. Assume a click event handler is set on the parent element. You can click anywhere within the bounds of the parent element, and the click event is handled by your handler. This includes Child-A and Child-B. So when you click Child-B, it receives the click event, but because it is a child of the parent (and because the event bubbles up to the parent), the event handler executes and the event's target is Child-B.
So, forget all about the event handler for the divElement <div/> element, and look at the following code, which uses event delegation:
eventUtility.addEvent(document, "click", function(event) {
    var eSrc = event.target;

    if (eSrc.tagName.toUpperCase() === "DIV") {
        var bgColor = eSrc.style.backgroundColor;
        var color = "red";

        if (bgColor === color) {
            color = "green";
        }

        eSrc.style.backgroundColor = color;
} });
One thing about event delegation: It does involve a little bit more code. So let's look at it starting with the first line. A variable called eSrc is set to contain the event's target; it makes referring to the event target much easier (eSrc is your author's convention for naming this variable; it is short for "event source").
The next bit of code uses the tagName property to determine whether the element is a <div/> element (the tagName property usually returns the element's tag name in all-uppercase letters, but in some instances, like with XHTML documents, it doesn't. So, it's a good habit to use toUpperCase() to ensure uniformity. Remember that because the click event handler was set up on the document object, any mouse click anywhere in the page will cause the click event to fire and the event handler to execute. So you need to ensure that the event target is the element that you want to manipulate. In the case of this example, we want to manipulate any <div/> element in the page, so our simple check of the element's tagName property is sufficient. From there the code is largely the same as before. The code determines the element's background color and changes it.
When you need to handle one or more events on a variety of elements, use event delegation. It actually performs better and more efficiently than one or more event handlers set on a variety of elements.
The event's type and target are major pieces of information, and you'll use them quite often. Let's apply this knowledge with a simple example.
In this lesson you learn how to retrieve basic information regarding an event in the standard event model.
For this lesson, you need a text editor; any plain text editor will do. For Microsoft Windows users, Notepad is available by default on your system or you can download Microsoft's free Visual Web Developer Express (www.microsoft.com/express/web/) or Web Matrix (www.asp.net/webmatrix/). Mac OS X users can use TextMate, which comes as part of OS X, or download a trial for Coda (www.panic.com/coda/). Linux users can use the built-in VIM.
You also need a modern web browser. Choose any of the following:
Internet Explorer 8+
Google Chrome
Firefox 3.5+
Apple Safari 4+
Opera 10+
Create a subfolder called Lesson21 in the JS24Hour folder you created in Lesson 1. Store the files you create in this lesson in the Lesson21 folder.
You will write a simple toolbar with three buttons. They will have a normal state, a state when the mouse pointer moves over them, and a state when they're clicked. Use event delegation to handle the events for the buttons.
Open your text editor and type the following HTML:
<html>
<head>
    <title>Lesson 21: Example 01</title>
    <style type="text/css">
        #divContainer {
            background-color: silver;
            height: 50px;
            padding: 2px;
        }

        span {
            display: inline-block;
            width: 50px;
            height: 50px;
        }

        .button-normal {
            background-color: gray;
        }

        .button-over {
            background-color: navy;
        }

        .button-click {
            background-color: yellow;
        }
    </style>
</head>
<body>
    <div id="divContainer">
        <span class="button-normal">

        </span>
        <span class="button-normal">

        </span>
        <span class="button-normal">

        </span>
    </div>
    <script type="text/javascript" src="eventutility.js"></script>
<script type="text/javascript"> </script> </body> </html>Save it as
lesson21_example01.htm. There's nothing very exciting here. A<div/>element contains three<span/>elements, and they're styled to look like a rough, oversize toolbar. There are three CSS classes of note:button-normal,button-over, andbutton-click. These three classes are the three different states a button can be in.Now add the bold JavaScript code:
<html>
<head>
    <title>Lesson 21: Example 01</title>
    <style type="text/css">
        #divContainer {
            background-color: silver;
            height: 50px;
            padding: 2px;
        }

        span {
            display: inline-block;
            width: 50px;
            height: 50px;
        }

        .button-normal {
            background-color: gray;
        }

        .button-over {
            background-color: navy;
        }

        .button-click {
            background-color: yellow;
        }
    </style>
</head>
<body>
    <div id="divContainer">
        <span class="button-normal">

        </span>
        <span class="button-normal">

        </span>
        <span class="button-normal">

        </span>
    </div>
<script type="text/javascript" src="eventutility.js"></script> <script type="text/javascript">function mouseHandler(event) {var eSrc = event.target;var type = event.type;if (eSrc.tagName.toUpperCase() === "SPAN") {}}</script> </body> </html>This code adds a function called
mouseHandler(), and it accepts a single argument that the browser passes to the function. The first statement creates two variables,eSrcandtype. These variables hold the event target and event type, respectively.After the variable declarations, an
ifstatement determines if the event target is a<span/>element. This check is sufficient since they're the only<span/>elements in the document. If there were other<span/>elements, you could use theclassNameproperty to determine whether the target had one of the three CSS classes.Now add more code; it's bold in the following:
<html>
<head>
    <title>Lesson 21: Example 01</title>
    <style type="text/css">
        #divContainer {
            background-color: silver;
            height: 50px;
            padding: 2px;
        }

        span {
            display: inline-block;
            width: 50px;
            height: 50px;
        }

        .button-normal {
            background-color: gray;
        }

        .button-over {
            background-color: navy;
        }

        .button-click {
            background-color: yellow;
        }
    </style>
</head> <body> <div id="divContainer"> <span class="button-normal"> </span> <span class="button-normal"> </span> <span class="button-normal"> </span> </div> <script type="text/javascript" src="eventutility.js"></script> <script type="text/javascript"> function mouseHandler(event) { var eSrc = event.target; var type = event.type; if (eSrc.tagName.toUpperCase() === "SPAN") {if (type === "mouseover") {if (eSrc.className !== "button-click") {eSrc.className = "button-over";}} else if (type === "mouseout") {if (eSrc.className !== "button-click") {eSrc.className = "button-normal";}} else if (type === "click") {if (eSrc.className !== "button-click") {eSrc.className = "button-click";} else {eSrc.className = "button-over";}}} } </script> </body> </html>This code goes through an
if...else if...else ifchain checking for the different event types. If amouseoverevent occurs, you want to change the element'sclassNameproperty tobutton-over—but only if its CSS class isn'tbutton-click. You want clicked buttons to persist their state, as that mimics the behavior of pretty much every toolbar ever created. Next check for themouseoutevent, and change the CSS class of the element tobutton-normal(again, only if the class isn'tbutton-click). Finally comes the check for theclickevent, and you will toggle the CSS class betweenbutton-clickandbutton-over. You usebutton-overhere because, when you click a button in the toolbar, the mouse pointer is over the element.Add the code that sets the
click,mouseoverandmouseoutevent handlers to the document object. It is bold in the following code:<html> <head> <title>Lesson 21: Example 01</title> <style type="text/css"> #divContainer { background-color: silver; height: 50px; padding: 2px; } span { display: inline-block; width: 50px; height: 50px; } .button-normal { background-color: gray; } .button-over { background-color: navy; } .button-click { background-color: yellow; } </style> </head> <body> <div id="divContainer"> <span class="button-normal"> </span> <span class="button-normal"> </span> <span class="button-normal"> </span> </div> <script type="text/javascript" src="eventutility.js"></script> <script type="text/javascript"> function mouseHandler(event) { var eSrc = event.target, var type = event.type; if (eSrc.tagName.toUpperCase() === "SPAN") { if (type === "mouseover") { if (eSrc.className !== "button-click") { eSrc.className = "button-over";} } else if (type === "mouseout") { if (eSrc.className !== "button-click") { eSrc.className = "button-normal"; } } else if (type === "click") { if (eSrc.className !== "button-click") { eSrc.className = "button-click"; } else { eSrc.className = "button-over"; } } } }eventUtility.addEvent(document, "mouseover", mouseHandler);eventUtility.addEvent(document, "mouseout", mouseHandler);eventUtility.addEvent(document, "click", mouseHandler);</script> </body> </html>Save the file and load it into any browser (except IE8 and below). You'll see that as you move your mouse pointer over a button, the background color changes to navy. When you move your mouse pointer off a button, it will change back to gray. When you click a button, the element's background color will change to yellow. Clicking a button that is yellow will change it to navy.
To get the sample code files, you can download Lesson 21 from the book's website at www.wrox.com.
Note
Please select Lesson 21 on the DVD to view the video that accompanies this lesson.