Chapter 12
Developing a Ping-Pong Game
The tic-tac-toe game developed in Lesson 11 was a simple one. My goal was to show you the basic layout of UI components and event processing. Now you’ll learn how to draw and move such objects as ovals, rectangles, and lines in a window. You’ll also learn how to process keyboard events. To add a little fun to these subjects, you’ll be learning all these things while creating a ping-pong game. This game will have two players: the user and the computer.
Let’s come up with the rules for our version of the ping-pong game:
1. The game lasts until one of the players (the user or the computer) reaches a score of 21. The computer’s racket is on the left.
2. The user’s racket movements will be controlled by the mouse.
3. The game score will be displayed at the bottom of the window.
4. A new game starts when a player presses the N key on the keyboard; the Q key ends the game; S serves the ball.
5. Only the user can serve the ball; the computer can’t.
6. For one of the players to win a point the ball must go beyond the opponent’s racket’s vertical line when the racket is not blocking the ball.
7. When the computer bounces the ball, the ball can move only horizontally to the right.
8. If the ball contacts the user’s racket in the upper half of the table, the ball should be moving up and left. If the ball was located in the bottom part of the table, it should move down and left.
It sounds like a very complicated task, but let’s split it into a set of simple tasks and solve them one by one. The first version of the game will have only some of these rules implemented: It’ll just paint the table, move the racket, and display the coordinates of the mouse pointer when you click the mouse button.
From the code organization perspective, you need to decide how many classes you need to write to separate UI and functionality. This game will consist of two classes and one interface:
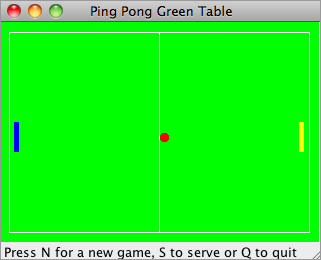
- The class PingPongGreenTable will take care of the visual part. During the game it’ll display the table, rackets, and ball. The final version of the table is shown in Figure 12-1. This book doesn’t show colors, but the table surface is green, the rackets are blue and yellow, and the ball is red.
- The class PingPongGameEngine will be responsible for calculating the ball’s and rackets’ coordinates, starting and ending the game, and serving the ball. The engine will pass the current coordinates of the UI components to PingPongGreenTable, which will repaint itself accordingly.
- The interface GameConstants will contain declarations of all constants that the game needs, for example the width and height of the table, the starting positions of the rackets, and so on.
The User Interface
The first version of the game will do only three things:
- Display the green ping-pong table.
- Display the coordinates of the mouse pointer when you click the mouse.
- Move the user’s racket up and down according to the mouse pointer’s movements.
Listing 12-1 shows the first version of the UI. The class PingPongGreenTable1 is a subclass of the Swing JPanel.

Listing 12-1: Coding UI of the ping-pong game (version 1)
public class PingPongGreenTable1 extends JPanel implements GameConstants1{

    JLabel label;
    public Point point = new Point(0,0);

    private int ComputerRacketX =15;
    private int kidRacketY =KID_RACKET_Y_START;

    Dimension preferredSize = new Dimension(TABLE_WIDTH,TABLE_HEIGHT);

    // This method sets the size of the frame. It's called by JVM
    public Dimension getPreferredSize() {
          return preferredSize;
    }

    // Constructor instantiates the engine
    PingPongGreenTable1(){

      PingPongGameEngine1 gameEngine = new PingPongGameEngine1(this);

       // Listen to mouse clicks to show its coordinates
         addMouseListener(gameEngine);

       // Listen to mouse movements to move the rackets
         addMouseMotionListener(gameEngine);
     }

     // Add a panel with a JLabel to the frame
     void addPaneltoFrame(Container container) {

        container.setLayout(new BoxLayout(container, BoxLayout.Y_AXIS));
        container.add(this);

         label = new JLabel("Click to see coordinates");
         container.add(label);
      }

      // Repaint the window. This method is called by the JVM
      // when it needs to refresh the screen or when a
      // method repaint() is called from PingPointGameEngine1

       public void paintComponent(Graphics g) {

         super.paintComponent(g);
         g.setColor(Color.GREEN);

         // paint the table green
         g.fillRect(0,0,TABLE_WIDTH,TABLE_HEIGHT);

         // paint the right racket
         g.setColor(Color.yellow);
         g.fillRect(KID_RACKET_X_START,kidRacketY,5,30);

        // paint the left racket
         g.setColor(Color.blue);
         g.fillRect(ComputerRacketX,100,5,30);

         //paint the ball
         g.setColor(Color.red);
         g.fillOval(25,110,10,10);

         // Draw the white lines on the table
         g.setColor(Color.white);
         g.drawRect(10,10,300,200);
          g.drawLine(160,10,160,210);

         // Display the dot as a small 2x2 pixels rectangle
        if (point != null) {
            label.setText("Coordinates (x,y): " +
                         point.x + ", " + point.y);
      g.fillRect(point.x, point.y, 2, 2);
  }
      }

      // Set the current position of the kid's racket
      public void setKidRacketY(int xCoordinate){

       this.kidRacketY = xCoordinate;
     }

     // Return the current position of the kid's racket
      public int getKidRacketY(int xCoordinate){
        return kidRacketY;
     }

       public static void main(String[] args) {

         JFrame f = new JFrame("Ping Pong Green Table");

         // Ensure that the window can be closed
        // by pressing a little cross in the corner
         f.setDefaultCloseOperation(WindowConstants.EXIT_ON_CLOSE);

         PingPongGreenTable1 table = new PingPongGreenTable1();

         table.addPaneltoFrame(f.getContentPane());

         // Set the size and make the frame visible
        f.pack();
         f.setVisible(true);
     }
 }
At any given time the game needs to know the exact coordinates of the mouse pointer. The constructor of PingPongGreenTable1 will create an instance of the event listener class PingPongGameEngine, which will perform some actions when the user clicks the mouse button or just moves the mouse.
The method addPaneltoFrame() creates a JLabel component that will display the coordinates of the mouse.
This class is not an applet, which is why instead of the method paint() it uses the method paintComponent(). This method is called by JVM when it needs to refresh the window, or when our program calls the method repaint(). In other words, the method repaint() internally calls paintComponent() and provides our class with the object Graphics so it can paint on the window. Always call this method after recalculating the coordinates of the rackets or the ball to display them in the proper position.
To paint a racket, set the color first, and then fill a thin vertical rectangle with this paint using the method fillRect(). This method needs to know the x- and y-coordinates of the top left corner of the rectangle and its width and height in pixels.
The ball is painted with the method fillOval(), which needs to know the coordinates of the center of the oval, its height and its width. When the height and width of the oval are the same, it is a circle.
The x-coordinate in a window increases from left to right, and the y-coordinate increases from top to bottom (see Figure 12-2). For example, the width of the rectangle shown in Figure 12-1 is 100 pixels, and the height is 70.
The x- and y-coordinates of the corners of this rectangle are shown in parentheses.
Another interesting method is getPreferredSize(). The program creates an instance of the Swing class Dimension to set the size of the ping-pong table. The JVM needs to know the dimensions of the window, which is why it calls the method getPreferredSize() of the PingPongGreenTable1 object. This method returns to the JVM an object, Dimension, that is created in the code according to the size of our table.
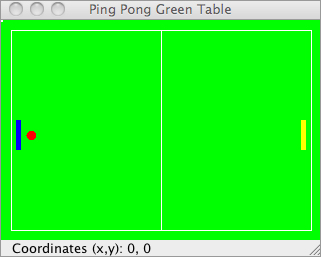
The first version of the UI is shown in Figure 12-3. You can move the mouse, and the correct racket moves along. When you click the mouse anywhere on the table, the current coordinates are displayed at the bottom.
The Constants
Both table and engine classes use some constant values that do not change. For example, the class PingPongGreenTable1 uses the width and height of the table, and PingPongGameEngine1 needs to know the ball movement increments — the smaller the increment, the smoother the movement. It’s convenient to keep all the constants (final variables) in an interface. In our game the name of the interface is GameConstants1. If a class needs these values, there are two ways of making them available in the game classes.
The first one is just adding the clause implements GameConstants1 to the class declaration and using any of the final variables from this interface as if they had been declared in the class itself. This method of adding constants has a code readability drawback — it won’t be easily understood where these final variables were declared. Both the table and engine classes (see Listing 12-3) implement the GameConstants1 interface shown in Listing 12-2.
The second (and better) way of using these constants is to import the interface in the classes that need them, and use the fully qualified names of the constants, e.g. GameConstants1.TABLE_WIDTH. Changing the code of Listing 12-3 to apply this technique is one of the assignments in the Try It section.
If you decide to change the size of the table, ball, or rackets you’ll need to do it in only one place — the GameConstants1 interface.
Listing 12-2: The game’s constants (version 1)
public interface GameConstants1 {

 int TABLE_WIDTH =  320;
 int TABLE_HEIGHT = 220;
 int KID_RACKET_Y_START = 100;
 int KID_RACKET_X_START = 300;
 int TABLE_TOP = 12;
 int TABLE_BOTTOM = 180;
 int RACKET_INCREMENT = 4;
}
A program cannot change the values of these variables, because they were declared as final. But if, for example, you decide to increase the size of the table, you’ll need to change the values of TABLE_WIDTH and TABLE_HEIGHT and then recompile the GameConstants1 interface.
The Engine
The decision maker in this game is the class PingPongGameEngine1, which implements two mouse-related interfaces. The first version of the engine is shown in Listing 12-3.
Listing 12-3: The game’s engine (version 1)
public class PingPongGameEngine1  implements
       MouseListener, MouseMotionListener, GameConstants1{

 PingPongGreenTable1 table;
 public int kidRacketY = KID_RACKET_Y_START;

 // Constructor. Stores a reference to the UI object
 public PingPongGameEngine1(PingPongGreenTable1 greenTable){
   table = greenTable;
 }

// Methods required by the MouseListener interface
 public void mouseClicked(MouseEvent e) {

   // Get X and Y coordinates of the mouse pointer
   // and set it to the "white point" on the table
   // Bad practice! Fix it in the Try It section
       table.point.x = e.getX();
table.point.y = e.getY();

  //The method repaint internally calls the table's
  // method paintComponent() that refreshes the window
  table.repaint();
 }

 public void mouseReleased(MouseEvent e) {};
 public void mouseEntered(MouseEvent e) {};
 public void mouseExited(MouseEvent e) {};
 public void mousePressed(MouseEvent e) {};

 // Methods required by the MouseMotionListener interface
 public void mouseDragged(MouseEvent e) {}

 public void mouseMoved(MouseEvent e) {
  int mouseY = e.getY();

  // If a mouse is above the kid's racket
  // and the racket did not go over the table top
  // move it up, otherwise move it down

  if (mouseY < kidRacketY && kidRacketY > TABLE_TOP){
kidRacketY -= RACKET_INCREMENT;
  }else if (kidRacketY < TABLE_BOTTOM) {
       kidRacketY += RACKET_INCREMENT;
  }

  // Set the new position of the racket table class
    table.setKidRacketY(kidRacketY);
    table.repaint();
  }
}
The MouseListener will have code only in the method mouseClicked(). On every mouse click this method will draw a small white dot on the table and display its coordinates. This code is not very useful for our game, but I wanted to show you a simple way to get the coordinates of the mouse from the MouseEvent object that is given to the program by JVM.
The method mouseClicked() sets the coordinates of the variable point depending on where the mouse pointer was when the player pressed the mouse button. After coordinates are set, this method asks the JVM to repaint the table.
MouseMotionListener reacts to movements of the mouse over the table, and we’ll use its method mouseMoved() to move the user’s racket up or down.
The method mouseMoved() calculates the next position of the user’s racket. If the mouse pointer is above the racket (the t-coordinate of the mouse is less than the y-coordinate of the racket) this method ensures that the racket will not go over the top of the table.
When the constructor of the table class creates the engine object, it passes to the engine a reference to the table’s instance (the keyword this represents a reference to the memory location of the object PingPongGreenTable1). Now the engine can “talk” to the table, for example by setting the new coordinates of the ball or repainting the table if needed.
I’ve included an example of a bad programming practice in Listing 12-3. The engine class is directly accessing the variable point declared in another class, PingPongGreenTable1. It would be better to make the variable point private and to provide a public method in the class PingPongGreenTable1 to set the coordinates of the point. This way if you decide to rename the variable point you won’t need to change the engine’s class; the public interface will remain the same. You’ll need to fix this bad practice in the “Try It” section.
In our game rackets move vertically from one position to another using the four-pixel increment defined in the interface GameConstants1 (the engine class implements this interface). For example, the next line subtracts four from the value of the variable kidRacketY:
kidRacketY -= RACKET_INCREMENT;
Suppose the y-coordinate of the racket is 100: after this line it becomes 96, which means that the racket has to be moved up. You can get the same result using the following syntax:
kidRacketY = kidRacketY – RACKET_INCREMENT;
Well, to finish the game you need to learn about multi-threading, which will be explained in Lesson 20. If you feel a craving to finish the game right now, read the first half of Lesson 20 and then examine the code that comes on the accompanying DVD and read the following explanations. I won’t include the full listing of the completed game here — just some highlights to help you in reading the code located on the disk. The class names in the completed version of the code are the same as the ones used in this lesson, but they do not end with the digit 1.
Let’s start with the class PingPongGreenTable. You don’t need to display a white dot when the user clicks the mouse; this was just an exercise to show you how to get the coordinates of the mouse pointer. That’s why I’ll remove the declaration of the variable point and the lines that paint the white dot from the method paintComponent(). Also, the constructor does not need to add the MouseListener anymore; it was there only to display the point’s coordinates.
On the other hand, PingPongGreenTable should react to some of the keyboard buttons (N for new game, S for serving the ball, and Q for quitting the game). Adding KeyListener to the engine will take care of the communication with the keyboard. The declaration of the engine will look like this:
public class PingPongGameEngine implements Runnable,
       MouseMotionListener, KeyListener, GameConstants{...}
Accordingly, you’ll need to add to the constructor of the class PingPongGreenTable the following line:
addKeyListener(gameEngine);
To make the code a little more encapsulated, I’ve also moved the repaint() calls from the engine class to PingPongGreenTable. Now this class will be responsible for repainting itself when needed.
I’ve also added methods to change the positions of the ball and the computer’s racket, and to display messages. The final GameConstants interface has more variables than the one shown in Listing 12-2. You should be able to guess what they are for just by looking at their names.
Following is a summary of the changes I’ve made in the class PingPongGameEngine — review the code from the DVD and identify these changes:
- I have removed the interface MouseListener and all its methods, because we’re not processing mouse clicks anymore. MouseMotionListener will take care of all mouse movements.
- This class now implements the Runnable interface, and you can find the decision-making code in the method run(). Look at the constructor: I create and start a new thread there. The method run() implements the game strategy rules in several steps, and all these steps are programmed inside the if statement if(ballServed), which is a short version of if(ballServed==true).
- Note the use of the conditional if statement that assigns a value to the variable canBounce in the code marked in the comments as Step 1. The variable will get a value of either true or false depending on the result of the following expression:
canBounce = (ballY >= computerRacketY &&
                      ballY < (computerRacket_Y + RACKET_LENGTH)? true: false);
- The class PingPongGameEngine implements the KeyListener interface, and the method keyPressed() checks what letter was keyed in — N to start, Q to quit, or S to serve. The code of this method enables the user to type either capital or lowercase letters, for example N or n.
- I’ve added several private methods like displayScore(), kidServe(), and isBallOnTheTable(). These methods are declared private because they are used within this class only, and other classes do not even have to know about them.
- Today’s computers are too fast, and this makes the ball movements difficult to control. That’s why I’ve slowed the game down by calling a method called Thread.sleep(). A static method, sleep(), will pause this particular thread for a number of milliseconds given as an argument of this method (see Lesson 20 for details).
- To make the ball movement a little more difficult to predict, when the user’s racket hits the ball it moves diagonally. That’s why code changes not only the x-coordinate of the ball, but the y-coordinate as well.
That’s all there is to it. Run the program and enjoy the game!
Your homework is to re-factor the code shown in this lesson. First split the UI, the constants, and the engine into separate Java packages. Review the code and add the proper access modifiers: Make the variables and methods that don’t have to be exposed to other classes private. The code in Listing 12-3 shows an example of a bad programming practice: The engine class directly modifies the internal variable point of the UI class. Fix this.
Lesson Requirements
You should have Java installed.
You can download the code and resources for this Try It from the book’s web page at www.wrox.com. You can find them in the Lesson12 folder in the download.
Hints
After learning how to work with files in Lesson 16, consider adding a new feature to the ping-pong game — that of saving the score in a file and providing a menu option to show the past scores.
Step-by-Step
1. Create a new Eclipse project called Lesson12, copy the two classes whose names end with 1 from the DVD accompanying the book into this project, and run it to ensure that the ping-pong table is shown and the correct racket is moving up and down according to the movements of the mouse.
2. Create three packages named ui, engine, and common.
3. Move the class PingPongGreenTable1 to ui, PingPongGameEngine1 to engine, and GameConstants1 to common.
4. Include the import statements where required.
5. Compile and run the program.
6. In the class PingPongGreenTable1 introduce the public method setPointCoordinates(), which will set the x- and y-coordinates of the variable point (make this method private).
7. Browse the source code of all these classes and add the proper data access qualifiers to all variables and methods.
8. Refactor the code of PingPongGameEngine1 to import the interface GameConstants1 rather than implementing it.
Please select Lesson 12 on the DVD with the print book, or watch online at www.wrox.com/go/fainjava to view the video that accompanies this lesson.