
Chapter 8
Introducing the Graphic User Interface
These days people are accustomed to working with applications that have rich user interfaces. If you develop rich Internet applications, JavaFX is the newest platform for development offered by Oracle. But Java itself offers a library of components called Swing, which is used for building graphic user interfaces (GUIs) for desktop applications, as well as a web program called applets (see Lesson 10). In this and the following lesson you’ll learn the principles of building GUIs while developing a simple desktop calculator using the Java Swing library.
Eclipse Foundation offers another library of UI components called SWT, which is out of the scope of this book.
Originally Java offered a pretty basic library of UI-related classes called the Abstract Windowing Toolkit (AWT). A couple of years later a new widget toolkit called Swing was introduced. It offers a lighter set of UI components while keeping the main idea intact — to keep UI development independent of the specifics of the end user’s operating system. Today developers are trying to create UIs that appear to be native to the OS, whether that is Windows, Mac OS, iOS, or Android. Eventually the market share of Swing-based UIs will diminish, but at the time of this writing it’s still widely used by enterprises, and skilled Swing developers remain in big demand.
Swing offers you everything you need to build UIs in Java: There are controls to represent buttons, drop-downs, grids, scrollbars, trees, tab folders, and so on. Typically you’ll be creating UIs by combining controls into containers (such as JPanel) that support various layouts that enable controls to be arranged as you or a graphic designer envision. In this lesson you use some of the Swing components while creating a UI for a simple calculator.
A complete discussion of the Swing library is out of the scope of this book, but there are plenty of books and technical articles covering this subject. The official online Swing tutorial is located at http://java.sun.com/docs/books/tutorial/uiswing.
Swing classes are located in the javax.swing package, and the process of creating a UI comes down to extending some of these classes to display the UI and respond to various user- and system-generated events. You create a top-level window with a title and border by instantiating the class JFrame, as in Listing 8-1.

Listing 8-1: An empty descendant of JFrame
import javax.swing.JFrame;

public class HelloWorld extends JFrame {

    public HelloWorld(){
       setSize(200,300);
       setTitle("Hello World");
       setVisible(true);
    }
       public static void main(String[] args) {
       HelloWorld myHello = new HelloWorld();
       }

}
The constructor of this version of Hello World sets the size and title of the window and makes it visible. Run this program and it’ll show a small empty window, as in Figure 8-1.

JFrame is an example of a container that can hold UI controls, which must be instantiated first and then added to the container. For example, to add a button you can include the following two lines to the constructor in Listing 8-1:
       JButton myButton = new JButton ("Click me");
       add(myButton);
This code will work, but it doesn’t specify the size of the button, where to put it, or whether there should be space between the components and the borders. Without layout instructions, the entire empty space in Figure 8-1 will be occupied by one huge button.
Usually JFrame includes some other containers, where you’ll place controls such as JButton, JTable, and JList. Java Swing comes with layout managers that help you arrange all these controls appropriately. A sample coding process for creating a JFrame containing JPanel goes like this:
1. Create a JPanel.
2. Assign a layout manager to it.
3. Instantiate some Swing controls and add them to the panel.
4. Add the panel to the top-level container — JFrame — by calling the setContentPane() method.
5. Set the frame’s size and make it visible.
You can assign different layout managers to your containers to create pretty sophisticated windows. But displaying a window with properly laid-out components is only half of the job, because these controls should know how to respond to various events, such as a click on a button. This lesson covers the basics of displaying UI components; the next one is about writing code for responding to events.
The simplest layout manager is FlowLayout, which allocates all components being added to the container horizontally. When there’s no room for the next component, FlowLayout uses the next row, and the process repeats.
A Simple Calculator with FlowLayout
The best way to learn layout management is by trying to use it in practice. Let’s create a UI for a simple calculator that can accept two numbers and display the result. Create a new Eclipse project called Lesson8 and a new class called SimpleCalculator with the following code:
Listing 8-2: Calculator with FlowLayout
import javax.swing.*;
import java.awt.FlowLayout;

public class SimpleCalculator {
 public static void main(String[] args) {
  // Create a panel
       JPanel windowContent= new JPanel();

  // Set a layout manager for this panel
       FlowLayout fl = new FlowLayout();
       windowContent.setLayout(fl);

  // Create controls in memory
       JLabel label1 = new JLabel("Number 1:");
       JTextField field1 = new JTextField(10);
       JLabel label2 = new JLabel("Number 2:");
       JTextField field2 = new JTextField(10);
       JLabel label3 = new JLabel("Sum:");
       JTextField result = new JTextField(10);
       JButton go = new JButton("Add");

  // Add controls to the panel
       windowContent.add(label1);
       windowContent.add(field1);
       windowContent.add(label2);
       windowContent.add(field2);
       windowContent.add(label3);
       windowContent.add(result);
       windowContent.add(go);

  // Create the frame and add the panel to it
  JFrame frame = new JFrame("My First Calculator");

  // Add the panel to the top-level container
  frame.setContentPane(windowContent);

  // set the size and make the window visible
  frame.setSize(400,100);
  frame.setVisible(true);
 }
}
}
Compile and run this program and it’ll display the window shown in Figure 8-2. This may not be the best-looking calculator, but it demonstrates the use of FlowLayout. In the next section you’ll make it look better with the help of more suitable layout managers.
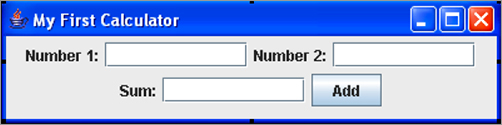
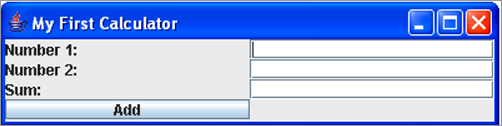
Grab the corner of the window and make it wider. You’ll see how FlowLayout starts reallocating controls, trying to fill the new area. If you make the window wide enough, all the components will fit in one row, as in Figure 8-3.

Even though you can enforce exact coordinates and sizes for each window component, Swing has layout managers that can maintain relative positions for all controls without assigning strict positions to them. Layout managers will ensure that the content of a container looks nice regardless of the current window size.
A Brief Introduction to Layout Managers
Swing offers the following layout managers:
- FlowLayout
- GridLayout
- BoxLayout
- BorderLayout
- CardLayout
- GridBagLayout
To use any layout manager, instantiate it first and then assign this instance to a container via setLayout() as you did with the class SimpleCalculator in Listing 8-2.
FlowLayout
This layout arranges components in a window row by row. For example, labels, text fields, and buttons will be added to the first imaginary row until there is room left in this row. When the current row is filled, the rest of the components will go to the next row, and so on. If a user changes the size of the window, it may mess up the picture, as illustrated in Figure 8-2. Indeed, FlowLayout is not the best choice for our calculator. Let’s try something different.
GridLayout
The class java.awt.GridLayout allows you to arrange components as rows and columns in a grid. You’ll be adding components to imaginary cells of this grid. If the container gets resized, grid cells may become larger or smaller, but the relative positions of the components inside the container will remain the same.
So far our calculator has seven components: three labels, three text fields, and a button. You may arrange them as a grid of four rows and two columns (one cell stays empty) by creating an instance of GridLayout like this:
GridLayout gr = new GridLayout(4,2);
You can also assign some horizontal and vertical spaces of, for example, five pixels, between the cells:
GridLayout gr = new GridLayout(4,2,5,5);
Replace FlowLayout with GridLayout in Listing 8-2 and the calculator will look a little prettier. Create and compile a new class called SimpleCalculatorGrid (see Listing 8-3).
Listing 8-3: Calculator with GridLayout
import javax.swing.*;
import java.awt.GridLayout;
public class SimpleCalculatorGrid {
 public static void main(String[] args) {

       JPanel windowContent= new JPanel();

       // Set the layout manager for the panel
       GridLayout gl = new GridLayout(4,2);
       windowContent.setLayout(gl);

       JLabel label1 = new JLabel("Number 1:");
       JTextField field1 = new JTextField(10);
       JLabel label2 = new JLabel("Number 2:");
       JTextField field2 = new JTextField(10);
       JLabel label3 = new JLabel("Sum:");
       JTextField result = new JTextField(10);
       JButton go = new JButton("Add");

 // Add controls to the panel
       windowContent.add(label1);
       windowContent.add(field1);
       windowContent.add(label2);
       windowContent.add(field2);
       windowContent.add(label3);
       windowContent.add(result);
       windowContent.add(go);

  // Create the frame and add the panel to it
       JFrame frame = new JFrame("My First Calculator");

       frame.setContentPane(windowContent);

 // set the size and display the window
       frame.setSize(400,100);
       frame.setVisible(true);
 }
}
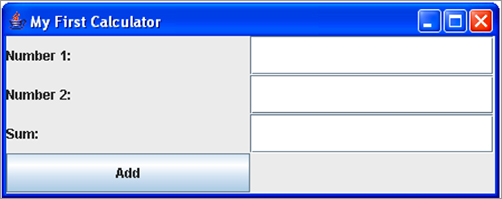
Run the program SimpleCalculatorGrid and you’ll see a much nicer calculator than before (see Figure 8-4).
Try to resize this window — controls will grow with the window, as shown in Figure 8-5, but their relative positions won’t change. Note that with GridLayout all cells of the grid have the same width and height.
BorderLayout
The layout manager java.awt.BorderLayout divides a container into South, West, North, East, and Center areas. The North area stays on top of the window, South at the bottom, West on the left, and East on the right. For example, in the calculator shown in Figure 8-6, a text field that displays numbers is located in the North area, and the panel p2 in the West.
You can use the following code to create a BorderLayout and place a text field there:
BorderLayout bl = new BorderLayout();
this.setLayoutManager(bl);

JTextField  txtDisplay = new JTextField(20);
this.add(BorderLayout.NORTH, txtDisplay);
You are not required to have window controls in all five areas. If you need only North, Center, and South areas, the Center area will become wider because you are not going to use the East and West areas. I’ll use a BorderLayout a little later in this lesson, in the next version of our calculator: Calculator.java.
Combining Layout Managers
Do you think that GridLayout will enable you to design a calculator that looks like the one that comes with Microsoft Windows, shown in Figure 8-6? Unfortunately it won’t, because cells have different sizes there — the text field is wider than the buttons. You can, however, combine layout managers by using panels that have their own layout managers.

To combine layout managers in the new version of our calculator, do the following:
- Assign the border layout to the content panel of the frame.
- Add a JTextField to the North area of the frame to display the numbers.
- Create a panel, p1, with the GridLayout, add 20 buttons to it, and add it to the Center area of the content pane.
- Create a panel, p2, with GridLayout, add four buttons to the panel, and add p2 to the West area of the content pane.
But first start by creating a somewhat simpler version of the calculator, which will look as shown in Figure 8-7.
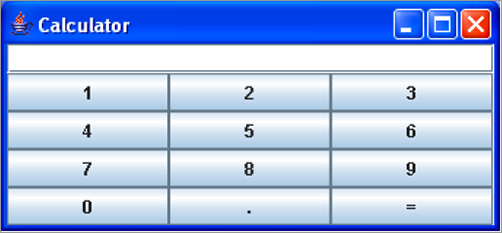
Create a new class, Calculator, as per Listing 8-4, and run the program. Read the program comments — you should be able to understand how the code works by reading the comments, shouldn’t you?
Listing 8-4: Calculator with combined layouts
import javax.swing.*;
import java.awt.GridLayout;
import java.awt.BorderLayout;

public class Calculator {

    // Declare all calculator's components.
       JPanel windowContent;
       JTextField displayField;
       JButton button0;
       JButton button1;
       JButton button2;
       JButton button3;
       JButton button4;
       JButton button5;
       JButton button6;
       JButton button7;
       JButton button8;
       JButton button9;
       JButton buttonPoint;
       JButton buttonEqual;
       JPanel p1;

      // Constructor  creates the components
      // and adds the to the frame using combination of
      // Borderlayout and Gridlayout

  Calculator(){

         windowContent= new JPanel();

        // Set the layout manager for this panel
         BorderLayout bl = new BorderLayout();
         windowContent.setLayout(bl);

       // Create the display field and place it in the
       // North area of the window

         displayField = new JTextField(30);
         windowContent.add("North",displayField);

     // Create buttons using constructor of the
     // class JButton that takes the label of the
     // button as a parameter

         button0=new JButton("0");
         button1=new JButton("1");
         button2=new JButton("2");
         button3=new JButton("3");
         button4=new JButton("4");
         button5=new JButton("5");
         button6=new JButton("6");
         button7=new JButton("7");
         button8=new JButton("8");
         button9=new JButton("9");
         buttonPoint = new JButton(".");
         buttonEqual=new JButton("=");

        // Create the panel with the GridLayout with 12 buttons –
        //10 numeric ones, period, and the equal sign

                p1 = new JPanel();
                GridLayout gl =new GridLayout(4,3);
                p1.setLayout(gl);

        //  Add window controls to the panel p1
                p1.add(button1);
                p1.add(button2);
                p1.add(button3);
                p1.add(button4);
                p1.add(button5);
                p1.add(button6);
                p1.add(button7);
                p1.add(button8);
                p1.add(button9);
                p1.add(button0);
                p1.add(buttonPoint);
                p1.add(buttonEqual);

       // Add the panel p1 to the center of the window
               windowContent.add("Center",p1);

       //Create the frame and set its content pane
              JFrame frame = new JFrame("Calculator");
              frame.setContentPane(windowContent);

        // Set the size of the window big enough to accomodate all controls
              frame.pack();

               // Display the window
                frame.setVisible(true);
     }

     public static void main(String[] args) {

         Calculator calc = new Calculator();
     }
}
BoxLayout
The class javax.swing.BoxLayout allows multiple window components to be laid out either horizontally (along the x-axis) or vertically (along the y-axis). Unlike with the FlowLayout manager, when the window with the BoxLayout is resized, its controls do not wrap. And unlike with GridLayout, with BoxLayout, window controls can have different sizes.
The next two lines of code assign BoxLayout with vertical alignment to JPanel. To make this code shorter, I have not declared a variable to store a reference to the object BoxLayout, but rather create an instance of this object and immediately pass it to the method setLayout() as an argument.
JPanel p1= new JPanel();
setLayout(new BoxLayout(p1, BoxLayout.Y_AXIS));
If you just add several buttons to the panel p1, they all display one under another.
You can use combinations of various containers implementing horizontal or vertical BoxLayout to build a fairly sophisticated UI. Think of a front page of a game that has to have several items next to each other on the top of the window, some controls located vertically on the left sidebar, and the rest of the window’s real estate allocated for the main battlefield. You can use BorderLayout having a panel with a horizontal BoxLayout on the North, and a panel with vertical BoxLayout on the West. The next section shows you a sophisticated yet more verbose GridBagLayout, but you should always try to see if the BoxLayout can do the job and use it, if possible.
GridBagLayout
In this section you’ll get familiar with yet another way of designing the calculator, by using the java.awt.GridBagLayout manager instead of combining panels with different layouts. GridBagLayout is an advanced grid that allows cells of different sizes. GridBagLayout works with another class called GridBagConstraints.
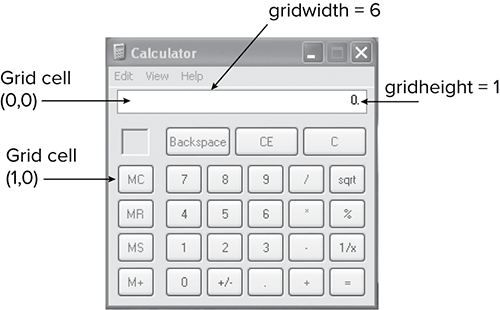
Constraints are just attributes of a cell, and you have to set them for each cell separately. All constraints for a cell have to be set before you place a component in the cell. For example, one of the constraint’s attributes is called gridwidth (see Figure 8-8). It allows you to make a cell as wide as several other cells.
When working with the grid layout you should create an instance of the constraint object first, and then set the values to its properties. Then you can add a UI component to the cell in your container.
The code sample in Listing 8-5 is heavily sprinkled with comments to help you understand how to use GridBagLayout. While working on this lesson’s assignment you’ll be using this code.
Listing 8-5: Creating constraints for GridBagLayout
// Set the GridBagLayout for the window's content pane
 GridBagLayout gb = new GridBagLayout();
 this.setLayout(gb);

// Create an instance of the GridBagConstraints
// You'll have to repeat these lines for each component
// that you'd like to add to the grid cell
 GridBagConstraints constr = new GridBagConstraints();

//setting constraints for the Calculator's displayField:

// x coordinate in the grid
 constr.x=0;
// y coordinate in the grid
 constr.y=0;

// this cell has the same height as other cells
 constr.gridheight =1;

// this cell is as wide as 6 other ones
 constr.gridwidth= 6;

// fill all space in the cell
 constr.fill= constr.BOTH;
// proportion of horizontal space  taken by  this
// component
 constr.weightx = 1.0;

// proportion of  vertical space taken by  this component
 constr.weighty = 1.0;
// position of the component within the cell
 constr.anchor=constr.CENTER;

 displayField = new JTextField();
// set constrains for this field
 gb.setConstraints(displayField,constr);

// add the text field to the window
 windowContent.add(displayField);
CardLayout
Think of a deck of cards lying on top of each other, only the top card visible. You can use the java.awt.CardLayout manager to create a component that shows one panel at a time, such as the tabbed folder in Figure 8-9.

When the user clicks a tab, the content of the window changes. In fact, all the panels needed for this screen are already preloaded and lie on top of each other. When the user clicks a tab, the program just brings this “card” to the top and makes the other “cards” invisible. The tabbed folder here was used for illustration; the Swing library includes a ready-to-go component for windows with tabs, called JTabbedPane.
Containers with Absolute Layout
If you want a container’s content to remain the same regardless of the window’s size, set the x and y coordinates, width, and height (aka the bounds) of each component while adding them to the window. Your class has to explicitly state that it won’t use any layout manager by passing null to setLayout():
windowContent.setLayout(null);
The next code snippet shows how you can set a button’s width to 40 pixels and its height to 20, and place it 100 pixels to the right of and 200 pixels down from the top left corner of the window:
JButton myButton = new Button("New Game");
myButton.setBounds(100,200,40,20);
More about Swing Widgets
It’s not possible to describe all the Swing components in a short lesson — use the Swing online tutorial mentioned earlier in this lesson. Here’s a list of all the Swing widgets:
JButton
JLabel
JCheckBox
JRadioButton
JToggleButton
JScrollPane
JSpinner
JScrollBar
JSlider
JProgressBar
JComboBox
JList
JTabbedPane
JTable
JTextField
JTextArea
JPasswordField
JFormattedTextField
JEditorPane
JToolTip
JTree
JViewPort
ImageIcon
You can also create menus (JMenu and JPopupMenu), pop-up windows, and frames inside other frames (JInternalFrame), and use the standard-looking windows (JFileChooser, JColorChooser, and JOptionPane).
Java comes with an excellent demo application, SwingSet3, that shows all the available Swing components in action. You can find it in your JDK install directory. (On my computer it’s in C:Program FilesJavajdk1.6.0_19demojfcSwingSet3.) Just open the file readme.html located in the same directory and it’ll bring you to a web page containing instructions for launching the demo. The MAC OS users won’t find these samples in their Java installation, but they are also available at https://swingset3.dev.java.net.
Java developers use various tools to speed the process of designing UIs. See what’s available for the IDE that you use. For example, there is a popular plug-in called Matisse that lets you design a Swing UI in what-you-see-is-what-you-get mode. You can find its version for Eclipse-based products, called MyEclipse, at the following URL: www.myeclipseide.com/module-htmlpages-display-pid-1.html.
Matisse was originally developed for the NetBeans IDE, and you can find it here: http://netbeans.org/kb/trails/matisse.html.
Finally, consider yet another Eclipse plug-in, called Jigloo GUI Builder: http://marketplace.eclipse.org/content/jigloo-swtswing-gui-builder. You can definitely find a tool that will substantially speed up your design of UIs with the Java Swing library.
Your task for today is to create another version of the calculator in Figure 8-8, using only one layout: GridBagLayout.
Lesson Requirements
For this lesson you should have Java installed.
You can download the code and resources for this Try It from the book’s web page at www.wrox.com. You can find them in the Lesson8 folder in the download.
Step-by-Step
This assignment comes down to creating appropriate constraints for each UI component shown in Figure 8-8. So there is just one long step in this assignment: Follow the example given in Listing 8-5 for each UI component needed for the calculator.
Please select Lesson 8 on the DVD with the print book, or watch online at www.wrox.com/go/fainjava to view the video that accompanies this lesson.